
Autodistill, an open source project maintained by Roboflow, eliminates manual polygon labeling by using Grounded SAM (a combination of Grounding DINO and SAM) to auto-annotate images from a text prompt and then train a downstream segmentation model. This tutorial builds a fire and smoke detector using a dataset from Roboflow Universe, auto-labeling with Grounded SAM and training a YOLOv8 instance segmentation model, all in roughly a dozen lines of code, then deploys it via Roboflow Inference.
Labeling images, particularly for segmentation tasks, is a necessary but time consuming step in building a computer vision model. This is especially true if there is limited annotated data available for the use case on which you are working.
With Autodistill, a new open source project maintained by Roboflow, you can automatically generate polygon annotations for a wide range of objects, enabling you to go from idea to trained model faster than ever.
In this guide, we are going to show how to train a segmentation model without labeling. To do so, we will:
- Install Autodistill;
- Use Grounded SAM with Autodistill to segment and label images;
- Train a new Ultralytics YOLOv8 segmentation model for our use case, and;
- Test our model.
Without further ado, let’s get started!
We recommend running the code in this tutorial in a Notebook. We have created an accompanying Google Colab for use with this guide.
Step 1: Install Autodistill
First, we need to install Autodistill and the Autodistill Grounded SAM extension. We will also install YOLOv8, the model which we will train using the images labeled with Grounding SAM. You can the required dependencies using the following command:
pip install autodistill autodistill-grounded-sam autodistill-yolov8 supervisionWith these dependencies installed, we can begin automatically annotating our images!
Step 2: Annotate Images with Grounded SAM
In this guide, we are going to use Autodistill and the Grounded SAM Autodistill extension. This extension, a combination of Grounding DINO and SAM, accepts a text prompt (i.e. “fire”) and generates bounding boxes and segmentation masks of all the objects found that match our prompt. We can use Grounded SAM and Autodistill to auto-label a folder of images.
We will build a model that can detect fire. This model could be used to, for example, detect fires in power facilities.
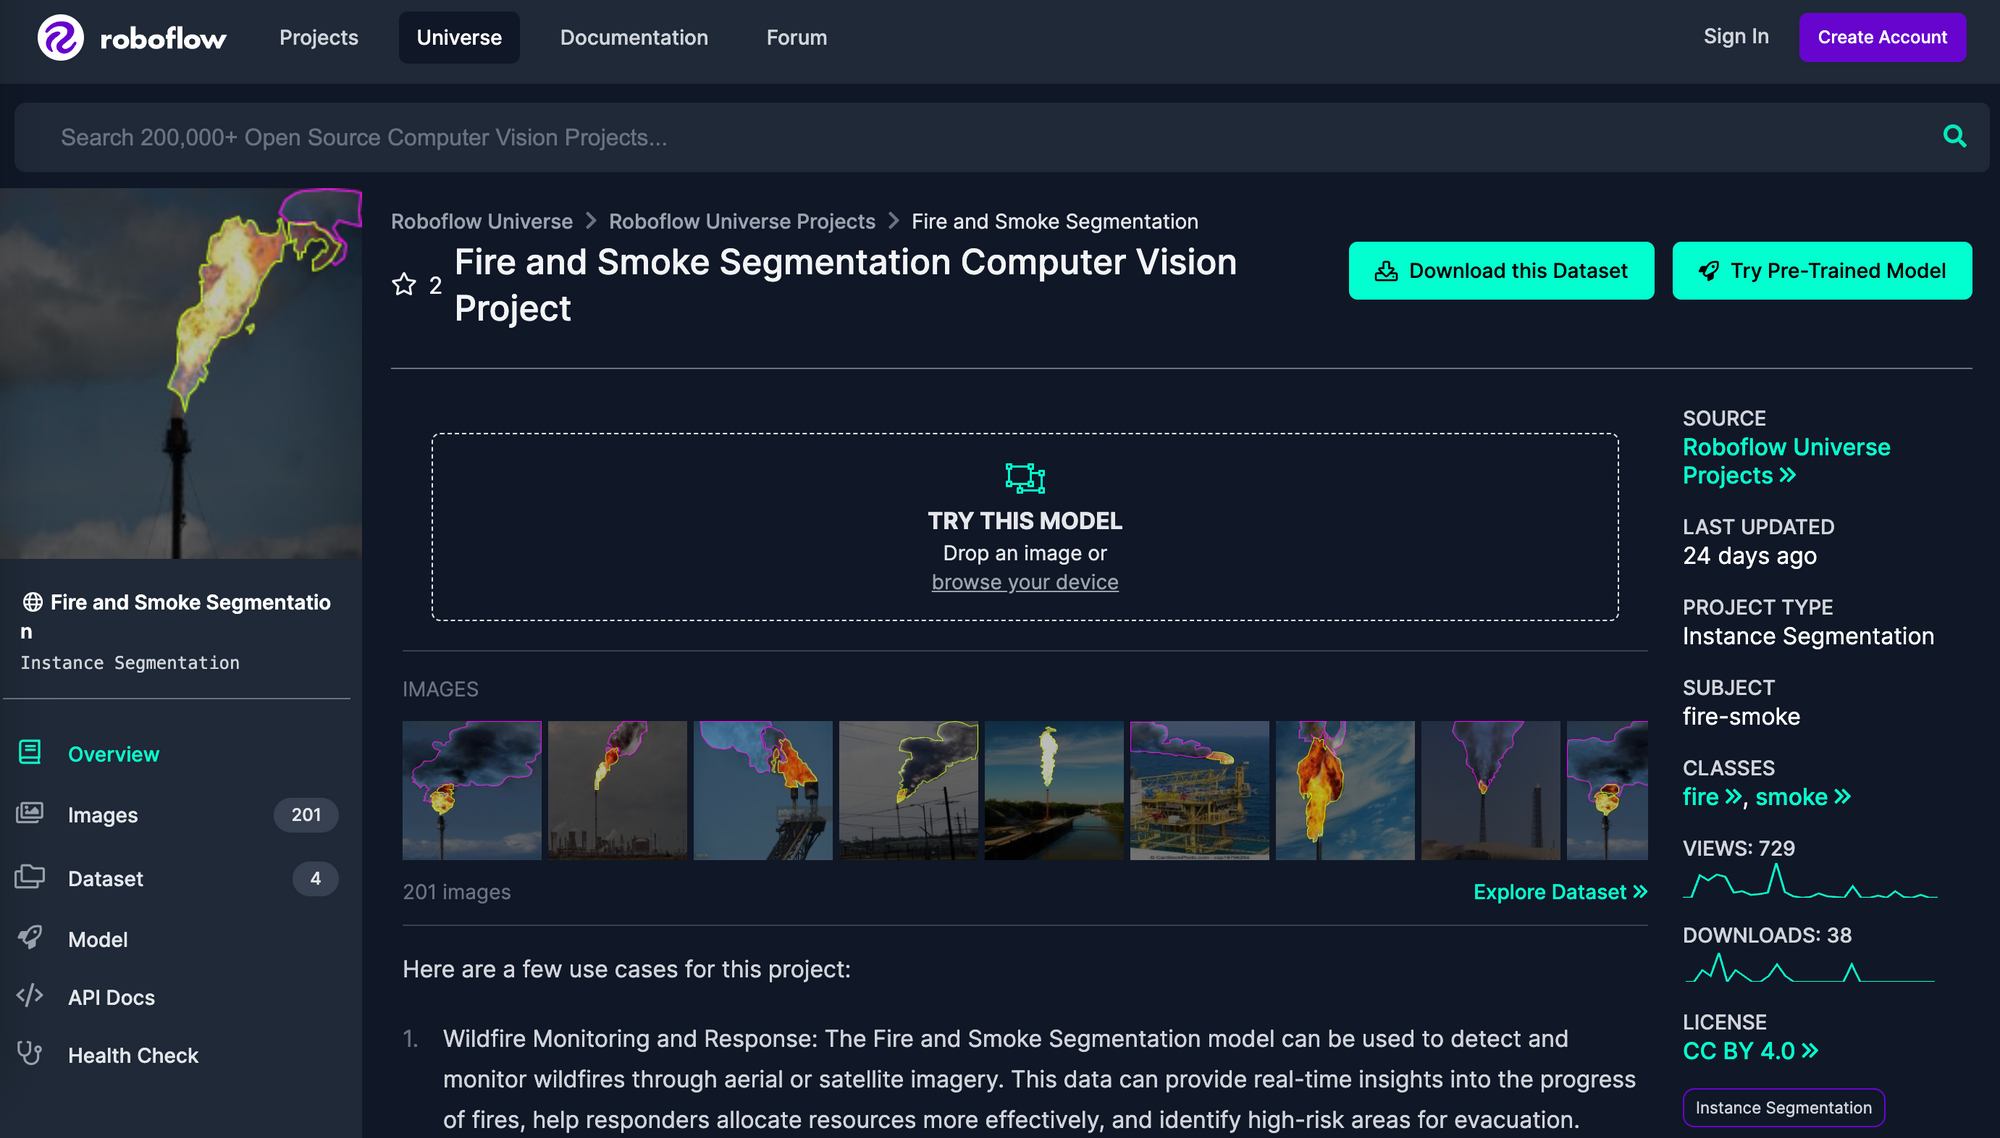
To build this model, we need images of fire and smoke that we can label and use to train our model. For this guide, we will use the Fire and Smoke Segmentation dataset from Roboflow Universe.
First, download the fire and smoke dataset from Roboflow Universe, our community of public datasets for use in computer vision projects. If you have your own images, feel free to skip this step.
Next, we can use Autodistill and Grounded SAM to label our dataset. Grounded SAM will return both bounding boxes and segmentation masks with which we can work. Bounding boxes are square boxes around objects, whereas segmentation masks are tight polygons that represent at a pixel level an object in an image. Later on in this guide, we will use the segmentation masks and images to train our model.
To get started, we need to import the required dependencies and set an ontology. This ontology will be passed to Grounded SAM for use in labeling our data.
from autodistill_grounded_sam import GroundedSAM
from autodistill.detection import CaptionOntology

base_model = GroundedSAM(ontology=CaptionOntology({"fire": "fire", "smoke": "smoke"}))
Ontologies take the structure caption:class. The first string, “fire”, will be fed as a prompt to our model. “fire” is the label that Autodistill will return. We also map the prompt "smoke" to the label "smoke".
Let's try Grounding DINO on our prompt:
image_name = "./Fire-and-Smoke-Segmentation-4/train/flare_0011_jpg.rf.9e0801c489b008a2619e1cbde16872c2.jpg"

mask_annotator = sv.MaskAnnotator()

image = cv2.imread(image_name)

classes = base_model.ontology.classes()

detections = base_model.predict(image_name)

labels = [
    f"{classes[class_id]} {confidence:0.2f}"
    for _, _, confidence, class_id, _
    in detections
]

annotated_frame = mask_annotator.annotate(
    scene=image.copy(),
    detections=detections
)

sv.plot_image(annotated_frame, size=(8, 8))
This code returns the following:
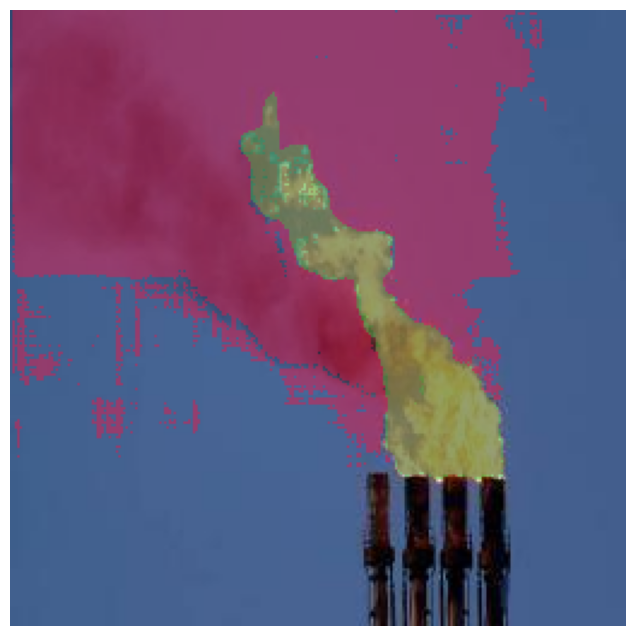
The model was able to successfully segment the plume of smoke and fire from this image. The smoke segmentation mask is a bit large, but we could experiment with different prompts to achieve different results. For now, let's stick with our smoke prompt and continue.
With our ontology set, we can label our data:
base_model.label(input_folder="./Fire-and-Smoke-Segmentation-4/train", output_folder="./dataset")This line of code labels all images in the training set and saves the images and annotations into a new folder called “dataset”.
Step 3: Train a Fire and Smoke Segmentation Model
With our images labeled, we can now train a fire and smoke segmentation model. For this guide, we will train a YOLOv8 segmentation model. Autodistill refers to models you can train as “target models.” Check the Autodistill documentation for supported target models for segmentation.
To train our segmentation model, we can use the following code:
from autodistill_yolov8 import YOLOv8

target_model = YOLOv8("yolov8n-seg.pt")
target_model.train("./dataset/data.yaml", epochs=200)
This code will train our segmentation model over 200 epochs. When you run the code above, you will see the training process begin:
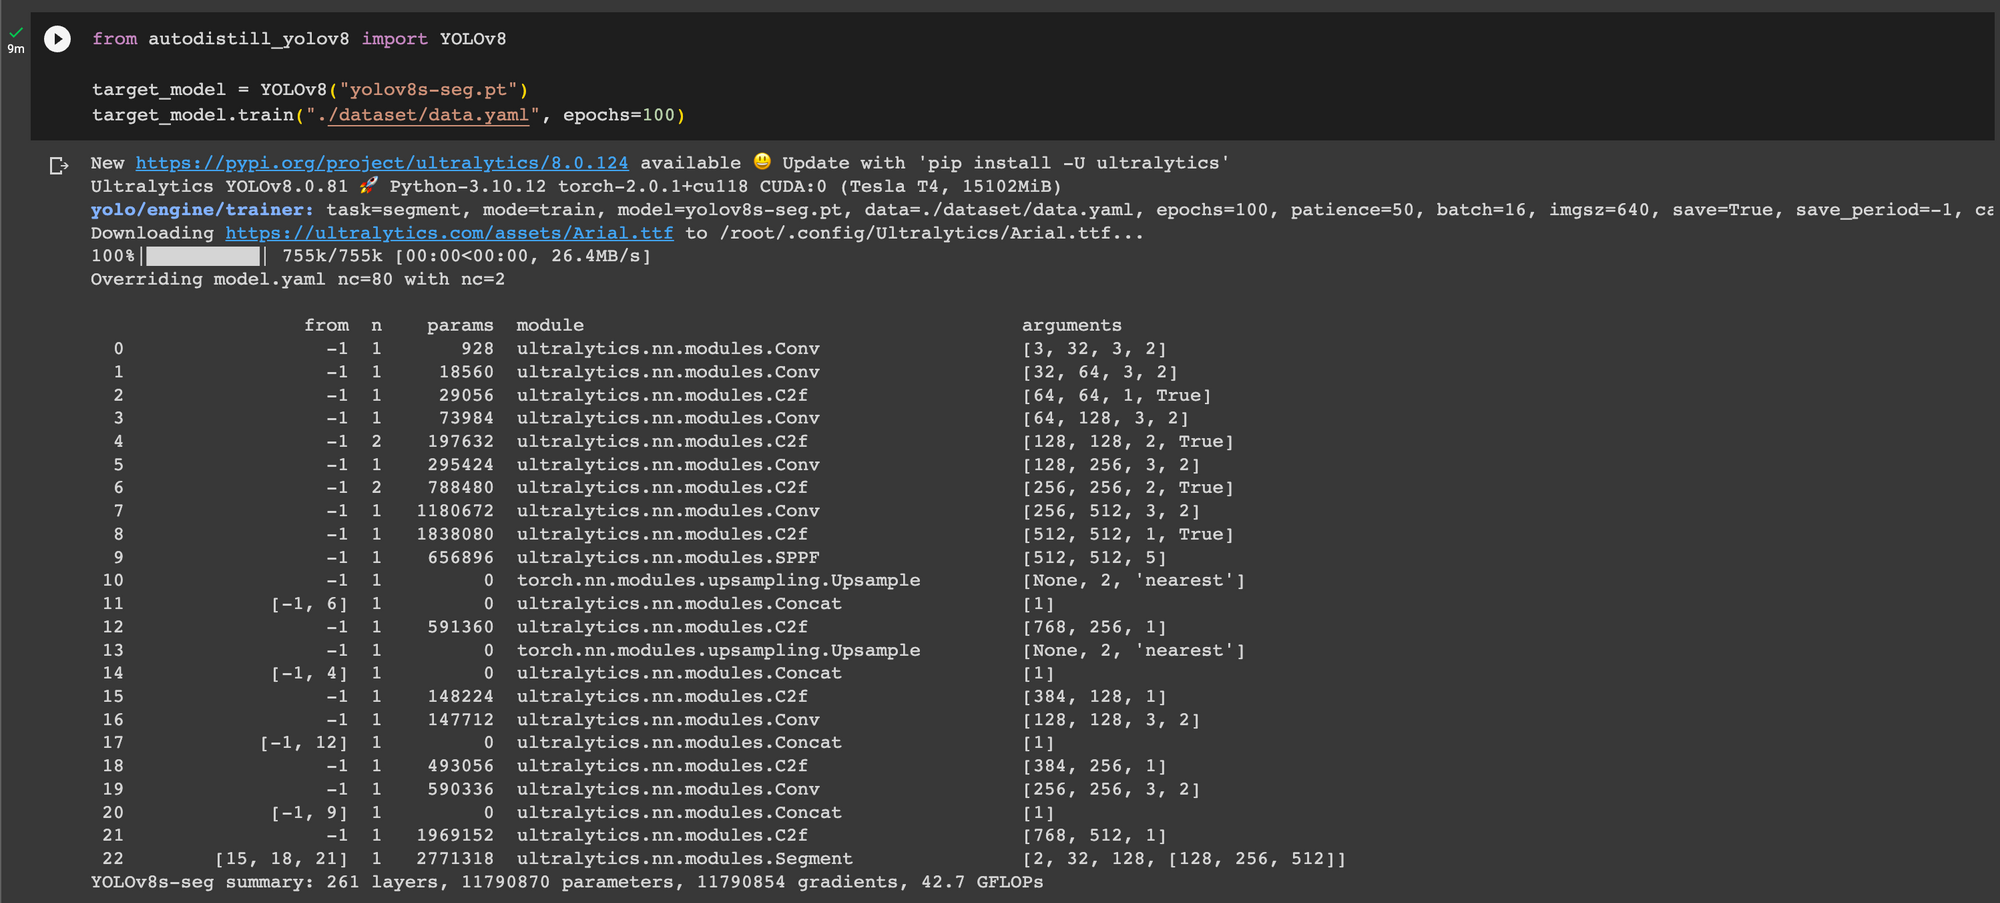
The amount of time it takes to train your model will depend on the number of images in your dataset and the hardware on which you are training the model. Training a model with images in the fire and smoke model will take a few minutes. Feel free to go prepare a cup of tea or coffee and come back later to check on your model’s training progress.
Step 4: Test the Model
Now that we have a segmentation model, we can test it! To run inference on our model, we can use the following code:
pred = target_model.predict("./dataset/valid/images/your-image.jpg", confidence=0.5)This will return a `supervision.Detections` object with all of the masks for predictions with a confidence level greater than 0.5 returned by our model.
We can plot the detections on an image using the following code:
import supervision as sv

image_name = "/content/dataset/valid/images/image.jpg"

results = target_model.predict(image_name)

mask_annotator = sv.MaskAnnotator()

image = cv2.imread(image_name)

classes = base_model.ontology.classes()

detections = base_model.predict(image_name)

labels = [
    f"{classes[class_id]} {confidence:0.2f}"
    for _, _, confidence, class_id, _
    in detections
]

annotated_frame = mask_annotator.annotate(
    scene=image.copy(),
    detections=detections
)

sv.plot_image(annotated_frame, size=(8, 8))
Here is the results of our model running:
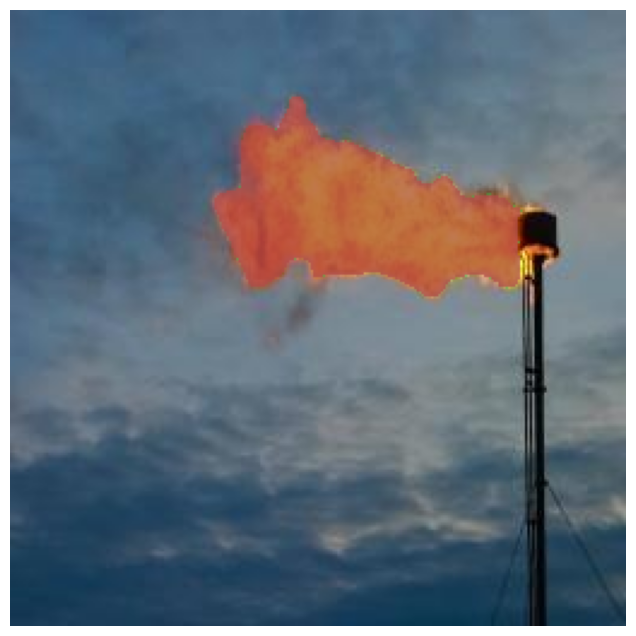
Our model has successfully segmented the fire in our image! But, the model missed the smoke. This tells us we may need to, as we suspected earlier, revise our smoke prompt and ensure the model is able to identify smoke in images across our dataset.
We can take a look at the confusion matrix for our model to understand our model performance in more depth:
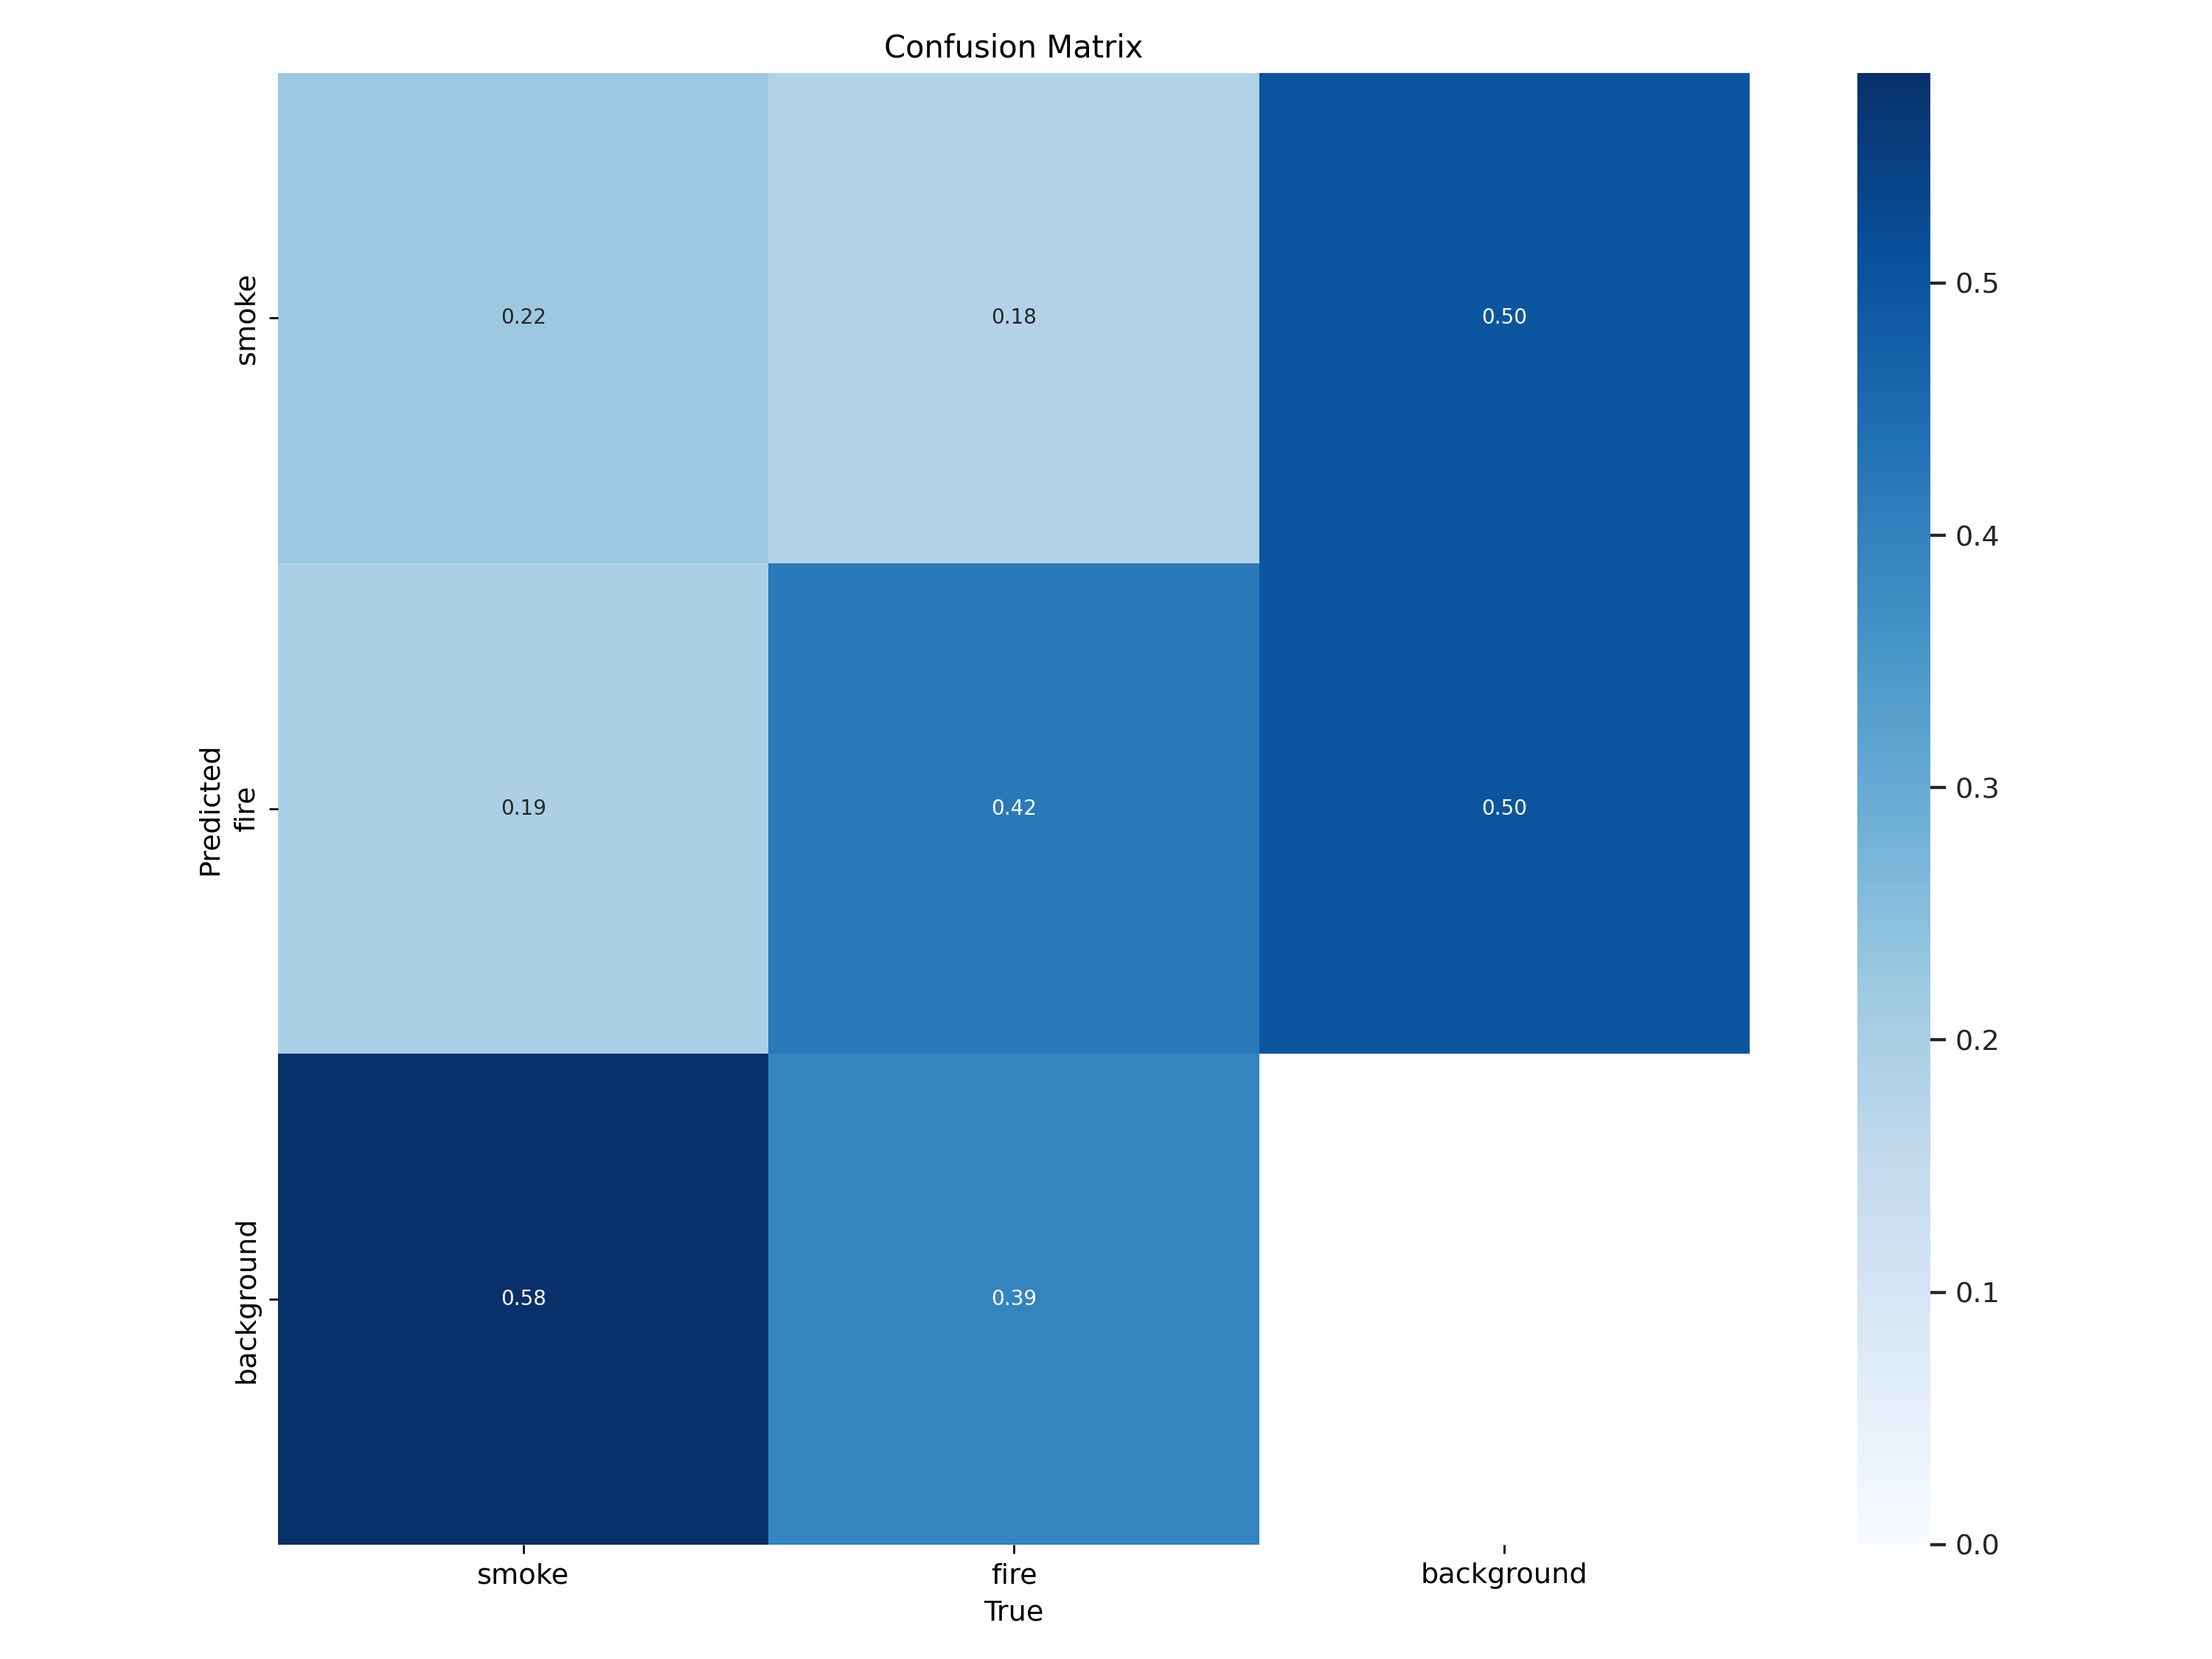
Our model was able to predict fire well, but struggled more with smoke. To fix this, we could:
- Experiment with new prompts for smoke
- Add new images to our dataset
- Manually label some smoke masks after using Autodistill to label fire
Step 5: Deploy the Model
You can upload YOLOv8 instance segmentation model weights – the output of your model training – to Roboflow for deployment. Roboflow provides a range of SDKs with which you can run inference on your model. For example, you can use the Python SDK to run inference in a Python script.
To upload your YOLOv8 instance segmentation model weights to Roboflow, first create a Roboflow account, upload your dataset to a new project, and generate a dataset version. Then, run the following lines of code:
from roboflow import Roboflow

rf = Roboflow(api_key="API_KEY")
project = rf.workspace().project("PROJECT_ID")
project.version(DATASET_VERSION).deploy(model_type="yolov8-seg", model_path=f"./runs/segment/train/")
Substitute your API key, project ID, and dataset version with the relevant values for your account and project. You can learn how to find these values in the Roboflow documentation.
Step 6 (Optional): Use Your Model on the Edge
In addition to using the Roboflow hosted API for deployment, you can use Roboflow Inference, an open source inference solution that has powered millions of API calls in production environments. Inference works with CPU and GPU, giving you immediate access to a range of devices, from the NVIDIA Jetson to TRT-compatible devices to ARM CPU devices.
With Roboflow Inference, you can self-host and deploy your model on-device.
You can deploy applications using the Inference Docker containers or the pip package. In this guide, we are going to use the Inference Docker deployment solution. First, install Docker on your device. Then, review the Inference documentation to find the Docker container for your device.
For this guide, we'll use the GPU Docker container:
docker pull roboflow/roboflow-inference-server-gpuThis command will download the Docker container and start the inference server. This server is available at http://localhost:9001. To run inference, we can use the following Python code:
import requests

workspace_id = ""
model_id = ""
image_url = ""
confidence = 0.75
api_key = ""

infer_payload = {
    "image": {
        "type": "url",
        "value": image_url,
    },
    "confidence": confidence,
    "iou_threshold": iou_thresh,
    "api_key": api_key,
}
res = requests.post(
    f"http://localhost:9001/{workspace_id}/{model_id}",
    json=infer_object_detection_payload,
)

predictions = res.json()
Above, set your Roboflow workspace ID, model ID, and API key.
Also, set the URL of an image on which you want to run inference. This can be a local file.
To use your YOLOv5 model commercially with Inference, you will need a Roboflow Enterprise license, through which you gain a pass-through license for using YOLOv5. An enterprise license also grants you access to features like advanced device management, multi-model containers, auto-batch inference, and more.
To learn more about deploying commercial applications with Roboflow Inference, contact the Roboflow sales team.
Conclusion
In this guide, we have created a segmentation model to detect fire and smoke in an image without labeling any data. We used images from a fire and smoke dataset to train the first version of our model, which used a YOLOv8 instance segmentation architecture. We then showed how to deploy a model for use with the Roboflow platform.
With Autodistill, taking a folder of images, labeling them, and training a model using the labeled data only required a dozen or so lines of code. To learn more about Autodistill and its supported models, check out the full project documentation.
Cite this Post
Use the following entry to cite this post in your research:
James Gallagher. (Jul 3, 2023). Train a Segmentation Model with No Labeling. Roboflow Blog: https://blog.roboflow.com/train-a-segmentation-model-no-labeling/