

Corrosion is one of the most persistent threats to pipeline integrity. PHMSA data attribute about 18 percent of significant pipeline incidents to corrosion, a share climbing past 25 percent in 2024, at an estimated $7 billion a year on transmission lines.
None of that damage shows up overnight. A rupture starts as a crack somebody missed on an earlier pass, and manual inspection doesn't scale to catch it: across long runs of pipework, the same hairline crack that gets flagged one week gets walked past the next.
In this tutorial, you'll train Roboflow's RF-DETR model to detect holes, cracks, and ruptures, then connect it to a Roboflow Workflow that routes each image to a PASS, REVIEW, or FAIL verdict. The model is trained on pipe defect imagery, and the same workflow applies directly to tube inspection.
How It Works: Tube Quality Inspection with RF-DETR and Roboflow Workflows
Here's the workflow I'll walk you through building. Our workflow starts with a single image. It runs through a custom-trained RF-DETR model at a very low confidence threshold, so nothing gets thrown away at the model stage. A separate filter block then applies the real inspection threshold, and a Custom Python block reads what survived and decides the verdict.
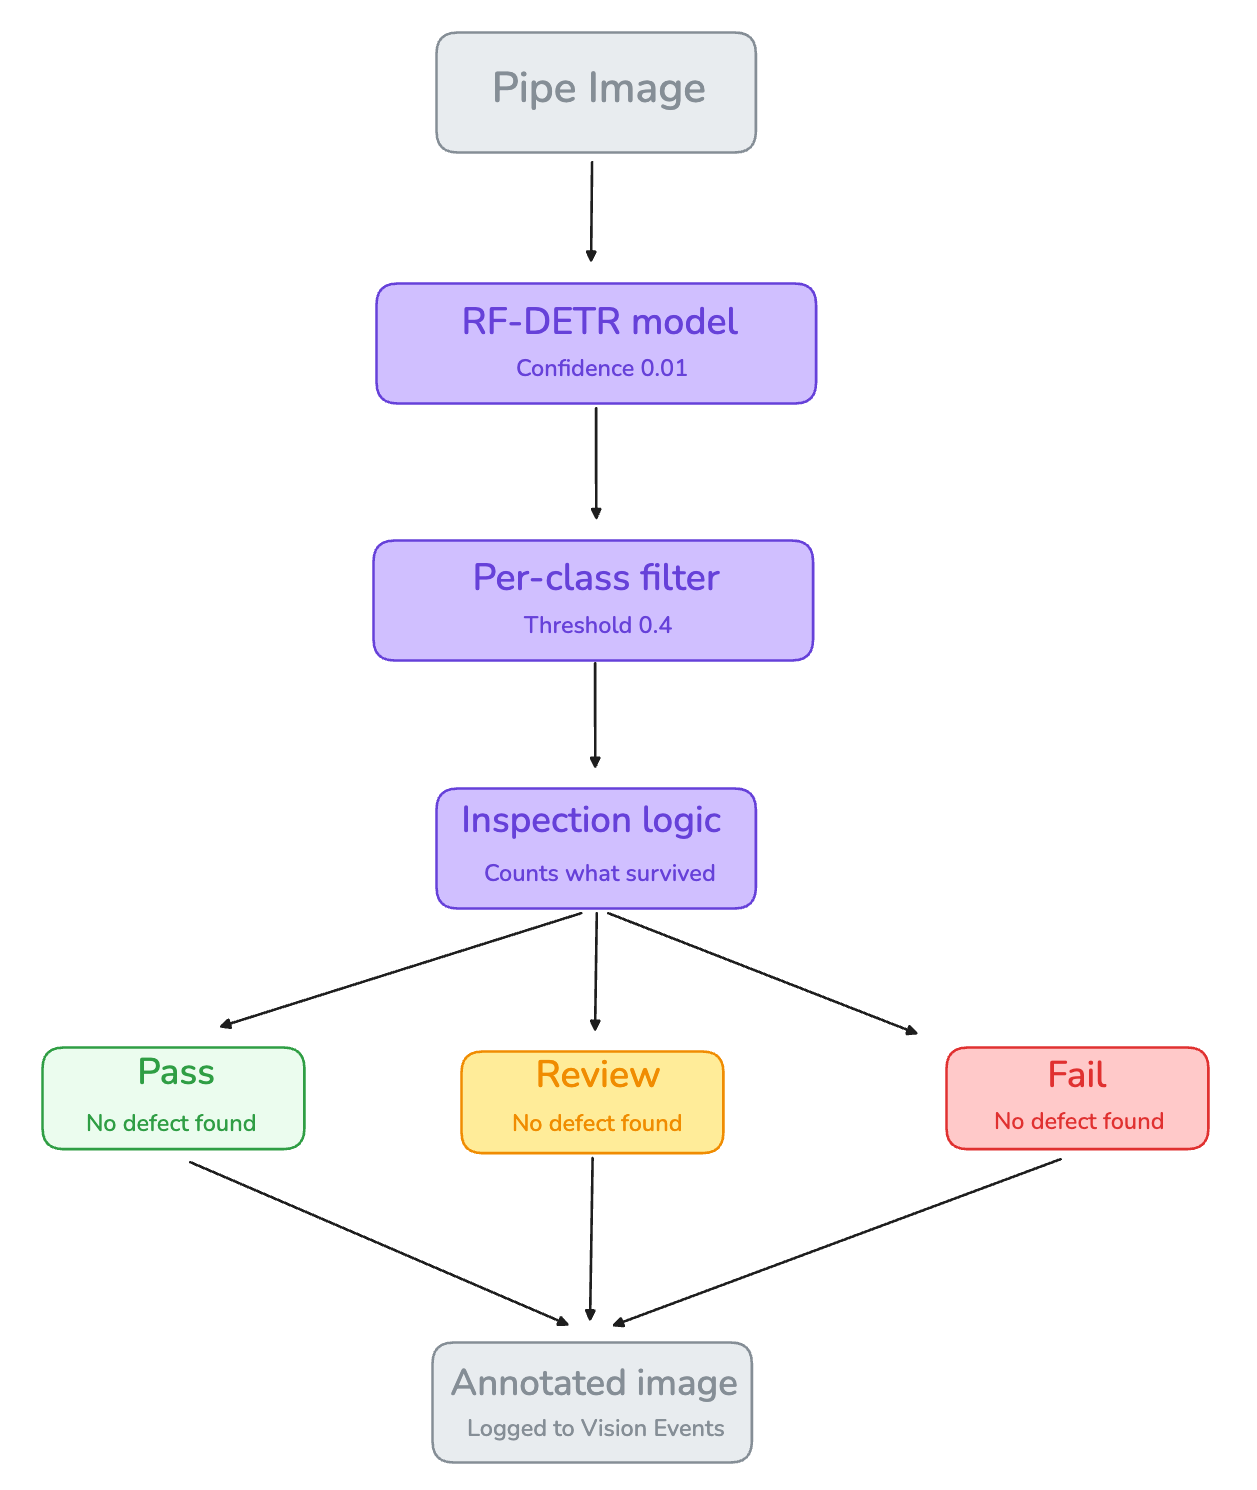
The result is an annotated image with high-contrast boxes around every defect, a report overlaid in the corner, and a JSON payload carrying the verdict, the defect count, and the highest confidence score. Every run gets logged to Vision Events.
Why the Threshold Lives in Its Own Block
Most inspection workflows set the confidence threshold on the model block and move on. This one doesn't. The detector runs at 0.01, and the real 0.4 threshold is applied separately, in a Per-Class Confidence Filter.
The reason is debuggability. When a threshold lives inside the model, a prediction that gets cut is simply gone, and there's no way to tell whether the model missed a defect or the threshold ate it. Split them, and you can compare the raw predictions leaving the detector against the filtered ones leaving the filter, and see exactly where a detection died.
That distinction turns out to matter, as the next section shows.
Prepare the Dataset
This tutorial uses the Pipe Defects Computer Vision dataset from Roboflow Universe.
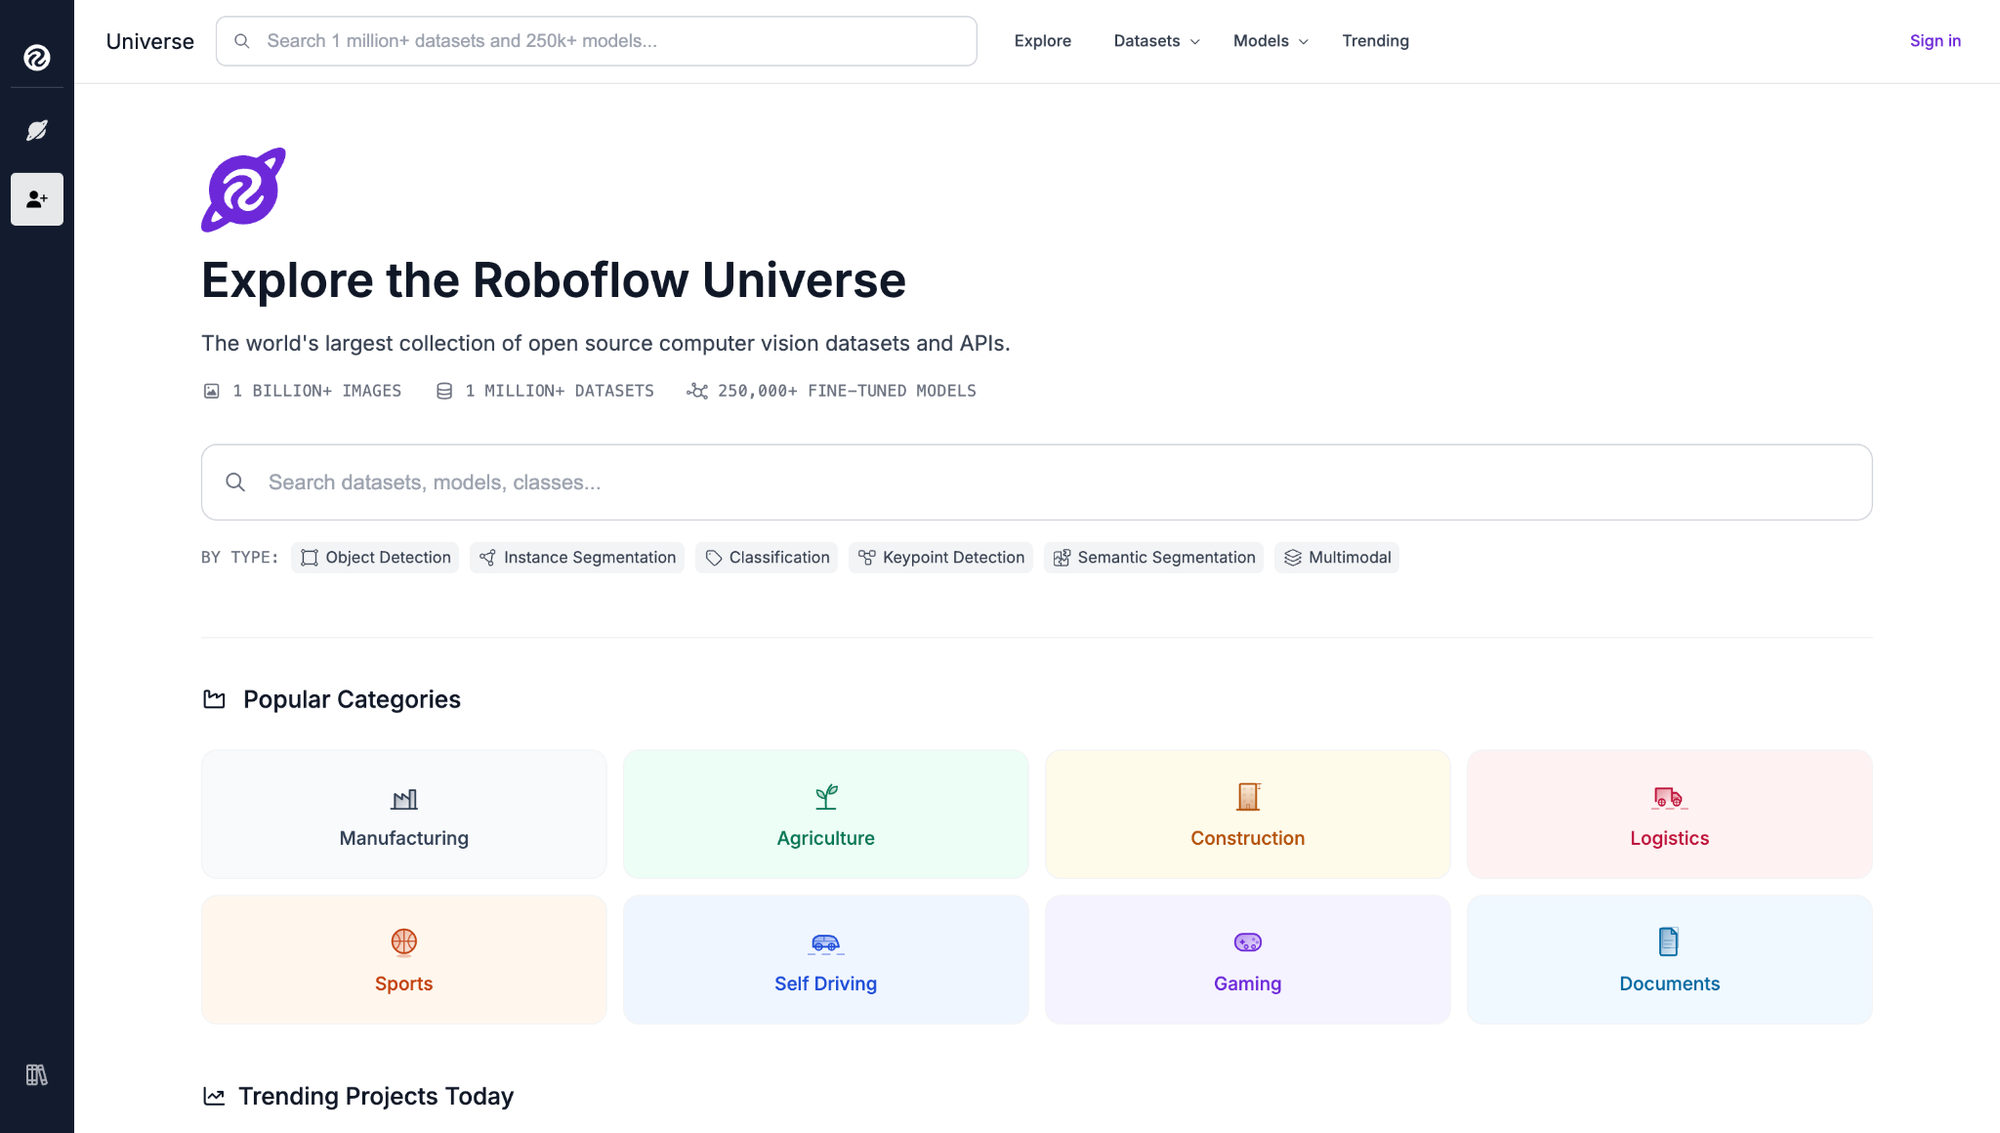
The dataset contains 62 images across six classes: hole and rupture for through-wall failures, crack for linear surface fractures, rust and copper corrosion for surface degradation, and water rupture for burst sections. All images are real captures of damaged pipe/tube work, shot under varying lighting, surface finish, and corrosion levels.
Open the dataset page and click Fork Dataset. This copies the dataset into your workspace with annotations included.
Train the Model
From your dataset version, click Train Model, select Custom Training, then choose RF-DETR as the architecture. RF-DETR is Roboflow's transformer-based detection model that delivers high accuracy with fast convergence.
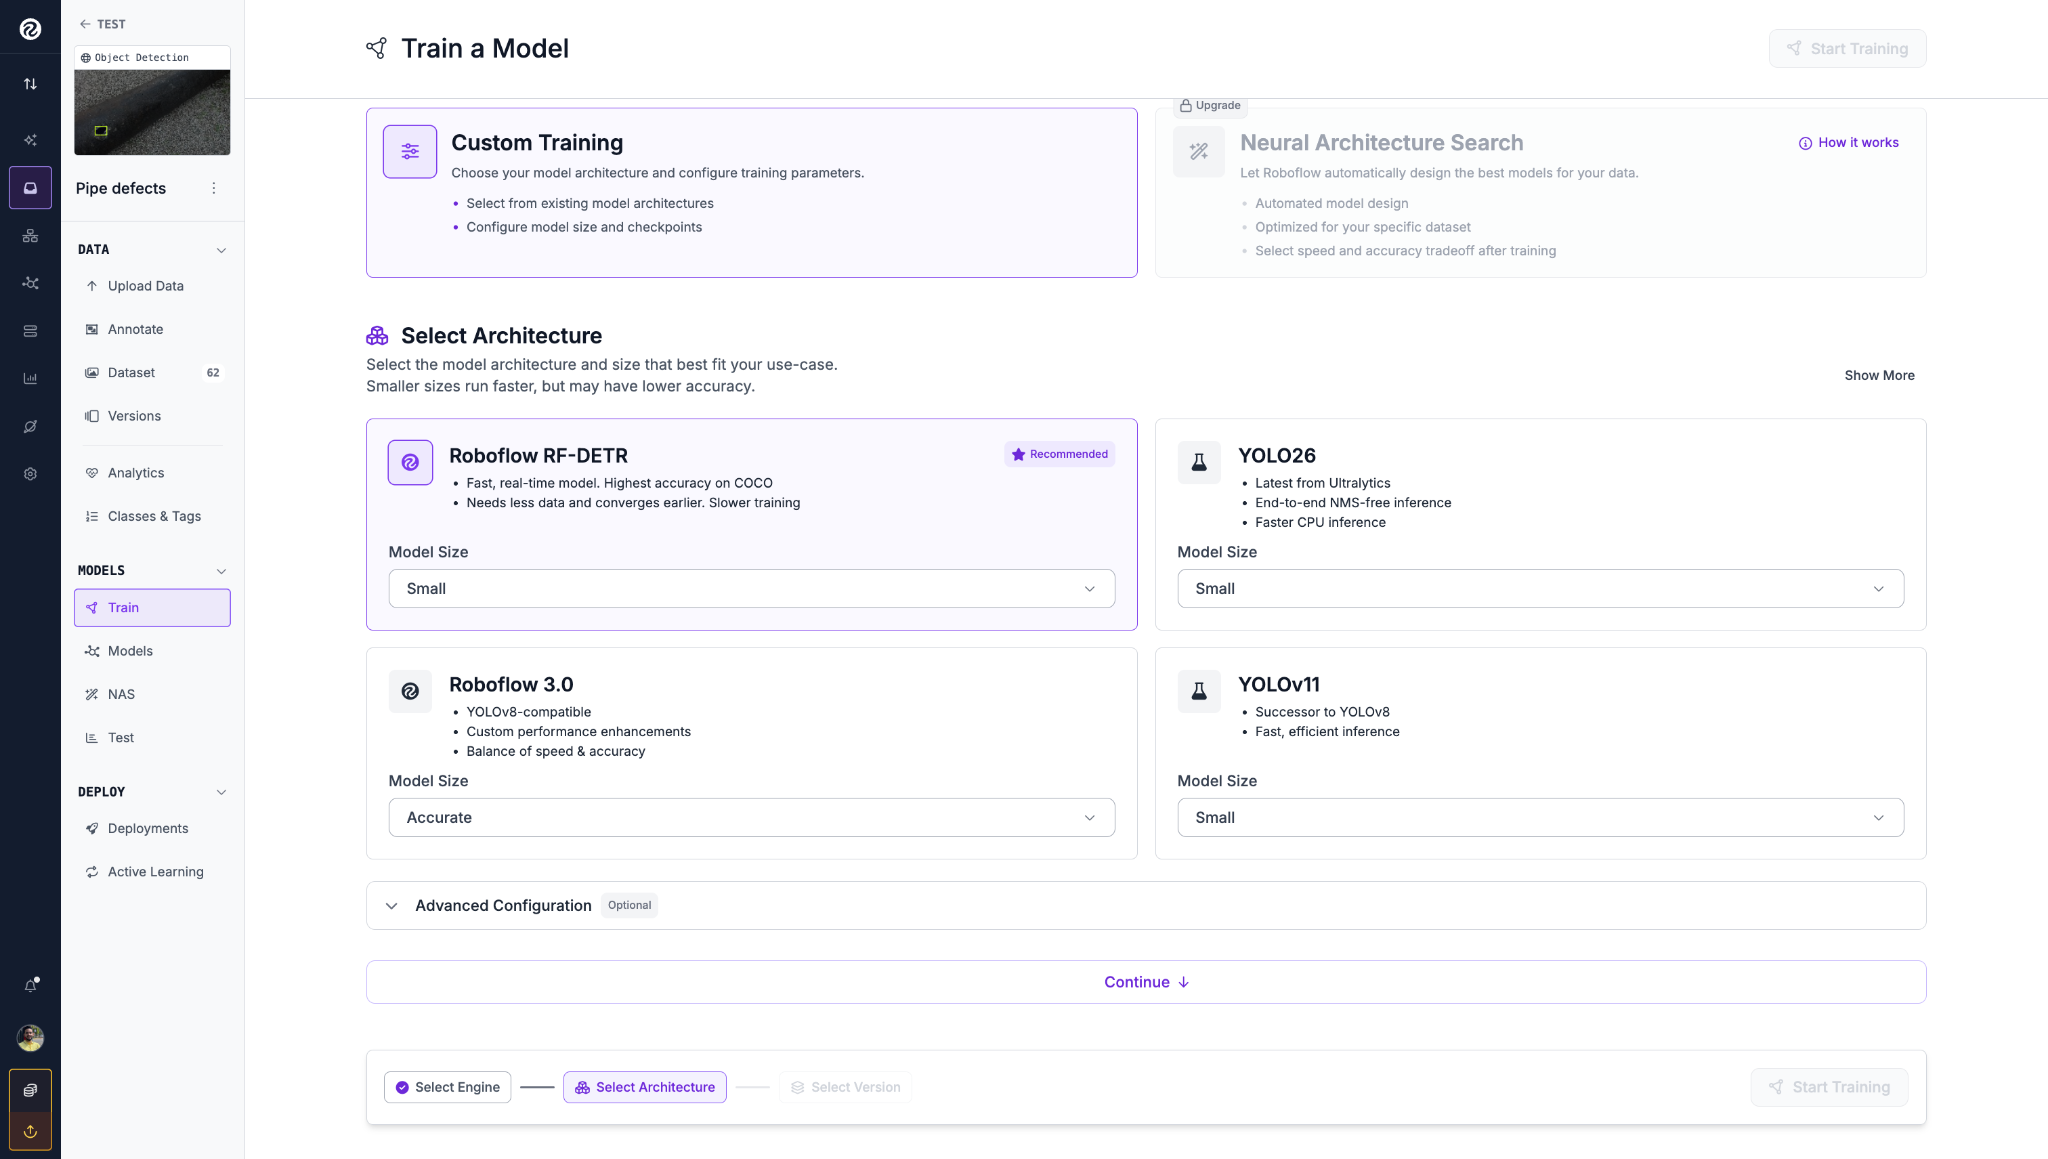
Click Start Training. Roboflow trains the model in the cloud, so there's no local setup or GPU to manage. Expect 30 to 60 minutes depending on early stopping.
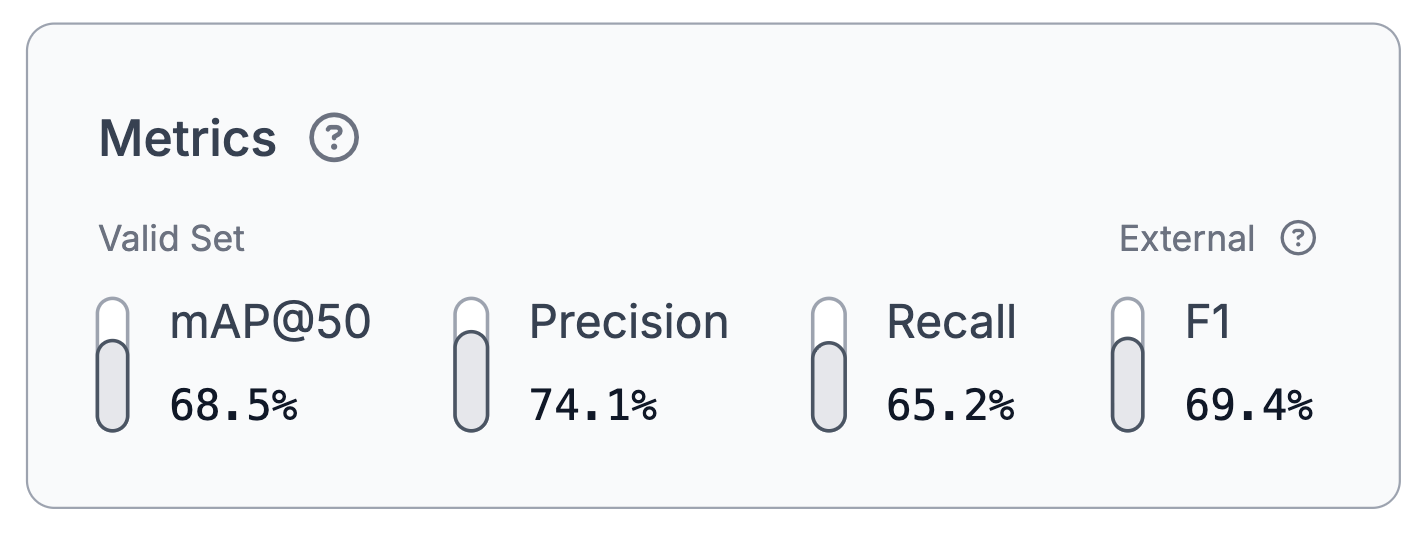
Precision of 74.1% means most of what the model flags is real damage. Recall of 65.2% means it finds about two-thirds of the damage that's actually there. Recall is the one to watch in an inspection pipeline, because a crack the model misses is a crack that keeps growing.
Before you leave this page, write down the exact class names. They're crack, hole, rust, copper corrosion, rupture, and water rupture. You'll need them exactly as written, and Step 4 shows why.
Build the Tube Quality Inspection Workflow
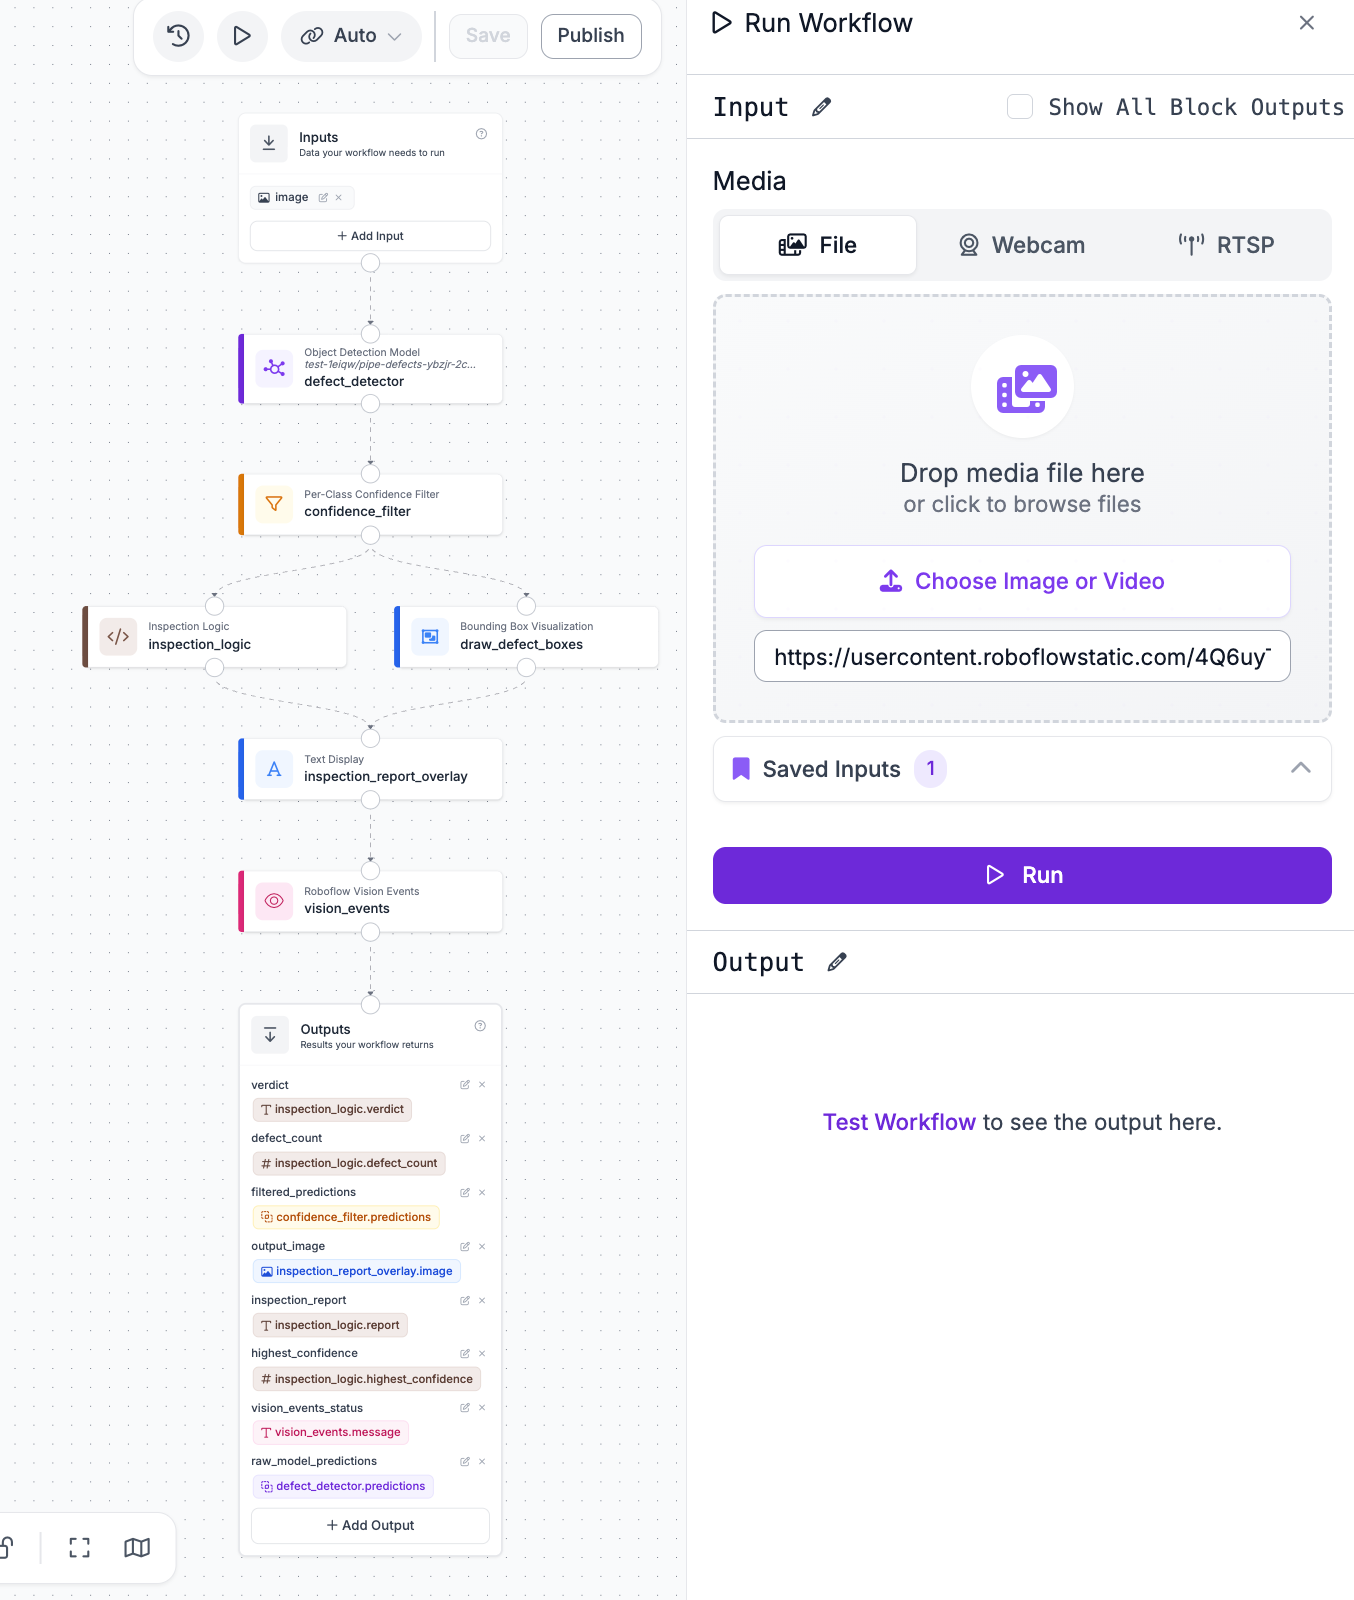
Here's the workflow we'll build. The Workflow consists of the following components, each responsible for a specific task:
- Image Input: a single tube or pipe image
- Object Detection Model: runs the trained RF-DETR model at very low confidence so raw predictions stay intact
- Per-Class Confidence Filter: applies the real inspection threshold
- Inspection Logic: counts surviving detections and decides pass, review, or fail
- Bounding Box Visualization: draws a box around each filtered detection
- Text Display: overlays the inspection report on the image
- Roboflow Vision Events: logs each inspection with the image, detections, and verdict
- Outputs: returns the verdict, count, predictions, annotated image, and report
Step 1: Create a new Workflow in Roboflow
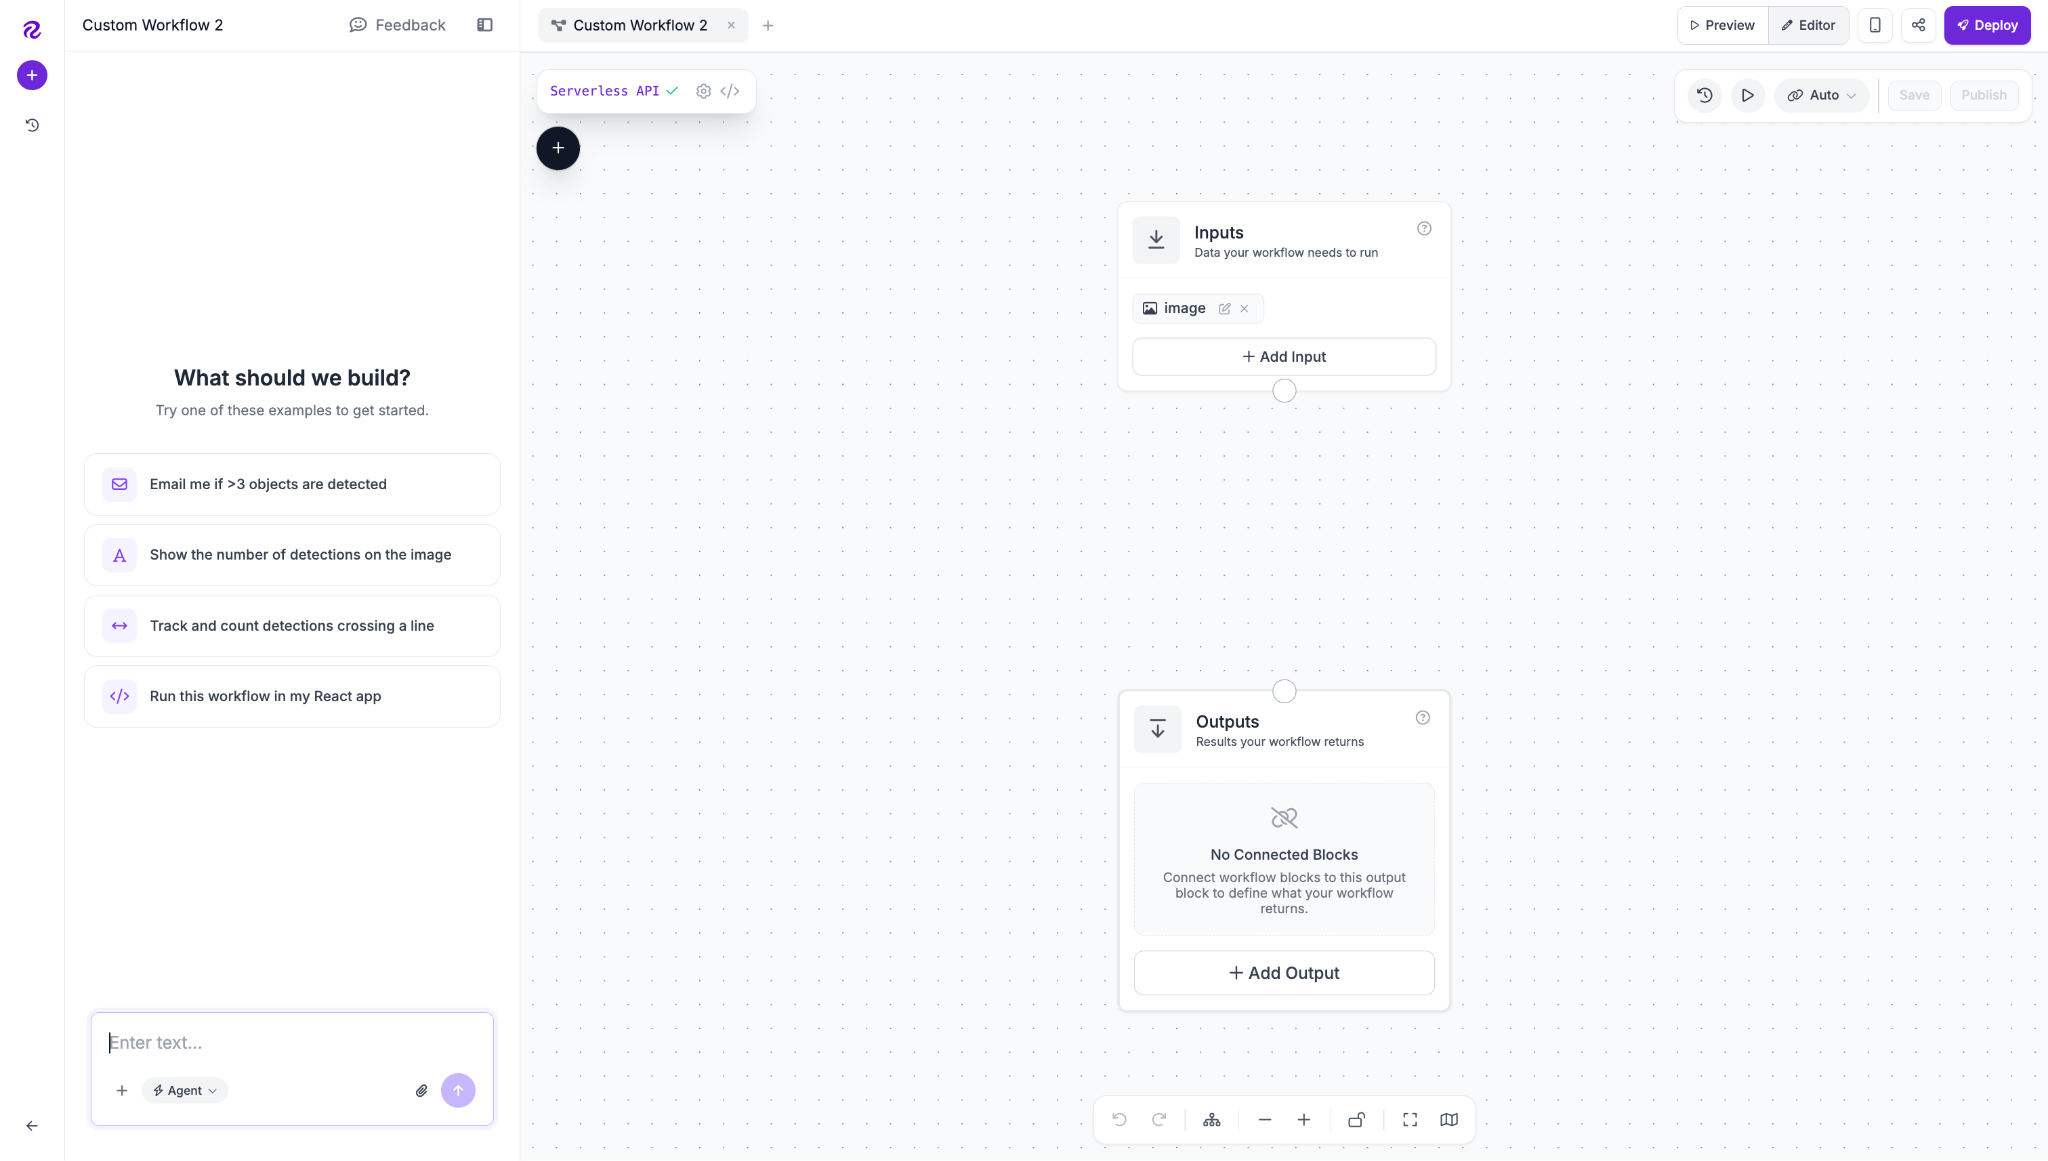
Create a new Workflow from the Workflows tab. An Image Input block and an Outputs block are added automatically. Name the input image.
Step 2: Add the Object Detection block
Click the plus icon, search for Object Detection Model, and add it as defect_detector. Connect Image to inputs.image, then paste your trained model's ID into the Model field. Set Confidence mode to custom and Custom confidence to 0.01, and leave the class filter empty.
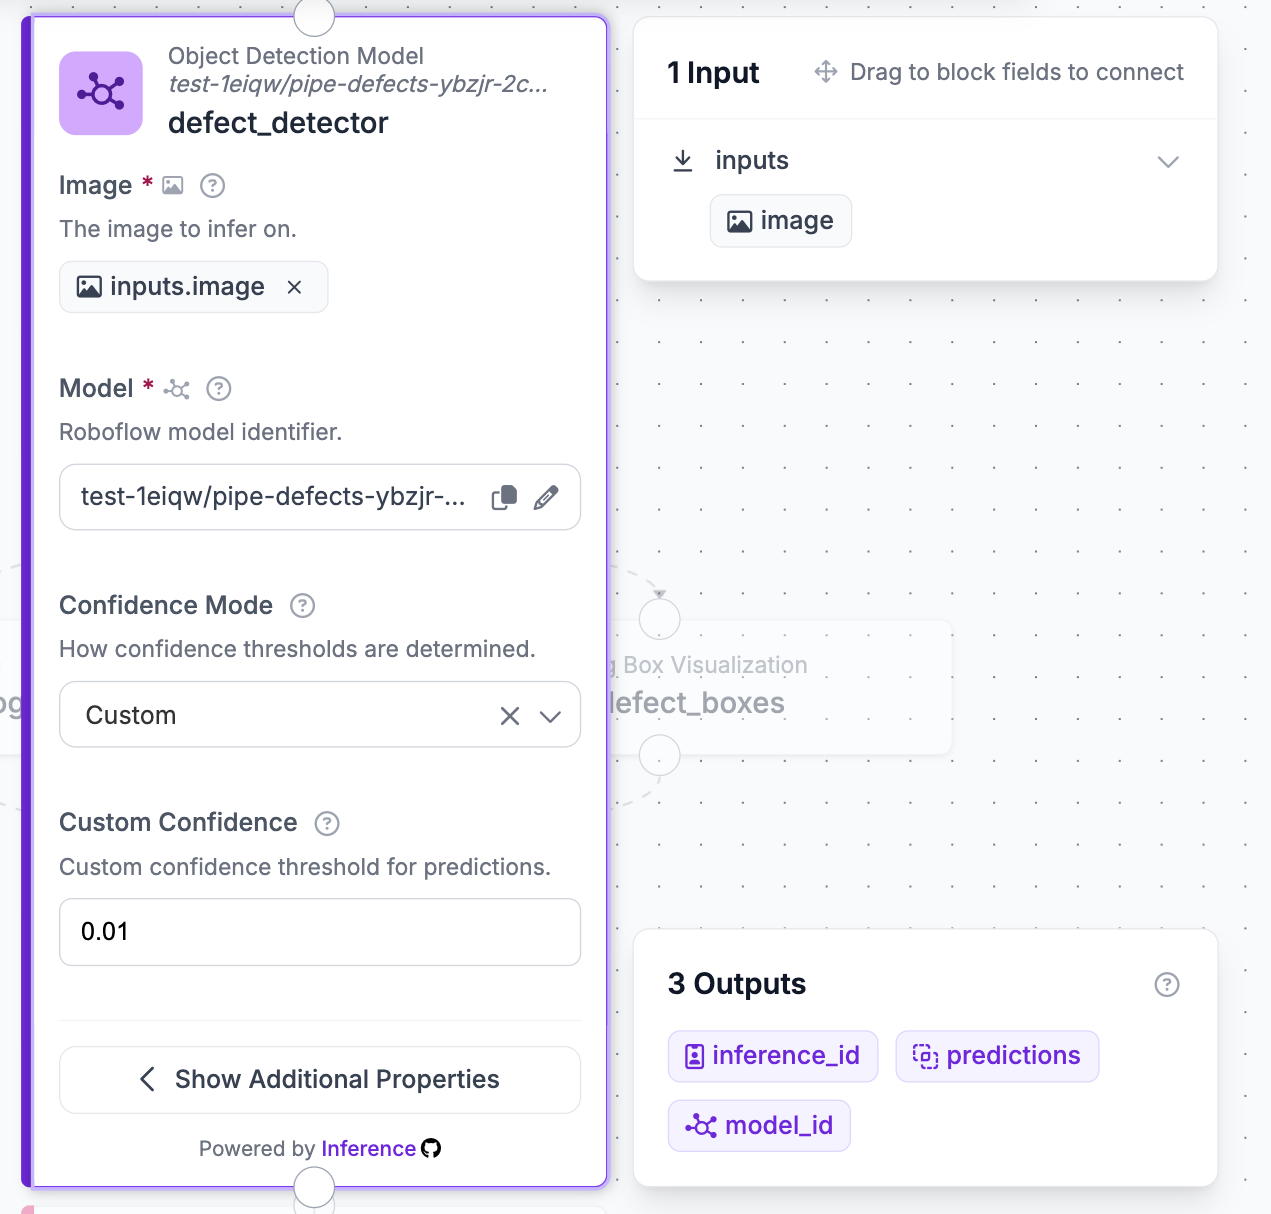
The 0.01 keeps the raw prediction list intact, since the real threshold is applied downstream in the filter block. The empty class filter matters even more, and Step 4 explains why.
Step 3: Add the Per-Class Confidence Filter
Add a Per-Class Confidence Filter block named confidence_filter. Connect Predictions to defect_detector.predictions and set the Default threshold to 0.4.
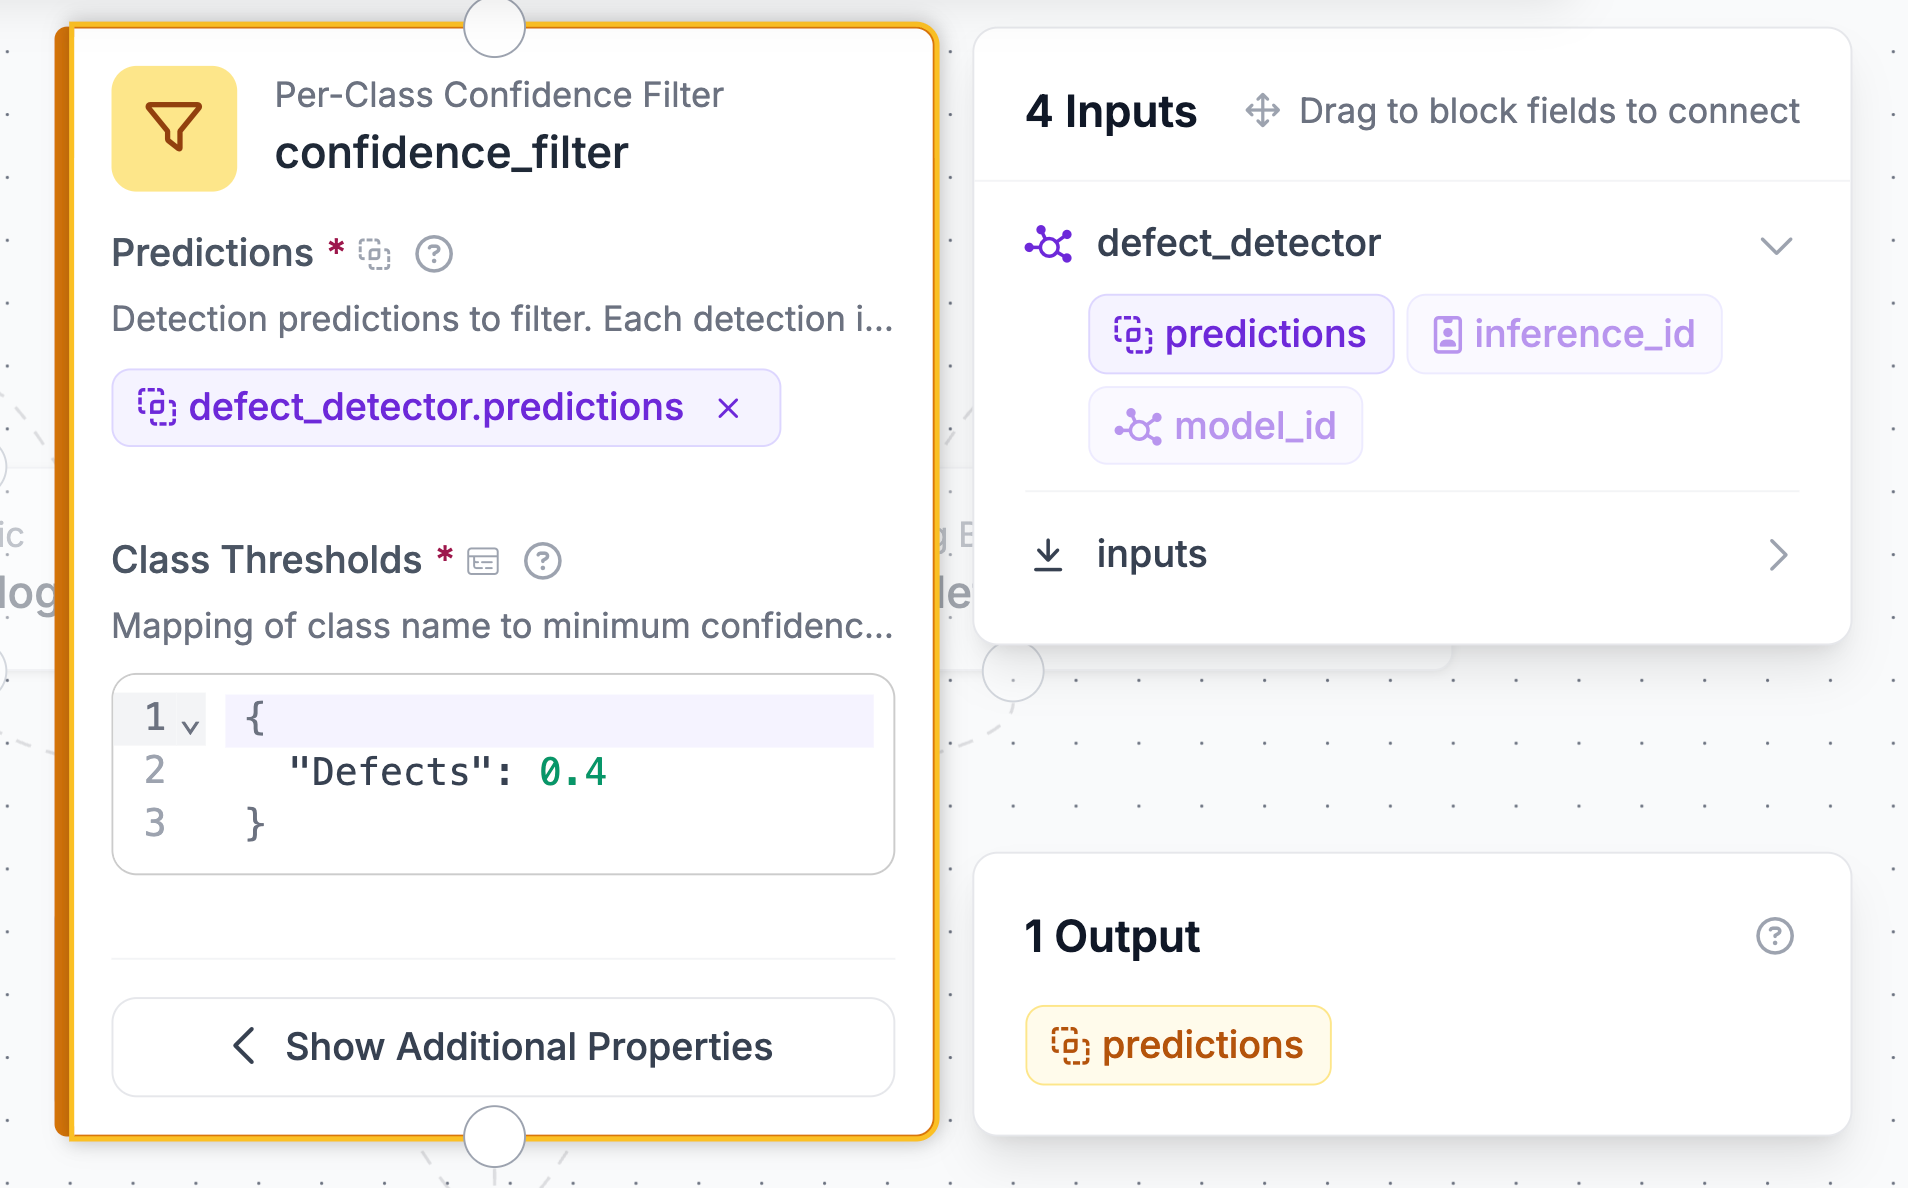
This is where the real inspection threshold lives. Anything below 0.4 gets dropped, and everything at or above it moves on to the verdict logic.
Step 4: Add the Inspection Logic block
Add a Custom Python Block named inspection_logic. Set the Block Type to "Inspection Logic" and the description to "Count filtered defects across all six damage classes and return a pass, review, or fail verdict with an inspection report."
Add one input, predictions of kind object_detection_prediction, and five outputs: verdict (string), defect_count (integer), highest_confidence (float), report (string), and qc_result (string). Connect predictions to confidence_filter.predictions.
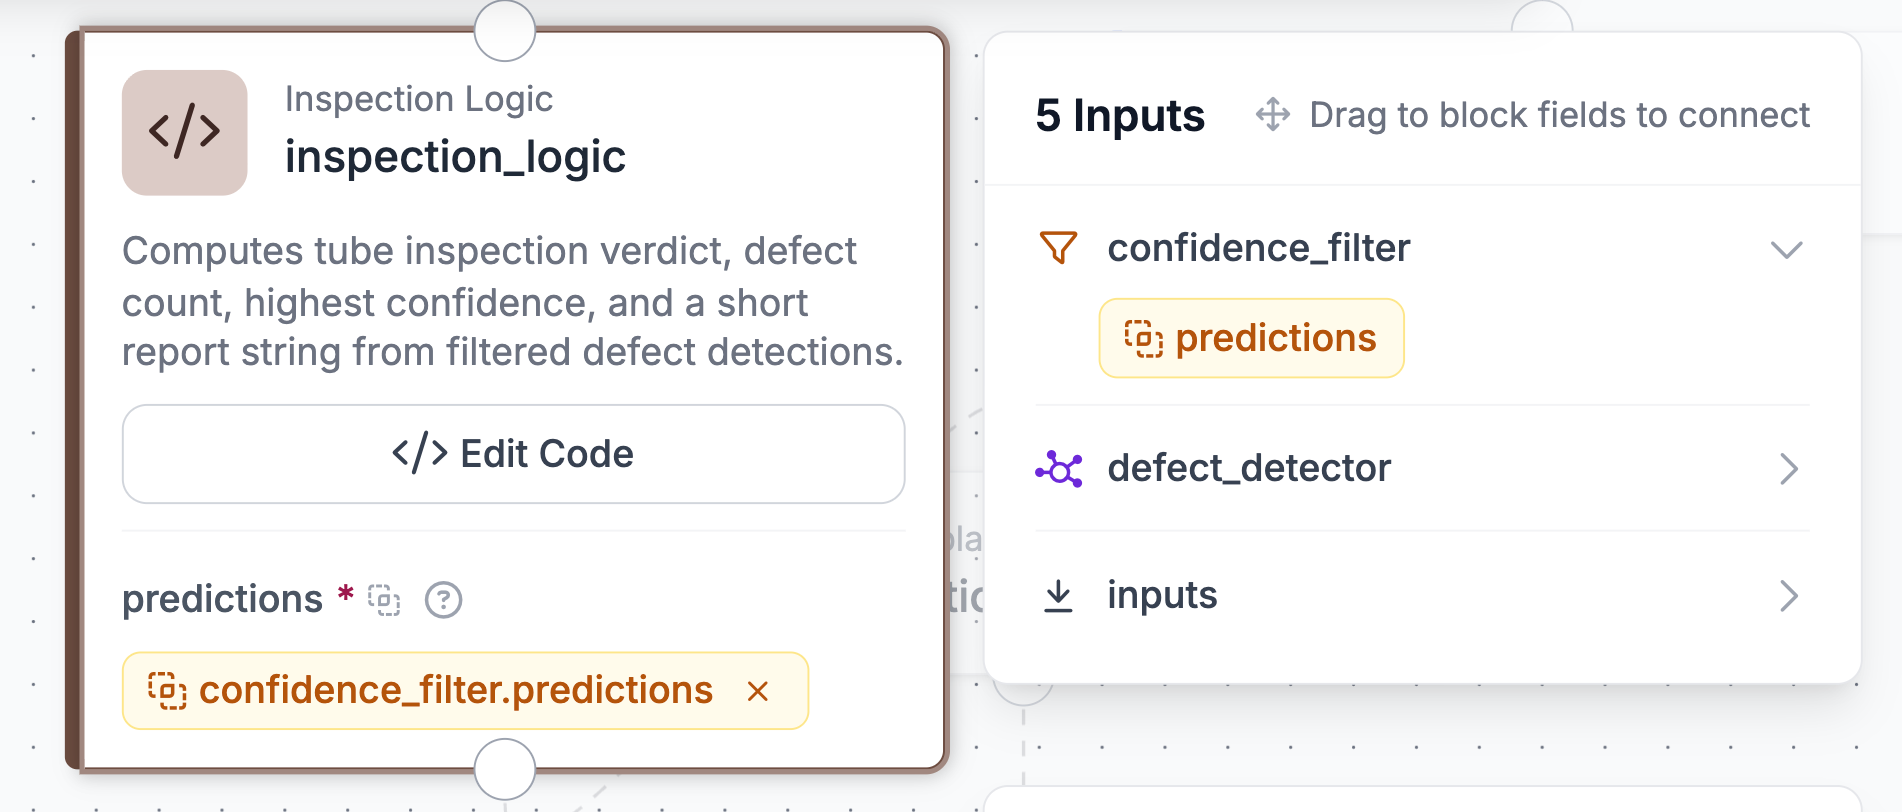
Paste the following code:
def run(self, predictions):
    count = len(predictions) if predictions is not None else 0

    max_confidence = 0.0
    confidences = None

    if predictions is not None:
        confidences = predictions.confidence

    if confidences is not None and len(confidences) > 0:
        max_confidence = float(np.max(confidences))

    if count == 0:
        verdict = "PASS"
    elif count == 1 and max_confidence < 0.7:
        verdict = "REVIEW"
    else:
        verdict = "FAIL"

    qc_result = "pass" if verdict == "PASS" else "fail"

    report = (
        f"Verdict: {verdict}\n"
        f"Defects: {count}\n"
        f"Highest confidence: {max_confidence:.2f}"
    )

    return {
        "verdict": verdict,
        "defect_count": int(count),
        "highest_confidence": float(max_confidence),
        "report": report,
        "qc_result": qc_result,
    }
Zero defects is a PASS, a single defect under 0.7 confidence is a REVIEW, and everything else is a FAIL. The block also emits qc_result, a lowercase pass or fail, because Vision Events only accepts two states and the full verdict gets preserved as metadata instead.
Step 5: Add Bounding Box Visualization
Add a Bounding Box Visualization block named draw_defect_boxes. Connect Input Image to inputs.image and Predictions to confidence_filter.predictions. Set Color Axis to INDEX and use high-contrast custom colors such as cyan and magenta.
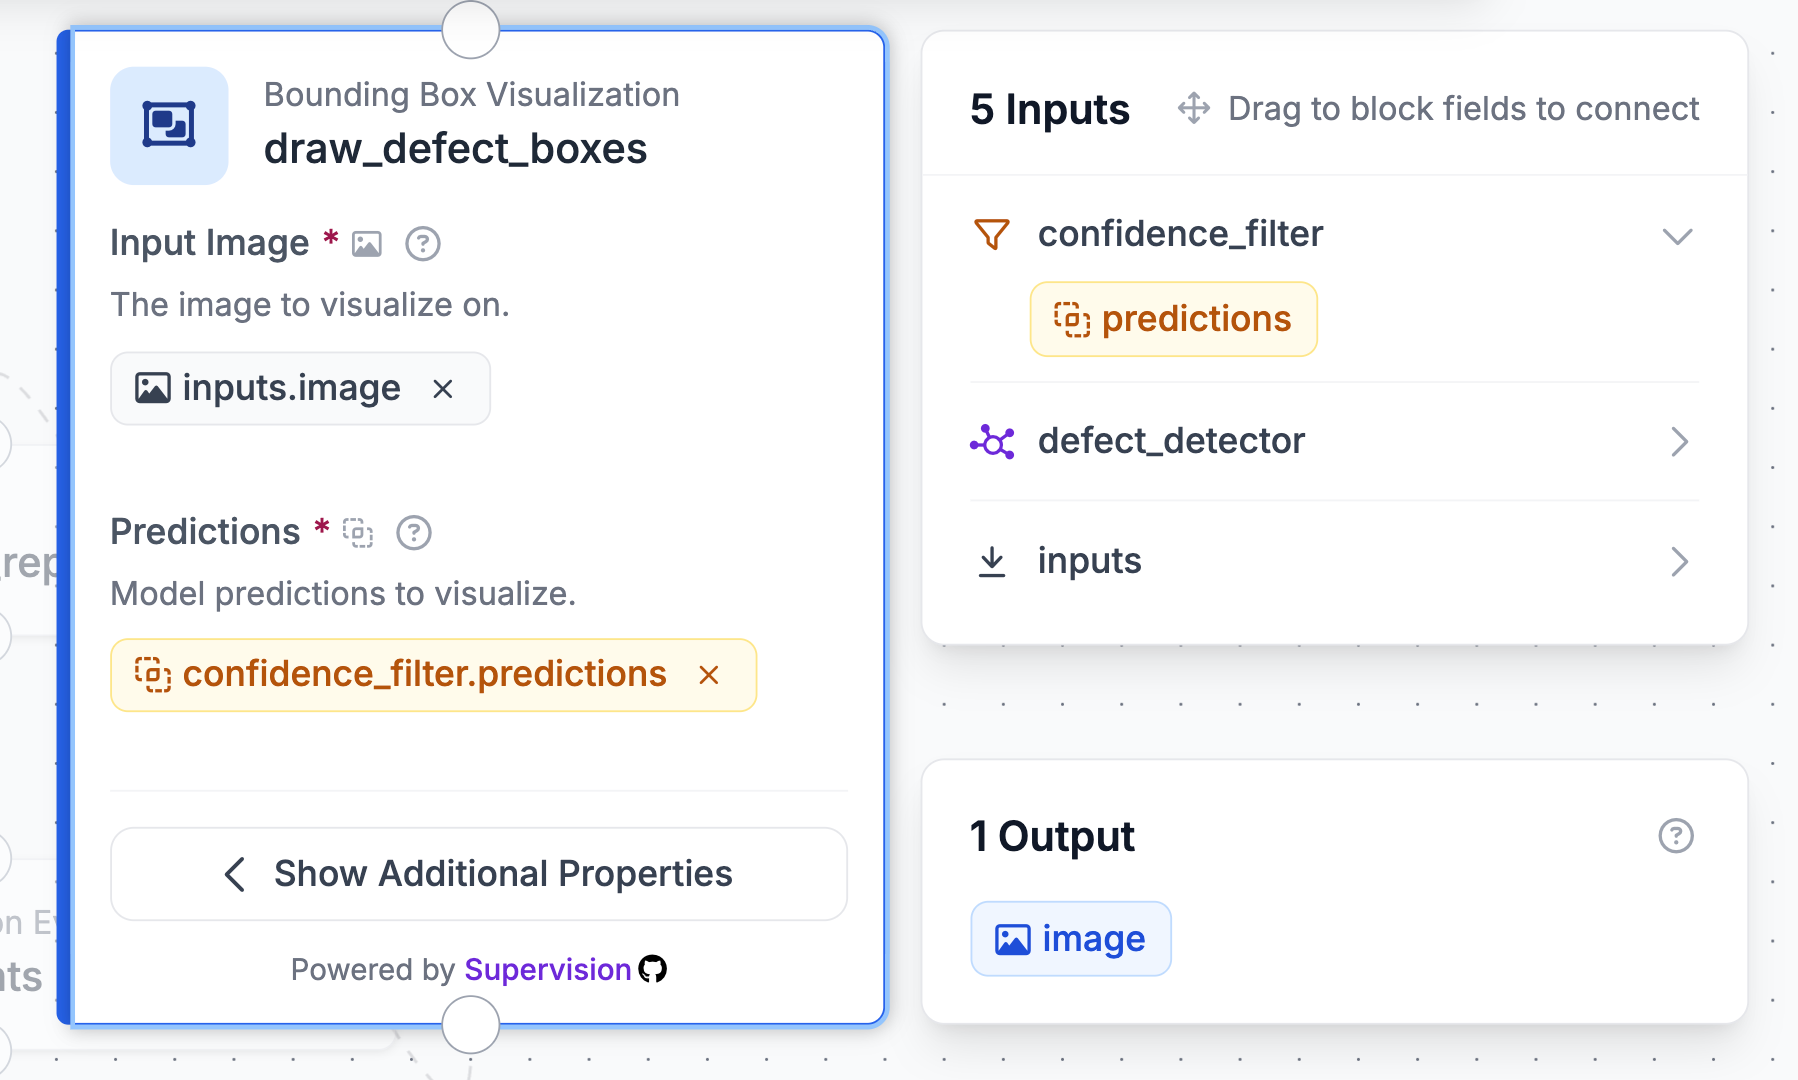
Inspection imagery is often grayscale, so cyan and magenta boxes stay legible where a default red would disappear. Optionally, add a Label Visualization block after this one, connected to draw_defect_boxes.image, to write labels like hole 0.91 onto each box.
Step 6: Add a Text Display block
Add a Text Display block named inspection_report_overlay. Connect Input Image to draw_defect_boxes.image and set Text to:
{{ $parameters.report }}Set Text Parameters to:
{
  "report": "$steps.inspection_logic.report"
}
Set Text Color to WHITE, Background Color to BLACK, Background Opacity to 0.65, and Anchor to top_left.
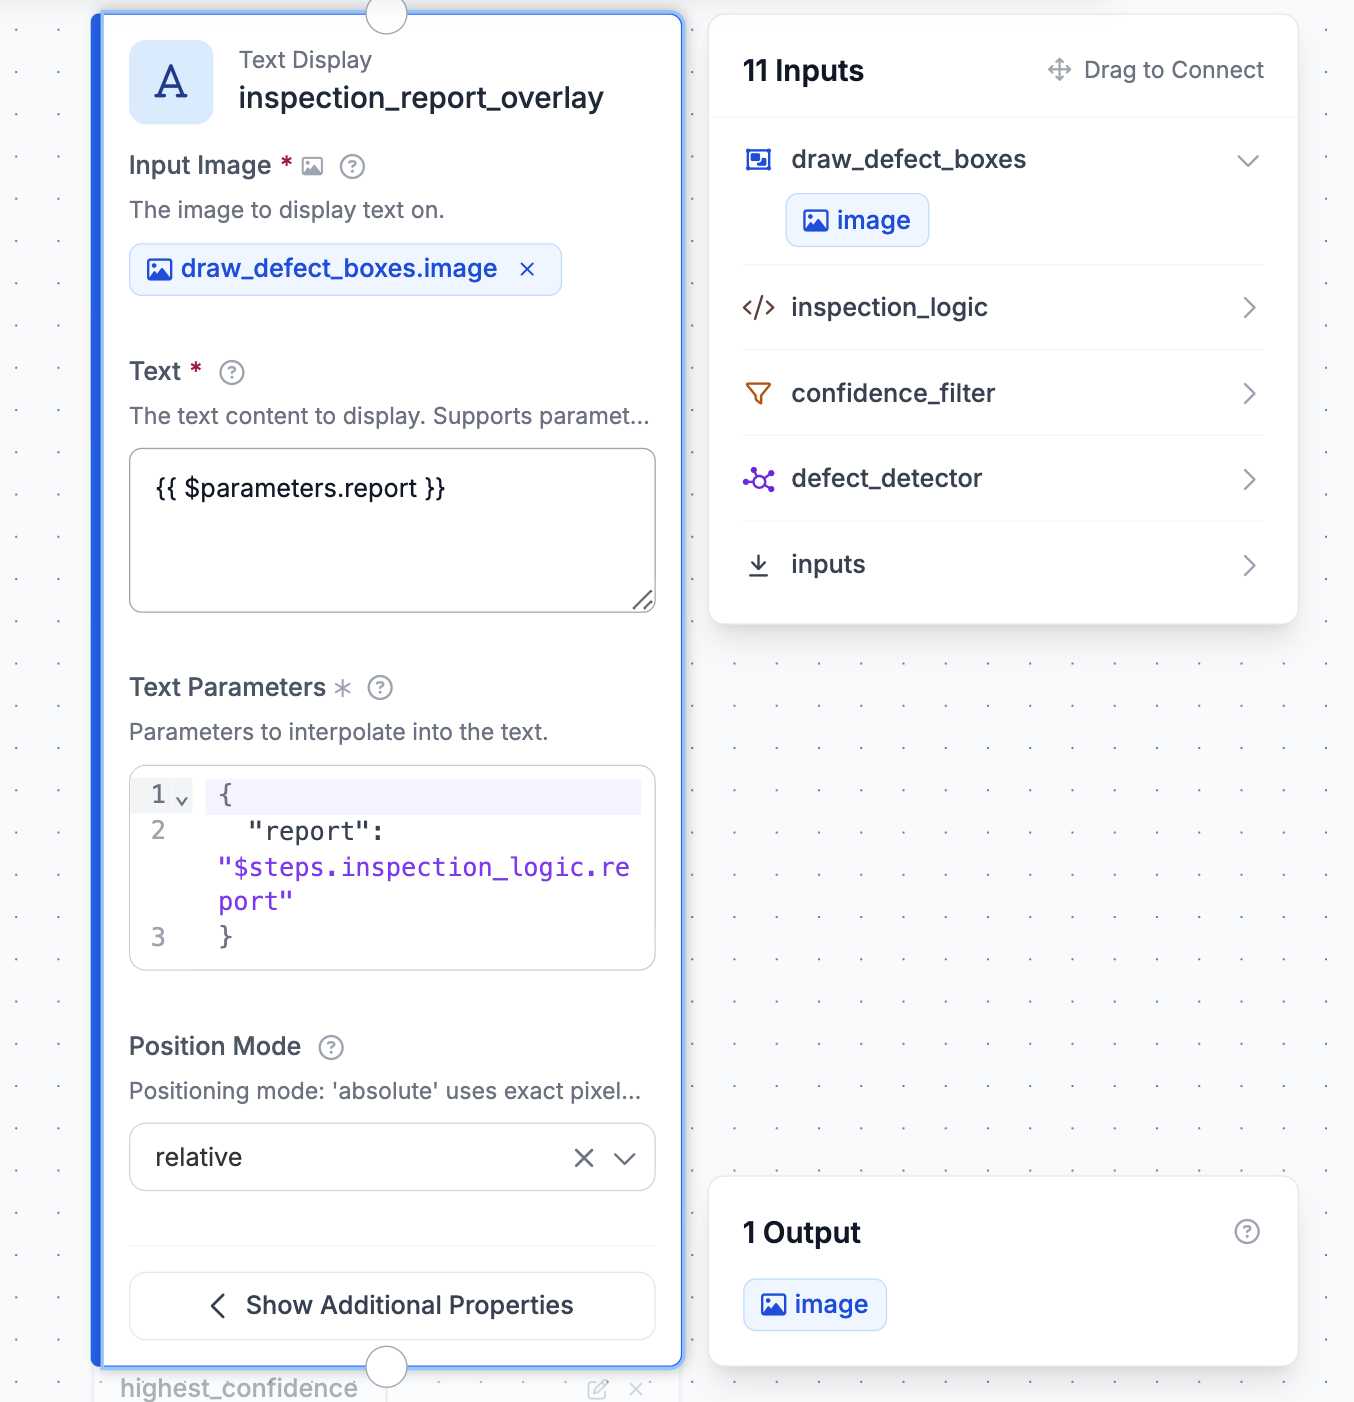
This overlays the verdict, defect count, and highest confidence directly on the output image, so the result is readable without opening the JSON.
Step 7: Add the Vision Events block
Add a Roboflow Vision Events block named vision_events. Connect Input Image to inputs.image, Output Image to inspection_report_overlay.image, and Predictions to confidence_filter.predictions.
Set Event Type to quality_check, Use Case to Tube Quality Inspection, and QC Result to inspection_logic.qc_result. Attach the verdict, defect count, highest confidence, and report as custom metadata.
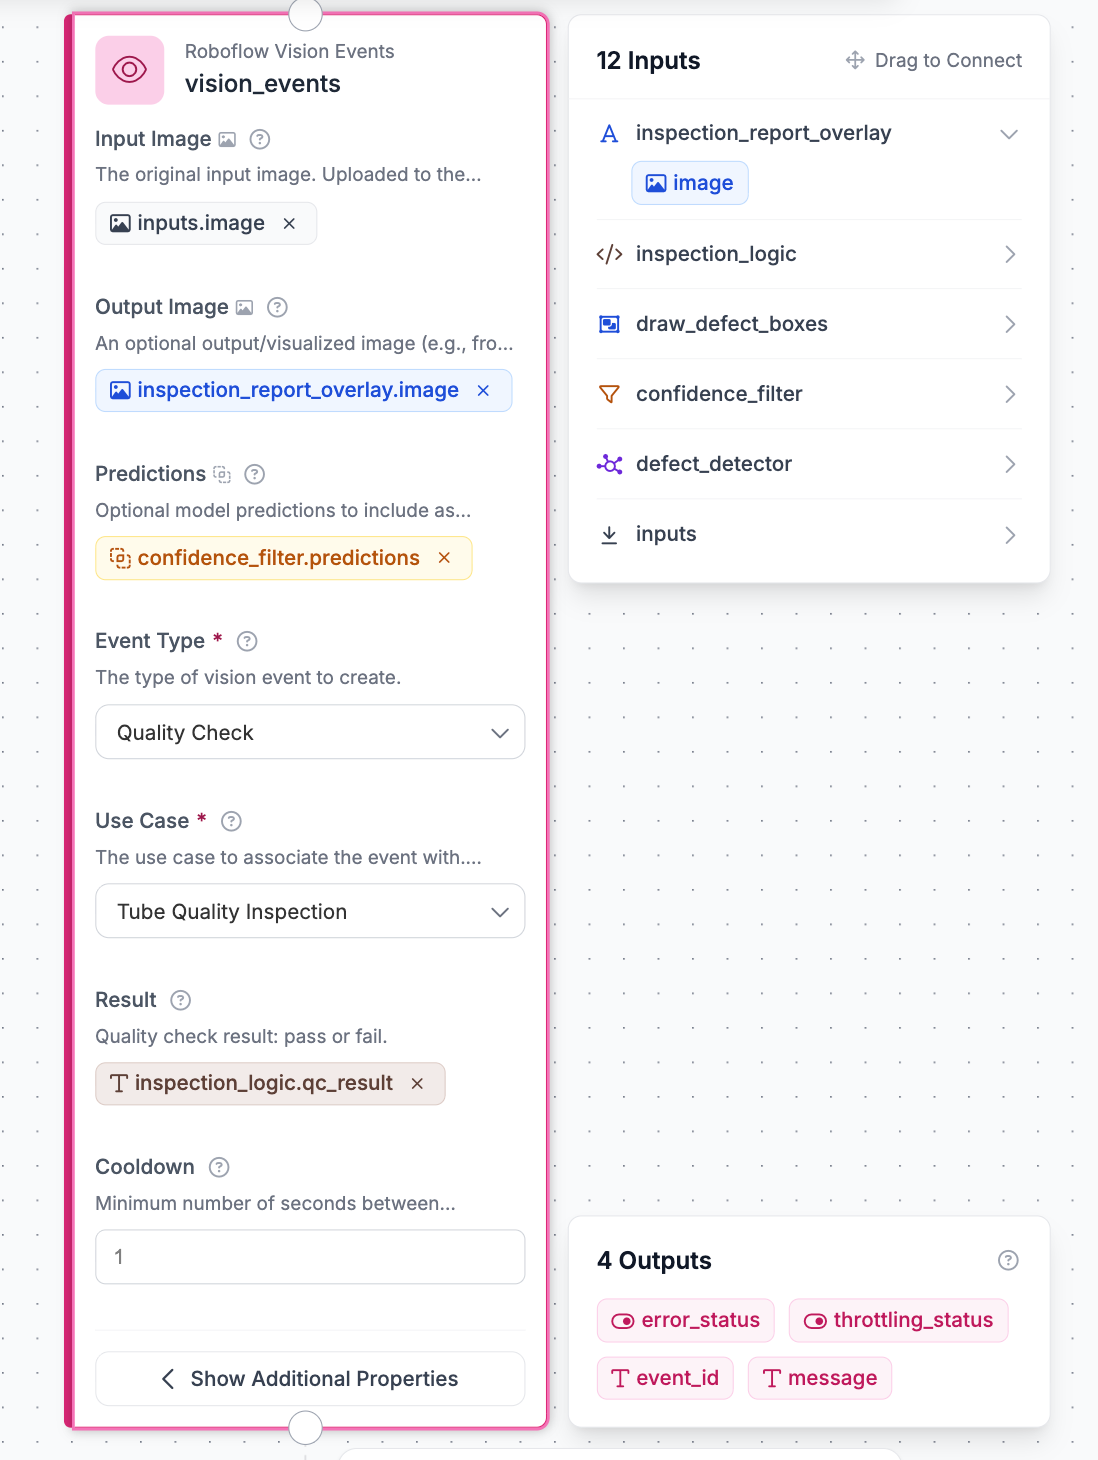
This logs each inspection as a quality event with the image, detections, and verdict. It runs in the background and doesn't change what the Workflow returns.
Step 8: Configure Outputs
Set the outputs: verdict, defect_count, highest_confidence, and inspection_report from inspection_logic; filtered_predictions from confidence_filter; output_image from inspection_report_overlay; and raw_model_predictions from defect_detector.predictions.
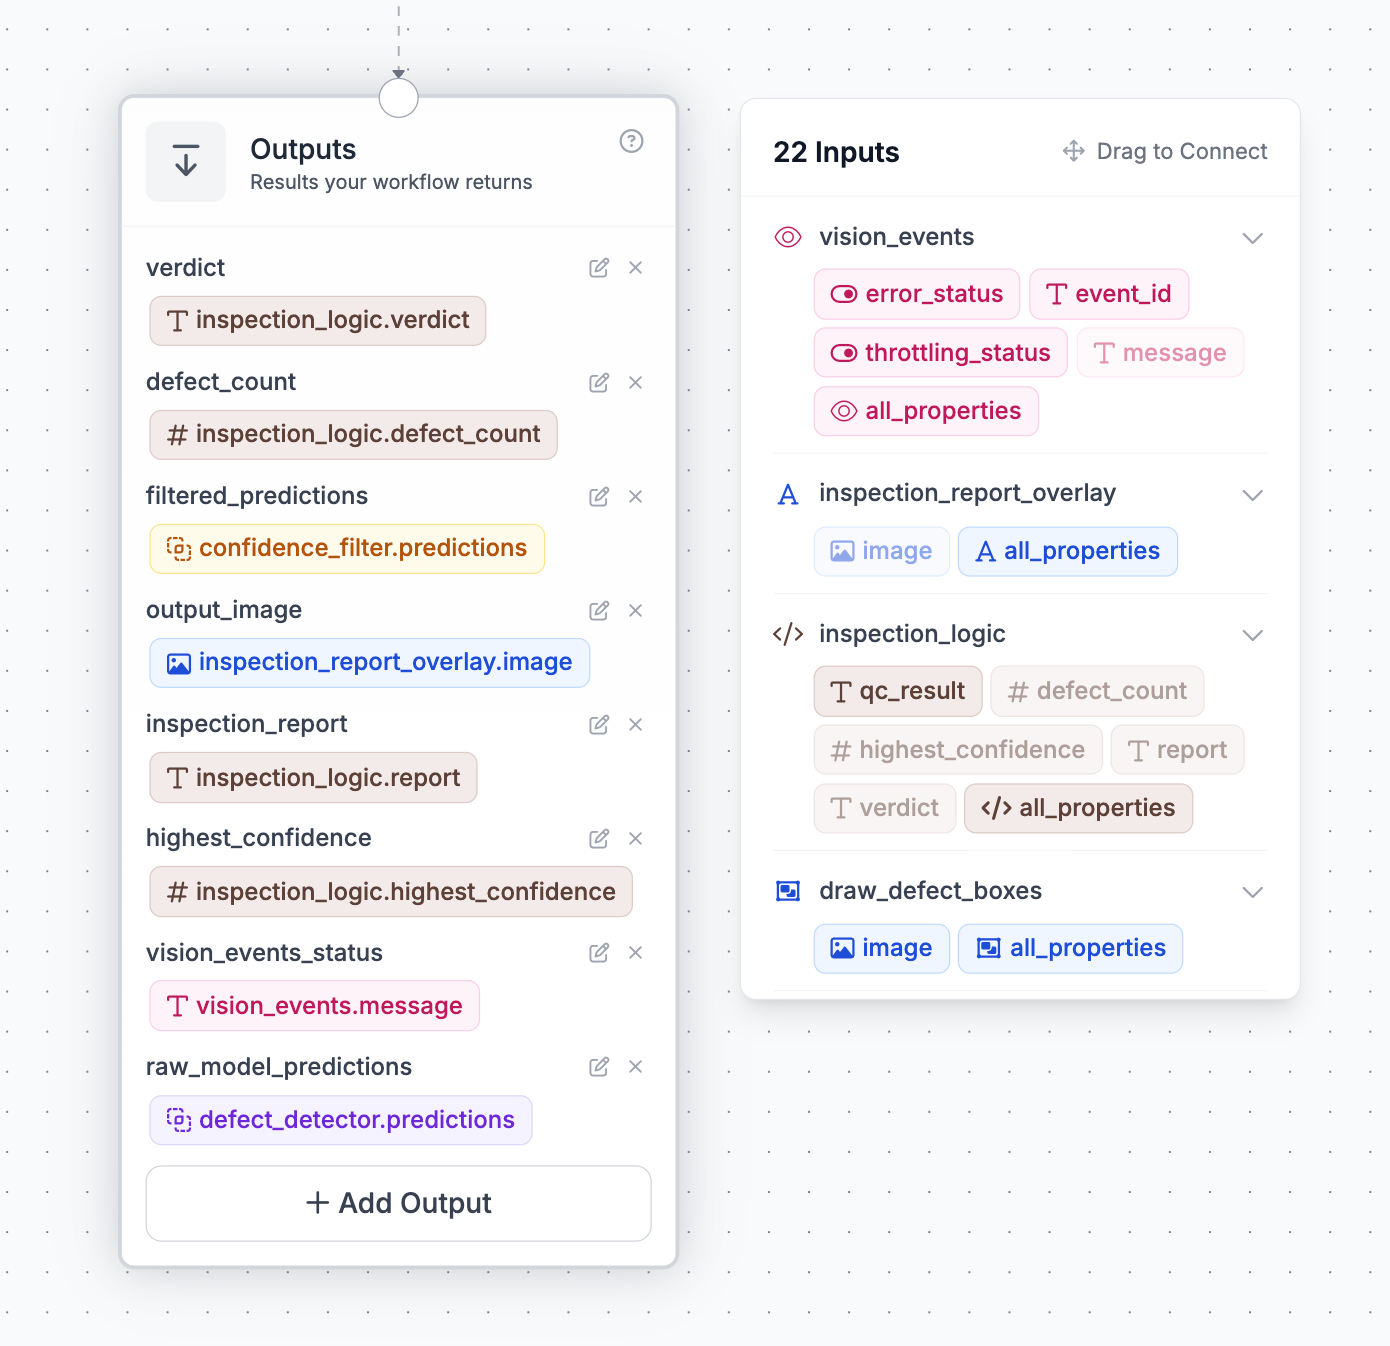
That last output is the debugging hook. If filtered_predictions comes back empty but raw_model_predictions is populated, the model found something and the Workflow threw it away.
With everything connected, the full Workflow looks like this:
Tube Quality Inspection Workflow Results
Test case 1: An intact tube
A section of a tube with no visible damage. Nothing survives the 0.4 filter, and the Workflow returns PASS with a defect count of zero.
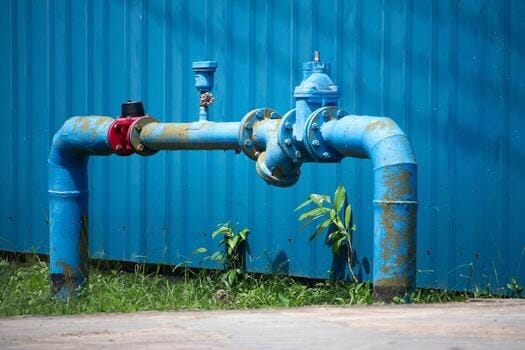
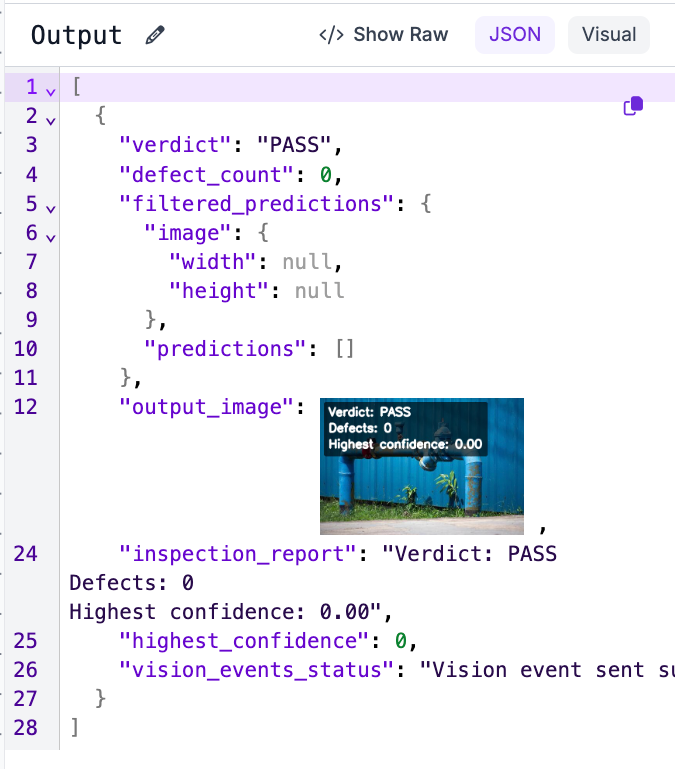
Nothing gets flagged, and no crew is dispatched.
Test case 2: A low-confidence crack
A tube with a faint linear fracture. The model detects it at [FILL] confidence, above the 0.4 filter but below the 0.7 cutoff, so the Workflow returns REVIEW.
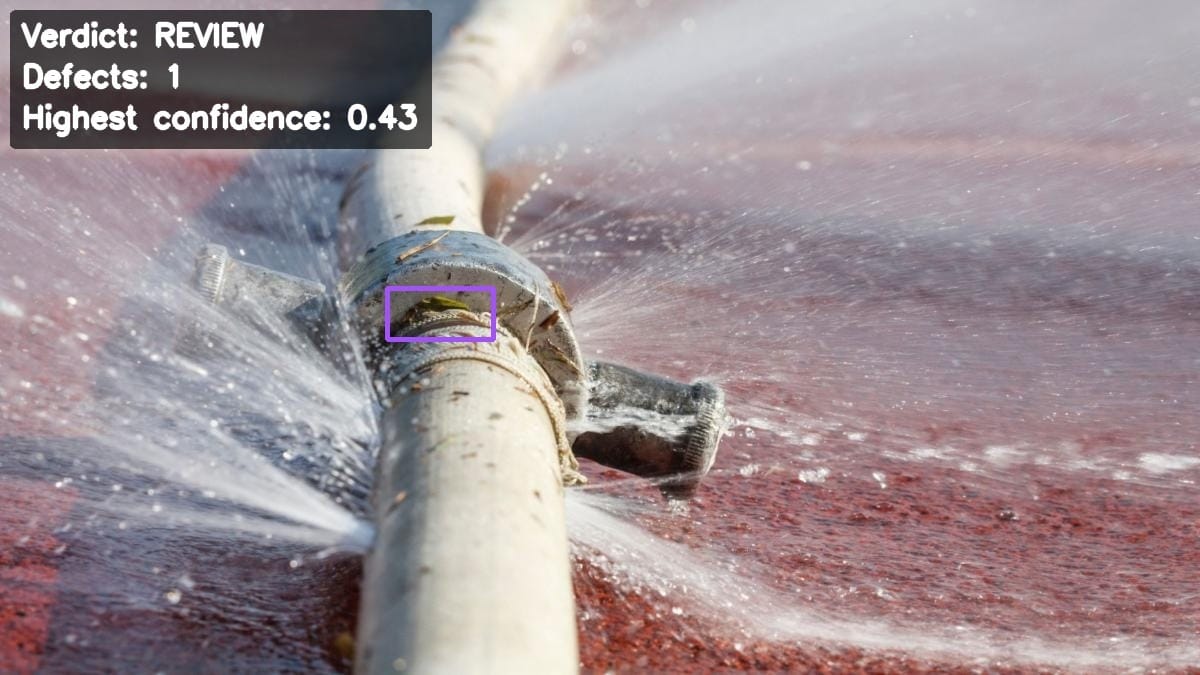
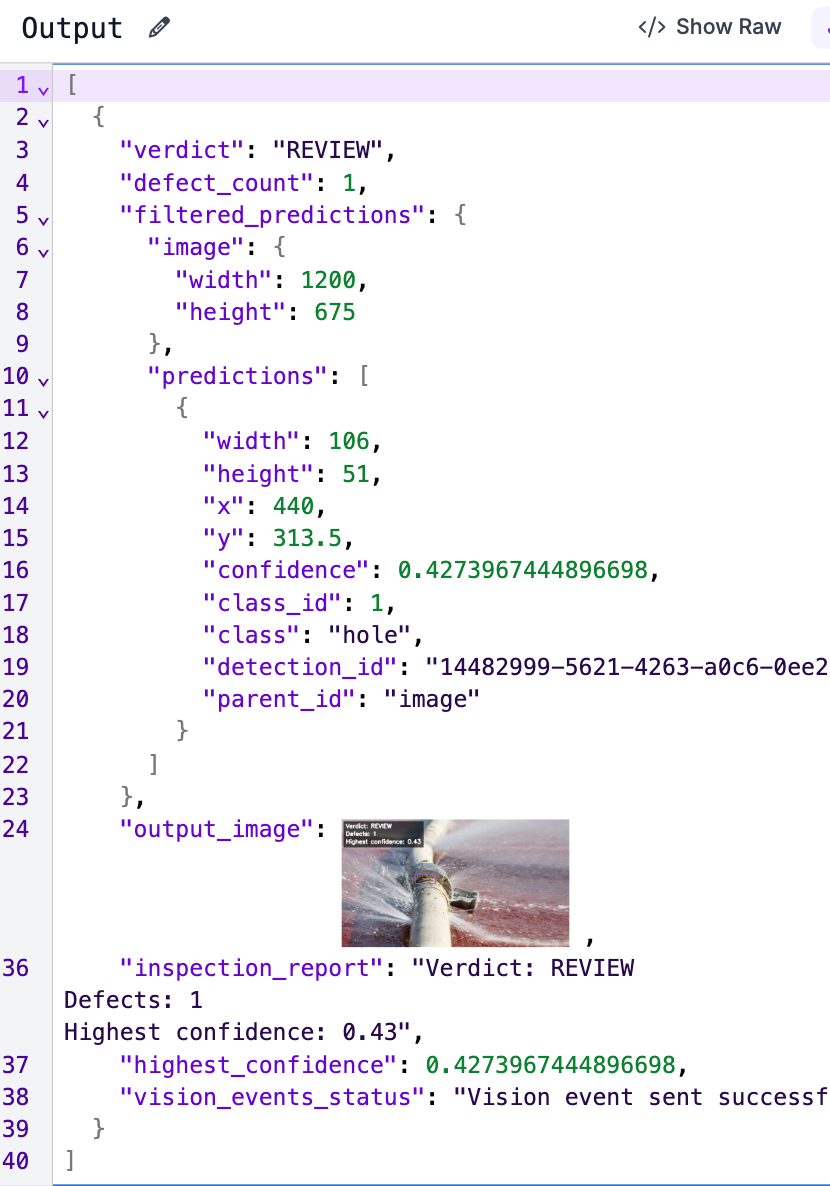
It's a real detection, just not a confident one. Rather than force a pass or a fail, the Workflow puts it in front of a person, and once someone checks the image it goes back into the training set.
Test case 3: A large hole
A badly damaged tube with a hole torn through the wall. The model detects it at 0.91 confidence and the Workflow returns FAIL.
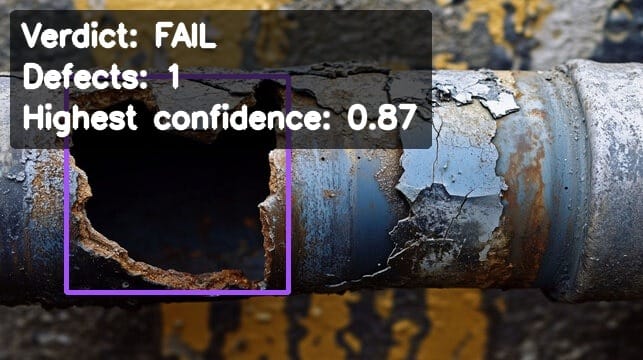
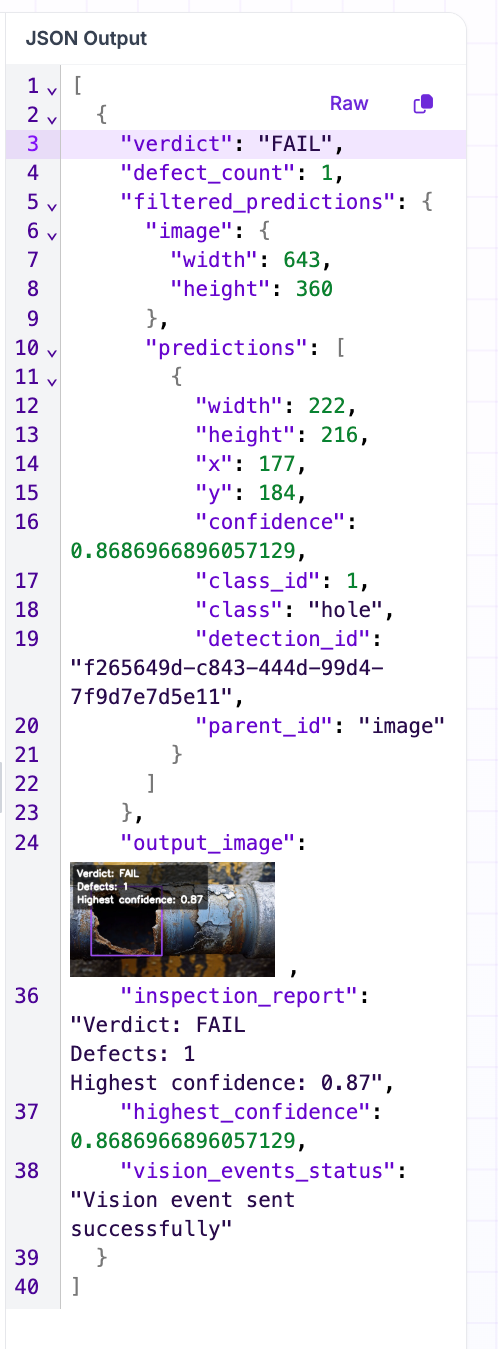
This is the same image that came back PASS before the class filter came out. The model was finding the hole the whole time. The Workflow was throwing it away.
Tube Quality Inspection Production and Deployment
Once published, the Workflow runs through the Roboflow API or on-device with Roboflow Inference, so it can sit anywhere the images are captured: a drone, a crawler, or a handheld camera, without changes.
Worth being straight about where this model is. It catches large holes reliably, but some crack and rupture detections came back under the 0.4 threshold and got filtered out. For obvious damage that's fine; for hairline cracks it isn't, and those weaker classes need more training examples. Because the threshold sits in its own block, tuning it is a one-field change: lower it to catch more cracks at the cost of more REVIEW cases. And as Vision Events logs each inspection, the dataset grows on its own, so the model improves without the Workflow changing.
Use Roboflow Agent for Tubes QA
If you'd rather not add each block by hand, use Roboflow Agent. Instead of configuring blocks one at a time, you describe the pipeline you want in plain text and the Agent builds it for you. Here's an example:
Conclusion
This Workflow takes a tube image, runs it through a trained RF-DETR model, applies the inspection threshold in its own filter block, and returns a verdict: pass, review, or fail. Every run gets annotated, reported, and logged.
It also produced a debugging lesson worth keeping. A model can be working perfectly and the workflow around it can still return nothing, if the class names in the filter don't match what the model actually emits. Check the filter before you blame the model.
The pipeline handles all three defect types without any change to the Workflow structure. Adding a new damage type means collecting labeled examples and retraining. The workflow stays the same.
Further reading


Cite this Post
Use the following entry to cite this post in your research:
Mostafa Ibrahim. (Jul 17, 2026). Pipe and Tubes Quality Inspection with Roboflow. Roboflow Blog: https://blog.roboflow.com/tubes-quality-inspection/