

Video analytics with vision AI uses computer vision models to detect, track, and interpret objects and activity inside a video stream, in real time or on recorded footage, without a person watching every frame. Instead of a camera that only records, the system understands what is moving through the scene: what each object is, where it goes, and whether it meets the standard you set.
This tutorial builds a working example end to end. We train an RF-DETR model to detect boxes on a conveyor belt, deploy it in Roboflow Workflows, use ByteTrack to assign a unique ID to each box as it moves, and use Gemini 2.5 Pro to inspect each tracked box for visible damage. The result is an annotated video showing every detected box, its tracker ID, and its inspection label. Before the build, here is how video analytics with vision AI actually works and where it is used.
What Is Video Analytics with Vision AI?
Traditional video analytics relied on hand-coded rules: motion in a zone, a line crossing, a pixel threshold. Vision AI replaces those brittle rules with trained models that recognize objects and conditions directly, so the same camera feed can answer far more specific questions, "Is this package damaged?," not just "Did something move?"
Most production systems combine three stages, and today's tutorial uses all three:
Object detection locates every object of interest in each frame and draws a bounding box around it. Here, an RF-DETR model detects cardboard boxes on the conveyor. Detection is what makes the rest of the pipeline possible, because you cannot track or inspect what you have not localized.
Multi-object tracking assigns a persistent ID to each object and follows it across frames, so one box stays one box as it travels through the scene. We use ByteTrack for this. Tracking is what turns a stack of independent frame predictions into a coherent view of objects moving over time, and it prevents the same package from being counted or inspected twice.
Multimodal inspection applies a vision-capable model to each tracked object to make a judgment a plain detector cannot. We send each fully visible box crop to Gemini 2.5 Pro, which classifies it as Defective, Not Defective, or Opened. This is the layer that reads context, condition, and intent rather than just object class.
Where Video Analytics with Vision AI Is Used
The same detect, track, inspect pattern powers a wide range of real-time video analytics beyond the conveyor line:
- Manufacturing and logistics: package inspection, on-shelf availability, throughput and dwell-time analysis.
- Workplace safety: PPE compliance, restricted-zone monitoring, and unsafe-interaction alerts.
- Retail: shelf monitoring, queue length, and stock-out detection.
- Sports: player and ball tracking for performance analytics.
- Traffic and cities: vehicle counting, incident detection, and flow analysis.
In every case the architecture is the same one we build below: detect the objects, track them across frames, and inspect each one. The conveyor box inspection system is a concrete, buildable version of that pattern.
Video Analytics with Vision AI Demo
Now let's automate conveyor belt monitoring by combining object detection, multi-object tracking, and multimodal AI inspection into a single video analytics workflow.
Conveyor systems are widely used, and as boxes move along the conveyor, ensuring that each package is correctly handled and free from visible damage is essential for maintaining product quality and preventing downstream issues. For many manufacturers, the Cost of Poor Quality is estimated to consume 15–20% of revenue, underscoring the importance of reliable quality inspection.
Computer vision enables manufacturers to automatically detect packages, track their movement, and perform visual quality inspection without stopping the conveyor.
In this tutorial, we will build an automated conveyor box inspection system using Roboflow. We will train an RF-DETR model to detect boxes on a conveyor belt, deploy the model in Roboflow workflows, use ByteTrack to assign a unique ID to each box as it moves through the scene, and leverage Gemini 2.5 Pro to inspect each tracked box for visible damage and packaging defects.
The system can help identify:
- Boxes moving along the conveyor
- Unique IDs for each tracked box
- Crushed, torn, or damaged packaging
- Boxes that require manual inspection
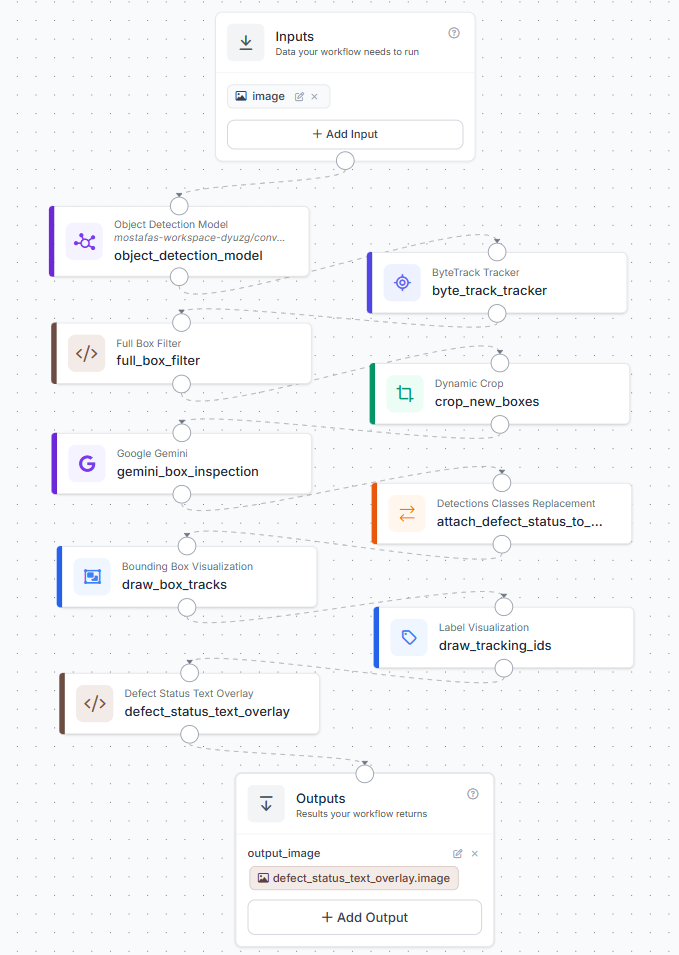
The final output is an annotated video showing each detected box, its tracker ID, and its Gemini-generated inspection label. Here's the workflow we'll build.
Step 1: Prepare the Dataset
For this tutorial, we use a public conveyor box dataset from Roboflow Universe. Our goal is to train a model that detects boxes moving along a conveyor belt, providing the foundation for real-time tracking and AI-powered inspection. Rather than training the model to recognize multiple object categories, we focus on a single object of interest: cardboard boxes.
The original dataset contains several annotation classes, including multiple box-related labels and additional objects that are not required for our application. Since our workflow only requires detecting cardboard boxes, we fork the dataset into our Roboflow workspace and remove images containing annotations unrelated to our target object. The resulting dataset contains a single detection class, allowing the model to focus entirely on localizing boxes while downstream components handle tracking and inspection.
The resulting dataset contains 850 annotated images captured in an industrial conveyor environment. Boxes appear at different positions along the conveyor, under varying lighting conditions, and at different distances from the camera. This variety helps the model generalize to real-world production lines where package placement and environmental conditions naturally vary.
Here are examples of the detection targets:
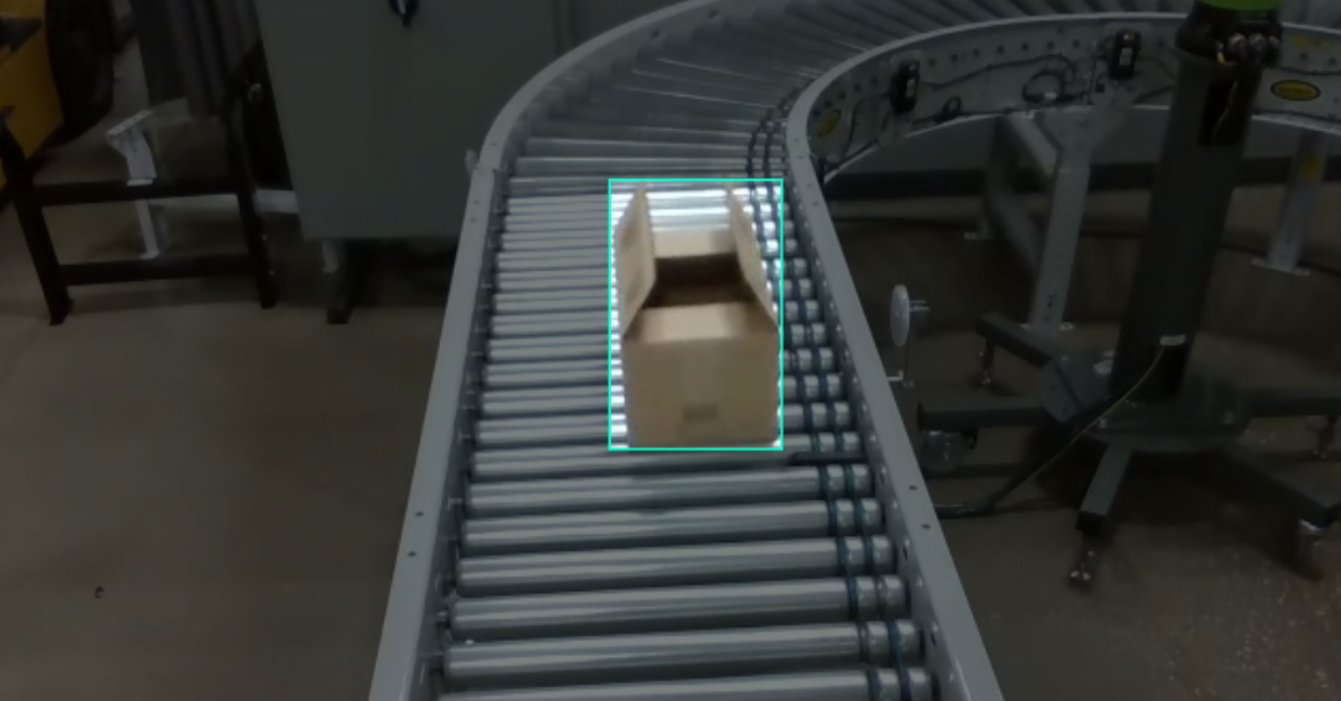
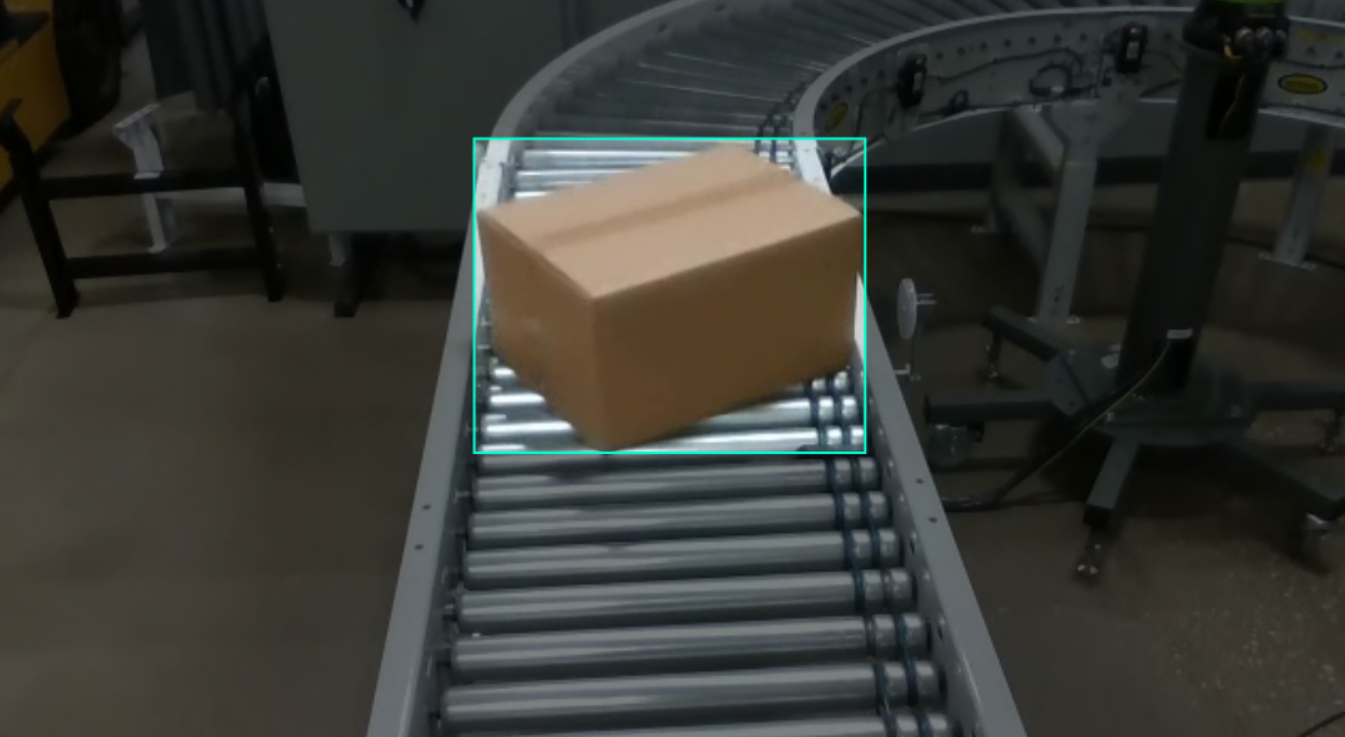
To begin, fork the dataset into your Roboflow workspace. Then navigate to the Train tab and select Custom Training. From the available architectures, choose RF-DETR and set the model size to Small.
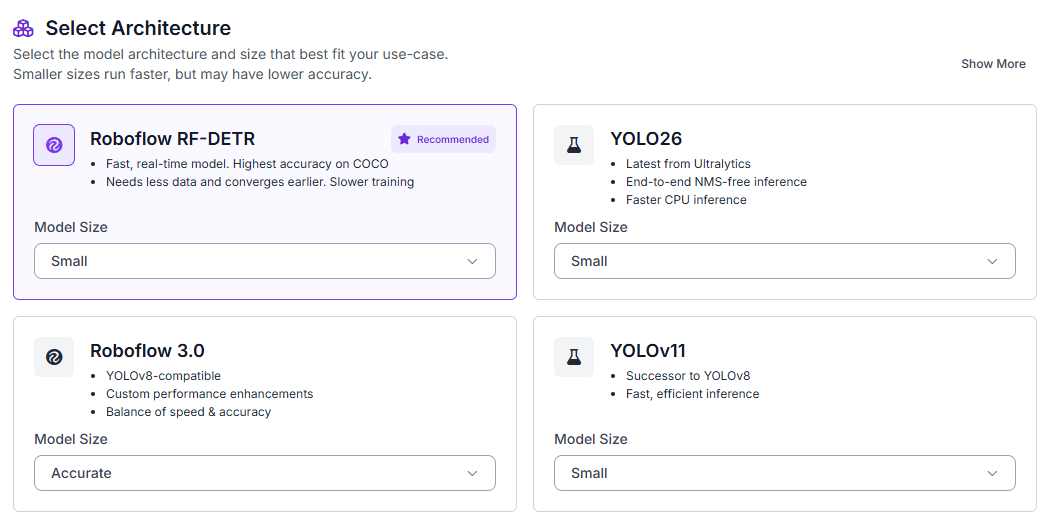
Once the model architecture is selected, generate a new dataset version before starting training. Configure a 70/15/15 split for training, validation, and testing.
Enable the following preprocessing steps:
- Auto-orientation
- Resize (512×512)
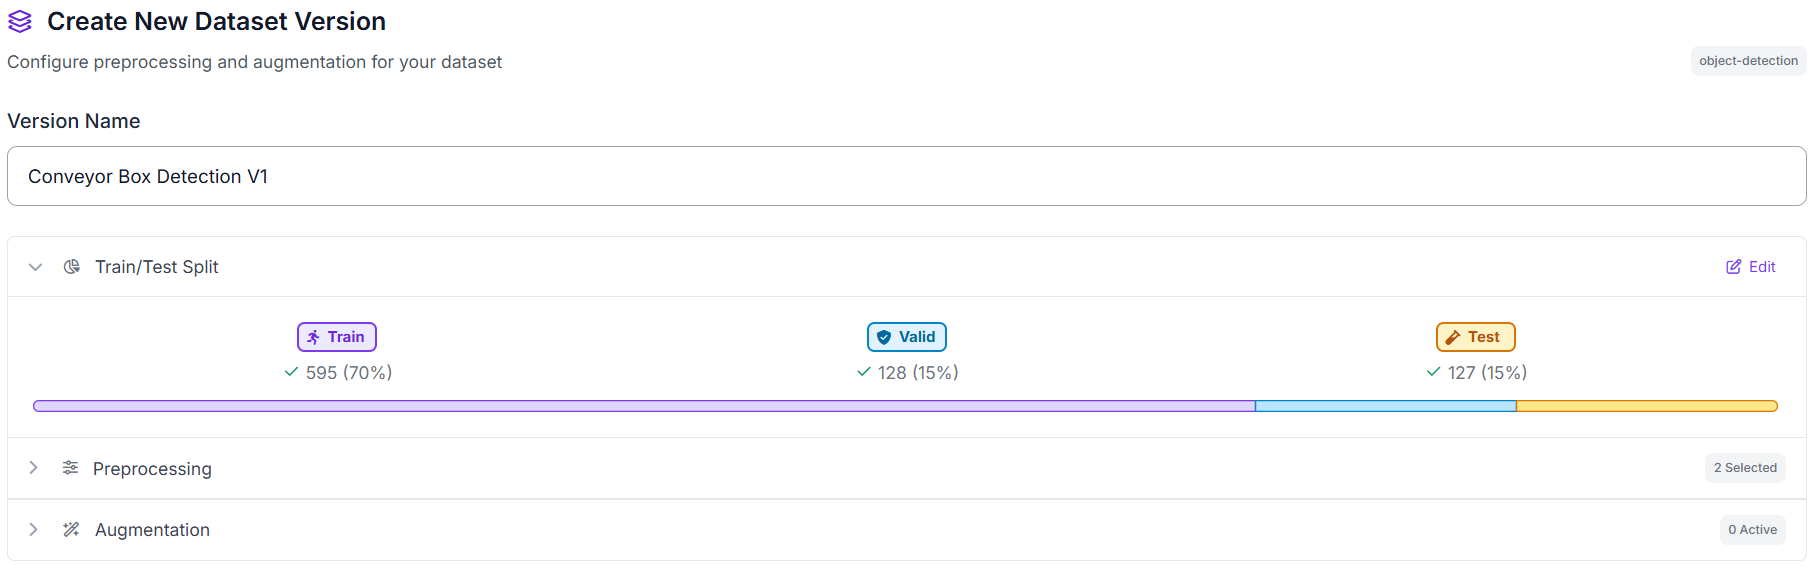
These preprocessing steps normalize the input images while providing a consistent input resolution for RF-DETR training.
Step 2: Train the RF-DETR Model
Once training begins, RF-DETR learns to localize cardboard boxes directly from the annotated examples. Unlike an image classification model that only determines whether a box is present, RF-DETR predicts a bounding box around every detected package, making it well-suited for real-time video analytics.
This localization capability forms the foundation of the remainder of our workflow. The detected bounding boxes are passed to ByteTrack, which assigns a persistent ID to every box as it moves through the conveyor.
Once training is complete, deploy the model in Roboflow Workflows, where it serves as the first stage of our video analytics pipeline. The detector identifies every box entering the scene, ByteTrack maintains a unique ID for each object throughout its journey on the conveyor, and Gemini 2.5 Pro performs AI-powered inspection on each tracked box.
Step 3: Deploy the Model to Workflows
After training, deploy the RF-DETR model in Roboflow Workflows to build the conveyor inspection pipeline. The workflow detects boxes in each frame, assigns a tracker ID to every package, waits until the tracked bounding box is fully inside the frame, and sends the cropped box to Gemini 2.5 Pro for inspection.
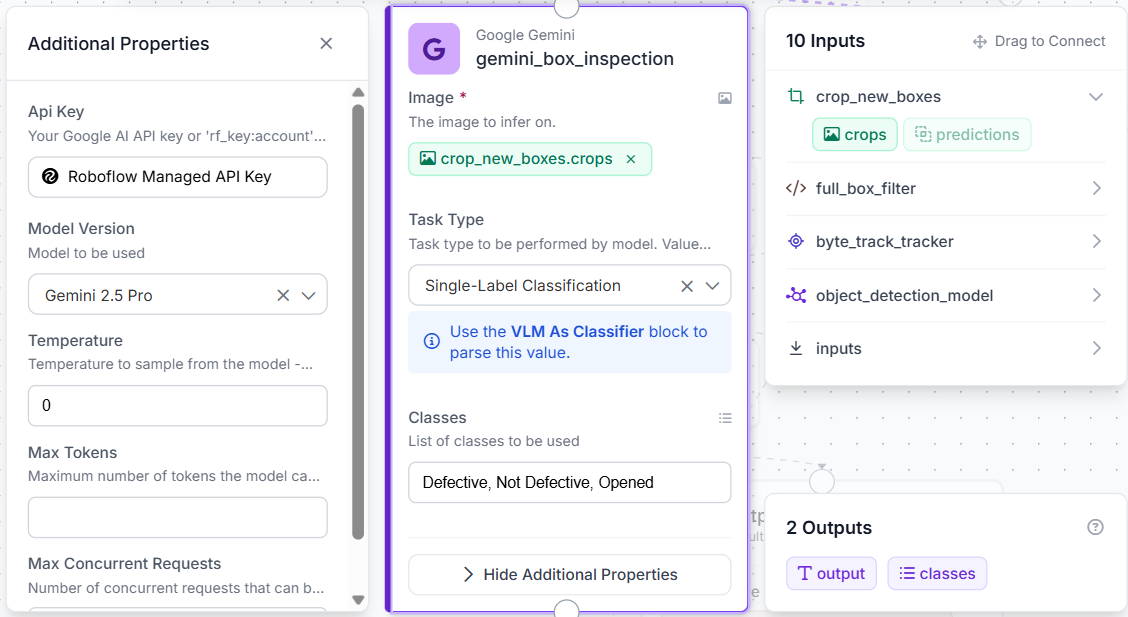
Gemini classifies each package as:
- Defective
- Not Defective
- Opened
The final output draws the box location, tracker ID, and inspection result onto each video frame.
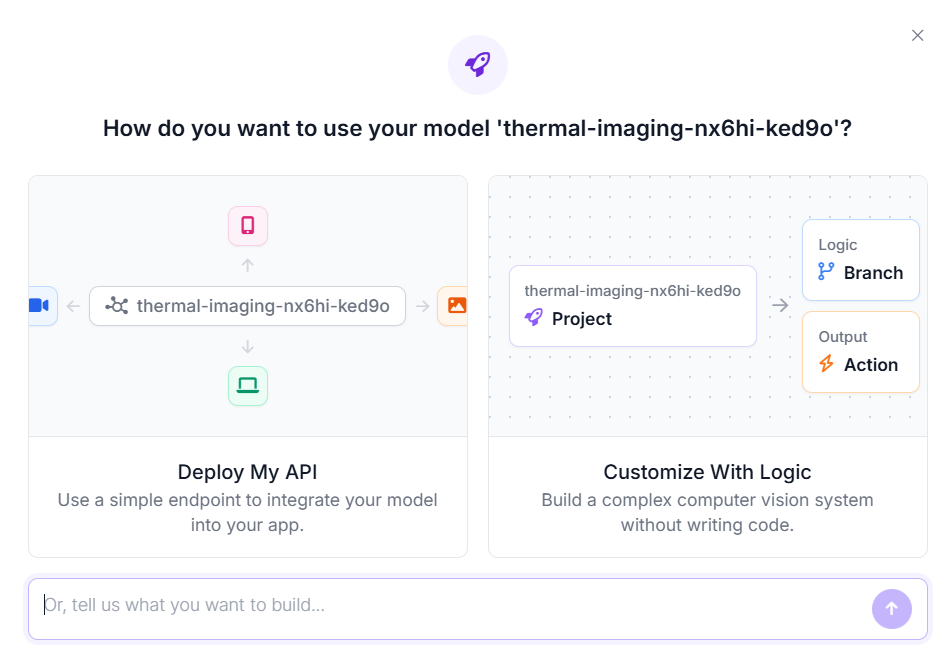
Open the trained model and click Deploy Model. In the deployment window, select Customize With Logic. This opens the Workflow editor with the RF-DETR model already connected to the image input.
Step 4: Configure Box Tracking and Filtering
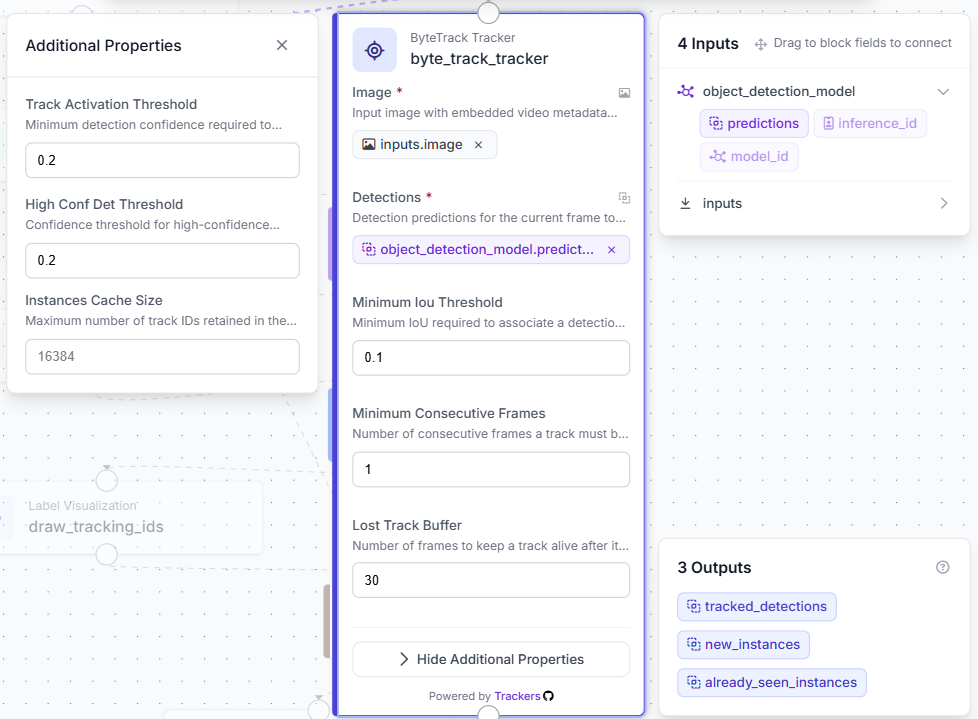
Add a ByteTrack Tracker block after the detection model. Connect the original frame to the image input and the model predictions to the detections input.
ByteTrack assigns a persistent ID to each package as it moves through the video. This allows the workflow to follow the same box across multiple frames and distinguish it from other packages on the conveyor.
Next, add the custom Full Box Filter block. Connect the original frame to its image input and the ByteTrack tracked detections to its predictions input.
Boxes often enter the frame partially. Inspecting them too early can produce an unreliable result because Gemini cannot see the full package. The filter only passes boxes whose bounding box is safely inside the frame and larger than 20 pixels in both dimensions.
The block also keeps a small margin between the box and the image border. Boxes touching the edge remain visible in the tracking output, but are not sent for inspection yet.
The code for the block:
def run(self, image, predictions):
    if hasattr(image, 'numpy_image'):
        img = image.numpy_image
    else:
        img = np.array(image)
    h, w = img.shape[:2]
    margin = max(12, int(0.02 * min(h, w)))

    xyxy = getattr(predictions, 'xyxy', [])
    mask = []
    for box in xyxy:
        x1, y1, x2, y2 = [float(v) for v in box]
        is_full = (
            x1 > margin and
            y1 > margin and
            x2 < (w - margin) and
            y2 < (h - margin) and
            (x2 - x1) > 20 and
            (y2 - y1) > 20
        )
        mask.append(is_full)


    full = predictions[np.array(mask, dtype=bool)]

    return {'full_detections': full}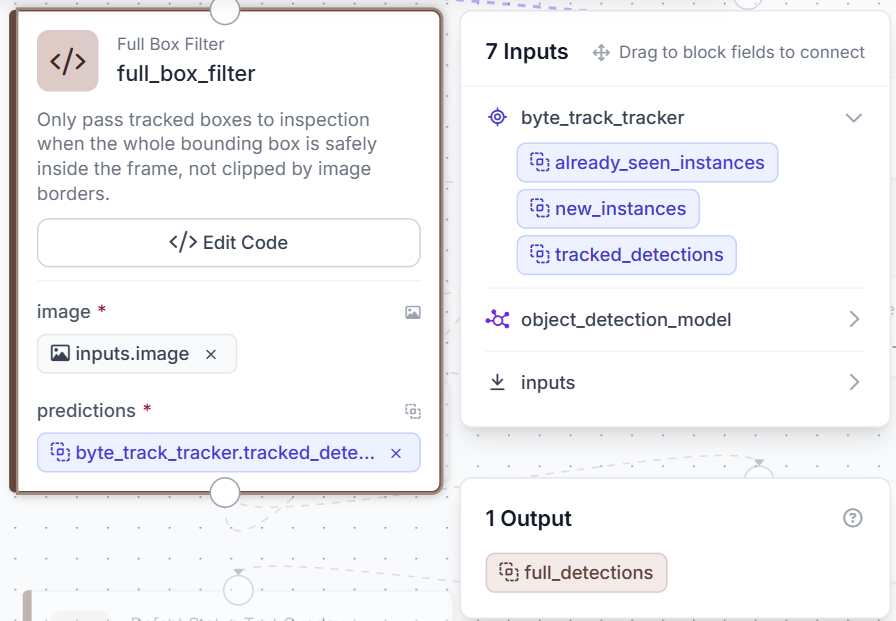
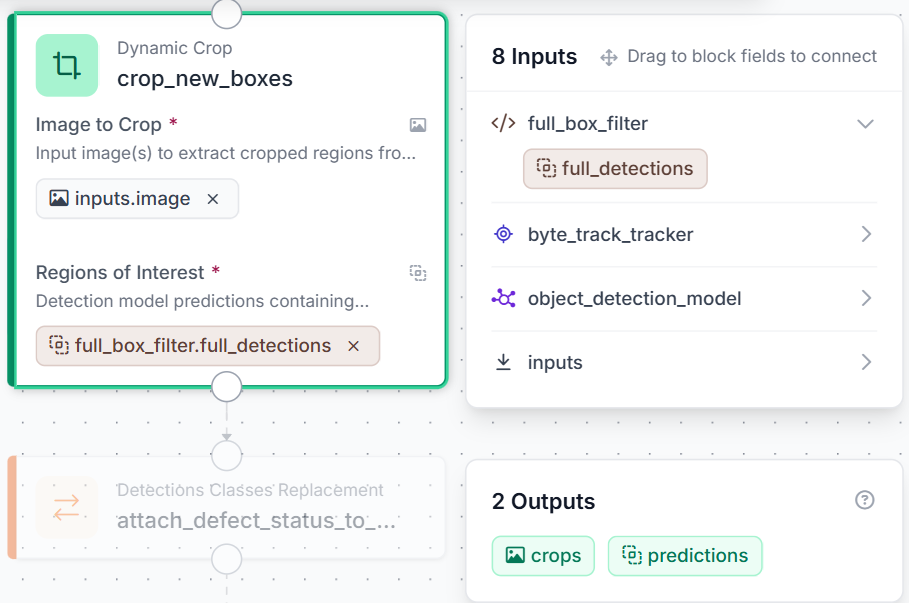
Add a Dynamic Crop block after the filter. Use the original frame as the image input and full_box_filter.full_detections as the predictions input. The block uses each accepted bounding box to crop the corresponding package from the frame.
Step 5: Configure Gemini Inspection
Add a Google Gemini block after Dynamic Crop, it receives an individual box crop instead of the full conveyor frame. This keeps the inspection focused on the visible condition of one package.
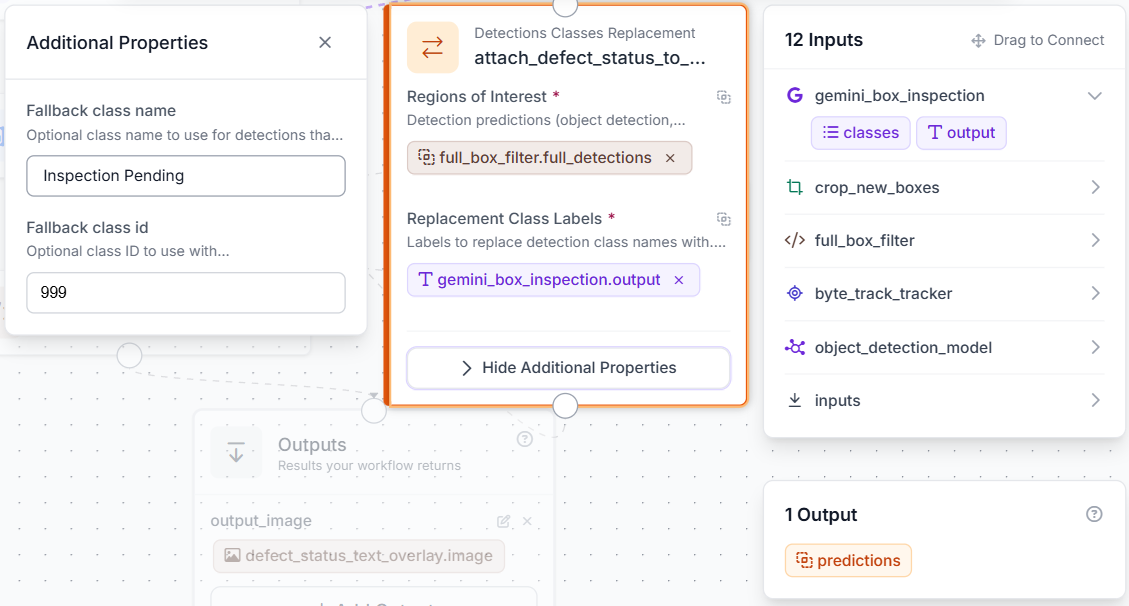
Add a Detections Classes Replacement block next. It attaches the inspection result to the corresponding tracked detection while preserving its box coordinates and tracker ID.
Step 6: Draw and Test the Results
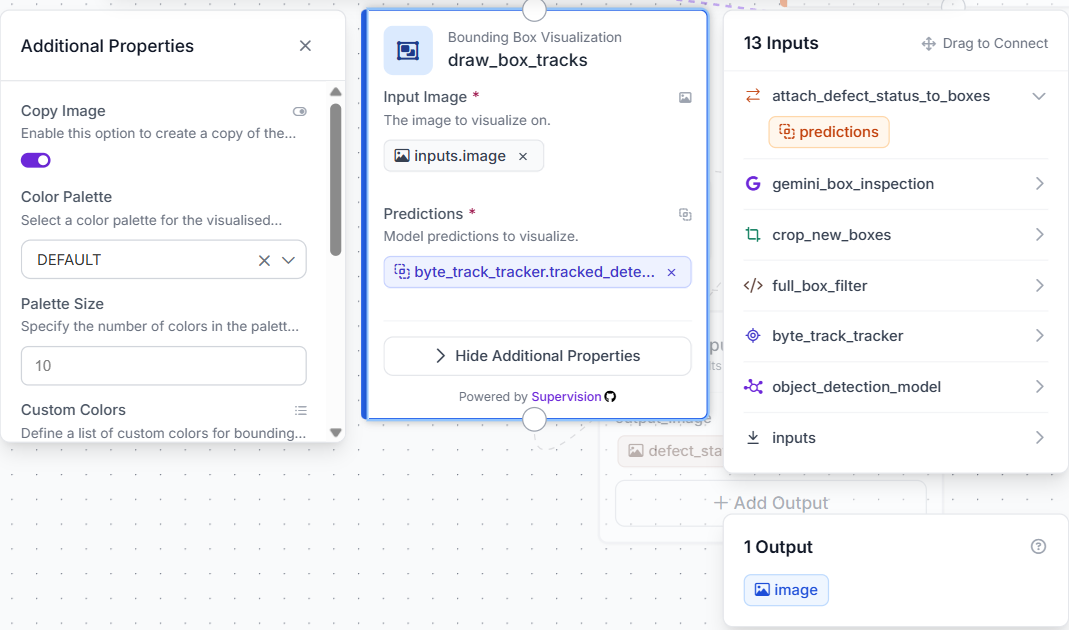
Add a Bounding Box Visualization block using all ByteTrack detections. This draws boxes around every tracked package, including boxes that have not yet passed the full-box filter.
Add a Label Visualization block after it and configure the text as Tracker Id. Place the label in the top-left corner of each box.
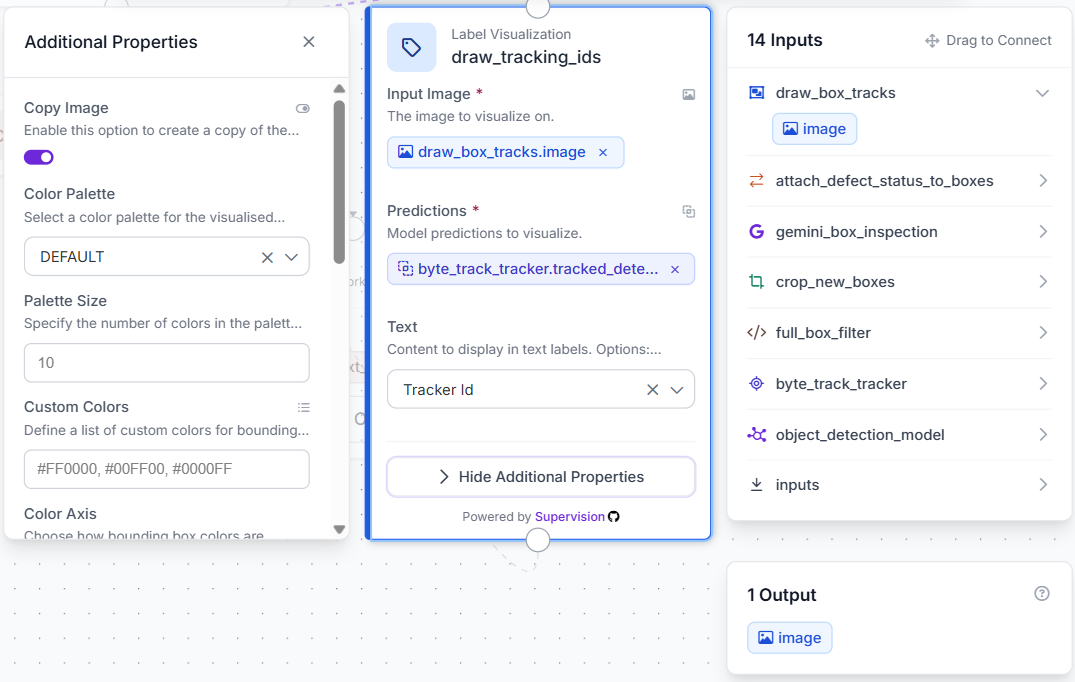
Finally, add the custom Defect Status Text Overlay block. It receives all tracked detections and the inspected detections.
The code used for this block:
def run(self, image, all_predictions, inspection_predictions):
    from inference.core.workflows.execution_engine.entities.base import WorkflowImageData

    if not hasattr(self, "status_by_tracker_id"):
        self.status_by_tracker_id = {}

    original = image if hasattr(image, "numpy_image") else None
    img = image.numpy_image.copy() if original else np.array(image).copy()
    img = np.clip(img, 0, 255).astype(np.uint8)

    def get_tracker_ids(detections):
        ids = getattr(detections, "tracker_id", None)

        if ids is None:
            data = getattr(detections, "data", {}) or {}
            ids = data.get("tracker_id", data.get("track_id", []))

        result = []
        for tracker_id in ids:
            try:
                tracker_id = int(tracker_id)
                result.append(tracker_id if tracker_id >= 0 else None)
            except (TypeError, ValueError):
                result.append(None)

        return result

    def get_labels(detections):
        data = getattr(detections, "data", {}) or {}
        labels = data.get("class_name", [])

        if len(labels) == 0:
            labels = getattr(detections, "class_name", [])

        return list(labels)

    valid_labels = {
        "defective": "Defective",
        "not defective": "Not Defective",
        "opened": "Opened",
    }

    inspected_ids = get_tracker_ids(inspection_predictions)
    inspected_labels = get_labels(inspection_predictions)

    for tracker_id, raw_label in zip(inspected_ids, inspected_labels):
        if tracker_id is None or tracker_id in self.status_by_tracker_id:
            continue

        label = valid_labels.get(
            str(raw_label).strip().lower().replace("_", " ")
        )

        if label:
            self.status_by_tracker_id[tracker_id] = label
    colors = {
        "Defective": (0, 0, 255),
        "Not Defective": (0, 180, 0),
        "Opened": (0, 165, 255),
    }

    boxes = getattr(all_predictions, "xyxy", [])
    tracker_ids = get_tracker_ids(all_predictions)
    height, width = img.shape[:2]

    for box, tracker_id in zip(boxes, tracker_ids):
        label = self.status_by_tracker_id.get(tracker_id)
        if not label:
            continue
        x1, _, _, y2 = [int(round(float(value))) for value in box]
        x = max(0, min(width - 1, x1))
        y = max(20, min(height - 1, y2 - 8))

        font = cv2.FONT_HERSHEY_SIMPLEX
        scale = 0.8
        thickness = 2
        color = colors[label]

        (text_width, text_height), baseline = cv2.getTextSize(
            label, font, scale, thickness
        )
        cv2.rectangle(
            img,
            (x, max(0, y - text_height - baseline - 8)),
            (
                min(width - 1, x + text_width + 10),
                min(height - 1, y + baseline + 4),
            ),
            color,
            -1,
        )

        cv2.putText(
            img,
            label,
            (x + 5, y - 4),
            font,
            scale,
            (255, 255, 255),
            thickness,
            cv2.LINE_AA,
        )

    output_image = (
        WorkflowImageData.copy_and_replace(
            origin_image_data=original,
            numpy_image=img,
        )
        if original is not None
        else img
    )

    return {"image": output_image}
Step 7: Test the Workflow
Click Run and upload a conveyor video. Check that:
- Every visible package receives a tracker ID.
- Partially visible boxes are not inspected.
- The inspection label appears after the full box enters the frame.
- Different boxes keep separate IDs and results.
Use Roboflow Agent for Video Analytics with Vision AI
If you'd rather not add each block by hand, use Roboflow Agent. Instead of configuring blocks one at a time, you describe the pipeline you want in plain text and the Agent builds it for you. Here's an example:
Real-Time Video Analytics with Vision AI Conclusion
In this tutorial, we built an automated conveyor box inspection workflow using Roboflow. We trained an RF-DETR model to detect packages, used ByteTrack to follow each box across video frames, and added Gemini 2.5 Pro to classify boxes as Defective, Not Defective, or Opened.
The workflow waits until a package is fully visible before inspection. It can be extended with fixed conveyor cameras, alert systems, or reporting tools to support continuous package monitoring.
Further reading
- How to Train RF-DETR on a Custom Dataset
- What is ByteTrack? A Deep Dive
- Video Object Counting: A Step-by-Step Guide
Video Analytics with Vision AI FAQ
How does AI video analytics work?
Most systems run three stages. An object detection model localizes each object in every frame, a tracker assigns a persistent ID and follows each object across frames, and an inspection or classification model evaluates each tracked object. In this tutorial that maps to RF-DETR for detection, ByteTrack for tracking, and Gemini 2.5 Pro for inspection, all connected in a single Roboflow Workflow.
What is the difference between video analytics and computer vision?
Computer vision is the broader field of getting models to understand images. Video analytics is the application of computer vision to video streams specifically, adding the time dimension, so tracking objects across frames and analyzing behavior over time matter as much as recognizing them in a single image.
Can video analytics with vision AI run in real time?
Yes. With an efficient detector like RF-DETR and a lightweight tracker like ByteTrack, the detection and tracking stages run frame by frame at production speed. Heavier multimodal inspection is applied selectively, in this workflow only once a box is fully inside the frame, which keeps the pipeline fast while still inspecting every package.
Do I need to write code to build a video analytics pipeline?
No. You can build the entire detect, track, inspect pipeline visually in Roboflow Workflows by connecting blocks, or describe it in plain language to Roboflow Agent and have it assembled for you. Custom logic blocks are available when you need them, but they are optional.


Cite this Post
Use the following entry to cite this post in your research:
Mostafa Ibrahim. (Jun 29, 2026). Video Analytics with Vision AI. Roboflow Blog: https://blog.roboflow.com/video-analytics-with-vision-ai/