
A two-stage detector is an object detection model that solves detection in two steps. First, it finds possible object regions. Then, it classifies and refines those regions. This design makes two-stage detectors accurate and reliable, especially in complex scenes where objects are small, overlapping, or difficult to separate from the background.
Object detection is one of the most important tasks in computer vision. It is used when a model needs to identify objects in an image and also locate where those objects are present. Unlike image classification, where the model predicts a single label for the whole image, object detection must find multiple objects, assign class names, and draw bounding boxes around them.
Different object detection models solve this problem in different ways. Some models detect objects in a single step, while others divide the task into two steps. These two approaches are commonly known as one-stage detectors and two-stage detectors.
In this blog, I will cover:
- What object detection is.
- Why object detection is harder than image classification.
- What a two-stage detector is.
- How the two-stage detector architecture works.
- Examples of two-stage detectors.
- Two-stage vs. one-stage detectors.
- How to train a two-stage detector.
The Object Detection Problem
Object detection means identifying what objects are present in an image and where they are located. The output is usually a set of bounding boxes, class labels, and confidence scores.
This makes object detection harder than image classification. In image classification, the model usually predicts one label for the whole image, such as “person” “car,” or “bus.” In object detection, the model must solve several problems at once.
It must find multiple objects in the same image, even when they overlap. It must detect objects at different scales, such as a large car close to the camera and a small car far away. It must also handle cluttered backgrounds, lighting changes, partial occlusion, and similar-looking objects.
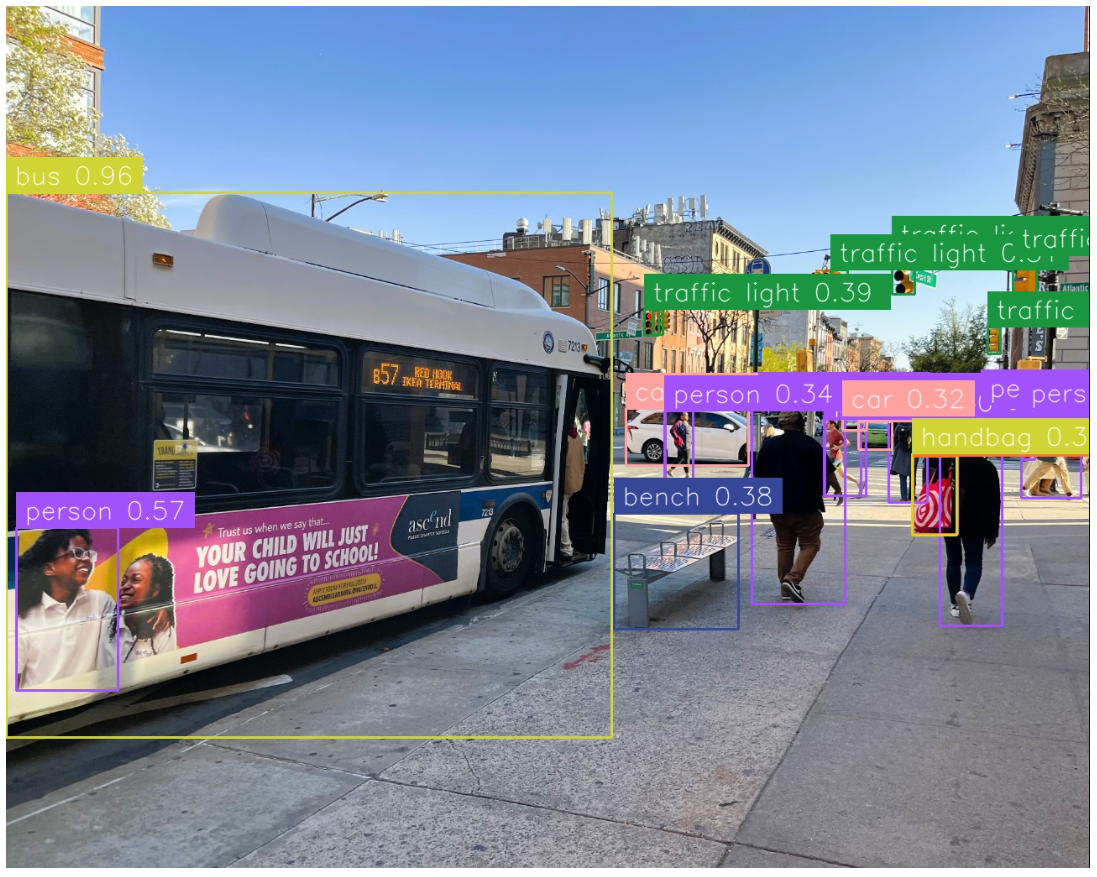
For example, in a traffic image, an object detection model may need to detect cars, bus, pedestrians, traffic lights, and road signs at the same time. Each object needs its own bounding box and class name. This is why object detection requires both localization and classification, while image classification mainly focuses on recognition.
What Is a Two-Stage Detector?
A two-stage detector is an object detection model that finds objects in two main steps. First, it identifies possible regions in an image where objects may be present. Then, it classifies those regions and refines their bounding boxes. In simple terms, a two-stage detector first asks:
“Where are the possible objects?”
Then it asks:
“What object is present in each region, and where exactly is it located?”
This design separates the detection process into region proposal and final object detection. Because the model checks selected regions more carefully, two-stage detectors are often known for strong localization accuracy. However, they can be slower than one-stage detectors because they require an additional region proposal step.
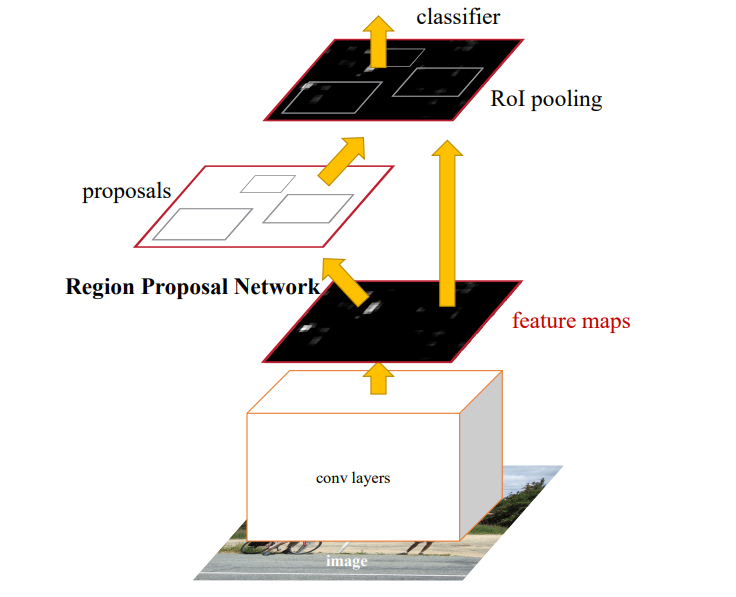
Most deep learning-based object detectors contain two major parts, a backbone network and a head network. The backbone network extracts useful visual features from the input image. The head network uses those features to predict object classes and bounding boxes. The backbone can be CNN-based or transformer-based, while the head network decides whether the detector follows a one-stage or two-stage structure.
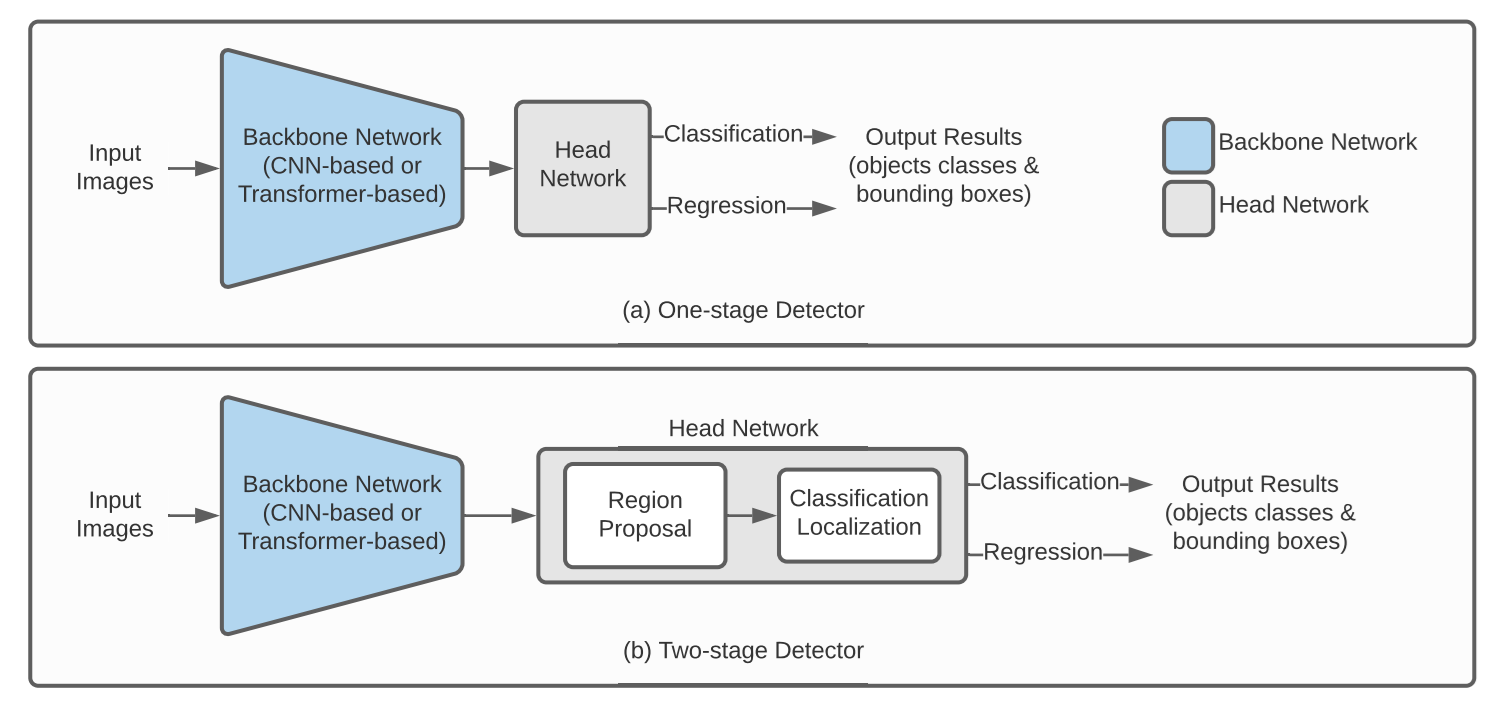
Backbone: Feature Extraction
The backbone network processes the input image and converts it into a feature map. This feature map contains important visual information such as edges, shapes, textures, and higher-level object patterns.
The backbone itself does not produce the final detections. Instead, it acts as the feature extractor for the rest of the detector. Both the region proposal step and the final detection step use features from this backbone output.
For example, in a model such as Faster R-CNN, the image is passed through the backbone once. The detector then uses the extracted feature map to find possible object regions and classify them. This is more efficient than running a separate feature extractor on every possible image region.
Stage 1: Region Proposal
The first stage in a two-stage object detector is region proposal. In this stage, the model uses the feature map produced by the backbone network to identify areas that are likely to contain objects. These candidate areas are called region proposals or Regions of Interest (ROIs).
At this point, the model does not focus on determining the exact object class. Instead, it mainly tries to answer:
“Is there an object-like thing in this area?” and “Roughly where might the object be?”
This is often called objectness and coarse localization. This step is important because it reduces the search space. Instead of analyzing every possible location in the image with full detail, the model focuses on a smaller set of promising regions. These region proposals are then passed to the second stage, where the model performs detailed classification and bounding box refinement.
Stage 2: Classification and Localization
After the Region Proposal Network (RPN) generates candidate regions in the first stage, the second stage processes these proposals more thoroughly. This stage performs two parallel tasks:
- Classification: It predicts the class of the object, such as person, car or bus.
- Localization / Regression: It refines the bounding box so that it fits the object more accurately.
The classification branch answers:
“What object is this?”
The regression branch answers:
“How should the bounding box be adjusted?”
Together, these outputs produce the final object detection result, object class labels, confidence scores, and bounding boxes.
Why Does The Two-Stage Design Work?
The two-stage design works because it breaks object detection into a more focused process. The first stage quickly finds possible object regions. The second stage spends more attention on those selected regions to classify objects and improve bounding box accuracy. This makes two-stage detectors useful when accuracy and precise localization are important. They can perform well in complex scenes, small object detection, dense object detection, and cases where bounding box quality matters.
However, the extra stage also adds computational cost. Because the model has to generate and process many region proposals, two-stage detectors usually have longer inference time than one-stage detectors. Two-stage detectors generally have higher accuracy, but their inference time tends to be longer because of the additional region processing.
Examples of Two-Stage Detectors
The R-CNN family represents the primary lineage of two-stage detectors. Each generation solved a specific bottleneck in the one before it.
R-CNN
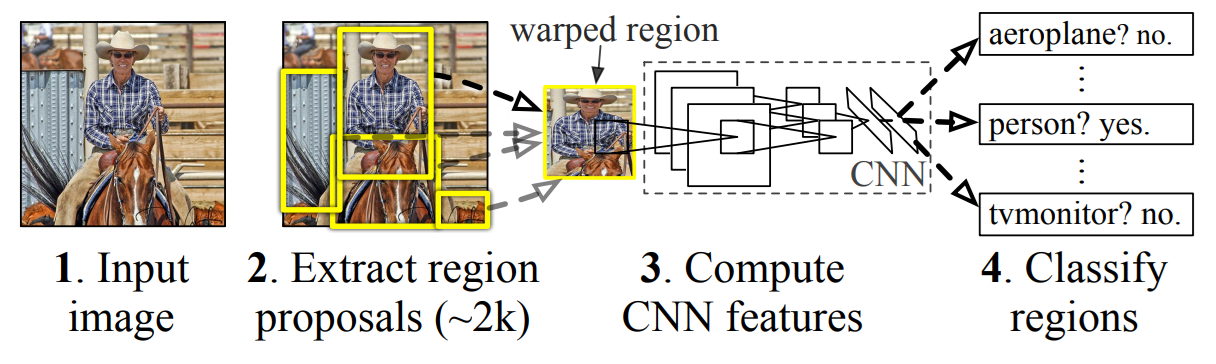
R-CNN was one of the first successful deep learning based two-stage object detectors. It used an external method to generate region proposals, then passed each region through a CNN to extract features. These features were then used for classification and bounding box refinement. R-CNN was accurate for its time, but it was slow because each region proposal had to be processed separately.
Fast R-CNN
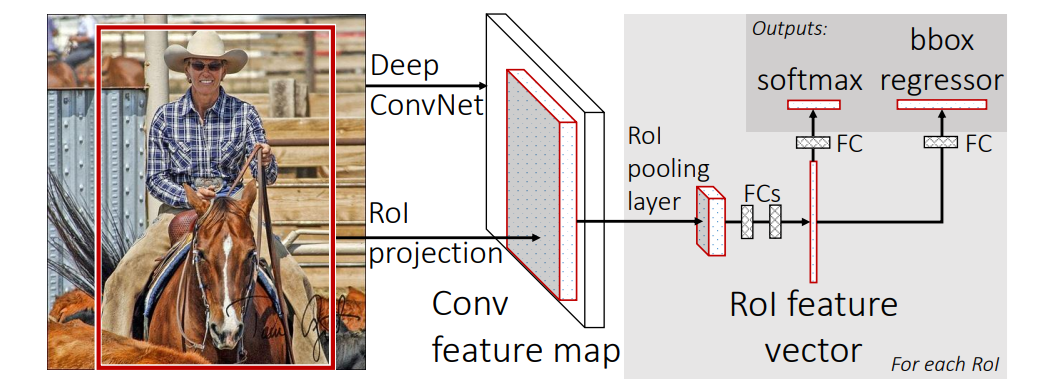
Fast R-CNN improves R-CNN by passing the full image through the CNN only once to create a shared feature map. Then, instead of running a CNN separately on every region proposal, it extracts features for each proposed region from this shared feature map using RoI Pooling. After that, the model classifies the object and refines the bounding box. In simple words, Fast R-CNN makes R-CNN faster by sharing CNN features for the whole image.
Faster R-CNN
Faster R-CNN improves Fast R-CNN by adding a Region Proposal Network, or RPN. Instead of using an external method to generate region proposals, the RPN learns to suggest possible object regions directly from the shared feature map. These proposed regions are then passed to the detection head for classification and bounding box refinement. In simple words, Faster R-CNN makes the region proposal step part of the neural network itself.
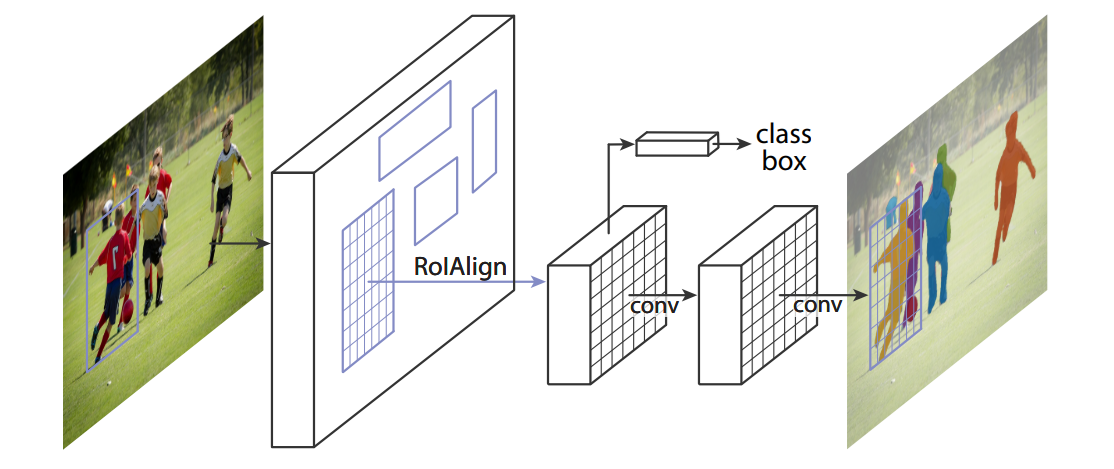
Mask R-CNN
Mask R-CNN extends Faster R-CNN by adding one more branch for segmentation masks. It still uses region proposals, classification, and bounding box refinement, but it also predicts a pixel-level mask for each detected object. This means Mask R-CNN can tell not only where an object is, but also the exact shape of the object inside the bounding box. In other words, Mask R-CNN is Faster R-CNN with an extra mask prediction step.
Two-Stage vs. One-Stage Detectors
Two-stage detectors and one-stage detectors solve the same object detection problem, but they approach it differently.
A two-stage detector first generates region proposals and then classifies them. This usually gives strong accuracy, especially when objects are small, overlapping, or difficult to separate from the background. The trade-off is that two-stage detectors are often slower and more complex.
A one-stage detector predicts bounding boxes and class labels directly in a single forward pass. Models such as YOLO and SSD follow this style. They are usually faster and simpler to deploy, which makes them popular for real-time applications.
| Feature | Two-Stage Detector | One-Stage Detector |
|---|---|---|
| Detection flow | Region proposal + classification | Direct prediction |
| Main strength | Accuracy and careful localization | Speed and deployment simplicity |
| Common examples | R-CNN, Fast R-CNN, Faster R-CNN, Mask R-CNN | YOLO, SSD, RetinaNet |
| Best suited for | Accuracy-focused tasks, complex scenes, small objects | Real-time detection, edge deployment, video analytics |
| Limitation | Slower and more complex | May need more tuning for difficult small-object cases |
Training a Two-Stage Detector
To train a two-stage detector, we first need a properly prepared object detection dataset. In this workflow, Roboflow is used for dataset creation, annotation, preprocessing, versioning, and export. The actual model training is done in a Colab notebook using Faster R-CNN, a common two-stage detector.
Step 1: Create an Object Detection Project in Roboflow
Start by creating a new project in Roboflow and choose Object Detection as the project type. For this example, the project contains surgical tool images, where each tool is labeled with a bounding box and a class name.
Step 2: Upload and Annotate Images
After creating the project, upload your images to Roboflow. Then annotate each object using bounding boxes. Each bounding box should tightly cover the object you want the model to detect.
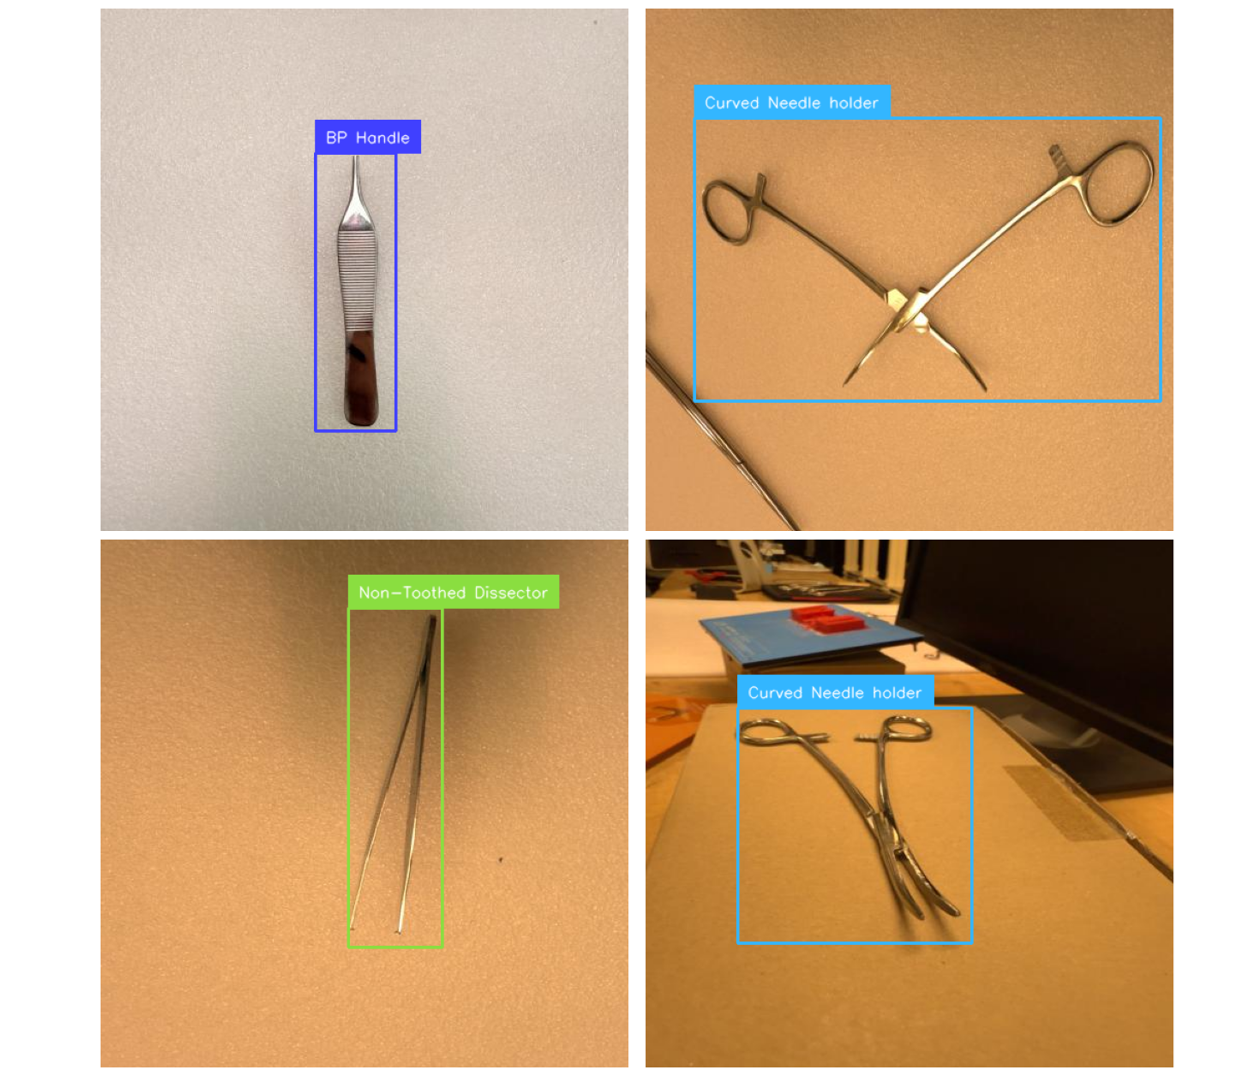
For example, if an image contains multiple surgical tools, each tool should be labeled separately. Roboflow Annotate provides tools for drawing, editing, and assigning labels to bounding boxes. The classes in this dataset are:
- Babcock Tissue Forceps
- BP Handle
- Curved Mayo Scissors
- Curved Needle holder
- Dressing Scissors
- Mayo Metzenbum Scissors
- Mayo Needle Holder
- Non-Toothed Dissector
- Right-Angled Needle Holder
- Toothed Dissector
Annotating the dataset in Roboflow
Step 3: Generate a Dataset Version
Once annotation is complete, generate a dataset version in Roboflow. A dataset version is a fixed snapshot of your images, annotations, preprocessing, and augmentation settings. This is useful because it keeps training reproducible. Later, if you add more images or fix labels, you can create a new version and compare model performance across versions.
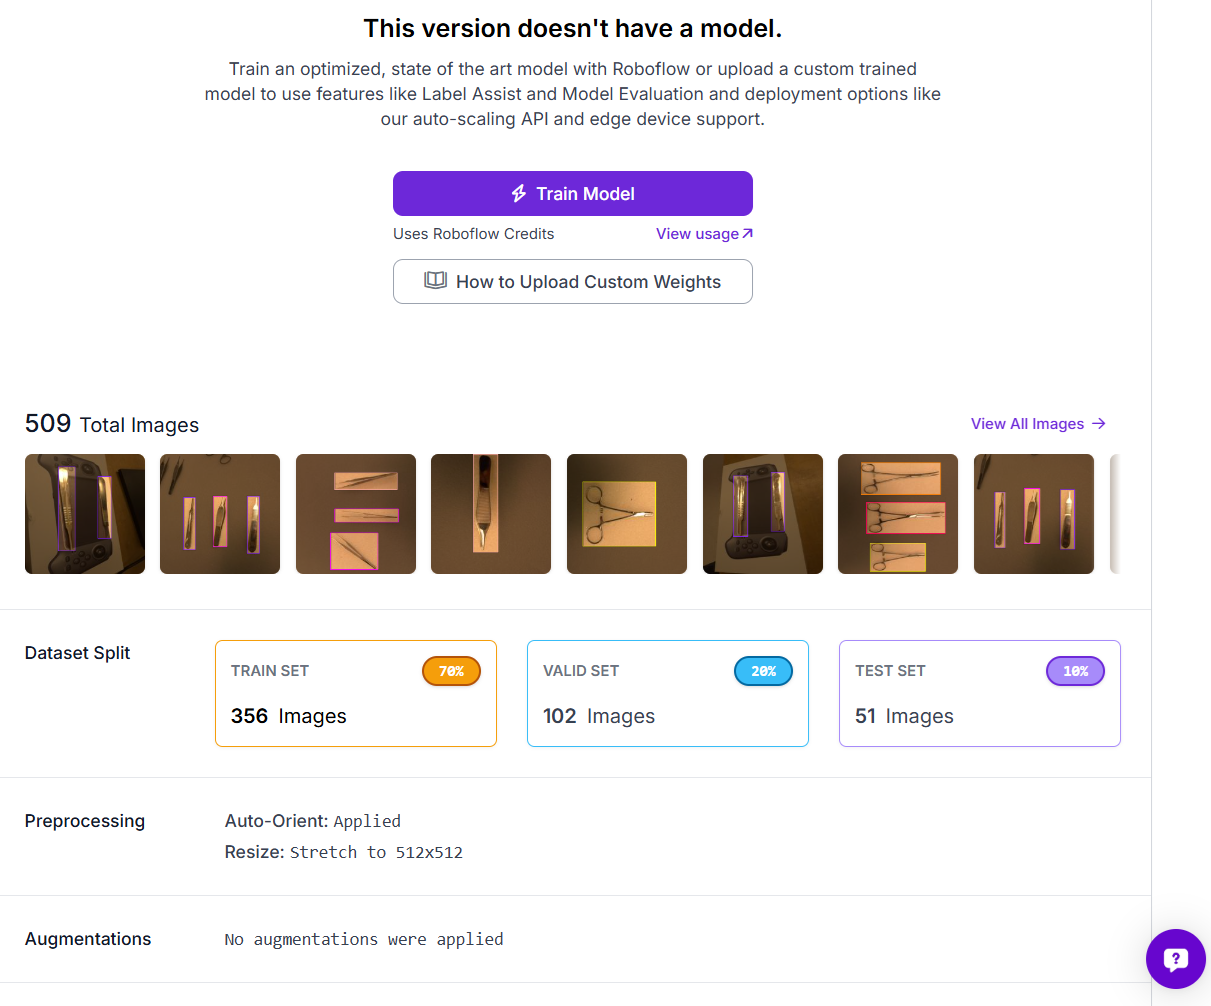
Step 4: Export the Dataset in COCO Format
For Faster R-CNN training, export the dataset in COCO format. COCO is commonly used for object detection because it stores image information, class labels, and bounding box annotations in a structured JSON file. Roboflow allows dataset versions to be exported from the web interface or through the Python package.
In Colab, the dataset can be downloaded with the Roboflow Python package:
from roboflow import Roboflow

rf = Roboflow(api_key="YOUR_ROBOFLOW_API_KEY")
project = rf.workspace("tim-4ijf0").project("surgical-tools-yotlv-nvvoh")
version = project.version(2)

dataset = version.download("coco")
For a public blog or notebook, avoid hardcoding your API key. Use getpass() or Colab Secrets instead.
Step 5: Inspect the Dataset Before Training
Before training, inspect the dataset to make sure the annotations are correct. In the Colab notebook, the class names and object counts are read automatically from the COCO annotation file. This helps you check whether the dataset is balanced. If one class has very few examples, the model may not learn that class well.
The example notebook also displays a few sample images with bounding boxes using the Roboflow Supervision library. Supervision can annotate images with bounding boxes, labels, and detections, which makes it useful for checking both ground truth labels and model predictions.
Step 6: Train Faster R-CNN in Colab
For training, I used Faster R-CNN with a ResNet-50-FPN backbone from Torchvision. Faster R-CNN is a two-stage detector. A Region Proposal Network (RPN) first suggests areas likely to contain objects, then those proposals are classified and their boxes refined in the second stage. This is the key difference from single-stage models like YOLO, which predict classes and boxes in one pass.
The backbone extracts features from raw pixels. Here it consists of ResNet-50 paired with a Feature Pyramid Network (FPN), which generates multi-scale features to handle both small and large objects effectively. Torchvision provides this stack pretrained on COCO, so most of the network is reused, and only the final prediction head is replaced for the custom classes.
import torchvision
from torchvision.models.detection.faster_rcnn import FastRCNNPredictor

# num_classes = number of object classes + 1 background class
# Faster R-CNN reserves label 0 for background
num_classes = len(class_names) + 1

# Load pretrained Faster R-CNN with ResNet-50-FPN
model = torchvision.models.detection.fasterrcnn_resnet50_fpn(weights="DEFAULT")

# Replace the box predictor head
in_features = model.roi_heads.box_predictor.cls_score.in_features
model.roi_heads.box_predictor = FastRCNNPredictor(in_features, num_classes)

model.to(device)
Only the second-stage box predictor (classification + bounding box regression head) is replaced. The backbone, FPN, and Region Proposal Network keep their pretrained weights, enabling much faster fine-tuning. Remember that Faster R-CNN treats label 0 as background, which is why num_classes is the object classes plus one, and the head is sized to num_classes.
Training uses SGD with momentum and weight decay plus a StepLR scheduler, the standard Torchvision detection recipe. Alternatives like AdamW with cosine annealing also work well. The model returns four losses per step (classification & box regression from the detection head, plus objectness & box regression from the RPN), which are summed for backpropagation.
After each epoch, validation is performed with TorchMetrics MeanAveragePrecision, providing mAP, mAP@50, mAP@75, and mAR@100. All metrics and losses are logged to TensorBoard. Start with a few epochs to verify the pipeline, then increase once loss is decreasing and mAP is improving. The full training loop is available in the example notebook.
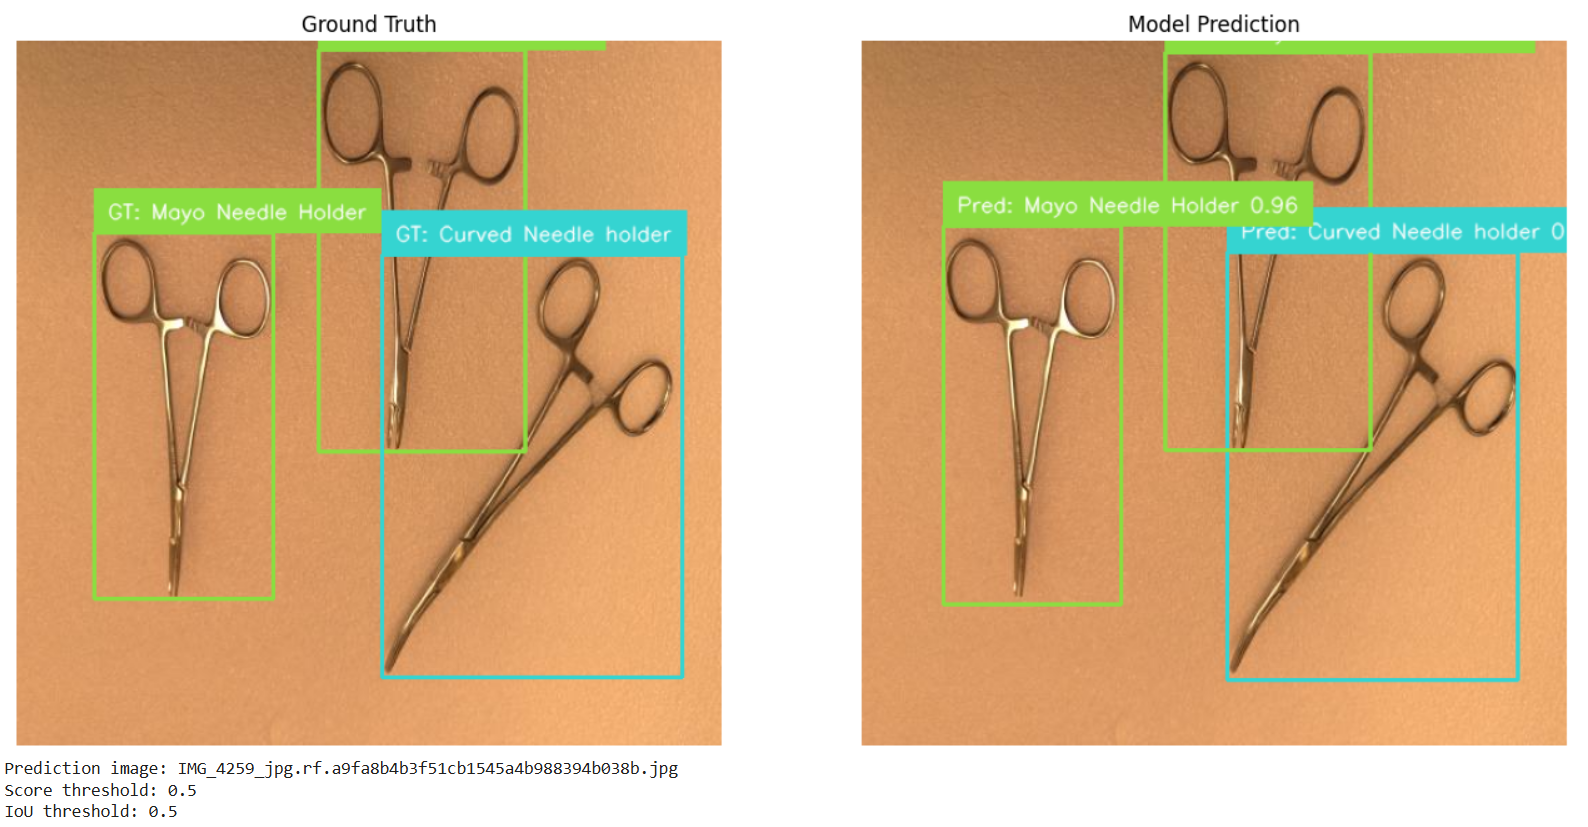
Step 7: Evaluate and Test the Model
After training, the model is evaluated on the validation or test set using object detection metrics such as:
- mAP
- mAP@50
- mAP@75
The notebook also runs prediction on one test image and compares the result with the ground truth annotations. This makes it easier to visually check whether the model is detecting the correct tools and placing bounding boxes accurately.
Two-Stage Detector Conclusion
A two-stage detector is an object detection model that solves detection in two steps. First, it finds possible object regions. Then, it classifies and refines those regions. This design makes two-stage detectors accurate and reliable, especially in complex scenes where objects are small, overlapping, or difficult to separate from the background.
The R-CNN family shows how this idea evolved. R-CNN introduced region-based CNN detection, Fast R-CNN made the process faster with shared feature maps, Faster R-CNN introduced the Region Proposal Network, and Mask R-CNN extended the idea to instance segmentation.
For practical projects, Roboflow is useful for preparing the dataset by creating an object detection project, uploading images, annotating with bounding boxes, generating dataset versions, applying preprocessing and augmentation, and exporting in training-ready formats. The actual two-stage detector, such as Faster R-CNN, can then be trained in a Colab notebook using the exported dataset.
Cite this Post
Use the following entry to cite this post in your research:
Timothy M. (Jul 1, 2026). What Is A Two-Stage Detector?. Roboflow Blog: https://blog.roboflow.com/what-is-a-two-stage-detector/