

This guide walks through training a Faster R-CNN style object detection model on your own dataset, end to end, entirely in Roboflow. You upload images, label them, generate a dataset version, and train a model in the cloud with no GPU to set up and nothing to install.
The model you train is RF-DETR, a real-time transformer-based detector that fine-tunes quickly, hits state-of-the-art accuracy, and ships under a permissive Apache 2.0 license so you can take it to production without licensing friction.
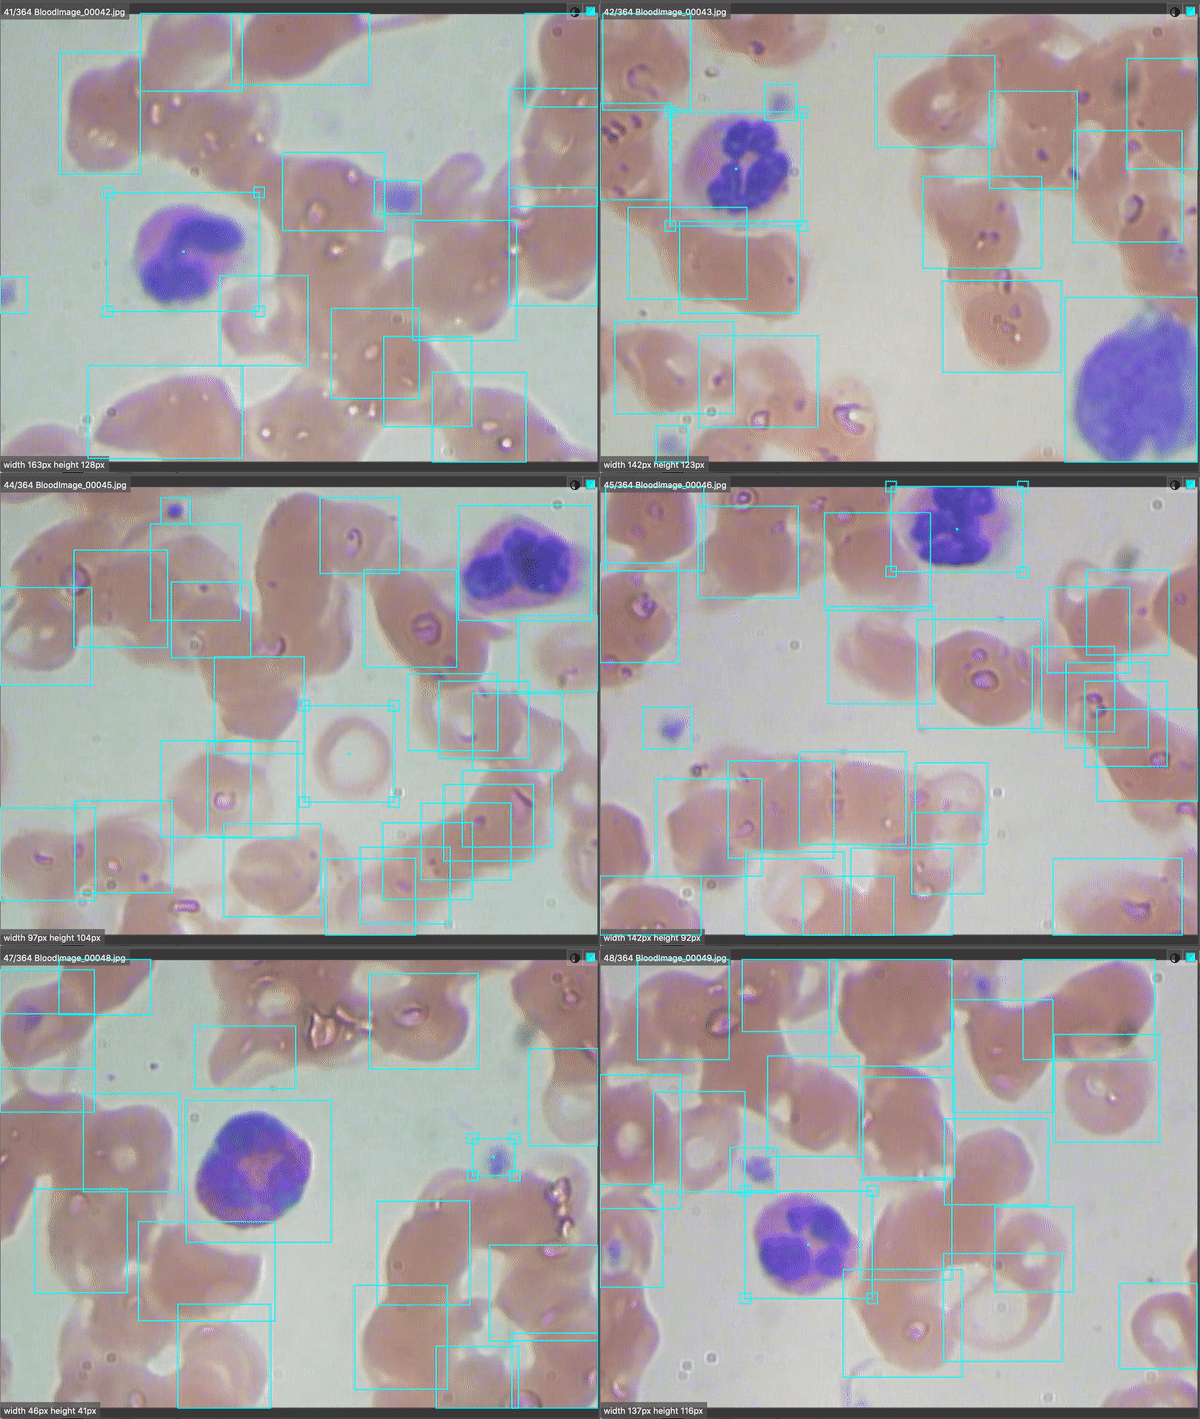
The worked we'll use is the Blood Cell Count and Detection (BCCD) dataset, a set of microscope images labeled with red blood cells, white blood cells, and platelets. The workflow is identical for any detection problem, so you can swap in your own images at any point.
What is Faster R-CNN?
Faster R-CNN is a two-stage object detection architecture introduced in 2015. It became one of the most cited detectors in computer vision because it made region-based detection fast enough to be practical.
How the Faster R-CNN architecture works
The first stage is a Region Proposal Network (RPN) that scans the image and proposes regions likely to contain an object. The second stage takes each proposed region, extracts features with a convolutional backbone, and predicts a class label plus a refined bounding box for the object. Training optimizes both the region proposals and the final box regression together, which is what made Faster R-CNN more accurate than the earlier R-CNN and Fast R-CNN designs.
That two-stage approach buys accuracy at the cost of speed. Because every proposed region runs through the classification head, Faster R-CNN is heavier at inference time than single-stage detectors, which is why real-time applications have largely moved to newer architectures.
Where Faster R-CNN fits today
Faster R-CNN is still a solid reference architecture and a good way to understand how region-based detection works. For building a model you plan to deploy, though, transformer-based detectors now match its accuracy while running fast enough for real-time use.
That is why this tutorial trains RF-DETR. Roboflow's RF-DETR is a real-time detection transformer that fine-tunes on a custom dataset in a fraction of the time a classic Faster R-CNN training run takes, reaches state-of-the-art accuracy on real-world data, and runs from cloud to edge. You keep the accuracy that made Faster R-CNN popular and gain the speed and deployment path that modern production work needs.
How to think about our vision problem
Our goal is a model that looks at a microscope image and draws a box around every red blood cell, white blood cell, and platelet, labeled by type. Knowing the count and ratio of these cell types is a routine and valuable diagnostic signal, and it is a clean stand-in for any detection task where you need to find and classify many small objects in a single frame.
The BCCD dataset is 364 images with roughly 4,900 labels. That is a small dataset by deep learning standards, which is exactly the point: with transfer learning from a COCO-pretrained checkpoint, you do not need millions of images to get a working detector. A few hundred well-labeled images is often enough to start.
What you need
You need a free Roboflow account, a set of images (yours, or the public BCCD dataset we use here), and a web browser. That is the whole requirement for training. If you later want to run inference from a script, you also need Python installed locally, but the training itself happens in the browser.
Step 1: Create a project
Sign in to Roboflow and create a new project. Give it a name, set the project type to Object Detection, and name the class of thing you are annotating (for BCCD, your classes are RBC, WBC, and Platelets). This project becomes the home for your images, annotations, dataset versions, and trained models.
Step 2: Upload your images
Drag your images into the upload screen. For the BCCD example, you have two shortcuts. You can fork the BCCD dataset from Roboflow Universe, the open library of more than 200,000 datasets and pre-trained models, straight into your workspace so it arrives already labeled. Or you can upload your own raw images and label them in the next step. Universe is worth a look before you start any project, since a public dataset close to your problem can save you hours of collection and labeling.
If you upload your own images, Roboflow reads the annotations if you already have them (in COCO, Pascal VOC, and many other formats) or leaves the images unlabeled for you to annotate directly.
Step 3: Annotate your images
If your images are not yet labeled, label them in Roboflow Annotate. You draw a box around each object and assign it a class. Two features make this much faster than boxing by hand:
Auto Label uses a foundation model to draft annotations across your dataset automatically, so you review and correct rather than start from a blank image. Label Assist lets a model (a public checkpoint or one of your own earlier models) pre-draw boxes on each image as you go, so labeling becomes a matter of confirming and nudging boxes instead of drawing every one.
Good labels matter more than model choice. Check that every object is boxed, that boxes are tight, and that classes are applied consistently. This is where accuracy is won or lost.
Step 4: Generate a dataset version
A version is a frozen snapshot of your labeled images plus the preprocessing and augmentation you choose. Roboflow splits your images into training, validation, and test sets automatically (a common split is about 70 percent train, 20 percent validation, 10 percent test) so your evaluation numbers reflect performance on images the model never saw during training.
Two preprocessing steps are worth applying for almost any dataset. Auto-orient fixes the EXIF orientation mismatch that causes images to train sideways. Resize standardizes image dimensions so training is consistent and efficient.
Augmentation generates additional training images by transforming your existing ones, which expands a small dataset and reduces overfitting. For BCCD, flips and small rotations are reasonable, since a cell has no natural up or down. Be deliberate: only add augmentations that reflect variation your model will actually see in production. Generate the version when you are happy with the settings.
Step 5: Train your model
From your dataset version, start a training job with Roboflow Custom Training. Choose RF-DETR as the architecture and train from the COCO-pretrained checkpoint so the model starts with a strong general understanding of objects and only has to learn your specific classes. This is transfer learning, and it is why a few hundred images is enough. You can read more on how transfer learning works.
Training runs in the cloud on Roboflow's infrastructure, so there is no GPU to provision and no environment to configure. Start the job and you can close the tab; you get notified when it finishes. For most small datasets like BCCD, training completes in well under an hour.
Step 6: Evaluate your model
When training finishes, Roboflow reports how the model performed on the held-out test set. The headline metric for object detection is mean average precision (mAP), which summarizes how well the predicted boxes match the ground truth across all classes and confidence thresholds. Alongside it you get precision (of the boxes the model predicted, how many were correct) and recall (of the objects that were actually there, how many the model found).
Read the per-class breakdown, not just the overall number. BCCD has a heavy class imbalance: there are far more red blood cells than white blood cells or platelets, so a model can post a healthy overall mAP while quietly missing the rarer classes. If a minority class underperforms, that is the signal to collect or label more examples of it rather than to keep tuning.
Treat this as a loop. Evaluate, find the weak class or the confused pair, add or fix labels, generate a new version, and retrain. Two or three passes usually move a model from promising to production-ready, and each pass is cheap because the data work is where the leverage is.
Step 7: Run inference
Once you are happy with the model, run it. The fastest path is the Serverless Hosted API, which serves your trained model so you can send images and get predictions back without deploying anything yourself.
Install the SDK:
pip install inference-sdk supervision
Then run your model on an image. Your model_id is your project name and version number (for example bccd/1), and you pass your API key through an environment variable rather than pasting it into code:
import os
import cv2
import supervision as sv
from inference_sdk import InferenceHTTPClient

client = InferenceHTTPClient(
    api_url="https://serverless.roboflow.com",
    api_key=os.getenv("ROBOFLOW_API_KEY"),
)

# model_id is "project-name/version", e.g. "bccd/1"
result = client.infer("image.jpg", model_id="your-project/1")

image = cv2.imread("image.jpg")
detections = sv.Detections.from_inference(result)

box_annotator = sv.BoxAnnotator()
label_annotator = sv.LabelAnnotator()
annotated = box_annotator.annotate(scene=image.copy(), detections=detections)
annotated = label_annotator.annotate(scene=annotated, detections=detections)
cv2.imwrite("annotated.png", annotated)
This returns the predicted boxes, classes, and confidence scores, and writes an annotated image so you can see the results. The supervision library handles drawing and post-processing so you are not writing box math by hand.
Step 8: Deploy to production
The Serverless Hosted API covers a lot of use cases, but you often need the model to run where the images are. Roboflow Inference is the open source engine that runs your model on the cloud, on-prem, or at the edge on devices like NVIDIA Jetson, using the same model ID. That matters for the industrial and lab settings where these detectors do real work, where sending every frame to a remote server is not practical.
To wrap the model in application logic without writing a service from scratch, Roboflow Workflows is a low-code visual builder where you chain your model together with steps like filtering by class, counting objects, cropping, and triggering actions. For a blood cell counter, a Workflow can run the model, tally each class, and return the counts as structured output.
If you work with a coding agent, the Roboflow MCP server connects your workspace to tools like Claude Code, Codex, and Cursor over the Model Context Protocol, so an agent can pull datasets, trigger training, and run inference on your behalf.
Going further: vision AI agents
Once your detector is running inside a Workflow, you can compose it into a vision AI agent: a system that perceives with your model, reasons over the result with a multimodal model, acts, and repeats. In a lab context, an agent could count cell types, compare the ratios against a reference range, flag samples that fall outside it, and route them for human review. The detector you trained here is the perception layer that makes that possible.
Why RF-DETR for custom object detection
Faster R-CNN earned its reputation on accuracy, and for a two-stage detector it delivers. RF-DETR gives you that accuracy without the tradeoffs that keep older architectures out of production.
RF-DETR fine-tunes fast, so the iterate-evaluate-retrain loop that actually improves a model is quick instead of an overnight wait. It runs in real time, so the same model you train for analysis can go into a live pipeline. It ships under an Apache 2.0 license, so there is no commercial-use ambiguity when you deploy it in a product. And it lives inside one platform that carries you from labeling to training to deployment, so you are not stitching together a notebook, a training framework, and a separate serving stack that each rot on their own schedule.
Can I still train Faster R-CNN in Roboflow?
Roboflow trains RF-DETR for object detection rather than Faster R-CNN. RF-DETR reaches comparable or better accuracy, fine-tunes far faster, runs in real time, and ships under a permissive license, so it is the better choice for nearly any project that would historically have used Faster R-CNN. You keep the same workflow described here and get a model that is easier to take to production.
How much data do I need to train a custom object detection model?
With transfer learning from a COCO-pretrained checkpoint, a few hundred labeled images per class is often enough to get a working model. The BCCD example uses 364 images. Start small, evaluate, and add data where the per-class metrics show weakness.
Do I need a GPU to train a model?
No. Training runs in the cloud on Roboflow's infrastructure, so there is nothing to install and no GPU to provision. You only need Python locally if you want to run inference from a script.
What format does my dataset need to be in?
Roboflow reads common annotation formats including COCO JSON and Pascal VOC XML, and can export to whatever format you need later. You can also label from scratch in the browser, so an existing annotation format is not required.
How do I know when my model is good enough?
Look at mean average precision on the held-out test set, then read the per-class precision and recall. A model is ready when the classes you care about clear the accuracy bar your application needs. If a class lags, add or fix labels for it and retrain rather than continuing to tune.
Get started
You can train a custom object detection model on your own images today, entirely in the browser, and have a deployable model in an afternoon. Create a free Roboflow account and start with your dataset or one from Universe.
Roboflow is the end-to-end Vision AI platform used by over one million engineers and more than half the Fortune 100 to label data, train models, and deploy them to the cloud, the edge, and on-prem.
Following this tutorial, you only need to change a couple lines of code to train an object detection model to your own dataset.
Update: YOLO v5 has been released
If you're Ok with using PyTorch instead of Tensorflow, we recommend jumping to the YOLOv5 tutorial. You'll have a trained YOLOv5 model on your custom data in minutes.
To that end, in this example we will walkthrough training an object detection model using the TensorFlow object detection API. While this tutorial describes training a model on a microscopy data, it can be easily adapted to any dataset with very few adaptations.
Impatient? Skip directly to the Colab Notebook.
The sections of our example are as follows:
- Introducing our open source computer vision dataset
- Preparing our images and annotations
- Creating TFRecords and Label Maps
- Training Our Model
- Model Inference
Throughout this tutorial, we’ll make use of Roboflow, a tool that dramatically simplifies our data preparation and training process by creating a hosted computer vision pipeline. Roboflow has a free plan, so we’ll be all set for this example.
Our Example Dataset: Blood Cell Count and Detection (BCCD)
Our example dataset is 364 images of cell populations and 4888 labels identifying red blood cells, white blood cells, and platelets extracted from microscope slides. Originally open sourced two years ago by comicad and akshaymaba, and available at https://public.roboflow.com. (Note the version hosted on Roboflow includes minor label improvements versus the original release.)
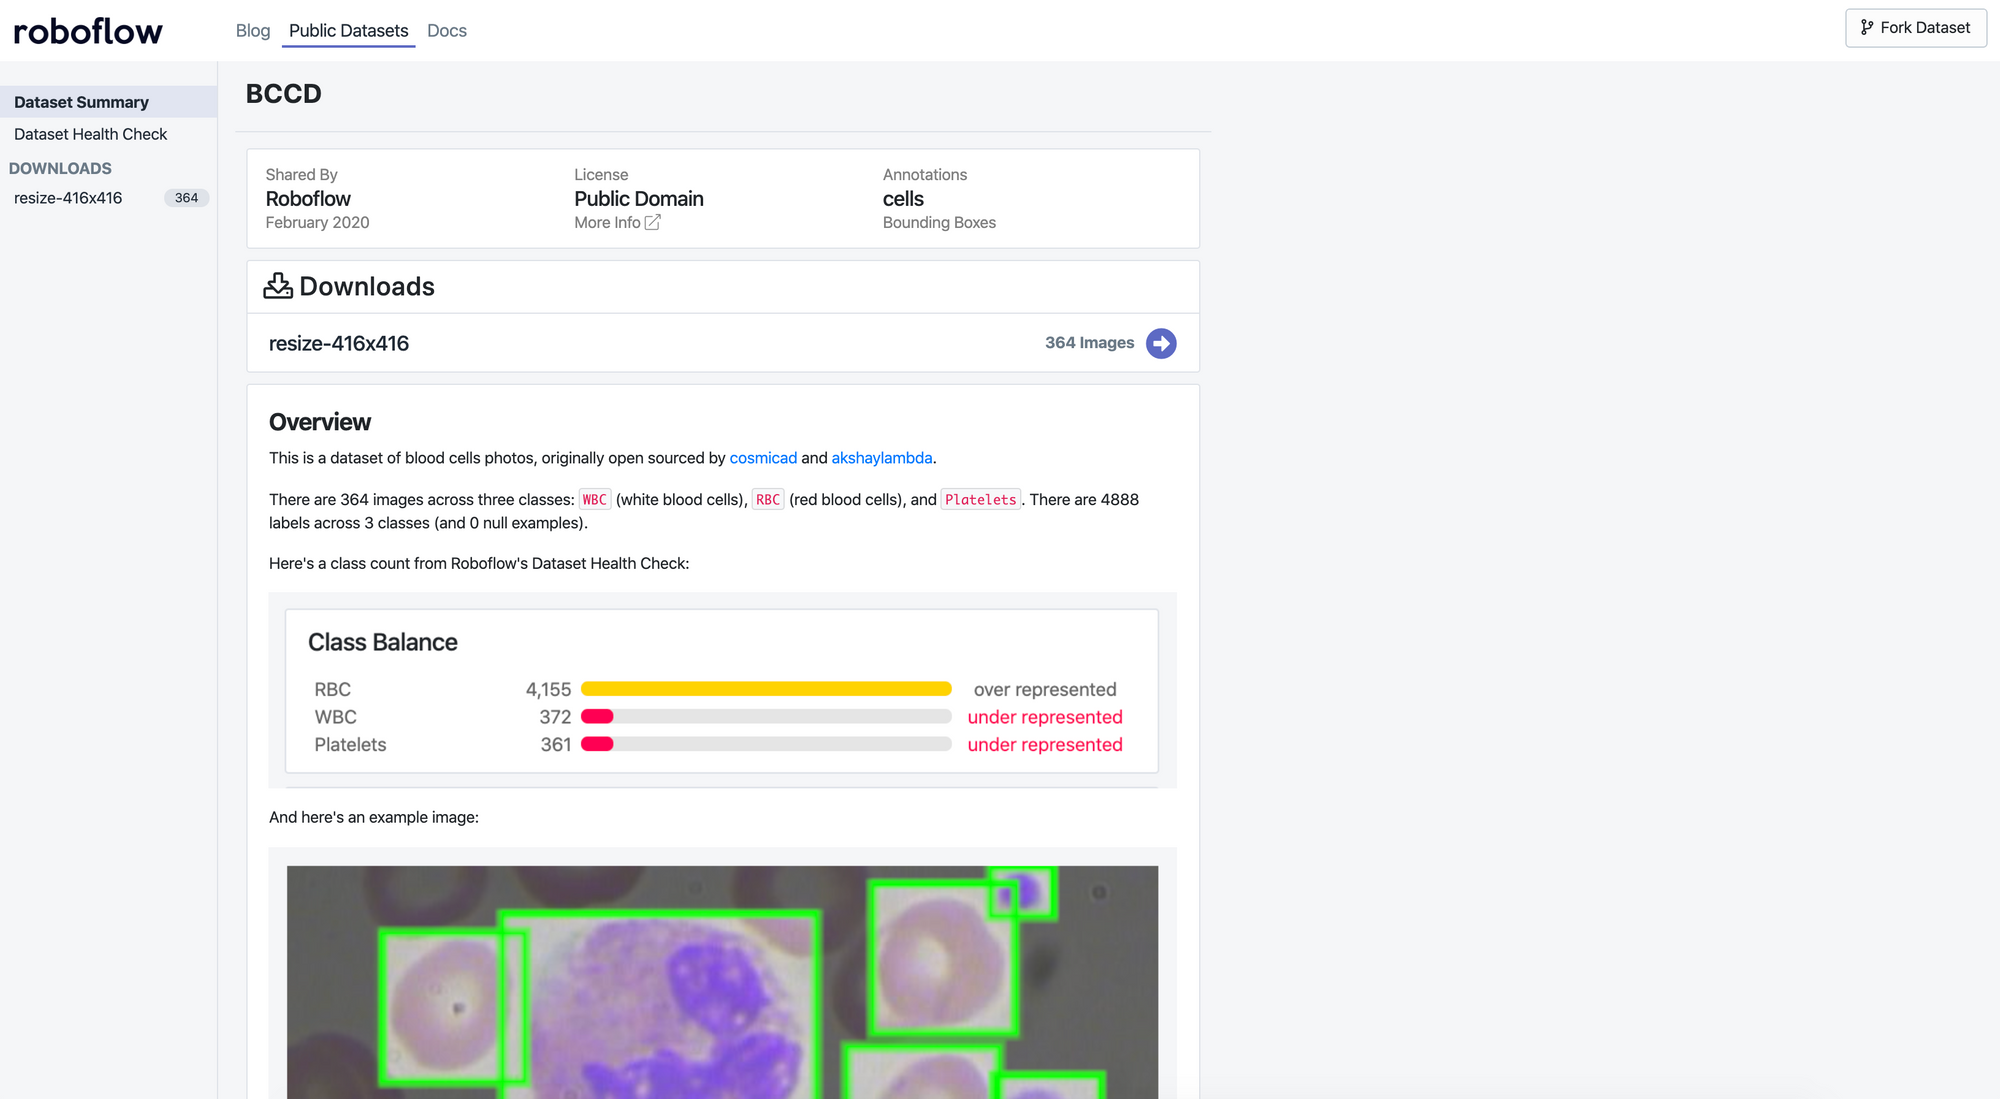
Fortunately, this dataset comes pre-labeled by domain experts, so we can jump right into preparing our images and annotations for our model.
Knowing the presence and ratio of red blood cells, white blood cells, and platelets for patients is key to identifying potential maladies. Enabling doctors to increase their accuracy and throughput of identifying said blood counts can massively improve healthcare for millions.
For your custom data, consider labelling them using tools like Roboflow, LabelImg, CVAT, LabelMe, or VoTT.
Preparing Our Images and Annotations
Going straight from data collection to model training leads to suboptimal results. There may be problems with the data. Even if there aren’t, applying image augmentation expands your dataset and reduces overfitting.
Preparing images for object detection includes, but is not limited to:
- Verifying your annotations are correct (e.g. none of the annotations are out of frame in the images)
- Ensuring the EXIF orientation of your images is correct (i.e. your images are stored on disk differently than how you view them in applications, see more)
- Resizing images and updating image annotations to match the newly sized images
- Checking the health of our dataset, like its class balance, images sizes, and aspect ratios — and determining how these might impact preprocessing and augmentations we want to perform
- Various color corrections that may improve model performance like grayscale and contrast adjustments
Similar to tabular data, cleaning and augmenting image data can improve your ultimate model’s performance more than architectural changes in your model.
Let’s take a look at the “Health Check” of our dataset:
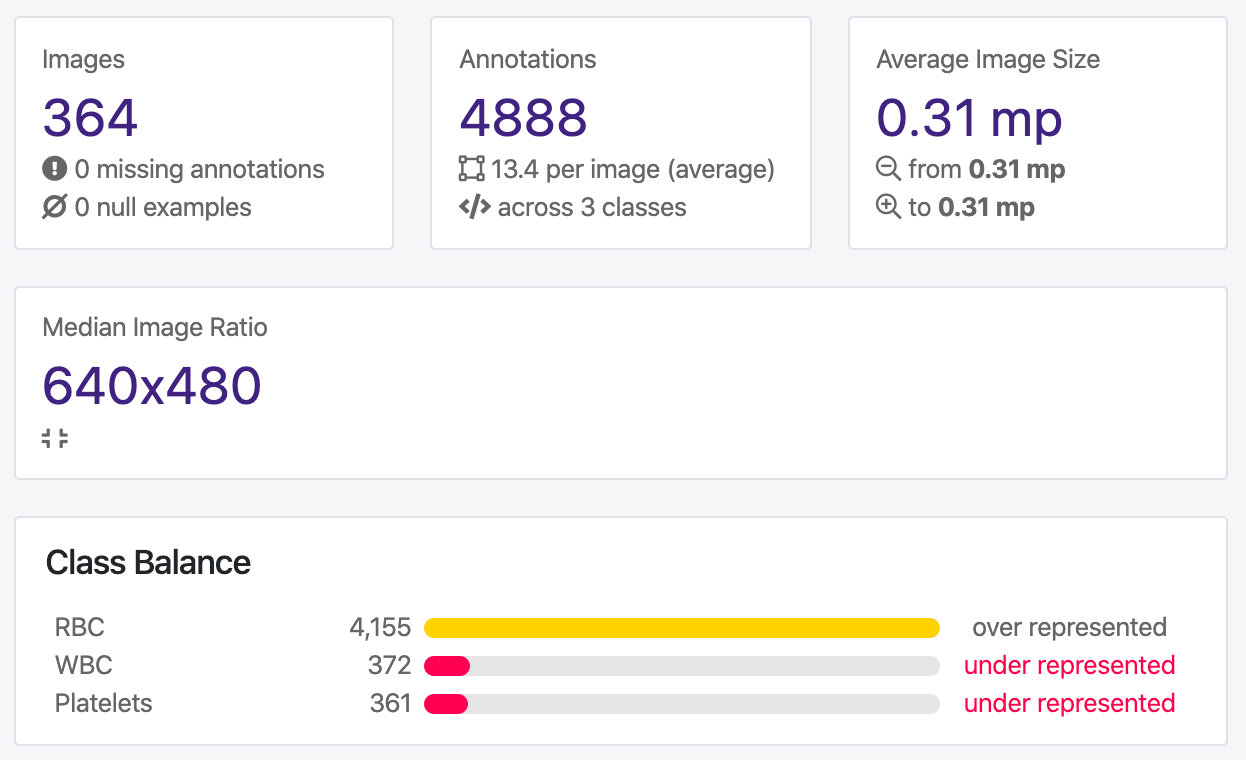
We can clearly see we have a large class imbalance present in our dataset. We have significantly more red blood cells than white blood cells or platelets represented in our dataset, which may cause issues with our model training. Depending on our problem context, we may want to prioritize identification of one class over another as well.
Moreover, we can see from the annotation heat map that our images are all the same size, which makes our resize decision easier.
Annotation heat map using Roboflow
When examining how our objects (cells and platelets) are distributed across our images, we see our red blood cells appear all over, our platelets are somewhat scattered towards the edges, and our white blood cells are clustered in the middle of our images.
Given this, we may want to be weary of cropping the edges of our images when detecting RBC and platelets, but should we just be detecting white blood cells, edges appear less essential. We also want to check that our training dataset is representative of our out-of-sample images. For example, can we expect white blood cells to commonly be centered in newly collected data?
For your custom dataset, upload your images and their annotations to Roboflow following this simple step-by-step guide.
Creating TFRecords and Label Maps
We’ll be using a TensorFlow implementation of Faster R-CNN (more on that in a moment), which means we need to generate TFRecords for TensorFlow to be able to read our images and their labels. TFRecord is a file format that contains both our images and their annotations. It’s serialized at the dataset-level, meaning we create one set of records for our training set, validation set, and testing set. We’ll also need to create a label_map, which maps our label names (RBC, WBC, and platelets) to numbers in a dictionary format.
Frankly, TFRecords are a little cumbersome. As a developer, your time should be focused on fine tuning your model or the business logic of using your model rather than writing redundant code to generate annotation file formats. So, we’ll use Roboflow to generate our TFRecords and label_map files for us with a few clicks.
First, visit the dataset we’ll be using here: https://public.roboflow.com/object-detection/bccd/1 (Note we’re using a specific version of the dataset. Images have been resized to 416x416.)
Next, click “Download.” You may be prompted to create a free account with email or GitHub.
When downloading, you can download in a variety of formats and download either locally to your machine, or generate a code snippet. For our purposes, we want to generate TFRecord files and create a download code snippet (not download files locally).
Export the dataset
You’ll be given a code snippet to copy. That code snippet contains a link to your source images, their labels, and a label map split into train, validation, and test sets. Hang on to it.
For your custom dataset, if you followed the step-by-step guide from uploading images, you’ll have been prompted to create train, valid, test splits. You’ll also be able to export your dataset to any format you need.
Training Our Model
We’ll be training a Faster R-CNN neural network. Faster R-CNN is a two-stage deep learning object detector: first it identifies regions of interest, and then passes these regions to a convolutional neural network. The outputted features maps are passed to a support vector machine (SVM) for classification. Regression between predicted bounding boxes and ground truth bounding boxes are computed. Faster R-CNN, despite its name, is known as being a slower model than some other choices (like YOLOv4 or MobileNet) for inference but slightly more accurate. For a deeper dive on the machine learning behind it, consider reading this post!
Faster R-CNN is one of the many model architectures that the TensorFlow Object Detection API provides by default, including with pre-trained weights. That means we’ll be able to initiate a model trained on COCO (common objects in context) and adapt it to our use case.
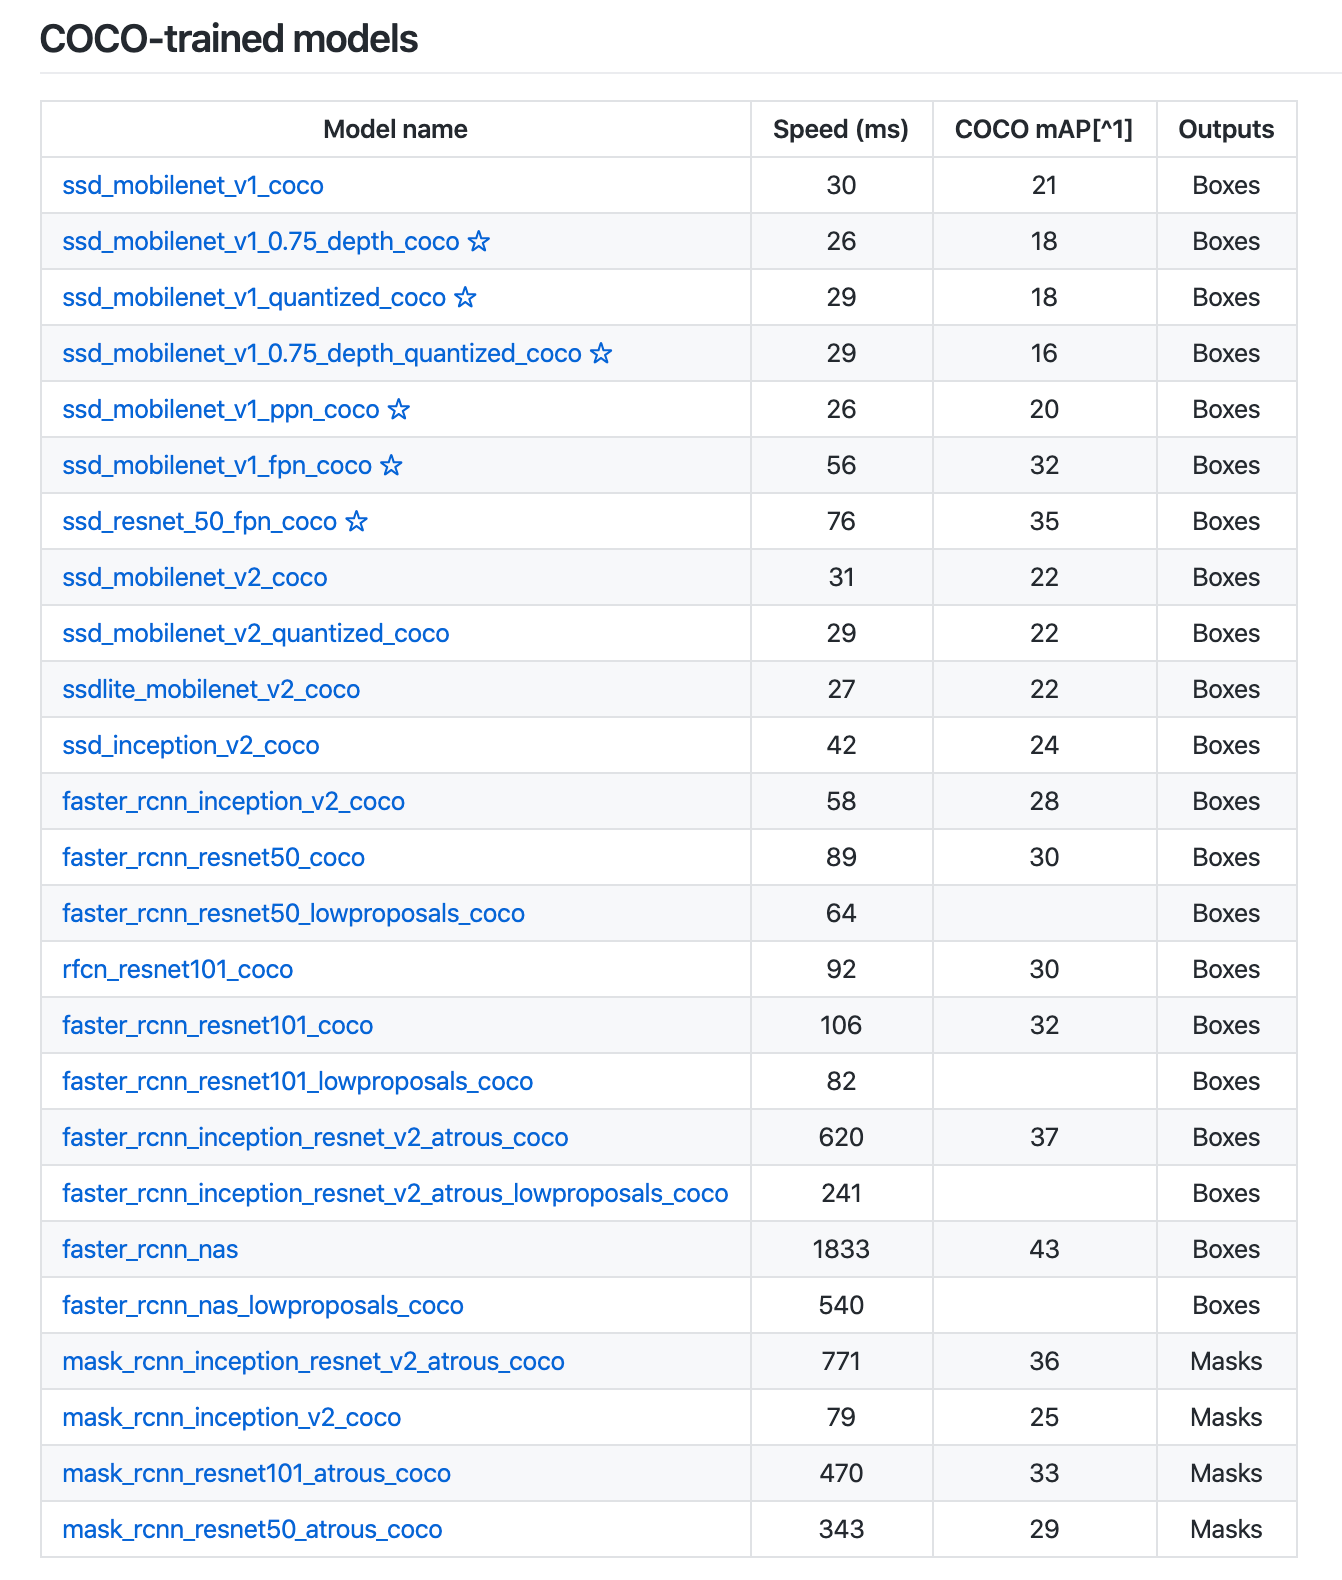
TensorFlow even provides dozens of pre-trained model architectures on the COCO dataset.
We’ll also be taking advantage of Google Colab for our compute, a resource that provides free GPUs. We’ll take advantage of Google Colab for free GPU compute (up to 12 hours).
Our Colab Notebook is here. Also check out the GitHub repository.
You need to be sure to update your code snippet where the cell calls for it with your own Roboflow exported data. Other than that, the notebook trains as-is!
There are a few things to note about this notebook:
- For the sake of running an initial model, the number of training steps is constrained to 10,000. Increase this to improve your results, but be mindful of overfitting!
- The model configuration file with Faster R-CNN includes two types of data augmentation at training time: random crops, and random horizontal and vertical flips.
- The model configuration file default batch size is 12 and the learning rate is 0.0004. Adjust these based on your training results.
- The notebook includes an optional implementation of TensorBoard, which enables us to monitor the training performance of our model in real-time.
In our example of using BCCD, after training for 10,000 steps, we see outputs like the following in TensorBoard:
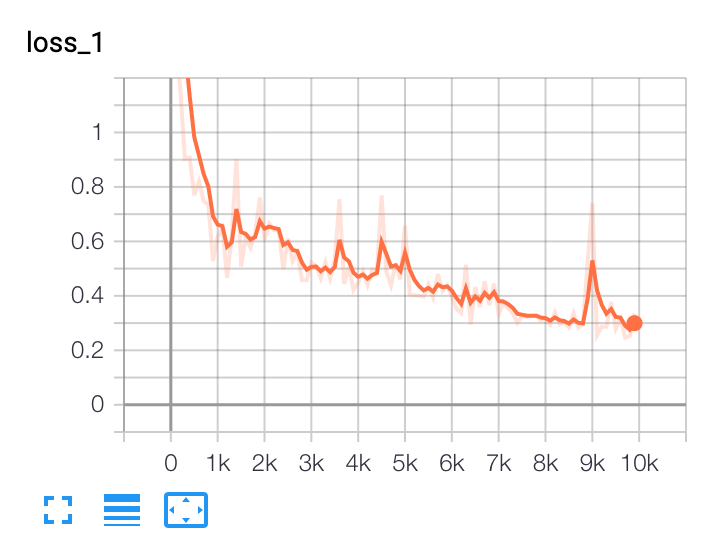
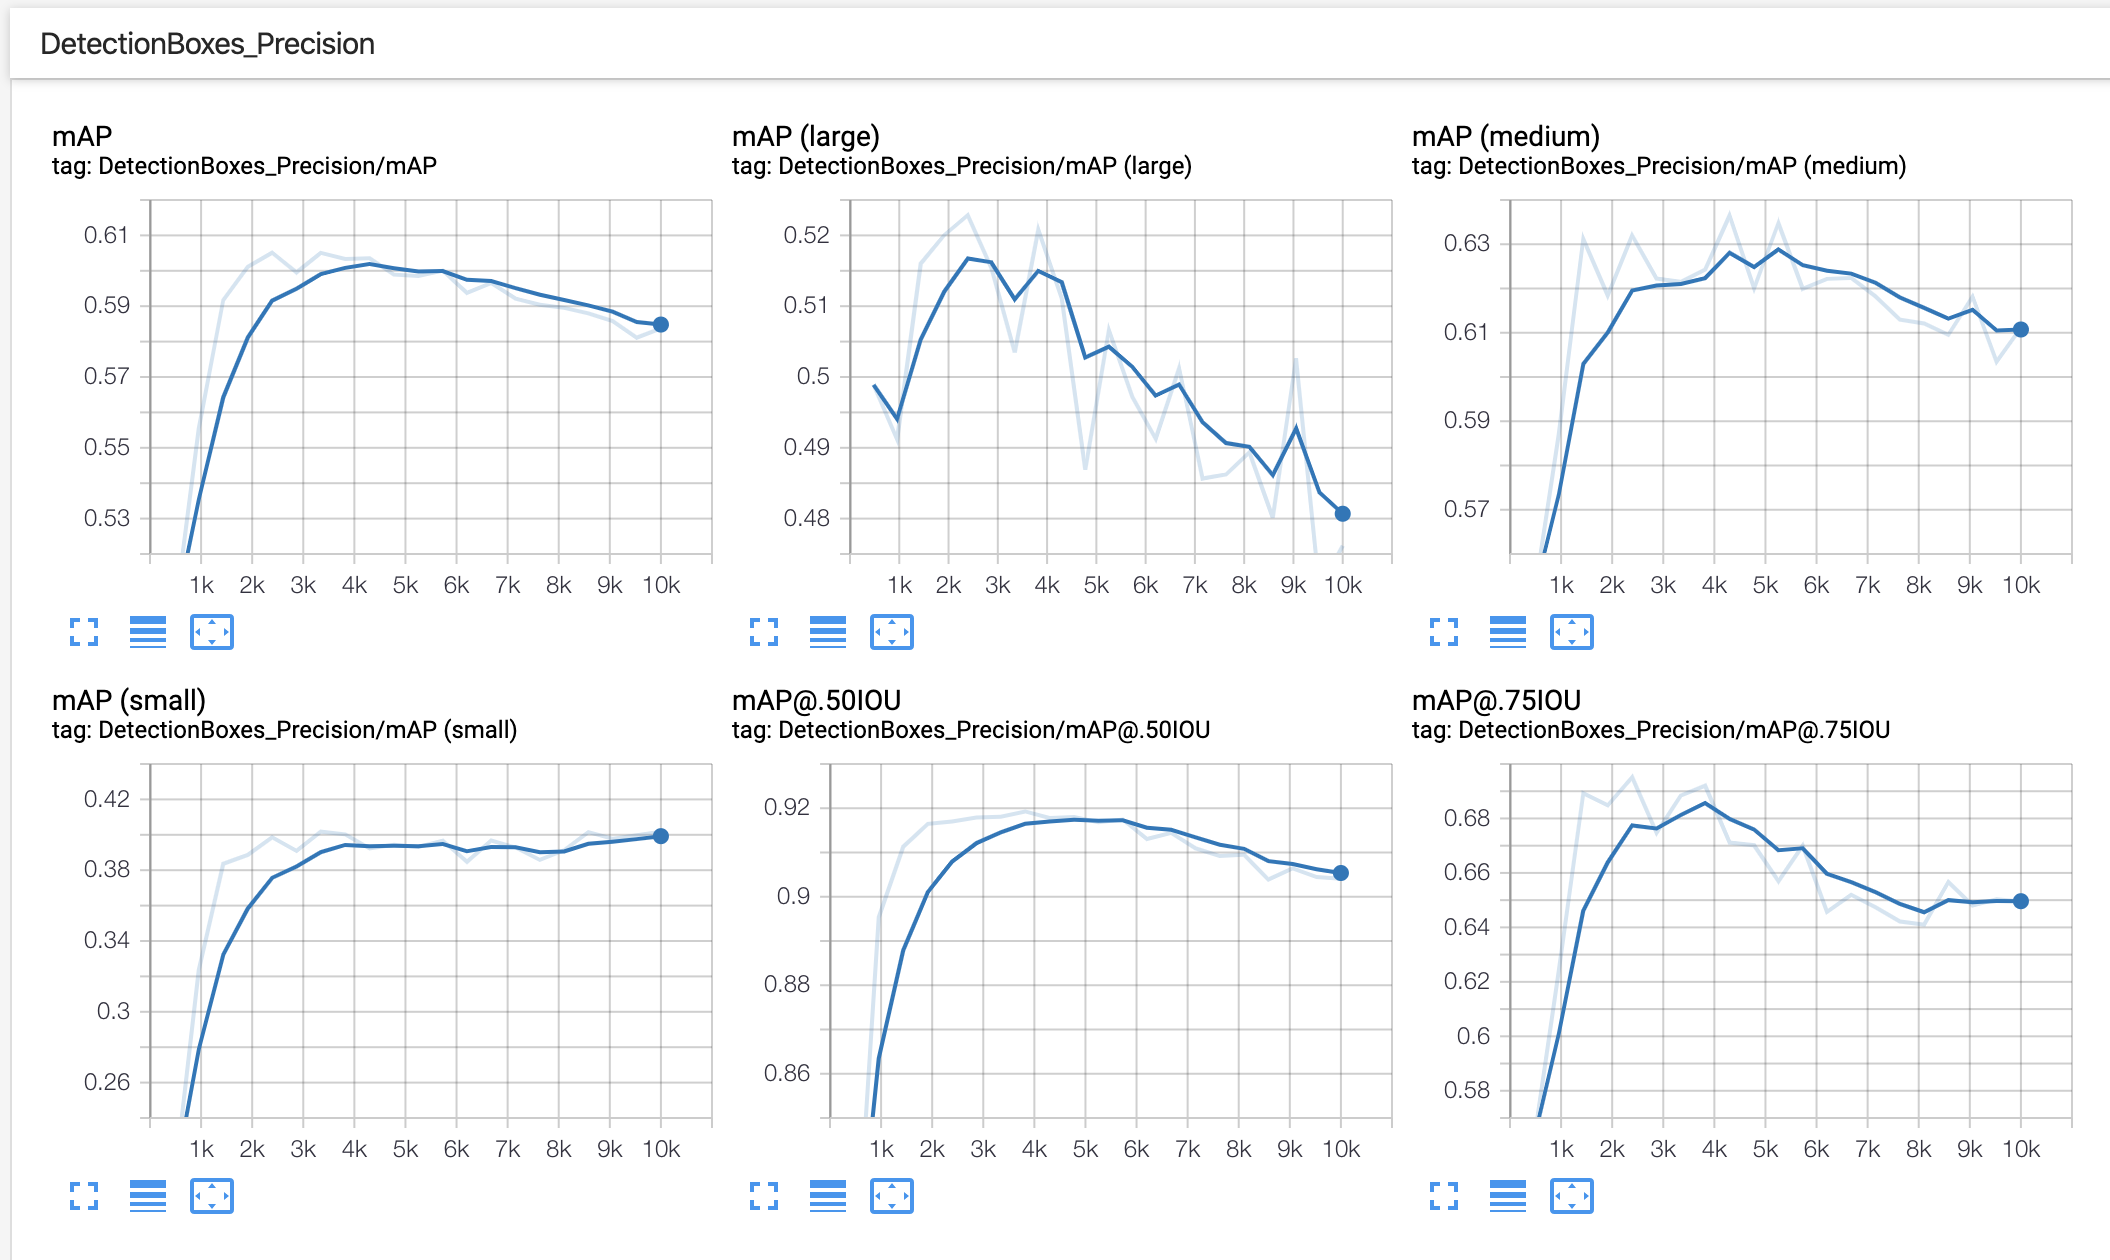
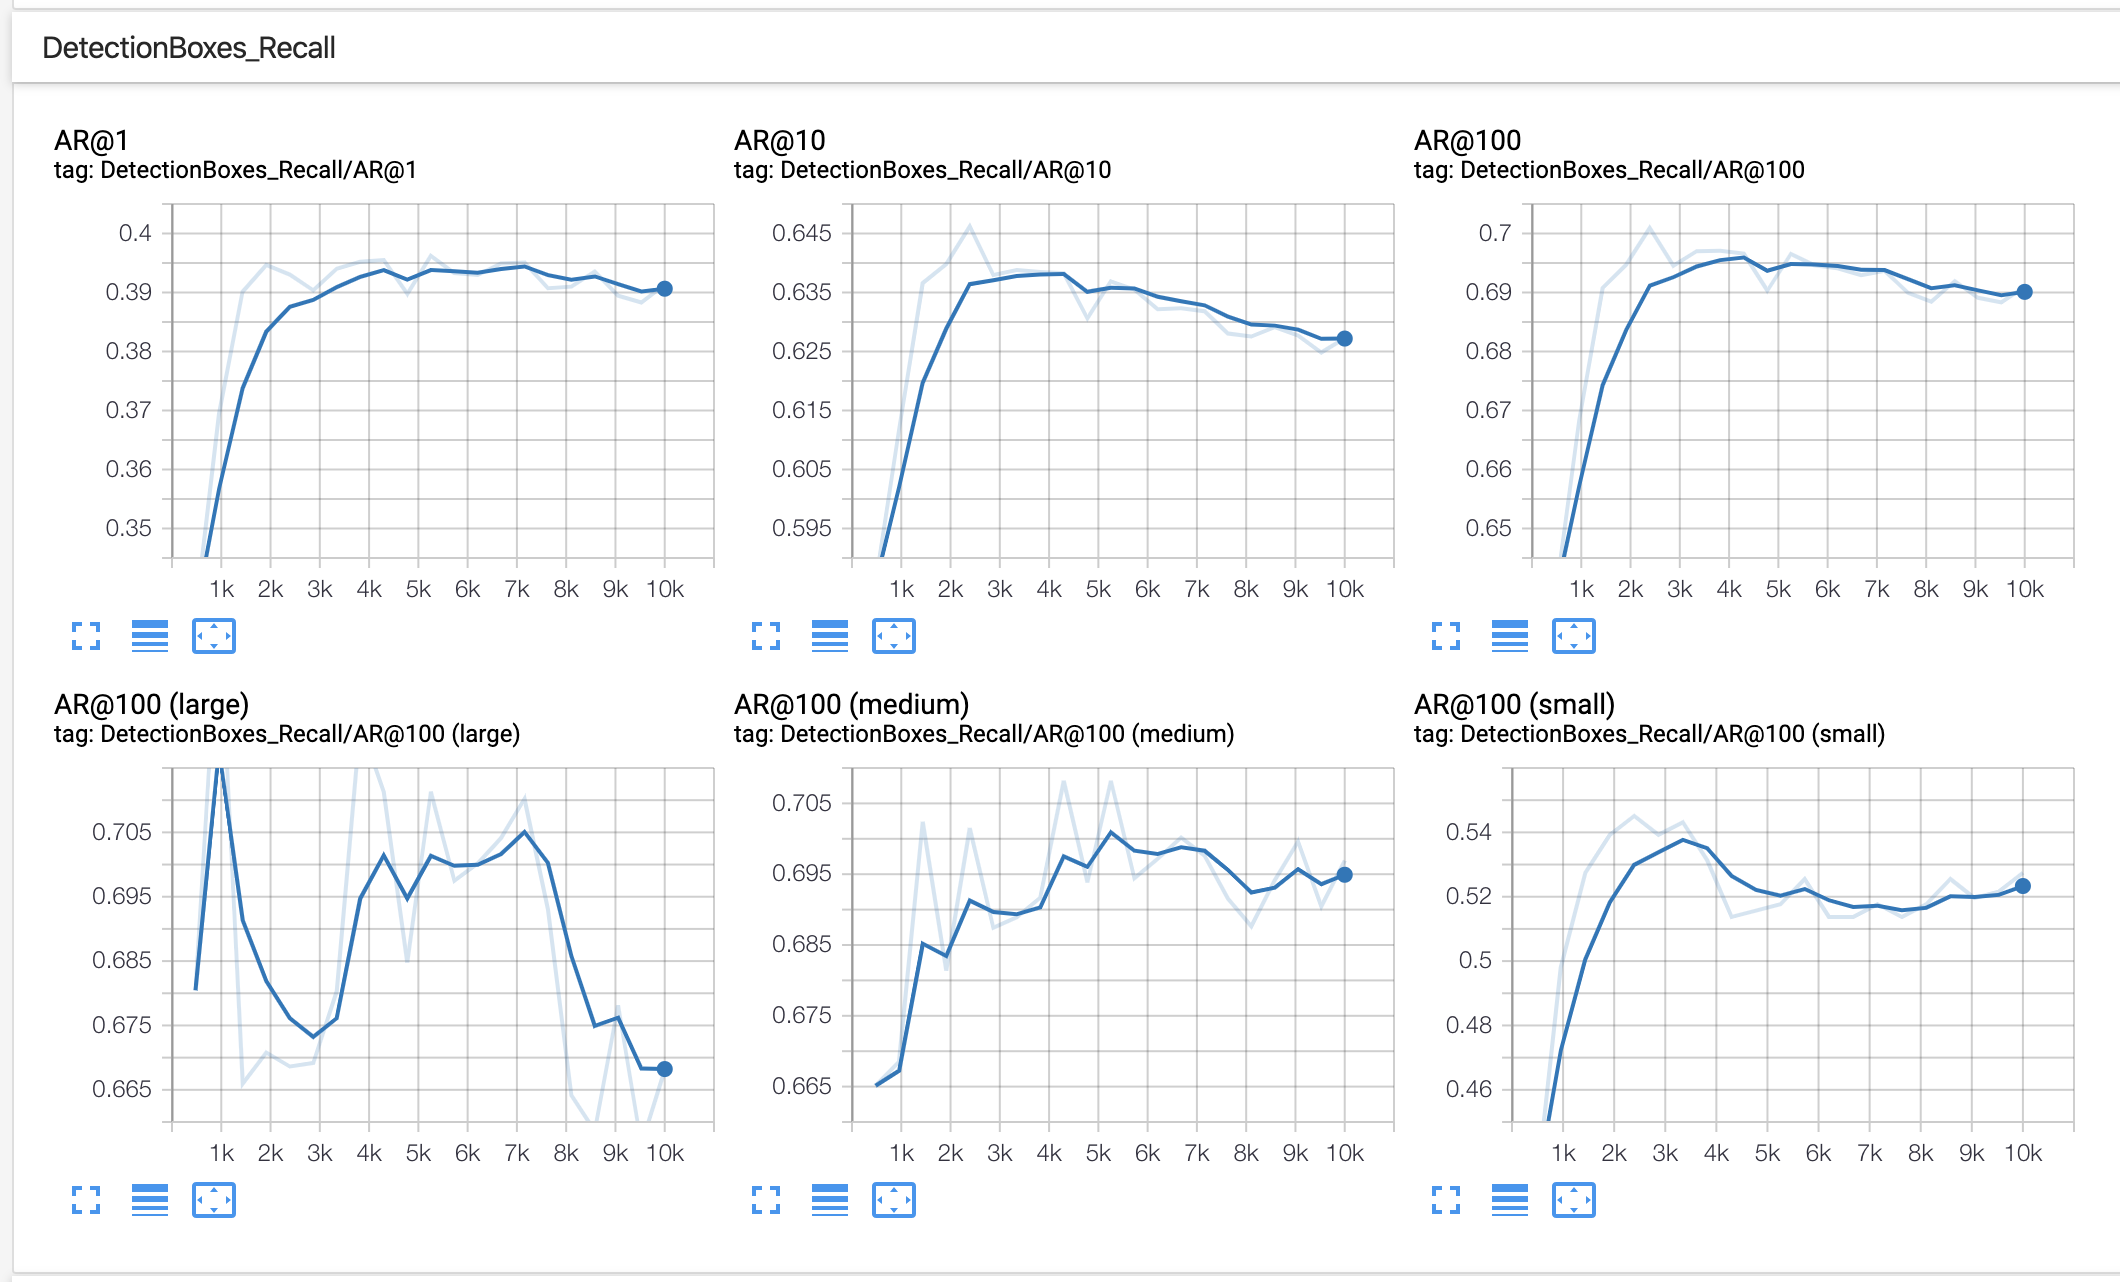
In this example, we should consider collecting or generating more training data and making use of greater data augmentation.
For your custom dataset, these steps will be largely identical as long as you update your Roboflow export link to be specific to your dataset. Keep an eye on your TensorBoard outputs for overfitting.
Model Inference
As we train our Faster R-CNN model, its fit is stored in a directory called ./fine_tuned_model. There are steps in our notebook to save this model fit — either locally downloaded to our machine, or via connecting to our Google Drive and saving the model fit there. Saving the fit of our model not only allows us to use it later in production, but we could even resume training from where we left off by loading the most recent model weights!
In this specific notebook, we need to add raw images to the /data/test directory. It contains TFRecord files, but we want raw (unlabeled) images for our model to make predictions.
We should upload test images that our model hasn’t seen. To do so, we can download the raw test images from Roboflow to our local machines, and add those images to our Colab Notebook.
Revisit our dataset download page.
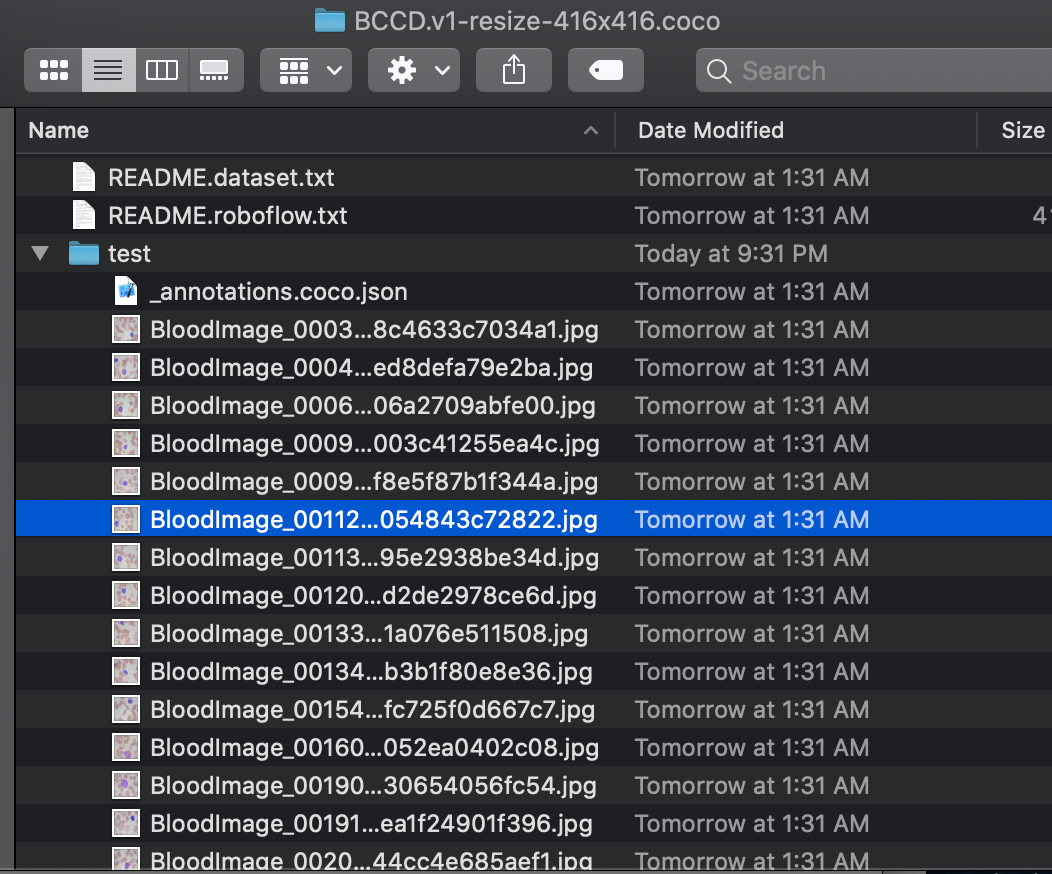
Click download. For format, select COCO JSON and download locally to your own computer. (You can actually download any format that isn’t TFRecord to get raw images separate from annotation formats!)
Once unzipping this file locally, you’ll see the test directory raw images:
Now, in the Colab notebook, expand the left hand panel to show the test folder:
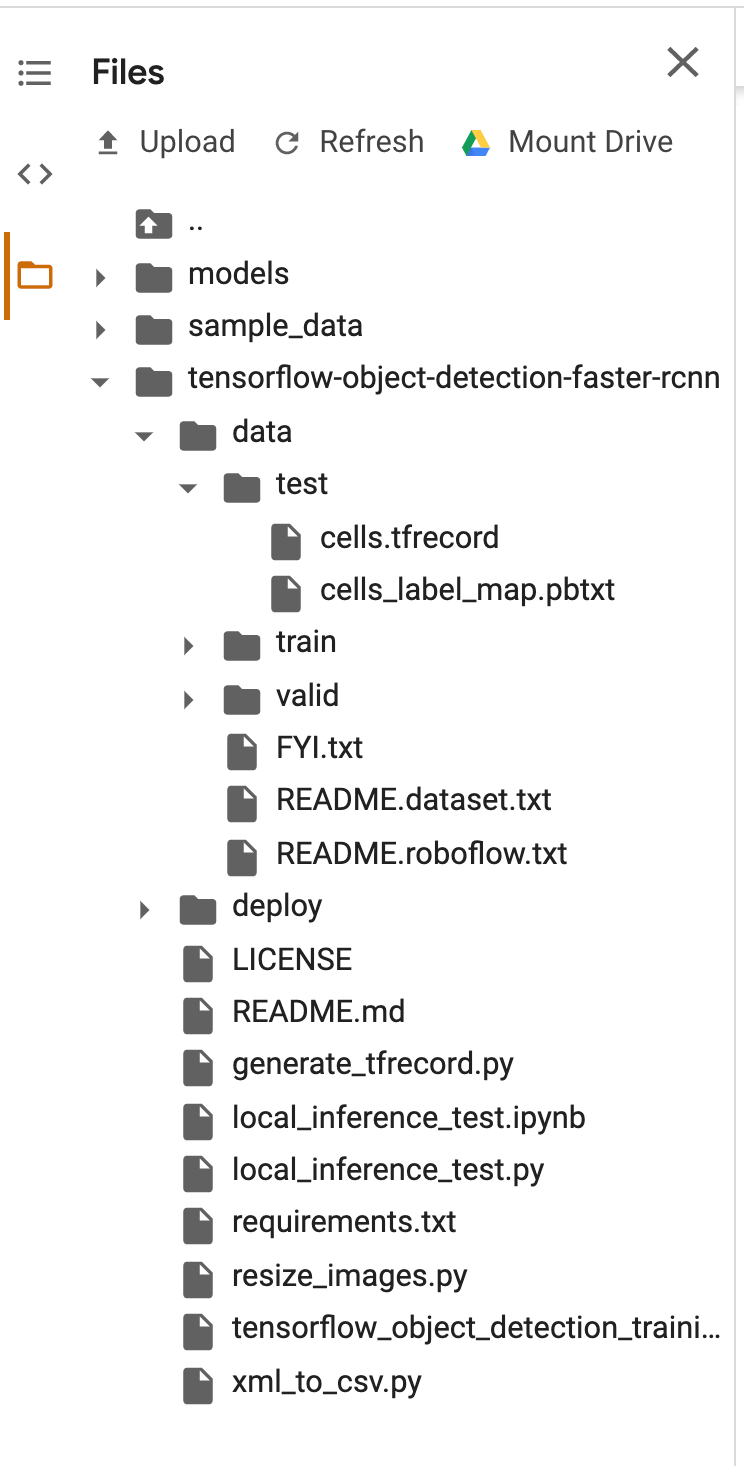
Right click on the “test” folder and select “Upload.” Now, you can select all the images from your local machine that you just downloaded!
Inside the notebook, the remainder of the cells go through how to load the saved, trained model we created and run them on the images you just uploaded.
For BCCD, our output looks like the following:
Our model does pretty well after 10,000 epochs
For your custom dataset, this process looks very similar. Instead of downloading images from BCCD, you’ll download images from your own dataset, and re-upload them accordingly.
Next Steps with your Trained Object Detection Model
You’ve trained an object detection model to a custom dataset.
Now, making use of this model in production begs the question of identifying what your production environment will be. For example, will you be running the model in a mobile app, via a remote server, or even on a Raspberry Pi? How you’ll use your model determines the best way to save and convert its format.
Consider these resources as next steps based on your problem: converting to TFLite (for Android and iPhone), converting to CoreML (for iPhone apps), converting for use on a remote server, or deploying to a Raspberry Pi.


Cite this Post
Use the following entry to cite this post in your research:
Joseph Nelson. (Mar 11, 2026). Training a TensorFlow Faster R-CNN Object Detection Model on a Custom Dataset. Roboflow Blog: https://blog.roboflow.com/training-a-tensorflow-faster-r-cnn-object-detection-model-on-your-own-dataset/