
You can build anomaly detection with a YOLO object detection model when defects are visible and labelable: annotate defect classes like scratch or dent, add clean images as null examples, and train in Roboflow to get the location, type, and confidence of each anomaly instead of a plain normal/abnormal flag. Deploy it as a Workflow with pass/fail logic and active learning, or swap in RF-DETR for transformer-based detection at the same real-time speed.
Anomaly detection is one of the most practical applications of computer vision. In manufacturing, logistics, agriculture, healthcare, infrastructure inspection, and retail, teams need to identify when something looks wrong. That might be a scratch on a product, a missing component, a dented package, a cracked surface, or a foreign object in the wrong place.
In industrial inspection, this problem is often discussed as defect detection. The goal is to find visible defects or out-of-spec parts before they move further through a production line. A defect may be small, rare, or hard to notice manually, but detecting it early reduces waste, improves product quality, and supports faster quality control decisions.
YOLO models are a strong fit for this kind of visual inspection when the anomalies are visible and can be labeled. Instead of only saying whether an image is normal or abnormal, a YOLO object detection model can locate the anomaly with a bounding box and classify the type of issue it found.
In this tutorial, I will walk through how to build an anomaly detection system using a YOLO model and Roboflow. We will cover how to collect anomaly images, annotate them, train a YOLO model, test predictions, and deploy the model for real-world use.
What Is Anomaly Detection?
Anomaly detection is the process of finding patterns that do not match normal behavior or normal appearance. In computer vision, an anomaly can be anything visually unusual, such as:
- A scratch on a manufactured part
- A crack in concrete
- A missing screw on a circuit board
- A dent in packaging
- A stain on fabric
- A broken tile
- A foreign object on a conveyor belt
- A wrong or missing label on a product
There are different ways to build anomaly detection systems. Some methods learn only from normal examples and flag visual patterns that appear unusual. This is useful when defects are unknown or when collecting examples of every possible failure is difficult.
In this tutorial, we will use a supervised YOLO based approach. In supervised anomaly detection, the training data includes labeled examples of both normal and anomalous cases. The model learns from those labels and predicts whether a new example belongs to a normal class or an anomaly class. In a YOLO workflow, this idea is applied visually by labeling known defects such as scratch, crack, dent, or missing-part and training the model to detect those regions.
This makes YOLO-based anomaly detection closer to supervised defect detection. The model is not just learning that something is unusual, but, it is learning to recognize specific defect categories that matter for the application.
This approach works best when you know the kinds of anomalies you want to find and you can collect labeled examples of them. For example, if a factory wants to detect cracks and dents on a part, those defects can be annotated as object classes. After training, the YOLO model can return the defect location, class name, and confidence score, which can then be used for inspection, reporting, or automated pass/fail decisions.
Why Use YOLO for Anomaly Detection?
YOLO is useful for anomaly detection because it is fast, simple to deploy, and works well for real-time inspection use cases. It can be used with images, videos, webcams, edge devices, and production camera systems. For anomaly detection, this is useful because the model can answer three important questions:
- Is there an anomaly in the image?
- Where is the anomaly located?
- What type of anomaly is it?
For example, in a product inspection system, a YOLO model can detect a scratch, draw a bounding box around it, and return a class label such as scratch with a confidence score.
RF-DETR as an Alternative for Anomaly Detection
YOLO is a strong starting point for supervised anomaly detection because it is fast, familiar, and easy to deploy. RF-DETR is another option for teams that want a transformer-based detector with strong real-time performance.
RF-DETR can be trained to detect known defect classes such as scratches, cracks, dents, stains, missing parts, or contamination. Its detection architecture is designed to support high accuracy while still running fast enough for real-time computer vision applications. This makes it useful for inspection systems that need both reliable defect localization and practical deployment speed.
RF-DETR can also be deployed with Roboflow Inference, including on edge devices. This allows inspection models to run locally near cameras, production lines, or embedded systems, reducing the need to send every image to the cloud. RF-DETR, therefore, is a strong alternative when you want real-time transformer-based detection with local deployment.
Building YOLO Anomaly Detection System with Roboflow
In this tutorial, we will build a YOLO anomaly detection system with the following steps:
- Define the anomaly classes
- Collect images of normal and anomalous examples
- Upload the dataset to Roboflow
- Annotate anomalies
- Generate a dataset version
- Train a YOLO model
- Use the model in an application
For this example, imagine we are building a defect detection system for product inspection. The same process can be used for PCB inspection, surface defect detection, packaging inspection etc. or any other visual anomaly detection task.
Step 1: Create an Alloy Wheel Defect Detection Project
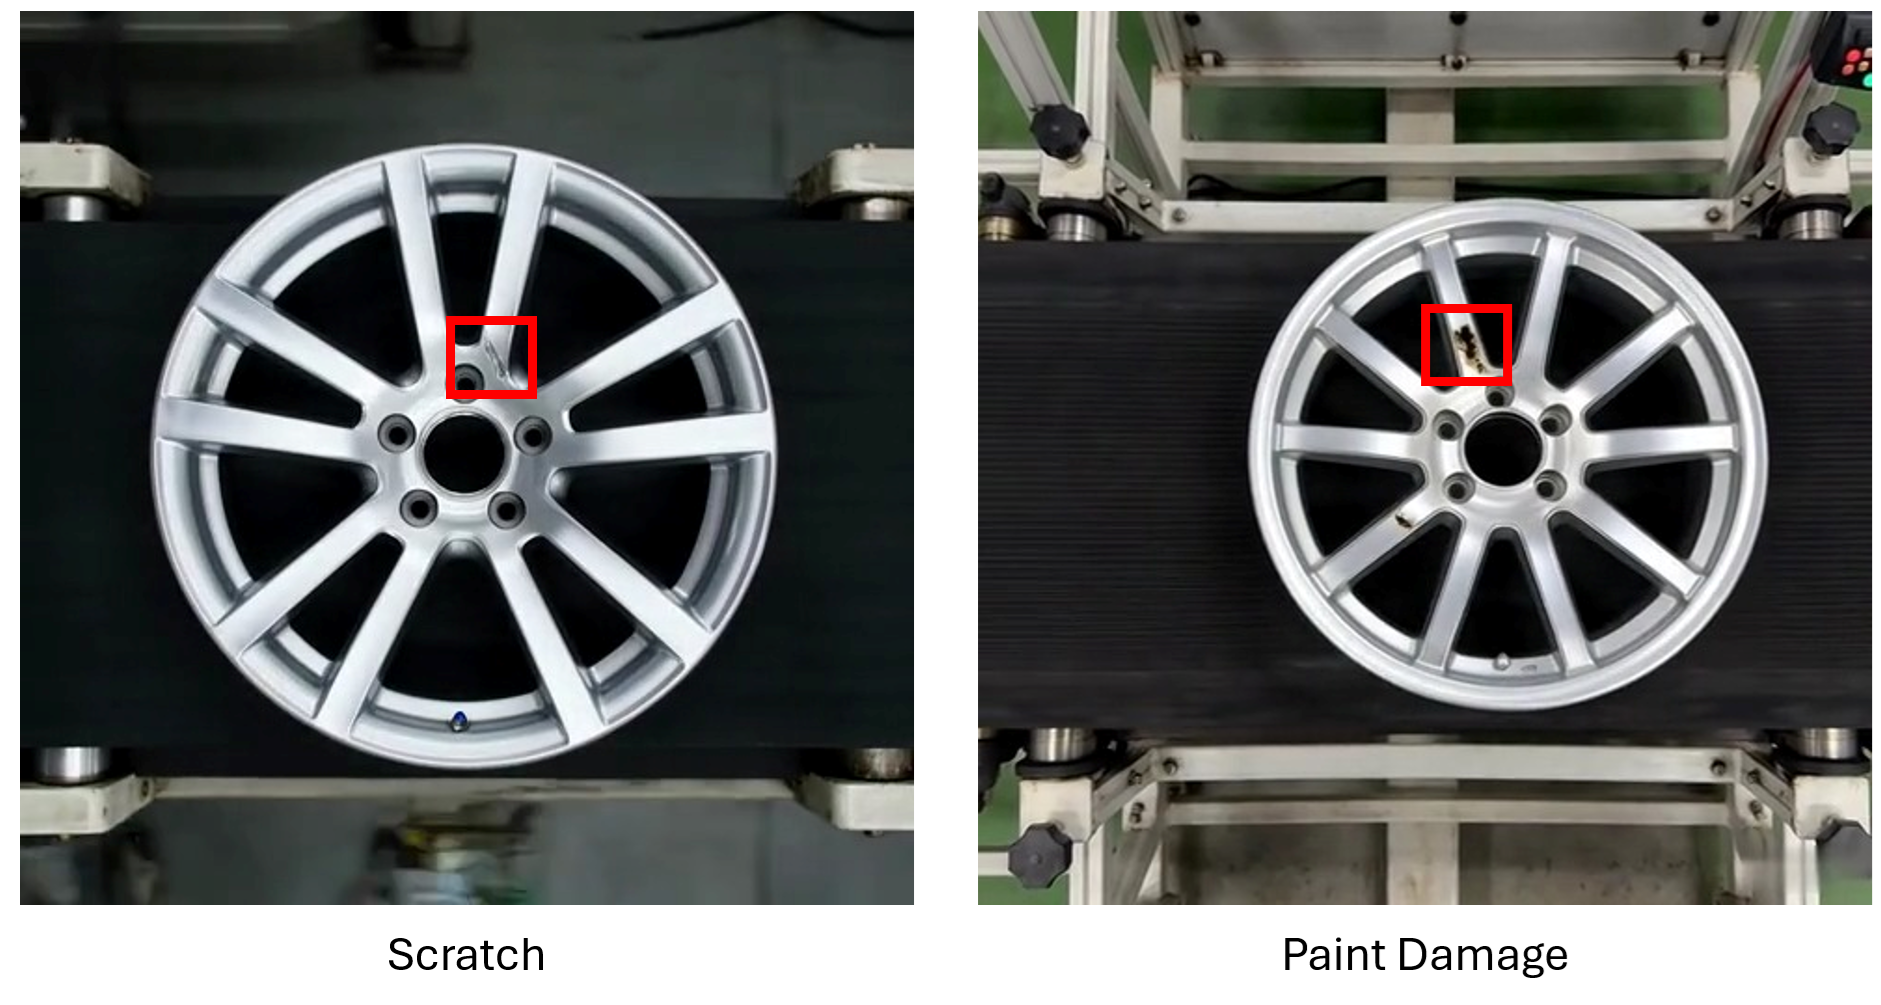
For this tutorial, I created an object detection project in Roboflow named alloy-wheel-defect. The goal of this project is to detect visible defects on car alloy wheels in a production line. I have collected two types of images:
- Normal alloy wheel images
- Alloy wheel images with visible defects
The normal images represent wheels without visible damage. The anomaly images contain defects such as scratches, and paint damage. Since this is an object detection project, the model is trained to locate the damaged region using bounding boxes instead of only classifying the full image as normal or defective.
Step 2: Define the Defect Classes
I used two anomaly classes for the alloy wheel dataset. Each class represents a different type of visible wheel damage. The classes are:
scratchis used for thin surface marks on the wheel face, spokes, or rim area.paint-damageis used when the coating or paint is chipped, removed, stained, or visibly damaged.
I did not create a normal class because normal images do not need bounding boxes in an object detection workflow. Instead, normal images are added as null examples.
Step 3: Annotate the Defective Wheel Images
After uploading the images to Roboflow, I have annotated only the visible anomaly regions. For each defective image:
- Draw a tight bounding box around the damaged area.
- Assign the correct defect class.
- Label every visible defect in the image.
- Use separate boxes if there are multiple separate defects.
The bounding boxes should cover only the damaged area, not the full wheel. This helps the YOLO model learn where the defect is located.
Step 4: Add Normal Images as Null Examples
As the dataset included normal alloy wheel images with no visible defects. For these images, I did not draw any bounding boxes. Instead, I used Roboflow’s null annotation option to add them to the dataset as images without annotations.
Marking images as null so that it can be added in the dataset
This is important because the model should learn that a clean wheel does not require any prediction. Normal images help reduce false positives by showing the model examples where no defect should be detected. The labeling setup was the following.
- Normal wheel image, no bounding box, null annotation.
- Defective wheel image, bounding box around the defect.
This makes the dataset suitable for supervised anomaly detection using object detection.
Step 5: Generate a Dataset Version
Next, I have generated a dataset version in Roboflow. A dataset version creates a fixed snapshot of the images, annotations, preprocessing, and augmentation settings. This makes the training process reproducible.
Generate dataset version
Step 6: Train a YOLO Model
After preparing the dataset, I trained a YOLO11 object detection model in Roboflow.
Training YOLO model
The model was trained to detect the two alloy wheel anomaly classes scratch, paint-damage. During training, the model learned to predict bounding boxes around visible defect regions and assign each box to one of the defect classes. This turns the anomaly detection problem into a supervised object detection/defect detection task. Instead of only predicting whether the wheel is normal or abnormal, the model can return:
- the defect location
- the defect type
- the confidence score
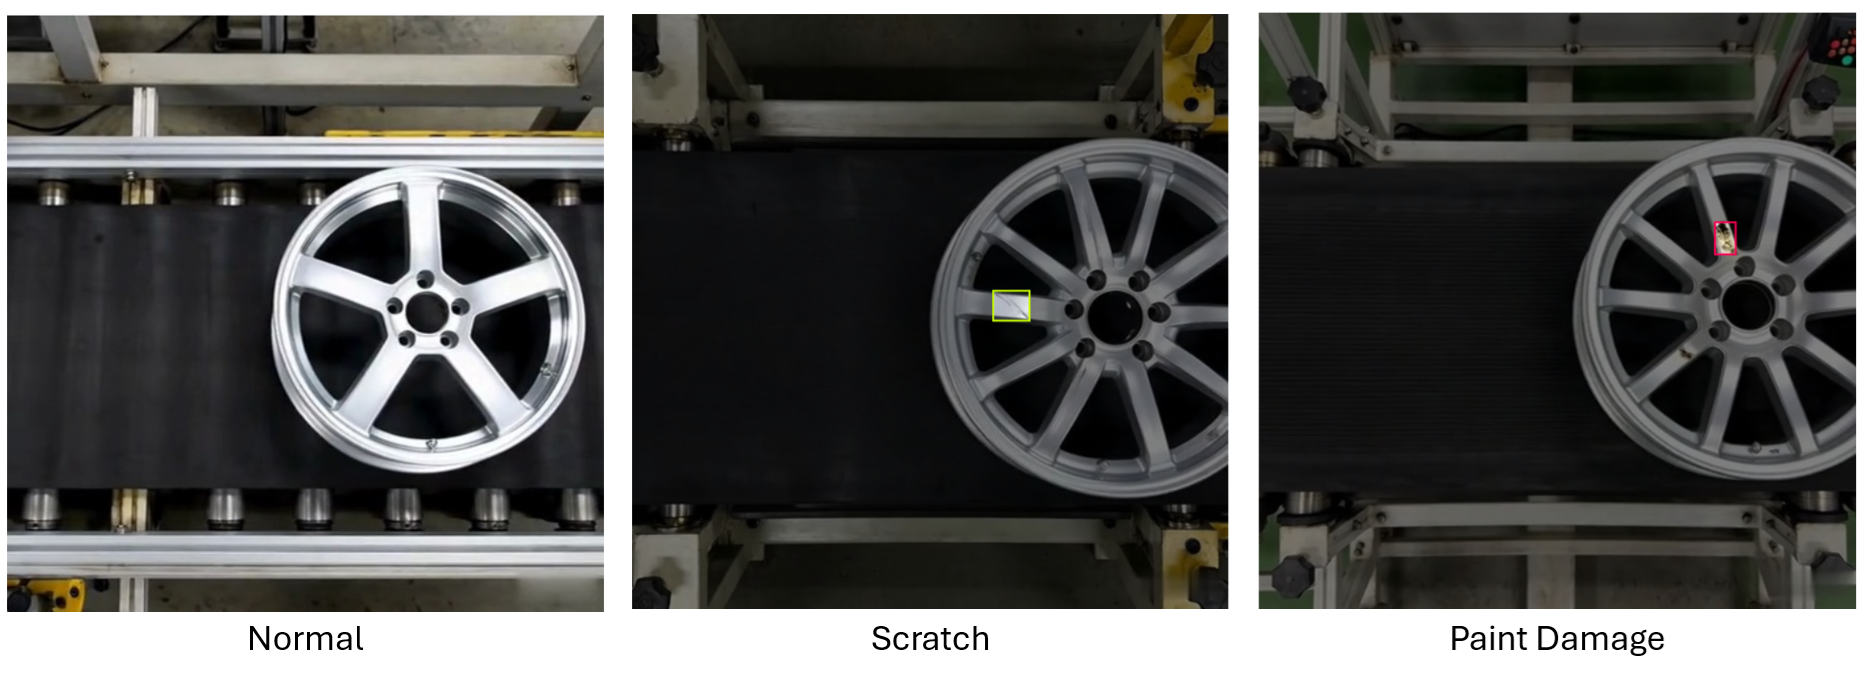
Once the model was trained, I tested it with normal sample, scratch sample and paint-damage sample and found that model is working accurately.
Testing the YOLO model
Step 7: Build the Workflow Application (Deploy the Model)
Alright! so now that we have a trained model, let's build alloy wheel defect detection application with Roboflow Workflows. The workflow application is shown in the image below.
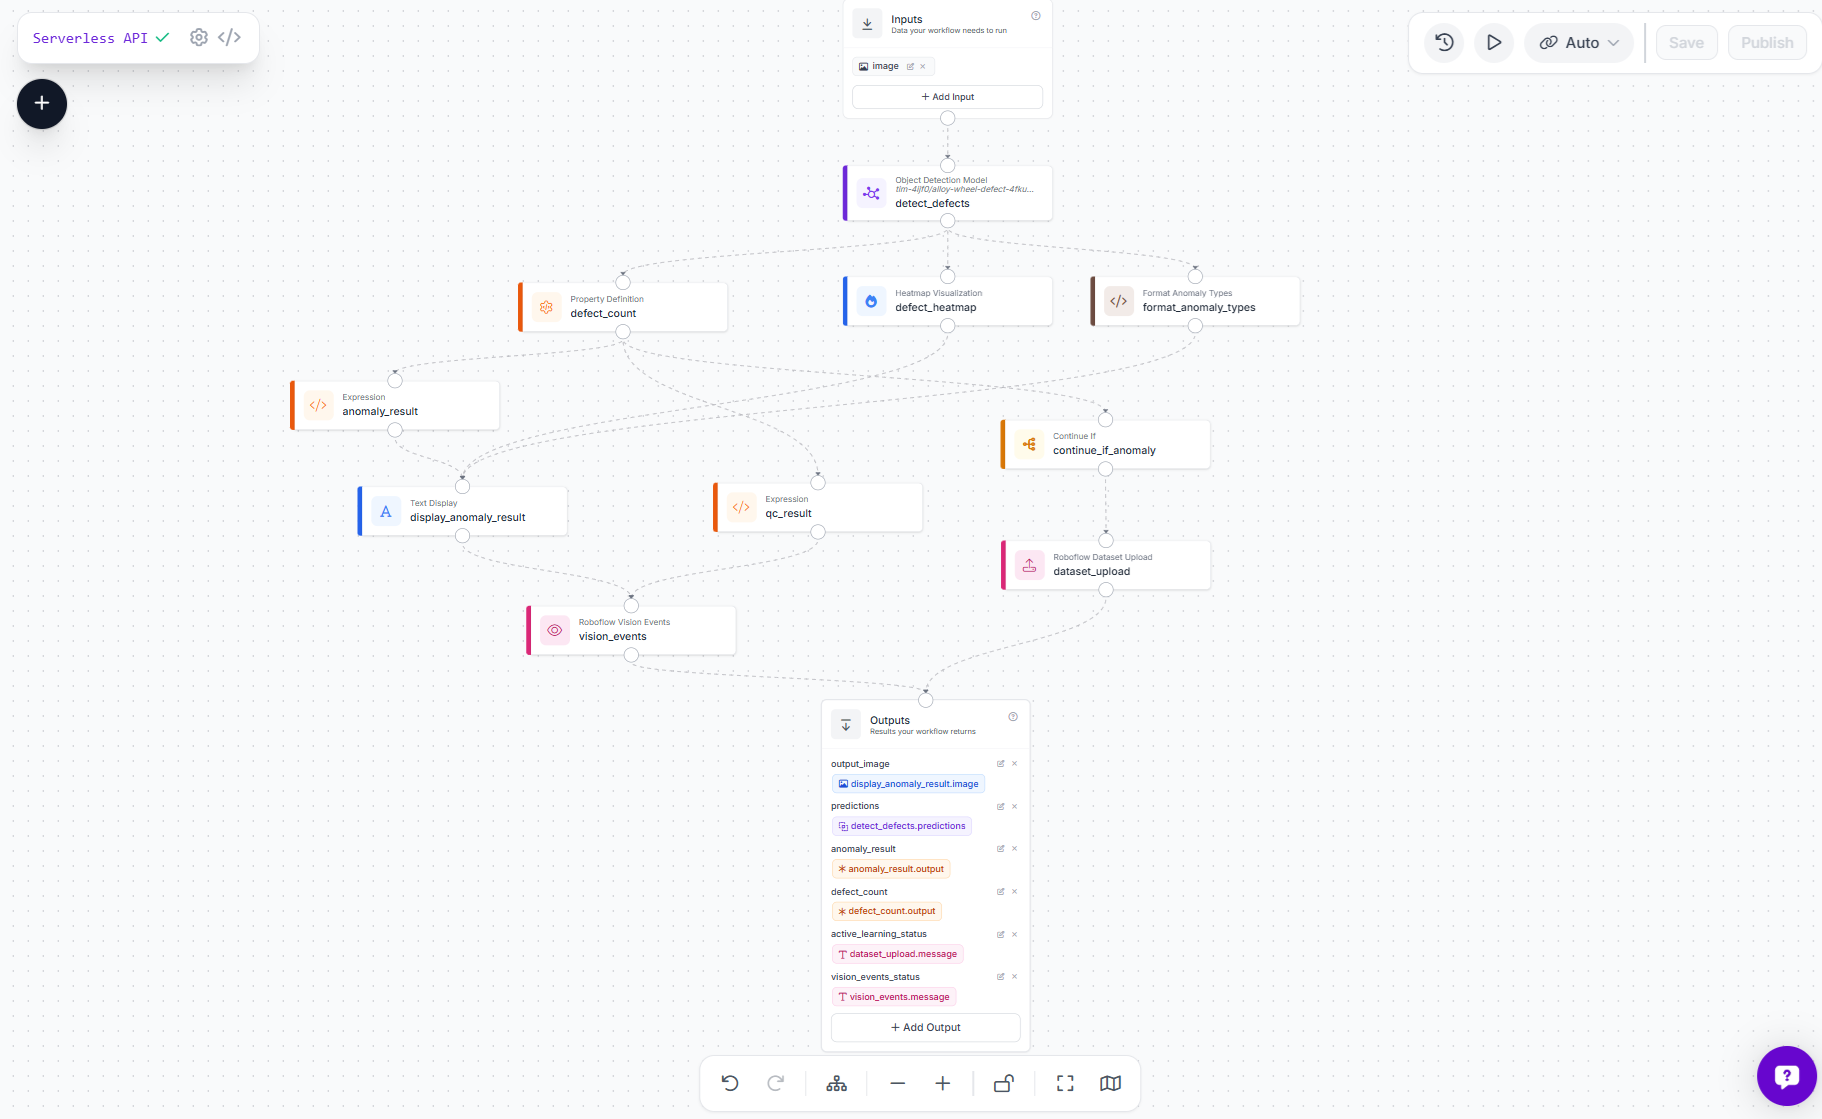
This workflow is an example of an automated visual inspection system for car alloy wheels. It uses a custom YOLO11s model trained to detect two visual defect types, scratch and paint-damage. The goal is simple, inspect a wheel image, decide whether it contains an anomaly, show the result visually, return structured JSON, and save useful failure cases for future model improvement.
How the process works
The workflow starts with a wheel image. The image is passed into a custom object detection model, alloy-wheel-defect-4fkug-1-yolo11s-t1, which looks specifically for scratches and paint damage. If the model finds one or more defects, the workflow marks the image as anomalous. If no defects are found, it marks the image as normal.
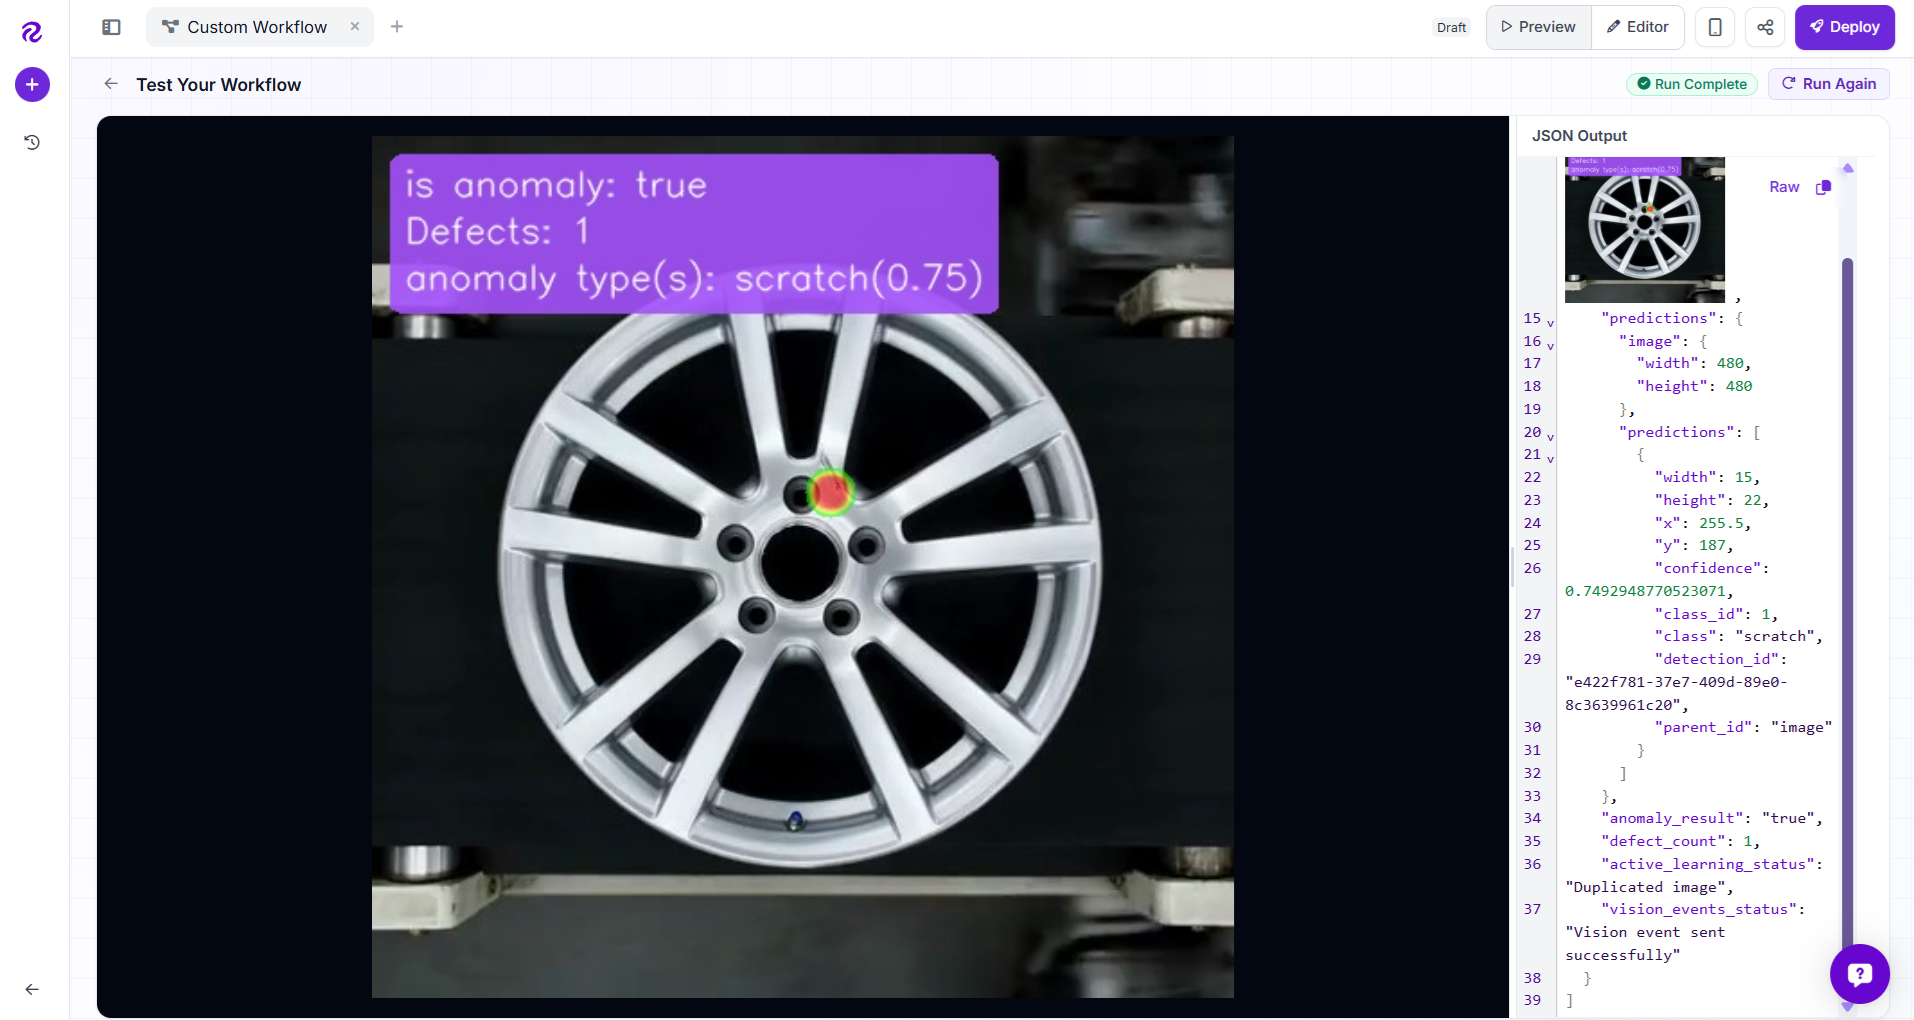
The final result is returned in two ways: an annotated image and JSON outputs. The image displays a heatmap over the defect area, plus a small text summary showing whether the wheel is anomalous, how many defects were found, and the anomaly types with confidence scores, for example:
is anomaly: true
Defects: 1
anomaly type(s): scratch(0.75), paint-damage(0.89)
Components in the workflow
Following are the components of the workflow.
1. Image Input
The workflow accepts a single image input. This can be a wheel photo from an API call, upload, camera frame, or inspection system.
2. Defect Detection Model
The detect_defects block runs the custom YOLO11s model. It is configured to detect only:
scratch
paint-damage
A custom confidence threshold of 0.4 is used, which helps catch likely defects while filtering out very weak predictions.
3. Defect Count
The defect_count block counts how many detections were returned by the model. This count becomes the basis for the inspection decision. If the count is 0, the wheel is treated as normal. If the count is greater than 0, the wheel is treated as anomalous.
4. Anomaly Result
The anomaly_result logic block converts the count into a simple boolean-style output true when defects are found, and false when no defects are found. This makes the output easy to consume in downstream systems, such as dashboards, APIs, PLCs, or QA tools.
5. Quality Check Result
The qc_result block converts the same defect count into a quality inspection result pass for clean wheels, and fail for wheels with scratches or paint damage. This is used for quality event tracking.
6. Heatmap Visualization
Instead of drawing bounding boxes, the workflow uses a heatmap visualization. The heatmap highlights the area where the defect was detected, giving the reviewer a softer and cleaner visual cue than a box and label. The heatmap is tuned with a smaller radius so it focuses tightly around the defect area rather than covering too much of the wheel.
7. Anomaly Text Overlay
The display_anomaly_result block adds a compact text overlay to the final image. It shows:
is anomaly: true/false
Defects: <count>
anomaly type(s): scratch(0.75)
This makes the image understandable at a glance, even without reading the JSON response.
8. Anomaly Type Formatter
A small custom formatting step turns raw predictions into readable text. For each detected defect, it combines the class name and confidence score rounded to two decimal places e.g. scratch(0.75), paint-damage(0.82) If no defects are found, it returns none .
9. Conditional Active Learning Upload
The workflow includes a dataset upload step for active learning, but it only runs when defect_count > 0.
That means clean wheels are not uploaded for review, while anomalous examples are saved back into the alloy-wheel-defect-4fkug project with model predictions as pre-labels. This keeps the review queue focused on useful defect examples that can be corrected and used to retrain a better model later.
10. Vision Events Logging
The workflow also sends a quality event to Vision Events. Each inspection is stored as a quality_check event with the image, visual result, predictions, and pass/fail status. This creates a searchable inspection history for reviewing defects, auditing quality, and tracking model behavior over time.
11. Outputs
The workflow returns:
- output_image
- predictions
- anomaly_result
- defect_count
- active_learning_status
- vision_events_status
Together, these outputs support both human review and machine integration. The image is useful for operators, while the JSON fields are useful for applications, dashboards, and automated quality systems.
Why is this workflow useful?
This workflow turns a trained defect detection model into a complete inspection pipeline. It does not just detect defects, it makes a pass/fail decision, creates a visual explanation, stores quality events, and captures real defect examples for active learning. That makes it a practical foundation for deploying alloy wheel inspection in production.
When you rin the workflow, you should see output similar to following.
YOLO for Anomaly Detection Conclusion
YOLO can be used as an effective anomaly detection model when anomalies are visible and can be labeled. With Roboflow you can manage the full workflow, collect images, annotate anomalies, prepare the dataset, train a YOLO model, evaluate performance, and deploy the model to real applications. The key steps are simple:
- Define what counts as an anomaly.
- Collect representative images.
- Annotate anomaly regions.
- Train a YOLO object detection model for defect detection.
- Evaluate the model on real examples.
- Deploy the model with Roboflow.
- Improve the model over time using new production data.
This approach gives you more than an image-level normal/abnormal result. It gives you the location, type, and confidence of each anomaly, making it useful for real-world inspection and automation systems. Try Roboflow for free today.
Cite this Post
Use the following entry to cite this post in your research:
Timothy M. (Jun 1, 2026). YOLO for Anomaly Detection. Roboflow Blog: https://blog.roboflow.com/yolo-for-anomaly-detection/