
YOLO-NAS is a new state-of-the-art object detection model developed by Deci. In this guide, we're going to discuss what YOLO-NAS is and how to train a YOLO-NAS model on a custom dataset.
To train our custom model, we will:
- Load a pre-trained YOLO-NAS model;
- Load a custom dataset from Roboflow;
- Set hyperparameter values;
- Use the
super-gradientsPython package to train the model on our data, and; - Evaluate the model to understand the results.
Without further ado, let's get started!
What is YOLO-NAS?
You Only Look Once Neural Architecture Search (YOLO-NAS) is the latest state-of-the-art (SOTA) real-time object detection model. YOLO-NAS achieves a higher mAP value at lower latencies when evaluated on the COCO dataset and compared to its predecessors, YOLOv6 and YOLOv8 .
YOLO-NAS is available as part of the super-gradients package maintained by Deci.
The following chart shows the result of Deci's benchmarks on the YOLO-NAS:
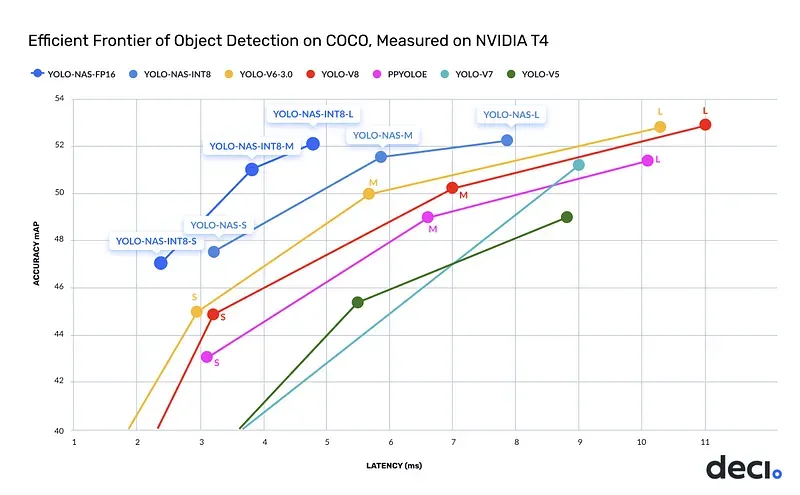
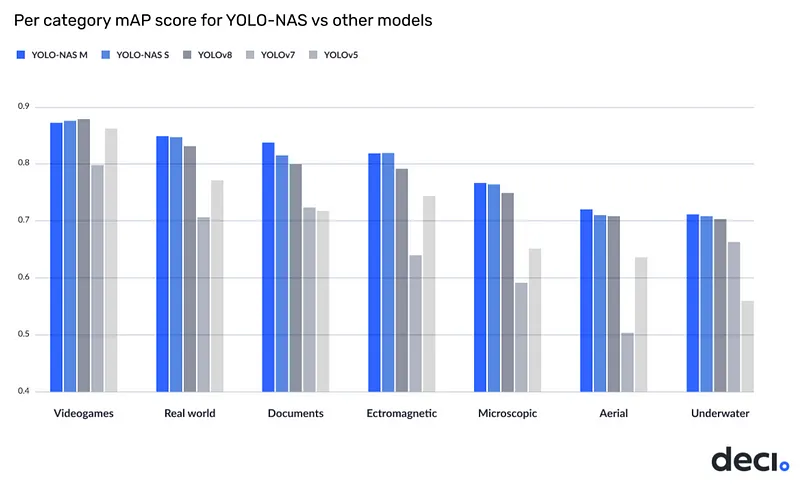
YOLO-NAS is also the best on the Roboflow 100 dataset benchmark, indicating the ease of its fine-tuning on a custom dataset.
In this written tutorial (and the video below), we will explore how to fine-tune YOLO-NAS on the custom dataset. As usual, we have prepared a Google Colab that you can open in a separate tab and follow our tutorial step by step. Let’s dive in!
Python Environment Setup
Before we start training, we need to prepare our Python environment. Let’s start by installing three pip packages. The YOLO-NAS model itself is distributed using a super-gradients package. Remember that the model is still being actively developed. To maintain the stability of the environment, it is a good idea to pin a specific version of the package. In addition, we will install roboflow and supervision, which will allow us to download the dataset from Roboflow Universe and visualize the results of our training respectively.
pip install super-gradients==3.1.1
pip install roboflow
pip install supervision
If you are running YOLO-NAS in Jupyter Notebook, don’t forget to restart the environment after installation is complete.
Inference with YOLO-NAS Using Pre-trained COCO Model
Before you start training, it’s a good idea to make sure the installation goes according to plan. The easiest way to do this is to make a test inference using one of the pre-trained models. At the same time, this will also allow us to familiarize ourselves with the YOLO-NAS API.
Load YOLO-NAS Model
To perform inference using the pre-trained COCO model, we first need to choose the size of the model. YOLO-NAS offers three different model sizes: yolo_nas_s, yolo_nas_m, and yolo_nas_l.
The yolo_nas_s model is the smallest and fastest, but it probably won’t be as accurate as the larger models. Conversely, the yolo_nas_l model is the largest, most accurate, and slowest. The yolo_nas_m model offers a middle ground between the two.
import torch
from super_gradients.training import models

DEVICE = 'cuda' if torch.cuda.is_available() else 'cpu'
MODEL_ARCH = 'yolo_nas_l'
#            'yolo_nas_m'
#            'yolo_nas_s'

model = models.get(MODEL_ARCH, pretrained_weights="coco").to(DEVICE)
YOLO-NAS Model Inference
The inference process involves setting a confidence threshold and calling the predict method. The predict method will return a list of predictions, where each prediction corresponds to an object detected in the image.
CONFIDENCE_TRESHOLD = 0.35

result = list(model.predict(image, conf=CONFIDENCE_TRESHOLD))[0]
YOLO-NAS Inference Output Format
The output of YOLO-NAS inference is an ImageDetectionPrediction object which encapsulates the details of the objects detected in the image. This object contains three fields:
image- NumPy array representing the image used for inference.class_names- Python list of category names used during the model's training.prediction- Instance of theDetectionPredictionclass, which contains detailed information about the detections made by the model.
The DetectionPrediction the object has three fields:
bboxes_xyxy- NumPy array of shape(N, 4), representing the bounding boxes of the detected objects inxyxyformat.confidence- NumPy array of shape(N,), representing the confidence values of the detections. Each value is between0and1.labels- NumPy array of shape(N,), representing the class IDs of the detected objects. Each class ID corresponds to an index in theclass_nameslist.
Fine-tune YOLO-NAS with Open-source Datasets
To fine-tune a model, we need data. We will use the Football Players Detection Image Dataset. If you already have a dataset in YOLO format, feel free to use it. If you don’t, please take a look at Roboflow Universe. We have over 200,000+ open-source projects there, and all of them can be exported in any format.
import roboflow
from roboflow import Roboflow

roboflow.login()

rf = Roboflow()
project = rf.workspace(WORKSPACE_ID).project(PROJECT_ID)
dataset = project.version(PROJECT_VERSION).download("yolov5")
Select Hyperparameter Values
To train the YOLO-NAS model, you’ll need to set several key parameters. First, you’ll need to select the model size. There are three options available: small, medium, and large. Keep in mind that a larger model may take longer to train and require more memory, so if you’re working with limited resources, you might want to consider using a smaller model.
Next, you’ll need to set the batch size. This parameter dictates how many images will pass through the neural network during each iteration of the training process. A larger batch size will speed up the training process but will also require more memory.
MODEL_ARCH = 'yolo_nas_l'
BATCH_SIZE = 8
MAX_EPOCHS = 25
CHECKPOINT_DIR = f'{HOME}/checkpoints'
EXPERIMENT_NAME = project.name.lower().replace(" ", "_")
LOCATION = dataset.location
CLASSES = sorted(project.classes.keys())

dataset_params = {
    'data_dir': LOCATION,
    'train_images_dir':'train/images',
    'train_labels_dir':'train/labels',
    'val_images_dir':'valid/images',
    'val_labels_dir':'valid/labels',
    'test_images_dir':'test/images',
    'test_labels_dir':'test/labels',
    'classes': CLASSES
}

from super_gradients.training.dataloaders.dataloaders import (
    coco_detection_yolo_format_train, coco_detection_yolo_format_val)

train_data = coco_detection_yolo_format_train(
    dataset_params={
        'data_dir': dataset_params['data_dir'],
        'images_dir': dataset_params['train_images_dir'],
        'labels_dir': dataset_params['train_labels_dir'],
        'classes': dataset_params['classes']
    },
    dataloader_params={
        'batch_size': BATCH_SIZE,
        'num_workers': 2
    }
)

val_data = coco_detection_yolo_format_val(
    dataset_params={
        'data_dir': dataset_params['data_dir'],
        'images_dir': dataset_params['val_images_dir'],
        'labels_dir': dataset_params['val_labels_dir'],
        'classes': dataset_params['classes']
    },
    dataloader_params={
        'batch_size': BATCH_SIZE,
        'num_workers': 2
    }
)
Finally, you’ll need to set the number of epochs for the training process. This is essentially the number of times the entire dataset will pass through the neural network.
Train a Custom YOLO-NAS Model
As you may have noticed, the process of training the model is more verbose than with YOLOv8. Many features in the Ultralytics model require passing a parameter in the CLI, whereas, in the case of YOLO-NAS, it requires custom logic to be written.
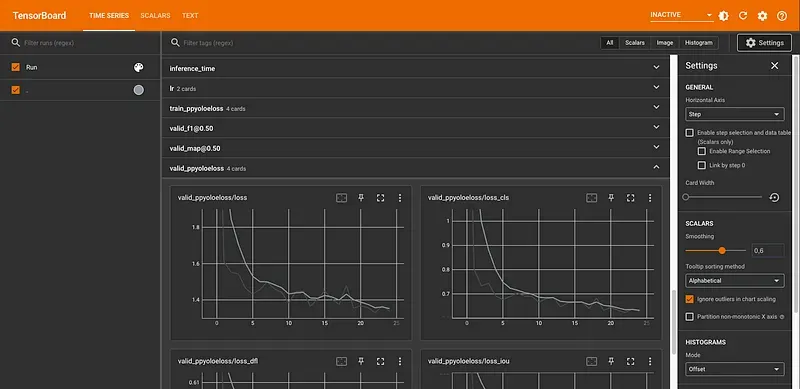
Finally, we are ready to start training. Before the call train method, it is worthwhile to run TensorBoard. This will allow us to track key metrics of our training in real time. It is worth mentioning that YOLO-NAS also supports the most popular experiment loggers like W&B.
trainer.train(
    model=model,
    training_params=train_params,
    train_loader=train_data,
    valid_loader=val_data
)
Evaluating the Custom YOLO-NAS Model
After training, you can evaluate your model's performance using the test method provided by the Trainer. You will need to pass in the test set data loader, and the trainer will return a list of metrics, including the Mean Average Precision (mAP) which is commonly used for evaluating object detection models.
trainer.test(
    model=best_model,
    test_loader=test_data,
    test_metrics_list=DetectionMetrics_050(
        score_thres=0.1,
        top_k_predictions=300,
        num_cls=len(dataset_params['classes']),
        normalize_targets=True,
        post_prediction_callback=PPYoloEPostPredictionCallback(
            score_threshold=0.01,
            nms_top_k=1000,
            max_predictions=300,
            nms_threshold=0.7
        )
    )
)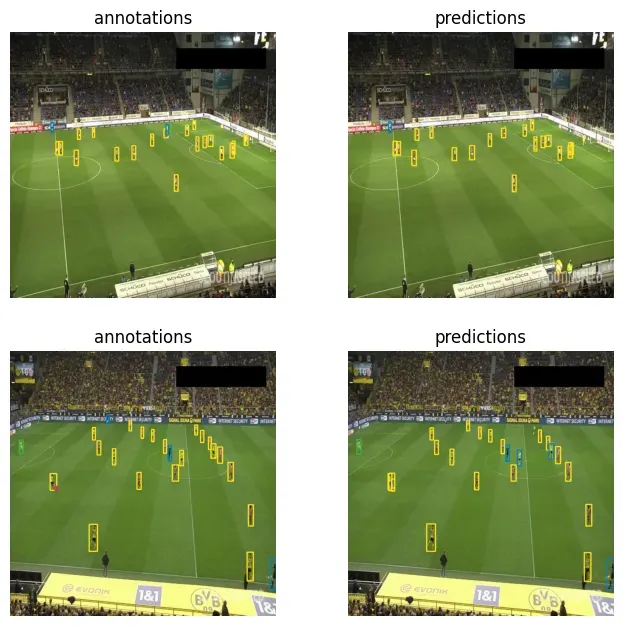
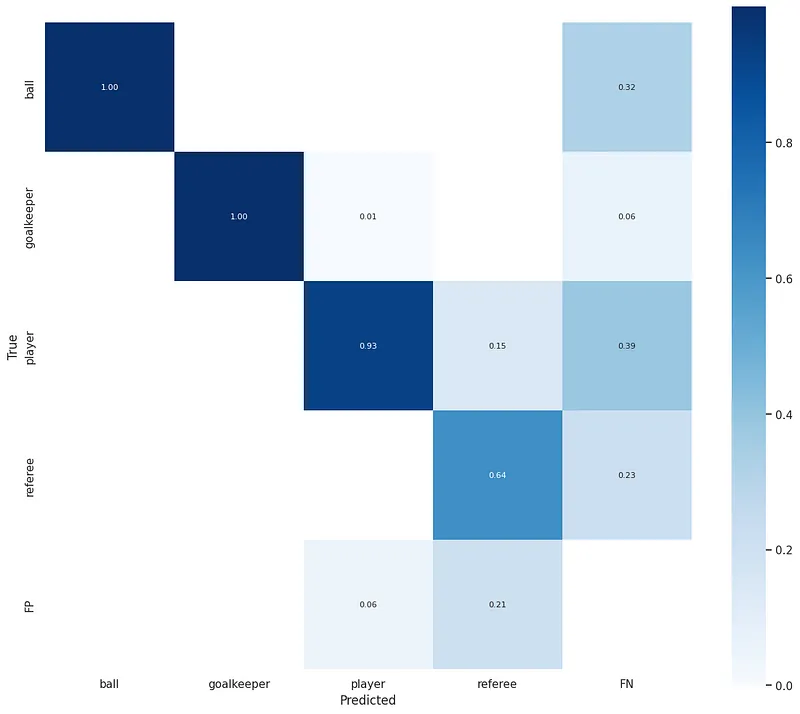
Additionally, you can perform inference on test set images and visualize the results to understand better how your model performs on individual examples. You can also calculate the confusion matrix to get a more detailed view of your model’s performance for each class.
Conclusion
Overnight, YOLO-NAS has become a new option when it comes to real-time object detectors. Remember to consider all aspects when fine-tuning the model for your project — from model accuracy through the speed of inference to ease of training and licensing restrictions.
Frequently Asked Questions
What does the NAS mean in YOLO-NAS?
NAS refers to Neural Architecture Search, a technology that aims to find the most optimal model architecture for a given problem.
How does YOLO-NAS compare to other YOLO models?
YOLO-NAS achieves ~0.5 mAP points more and 10-20% faster inference times than YOLOv8 and YOLOv7, according to the YOLO-NAS README.
Cite this Post
Use the following entry to cite this post in your research:
Piotr Skalski. (May 16, 2023). How to Train YOLO-NAS on a Custom Dataset. Roboflow Blog: https://blog.roboflow.com/yolo-nas-how-to-train-on-custom-dataset/