

Cosmetic defect detection with computer vision catches visible flaws like paint scratches, chips, and dents that pass function tests but still fail on appearance, and this guide builds a working car-parts inspector end to end in Roboflow. A custom RF-DETR model detects the bumper, door, and paint_scratch, then a Workflow counts each scratch, ties it to the affected part, and outputs a pass/fail result with a repair-routing recommendation and an annotated image.
A product can work correctly and still be rejected because of how it looks. A scratch on a vehicle door, a stain on a shoe, a dent in an appliance, or a chipped coating on a metal enclosure may not immediately stop the product from functioning, but it can reduce its value, create customer complaints, and require rework.
This is where cosmetic defect detection with computer vision can help. Cameras capture product surfaces and a computer vision model can identify visible imperfections, locate them in the image, and connect the defect to the affected product or component.
In this guide, I will show you how to build a cosmetic defect detection on car parts in a manufacturing settings. The system uses a custom RF-DETR object detection model to detect car parts such as bumper, door, and cosmetic defect paint_scratch. The computer vision model identifies whether a scratch is located on a bumper or a door then the logic counts the scratches, associates each scratch with the relevant car part, generates an inspection result, recommends an action, and produces an annotated inspection image.
What Is a Cosmetic Defect?
A cosmetic defect is a visible imperfection that changes the appearance of a product. It may not prevent the product from performing its intended function, but it can affect customer acceptance, resale value, finish quality, or brand perception.
For example, a car door with a light paint scratch or chip may still open and close normally. However, it affects the car’s appearance and may require polishing, touch-up, or repainting. Cosmetic defects commonly include but not limited to:
| Defect type | Examples |
|---|---|
| Surface removal | Paint chips, coating loss and peeling |
| Surface marks | Scratches, scuffs and abrasions |
| Surface deformation | Small dents, impressions and wrinkles |
| Contamination | Dirt, stains, glue residue and water spots |
| Colour problems | Discoloration, fading and inconsistent paint |
| Finish problems | Orange peel, paint runs, uneven gloss and rough texture |
| Printing problems | Blurred logos, missing print and incorrect labels |
| Edge damage | Chipped corners, worn edges and damaged trim |
The classification of a defect as cosmetic defect can depend on its depth, size, location, and product requirements. For example, a shallow scratch may be cosmetic paint_scratch, while a deep scratch that exposes bare metal may require additional corrosion or structural inspection. A computer vision system should therefore support the inspection process rather than make safety-critical conclusions without human review. Consider a vehicle door:
- A small paint scratch is usually a cosmetic defect.
- A broken handle is a functional defect.
- A deep crack in the door structure may be a structural defect.
- A dent may be cosmetic or more serious depending on its location and depth.
These boundaries are not always absolute. The same visible issue can trigger different responses depending on the product type, industry standards, and inspection criteria. This is why many production systems are designed to flag uncertain or high-severity cases for human review rather than making final pass/fail decisions automatically.
Industries That Use Cosmetic Defect Detection
Cosmetic inspection is useful wherever the appearance of a finished product matters. Following are some popular examples.
- Automotive manufacturing and repair: Systems inspect doors, bumpers, fenders, bonnets, and other exterior panels for scratches, paint chips, scuff marks, dents, paint runs, water spots, and coating imperfections.
- Consumer electronics: Smartphones, laptops, tablets, and wearables are checked for scratched screens or glass, chipped frames, coating wear, dents, stains, and damaged printed logos or branding.
- Home appliances: Refrigerators, washing machines, air conditioners, and kitchen appliances are inspected for dents, scratches, coating damage, colour variation, and surface contamination.
- Furniture: Wooden, plastic, and metal furniture can be examined for scratches, stains, chipped laminate or veneer, damaged edges, uneven paint or finish, and surface dents.
- Packaging: Bottles, cans, jars, boxes, labels, and containers are checked for crushed corners, torn or misaligned labels, stains, scratches, printing defects, and damaged seals.
- Footwear and leather goods: Shoes, bags, belts, and wallets may be inspected for glue marks or excess adhesive, scratches, scuffs, stains, stitching irregularities, and material wrinkles or creases.
- Ceramics and glass: Plates, tiles, sanitaryware, and glass products are commonly inspected for chips, scratches, glaze or coating defects, stains, bubbles, and surface cracks.
Read our tutorials on following:
How to Do Cosmetic Defect Detection Using Roboflow
This project detects cosmetic paint scratches on two car parts "bumper" and "door". The trained model detects three classes:
| Class | Purpose |
|---|---|
bumper |
Locates the vehicle bumper |
door |
Locates the vehicle door |
paint_scratch |
Locates a visible cosmetic paint scratch |
The Workflow accepts an image, detects the parts and defects, counts only the scratch predictions, assigns each scratch to a detected part, and produces both visual and structured outputs.
Why Detect the Car Part and the Defect?
A model trained only on paint_scratch could report that a scratch exists, but it would not know which component is affected. For example, this result is incomplete:
Scratch detectedA more useful inspection result is:
One paint scratch detected on the front bumper.
Route the bumper to paint repair.
Detecting the component and the defect in the same model provides three important pieces of information:
- What defect was found?
A paint scratch. - Where is the defect?
The bounding-box coordinates show its image location. - Which component is affected?
The scratch is associated with a bumper or door.
This part-level information is useful for repair routing, quality reports, work orders, inspection dashboards, and defect statistics. It also avoids requiring the operator to manually enter the affected component after every inspection.
Step 1: Create an Object Detection Project
In Roboflow, create a new project and choose Object Detection as the project type. Object detection is appropriate because both car parts and scratches need bounding-box annotations. Use three consistent class names:
bumperdoorpaint_scratch
Step 2: Collect and Upload Images
The dataset should include images showing bumper, doors, different paint colors of components, different scratch lengths and orientations. Defect-free images are important. They teach the model that a normal door or bumper should not automatically produce a paint_scratch prediction. For production inspection, camera placement should be reasonably controlled. A consistent camera distance, angle, and lighting arrangement makes small surface defects easier to detect. A useful inspection station may include:
- A fixed camera
- Diffused lights
- A plain background
- A marked vehicle or component position
- A defined inspection distance
The training set should still include realistic variation so the model does not depend on one exact setup.
Step 3: Annotate the Dataset
Draw bounding boxes around every visible bumper, door, and paint scratch.
Dataset annotation
Step 4: Generate a Dataset Version
Generate the dataset version. Apply the required preprocessing and augmentation to the images.
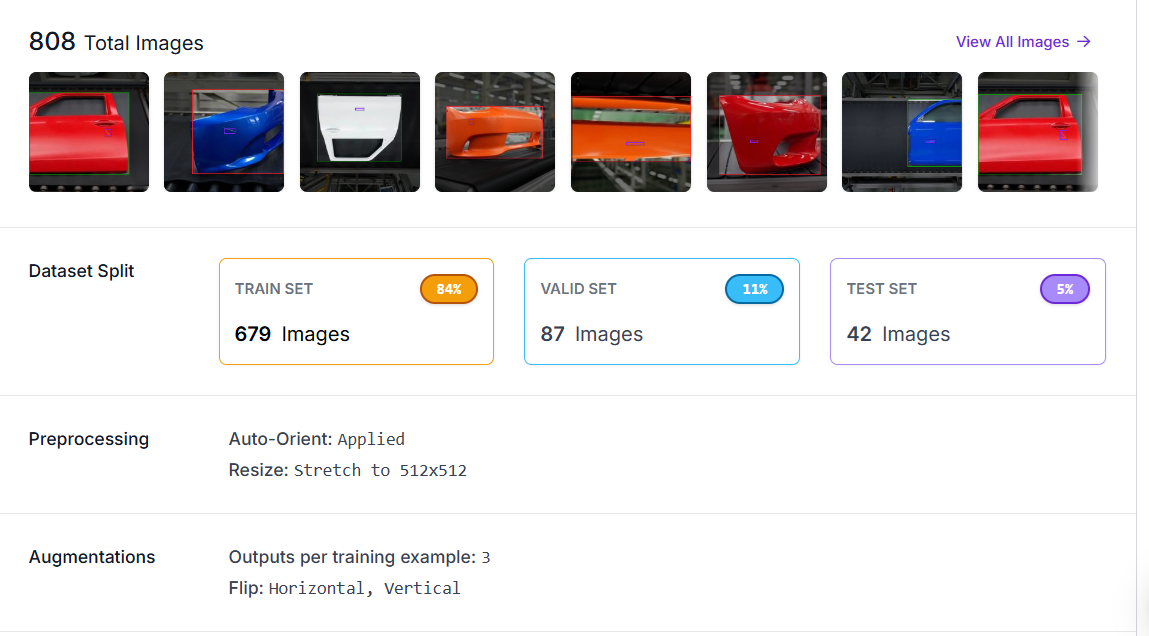
Step 5: Train an RF-DETR Small Model
After generating the dataset version, select Custom Train and choose RF-DETR Small as the object detection architecture.
Train cosmetic defect RF-DETR model
Step 6: Build the Roboflow Workflow
A trained model returns detections, but a useful inspection application needs additional logic. Roboflow Workflows combines model inference, data transformation, visualization, and decision logic using connected blocks. Blocks can run model inference, extract prediction properties, apply expressions, draw results, and connect to external services. The Workflow used in this project looks like following.
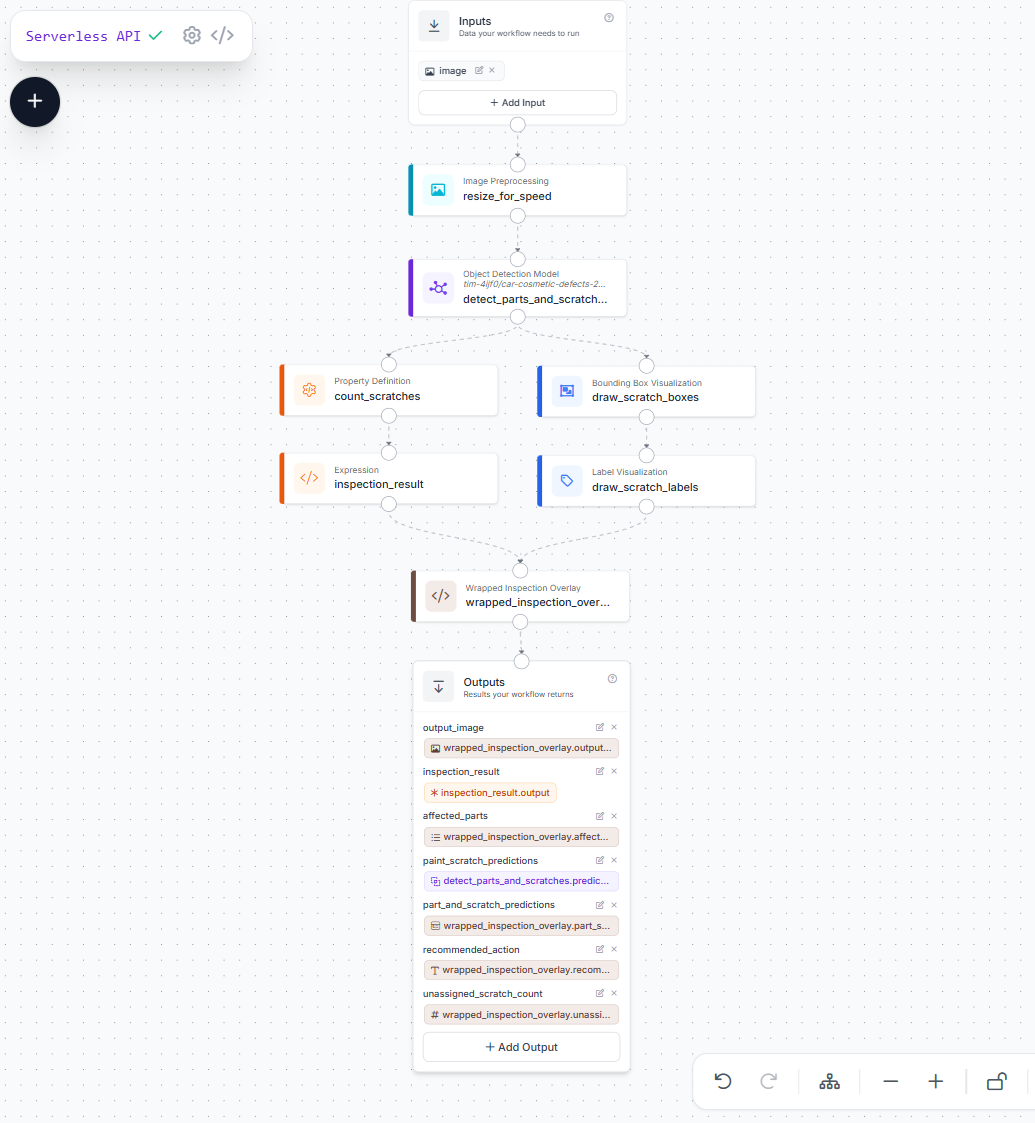
The model predictions are used by two parallel branches:
- A reporting branch counts scratches and creates a pass/fail result.
- A visualization branch draws boxes and labels.
The branches then feed into the custom reporting overlay. Roboflow’s Workflow documentation explains that branches without dependencies can execute in parallel and later feed their results into downstream blocks.
Image Input
Add an image input. The input may contain:
- A bumper
- A door
- One or more scratches
- A defect-free surface
The same Workflow can later receive images from an upload interface, batch-processing job, inspection camera, or application API.
Resize the input image/frame
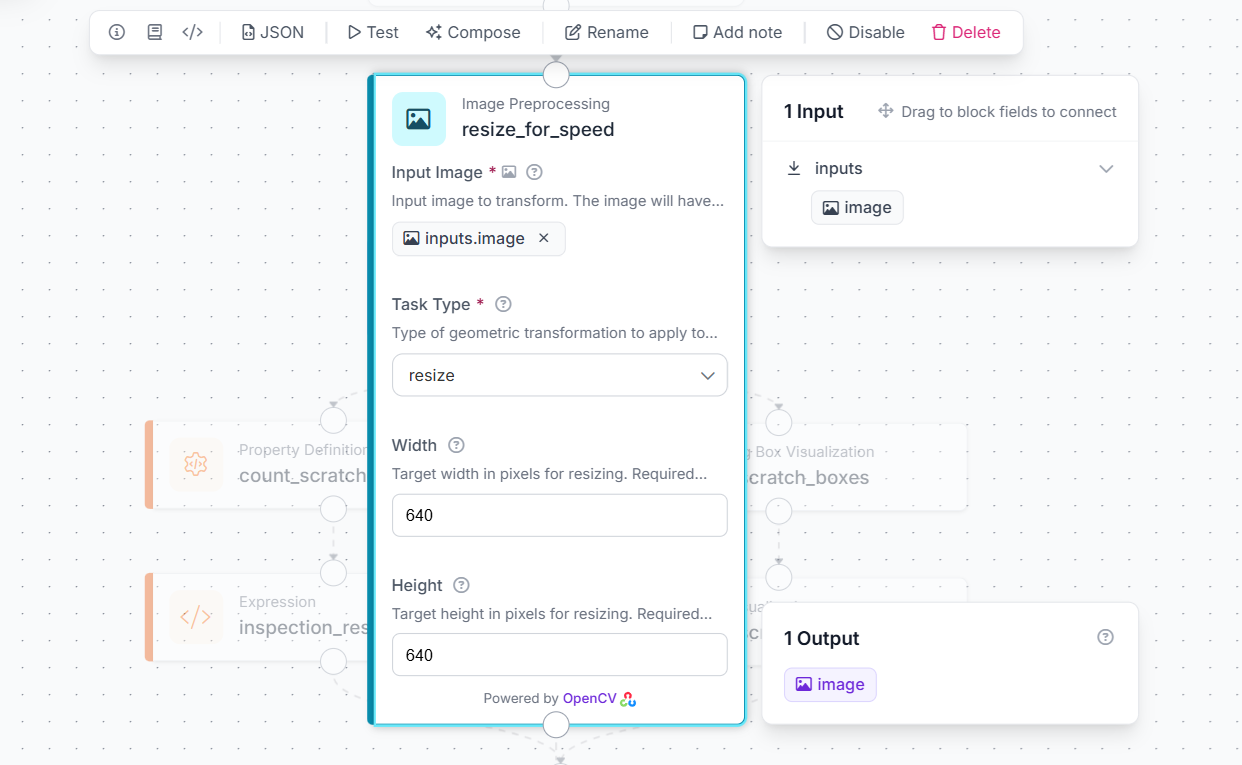
Add an Image Preprocessing block and name it resize_for_speed. Configure it as:
- Task: Resize
- Width: 640
- Height: 640
The block limits the input image size before inference and creates more consistent runtime behaviour. The workflow first resizes incoming images to 640 × 640.
Detect Parts and Scratches
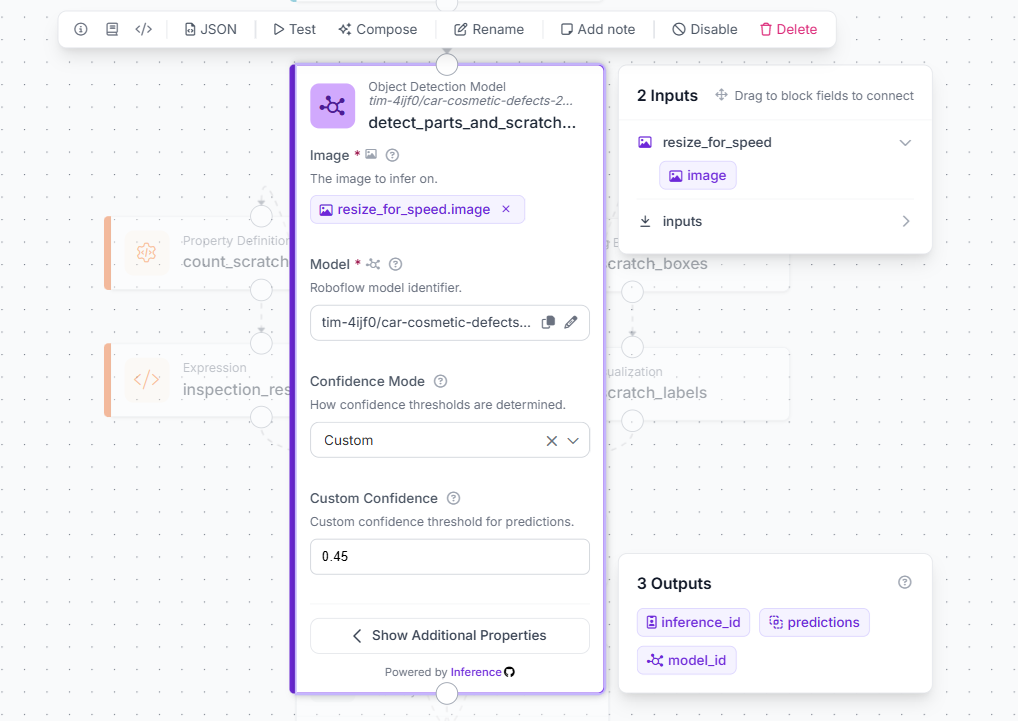
Add an Object Detection Model block and name itdetect_parts_and_scratches. Select the trained model car-cosmetic-defects-2-rfdetr-small-t1. Configure the class filter paint_scratch, bumper, door. Use the following settings:
Confidence threshold: 0.45
IoU threshold: 0.30
Maximum detections: 50
The Object Detection Model block predicts class labels and bounding-box locations. Its class filter limits the returned results, while confidence, IoU, and maximum-detection parameters control which predictions are retained.
Count Paint Scratches
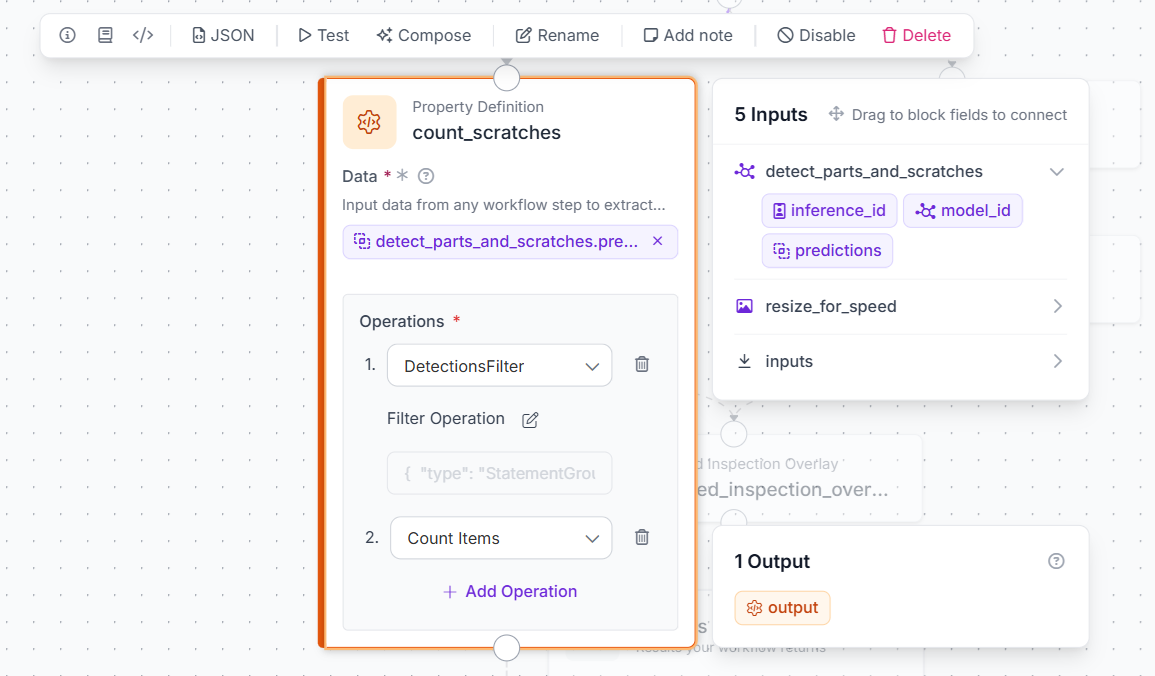
Add a Property Definition block and name it count_scratches. The model also detects bumper and door, so counting all predictions would be incorrect. First filter the predictions where class_name == "paint_scratch" then apply SequenceLength. This returns the number of detected scratches. For example:
Model detections:
1 bumper
1 door
2 paint_scratch

All detections: 4
Correct scratch count: 2
The Property Definition block is designed to extract information such as classes, confidences, image properties, or the number of detections from Workflow data. The Workflow’s scratch-count block specifically filters paint_scratch before counting so detected parts are not treated as defects.
Create the Inspection Result
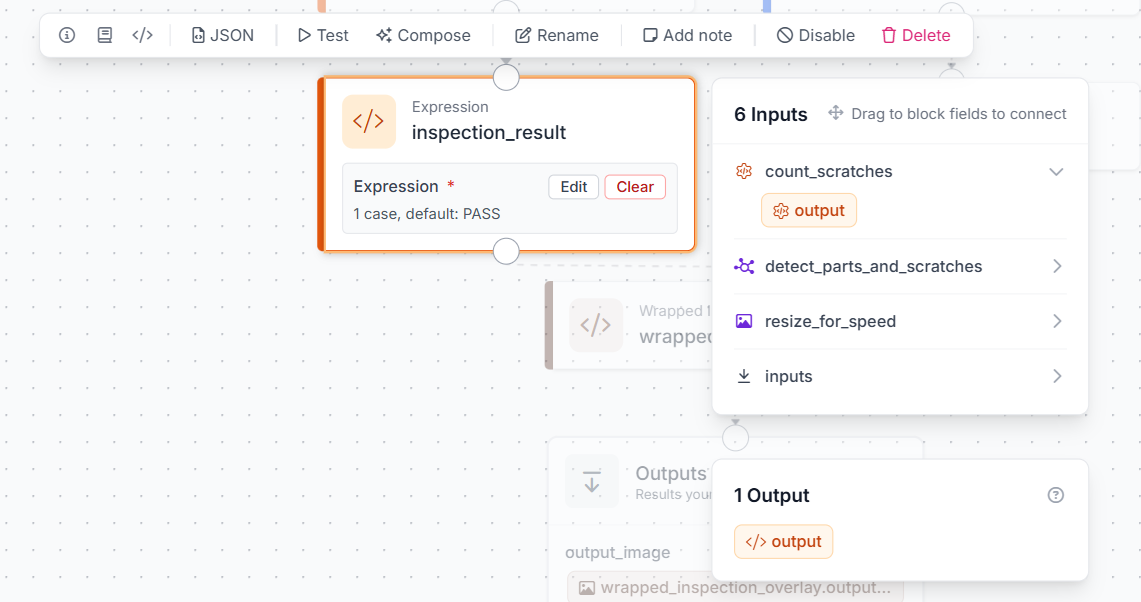
Add an Expression block named inspection_result. Use the following logic:
If scratch_count > 0:
    FAIL
Otherwise:
    PASS
The Expression block converts a numeric count into a simple business output. Roboflow lists Expression as an advanced Workflow block that produces an output using defined input variables and configured rules. In this demonstration:
0 scratches → PASS
1 or more scratches → FAIL
Here, FAIL means that a paint scratch was detected and the part requires further action. It should not be interpreted as a vehicle safety assessment. The pass/fail decision is intentionally simple. The more distinctive part of this project is not severity grading; it is identifying which component should be sent to paint repair.
Draw Bounding Boxes and Labels
Add a Bounding Box Visualization block and named draw_scratch_boxes. Add a Label Visualization block and name it draw_scratch_labels. Use the image returned by the bounding-box visualization as its image input. Configure the displayed text as Class and confidence.
Add Part-Level Inspection Logic
The standard Workflow blocks provide detections, counts, decisions, boxes, and labels. A custom Python block adds the relationship between scratches and vehicle parts. Name the block as wrapped_inspection_overlay. It receives four main inputs:
imagepredictionsinspection_resultscratch_count
It returns:
output_imageaffected_partspart_status_reportrecommended_actionunassigned_scratch_count
The custom python block is the central reporting component of the Workflow.
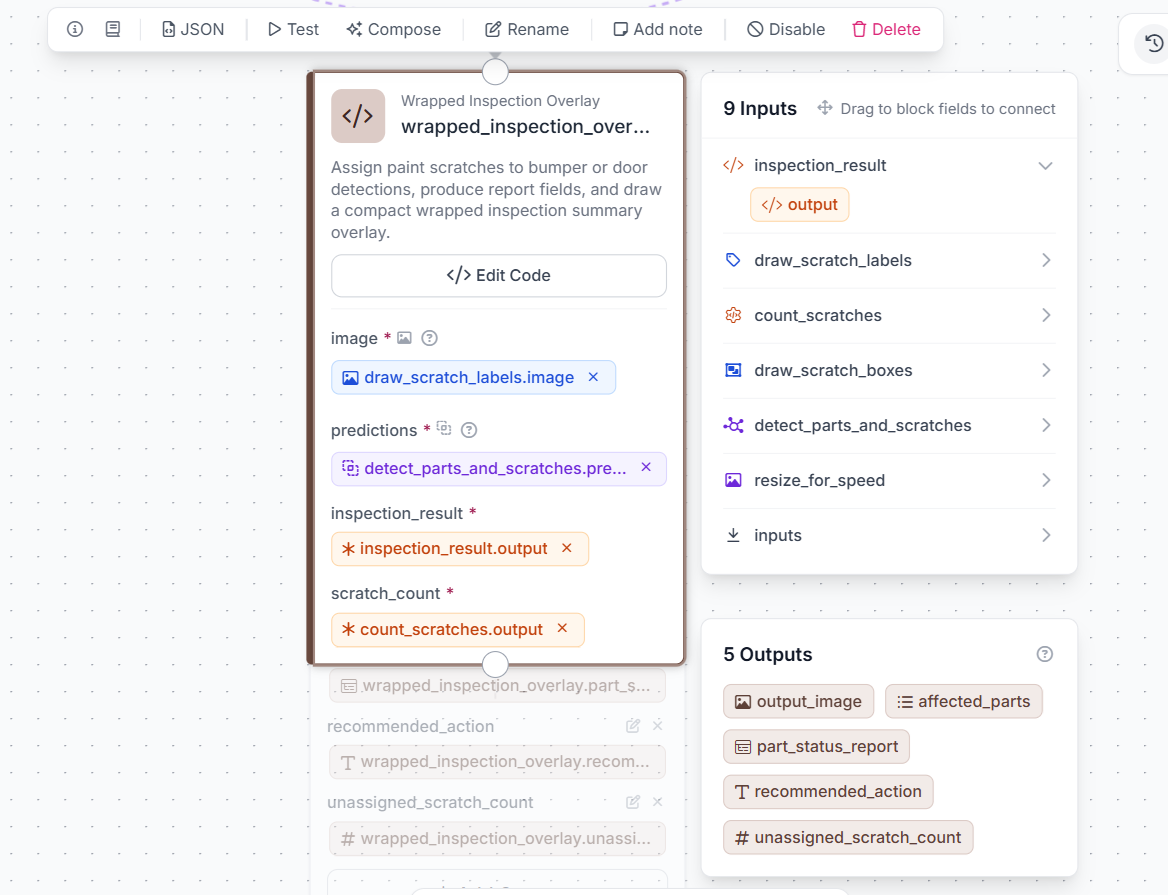
It converts raw detections into a part-level report and draws a compact inspection summary on the output image. Here's the code for this block.
def run(self, image, predictions, inspection_result, scratch_count):
    target_parts = ['bumper', 'door']
    report = {p: {'detected': False, 'scratch_count': 0, 'status': 'NOT_DETECTED'} for p in target_parts}
    affected_parts = []
    unassigned = 0

    if predictions is not None and len(predictions) > 0:
        names = list(predictions.data.get('class_name', []))
        boxes = predictions.xyxy
        part_boxes = []
        scratch_boxes = []
        for i, box in enumerate(boxes):
            name = str(names[i]) if i < len(names) else ''
            x1b, y1b, x2b, y2b = [float(v) for v in box]
            if name in target_parts:
                report[name]['detected'] = True
                report[name]['status'] = 'OK'
                area = max(0.0, x2b - x1b) * max(0.0, y2b - y1b)
                part_boxes.append({'part': name, 'box': (x1b, y1b, x2b, y2b), 'area': area})
            elif name == 'paint_scratch':
                scratch_boxes.append((x1b, y1b, x2b, y2b))

        for sx1, sy1, sx2, sy2 in scratch_boxes:
            cx = (sx1 + sx2) / 2.0
            cy = (sy1 + sy2) / 2.0
            containing = []
            for part in part_boxes:
                px1, py1, px2, py2 = part['box']
                if px1 <= cx <= px2 and py1 <= cy <= py2:
                    containing.append(part)
            if len(containing) > 0:
                chosen = min(containing, key=lambda p: p['area'])
                part_name = chosen['part']
                report[part_name]['scratch_count'] += 1
                report[part_name]['status'] = 'DEFECT_FOUND'
                if part_name not in affected_parts:
                    affected_parts.append(part_name)
            else:
                unassigned += 1

    affected_parts = sorted(affected_parts)
    if unassigned > 0:
        affected_parts.append('unknown_part')

    if len(affected_parts) == 0:
        action = 'Pass inspection, no scratches detected on bumper or door'
    else:
        repair_parts = [p for p in affected_parts if p != 'unknown_part']
        if len(repair_parts) > 0:
            action = 'Route ' + ', '.join(repair_parts) + ' to paint repair'
            if unassigned > 0:
                action += '; review unassigned scratch location'
        else:
            action = 'Review scratch location, defect was not inside a detected bumper or door'

    arr = image.numpy_image.copy()
    h, w = arr.shape[:2]
    result = str(inspection_result).strip()
    count = str(scratch_count).strip()
    parts_text = ', '.join(affected_parts) if len(affected_parts) > 0 else 'none'

    status_hex = '#16A34A' if result.upper() == 'PASS' else '#DC2626'
    try:
        status_color = tuple(int(v) for v in sv.Color.from_hex(status_hex).as_bgr())
        white = tuple(int(v) for v in sv.Color.from_hex('#FFFFFF').as_bgr())
        panel_border = tuple(int(v) for v in sv.Color.from_hex('#334155').as_bgr())
    except Exception:
        status_color = (38, 38, 220) if result.upper() != 'PASS' else (74, 163, 22)
        white = (255, 255, 255)
        panel_border = (85, 65, 51)

    font = cv2.FONT_HERSHEY_SIMPLEX
    font_scale = max(0.36, min(0.50, w / 1550.0))
    title_scale = font_scale + 0.05
    thickness = 1
    pad = max(8, int(w * 0.012))
    line_gap = max(5, int(h * 0.01))
    max_panel_width = min(int(w * 0.92), 540)
    max_text_width = max_panel_width - 2 * pad

    def text_width(text, scale=font_scale):
        return cv2.getTextSize(str(text), font, scale, thickness)[0][0]

    def wrap_text(text, max_width):
        words = str(text).split()
        if not words:
            return ['']
        lines = []
        current = words[0]
        for word in words[1:]:
            candidate = current + ' ' + word
            if text_width(candidate) <= max_width:
                current = candidate
            else:
                lines.append(current)
                current = word
        lines.append(current)
        return lines

    title = 'CAR PART COSMETIC INSPECTION'
    lines = [('Result: ' + result, title_scale, status_color, True), ('Paint scratches: ' + count, font_scale, white, False)]
    for wrapped in wrap_text('Affected parts: ' + parts_text, max_text_width):
        lines.append((wrapped, font_scale, white, False))
    for wrapped in wrap_text('Action: ' + action, max_text_width):
        lines.append((wrapped, font_scale, white, False))

    text_heights = []
    widest = text_width(title, title_scale)
    for text, scale, _, _ in lines:
        (tw, th), _ = cv2.getTextSize(text, font, scale, thickness)
        widest = max(widest, tw)
        text_heights.append(th)

    panel_w = min(max_panel_width, max(widest + 2 * pad, 240))
    title_h = cv2.getTextSize(title, font, title_scale, thickness)[0][1]
    panel_h = pad + title_h + line_gap + sum(text_heights) + line_gap * (len(lines) - 1) + pad

    x1, y1 = pad, pad
    x2, y2 = min(w - pad, x1 + panel_w), min(h - pad, y1 + panel_h)
    overlay = arr.copy()
    cv2.rectangle(overlay, (x1, y1), (x2, y2), (15, 15, 15), -1)
    cv2.addWeighted(overlay, 0.72, arr, 0.28, 0, arr)
    cv2.rectangle(arr, (x1, y1), (x2, y2), panel_border, 1)
    cv2.rectangle(arr, (x1, y1), (x1 + 5, y2), status_color, -1)

    cursor_y = y1 + pad + title_h
    cv2.putText(arr, title, (x1 + pad, cursor_y), font, title_scale, white, thickness, cv2.LINE_AA)
    cursor_y += line_gap + 3
    for idx, (text, scale, color, bold) in enumerate(lines):
        th = cv2.getTextSize(text, font, scale, thickness)[0][1]
        cursor_y += th + (line_gap if idx > 0 else 0)
        cv2.putText(arr, text, (x1 + pad, cursor_y), font, scale, color, thickness + (1 if bold else 0), cv2.LINE_AA)

    output = WorkflowImageData.copy_and_replace(origin_image_data=image, numpy_image=arr)
    return {
        'output_image': output,
        'affected_parts': affected_parts,
        'part_status_report': report,
        'recommended_action': action,
        'unassigned_scratch_count': int(unassigned),
    }
Configure the Workflow Outputs
Add the required values to the Outputs block. The final image contains:
- Part boxes
- Scratch boxes
- Class labels
- Confidence scores
- Inspection result
- Scratch count
- Affected parts
- Recommended action
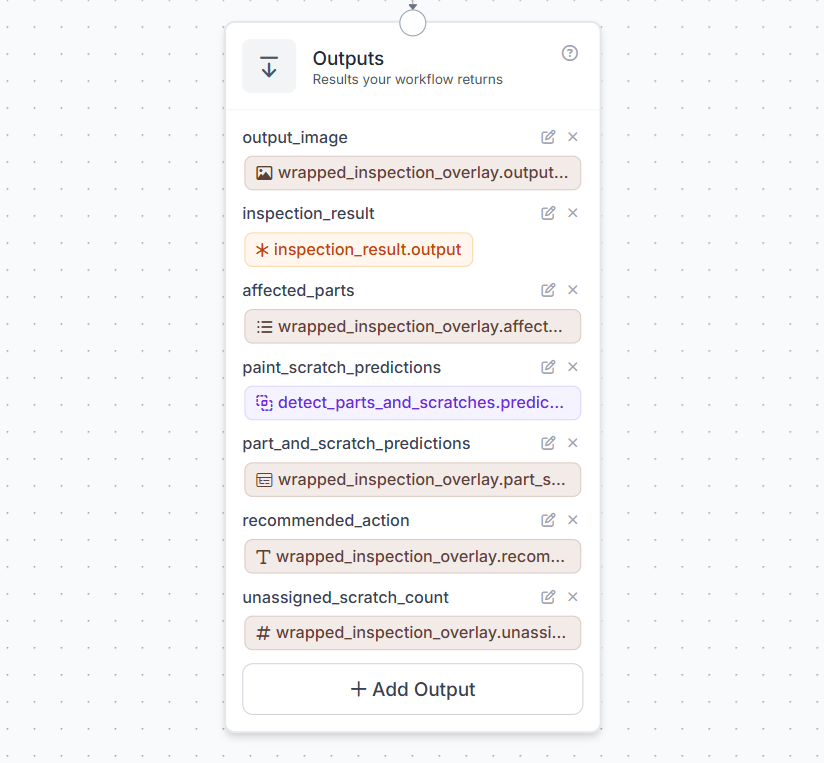
When you run the workflow, you should see output similar to following.
Conclusion
Computer vision can make cosmetic inspection faster, more consistent, and easier to scale by locating defects, identifying affected components, and producing results that can support manual review, repair, and quality reporting.
The same approach can be adapted for vehicles, electronics, appliances, furniture, packaging, footwear, and other products where appearance is important. With Roboflow, you can manage your image dataset, train a custom computer vision model, build inspection logic with Workflows, and deploy the completed application.
Start building your cosmetic defect detection system with Roboflow.


Cite this Post
Use the following entry to cite this post in your research:
Timothy M. (Jul 17, 2026). Cosmetic Defect Detection with Computer Vision. Roboflow Blog: https://blog.roboflow.com/cosmetic-defect-detection-with-computer-vision/