
The Luxonis DepthAI SDK Roboflow Integration lets you deploy any trained Roboflow model, or any of the 10,000+ models on Roboflow Universe, directly to a Luxonis OAK device with options to customize inference output, run on local video files, enable object tracking, and save results. This tutorial covers the full workflow: installing the DepthAI SDK, configuring the integration, deploying a model, and benchmarks showing 4 to 10 FPS on a Raspberry Pi 4 host depending on whether the Accurate or Fast model variant is used.
The new Luxonis DepthAI SDK Roboflow Integration gives you the option to deploy Roboflow models to Luxonis OAK (OpenCV AI Kit) devices with more functionality and out-of-the-box options for customization of inferences.

This deployment method will only work for models with model weights available for Roboflow Deploy. If you haven't yet built a model, you'll first need to gather data. For those without a labeled dataset, or trained model, there are a few options.
Gather Data and Train a Model
Create a Roboflow account, create a workspace, and start a project. Next, import an annotated dataset, clone a project from Roboflow Universe, or label your own dataset. Then, generate a dataset version and train your model.
The Roboflow Quick Start guide is a comprehensive step-by-step guide to walk you through those steps in detail.
Once you have a trained model, you'll see a dataset version with a green check mark, and denote the model type used in training.
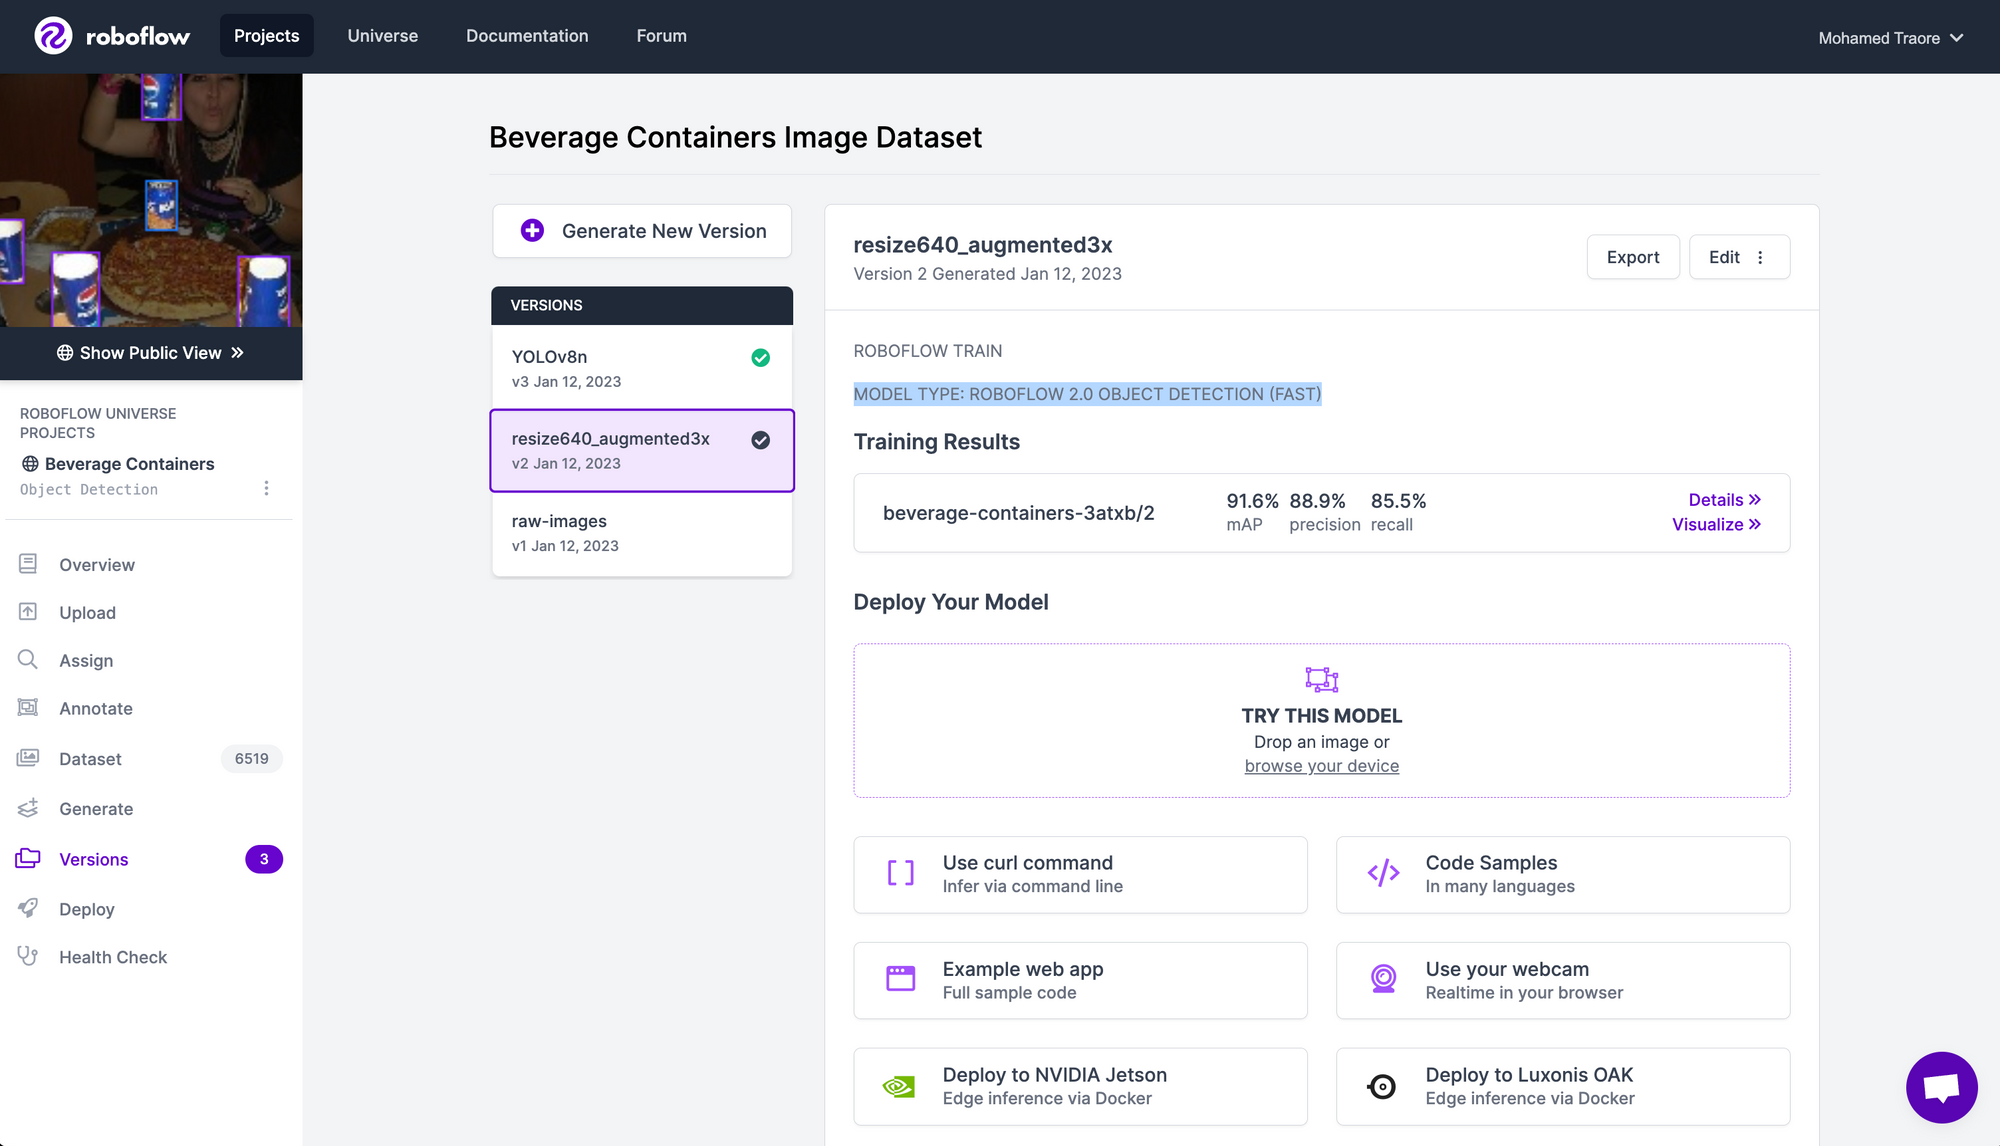
For models trained outside of Roboflow, you can upload YOLOv5 and YOLOv8 model weights to your project as well.
Utilize a Pre-Trained Model
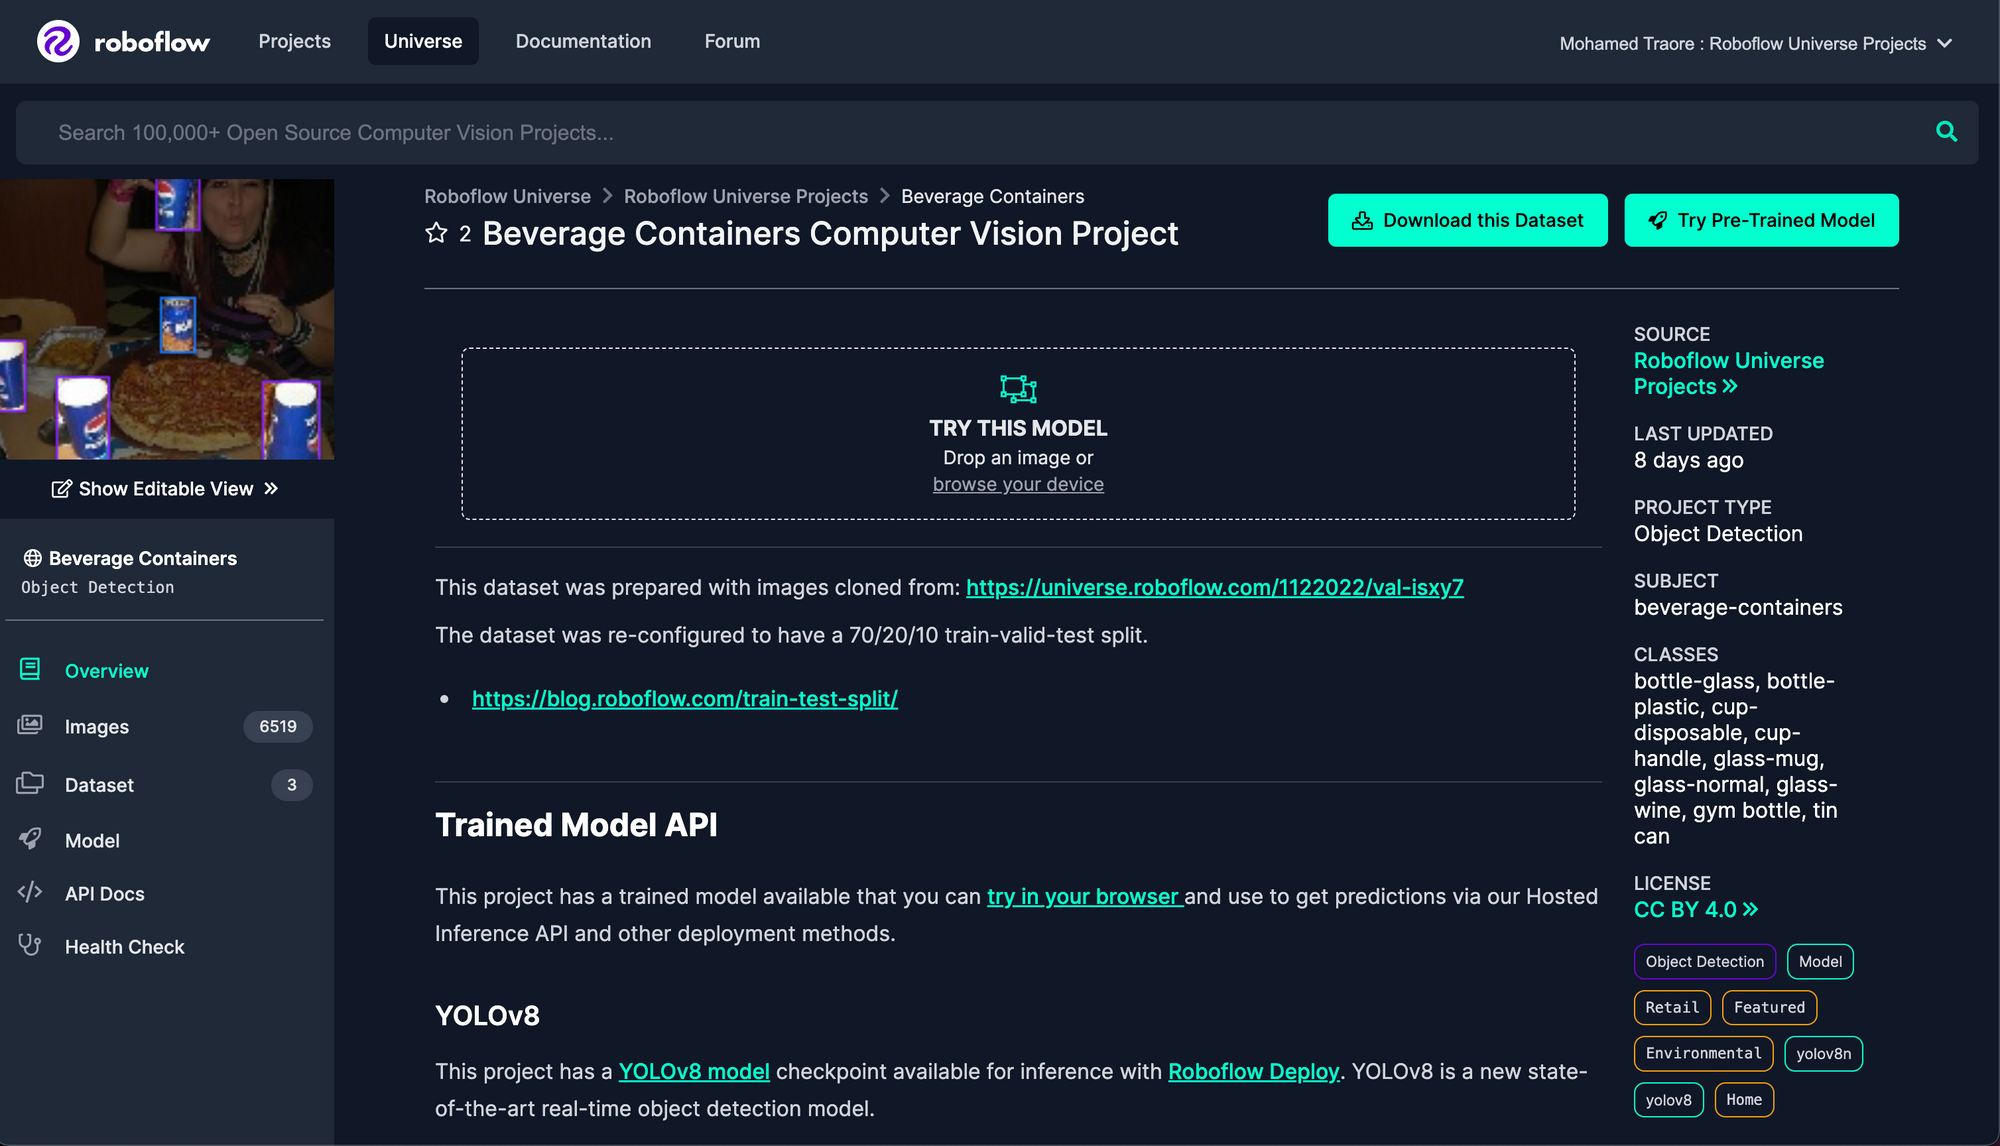
If you prefer to skip the above steps for training your own model, you can also deploy any of the 10,000+ available models from Roboflow Universe
In this example, we will utilize the Beverage Containers dataset and pre-trained model from the Roboflow Universe "Featured" section.
Installing the Required Packages
Luxonis DepthAI SDK
First, open a new terminal window and navigate to the directory or folder in which you'd like to install the required packages.
Create a new Python environment, or virtual environment, running a Python version of 3.6, 3.7, 3.8, 3.9 or 3.10 and activate it.
- Clone the DepthAI repository by entering
git clone https://github.com/luxonis/depthai.gitin your terminal window. - Navigate to the
depthaidirectory. Entercd depthaiin your terminal. - Install the requirements.
- Windows - enter
py -3 install_requirements.pyin your terminal. - Linux/MacOS/RaspbianOS - enter
python install_requirements.pyin your terminal.
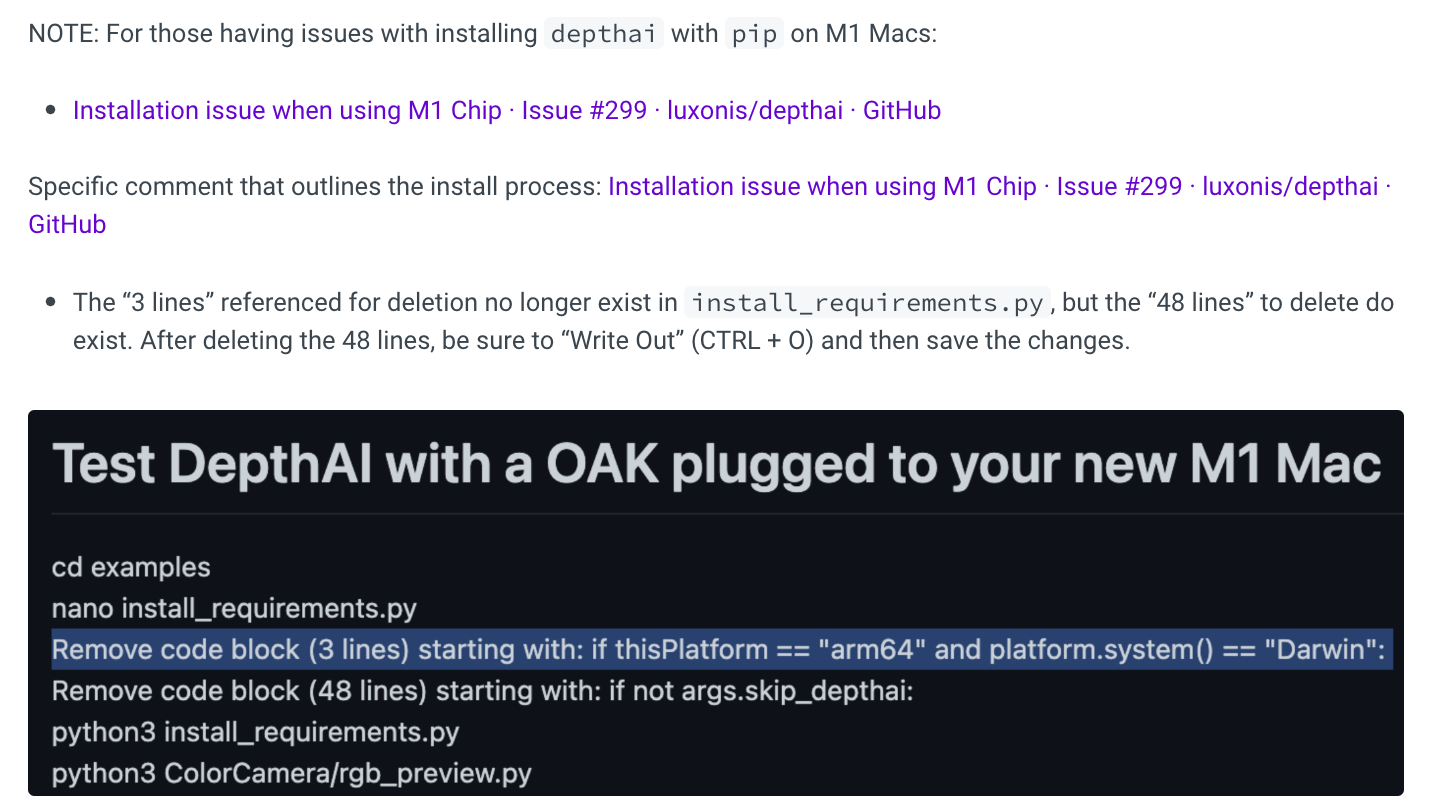
Mac M1 and M2 Users
For those wishing to use the DepthAI SDK Roboflow Integration with M1 Macs, you will need to follow the instructions in this GitHub Issue comment to first create an environment for installation of the DepthAI python package.
The instructions are also linked in the Roboflow Documentation.
After successful installation of the DepthAI python package, continue on to install the DepthAI SDK package by entering python3 -m pip install depthai-sdk in your terminal window within the python environment containing the DepthAI package.
Roboflow Python SDK (Optional)
While installation of Roboflow's Python package is not required, it is recommended for those looking to interact with their Roboflow project's programmatically. This makes the following functionality immediately available for your MLOps pipeline:
- List the available workspaces, project, dataset versions, trained models, and associated metadata
- Create new projects and generate dataset versions with specified preprocessing and augmentation techniques
- Kick off Roboflow Train training jobs
- Upload YOLOv8 object detection model weights for deployment
- Deploy optimized models to more target devices, such as NVIDIA Jetsons, Raspberry Pi's, web-based applications, a computer/laptop, or a dedicated server.
To install the Roboflow Python SDK, enter pip install roboflow in your Terminal in the same Python environment containing the Luxonis DepthAI SDK.
Model Deployment
Add the following code snippet to a Python, .py, file. This can be done in a .txt file with Notepad and saved as a .py file, or in a code editor such as Vim or VSCode.
from depthai_sdk import OakCamera
import depthai
# Download & deploy a model from Roboflow Universe
# https://universe.roboflow.com
with OakCamera() as oak:
color = oak.create_camera('color')
model_config = {
'source': 'roboflow', # Specify that we are downloading the model from Roboflow
'model':'beverage-containers-3atxb/2',
'key':'181b0f6e43d59ee5ea421cd77f6d' # FAKE Private API key, replace with your own!
}
nn = oak.create_nn(model_config, color)
oak.visualize(nn, fps=True)
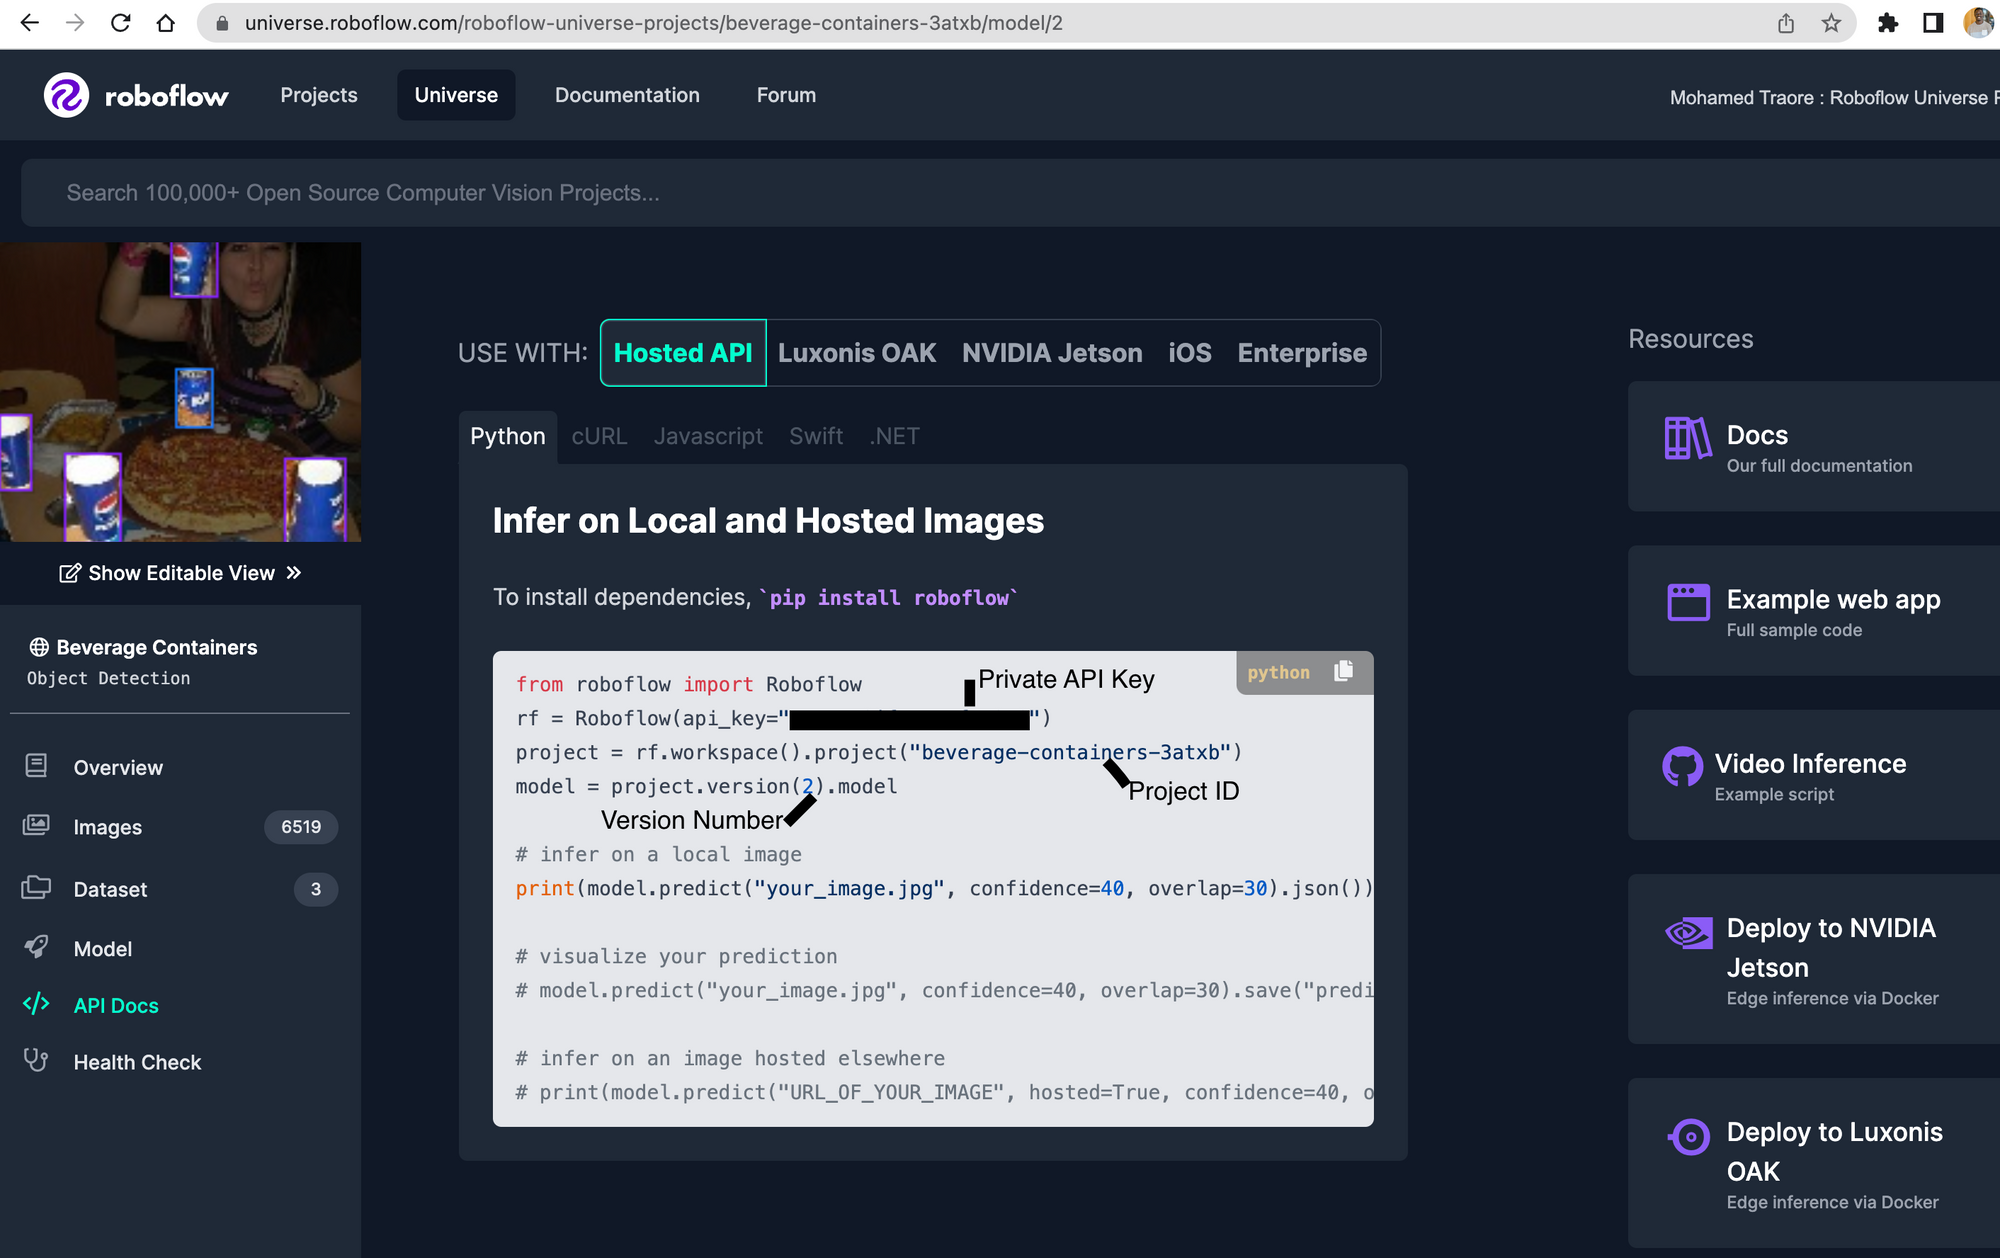
oak.start(blocking=True)Next to 'model', input your Project ID and Version Number, and replace the placeholder API Key next to 'key' with your Private API Key. This information is also available in the "API Docs" section for trained Roboflow Universe models.
For the Beverage Containers dataset, the Project ID is beverage-containers-3atxb, and we'll be deploying version 2, 2.
'model':'beverage-containers-3atxb/2'
If you're using a USB-C to USB-C cable to connect your OAK to your host device, replace with OakCamera() as oak: in Line 7 with with OakCamera(usb_speed=depthai.UsbSpeed.HIGH) as oak: to avoid the USB device warning.
Save and run the .py file after making the necessary updates. For example, if the file is named infer.py, run it with: python3 infer.py.
Customizing Model Predictions
There are many customization options available with the DepthAI SDK for inference results. Among them is the ability to customization rendered bounding boxes, run predictions on video files, and object tracking.

Infer on Local Video Files
from depthai_sdk import OakCamera
import depthai

# Download & deploy a model from Roboflow Universe
# https://universe.roboflow.com

with OakCamera(replay="INSERT_PATH_TO_VIDEO_FILE.mp4") as oak:
    color = oak.create_camera('color')
    model_config = {
        'source': 'roboflow', # Specify that we are downloading the model from Roboflow
        'model':'beverage-containers-3atxb/2',
        'key':'181b0f6e43d59ee5ea421cd77f6d' # FAKE Private API key, replace with your own!
    }
    nn = oak.create_nn(model_config, color)
    oak.visualize(nn, fps=True)
    oak.start(blocking=True)
Save Output File
from depthai_sdk import OakCamera
import depthai
import os

# Download & deploy a model from Roboflow Universe
# https://universe.roboflow.com

with OakCamera() as oak:
    color = oak.create_camera('color')
    model_config = {
        'source': 'roboflow', # Specify that we are downloading the model from Roboflow
        'model':'beverage-containers-3atxb/2',
        'key':'181b0f6e43d59ee5ea421cd77f6d' # FAKE Private API key, replace with your own!
    }
    nn = oak.create_nn(model_config, color)
    # setting fps to True will print the fps on the output video
    # record_path is the save location for the video
    oak.visualize(nn, record_path=os.curdir, fps=True)
    oak.start(blocking=True)
Object Tracking
from depthai_sdk import OakCamera
import depthai

# Download & deploy a model from Roboflow Universe
# https://universe.roboflow.com

with OakCamera() as oak:
    color = oak.create_camera('color')
    model_config = {
        'source': 'roboflow', # Specify that we are downloading the model from Roboflow
        'model':'beverage-containers-3atxb/2',
        'key':'181b0f6e43d59ee5ea421cd77f6d' # FAKE Private API key, replace with your own!
    }
    nn = oak.create_nn(model_config, color, tracker=True)
    oak.visualize(nn, fps=True)
    oak.start(blocking=True)
Performance
When connected to a Raspberry Pi 4 Model B 8GB (Raspbian OS 64-bit) as the host device, the OAK processed frames at speeds of 4-6 frames per second (FPS) for the Roboflow "Accurate" model, and 9-10 FPS for the Roboflow "Fast" model. Images were resized to 640x640 prior to training the model.
More on computer vision model size tradeoffs:

The OAK device is available to continue processing predictions even after the device is disconnected from an internet connection. Turning off your OAK device will remove the cached weights from your system.
If power to your Luxonis OAK device is lost, or you shut down your OAK, repeat the steps outlined above, beginning with the Model Deployment section, to once again process model predictions.
Conclusion
You are now armed with the tools necessary to deploy any of the 10,000 pre-trained computer vision models from Roboflow Universe, or your own custom Roboflow models, to a Luxonis OAK device with the Luxonis DepthAI SDK.
Sample frames from your OAK device with pre-defined logic and upload to your Roboflow dataset to label, retrain, and redeploy improved models. Active Learning is available with pre-defined logic is available in the Roboflow Python SDK.
Cite this Post
Use the following entry to cite this post in your research:
Mohamed Traore. (Feb 3, 2023). Deploy Models from Roboflow with the Luxonis DepthAI SDK. Roboflow Blog: https://blog.roboflow.com/deploy-roboflow-model-luxonis-depth-sdk/