
A Raspberry Pi 4 running 64-bit Ubuntu can serve as a self-contained edge inference device using the Roboflow Docker container to host a YOLOv8 model locally. This guide walks through sourcing a retail cooler dataset from Roboflow Universe, training a model to detect empty shelf space, downloading it to the Pi, and running predictions offline from local image files or a connected camera.
To follow along with this tutorial, you will need a Raspberry Pi 4 or 400. You will need to run the 64-bit Ubuntu operating system.
The Raspberry Pi is a useful edge deployment device for many computer vision applications and use cases. For applications that operate at lower frame rates, from motion-triggered security systems to wildlife surveying, a Pi is an excellent choice for a device on which to deploy your application. Pis are small and you can deploy a YOLOv8 computer vision model on your Pi.
Notably, you can run models on a Pi without an internet connection while still executing logic on your model inference results.
In this guide, we’re going to walk through how to deploy a computer vision model to a Raspberry Pi. We’ll be deploying a model built on Roboflow that we will deploy to a local Docker container. By the end of the guide, we’ll have a working computer vision model ready to use on our Pi.
Without further ado, let’s get started!
Step 1: Gather Data for the Model
In this guide, we are going to build a model that can detect a retail cooler that has an empty space. Such a model could be used as part of a system to inform retail workers when shelves are empty. This information could be used to ensure that, on busy days, cooled products are well stocked.
Before we build a model, we need to gather data. Luckily for us, we have Roboflow Universe to help. There is already a dataset on the Universe that contains over 200 annotated images of retail coolers in many different settings. We can use this as a starting point for our dataset. You can find the dataset we’ll use in this project on the Retail Coolers dataset page. You will need to sign up for a free Roboflow account to access the dataset.
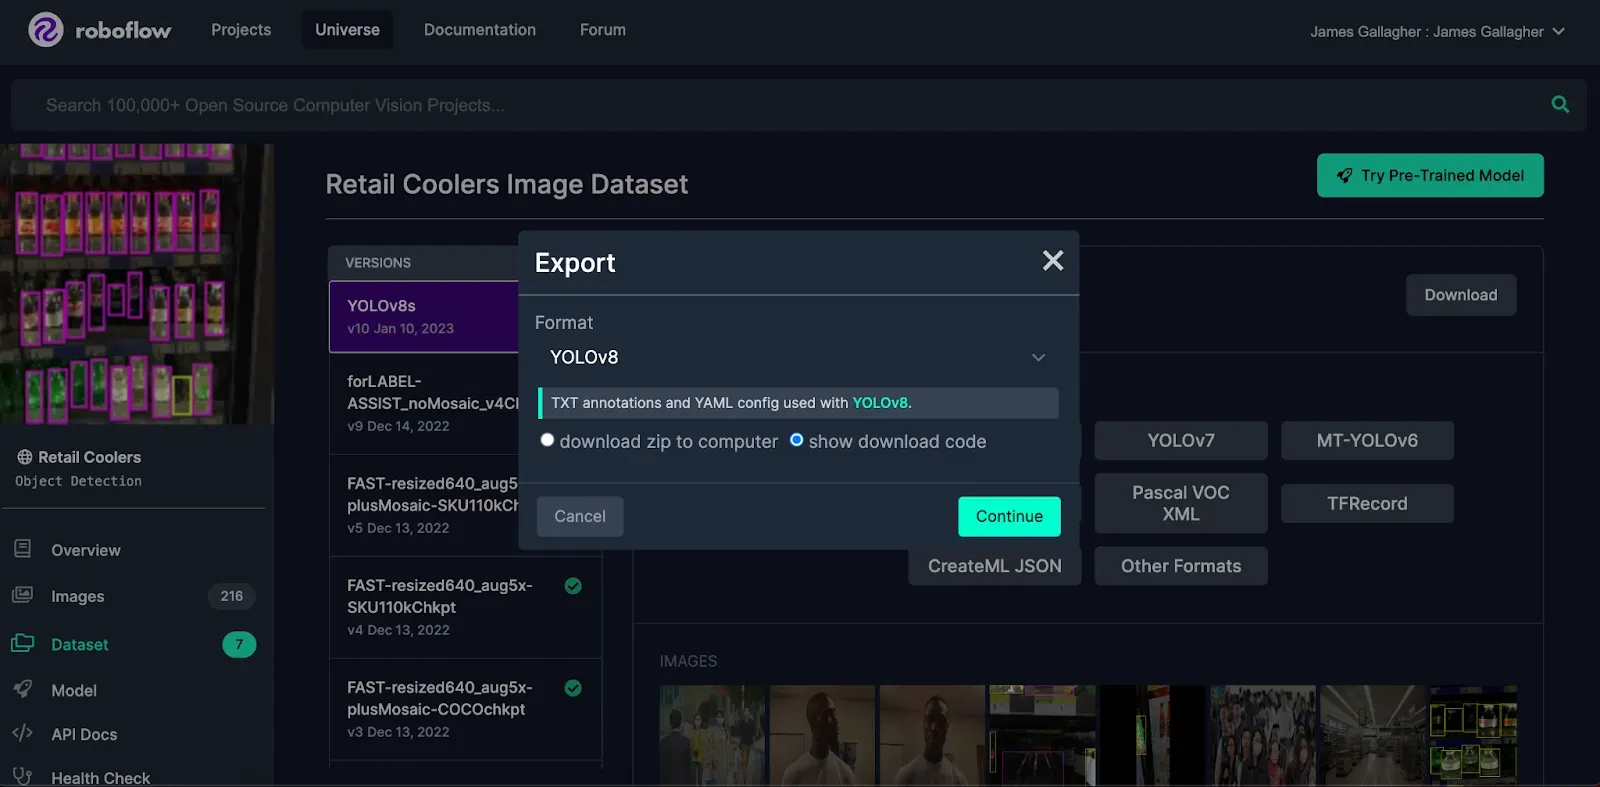
Click the button that says “Download this Dataset” and download the data in a format compatible with your chosen model, then click continue:
Further down the line, photos could be taken in the exact spot where the camera is positioned to build a model that is specifically tailored to the particular store in which the model will operate.
For this tutorial, you can use any data you want! Feel free to take your own photos to annotate, or explore Roboflow Universe to find another dataset that matches your needs.
Now that we have our data locally, we can upload it to Roboflow and start building our model.
Step 2: Upload and Annotate Data in Roboflow
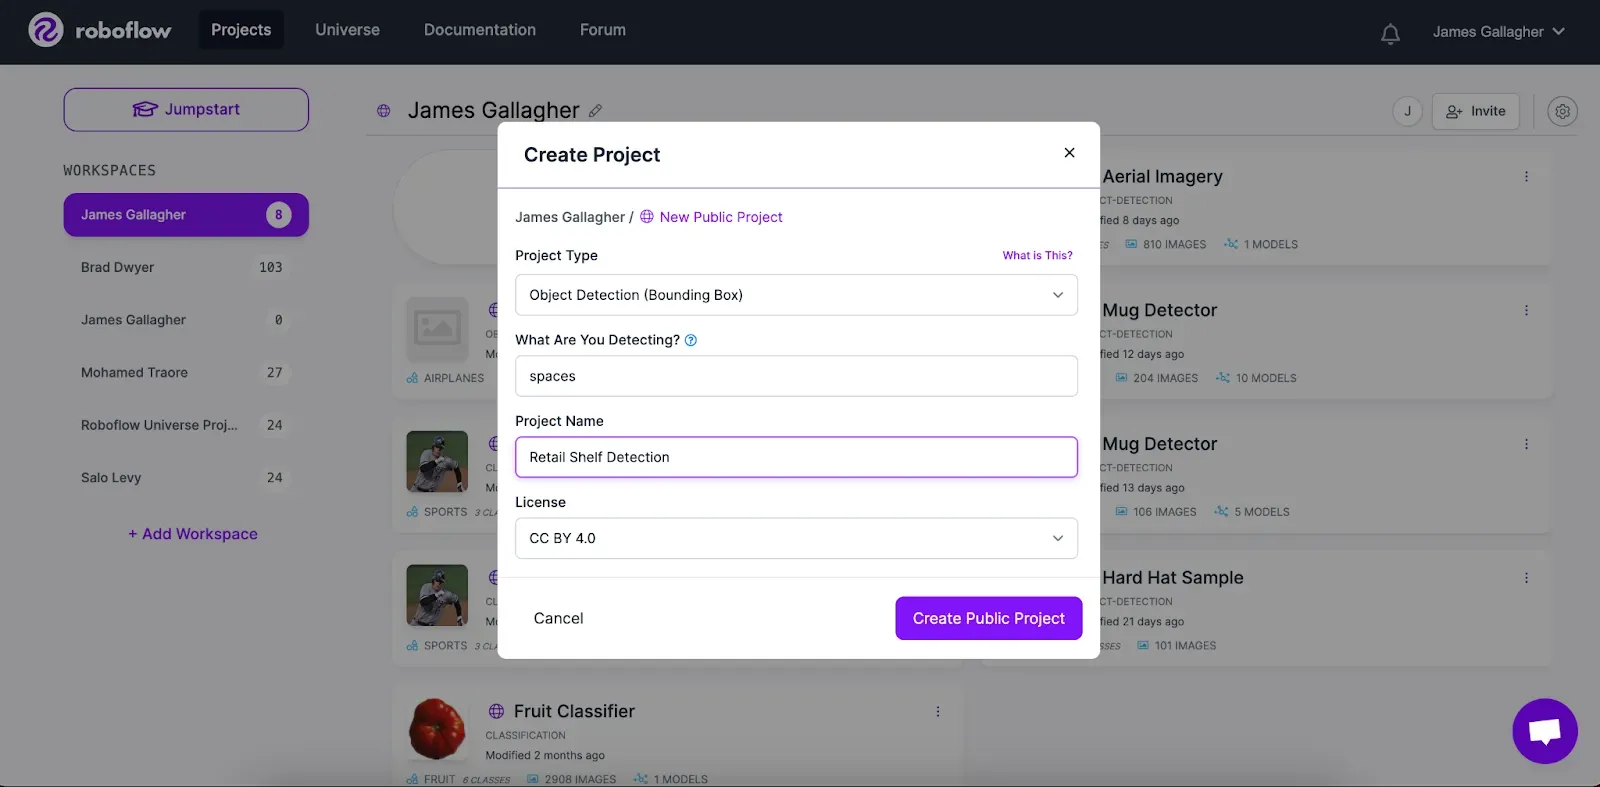
On the Roboflow dashboard, click “Create New Project”. This project will detect the location of empty spaces on a cooler shelf in an image or video, so we want to choose “Object Detection” as our project type. Type “spaces” in the question that asks what you are detecting, then select a project name.
Once you have a project ready, you can upload images for use in your model. If you are using the dataset discussed in the last section, all you have to do is unzip the file we downloaded in the last step and upload all of your images:
The dataset we downloaded includes annotations, so we don’t need to do any annotation. However, if you are uploading your own images, you’ll need to annotate them in the Roboflow dashboard. To learn more about annotating images and how to do so effectively, check out our best practices for image annotation guide.
Step 3: Generate a Dataset Version
Once you have uploaded your data to Roboflow, you can generate a dataset version. This will act as a snapshot of your dataset on which you can train a model at any time. To generate a dataset version, click “Versions” in the sidebar of your project then fill out the fields asking about preprocessing and augmentation.
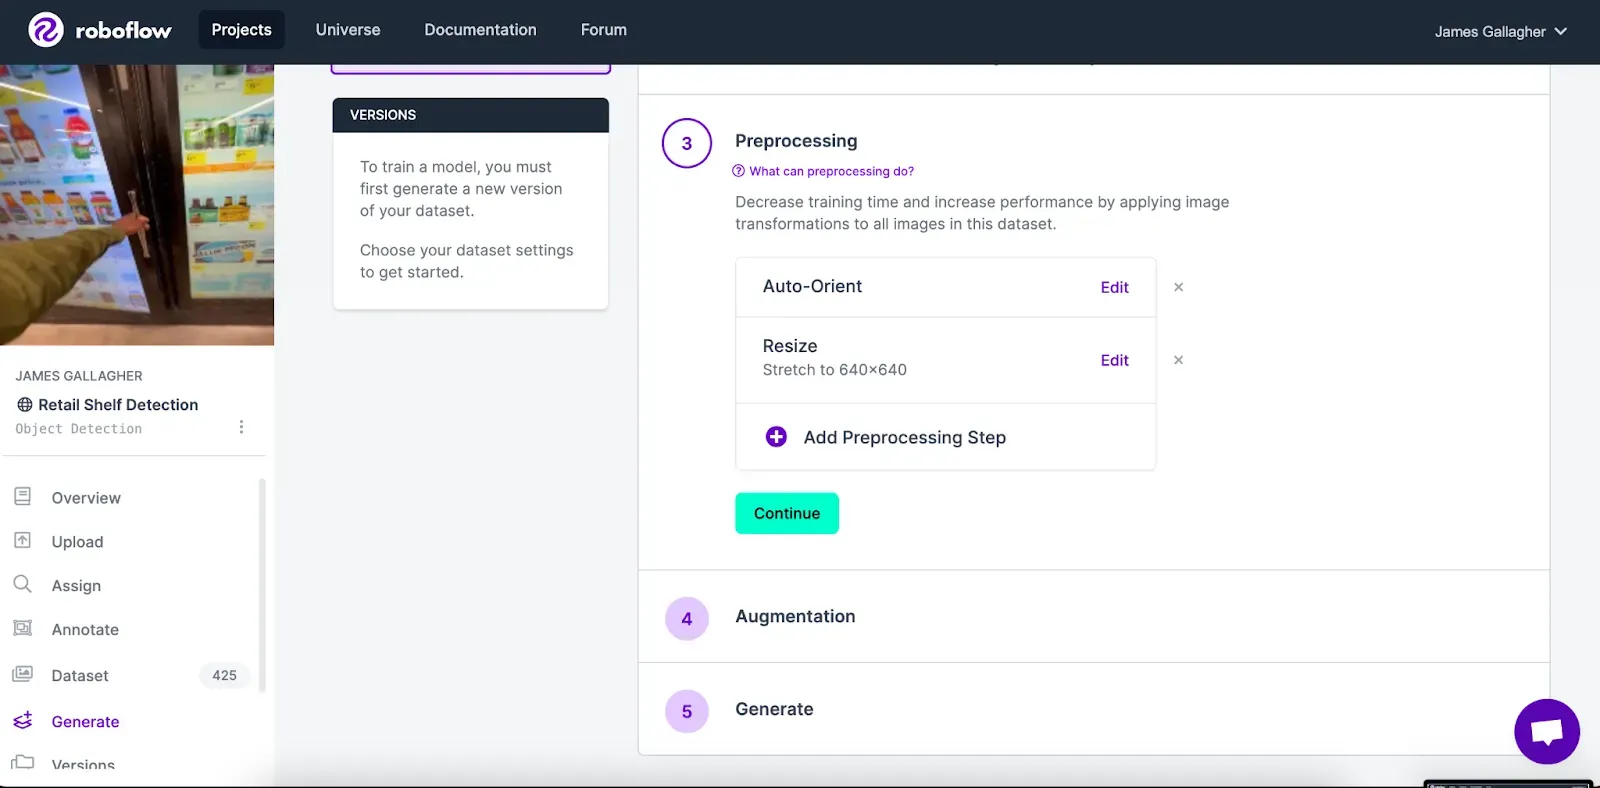
Because we are using a public dataset that already has some saved preferences, we’re going to leave all of the options as they are. If you built your own dataset, check out our guide on image augmentation and preprocessing. These resources will help you evaluate the additional steps you can use when generating a dataset version to improve the accuracy of your model.
Next, click “Generate”. This will create a version of your dataset on which you can train a model. After waiting a few moments, you will be taken to a page where you can train your model.
Step 4: Train a YOLOv8 Model
Roboflow lets you upload weights from a custom YOLOv8 model. To upload weights, you will first need to have a trained model from which you can export weights. If you don’t already have a trained YOLOv8 model, check out our guide to YOLOv8. Note: As an alternative, you can also make use of hosted GPU training in Roboflow. To do so, select Train with Roboflow Hosted GPU on your dataset version page.
Click the “Get Snippet” button next to the custom train and deploy option on the Roboflow Dashboard:
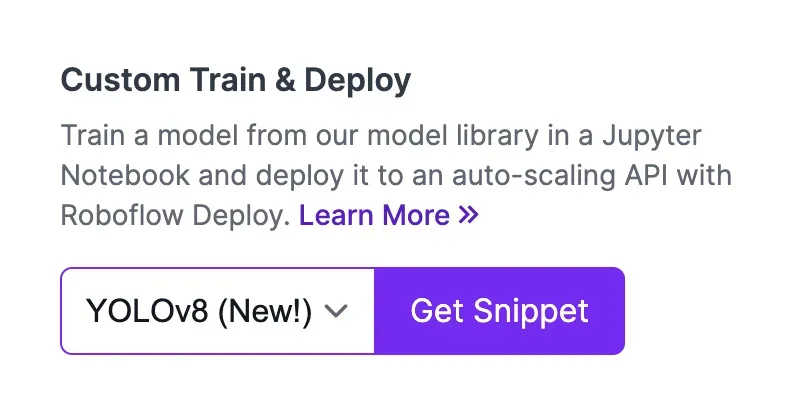
When you click “Get Snippet”, your data will be prepared. A code snippet will appear showing how to start using your Roboflow project:
from roboflow import Roboflow

rf = Roboflow(api_key="KEY")
project = rf.workspace("WORKSPACE").project("PROJECT_NAME")
dataset = project.version(VERSION).download("yolov8")
To upload your YOLOv8 weights to your project, add this line of code:
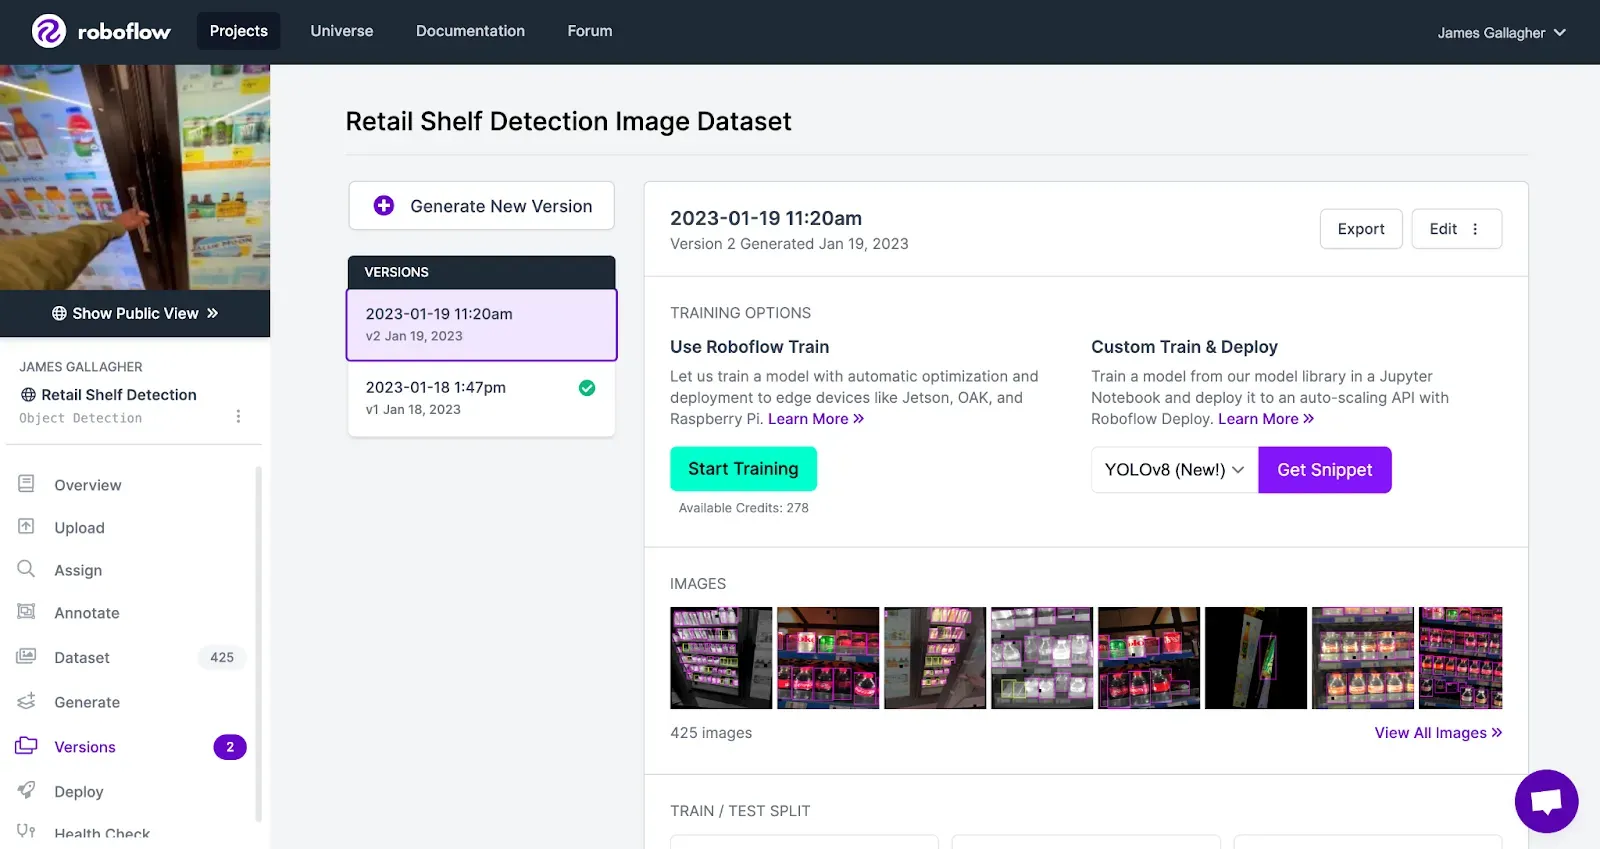
project.version(DATASET_VERSION).deploy(model_type="yolov8", model_path=f”{HOME}/runs/detect/train/”)You should replace the DATASET_VERSION and HOME values with the version number of your project and the directory in which your weights are stored, respectively. To retrieve your model version number, go back to the Roboflow training page and look at the version number in the sidebar associated with your dataset version:
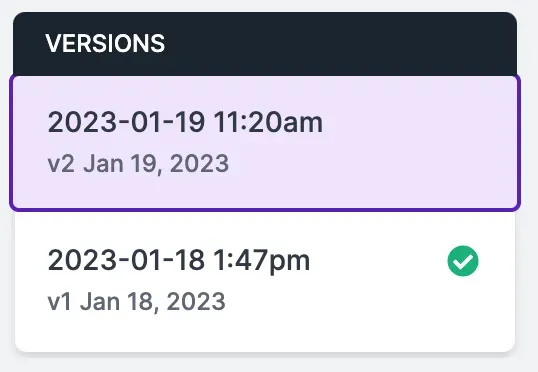
In this case, our version number is 2.
When you execute the aforementioned deploy() function in your code, your weights will be uploaded to Roboflow and your model will be deployed, ready for use.
Step 5: Download the Roboflow Docker Container to the Pi
While we wait for our model to train, we can get things set up on our Raspberry Pi. To run our model on the Pi, we’re going to use the Roboflow inference server Docker container. This container contains a service that you can use to deploy your model on your Pi.
To use the model we built on a Pi, we’ll first install Docker:
curl -fsSL https://get.docker.com -o get-docker.sh
sudo sh get-docker.sh
After Docker is installed, we can pull the inference server Docker container that we will use to deploy our model:
sudo docker pull roboflow/inference-server:cpuWe’ll be using the CPU Docker container as our model will run on the CPU of our Pi.
Next, we can run our container:
sudo docker run --net=host roboflow/inference-server:cpuHere’s what happens when you run this command:
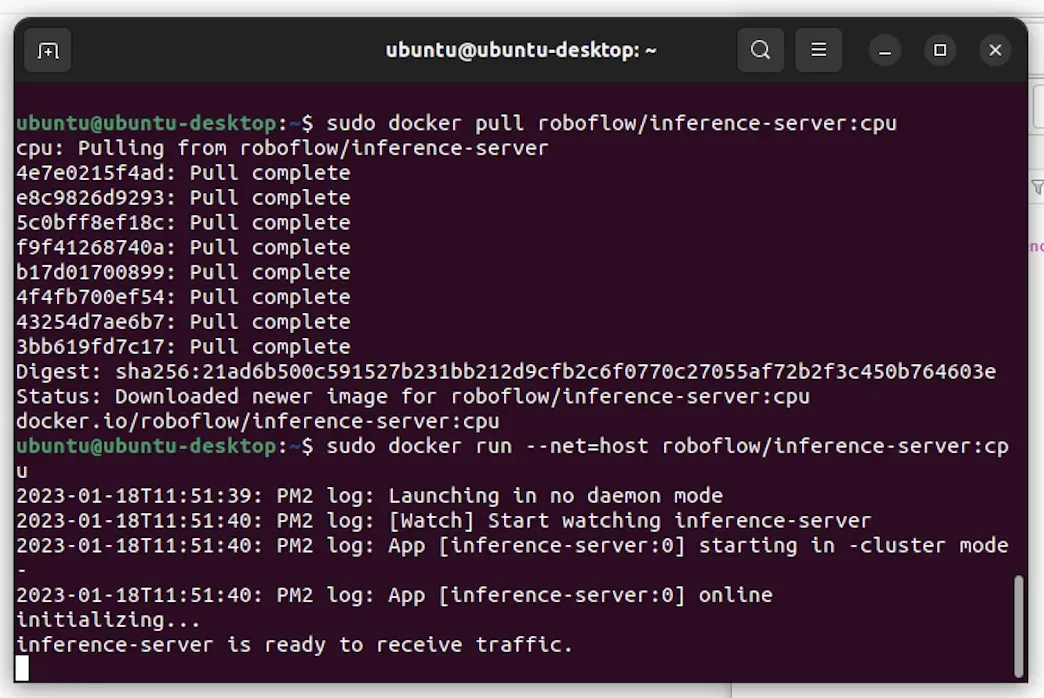
Our model will be available at localhost:9001, ready for use.
Step 6: Load Your YOLOv8 Model Onto the Pi
By default, the inference server doesn’t contain any models. You need to use our API to download a model onto your device on which you can infer. In our case, we’ll download the cooler detection API we trained earlier.
To get started, install the Roboflow Python package:
pip install roboflowThen, go back to the Roboflow dashboard and refer to the page that shows information about your model. Scroll down until you see the Python code snippet. This code snippet will come with your API key and all of the values you’ll need to retrieve your model from our API. The code snippet will look something like this:
from roboflow import Roboflow

rf = Roboflow(api_key="API_KEY")

version = rf.workspace("WORKSPACE").project("PROJECT").version(VERSION)
Remove the "version" line of code and replace it with this:
project = rf.workspace("WORKSPACE").project("PROJECT")

model = project.version(VERSION, local="http://localhost:9001").model
Make sure to substitute your workspace ID, project ID, and version number.
This code tells our Python package that you want to run inference using a local server rather than the Roboflow API. The first time you run this code, you will need to have an internet connection. This is because the Python package will need to download your model for use in the inference server Docker container.
After your model has been downloaded once, you can run the program as many times as you like without an internet connection.
Now, let’s make a prediction on an image!
Consider this photo of a retail shelf:
We can retrieve a prediction from our model that shows where the empty spaces are on the shelves in this image using the following lines of code:
prediction = model.predict("example.jpg")

print(prediction.json())
Here is a truncated result of our code:
{'predictions': [{'x': 724.1, 'y': 142.9, 'width': 121, 'height': 288, 'class': 'product', 'confidence': 0.925, 'image_path': 'example.jpg', 'prediction_type': 'ObjectDetectionModel'}, ...]}When we run the code, we see a JSON dictionary that contains the coordinates of the stocked products and empty spaces in our image. Our model is working! We can save an image that shows our annotated predictions using this code:
prediction.save("output.png")If we open up the file, we’ll see these results:
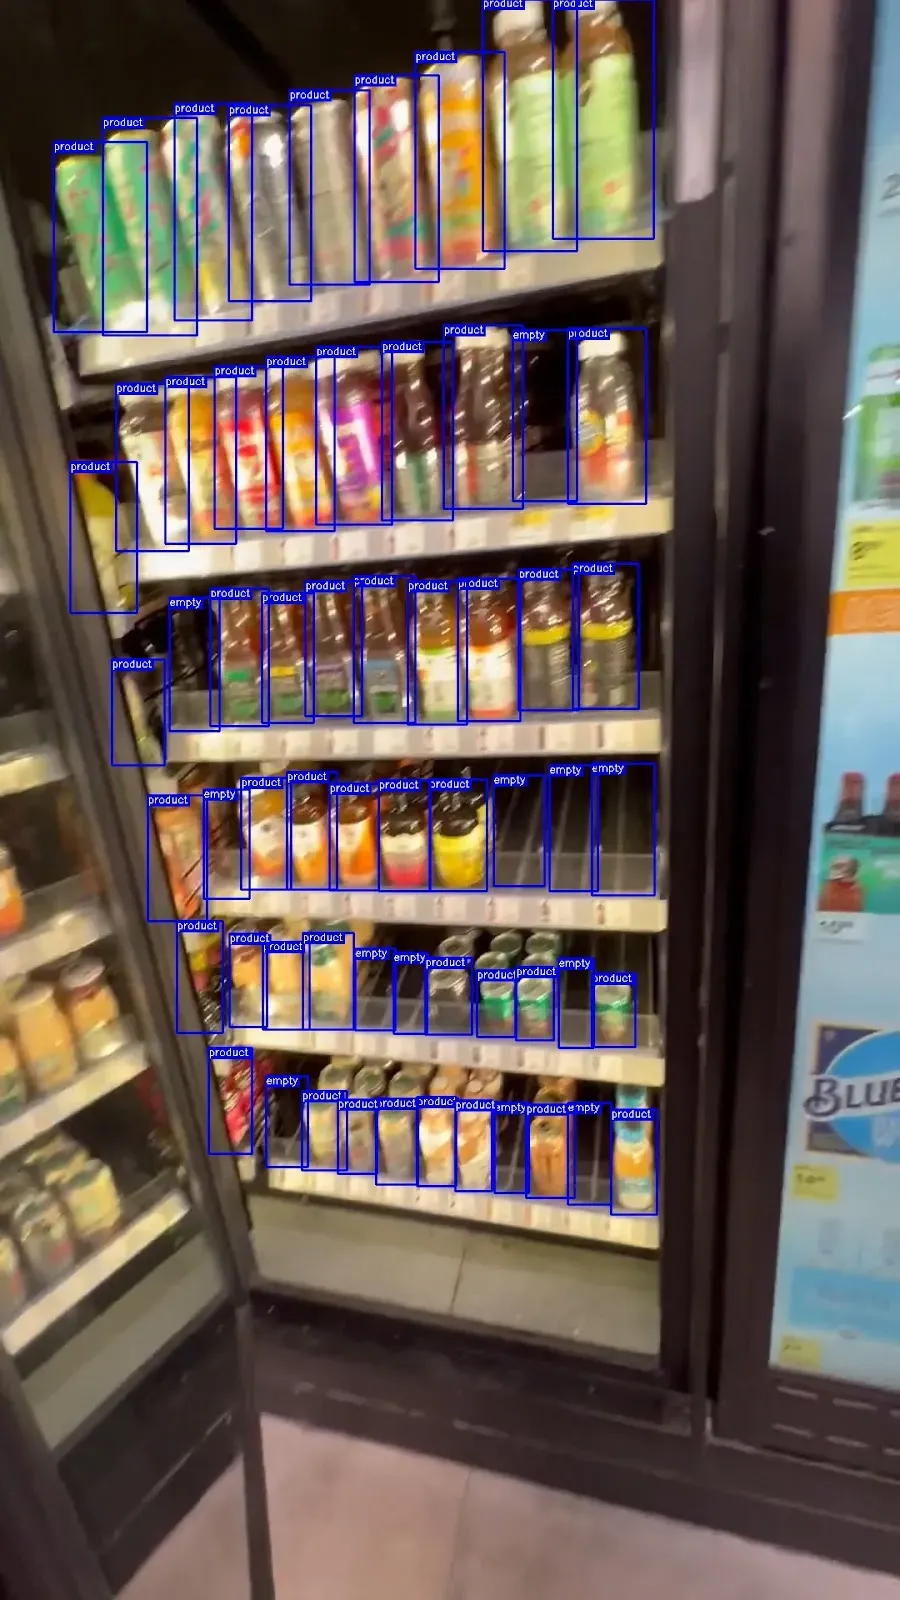
Great! Our model is working as expected and inference is happening on our local device.
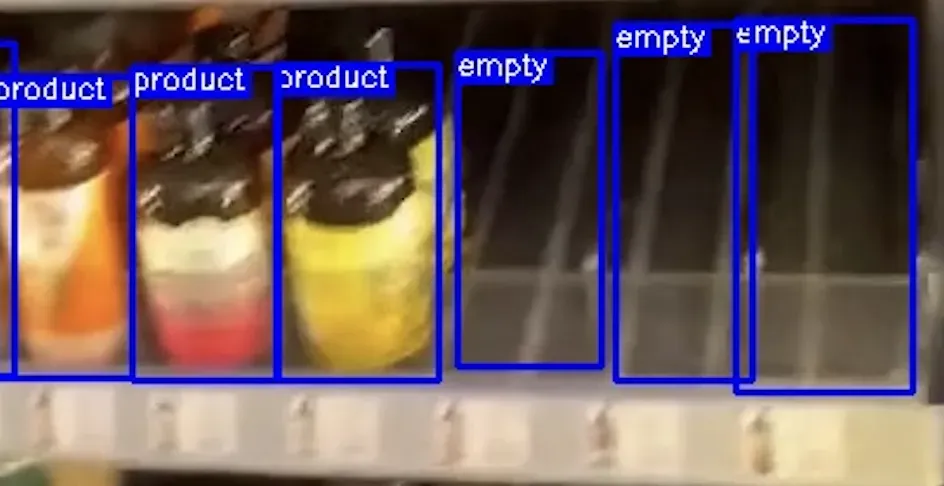
When we zoom in to the empty sections, we see that an “empty” label is applied to that area on the shelf:
Right now, our model works using image files that we have saved locally. But, that doesn’t need to be the case. You could use the Roboflow Python package with a tool like the Raspberry Pi camera to take a photo every few seconds or minutes and retrieve predictions. Or you could use the Pi camera to run your model on a live video feed.
Conclusion
The Raspberry Pi is a small, versatile device on which you can deploy your computer vision models. With the Roboflow Docker container, you can use state-of-the-art YOLOv8 models on your Raspberry Pi.
Connected to a camera, you can use your Raspberry Pi as a fully-fledged edge inference device. Once you have downloaded your model to the device, an internet connection is not required, so you can use your Raspberry Pi wherever you have power.
Now you have the knowledge you need to start deploying models onto a Raspberry Pi. Happy building!
Cite this Post
Use the following entry to cite this post in your research:
James Gallagher. (Jan 19, 2023). How to Deploy a YOLOv8 Model to a Raspberry Pi. Roboflow Blog: https://blog.roboflow.com/how-to-deploy-a-yolov8-model-to-a-raspberry-pi/