YOLO-World is a real-time, zero-shot object detection model developed by Tencent’s AI Lab. Because YOLO-World is a zero-shot model, you can provide text prompts to the model to identify objects of interest in an image without training or fine-tuning a model.
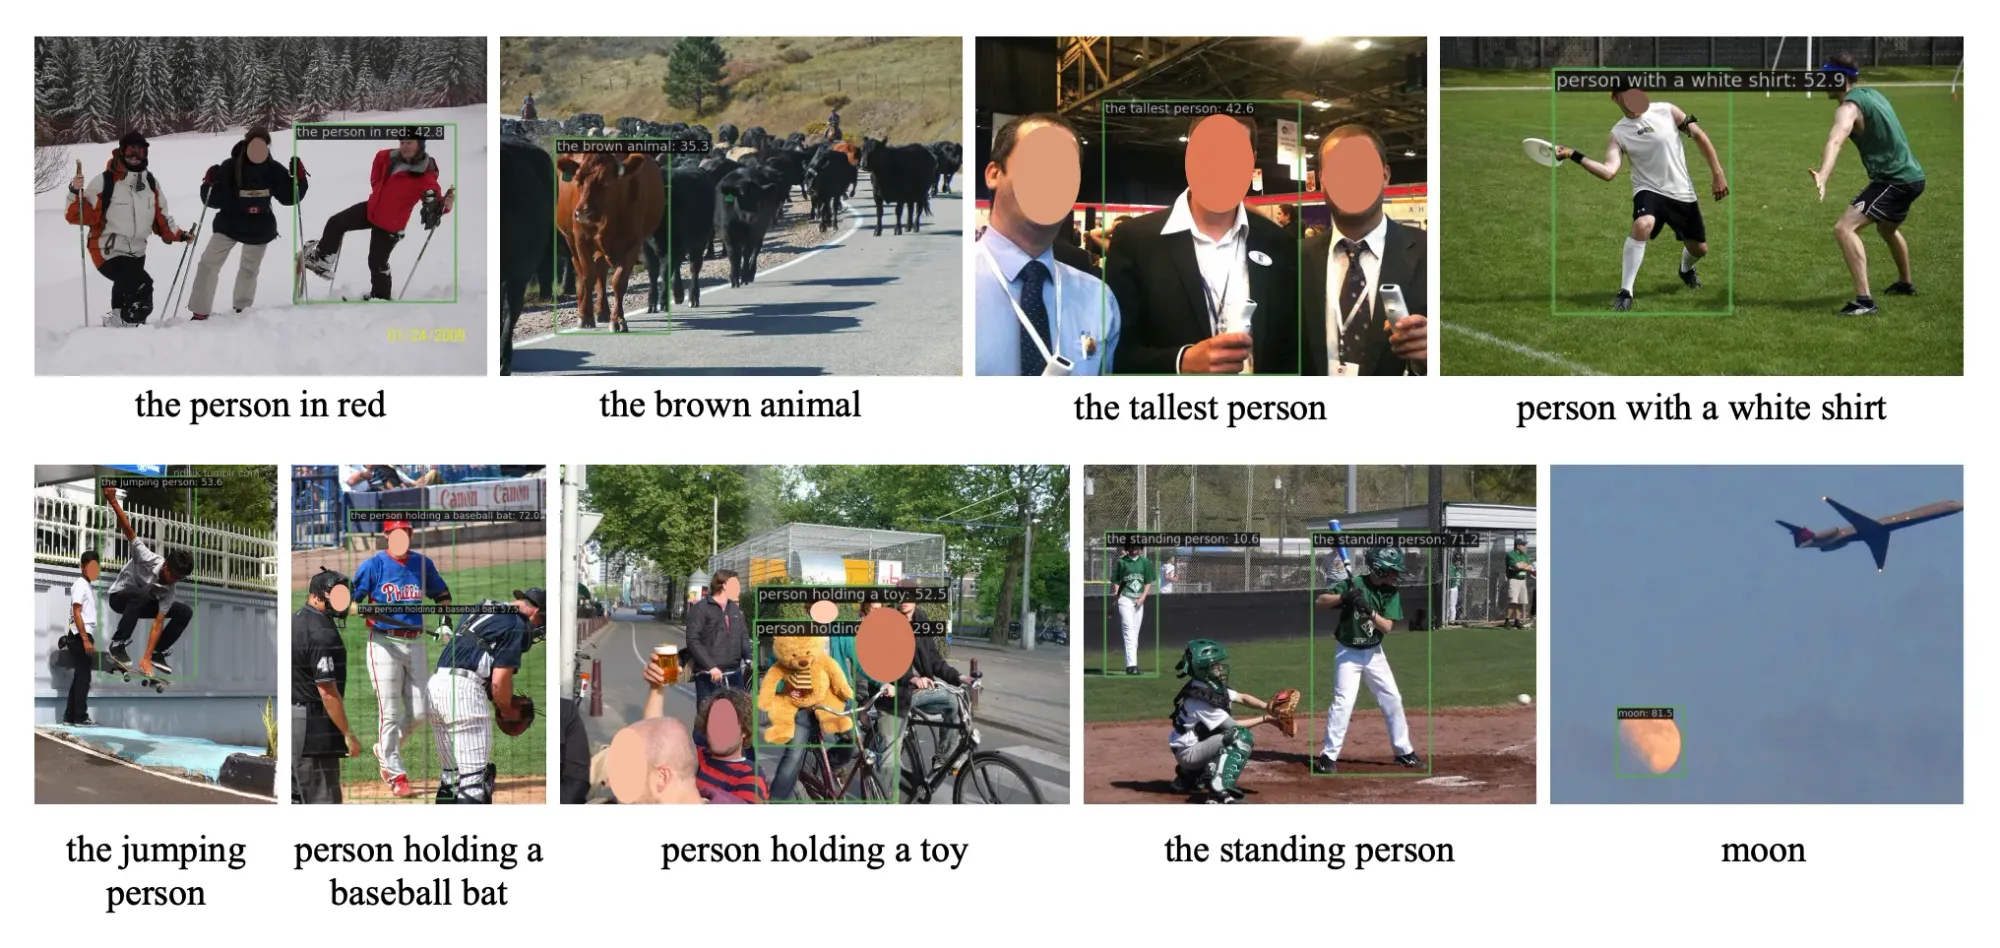
YOLO-World introduced a new paradigm of object detection: “prompt then detect”. This eliminates the need for just-in-time text encoding, a property of other zero-shot models like Grounding DINO that reduces the potential speed of the model. According to the YOLO World paper, the small version of the model achieves up to 74.1 FPS on a V100 GPU.
In this guide, we are going to show you how to detect objects using YOLO-World. We will use the Roboflow Inference Python package, which allows you to deploy a wide range of computer vision models on your own hardware.
Without further ado, let’s get started!
Detect Objects with YOLO-World
To detect objects with YOLO-World, we will:
- Install the required dependencies
- Import dependencies and download example data
- Run object detection with YOLO-World with Roboflow Inference
- Plot our predictions using supervision
Step #1: Install Dependencies
We are going to use Roboflow Inference to run YOLO-World and the Supervision Python package to manage predictions from the model. You can install these dependencies with the following commands:
pip install -q inference-gpu[yolo-world]==0.9.12rc1
pip install -q supervision==0.19.0rc3
Step #2: Import Dependencies and Download Data
First, we need to import the dependencies we need to use YOLO-World. Create a new Python file and add the following code:
import cv2
import supervision as sv

from tqdm import tqdm
from inference.models.yolo_world.yolo_world import YOLOWorld
In a new terminal, run the following commands to download example data. For this guide, we will be using an example of a person with a dog and, later, a video with chocolates.
wget -P {HOME} -q https://media.roboflow.com/notebooks/examples/dog.jpegIn your Python file, set variables that link to this data:
import os
HOME = os.getcwd()
print(HOME)

SOURCE_IMAGE_PATH = f"{HOME}/dog.jpeg"
With that said, you can use any image you want in this guide.
Step #3: Run the Model
There are three versions of YOLO-World: Small (S), Medium (M), and Large (L). These versions are available with the following model IDs:
yolo_world/syolo_world/myolo_world/l
For this guide, we will use the large model. While slower, this model will allow us to achieve the best performance on our task.
Next, we need to load our model and set the classes we want to identify. Whereas other zero-shot object detection models ask for text prompts at inference time, YOLO-World asks you to set your prompts before inference.
Use the following code to load your model, set classes, then run inference:
model = YOLOWorld(model_id="yolo_world/l")

classes = ["person", "backpack", "dog", "eye", "nose", "ear", "tongue"]
model.set_classes(classes)

image = cv2.imread(SOURCE_IMAGE_PATH)
results = model.infer(image)
detections = sv.Detections.from_inference(results)
In the above code snippet, we declare objects we want to identify, send those classes the model, then run inference on an image. We load our detections into an sv.Detections object. This object can be used with the Supervision Python package to manipulate, visualize, and combine detections.
To visualize your predictions, use the following code:
BOUNDING_BOX_ANNOTATOR = sv.BoundingBoxAnnotator(thickness=2)
LABEL_ANNOTATOR = sv.LabelAnnotator(text_thickness=2, text_scale=1, text_color=sv.Color.BLACK)

annotated_image = image.copy()
annotated_image = BOUNDING_BOX_ANNOTATOR.annotate(annotated_image, detections)
annotated_image = LABEL_ANNOTATOR.annotate(annotated_image, detections)
sv.plot_image(annotated_image, (10, 10))
In this code, we declare two annotators: one to plot bounding boxes, and another to plot labels. We then visualize the results. Here are the results from our model on an image:
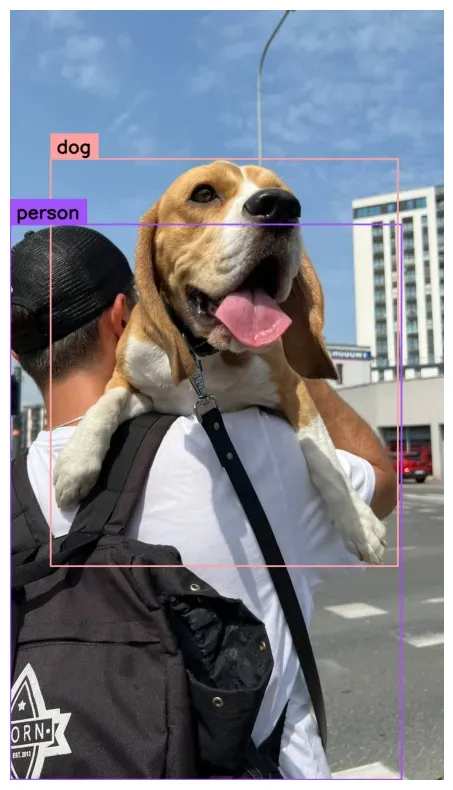
Our model successfully identified two classes: person and dog. The others were filtered out because the default confidence level in Inference is set to 0.5 (50%). YOLO-World often returns low confidences, even if the bounding boxes are correct.
We can resolve this by reducing the confidence level used in the model.infer() function. In the code below, we set the confidence to 0.003, then customize our annotator so that we display the confidence of each class:
image = cv2.imread(SOURCE_IMAGE_PATH)
results = model.infer(image, confidence=0.003)
detections = sv.Detections.from_inference(results)

labels = [
    f"{classes[class_id]} {confidence:0.3f}"
    for class_id, confidence
    in zip(detections.class_id, detections.confidence)
]

annotated_image = image.copy()
annotated_image = BOUNDING_BOX_ANNOTATOR.annotate(annotated_image, detections)
annotated_image = LABEL_ANNOTATOR.annotate(annotated_image, detections, labels=labels)
sv.plot_image(annotated_image, (10, 10))
Here are the results:
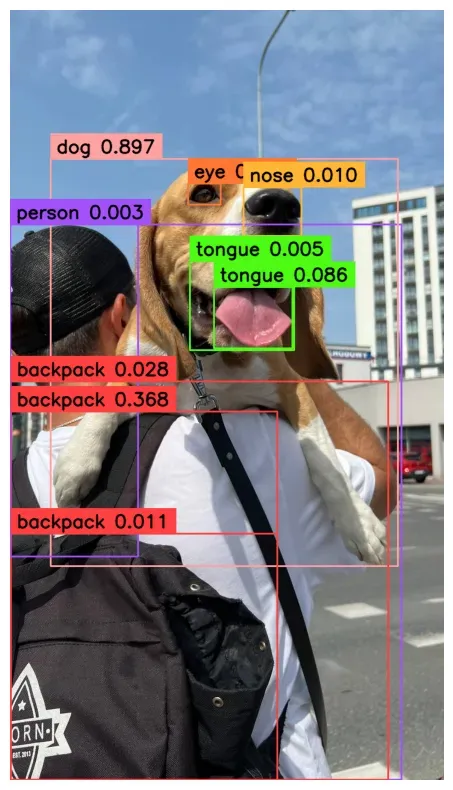
Of note, there are several instances where bounding boxes with the same class overlap. We can solve this by applying Non-Maximum Suppression (NMS), a technique for removing duplicate or close-to-duplicate bounding boxes.
You can apply NMS by adding .with_num(threshold=-0.1) to the end of your .from_inference() data loader, like so:
image = cv2.imread(SOURCE_IMAGE_PATH)
results = model.infer(image, confidence=0.003)
detections = sv.Detections.from_inference(results).with_nms(threshold=0.1)
Let’s visualize our predictions again:
labels = [
    f"{classes[class_id]} {confidence:0.3f}"
    for class_id, confidence
    in zip(detections.class_id, detections.confidence)
]

annotated_image = image.copy()
annotated_image = BOUNDING_BOX_ANNOTATOR.annotate(annotated_image, detections)
annotated_image = LABEL_ANNOTATOR.annotate(annotated_image, detections, labels=labels)
sv.plot_image(annotated_image, (10, 10))
Here are the results:
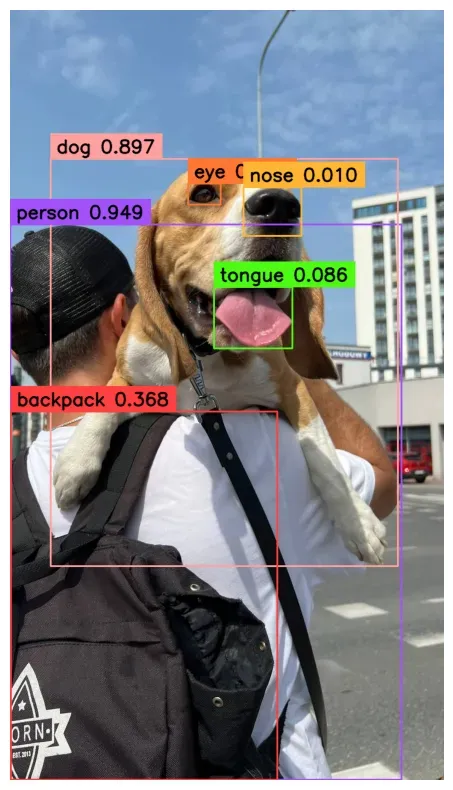
In the image above, the duplicate bounding boxes on the backpack and tongue classes have been removed.
Conclusion
YOLO-World is a zero-shot object detection model developed by Tencent’s AI Lab. You can deploy YOLO-World on your own hardware with Roboflow Inference, computer vision inference software.
In this guide, we walked through how to detect objects with YOLO-World. We loaded YOLO-World, ran inference on an image, then displayed results with the supervision Python package.
In the accompanying notebook, we walk through the example above as well as a bonus example that shows how to run inference on a video using YOLO-World and supervision.
If you are interested in learning more about the architecture behind YOLO World, refer to our “What is YOLO World?” blog post.

