
You've spent weeks collecting data, annotating images, and training a model that detects defects with near-perfect accuracy. Then you deploy it on a live webcam feed and it crawls at 4 frames per second. Products are flying past the camera faster than your model can think. Sound familiar?
This gap between a model that works and a model that works in real time is one of the most common frustrations in applied computer vision.
This guide walks through a systematic, step-by-step approach to closing that gap. I will cover practical techniques to speed up your model, from preprocessing to hardware acceleration, to optimized inference pipelines using Roboflow models, workflows, and the Inference API.
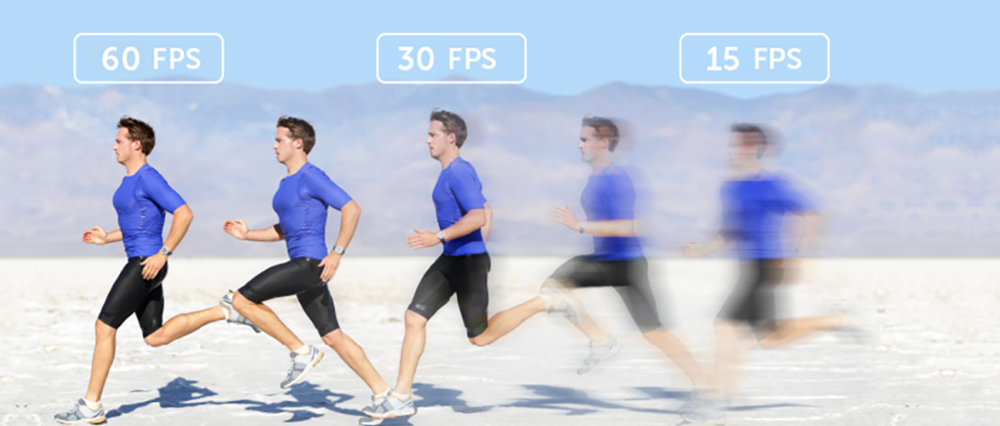
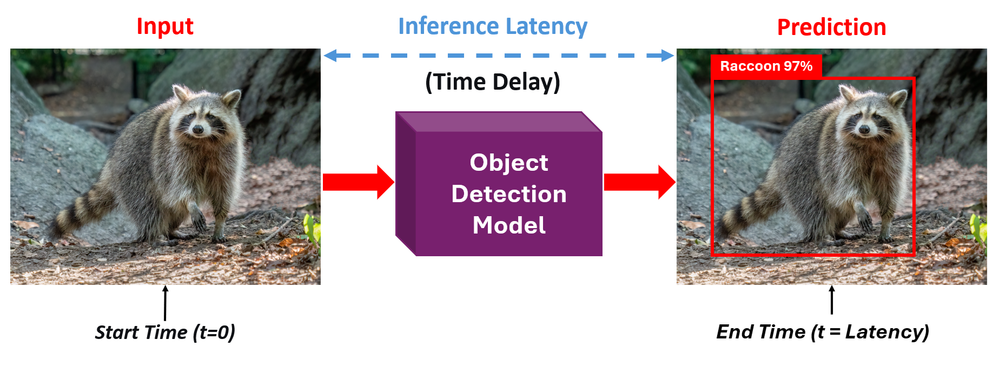
Two Key Inference Metrics: FPS and Latency
When talking about model speed, there are two important metrics to understand. Let's break them down before jumping into optimizations.
Frames Per Second (FPS)
FPS is a throughput metric. It tells you how many images your pipeline can process in one second. A model running at 30 FPS processes 30 images every second generally considered the threshold for "real-time" performance in applications like assembly-line inspection.
Latency
Inference latency is a responsiveness metric measured in milliseconds. Latency is the time it takes for a single frame to produce a prediction. It measures the time between sending a single image and receiving a prediction back. A model with 20ms latency responds quickly to each individual frame.
The two are related, but not identical. High FPS means high throughput - your system can keep up with fast-moving video streams. Low latency means fast response, each individual prediction arrives quickly. For most real-time deployments you need both, the system needs to respond fast (low latency) and keep up with the incoming frame rate (high FPS).
The goal for most real-time applications is 30+ FPS. Some use cases, like high-speed manufacturing inspection or drone navigation, may demand 60 FPS or more. Let's look at how to get there.
How to Maximize Your Model's Inference Speed
Now that you understand the key metrics, let's go through five practical steps to speed up your computer vision model, from simple input changes to full pipeline optimization.
Step 1: Optimize Your Input (Preprocessing)
The fastest optimization is often the simplest. Don't send more data than your model needs. If your camera captures at 4K (3840×2160) but your model was trained on 640×640 input, you're wasting enormous compute resizing that image on the fly during inference. Every extra pixel increases the number of operations your model must perform.
Match your input resolution to your model's training resolution. Most modern detection models like RF-DETR and YOLO variants are trained at 640×640 or similar resolutions. Sending a 4K frame through a model that immediately downscales it to 640×640 means you're paying the cost of moving and processing millions of unnecessary pixels.
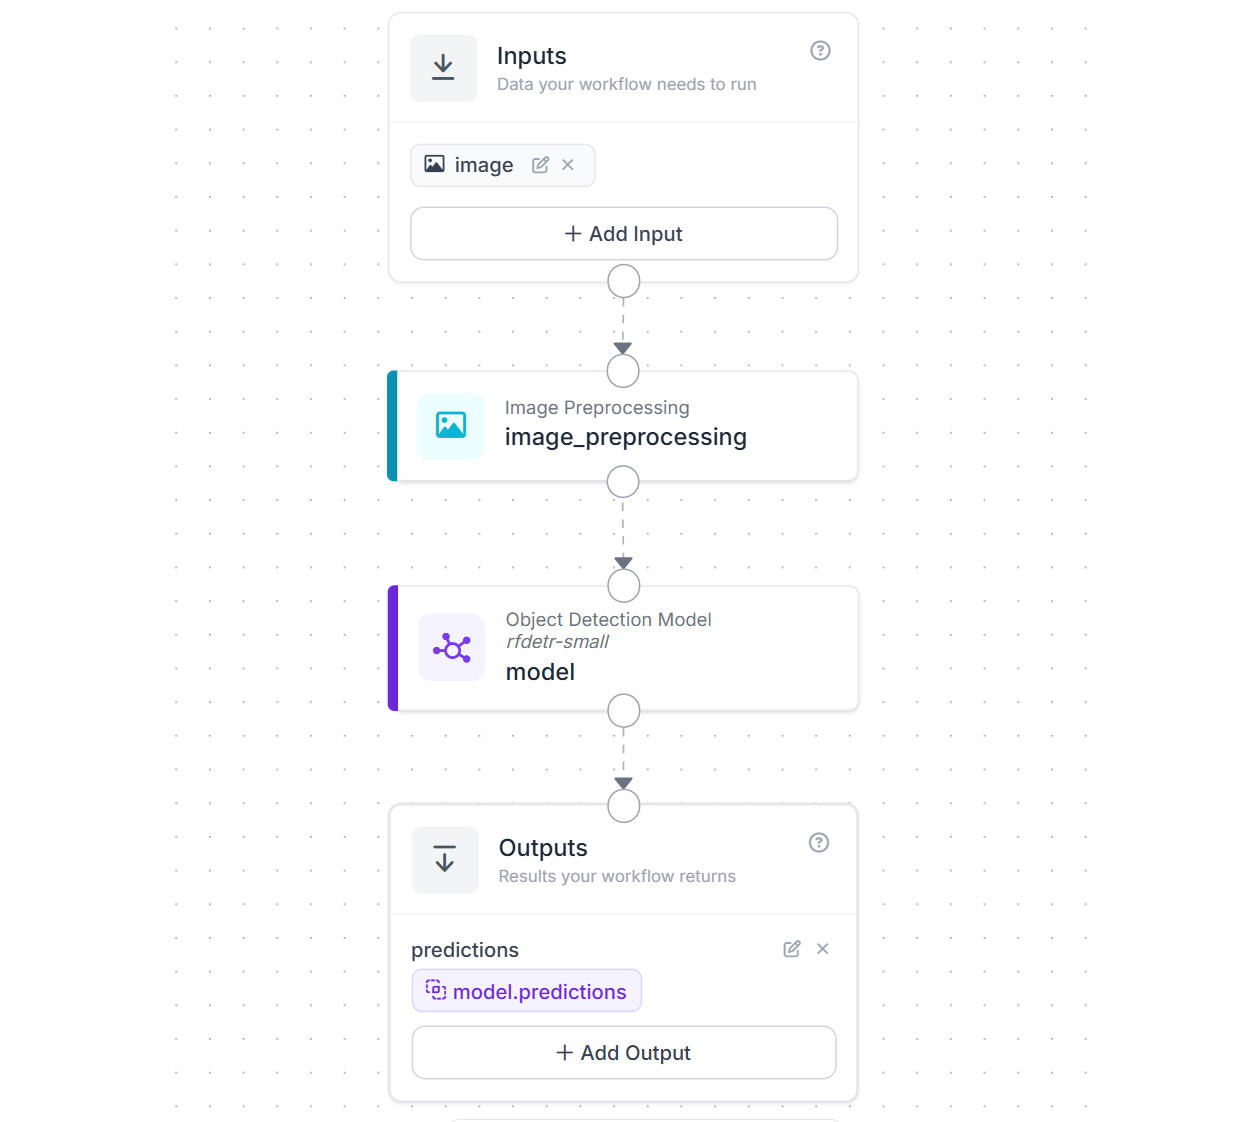
With Roboflow Workflows this is an easy step. All you need to do is use the Image Preprocessing block to resize frames on the fly before they reach your model in your workflow application. Here is an example workflow that resizes images to 512x512 for the RF-DETR-small object detection model.
Step 2: Choose the Right Model Architecture
Every model architecture represents a trade-off between accuracy and speed. Choosing the right point on that curve for your application is one of the highest-impact decisions you'll make. Roboflow supports training and deploying several model families. Let's look at how to pick the fastest one for your needs.
Select Smaller Model Variants
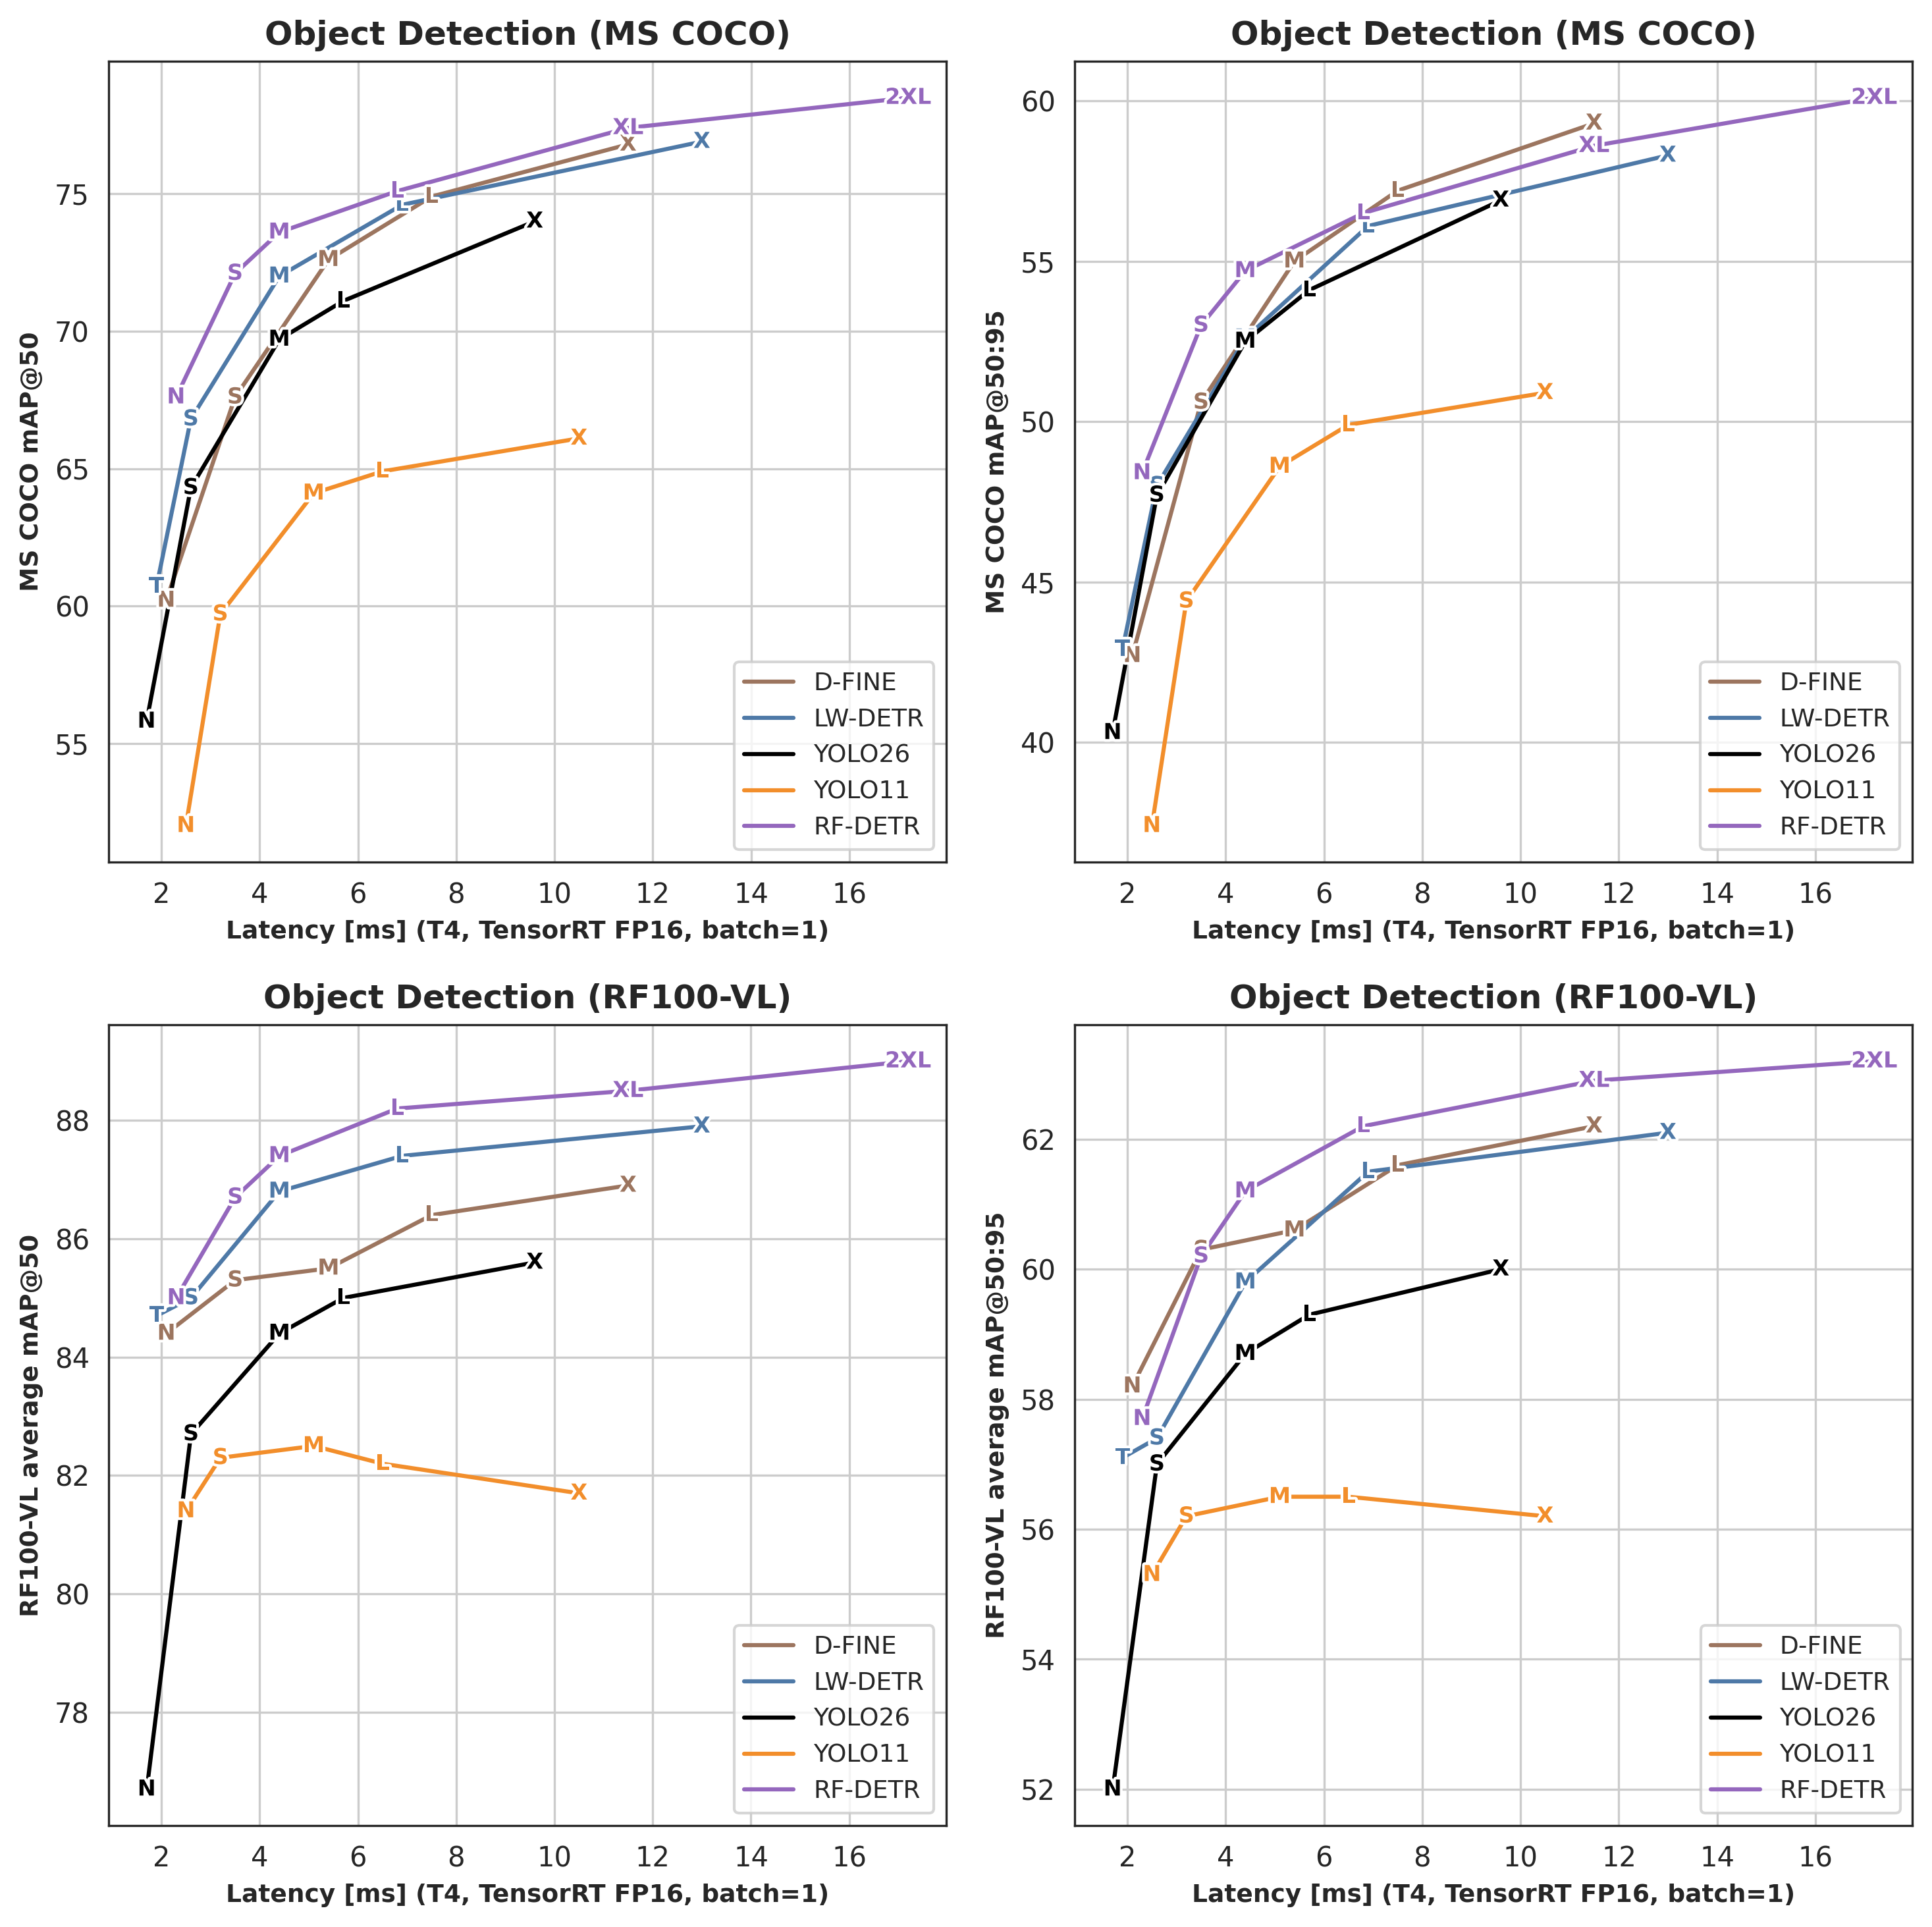
Most modern model families offer a range of sizes, typically from "Nano" to "XLarge." Smaller models run faster with some accuracy trade-off. Today’s compact models are remarkably capable, and each major family supported in Roboflow offers a full range of sizes to match speed and accuracy needs.
RF-DETR, Roboflow’s transformer-based detector (Apache 2.0), ranges from Nano to 2XLarge, with Nano delivering around 100 FPS on an NVIDIA T4 while eliminating NMS entirely for faster inference, and Medium achieving 54.7% mAP at roughly 4.52 ms latency.
YOLO26, the latest NMS-free and edge-optimized YOLO, comes in N, S, M, L, X variants, and is designed for efficient deployment on low-power devices while supporting multiple tasks. YOLOv12, an attention-based evolution, also spans N to X sizes (about 2.6M to 59.1M parameters), with the Nano model reaching about 1.6 ms latency on a T4 GPU. YOLOv11, widely adopted and multi-task capable, is available in N, S, M, L, X configurations with improved parameter efficiency over YOLOv8. Finally, YOLOv8 also offers N through X sizes with an anchor-free design and strong ecosystem support.
All of these models can be trained on custom datasets using Roboflow Train (cloud-based) or via custom notebooks, and deployed through Roboflow Inference. You can also find thousands of pre-trained models on Roboflow Universe.
Always start with the Nano or Small variant of your chosen model family. If accuracy is good enough for your use case, you're done. Only move to larger variants if you need more accuracy and can afford the speed cost.
Pick the Right Task
Not every problem needs the most complex model type. Computer vision tasks sit on a spectrum of computational cost:
- Classification: Answers "Is there a defect in this image?" A single label for the entire image. Minimal post-processing.
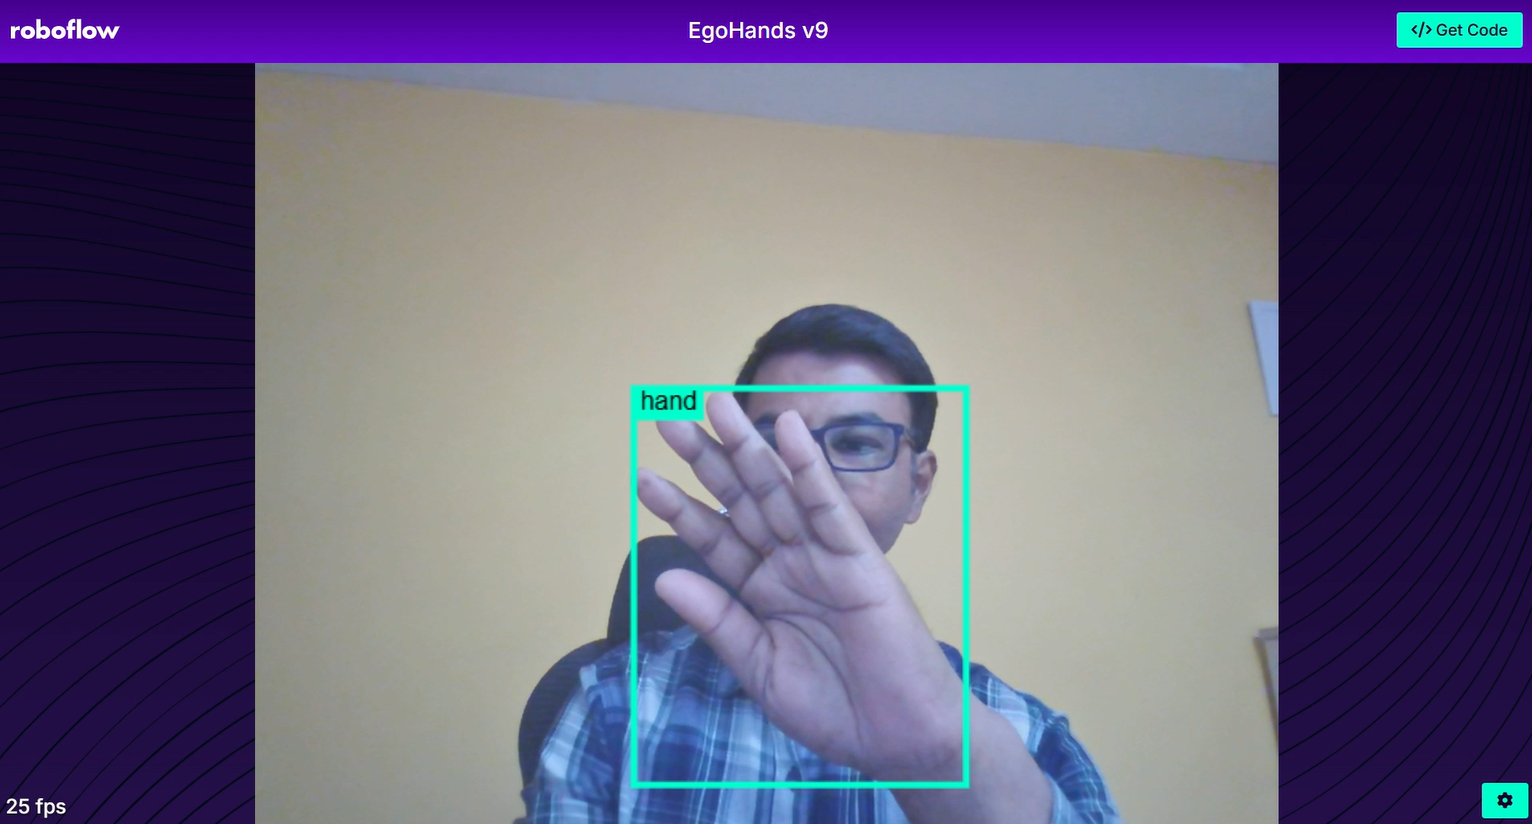
- Object Detection: Answers "Where are the defects?" Bounding boxes with class labels. Requires NMS in CNN-based models (though transformer models like RF-DETR and YOLO26 eliminate NMS entirely).
- Instance Segmentation: Answers "What is the exact shape of each defect?" Pixel-level masks for each object. Significantly more compute than detection.
If your application only needs to know whether something is present, not where it is, use classification. You'll see a substantial FPS improvement simply by matching the task complexity to your actual requirements.
Multiple model families on Roboflow support segmentation if you need it. RF-DETR-Seg (Nano to 2XLarge), YOLO26-Seg, YOLOv12-Seg, and YOLOv11-Seg all offer size variants so you can balance speed and accuracy for pixel-level tasks as well.
Step 3: Hardware Acceleration
Software optimizations can only take you so far. At some point, the speed of your hardware becomes the limiting factor. Roboflow supports deployment across a wide range of hardware, from cloud servers to tiny edge devices, so let's look at all the options and how they affect FPS.
CPU vs. GPU
Running inference on a CPU is feasible for simple models or low-throughput applications. But for real-time performance, a GPU is almost always necessary. NVIDIA GPUs with CUDA cores are the industry standard for computer vision inference. The parallelism of GPU architecture, thousands of cores running matrix operations at the same time, is a natural fit for neural network computation.
For example, a YOLOv8-Nano model might run at 5-10 FPS on a modern laptop CPU, while the same model on an NVIDIA T4 GPU achieves 60+ FPS. That's not a marginal improvement, it's the difference between unusable and production-ready.
Always verify your GPU is being used. A surprisingly common issue is running inference on CPU without realizing it. On Linux, run `nvidia-smi` to confirm GPU utilization. If your GPU shows 0% utilization while your model is running, something in your software stack isn't configured correctly (missing CUDA drivers, wrong PyTorch build, etc.).
Roboflow Inference supports the following hardware:
- ARM CPU (macOS, Raspberry Pi)
- x86 CPU (macOS, Linux, Windows)
- NVIDIA GPU (CUDA-enabled desktop/server GPUs)
- NVIDIA Jetson (JetPack 4.5.x, 4.6.x, 5.x, 6.x)
Edge Devices
For deployments where you can't rely on a cloud connection such as factory floors, drones, remote inspection sites, edge devices bring the compute to the data. Roboflow Inference is built with edge deployment in mind and supports several device types:
- NVIDIA Jetson series (Orin Nano, Orin NX, AGX Orin): Purpose-built for edge AI. Roboflow provides optimized Docker containers for Jetson that automatically use TensorRT for maximum performance. Different Jetson models offer different levels of compute power, so FPS will vary depending on which one you choose. Learn how to deploy to NVIDIA Jetson.
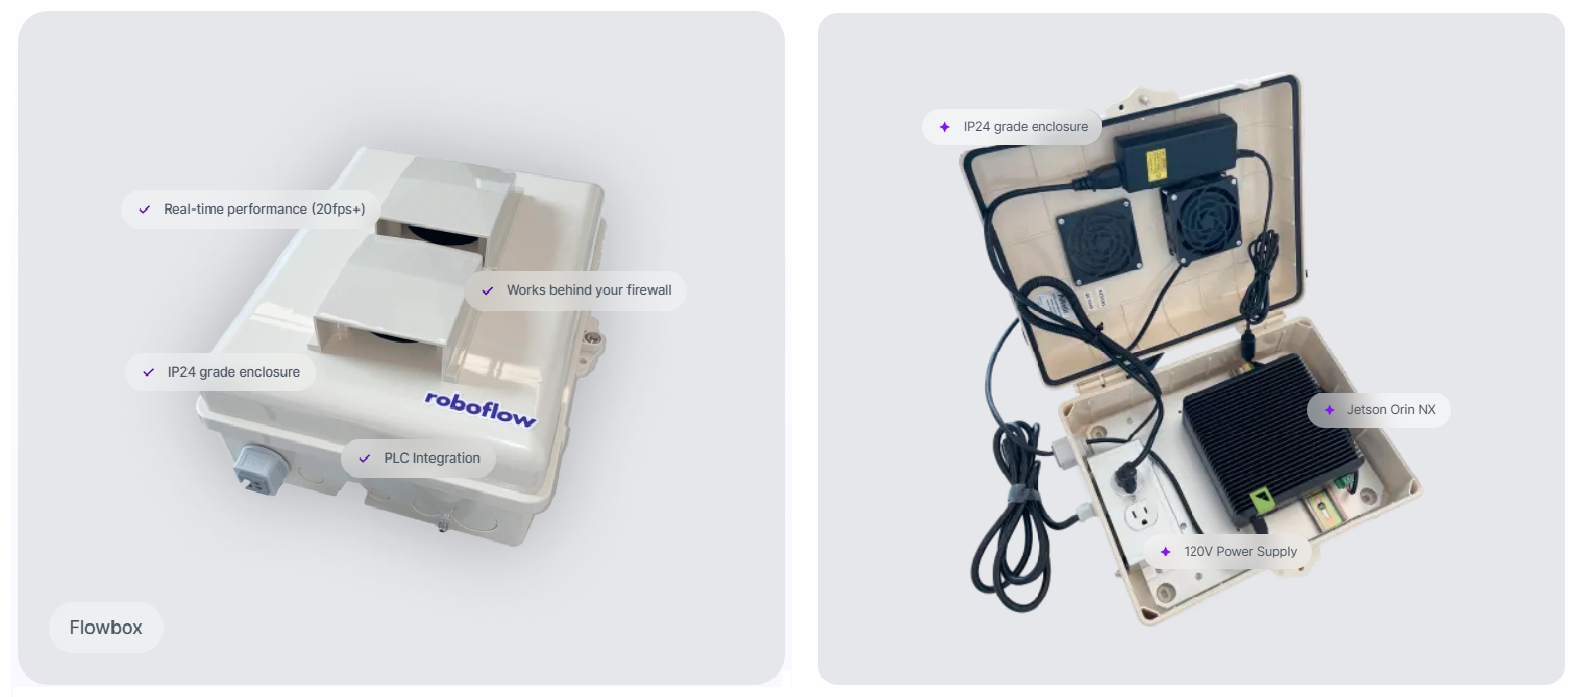
- Roboflow Flowbox: For manufacturing and logistics use cases, Roboflow offers the Flowbox: an NVIDIA Jetson-based device that comes pre-configured with Inference. It supports machine vision cameras (Basler, Lucid) over GigE, interfaces with PLCs and HMIs via OPC or MQTT, and includes enterprise device management through a DMZ.
- Raspberry Pi: A low-cost, single-board computer running on ARM CPU. Roboflow Inference runs on Raspberry Pi 4 (64-bit Ubuntu). While it won't match GPU speeds, it's a viable option for lightweight models in cost-sensitive or space-constrained deployments. Learn how to deploy to Raspberry Pi.
- Luxonis OAK cameras: These integrate a neural compute engine (Intel Myriad X VPU) directly into the camera module, enabling on-device inference without a separate compute unit. They can often achieve around 30 FPS for supported models. Learn how to deploy to Luxonis OAK.
For all edge devices, Roboflow Inference handles environment management, dependencies, and CUDA version issues through Docker containers. Models are downloaded once when you first connect, and after that, inference can run fully offline, no internet connection needed.
You can start inference server on any supported device with following commands:
pip install inference-cli && inference server startIt automatically selects the right container for your hardware.
Cloud Deployment
If you don't have local GPU hardware or need scalable infrastructure, Roboflow offers multiple cloud options:
Serverless Hosted API: The easiest way to get started. Send images to Roboflow's infrastructure via REST API and receive predictions back. It auto-scales to handle your traffic, requires no server management, and supports running both individual models and full Workflows. The V2 API is faster than V1 with improved latency. Best for applications where some network latency is acceptable.
from inference_sdk import InferenceHTTPClient

client = InferenceHTTPClient(
    api_url="https://serverless.roboflow.com",
    api_key="YOUR_API_KEY"
)
result = client.infer("image.jpg", model_id="your-model/1")
Dedicated Deployments: Reserved GPU and CPU machines running on Roboflow's infrastructure. These provide consistent performance, resource isolation, and support for GPU-heavy models (like SAM2 or large foundation models) that the serverless API cannot run. Ideal for production workloads that need predictable latency and higher throughput.
Browser Deployment: For web-based applications, Roboflow provides roboflow.js, a JavaScript SDK that runs models directly in the browser using TensorFlow.js. This enables at the edge, on the browser inference useful for real-time, privacy-sensitive applications or demos. Roboflow also offers a WebRTC-based option that streams video to the Roboflow cloud for inference with minimal latency.
Here's a quick FAQ guide to picking the right deployment for your speed needs:
Question 1: Need maximum FPS?
Answer: Self-hosted Inference Server on an NVIDIA GPU with TensorRT
Question 2: Need real-time on the edge?
Answer: NVIDIA Jetson with Roboflow Inference (or Flowbox for industrial)
Question 3: Need low-cost edge?
Answer: Raspberry Pi with a Nano/Small model
Question 4: No GPU hardware?
Answer: Dedicated Deployments (GPU) for consistent performance
Question 5: Quick prototyping?
Answer: Serverless Hosted API.
Step 4: Model Quantization and Compilation
Even with the right model and hardware, you can squeeze significantly more speed out of your setup by optimizing how the math is computed.
FP16 vs. INT8 Quantization
Neural network weights and activations are typically stored as 32-bit floating-point numbers (FP32). Quantization reduces this precision to 16-bit (FP16) or 8-bit integers (INT8), which means fewer bits to move through memory and simpler arithmetic operations.
- FP16 (half-precision): Cuts memory bandwidth in half and takes advantage of GPU tensor cores designed for half-precision math. On modern NVIDIA GPUs, switching from FP32 to FP16 typically delivers a 1.5-2X speedup with negligible accuracy loss. This is essentially free performance. All RF-DETR benchmarks, for example, are reported using TensorRT FP16, it's the standard for production deployment.
- INT8 (8-bit integer): Goes further, representing values with only 256 possible levels instead of billions. INT8 quantization can deliver 2-4X speedup over FP32, but requires a calibration step (running representative data through the model to determine optimal quantization ranges). The accuracy impact is small for most models but should be validated on your specific dataset.
TensorRT and Runtime Optimization
NVIDIA's TensorRT is an inference optimization engine that applies quantization, layer fusion (combining multiple operations into single GPU kernels), and kernel auto-tuning to produce a highly optimized inference engine.
The Roboflow Inference Server automatically leverages TensorRT when running on compatible NVIDIA GPUs. You can enable TensorRT acceleration by setting the execution providers:
export ONNXRUNTIME_EXECUTION_PROVIDERS="[TensorrtExecutionProvider,CUDAExecutionProvider,CPUExecutionProvider]"The first inference will take longer (10-15 minutes in some cases) as TensorRT compiles an optimized engine from your model weights. Subsequent inferences use the cached engine and run at peak speed.
Export to ONNX for Faster Inference
Models trained in frameworks like PyTorch are designed for training, not fast inference. Exporting your model to the ONNX (Open Neural Network Exchange) format allows it to run on optimized inference engines like ONNX Runtime, TensorRT, and OpenVINO which apply graph optimizations, operator fusion, and hardware-specific tuning that can significantly boost FPS compared to running raw PyTorch.
Roboflow Inference uses ONNX Runtime by default, so when you deploy via Inference, this conversion is handled automatically. But if you need manual control. For example, to further convert to TensorRT or deploy on custom hardware, you can export your model to ONNX directly.
For RF-DETR, use the built-in export function:
from rfdetr import RFDETRMedium
model = RFDETRMedium(pretrain_weights="<path/to/checkpoint.pth>")
model.export(simplify=True)  # simplification improves runtime compatibility and speed
Simplifying the ONNX model removes redundant operations and can further improve inference speed. You can also export at a specific resolution (must be divisible by 14) to match your deployment needs. See the full RF-DETR ONNX export guide for details.
You can also download trained model weights directly from Roboflow and convert them to ONNX for use outside the Roboflow ecosystem. Other runtime options include ONNX Runtime (the default for Roboflow Inference, with broad hardware support), OpenVINO (optimized for Intel hardware), and CoreML (for Apple devices). In Roboflow Inference, you can switch between these by setting the ONNXRUNTIME_EXECUTION_PROVIDERS environment variable. For example, adding OpenVINOExecutionProvider for Intel CPUs or CoreMLExecutionProvider for Apple devices. See the Roboflow Inference device guide for setup details.
Step 5: Optimize the Software Pipeline
You can have the fastest model on the fastest GPU, and still get terrible FPS if your software pipeline is the bottleneck.
Roboflow Inference Server
The Roboflow Inference server is a Docker-based deployment solution that handles the entire inference pipeline (i.e. image decoding, preprocessing, model execution, and post-processing) in an optimized, production-ready package. Start the inference server with following command, it auto-selects optimal container for your hardware:
inference server startThe server automatically detects available hardware (CPU, CUDA GPU, Jetson) and configures the appropriate runtime. It also provides a standardized REST API, meaning you can switch between local deployment, edge deployment, and Roboflow's hosted API without changing your client code.
Parallel Processing for Higher Throughput
For workloads where you need maximum throughput, Roboflow Parallel Inference separates preprocessing, batching, inference, and post-processing into separate threads. Requests to the same model are automatically batched on the fly, and images are passed between threads using shared memory to minimize overhead. Run the parallel processing container:
docker pull roboflow/roboflow-inference-server-gpu-parallel:latestRoboflow's benchmarks show that Inference Parallel achieves up to a 76% speedup on measured workloads compared to the standard inference server, with higher FPS across every model tested.
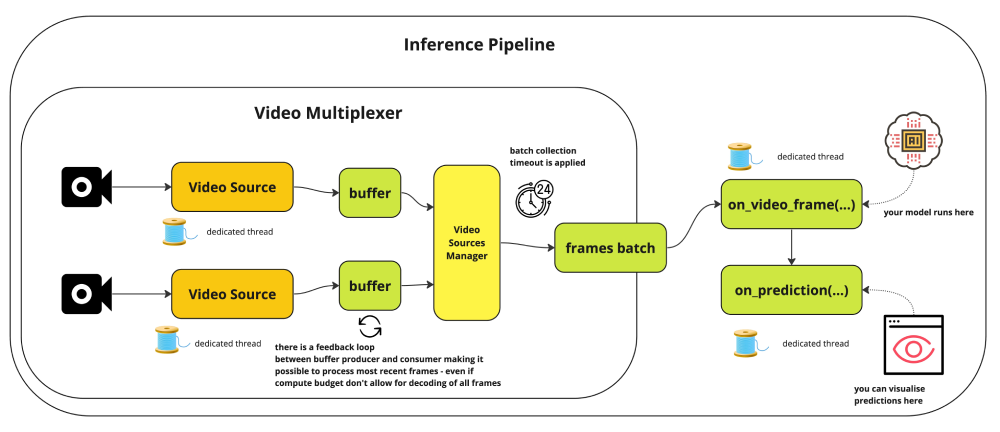
InferencePipeline for Video Streams
The InferencePipeline interface is built for real-time video streaming applications. It handles frame acquisition, buffering, inference, and result delivery asynchronously.
Here's an example of using InferencePipeline:
from inference import InferencePipeline
from inference.core.interfaces.camera.entities import VideoFrame

def on_prediction(predictions: dict, video_frame: VideoFrame) -> None:
    # Process predictions here
    pass

pipeline = InferencePipeline.init(
    model_id="rfdetr-nano",
    video_reference="rtsp://your-camera-stream",
    max_fps=30,
    confidence=0.5,
)
pipeline.start()
pipeline.join()
Key InferencePipeline features that impact FPS is the max_fps parameter caps frame processing rate to avoid overwhelming your system, and for live streams, the pipeline automatically drops older buffered frames to always process the most recent data, a critical behavior for real-time applications where stale predictions are worse than skipped frames.
Roboflow's benchmarks show that a GPU workstation with a Tesla T4 was able to run 4 concurrent HD streams at 15 FPS each, achieving over 60 FPS total throughput per GPU using YOLOv8-Nano.
Batched Inference for Higher GPU Utilization
When processing video files or image sets (not real-time single-camera streams), sending multiple frames through the model at once is one of the easiest ways to increase total FPS. This is called batched inference. Instead of feeding one image at a time to the GPU and leaving compute cycles idle between frames, batching fills the GPU with work and amortizes the overhead of each inference call.
The benchmarks show that with 100-frame parallelism, throughput reached 300 FPS against the hosted inference API which is far beyond what single-frame processing can achieve. You can configure batch size when running inference through batch processing deployment options. For even higher throughput, Roboflow Inference Parallel runs preprocessing, auto-batching, inference, and post-processing in separate threads. Separate requests to the same model are batched on the fly as allowed by `MAX_BATCH_SIZE`, and images are passed between threads via Python's SharedMemory module to minimize overhead. These optimizations result in as much as a 76% speedup on measured workloads, with higher FPS across every model tested.
Processing recorded video, running inference on image archives, or handling multiple concurrent camera streams on a single GPU. In all these cases, batching lets you extract more total FPS from the same hardware.
Troubleshooting: Why Is My FPS Still Low?
If your FPS is still low, work through this checklist:
Is your GPU actually being used?
Run `nvidia-smi` while your model is running. If GPU utilization is near 0%, your inference is falling back to CPU. Common causes include missing CUDA drivers, a CPU-only ONNX Runtime build, or incorrect execution provider configuration. If you are running inference inside Docker, check our guide on How to Use Your GPU in a Docker Container. For general setup, see the Roboflow Inference installation docs.
Is your CPU bottlenecked by post-processing?
Even with GPU inference, post-processing like Non-Maximum Suppression (NMS), drawing bounding boxes, or encoding annotated frames happens on the CPU. If your GPU shows low utilization but your CPU is maxed out, post-processing is your bottleneck.
One effective solution is switching to transformer models like RF-DETR, which eliminates traditional detection components like anchor boxes and Non-Maximum Suppression (NMS), enabling truly end-to-end object detection by removing post-processing overhead entirely. You can also move visualization to a separate thread.
Are you limited by your camera's native frame rate?
If your camera streams at 15 FPS, no amount of model optimization will get you above 15 FPS. Check your camera's capabilities and settings. Many industrial cameras support 30+ FPS at 1080p, but may default to lower rates. As documented in the InferencePipeline reference, you can use the `video_source_properties` parameter to configure your camera's resolution and frame rate explicitly.
Is your data transfer a bottleneck?
If you're using cloud inference, network latency adds to every frame. A 50ms round-trip network delay caps you at 20 FPS even with instant model inference. For real-time applications, prefer local or edge deployment. See the Roboflow Inference device compatibility guide for supported hardware options.
Is your preprocessing inefficient?
If you're writing custom Python code to read, resize, and convert frames before sending them to the model, that preprocessing loop can be surprisingly slow. As shown in Predict on a Video, Webcam or RTSP Stream, the `InferencePipeline` handles frame acquisition and preprocessing asynchronously, which can eliminate this bottleneck.
Increase Inference Speed for Computer Vision Models Conclusion
Achieving real-time FPS isn't about finding a single setting. it's about systematically optimizing every stage of the pipeline. The combination of a well-chosen model architecture (like RF-DETR-Nano or RF-DETR-Small), proper hardware acceleration, and an optimized inference pipeline (Roboflow Inference with parallel processing) can take you from single-digit FPS to real-time performance, often with higher accuracy than slower alternatives. Deploy with Roboflow Inference.
Cite this Post
Use the following entry to cite this post in your research:
Timothy M. (Feb 27, 2026). How to Increase Inference Speed for Computer Vision Models. Roboflow Blog: https://blog.roboflow.com/increase-inference-speed-for-computer-vision/