

Ambient light from windows, overhead fixtures, and nearby stations changes what the camera captures even when the part and model stay the same. Fix it with one-time hardware for glare and sunlight, use training data for the variation that keeps moving, and check production images before you ever retrain.
In industrial environments with strong noise and variable illumination, traditional machine-vision detection accuracy can fall to 70% or lower, according to a 2025 review of vision-based industrial gear inspection methods. This finding highlights why lighting should be treated as part of the inspection system rather than simply a way to brighten an image.
One source of this variation is uncontrolled ambient light from windows, overhead fixtures, nearby work lights, or adjacent inspection stations. These sources can change brightness, reflections, shadows, and color across the camera feed, even when the inspected object and model remain unchanged.
Lighting impacts the model input before inference begins. Reliable machine vision depends not only on model performance, but also on keeping image capture conditions consistent. This article explains how controlled lighting and a stable capture setup can reduce that variation in production.
How Ambient Light Impacts Machine Vision
The model never actually sees the object on the line. It only gets the photo the camera takes, so when the light changes, what the model sees changes with it.
The light can also change for a couple of other reasons. Operators, machinery, or moving objects may block part of the surrounding light and temporarily alter the visibility of edges or surface details.
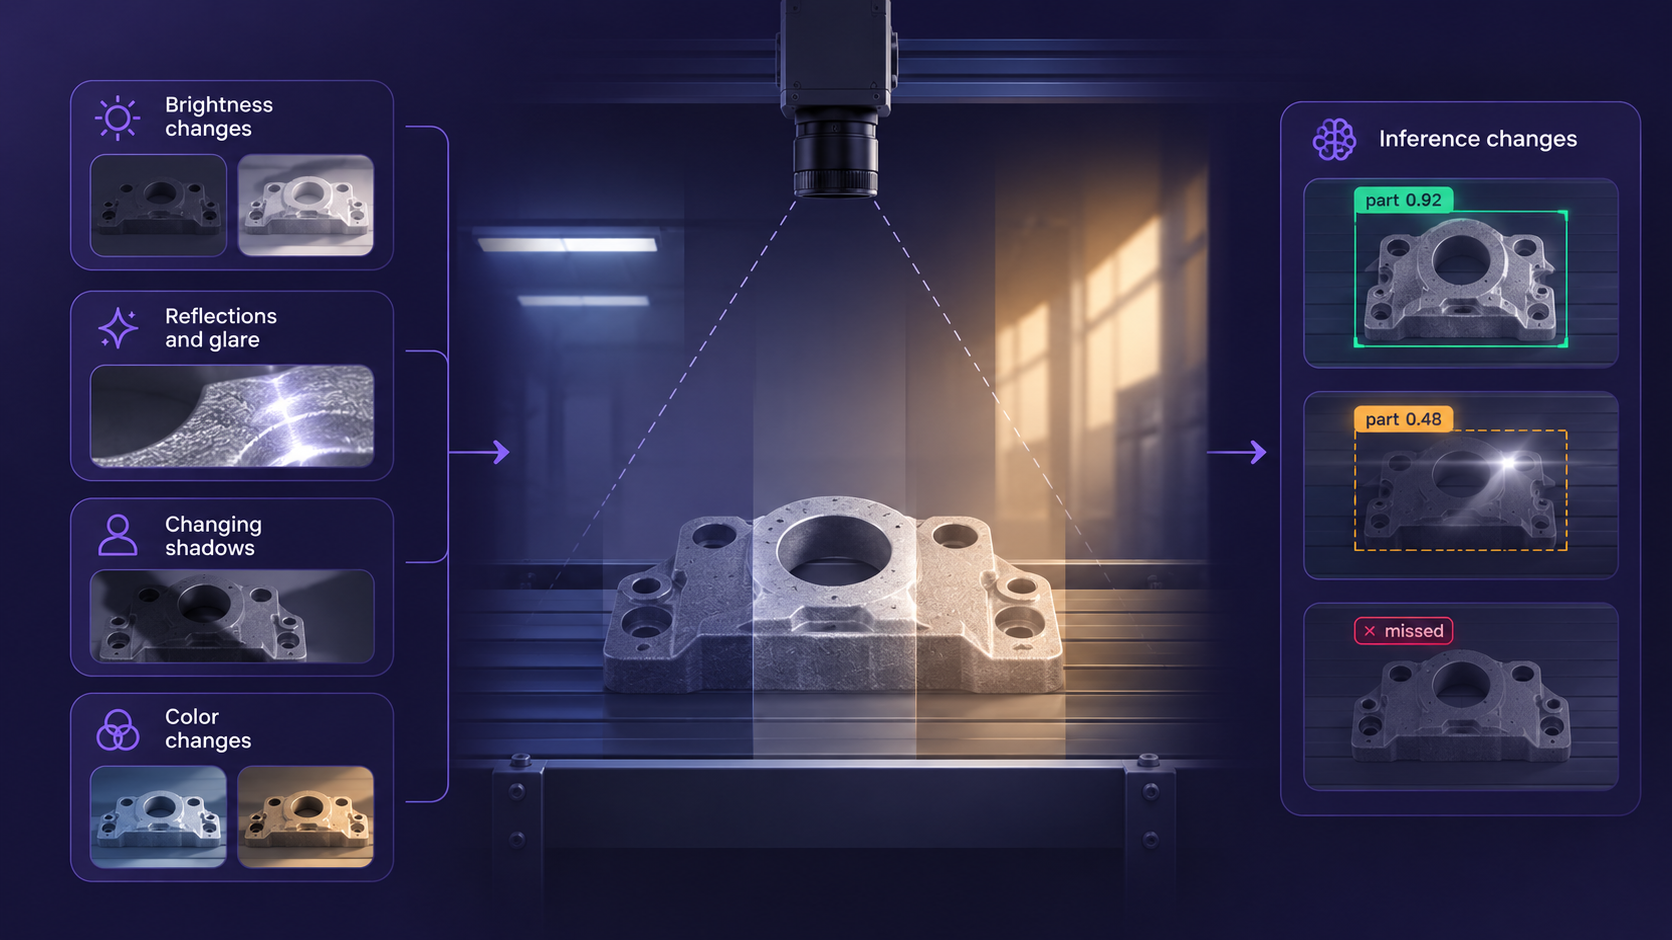
The problem is that none of this looks like a lighting issue. From the outside it seems like a model problem. The model starts missing things it used to catch, and its confidence moves around for no clear reason.
A lot of this can be prevented by picking the right light in the first place. That is a topic of its own, and Roboflow's machine vision lighting types guide covers it well, from backlights for outlines to low-angle bars for scratches and domes for curved shiny parts.
Lighting Problems That Do the Most Damage, and How to Fix Them
A model that looks solid in testing can struggle in production. During testing there is usually one light and an object in a fixed spot. A real factory floor is full of sunlight, shiny parts, and people moving around, and sooner or later all of it will impact the image taken.
1. Glare from reflective parts. Shiny surfaces reflect the light straight back into the lens, leaving a white patch right where the defect is. Solder joints and machined metal do this constantly, and a fully white area has no detail, so the defect simply is not in the image at all.
How to fix: Start by moving the light so the reflection misses the lens, since changing the angle costs nothing. If the part reflects from every angle, soften the light with a diffuser, and if that still is not enough, fit crossed polarizers on the light and the lens.
2. Sunlight changing with the time of day. If your error rate changes depending on the time of day, sunlight is getting into the frame. Everything works fine at night, then the numbers get worse in the afternoon. Direct sun is easily a hundred times brighter than indoor lighting, so even daylight coming in from the far side of the building can throw off the exposure.
How to fix: The strongest fix is a narrow bandpass filter matched to your LED wavelength, which means the camera only picks up your own light. A physical cover over the inspection area does the same job. If neither is practical, collect training data during every hour the line runs.
3. Hardware wearing out over time. This one takes months to show up. LEDs lose brightness as they age, dust builds up on the lens, and a mount bumped during cleaning shifts the frame without anyone noticing, so accuracy drops slowly enough that teams blame the model and retrain it, when the real problem is the hardware.
How to fix: Give yourself something objective to measure. A reference target fixed in the frame lets you track a sharpness or brightness number over time, and an alert fires when the numbers start to drop.
When to Buy Hardware and When to Add Training Data
Before choosing to buy anything, run one test. Capture an image of the part under the worst light you will realistically face and show it to someone. When a person can spot the defect in that image, a model can be trained to find it there too. When nobody can, more training data will not help, so fix the light first.
The test works because a trained model learns whatever variation it saw during training. Old rule-based systems compared pixel values against fixed numbers, so the image had to look the same every time, which is why they were usually built inside closed boxes that block out all outside light. A trained model does not need that, which turns lighting into a question of where the money helps most.
Spend on hardware when a one-time purchase removes a problem for good. A rigid mount, a light that fires in short flashes, a cover that blocks the room's light, and a filter that lets only your own light through are all one-time costs that keep working. The training set gets the rest, because daylight, seasons, and the differences between sites keep moving no matter what you buy.
Teams get this wrong both ways. Some spend heavily on enclosures and expensive lenses for a defect that a pair of bar lights and a few hundred more labeled images would have handled. Others ship bad optics and hope the model handles it. But a defect hidden inside a bright white spot never reaches the pixels in the first place.
Whichever option you choose, keep these fixed so every image is captured the same way:
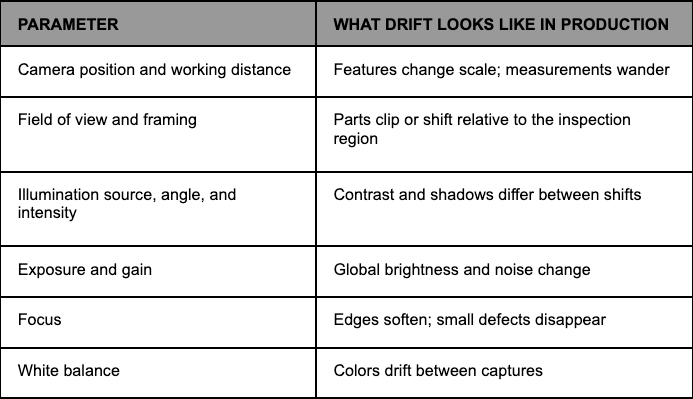
How the object sits in front of the camera matters as well. A holder that places every item in the same position removes more variation than most camera upgrades.
Roboflow AI1 for a Controlled Vision System
Reducing the impact of ambient light is easier when the camera and intended illumination are part of the same inspection setup. Roboflow AI1 is an all-in-one vision device designed for running computer vision at the edge.
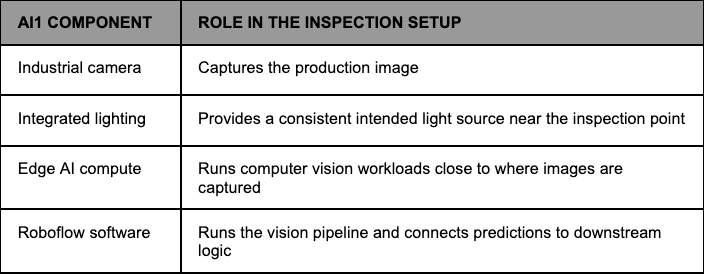
For lighting-sensitive applications, the integrated light reduces reliance on sunlight or other changing ambient sources. Keeping the camera and lighting in a fixed arrangement also makes the capture geometry easier to reproduce across repeated inspections and across sites.
Run Inference at the Inspection Point with AI1
AI1 can run computer vision models and Roboflow Workflows on-device, so predictions happen right at the inspection point. If prediction behavior changes while the deployed model remains the same, teams can first inspect the camera view, ambient lighting, reflections, focus, and physical installation before deciding that the model itself needs to change.
Monitoring the Capture Setup
Hardware wear, the third problem above, is why you need to keep checking the camera and light after the install.
The Camera Focus block in Roboflow Workflows scores sharpness on the live feed, so a bumped camera shows up in the sharpness score before it hurts the predictions.
Roboflow Vision Events keeps every production prediction with the image behind it, so a problem can be traced back to a specific camera, line, or time of day.
Together, these checks make it easier to investigate what changed at the inspection point before changing the model.
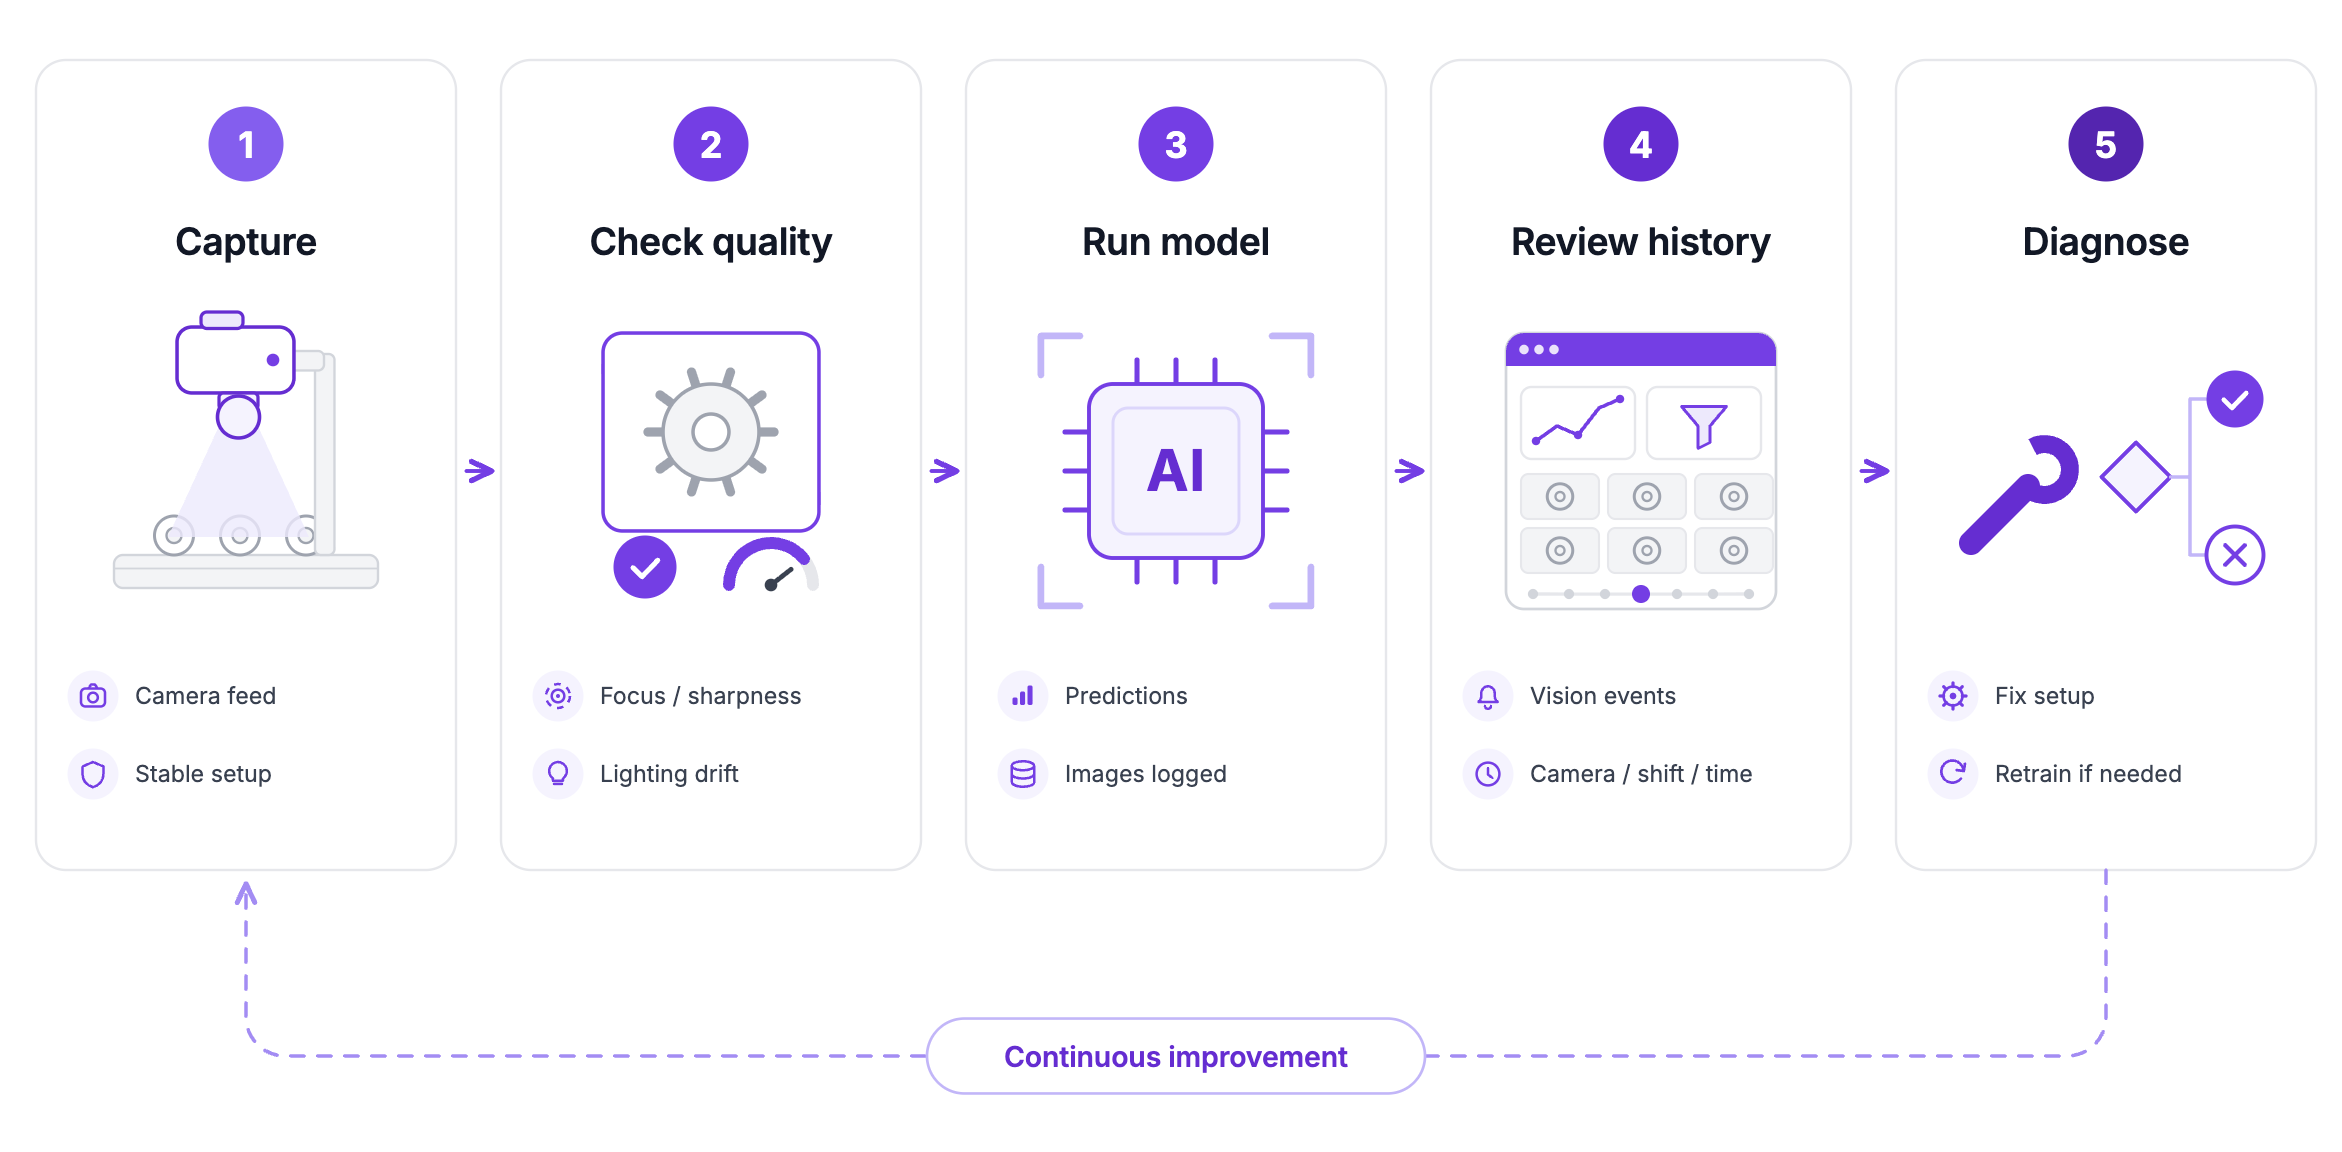
Lighting Problem or Model Problem?
Everything above was about setting a system up. This part is the diagnosis, for when a system that was working starts getting worse.
When prediction quality changes in production, retraining should not be the first step. First, determine whether the images reaching the model have changed.
1. Check the production images. Look for changes in brightness, glare, shadows, framing, focus, or exposure.
2. Stabilize the capture environment. Correct camera or lighting problems and test representative images again.
3. Keep the deployed model version fixed. Changing the model while troubleshooting makes it harder to determine whether the problem came from the input or the model.
4. Review repeated failures. Use recent production images and prediction history to check whether the same errors remain under stable capture conditions.
5. Retrain if the errors persist. Add representative failure cases to the dataset and use Roboflow Train to create a new model version.
If correcting the capture setup removes the errors, retraining may not be necessary. If consistent, good-quality images still produce the same failures, the dataset or model becomes the next area to investigate.
Further reading:
Cite this Post
Use the following entry to cite this post in your research:
Mostafa Ibrahim. (Aug 7, 2026). Machine Vision Lighting. Roboflow Blog: https://blog.roboflow.com/machine-vision-lighting/