
Build a robotic welding defect detection system with Roboflow's RF-DETR and Gemini 2.5 Pro to identify welding defects and generate automated quality inspection reports.
Weld quality inspection is a critical step in manufacturing workflows that rely on robotic welding. Even when welding parameters are carefully controlled, defects such as porosity, undercut, excessive spatter, and irregular weld beads can still occur. Detecting these issues early helps prevent defective components from moving further down the production line.
The demand for welding technologies continues to grow worldwide. The global welding market, valued at USD 26.1 billion in 2024, is projected to reach USD 38.27 billion by 2032, growing at a CAGR of 4.9%. As production volumes increase, automated inspection systems are becoming an important part of modern quality assurance processes.
Computer vision systems provide a consistent and automated approach to evaluating weld quality, enabling manufacturers to inspect large numbers of welds with minimal human intervention.
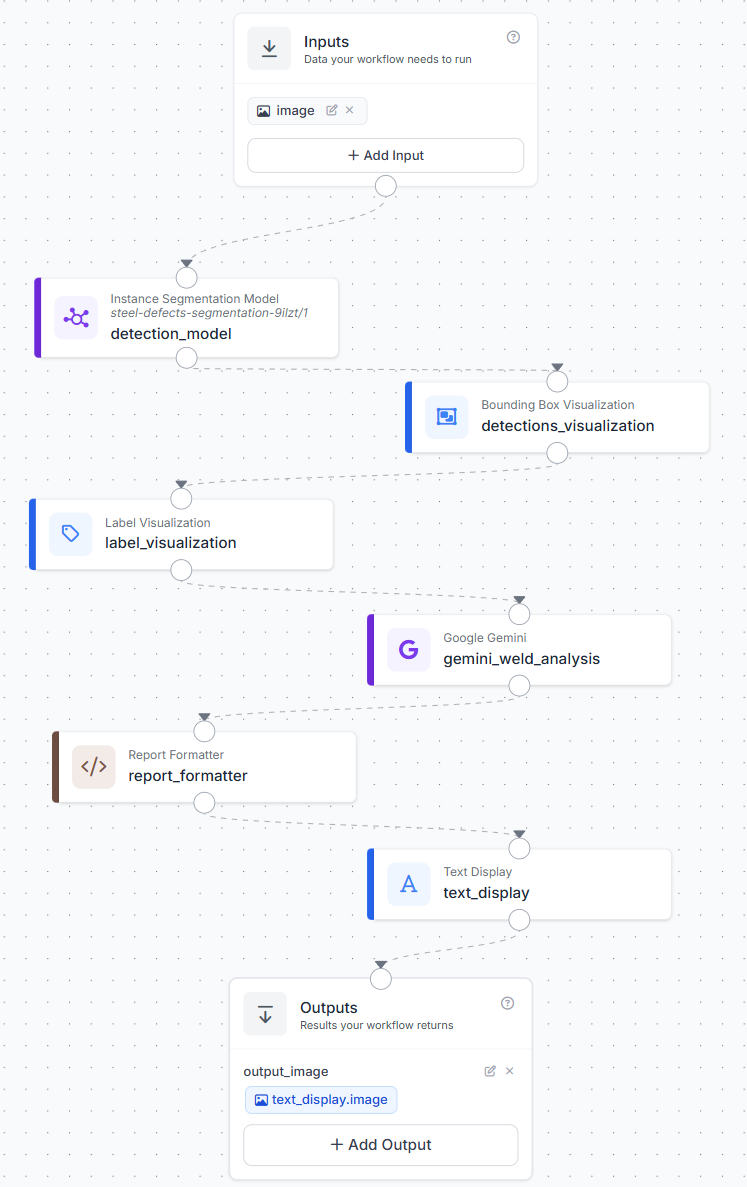
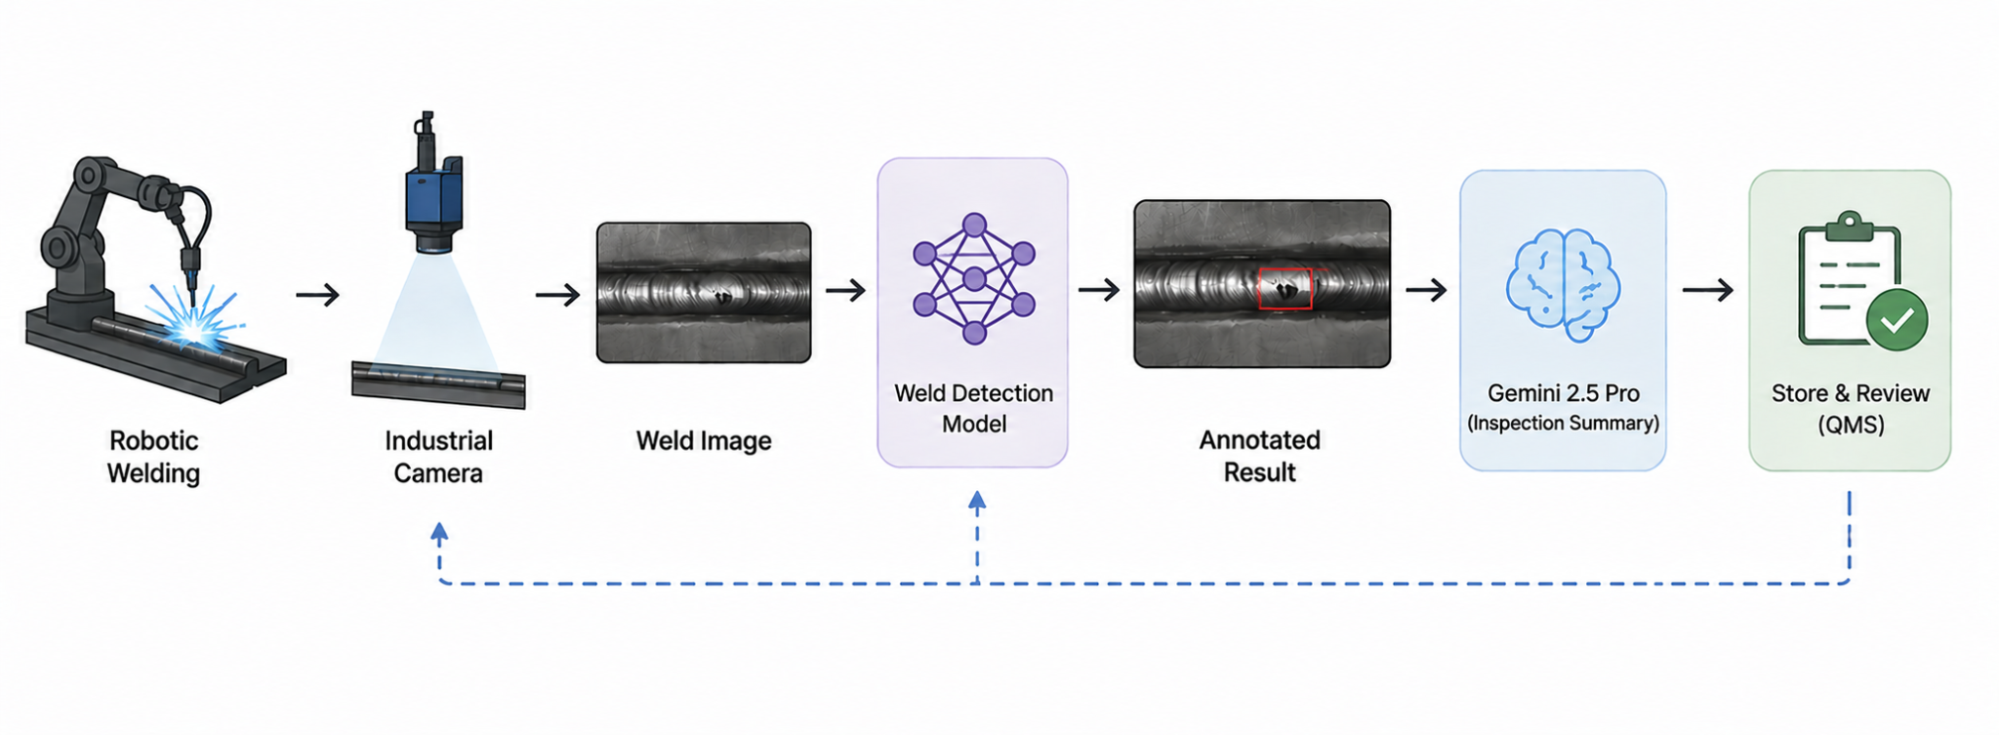
In this tutorial, we will build a weld inspection system using Roboflow. We will train Roboflow's RF-DETR model to classify welds as Good Weld or Bad Weld, deploy the model in Roboflow workflow, and use Gemini 2.5 Pro to generate inspection observations based on detected weld quality. Here is the workflow we will build.
Building a Robotic Welding Defect Detection System
We will use a weld inspection dataset designed for visual weld quality assessment. Our goal is to train RF-DETR to distinguish between acceptable and defective welds based on their visual appearance. Rather than inspecting the welding process itself, the model analyzes images captured after welding and identifies weld regions that meet quality standards or require further review.
Step 1: Prepare the Dataset
While the dataset contains additional annotations, we will focus exclusively on the following two classes:
- Good Weld
- Bad Weld
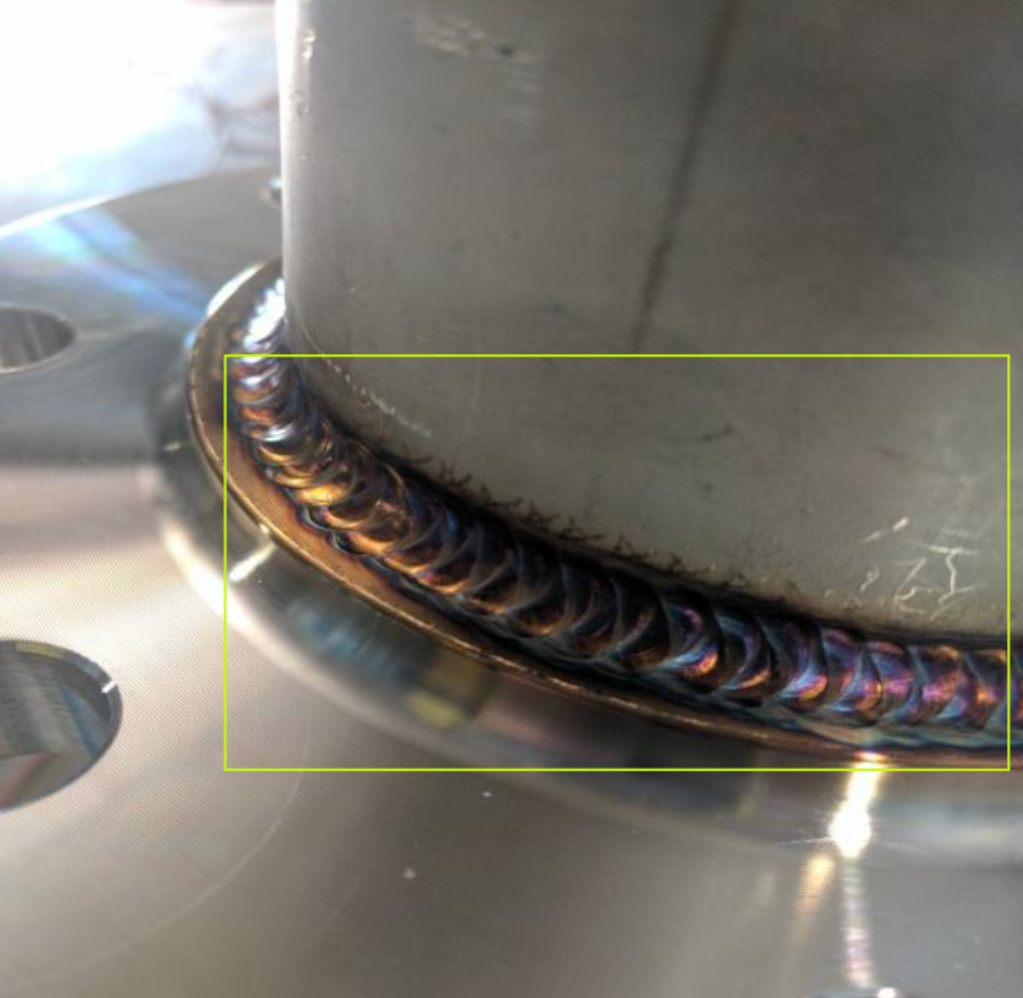
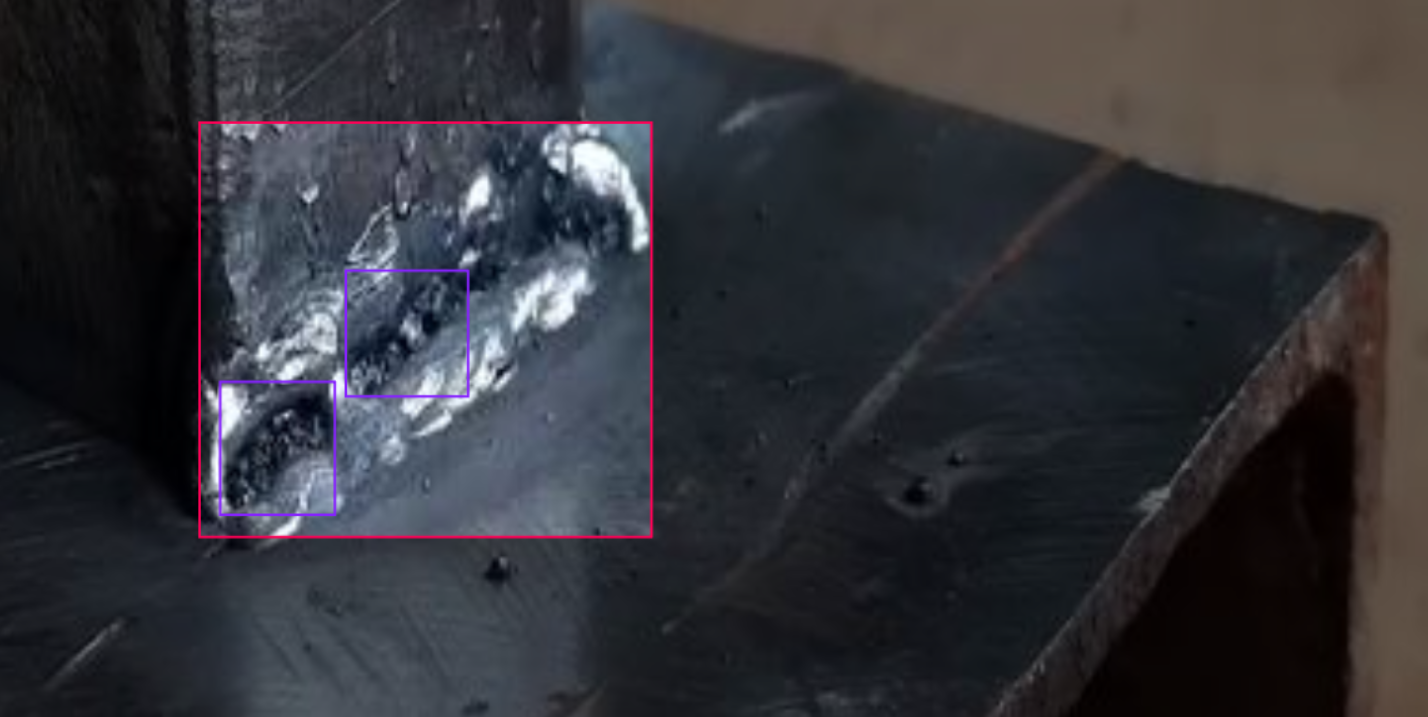
The Good Weld class represents welds with a consistent bead profile and acceptable visual quality. The Bad Weld class includes welds that exhibit visible defects, irregular bead formation, discontinuities, excessive spatter, or other characteristics associated with poor weld quality.
This combination allows the model to perform automated weld inspection by locating weld regions and classifying their quality directly from an image.
The dataset contains weld samples captured under different lighting conditions, viewing angles, and surface textures. Variations in weld appearance help the model learn robust visual features that generalize across different inspection scenarios. Below are examples of the target classes.
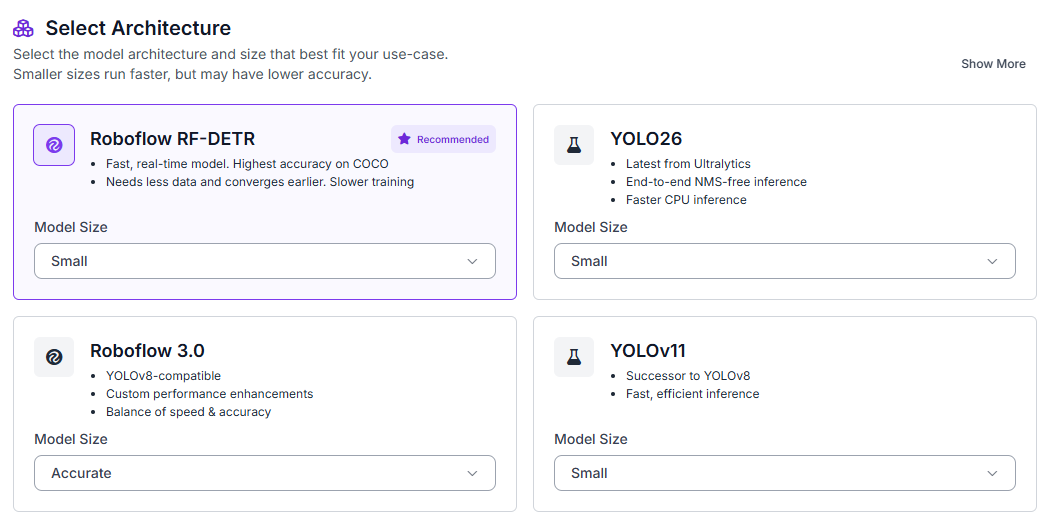
To get started, fork the dataset into your Roboflow workspace. Next, navigate to the Train tab and select Custom Training. From the available architectures, choose RF-DETR and set the model size to Small.
After selecting the model architecture, generate a new dataset version before training. Configure a 70/15/15 split for training, validation, and testing.
Enable the following preprocessing steps:
- Auto-orientation
- Resize (384×384)
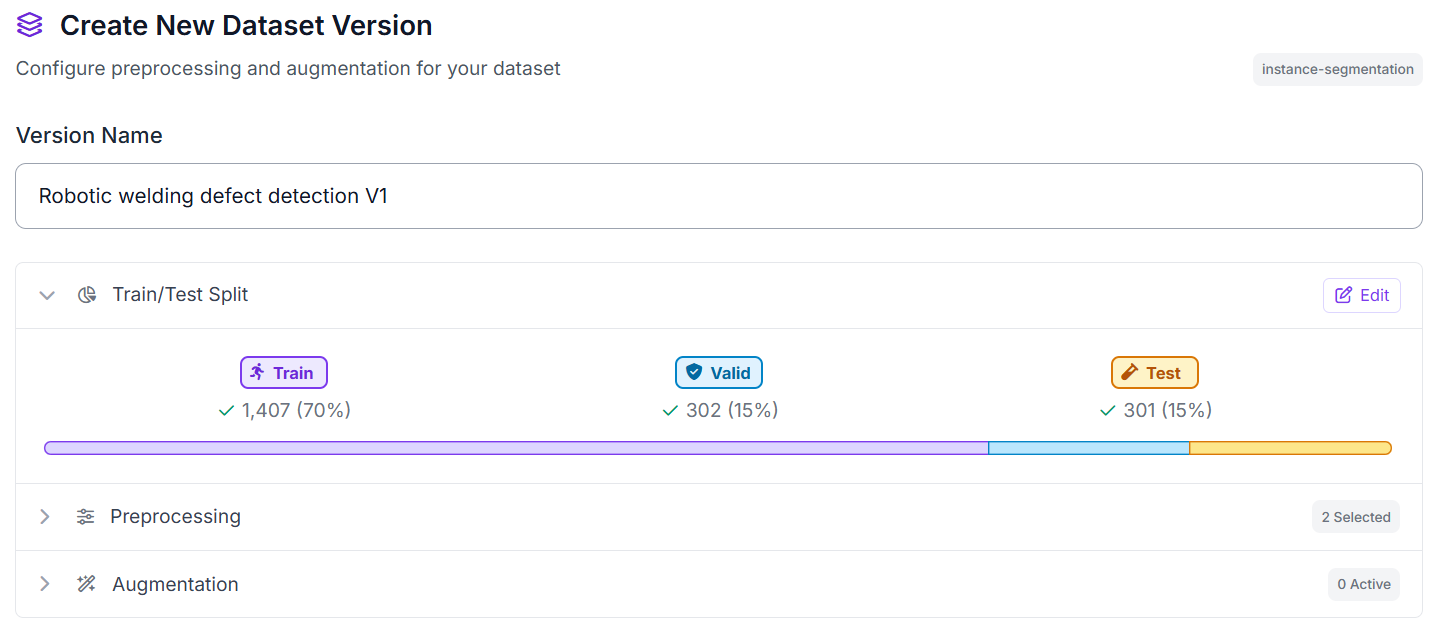
These preprocessing steps help normalize images captured under different conditions while providing a consistent input size for RF-DETR training.
Step 2: Train the RF-DETR Model
Once training begins, RF-DETR learns to localize and classify Good Weld and Bad Weld regions directly from the annotated examples in the dataset. Unlike a traditional image classification model that produces a single prediction for an entire image, RF-DETR identifies the location of each weld instance using bounding boxes while simultaneously assigning a weld quality label.
This localization capability is valuable for weld inspection workflows because it provides visual evidence for every prediction. Instead of returning a simple pass-or-fail result, the model highlights the specific weld regions classified as either good or defective, making it easier for operators and quality engineers to review inspection results.
After training completes, Roboflow provides evaluation metrics that measure how accurately the model detects and classifies weld quality. These metrics help determine whether the model is ready for deployment in a Roboflow Workflow and downstream analysis with Gemini 2.5 Pro.
Step 3: Evaluate Model Performance
Once training completes, review the model's performance on the test set.
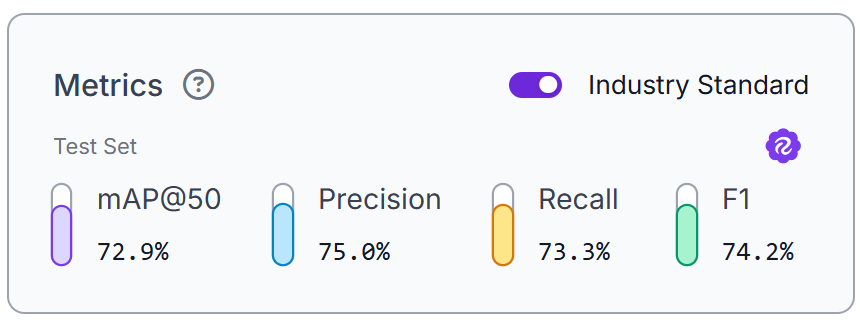
Our RF-DETR Small model achieved 72.9% mAP@50, 75.0% precision, 73.3% recall, and an F1 score of 74.2%. These results show that the model can identify and localize Good Weld and Bad Weld regions across the test dataset.
The precision score indicates that most detections correspond to the correct weld quality class, while the recall score shows that the model can detect a large portion of weld regions present in the dataset. Together, these metrics demonstrate that the model is capable of supporting an automated weld inspection workflow.
These metrics evaluate only the RF-DETR model. In the next step, we will deploy the model in Roboflow Workflows and use Gemini 2.5 Pro to generate inspection observations from the detected weld quality results.
Step 4: Deploy to Workflows
After validating the model, deploy it in Roboflow Workflows. The workflow starts with an input weld image, which is processed by the weld inspection model. The model is configured to return only the Good Weld and Bad Weld classes, with the Defect class filtered out.
A bounding box visualization block draws the detections, and a label visualization block adds the corresponding class labels. The annotated image is then passed to Gemini 2.5 Pro, which generates a short inspection summary based on the detected welds.
Finally, a custom Python block formats Gemini's response, and a text overlay block displays the inspection summary on the image. The workflow returns a final image containing weld detections, class labels, and AI-generated inspection observations.
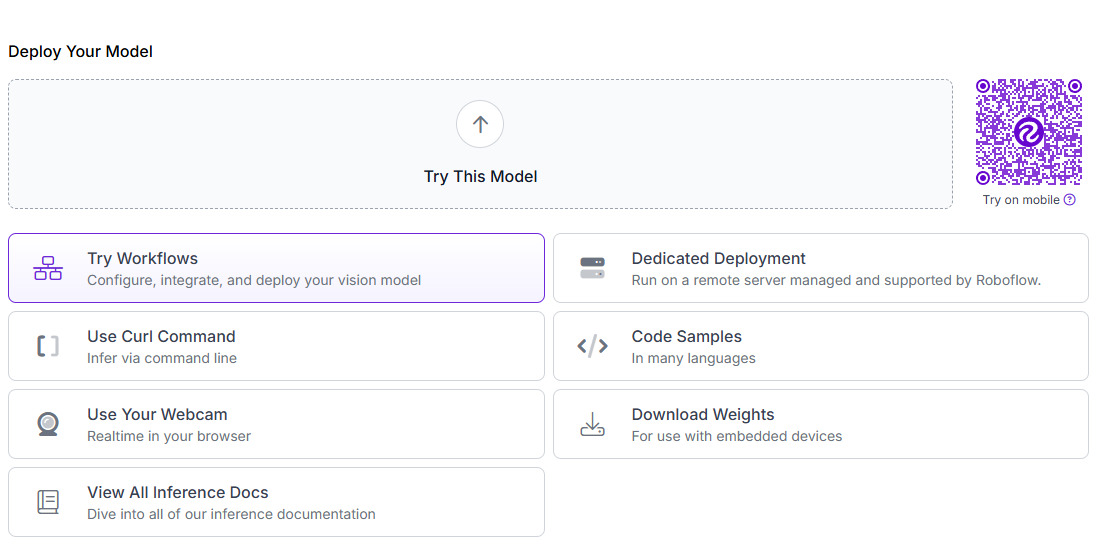
To create the workflow, click Try Workflows when viewing your trained model's deployment options. From the template gallery, select Detect and Visualize as the starting point.
Step 5: Configure the Gemini 2.5 Pro VLM Block
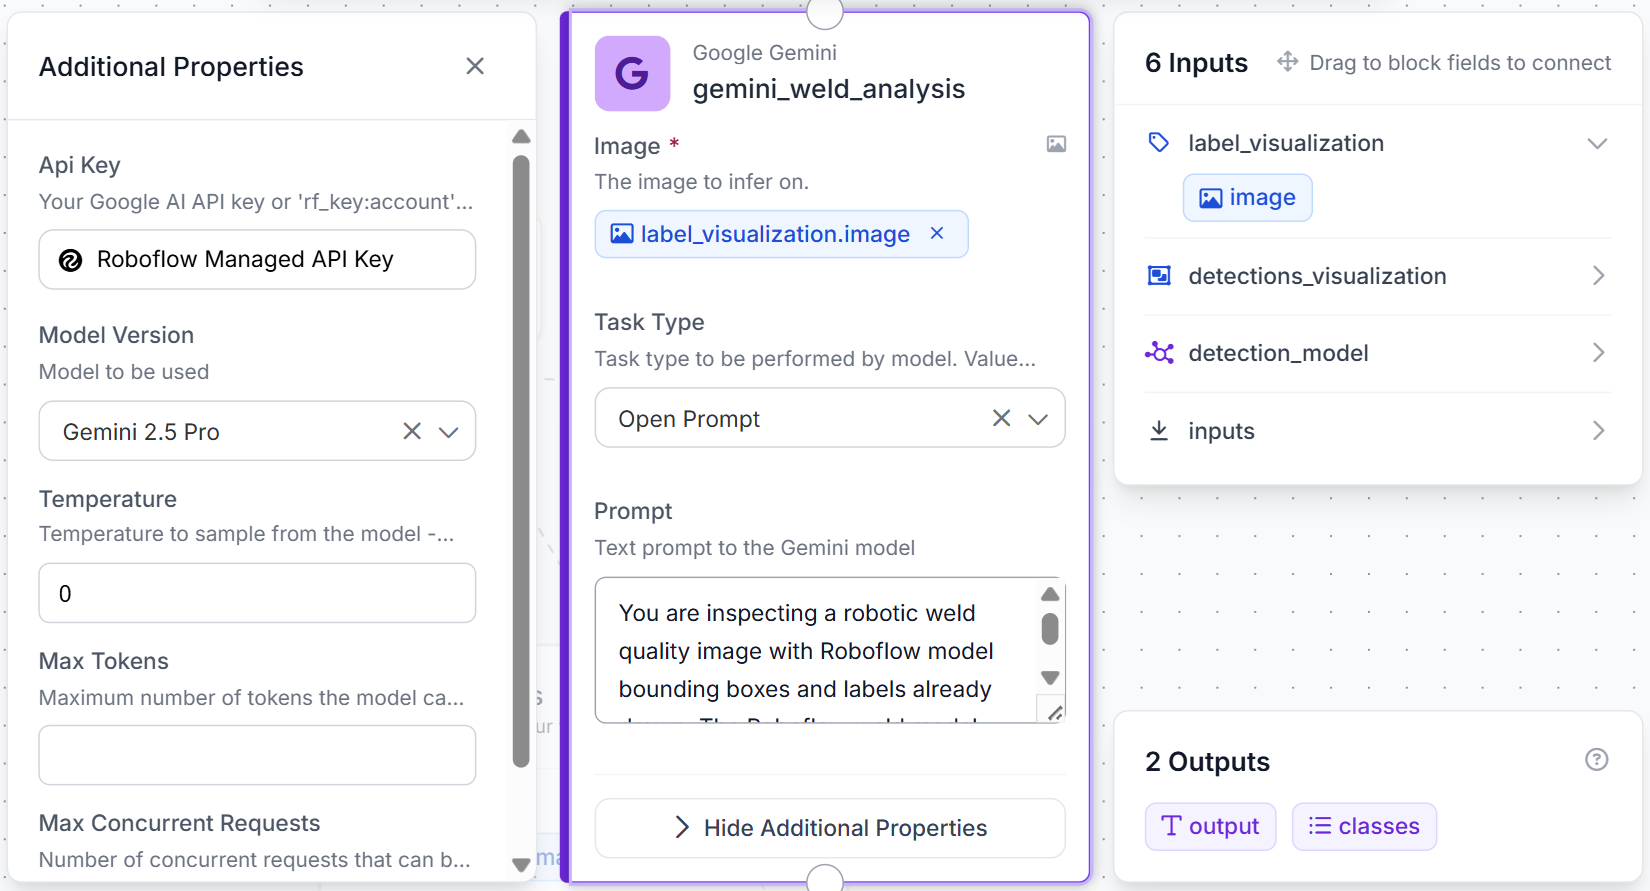
Add a Google Gemini block after the label visualization block. Configure it to receive the annotated image rather than the original image. This allows Gemini to review the same detections that appear in the final output.
Use these settings:
Image: $steps.label_visualization.imageModel: Gemini 2.5 ProTask Type: Open Prompt
Use this prompt:
You are inspecting a robotic weld quality image with Roboflow model bounding boxes and labels already drawn. The Roboflow weld model predictions are the source of truth for Good Weld vs Bad Weld, so do not reclassify welds. Generate a concise inspection summary in exactly this structure:

Inspection Summary

Good Welds: X
Bad Welds: Y

Observations:
- Short observation 1

Recommendation:
Accept / Review / Rework

Keep it compact for display on an image.
Gemini receives the annotated image produced by the detection and visualization steps. The model does not replace the weld detector. Instead, it reviews the detected welds and generates a short inspection summary based on the model's predictions.
Step 6: Format and Overlay the Inspection Summary
Next, add a custom Python block after the Gemini block. This block formats Gemini's response and prepares it for display on the final image.
def run(self, gemini_output, predictions):
    import re

    raw = str(gemini_output or '').strip()
    raw = re.sub(r'```.*?```', '', raw, flags=re.DOTALL)
    raw = raw.replace('**', '').replace('* ', '').replace('- ', '')
    raw = re.sub(r'\s+', ' ', raw).strip()

    data = getattr(predictions, 'data', {}) or {}
    class_names = data.get('class_name', data.get('class_names', []))
    if hasattr(class_names, 'tolist'):
        class_names = class_names.tolist()
    class_names = list(class_names) if class_names is not None else []

    good_count = sum(1 for c in class_names if str(c).lower() == 'good weld')
    bad_count = sum(1 for c in class_names if str(c).lower() == 'bad weld')
    recommendation = 'Accept' if bad_count == 0 else 'Review'

    obs_match = re.search(r'Observations?:\s*(.*?)(?:Recommendation:|$)', raw, flags=re.IGNORECASE)
    observation = obs_match.group(1).strip() if obs_match else raw
    observation = re.sub(r'Inspection Summary|Good Welds:\s*\d+|Bad Welds:\s*\d+|Recommendation:\s*\w+', '', observation, flags=re.IGNORECASE).strip(' -:;')
    if not observation:
        observation = f'{good_count} good weld(s), {bad_count} bad weld(s) detected.'
    if len(observation) > 72:
        observation = observation[:69].rstrip() + '...'

    compact = f'Weld QC | Good: {good_count} | Bad: {bad_count} | {observation} | Rec: {recommendation}'
    if len(compact) > 120:
        compact = compact[:117].rstrip() + '...'
    return {'formatted_report': compact}
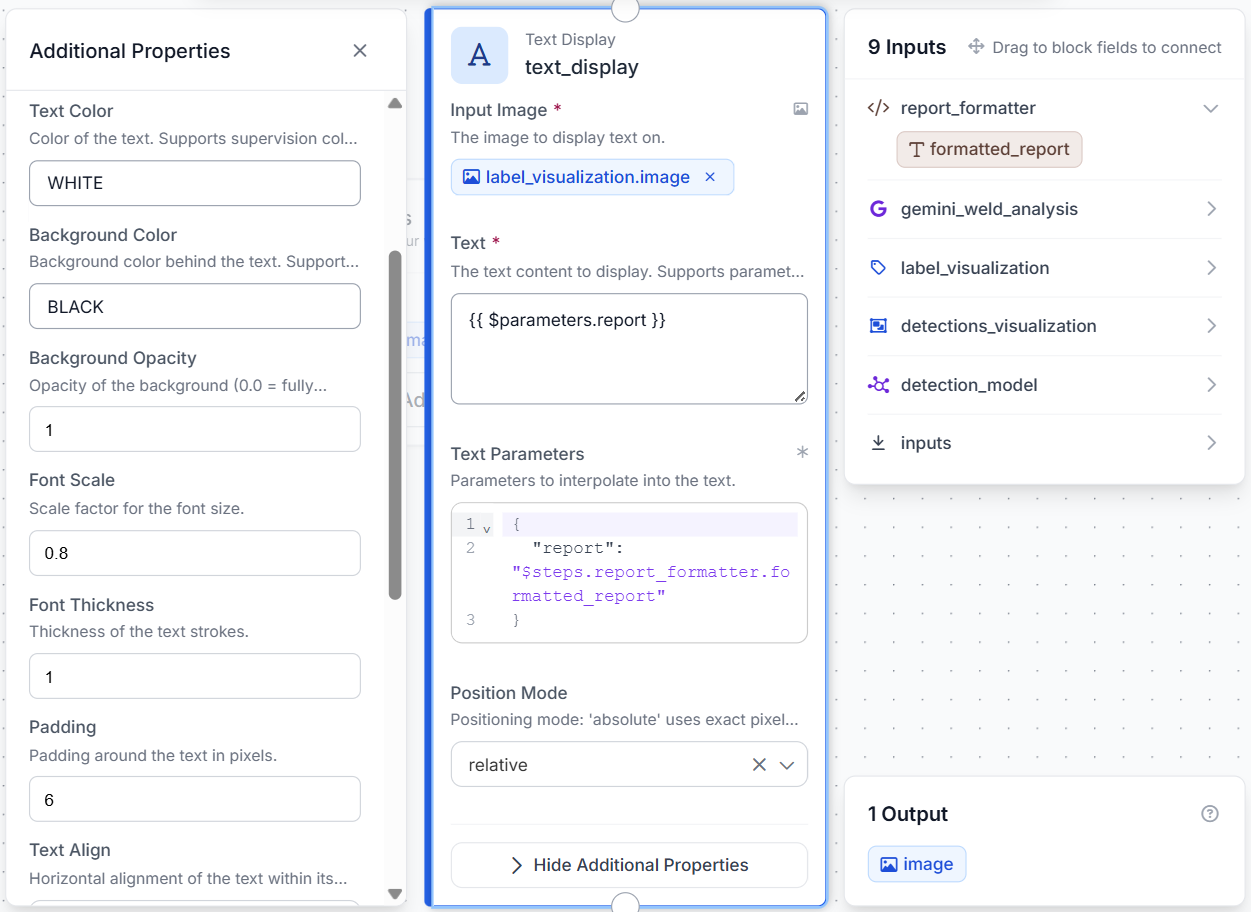
The block also counts the detected Good Weld and Bad Weld instances and generates a compact weld quality report. Finally, add a Text Display block. Use the labeled image as the base image and the formatted report as the overlay text. Place the text in the top-left corner with white text on a semi-transparent black background.
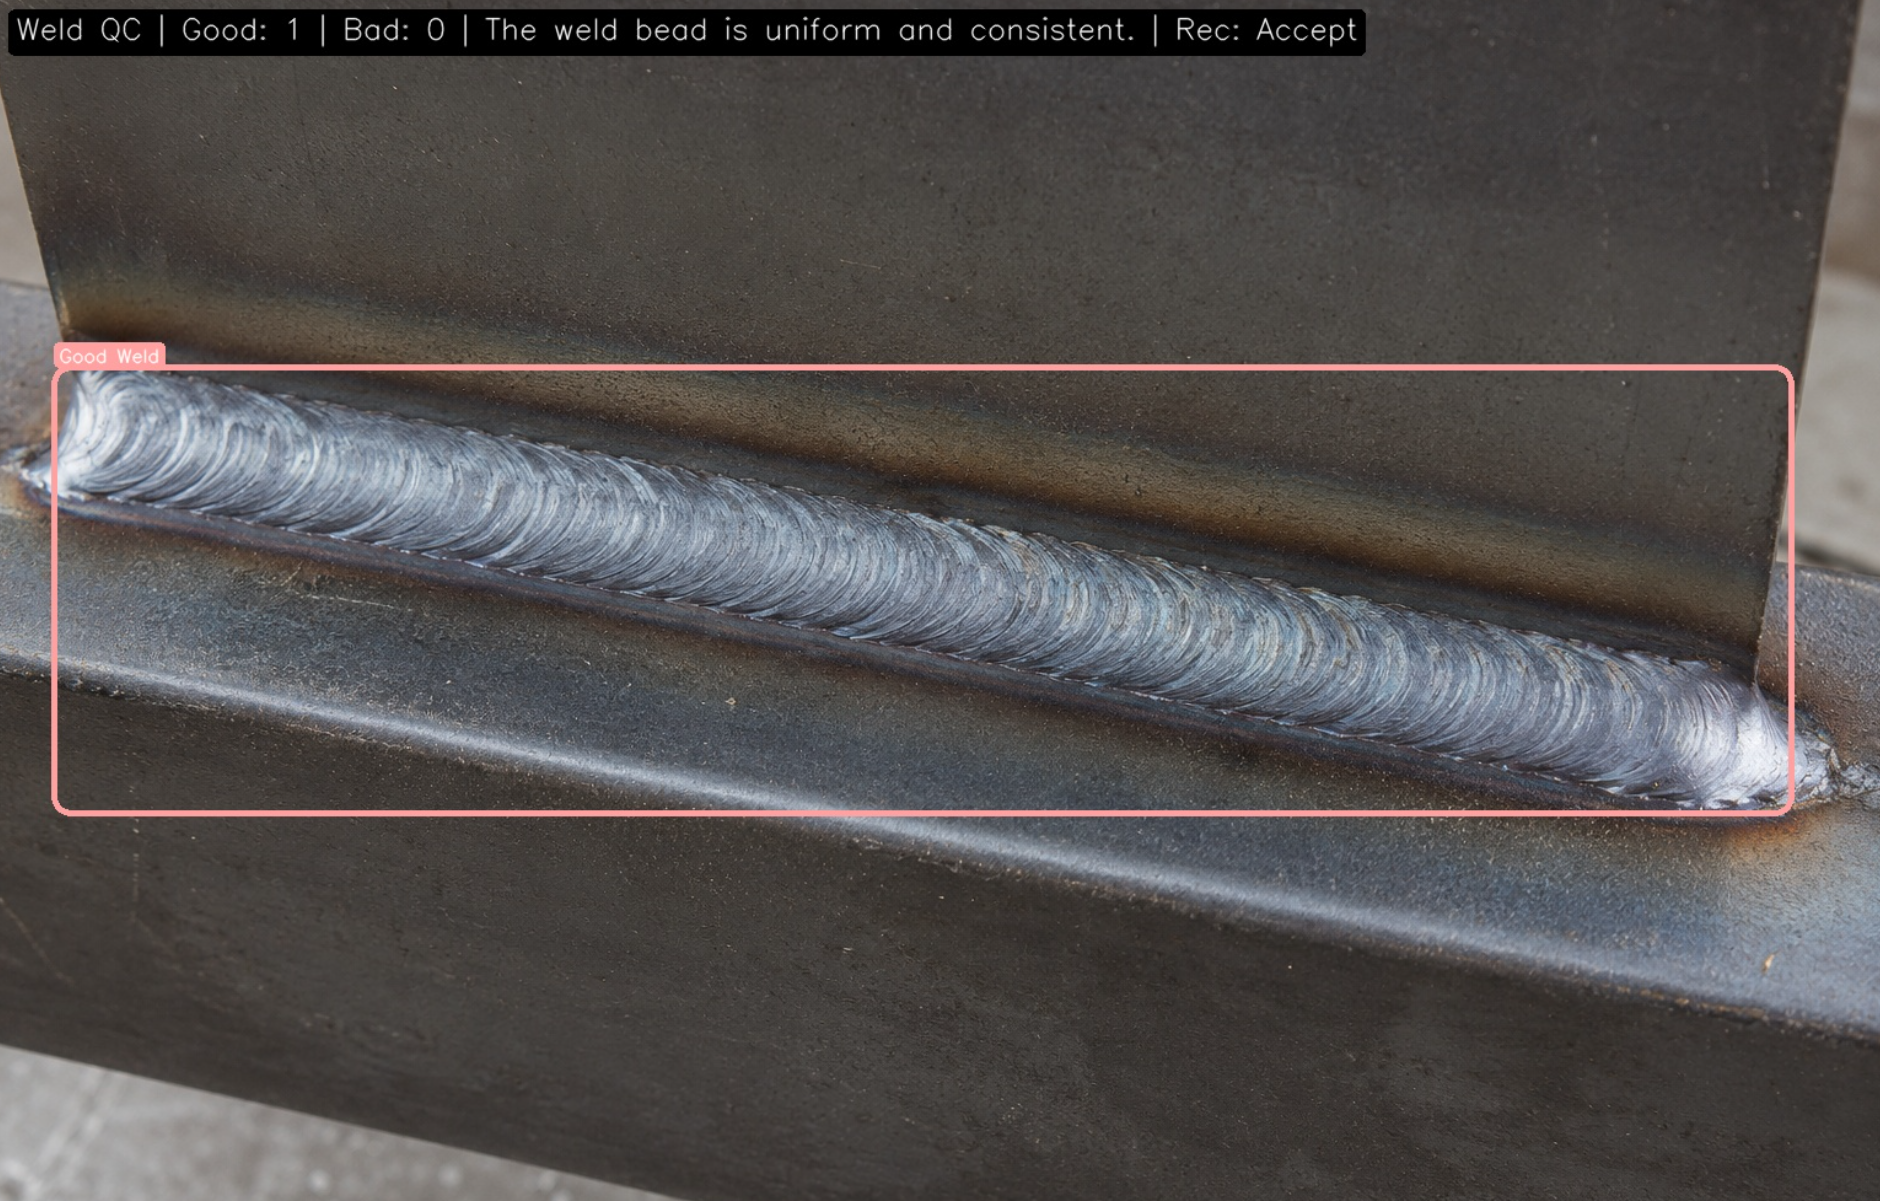
The final output is a single annotated image showing weld detections, class labels, and Gemini's inspection summary.
Step 7: Test the Workflow
Click Run in the top-right corner of Workflows to validate the pipeline. Upload a weld inspection image containing one or more weld regions.
The final output is a single annotated image containing:
- Good Weld detections
- Bad Weld detections
- Weld class labels
- Gemini-generated inspection observations
- A formatted inspection summary displayed on the image
Because the workflow relies on a single image, the results should be treated as visual assessments rather than formal weld certifications. Clear images with visible weld regions and minimal obstruction generally produce the most reliable results.
Production Considerations for Automated Weld Inspection
This tutorial uses a general weld inspection dataset to demonstrate the workflow, but a production system would typically be trained on welds from a specific manufacturing process. Different materials, joint configurations, and welding parameters produce different weld appearances, so using production data usually leads to more reliable results.
On a manufacturing line, cameras can be installed directly after robotic welding stations to inspect every completed weld in real time. The model can then be expanded to detect additional defect types such as porosity, undercut, excessive spatter, incomplete fusion, and other quality issues commonly encountered in production.
Gemini can serve as an additional review layer by turning model predictions into clear inspection notes that operators and quality engineers can quickly understand. Inspection results can also be stored in quality management systems for traceability, reporting, and follow-up analysis.
Build Automated Weld Inspection Faster with the Roboflow Agent
If you'd rather not add each block by hand, use Roboflow Agent. Instead of configuring blocks one at a time, you describe the pipeline you want in plain text and the Agent builds it for you. Here's an example:
Robotic Welding Defect Detection System Conclusion
In this tutorial, we built an automated weld inspection workflow using Roboflow. We trained a model to detect Good Weld and Bad Weld regions, deployed it in Roboflow Workflows, and used Gemini 2.5 Pro to generate inspection summaries.
The workflow combines weld detection and visual reasoning in a single pipeline, demonstrating how computer vision can help automate weld quality inspection and surface potential issues earlier in the production process.
Further reading:
Cite this Post
Use the following entry to cite this post in your research:
Mostafa Ibrahim. (Jun 22, 2026). Building an AI-Powered Robotic Welding Defect Detection System. Roboflow Blog: https://blog.roboflow.com/robotic-welding-defect-detection-system/