
This tutorial covers training a custom object detection model with the TensorFlow 2 Object Detection API, using a public blood cell dataset exported from Roboflow in TFRecord format. The walkthrough covers installing dependencies, writing a training configuration, running training with TensorBoard monitoring, exporting saved weights, and running inference on held-out test images. The API supports multiple architectures including EfficientDet, giving practitioners flexibility to swap models without rewriting their pipeline.
With the recent release of the TensorFlow 2 Object Detection API, it has never been easier to train and deploy state of the art object detection models with TensorFlow leveraging your own custom dataset to detect your own custom objects: foods, pets, mechanical parts, and more.
In this blog and TensorFlow 2 Object Detection Colab Notebook, we walk through how you can train your own custom object detector in minutes, by changing a single line of code for your dataset import.
In order to train our custom object detector with the TensorFlow 2 Object Detection API we will take the following steps in this tutorial:
- Discuss the TensorFlow 2 Object Detection API
- Acquire Labeled Object Detection Data
- Install TensorFlow 2 Object Detection Dependencies
- Download Custom TensorFlow 2 Object Detection Dataset
- Write Custom TensorFlow 2 Object Detection Training Configuration
- Train Custom TensorFlow 2 Object Detection Model
- Export Custom TensorFlow 2 Object Detection Weights
- Use Trained TensorFlow 2 Object Detection For Inference on Test Images
Resources included in this tutorial:
- TensorFlow 2 Object Detection Colab Notebook
- Public Blood Cell Object Detection Dataset
- TF2 OD GitHub Repository
Let's get started!
If you prefer a video tutorial, subscribe to the Roboflow YouTube channel.
What is the TensorFlow 2 Object Detection API?
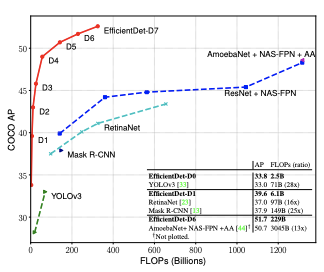
The TensorFlow2 Object Detection API is an extension of the TensorFlow Object Detection API. The TensorFlow2 Object Detection API allows you to train a collection state of the art object detection models under a unified framework, including Google Brain's state of the art model EfficientDet (implemented here).
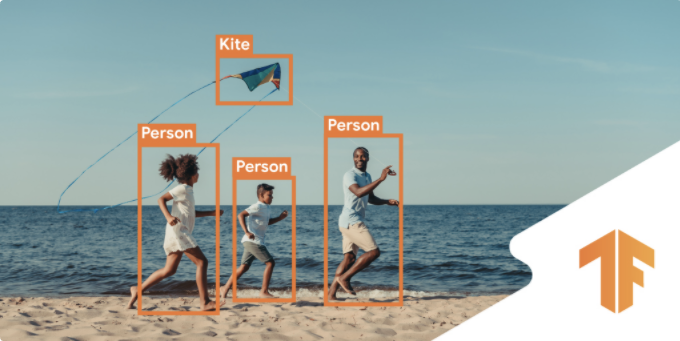
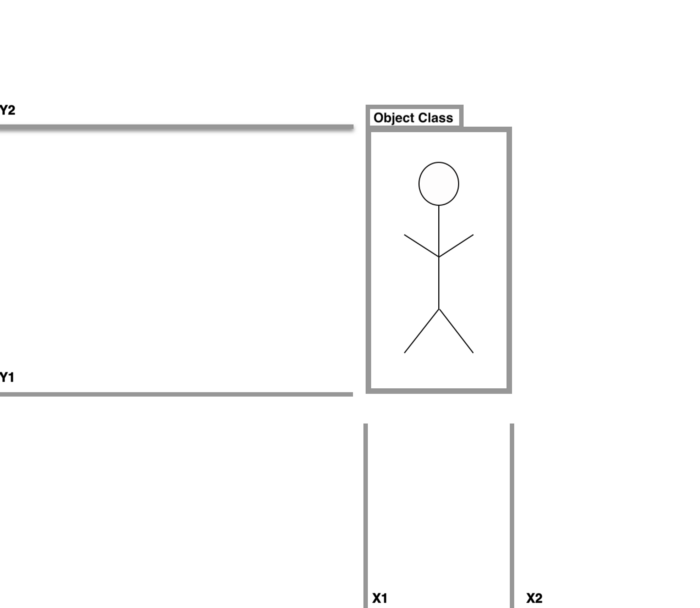
More generally, object detection models allow you to train your computer to identify objects in a scene with bounding boxes and class labels. There are many ways you can use deep learning techniques to model this problem and the TensorFlow2 Object Detection API allows you deploy a wide variety of different models and strategies to achieve this goal.
For a deep dive on the new features in the new library, see our post introducing the TensorFlow 2 Object Detection API.
TensorFlow 2 Object Detection Deep Dive
Learn about the new features included in the new TF2 OD library!
In this tutorial, we train the smallest EfficientDet model (EfficientDet-D0) for detecting our custom objects on GPU resources provided by Google Colab. That said, the TensorFlow 2 Object Detection library has many models available in their model zoo, so you can leverage this tutorial for the following:
- How to train CenterNet HourGlass in TensorFlow 2
- How to train CenterNet Resnet50 in TensorFlow 2
- How to train EfficientDet D7 in TensorFlow 2
- How to train MobileNet 2 in TensorFlow 2
- How to train ResNet50 in TensorFlow 2
- How to train Faster R-CNN in TensorFlow 2
- How to train ExtremeNet in TensorFlow 2
Acquiring Labeled Object Detection Data
If you already have a labeled object detection dataset, you can go ahead and skip this section.
Public Datasets
If you are simply trying to get a feel for the new deep learning technologies available in the TensorFlow Object Detection API, you might consider utilizing a public object detection dataset, many of which we make readily available via Roboflow. Consider forking any of these to your account. If you wish to follow along directly with this tutorial, we will be using the public blood cell detection dataset.
Open Source Labeling Solutions
If you have unlabeled images, and want to train a detector to detect your custom objects, we recommend trying your hand at free, open source labeling solutions. Our first choice is Roboflow Annotate, which will flow nicely with this guide.
Alternatively, you may consider other solutions to label your own object detection dataset, such as LabelImg, VoTT, SuperAnnotate, or LabelMe.
Regardless of which tool you use, we recommend exporting your annotations at VOC XML, which you can later convert to any format you need. We find VOC XML is less error prone.
***Using Your Own Data***
To export your own data for this tutorial, sign up for Roboflow and make a public workspace, or make a new public workspace in your existing account. If your data is private, you can upgrade to a paid plan for export to use external training routines like this one or experiment with using Roboflow's internal training solution.
Install TensorFlow 2 Object Detection Dependencies
Once you have a labeled dataset, you are ready to dive into the training procedures.
I recommend opening this Colab Notebook Training TensorFlow2 Object Detection Models, and working through it alongside this blog post. Open and save a copy in Drive so you have your own version of the Colab Notebook.
Google Colab also provides free GPU resources for training, so make sure that is switched on by selecting Runtime --> Change Runtime Type --> GPU.
Then, we install tensorflow_gpu=="2.2.0" as a backbone for our training job.
After that we install the object detection library as a python package.
Keras Bug: There is a bug in exporting TensorFlow2 Object Detection models since the repository is so new. We address this by re-writing one of the Keras utils files. This should disappear in a few days, and we will be updating the notebook accordingly.
Next up, we run the TF2 model builder tests to make sure our environment is up and running. If successful, you should see the following outputs at the end of the cell execution printouts.
[       OK ] ModelBuilderTF2Test.test_create_ssd_models_from_config
[ RUN      ] ModelBuilderTF2Test.test_invalid_faster_rcnn_batchnorm_update
[       OK ] ModelBuilderTF2Test.test_invalid_faster_rcnn_batchnorm_update
[ RUN      ] ModelBuilderTF2Test.test_invalid_first_stage_nms_iou_threshold
[       OK ] ModelBuilderTF2Test.test_invalid_first_stage_nms_iou_threshold
[ RUN      ] ModelBuilderTF2Test.test_invalid_model_config_proto
[       OK ] ModelBuilderTF2Test.test_invalid_model_config_proto
[ RUN      ] ModelBuilderTF2Test.test_invalid_second_stage_batch_size
[       OK ] ModelBuilderTF2Test.test_invalid_second_stage_batch_size
[ RUN      ] ModelBuilderTF2Test.test_session
[  SKIPPED ] ModelBuilderTF2Test.test_session
[ RUN      ] ModelBuilderTF2Test.test_unknown_faster_rcnn_feature_extractor
[       OK ] ModelBuilderTF2Test.test_unknown_faster_rcnn_feature_extractor
[ RUN      ] ModelBuilderTF2Test.test_unknown_meta_architecture
[       OK ] ModelBuilderTF2Test.test_unknown_meta_architecture
[ RUN      ] ModelBuilderTF2Test.test_unknown_ssd_feature_extractor
[       OK ] ModelBuilderTF2Test.test_unknown_ssd_feature_extractor
----------------------------------------------------------------------
Ran 20 tests in 52.705s

OK (skipped=1)
Model tests confirming our TF2 environment setup has been successful
Prepare TensorFlow 2 Object Detection Training Data
Once our programming environment has been properly installed, we need to acquire a version of our dataset in TFRecord format.
To do so, we recommend using Roboflow for your data transformations. First, sign up for a free account and upload your dataset.
After upload you will be prompted to choose options to version your dataset including preprocessing and augmentations.
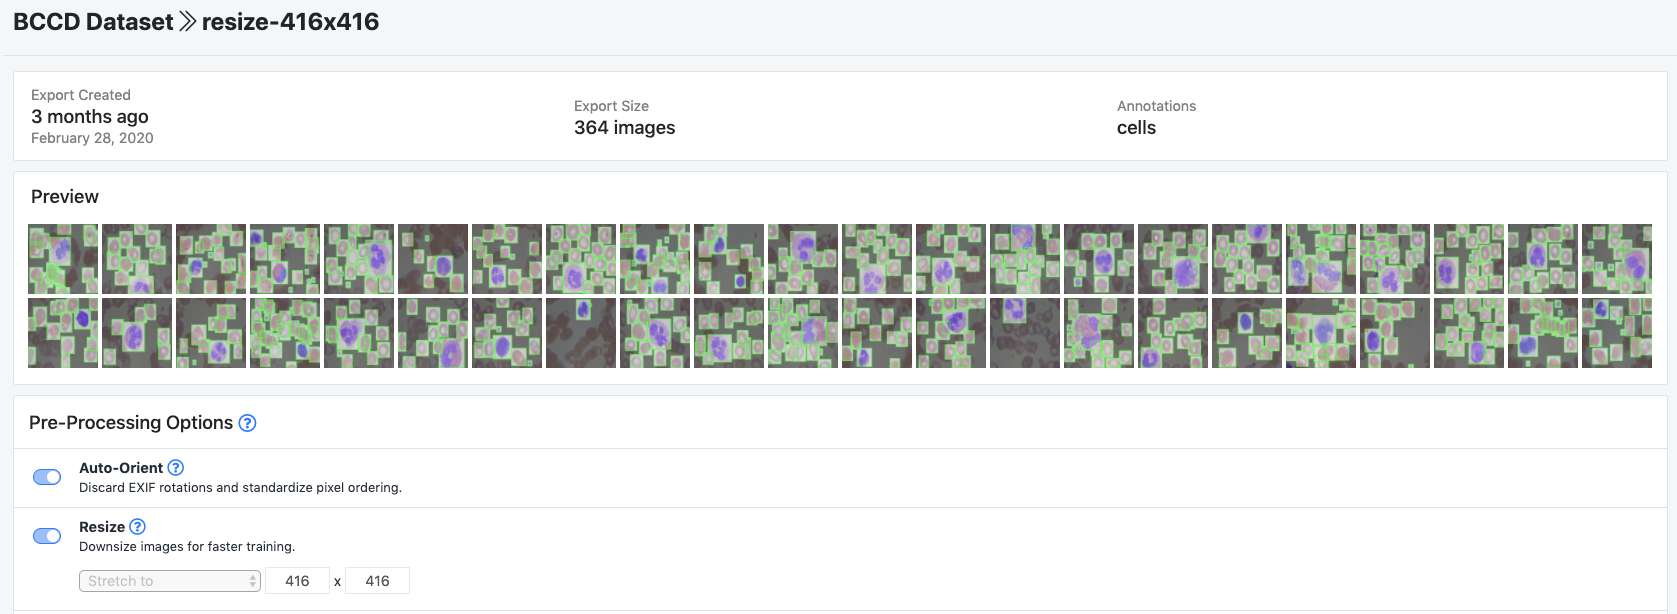
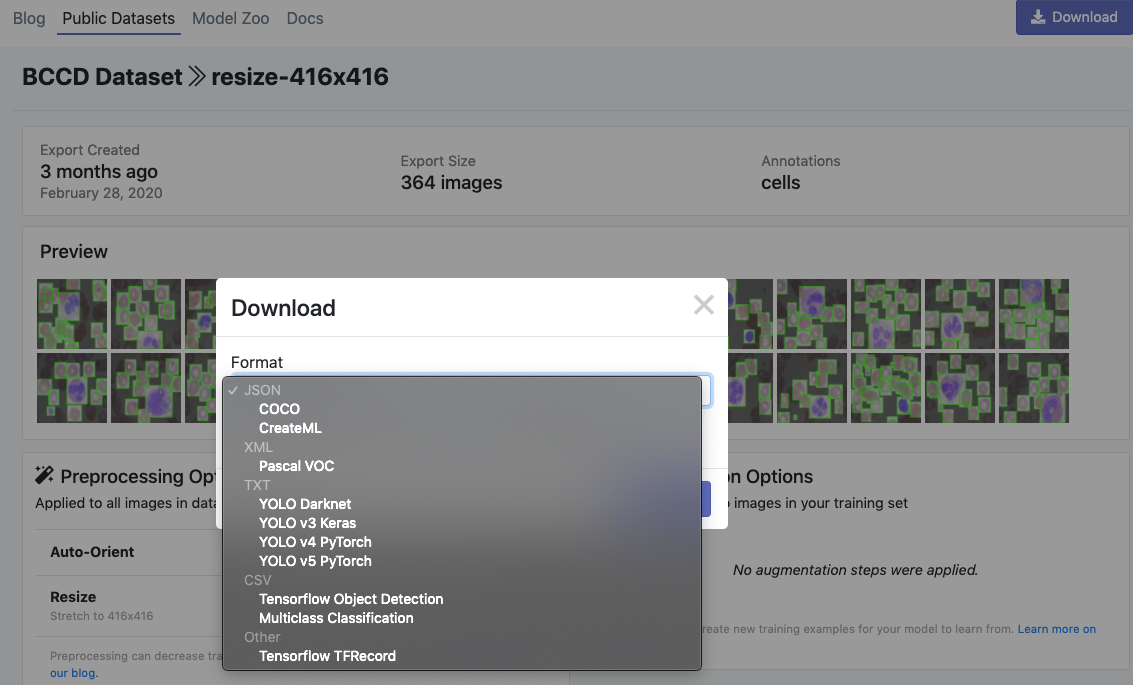
After selecting these options, click Generate and then Download. You will be prompted to choose a data format for your export. Choose Tensorflow TFRecord format.
Note: in addition to creating TFRecords in Roboflow, you can easily inspect the health of your dataset and its annotations as well as preprocess and augment your data to improve model performance.
After export, you will receive a curl link to download your data into our training notebook.
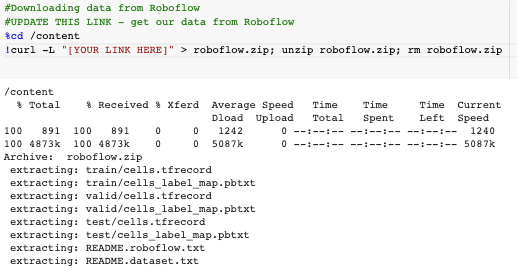
Lastly, we map our training data files to variables for use in our computer vision training pipeline configuration.
Write Custom TensorFlow 2 Object Detection Training Configuration
Next, we write a specialized training configuration file based on our choice of an object detection model to instruct the training procedure we plan to run later in the notebook.
By changing the chosen_model variable, you can select among available models for training. We have coded in the first few models in the EfficientDet model series for your exploration. If you want to use even bigger EfficientDet models, you will likely need to increase your compute resources beyond Google Colab!
You may also consider adding any model you desire in the TensorFlow 2 Object Detection model zoo.
Each model has a model_name, a base_pipeline_file, a pretrained_checkpoint, and a batch_size. The base_pipeline_file is a shell of a training configuration specific to each model type, provided by the authors of the TF2 OD repository. The pretrained_checkpoint is the location of a pretrained weights file saved from when the object detection model was pretrained on the COCO dataset. We will start from these weights, and then fine tune into our particular custom dataset task. By using pretraining, our model does not need to start from square one in identifying what features might be useful for object detection.
With all of those inputs defined, we edit the base_pipeline_file to point to our custom data, the pretrained_checkpoint, and we also specify some training parameters. To train for longer, increase the num_steps and to train faster, try increasing the batch_size to a level that your GPU can handle. Remember to decrease the number of steps with the same factor that you increase batch size to keep the training length the same.
Train Custom TensorFlow 2 Object Detector
Now we are ready to train!
We kick of training with the following command:
!python /content/models/research/object_detection/model_main_tf2.py \
    --pipeline_config_path={pipeline_file} \
    --model_dir={model_dir} \
    --alsologtostderr \
    --num_train_steps={num_steps} \
    --sample_1_of_n_eval_examples=1 \
    --num_eval_steps={num_eval_steps}
Our training command references our pipeline_file and the model_dir where we would like the model to be saved during training.
In Colab, even with free GPU, you should expect training to be a lengthy multi-hour process. Note that Colab will stop your kernel's session after a period of inactivity (around 45 minutes), so you may need to keep interacting in your browser tab.
Training Evaluation
At this time of writing, training time evaluation metrics are still under construction for EfficientDet. The code is there so you can try it! If you find out how to execute this part of the notebook, please drop us a line! This does not affect other architectures, and TensorBoard eval is still valid.
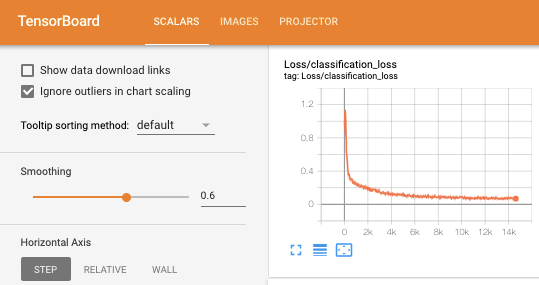
TensorBoard Output
To examine our training success, we output the TensorBoard showing how our models loss function has decreased over the training procedure. The lower the loss, the better!
Export Trained TensorFlow 2 Object Detector Weights
Next, we use the exporter_main_v2.py to export our model from TF2 OD library checkpoints to a .pb frozen graph file. The .pb file will be much easier for us to deploy to applications and move to new settings. Stay tuned for more to come on this front.
Use Trained TensorFlow 2 Object Detection For Inference on Test Images
Now that we have a trained TensorFlow2 object detector, we can use our model's saved weights to make test inference on images that the model has never seen.
TFRecord does not allow you to access the underlying images, so we recommend making another export of your dataset in COCO JSON format to access the underlying test images.
We rebuild our custom object detector from the saved checkpoints. Generally, you want to choose the last checkpoint but you may also want to choose the checkpoint where your object detector did the best on your validation set.
We draw from our test images randomly and send the image through the network for prediction.
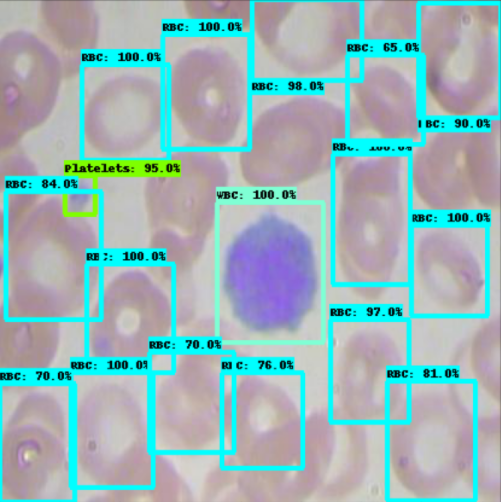
Our model does a pretty good job of detecting different types of cells in the blood stream!
With the right dataset, you can apply this technology to teach the model to recognize any object in the world.
Conclusion
Congratulations! Now you know how to train custom object detection models using the TensorFlow 2 Object Detection API toolkit.
The TensorFlow 2 Objection Detection API allows you immense flexibility to switch between state of the art computer vision techniques for the detection of your custom objects.
We hope you enjoyed! As always, happy detecting.
Cite this Post
Use the following entry to cite this post in your research:
Jacob Solawetz. (Jul 16, 2020). How to Train a TensorFlow 2 Object Detection Model. Roboflow Blog: https://blog.roboflow.com/train-a-tensorflow2-object-detection-model/