

To verify torque marks with computer vision, first train a custom Roboflow RF-DETR segmentation model to accurately detect and outline the paint on a fastener. Then, pass those segmented marks to a Vision-Language Model to automatically judge whether the seal is properly aligned, misaligned, or unreadable.
In December 2025, Toyota recalled nearly 55,400 hybrid vehicles over an inverter bolt that was not torqued to spec at the factory. Torque seal marks help catch this before a vehicle leaves the line. A painted line crosses the bolt and surface, shifting or breaking if the fastener turns. However, checking every mark manually makes faint or partial breaks easy to miss.
To solve this, manufacturers can verify torque marks with computer vision. This tutorial builds a Roboflow Workflow that automates the entire inspection process. We will use the instance segmentation variant of RF-DETR, Roboflow's real-time transformer architecture.
By the end, you'll have a Workflow that takes a fastener image and automatically returns a pass, fail, or unreadable status, complete with a labeled image showing the result.
Verify Torque Marks with Computer Vision: Start with the Dataset
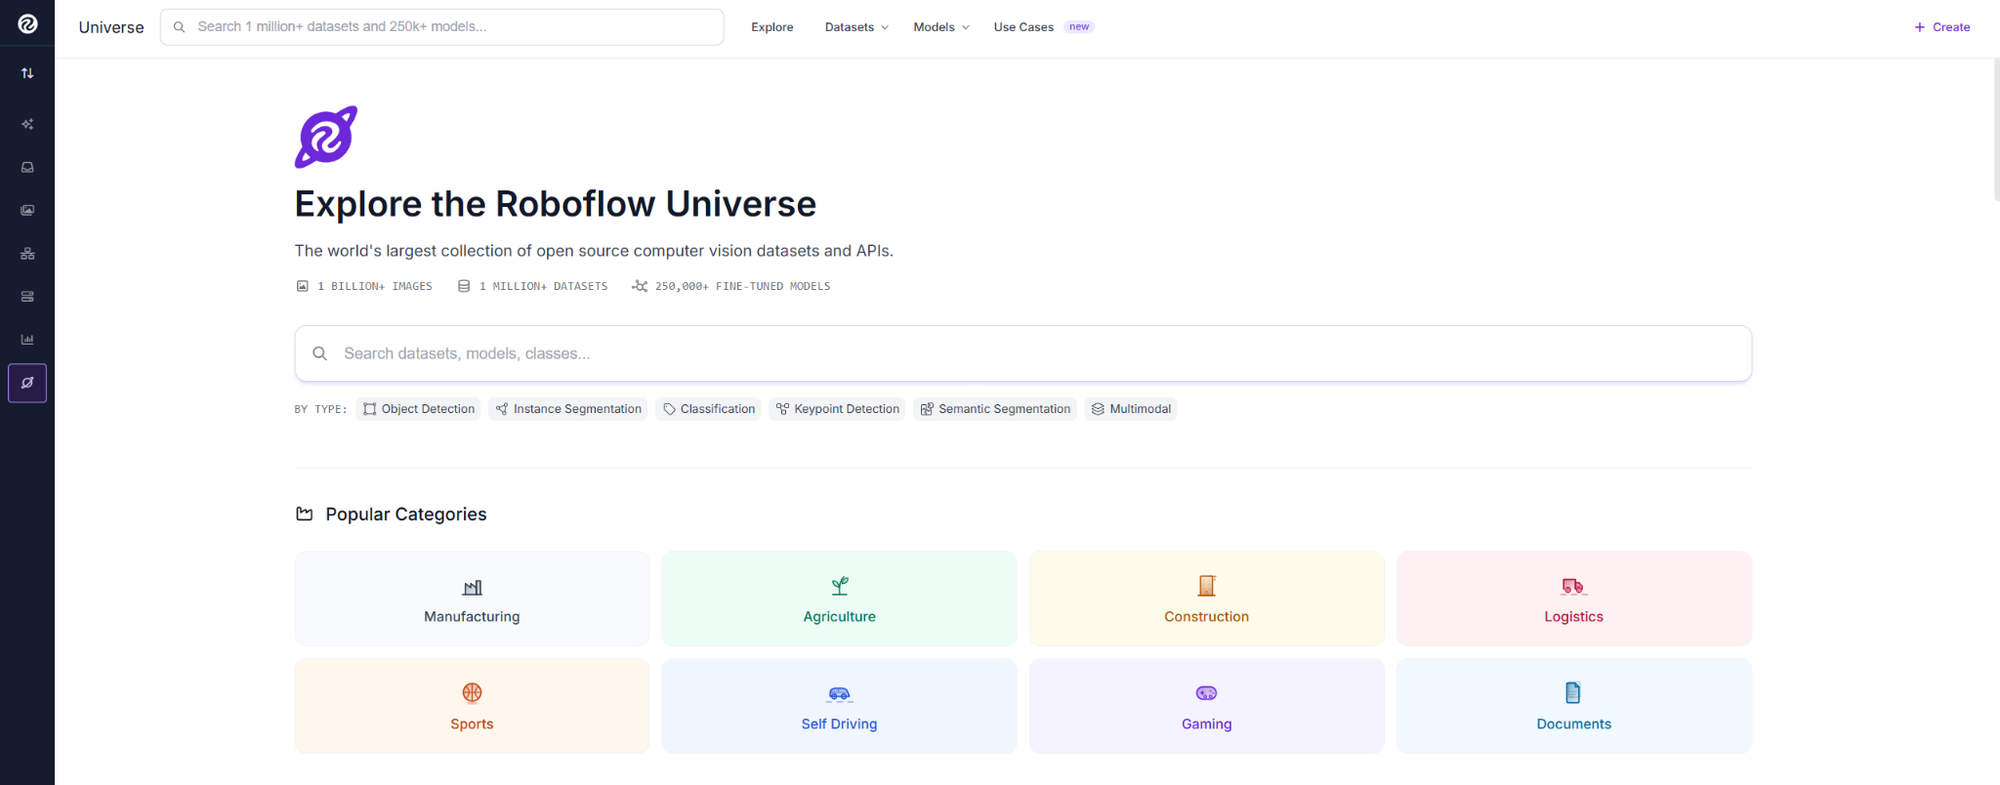
Go to Roboflow Universe and search for the torque seal detection dataset, an open-source collection among the million-plus datasets hosted on Universe.
The dataset has 517 fastener images labeled for torque seal, reflection, and objects.
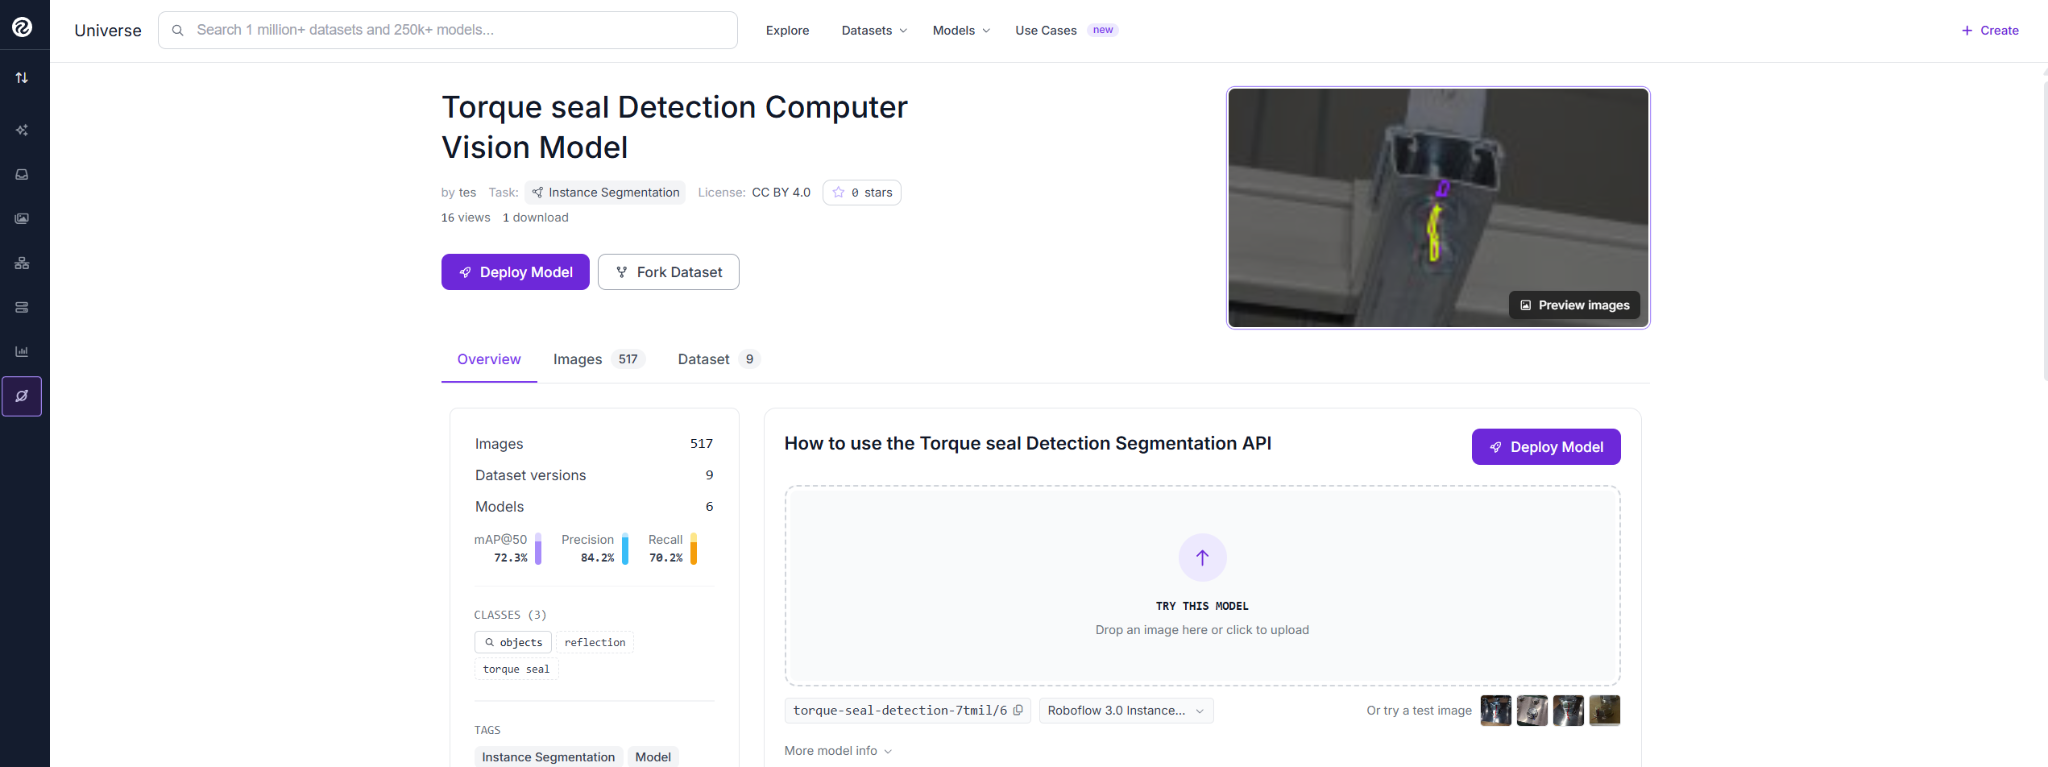
Separating reflection from torque seal helps the model distinguish glare from real marks. Fork the dataset with its annotations to create your own copy.
Train RF-DETR
In your forked project, open Versions and generate a new version. Once ready, click Custom Train and select RF-DETR.
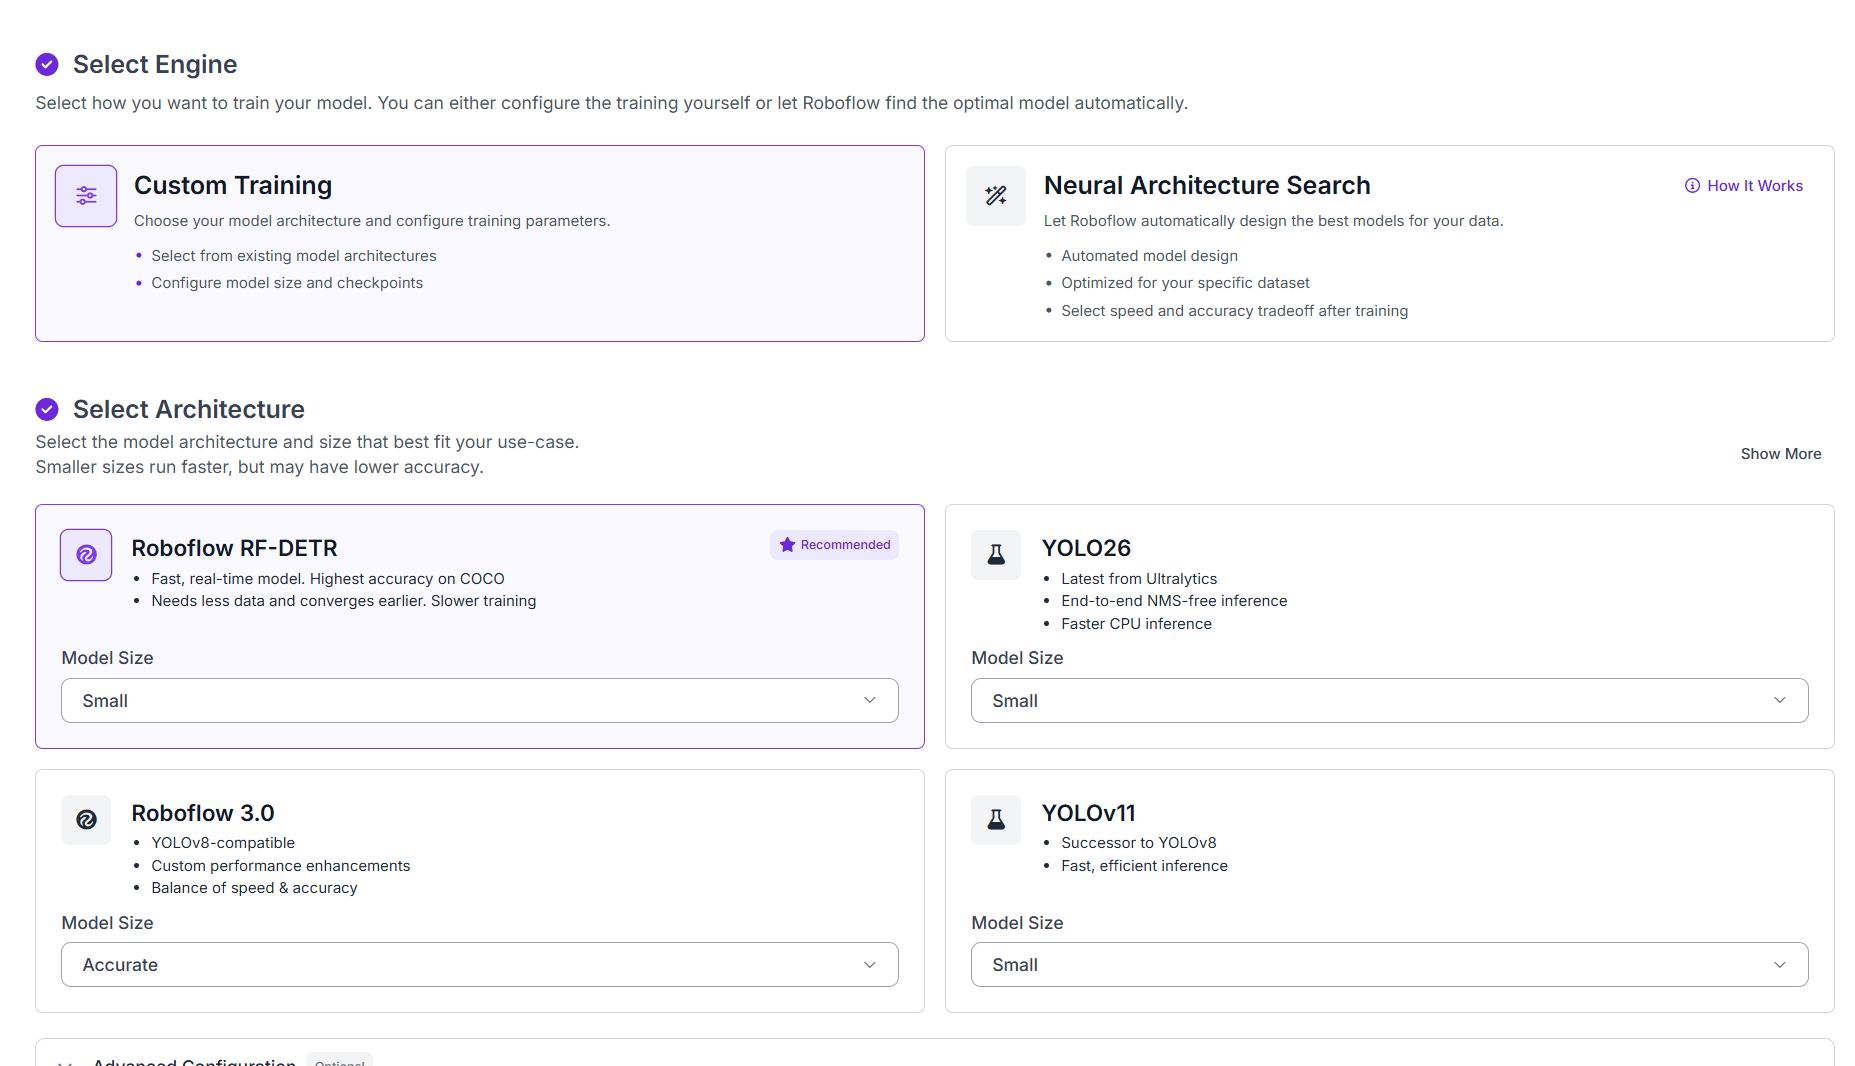
Use a 70/20/10 split for training, validation, and testing. Training runs on Roboflow's hosted infrastructure.
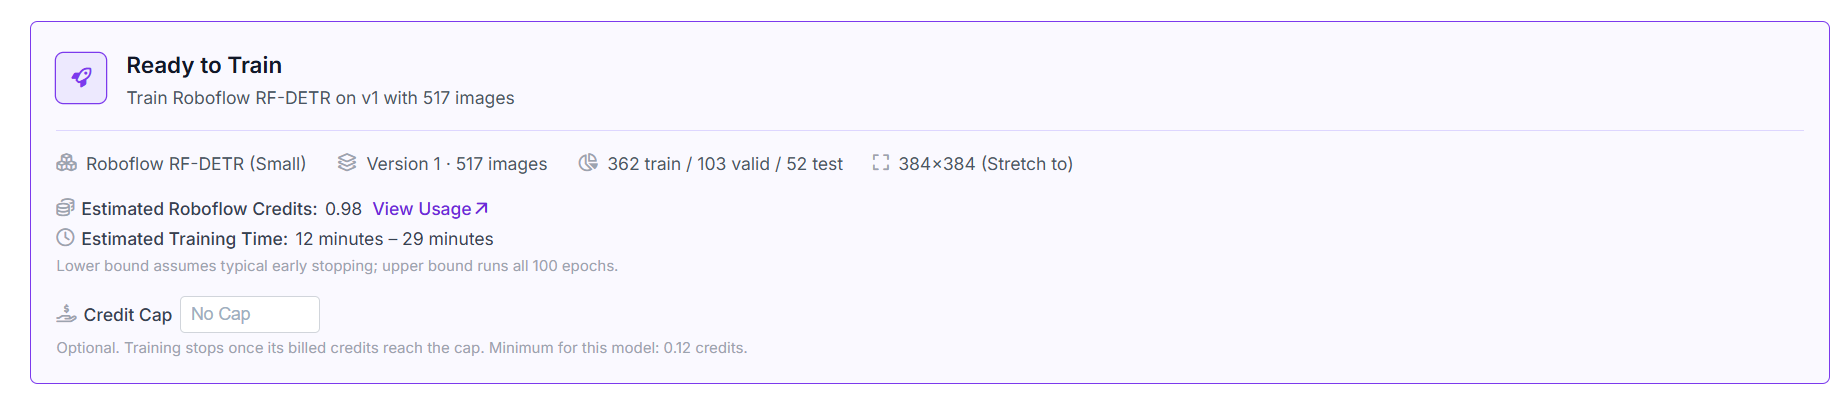
Before starting, review the training summary. It confirms the model size, dataset version, image count, train/validation/test split, input resolution, and the estimated time and credits for the run.
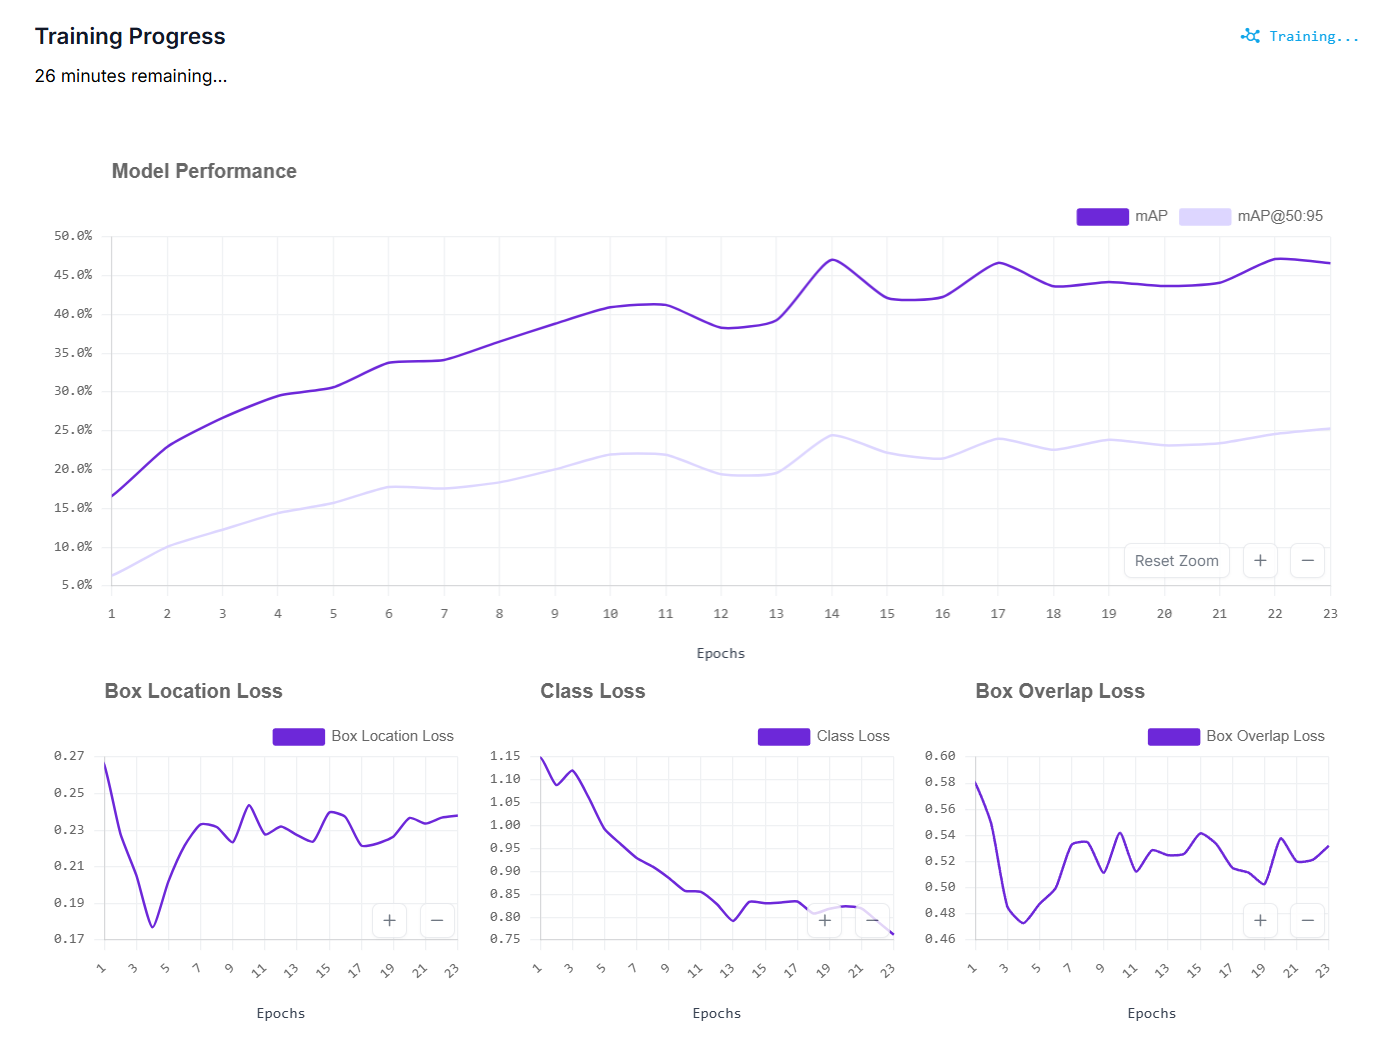
When training finishes, review the test set metrics: mAP, precision, recall, and F1. They show how the model performs on unseen images.
Build the Workflow to Verify Torque Marks
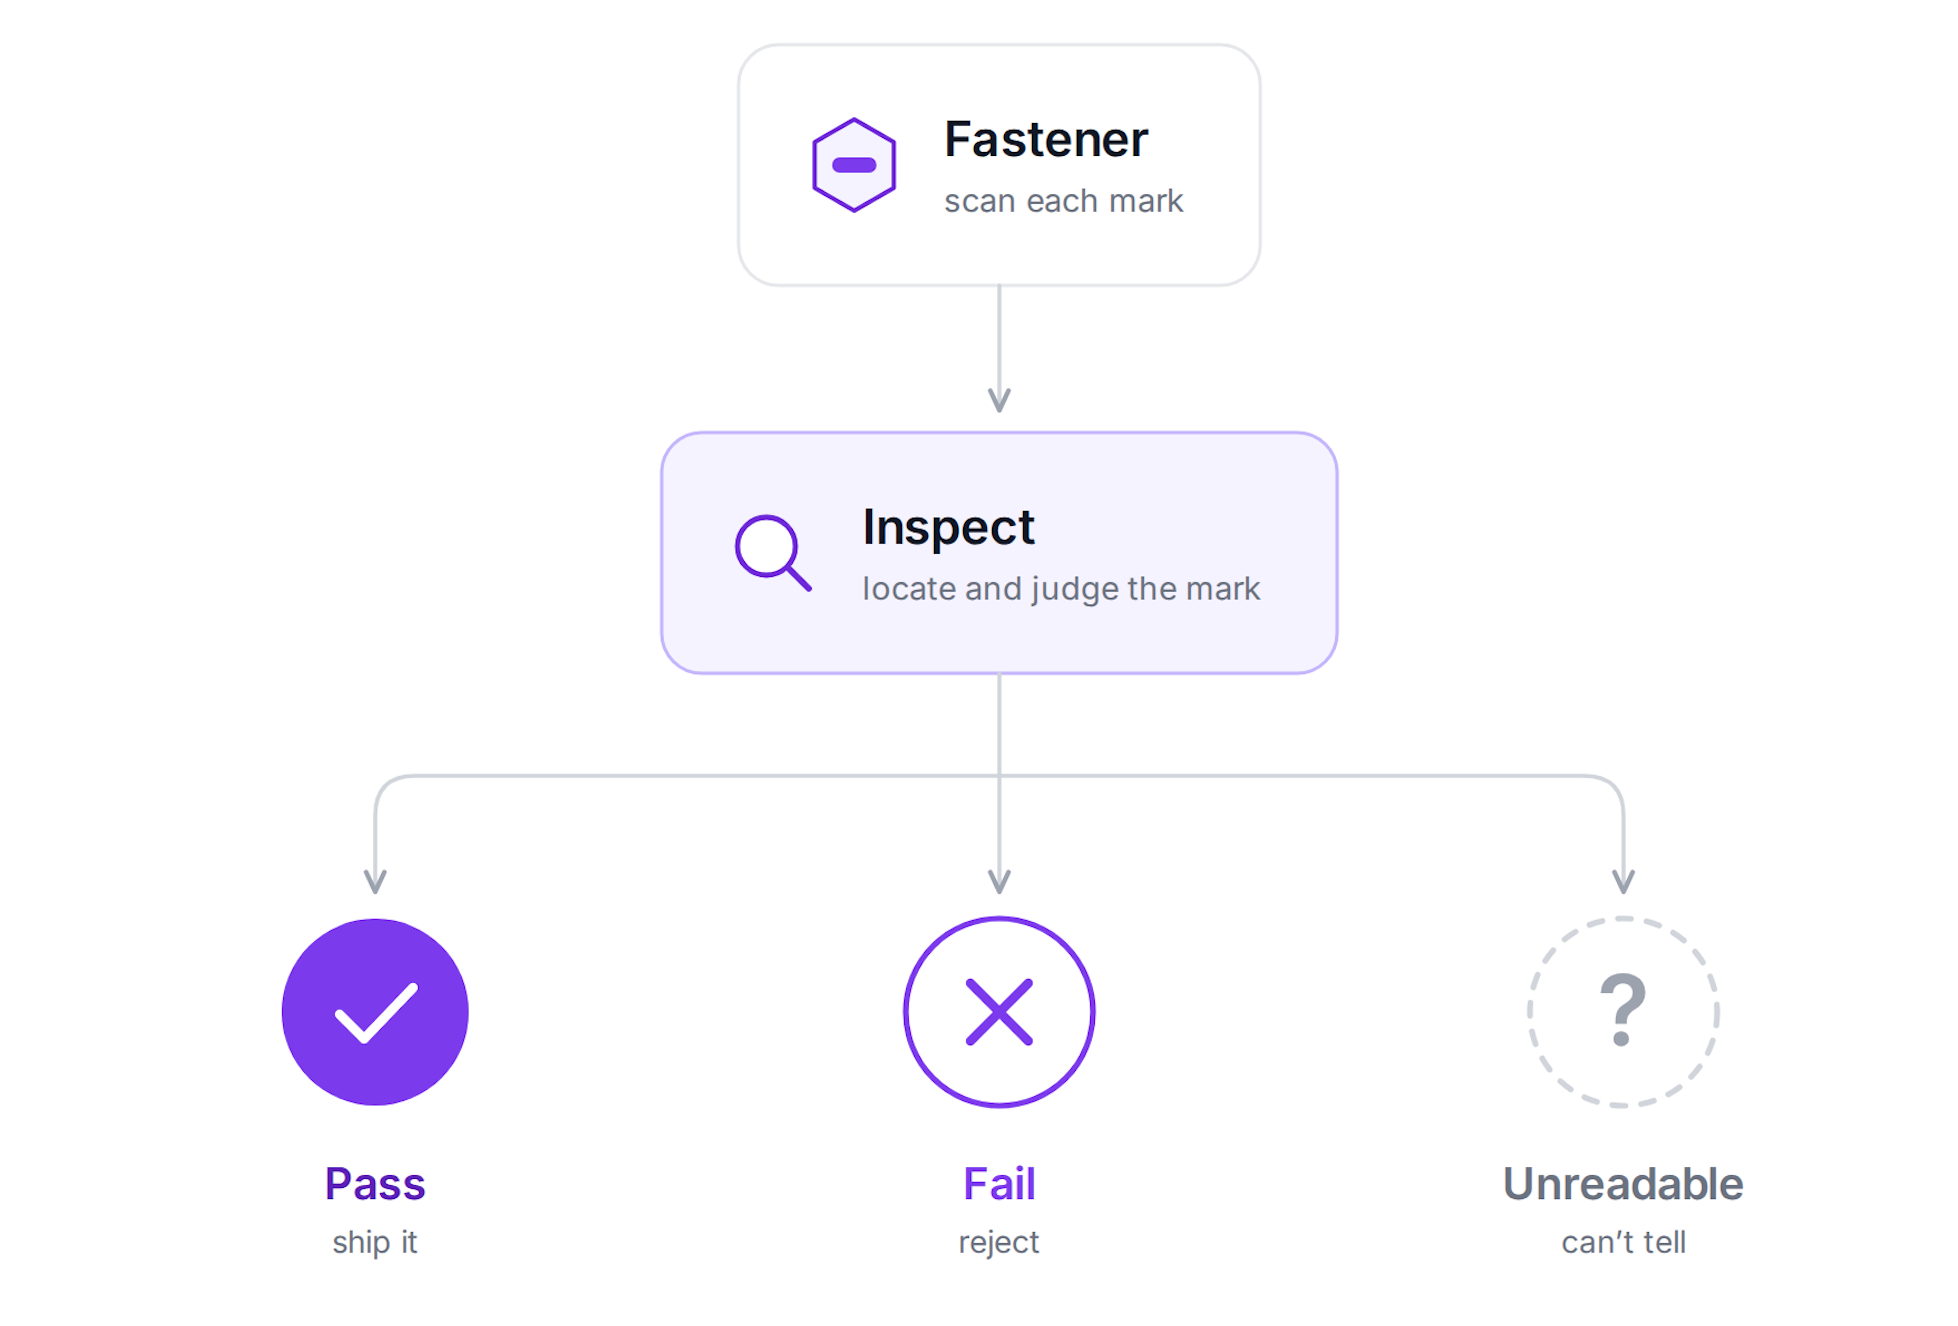
Here's the workflow we'll build. Here's what each block does in this workflow:
- Instance Segmentation Model: Detects torque seals and returns masks.
- Merge Seals: Combines fragments into one seal.
- Google Gemini: Judges each seal as aligned, misaligned, or unclear.
- VLM as Classifier: Converts Gemini's answer into a class.
- Seal Check: Maps the class to pass, fail, or unreadable and builds the report.
- Mask Visualization: Draws the masks on the image.
- Label Visualization: Adds class labels.
- Text Display: Shows the final status on the image.
- Roboflow Vision Events: Logs each inspection and result.
- Outputs: Returns the labeled image and JSON report.
Step 1: Add the trained model as an Instance Segmentation block
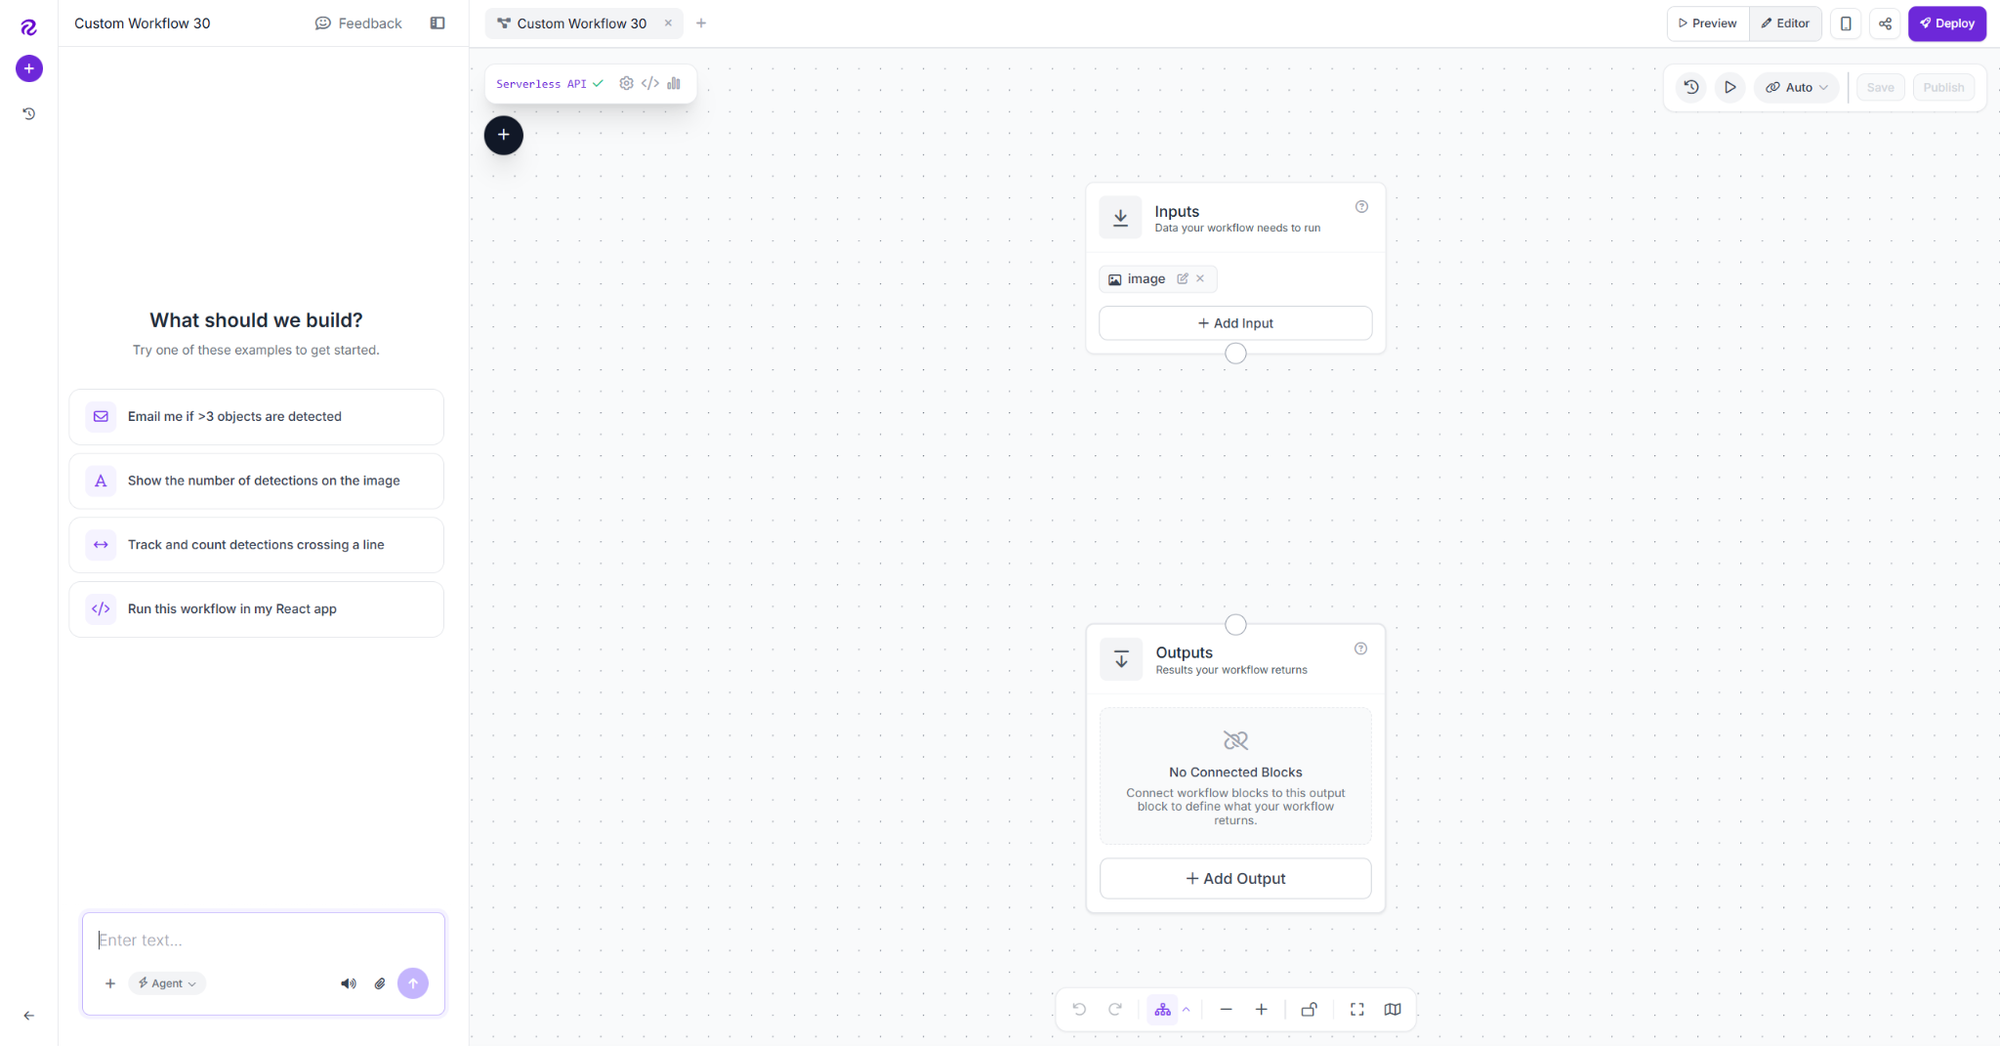
Open the Workflows tab and create a new Workflow. An empty canvas automatically includes Image Input and Outputs blocks.
Click + and add an Instance Segmentation Model named seal_detector. Connect Image to inputs.image, enter your model ID, set Confidence Mode to Custom, and use 0.3 confidence to catch faint seals.
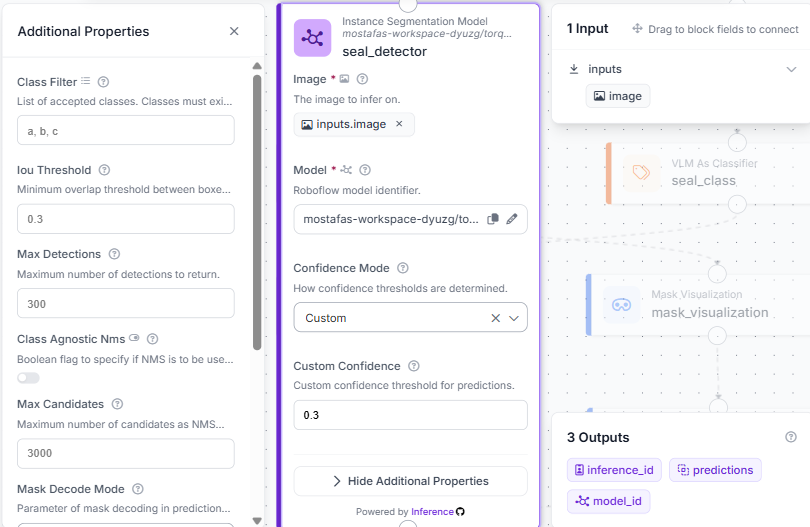
This block returns a segmentation mask and confidence for each detection above 0.3, along with the inference and model IDs.
Step 2: Merge fragmented detections with a Custom Python Block
Add merge_seals to combine fragments. Connect predictions to seal_detector.predictions and add merged and seal_count outputs.
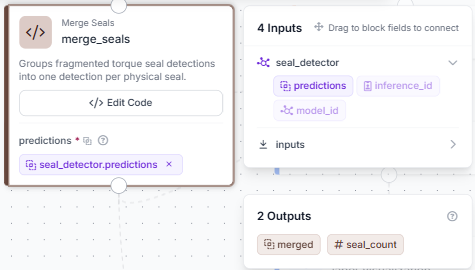
Open the full editor and configure the block type, description, and input/output types. merged returns one detection per seal, and seal_count returns the total.
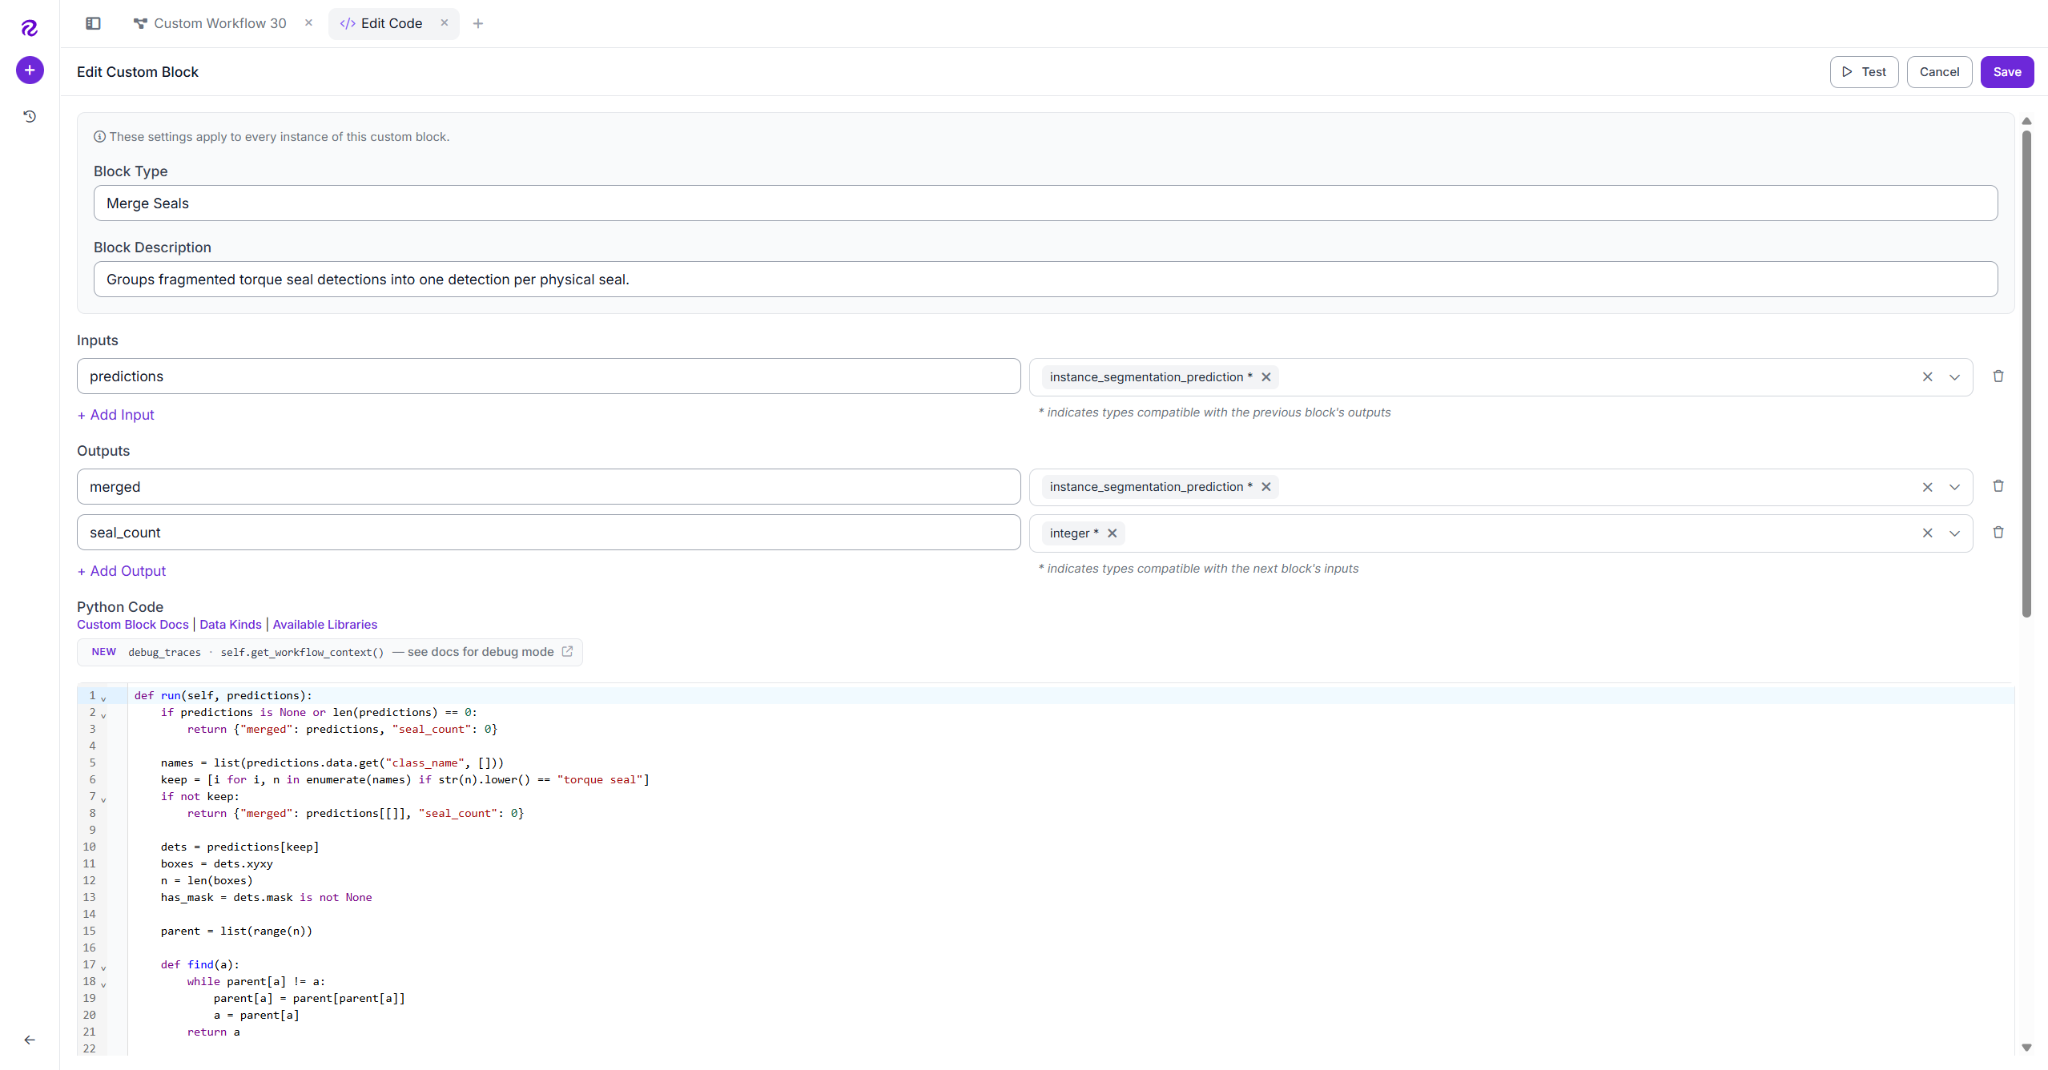
Click Edit Code and add the grouping logic. It filters torque seal detections, groups nearby fragments with union-find, and merges them into single detections.
def run(self, predictions):
    if predictions is None or len(predictions) == 0:
        return {"merged": predictions, "seal_count": 0}
    names = list(predictions.data.get("class_name", []))
    keep = [i for i, n in enumerate(names) if str(n).lower() == "torque seal"]
    if not keep:
        return {"merged": predictions[[]], "seal_count": 0}
    dets = predictions[keep]
    boxes = dets.xyxy
    n = len(boxes)
    has_mask = dets.mask is not None
    parent = list(range(n))
    def find(a):
        while parent[a] != a:
            parent[a] = parent[parent[a]]
            a = parent[a]
        return a
    def union(a, b):
        parent[find(a)] = find(b)
    GAP = 80
    def near(b1, b2):
        dx = max(0, max(b1[0], b2[0]) - min(b1[2], b2[2]))
        dy = max(0, max(b1[1], b2[1]) - min(b1[3], b2[3]))
        return dx <= GAP and dy <= GAP
    for i in range(n):
        for j in range(i + 1, n):
            if near(boxes[i], boxes[j]):
                union(i, j)
    clusters = {}
    for i in range(n):
        clusters.setdefault(find(i), []).append(i)
    reps, new_boxes, new_masks = [], [], []
    conf = dets.confidence
    for idxs in clusters.values():
        rep = idxs[int(np.argmax(conf[idxs]))] if conf is not None else idxs[0]
        reps.append(rep)
        cb = boxes[idxs]
        new_boxes.append([float(cb[:, 0].min()), float(cb[:, 1].min()),
                          float(cb[:, 2].max()), float(cb[:, 3].max())])
        if has_mask:
            canvas = np.zeros(dets.mask.shape[1:], dtype=np.uint8)
            for k in idxs:
                canvas |= dets.mask[k].astype(np.uint8)
            kernel = np.ones((3, 3), dtype=np.uint8)
            canvas = cv2.morphologyEx(canvas, cv2.MORPH_CLOSE, kernel, iterations=1)
            canvas = cv2.dilate(canvas, kernel, iterations=1)
            new_masks.append(canvas.astype(bool))
    merged = dets[reps]
    merged.xyxy = np.array(new_boxes, dtype=float)
    if has_mask:
        merged.mask = np.array(new_masks, dtype=bool)
    return {"merged": merged, "seal_count": int(len(reps))}
GAP sets how close fragments must be to merge. At 80 pixels, it joins pieces of the same seal without merging separate fasteners. This block uses numpy and cv2, which are available in the Roboflow custom Python block runtime.
Step 3: Add the Gemini block to judge the mark
Add seal_judge with Gemini 3.1 Pro. Connect Image to inputs.image and set Task Type to Open Prompt.
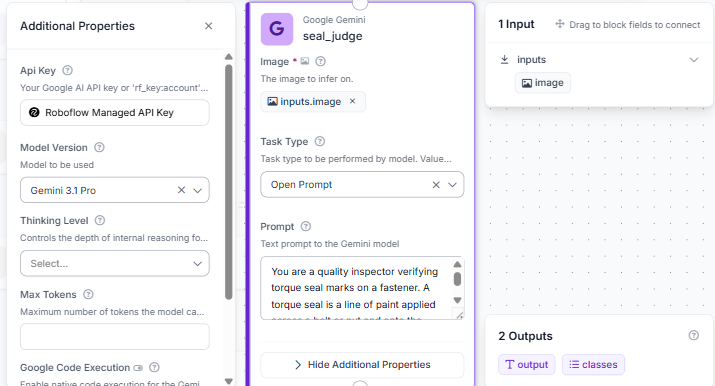
Select Roboflow Managed API Key and enter the detection and response instructions in Prompt.
You are a quality inspector verifying torque seal marks on a fastener. A torque seal is a line of paint applied across a bolt or nut and onto the surface beneath it. If the fastener rotates, the painted line shears at the seam between the fastener and the surface, leaving a visible sideways offset or a clean break. Look only at the torque seal paint. Judge whether the line is continuous and lined up where it crosses the seam between the fastener and the base surface. "aligned" = one continuous line across the seam, no sideways offset, the fastener has not moved. "misaligned" = paint clearly offset sideways at the seam or broken into pieces that no longer line up, the fastener has rotated. "unclear" = you cannot see the seam, the seal is too faint, or glare hides it. Do not treat paint texture, drips, or brush unevenness as misalignment. Only a lateral offset or break at the seam counts. Respond with only this JSON: {"class_name": "aligned" | "misaligned" | "unclear", "confidence": <0.0 to 1.0>}The prompt defines three verdicts, checks seam offset, ignores false signals, and returns JSON. This workflow judges one seal per image; for frames with multiple fasteners, crop each seal first so the prompt evaluates them one at a time.
Step 4: Parse Gemini's answer into a class
Add seal_class, connect inputs.image and seal_judge.output, and set classes to aligned, misaligned, and unclear.
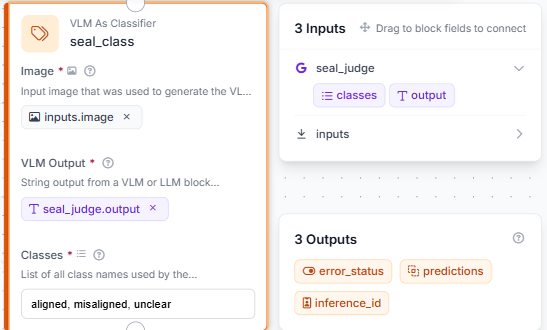
Converts Gemini's JSON into a classification with a class and confidence. Class names must match the prompt exactly.
Step 5: Add the Custom Python Block for verdict logic
Add seal_check, connect the inputs to seal_class and merge_seals, and add report, display_text, and qc_result outputs.
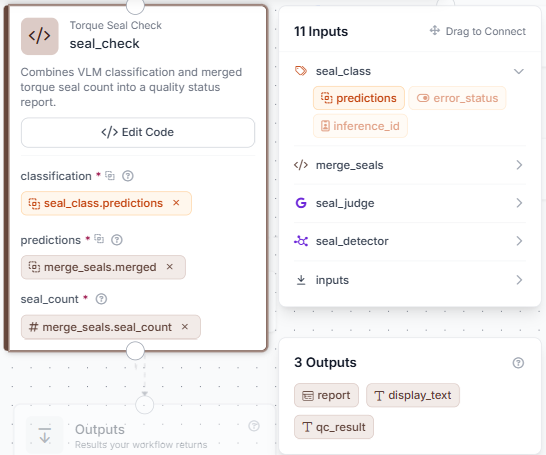
Open the editor to set the block description and input/output types. The logic normalizes Gemini's class and maps it to a status.
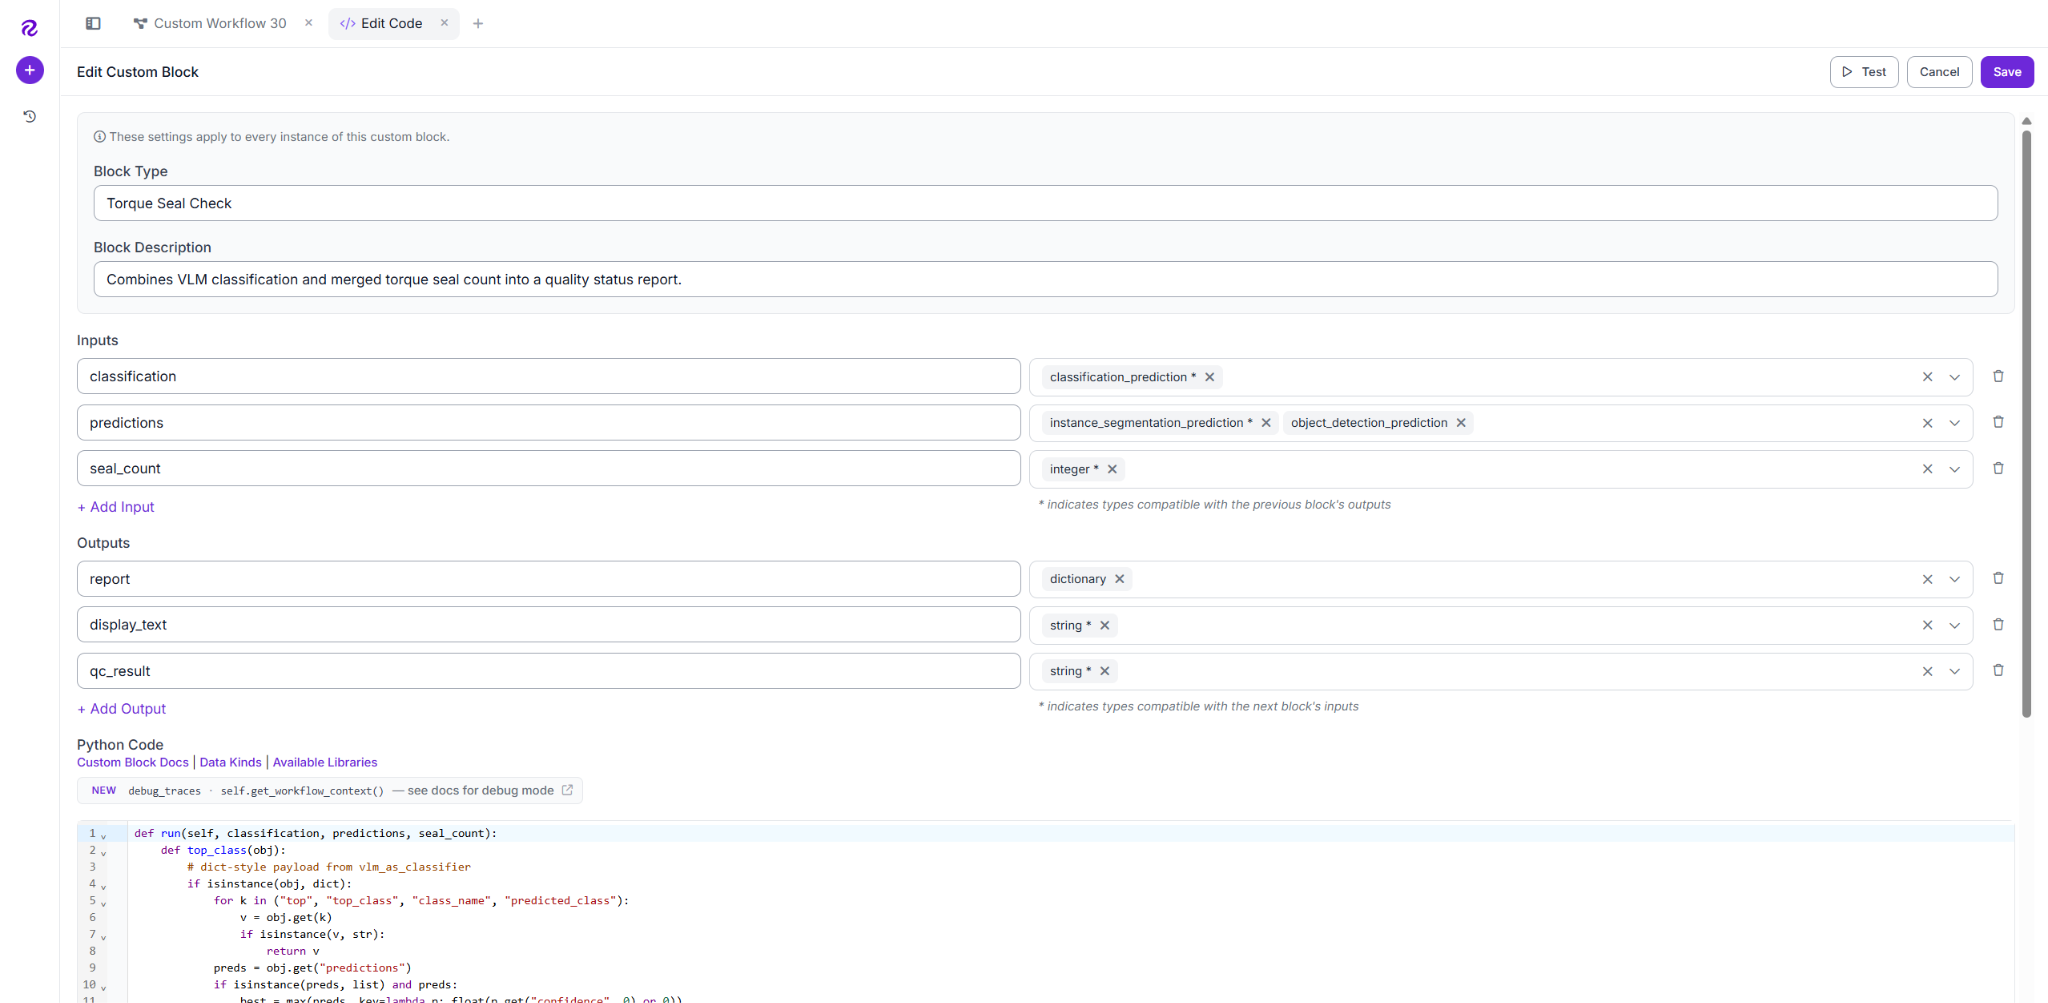
Aligned marks return pass, misaligned marks fail, and unclear or missing seals unreadable. Unknown outputs also return unreadable.
def run(self, classification, predictions, seal_count):
    def top_class(obj):
        # dict-style payload from vlm_as_classifier
        if isinstance(obj, dict):
            for k in ("top", "top_class", "class_name", "predicted_class"):
                v = obj.get(k)
                if isinstance(v, str):
                    return v
            preds = obj.get("predictions")
            if isinstance(preds, list) and preds:
                best = max(preds, key=lambda p: float(p.get("confidence", 0) or 0))
                return best.get("class_name") or best.get("class")
        # object-style payload
        for attr in ("top", "top_class", "class_name", "predicted_class"):
            v = getattr(obj, attr, None)
            if isinstance(v, str):
                return v
        data = getattr(obj, "data", None)
        return top_class(data) if isinstance(data, dict) else None

    verdict = str(top_class(classification) or "unclear").strip().lower()
    if verdict not in ("aligned", "misaligned", "unclear"):
        verdict = "unclear"

    try:
        seal_count = int(seal_count)
    except Exception:
        seal_count = len(predictions) if predictions is not None else 0

    if seal_count == 0 or verdict == "unclear":
        status = "UNREADABLE"
    elif verdict == "misaligned":
        status = "FAIL"
    else:
        status = "PASS"

    report = {"status": status, "verdict": verdict, "seal_count": seal_count}
    return {
        "report": report,
        "display_text": f"Status: {status}\nSeal: {verdict}",
        "qc_result": status,
    }
Maps aligned/misaligned/unclear to PASS/FAIL/UNREADABLE. display_text labels the image; report stores the details.
Step 6: Draw the mask with Mask Visualization
Add mask_visualization and connect inputs.image and seal_detector.predictions.
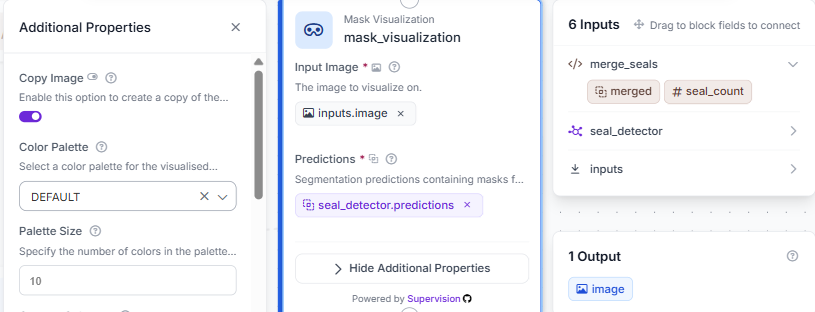
Use seal_detector.predictions for the full mask; use merged output for counting and labels.
Step 7: Add the class name with Label Visualization
Add label_visualization after the mask. Connect mask_visualization.image and merge_seals.merged, then set Text to Class.
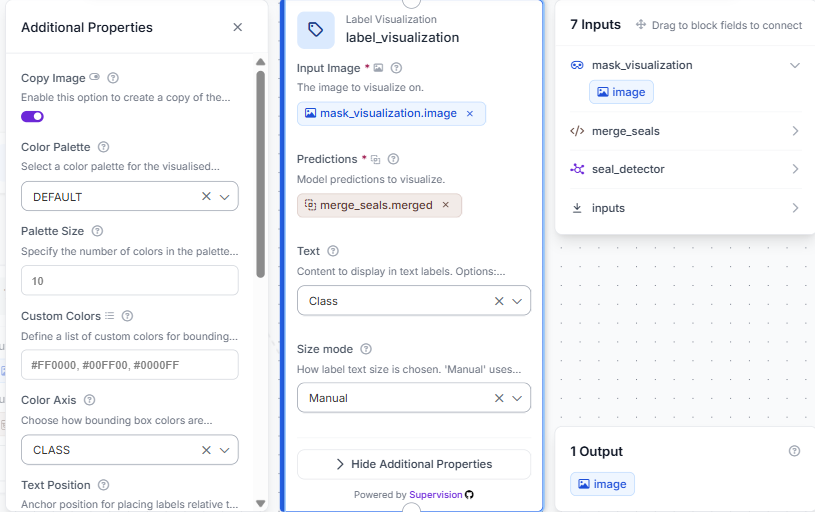
Raw output draws the mask; merge_seals.merged provides one "torque seal" label per seal.
Step 8: Write the status with Text Display
Add text_display after label_visualization. Connect the image and seal_check.display_text, using white text on a semi-transparent black background.
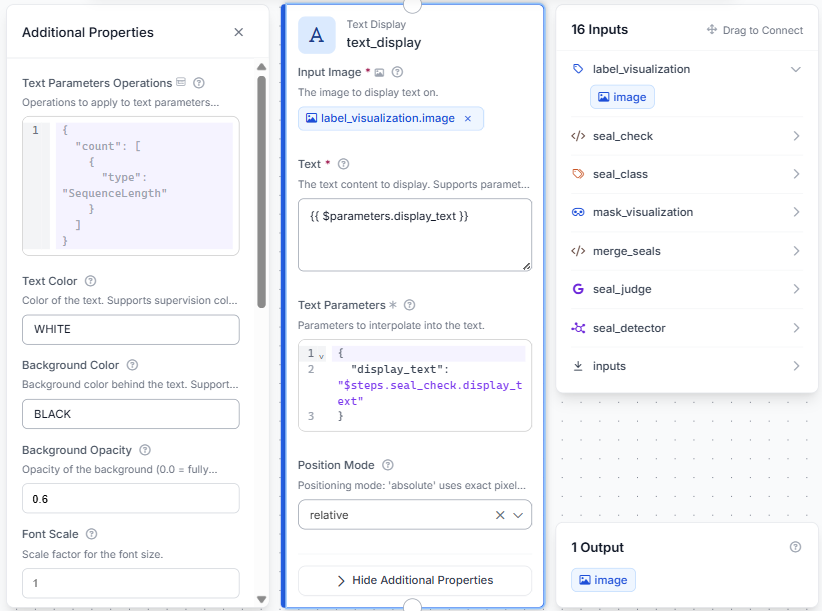
This adds the result and seal verdict to the image. The final frame shows the mask, seal label, and status together.
Step 9: Log each inspection with Vision Events
Add roboflow_vision_events, connect the image, output, predictions, and result, then set Event Type to Quality Check and Use Case to Torque Seal Verification. Expand Additional Properties to set the External ID to batch-2026-001, add the camera and location JSON metadata, and enable Fire and Forget.
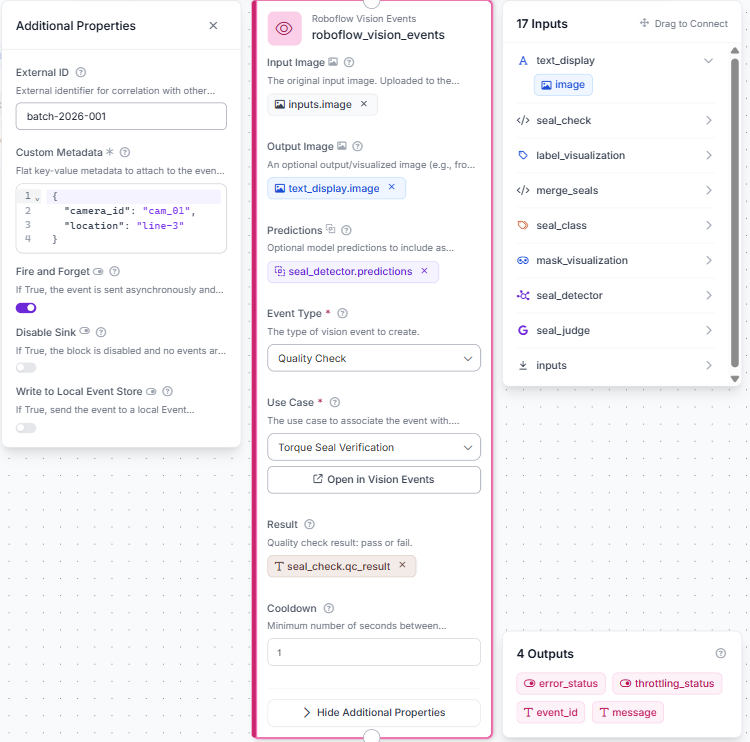
The log stores each inspection and its status, including pass, fail, or unreadable results.
Step 10: Configure Outputs
Set output_image to text_display.image and quality_report to seal_check.report.
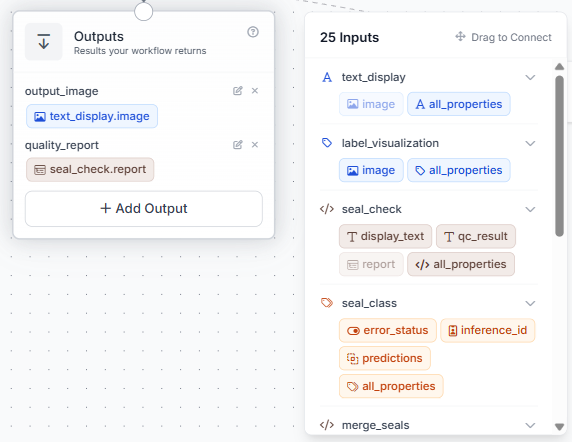
The Workflow is complete: one image in, a labeled image and structured report out, with every run logged for review.
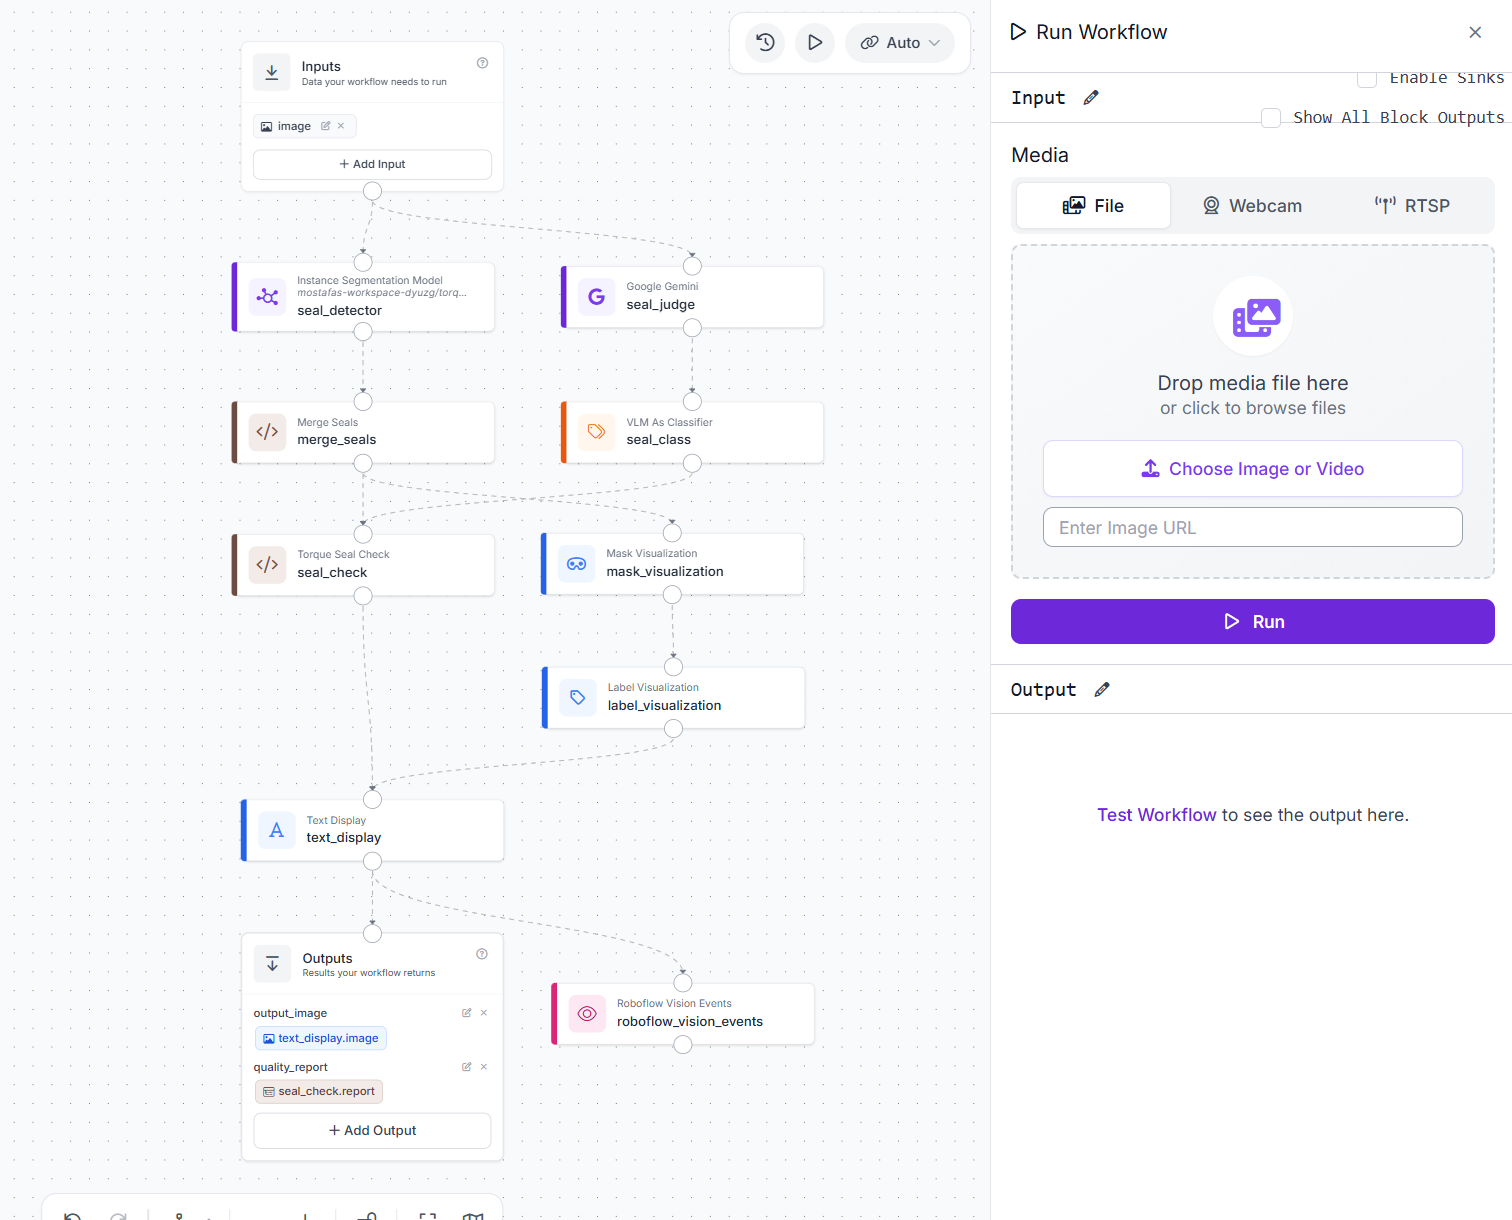
From here, every fastener image gets a labeled result, structured report, and logged record automatically.
Results
Test case 1: Misaligned seal, status fail
A moved seal shows a clear failure: the painted line is offset across the seam, indicating the fastener rotated.
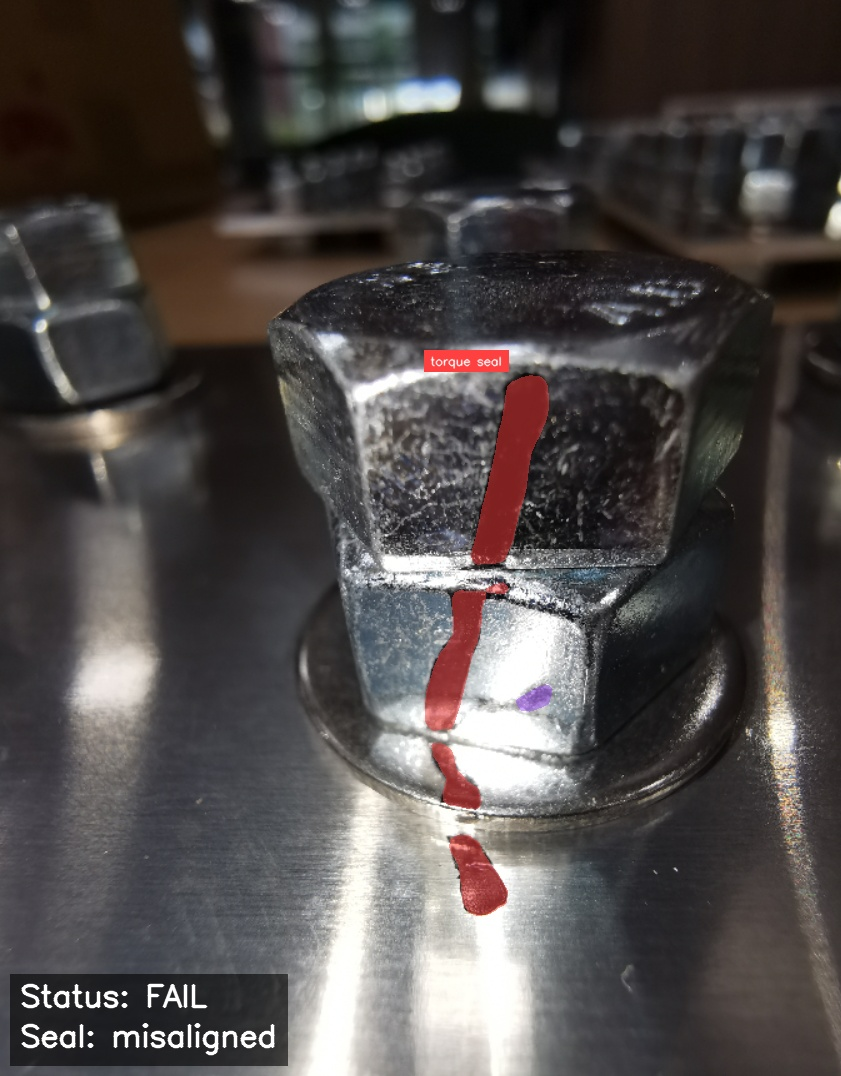
The overlay shows the merged mask and fail status. Gemini marked the seal misaligned.
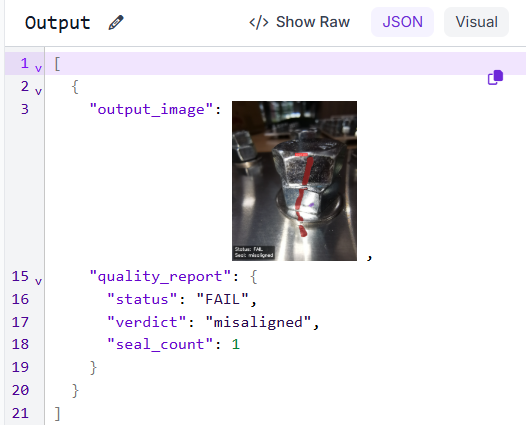
The report shows one misaligned seal with a fail status. Fragmented marks are merged into one seal.
Test case 2: No seal detected, status unreadable
Not every image contains a visible torque mark. Here, the detector finds nothing to evaluate.
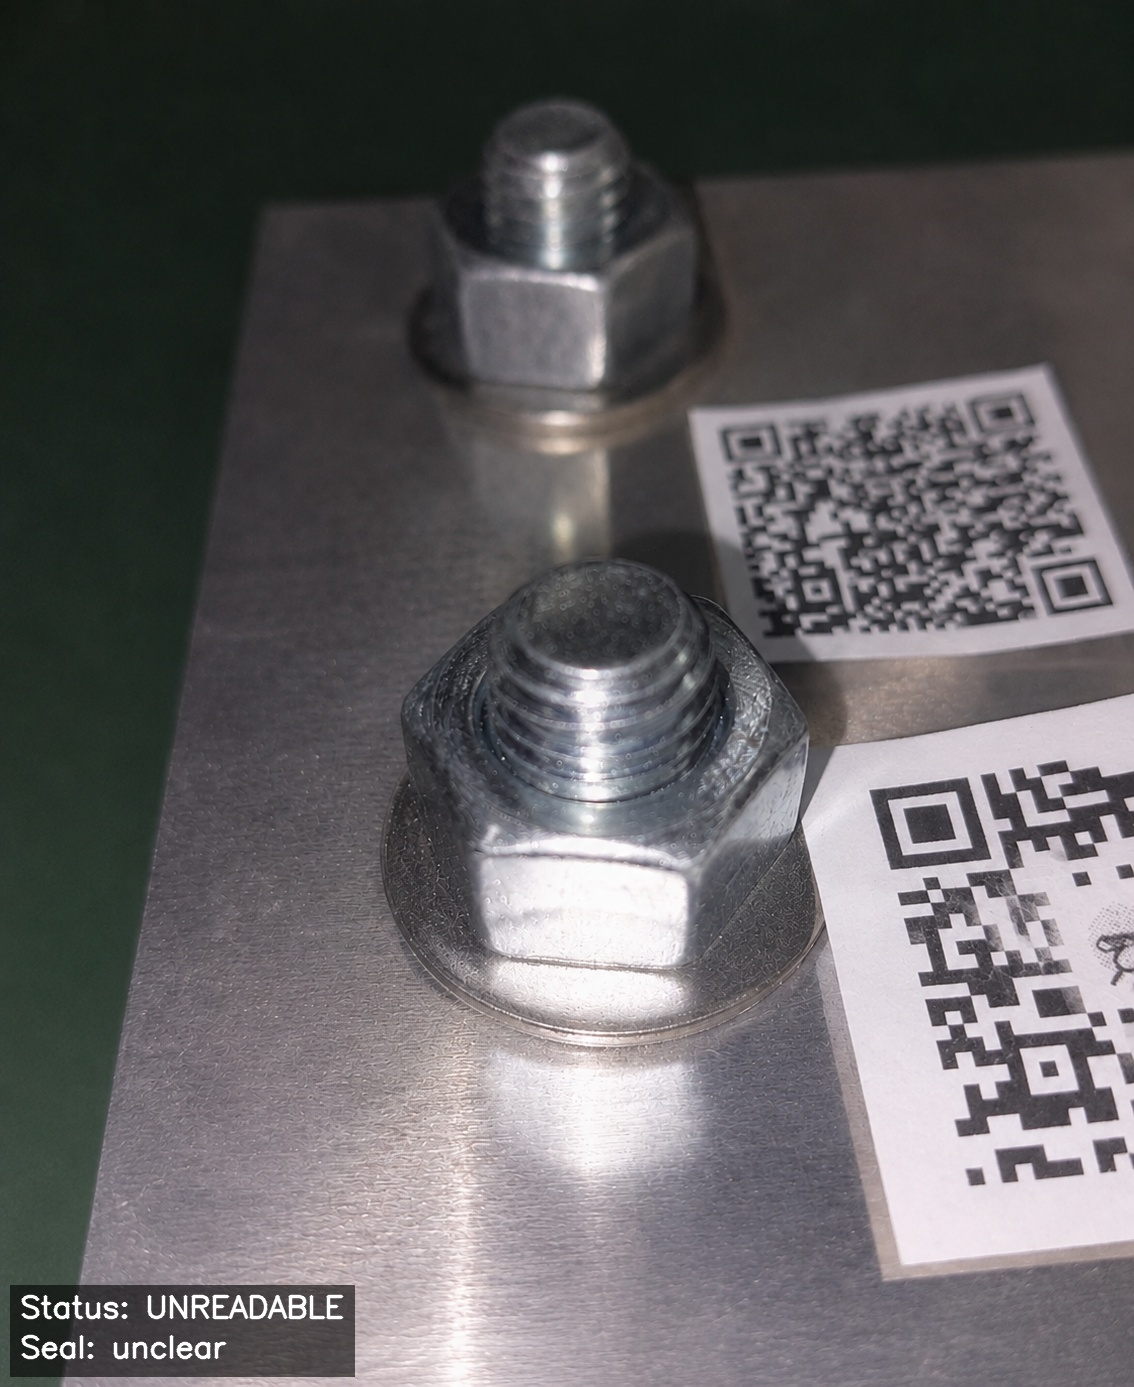
No seal returns unreadable to avoid false failures. If missing seals must fail, map zero detections to fail.
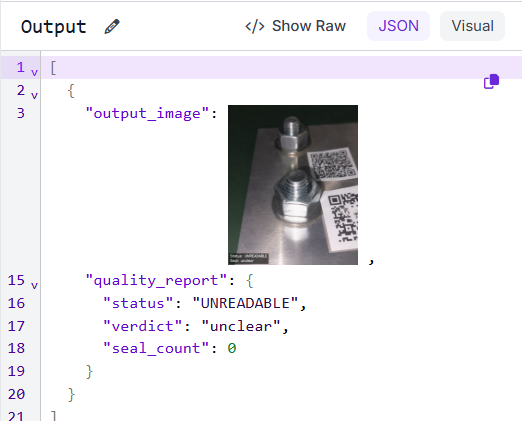
The report shows seal_count: 0 and unreadable, indicating no seal was detected.
Test case 3: Aligned seal, status pass
A good seal is an unbroken line crossing the seam without shifting.
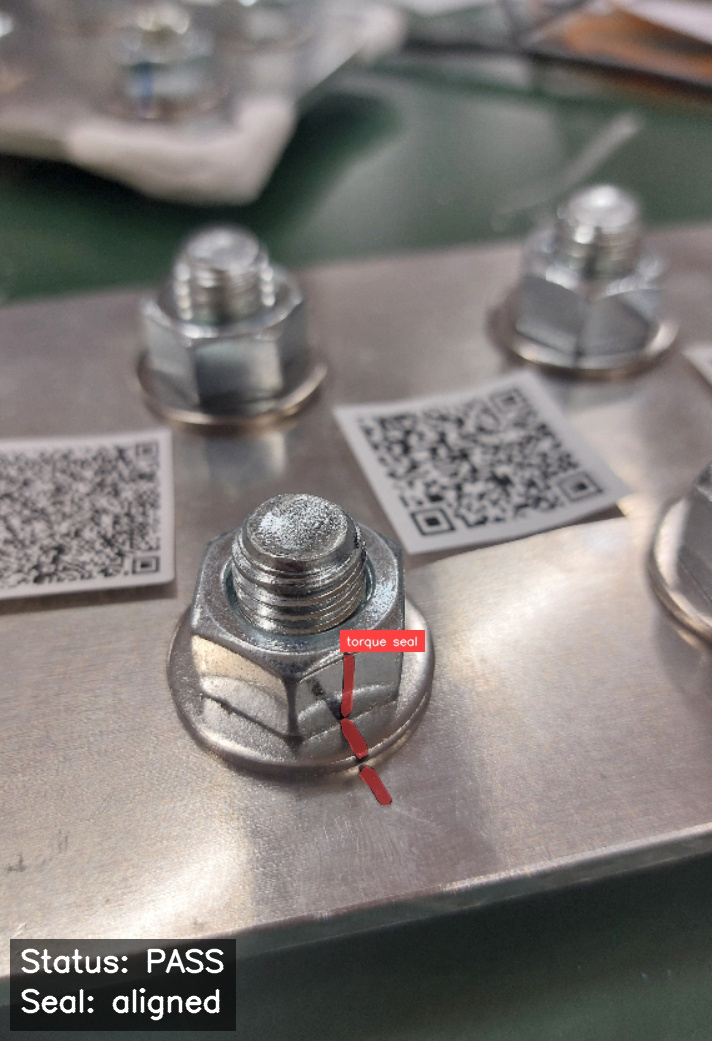
Gemini found the seal continuous and aligned, returning pass. The mask covers the full mark, with the merge block combining fragments into one seal.
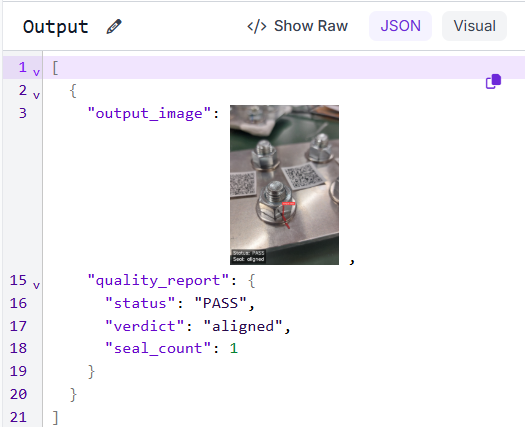
One aligned seal with a pass status, indicating an intact, correctly aligned mark.
Use Roboflow Agent
Use Roboflow Agent to build and test your entire inspection pipeline using simple natural language prompts. Instead of wiring each step, you can just describe your goal and let the Agent automatically configure the RF-DETR and VLM blocks.
Production Deployment
Moving from a tested Workflow to a live station depends on deployment and image sources. Hosted inference is the simplest option, while Roboflow Inference enables local processing at multiple points on the line. Images can come from files, URLs, webcams, or RTSP streams, supporting manual stations or fixed conveyor cameras. Each station returns pass, fail, or unreadable results for downstream tracking. The alignment stage still requires network access unless replaced with a local model. Unreadable cases can also become training data for future improvements.
Conclusion
The workflow takes a fastener image, detects the torque seal with a custom RF-DETR segmentation model, then uses a vision-language model to classify it as pass, fail, or unreadable. Unclear cases are not forced into a decision, and the output image shows what was detected.
The inspection criteria are defined in the prompt rather than fixed code, making them easy to change. Accuracy depends on the prompt. The same approach can be adapted to other defects by swapping the detector and updating the prompt.
Further reading


Cite this Post
Use the following entry to cite this post in your research:
Mostafa Ibrahim. (Aug 18, 2026). How to Verify Torque Marks with Computer Vision. Roboflow Blog: https://blog.roboflow.com/verify-torque-marks-with-computer-vision/