
YOLO distillation lets you skip manual labeling by using a large vision-language model to auto-label your images, then training a small, fast YOLO model on those labels for production. The tutorial shows two paths in Roboflow.
Training a YOLO model requires a labeled dataset. But labeling thousands of images manually is slow. A practical alternative is to use AI-assisted labeling such as using a large vision-language model (VLM) to label your images first, then train a smaller YOLO model on those generated labels.
This process is a practical form of YOLO knowledge distillation. A large model, VLM, helps create training supervision, and a smaller YOLO model learns from that supervision so it can run faster in production.
In this tutorial, I will walk through two ways to do YOLO distillation with Roboflow:
- Use Autodistill to label images with a large foundation model, Florence 2, and train a target YOLOv8 model (with an additional step to programmatically upload dataset to Roboflow project).
- Use Roboflow Workflows to build a full VLM-powered labeling pipeline that uploads generated labels back into a Roboflow project from where you can train YOLO models.
I will also explain where this fits in relation to YOLO knowledge distillation, and why this approach is useful when you want to move from a large, general-purpose VLM to a fast, deployable object detection (or segmentation) model.
What Is YOLO Distillation?
YOLO knowledge distillation is the process of using knowledge from a larger or more capable model to train a smaller YOLO model.
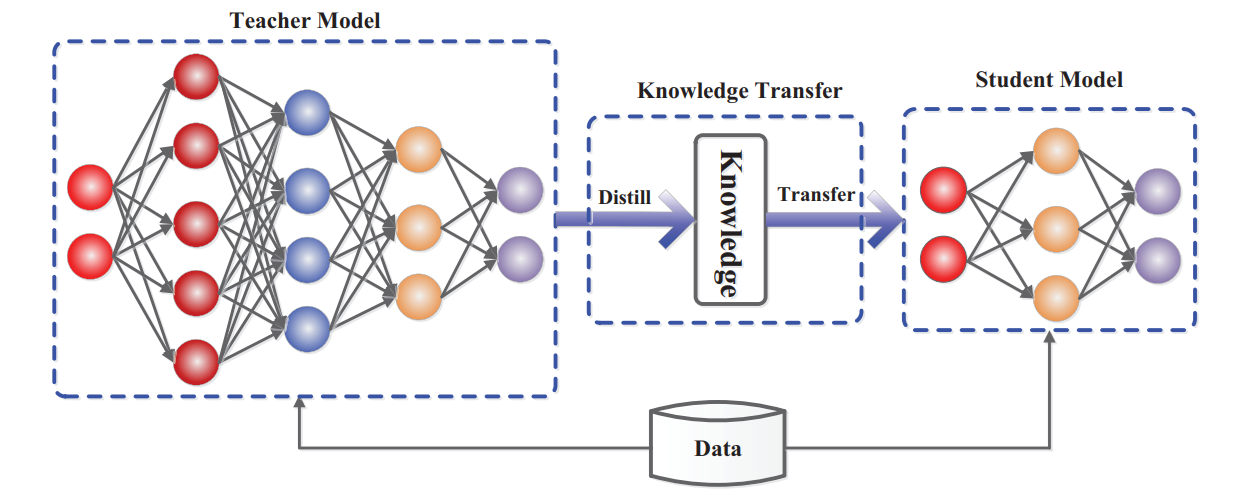
In machine learning, a classical knowledge distillation is a model compression and knowledge transfer technique in which a smaller neural network, called the student model, is trained to reproduce the behavior of a larger and more complex teacher model. Instead of learning only from raw ground-truth labels, the student learns from the richer knowledge produced by the teacher, such as soft predictions, class-probability distributions, logits, intermediate feature representations, or relationships between samples. The main goal is to transfer the predictive capability of a heavy model into a lightweight model that is easier to deploy on resource-constrained hardware, while retaining competitive accuracy and reducing computation and storage requirements.
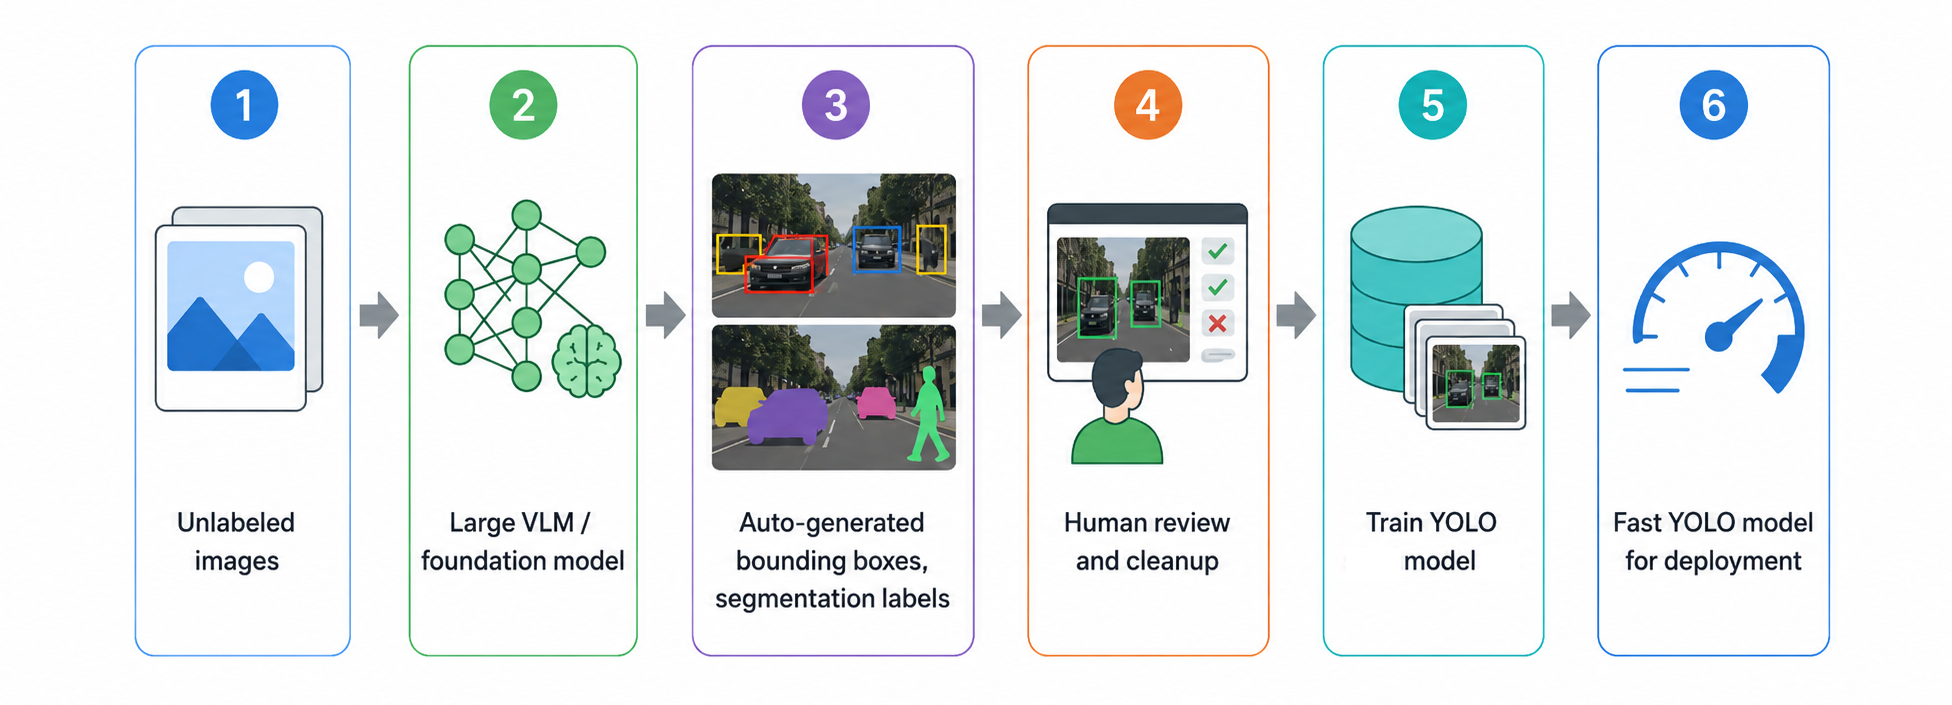
In computer vision workflows, there is also a practical form of distillation where a large VLM or foundation model acts as the base by generating labels for unlabeled images. Those generated labels are then reviewed and used to train a smaller YOLO model as the target. This is the version of YOLO distillation we will focus on in this tutorial.
The base model may be a VLM such as Florence-2, Grounding DINO, Grounded SAM, GPT-5, Gemini 3, or another multimodal model. The target model is a YOLO detector such as YOLOv8, YOLO11, YOLOv12, or another YOLO variant supported in your training workflow. The basic pipeline looks like this:
This is especially useful because VLMs are flexible and can understand text prompts, but they are often too large, slow, or expensive for real-time deployment. YOLO models are smaller and faster, making them better suited for production environments such as edge devices, cameras, robotics, factories, and mobile applications.
When Should You Use YOLO Distillation?
Use YOLO distillation when:
- You have many unlabeled images.
- You can describe your target objects with text prompts.
- You want to reduce manual annotation time.
- You need a fast object detector for production.
- You want to use a VLM for labeling, not for every inference request.
- You are building a first dataset for a new object detection project.
Do not treat auto-generated labels as perfect ground truth. VLMs can miss objects, hallucinate detections, or produce loose boxes. The best workflow is to use the VLM for the first labeling pass, then review and correct the annotations in Roboflow before training.
Tutorial 1: Use Autodistill to label images and train YOLO
Autodistill is an open source framework from Roboflow that uses large foundation models to label data and train smaller supervised models. In Autodistill terminology:
- A base model is the large model used to label data.
- A target model is the smaller model trained on the generated labels.
- An ontology maps prompts to class names.
For example, the prompt shipping container can be saved as the class name container.
In this tutorial, we will use a foundation model, Florence2, as the base and target YOLOv8 (supported in Autodistill library).
Step 1: Install Autodistill
Create a new Python environment or Colab notebook and install the required packages:
!pip install -q autodistill autodistill-florence-2 autodistill-yolov8 supervision roboflowThis installs:
autodistill: the main frameworkautodistill-florence-2: a base model packageautodistill-yolov8: a YOLOv8 target model packagesupervision: utilities for visualizing detectionsroboflow: optional, for uploading datasets or deploying trained weights
Step 2: Prepare your image folder
Place your unlabeled images in a folder:
images/
  001.jpg
  002.jpg
  003.jpg
For a first experiment, start with 50–100 images. This makes it easier to test whether your prompts work before labeling a large dataset.
Step 3: Define the ontology
The ontology tells the base model what to look for and what class name to save.
from autodistill_florence_2 import Florence2
from autodistill.detection import CaptionOntology

ontology = CaptionOntology({
    "basketball player": "player",
    "basketball": "basketball"
})

base_model = Florence2(ontology=ontology)
The left side is the prompt sent to the large model. The right side is the class name saved in the dataset. For example:
"basketball player": "player"means: ask the model to find "basketball player" but save the class as player. Prompt quality matters.
Step 4: Test the base model on one image
Before labeling every image, test one image.
image = Image.open("/content/images/0001.jpg")
result = base_model.predict('/content/images/0001.jpg')
detections = result[0] if isinstance(result, list) else result
bounding_box_annotator = sv.BoxAnnotator()
annotated_frame = bounding_box_annotator.annotate(
scene=image.copy(),
detections=detections
)
sv.plot_image(image=annotated_frame, size=(16, 16))
# label a dataset
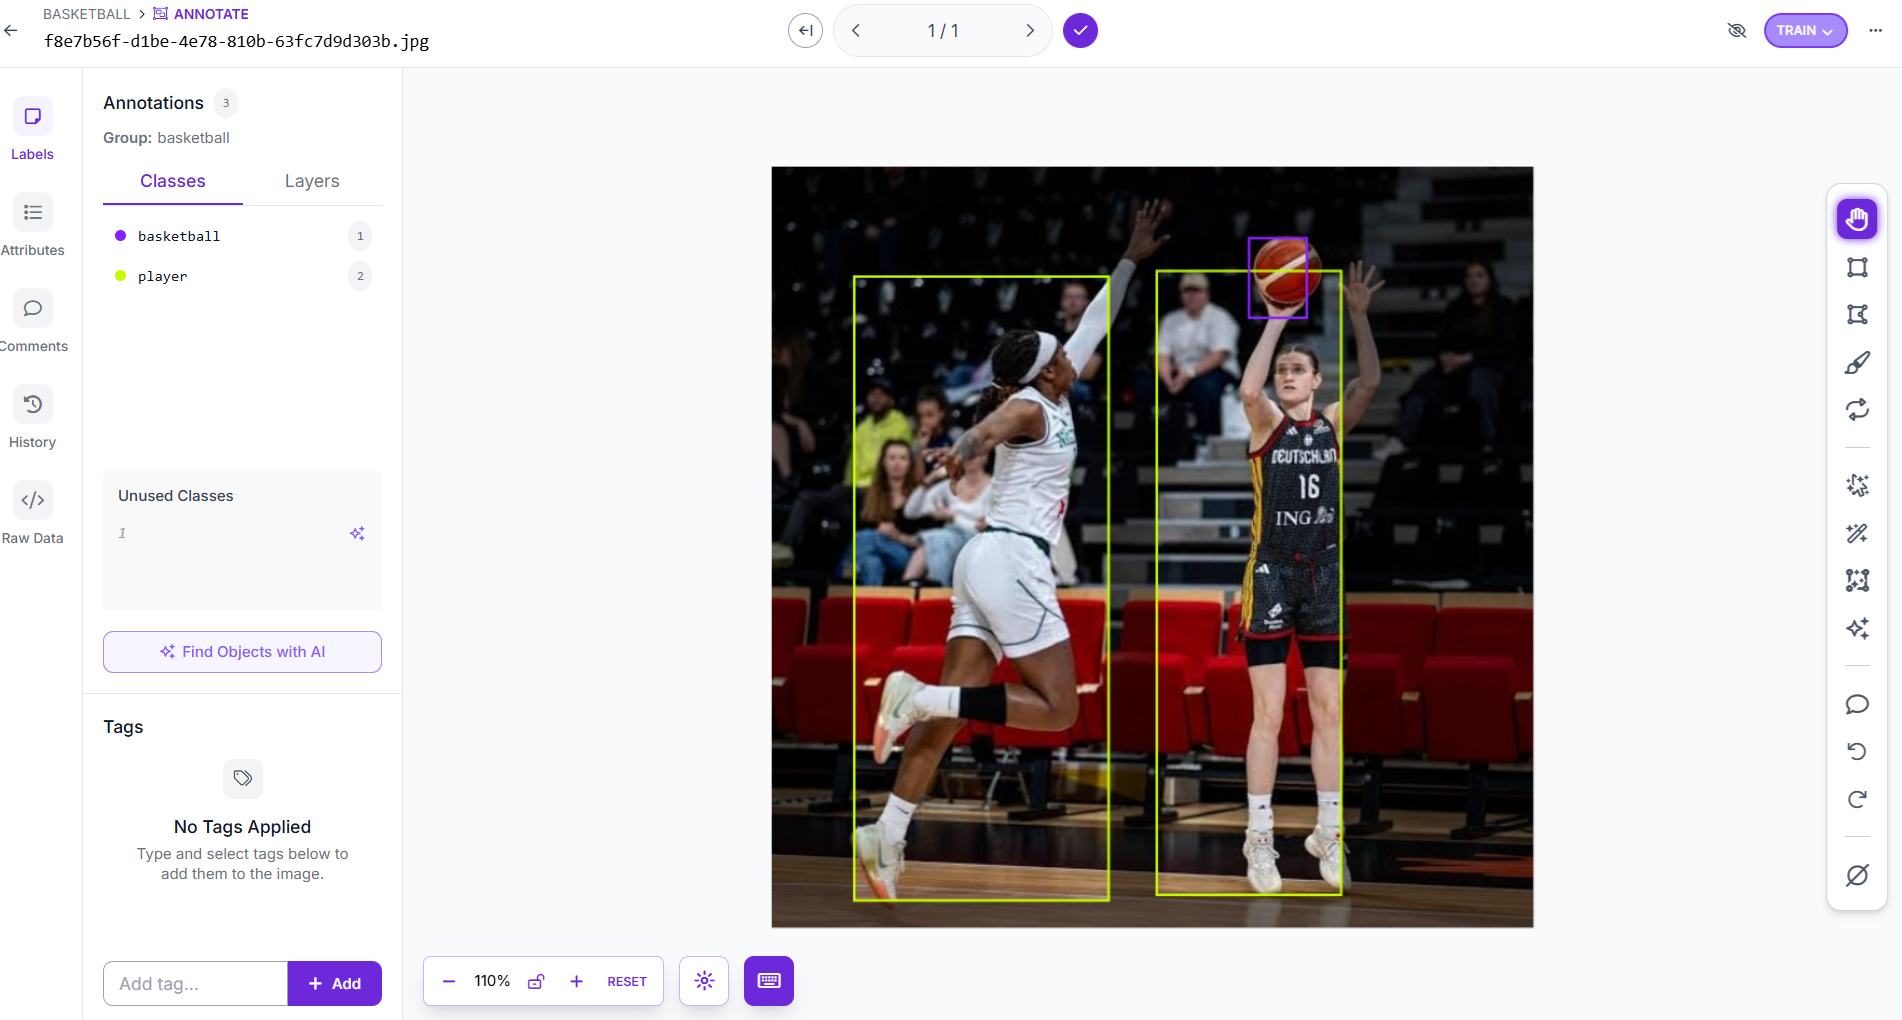
base_model.label("./context_images", extension=".jpg")This would give you output like following.

Review the output carefully. Check:
- Are the boxes around the correct objects?
- Are objects missing?
- Are boxes too large or too small?
- Are classes confused?
- Does the prompt need to be more specific?
If the result is poor, improve the ontology before moving forward.
Once the prompt works on sample images, label the full folder:
base_model.label(
    input_folder="./images",
    output_folder="./dataset"
)
This creates a YOLO-style dataset folder:
dataset/
  train/
  valid/
  data.yaml
The generated dataset is now ready for YOLO training.
Step 6: Train the YOLO target model
Now train a YOLO model on the generated labels.
from autodistill_yolov8 import YOLOv8

target_model = YOLOv8("yolov8n.pt")

target_model.train(
    "./dataset/data.yaml",
    epochs=100
)
Here, yolov8n.pt is the YOLOv8 nano model. It is small and fast, which makes it useful for deployment. You can use a larger model such as yolov8s.pt or yolov8m.pt if you need higher accuracy and can accept slower inference.
Step 7: Test the trained YOLO model
After training, test the model on a validation image:
pred = target_model.predict(
    "./dataset/valid/image_001.jpg",
    confidence=0.4
)

print(pred)
You should compare the YOLO model’s predictions with the VLM-generated labels and manually reviewed examples.
Step 8: Upload the generated dataset to Roboflow (Optional)
You can upload the labeled dataset to Roboflow for review, dataset management, versioning, and training.
from roboflow import Roboflow
rf = Roboflow(api_key="ROBOFLOW_API_KEY")
workspace = rf.workspace("WORKSPACE_ID")
workspace.upload_dataset(
"./dataset",
"yolo-distillation-demo",
project_type="object-detection",
project_license="MIT",
num_workers=10,
is_prediction=True
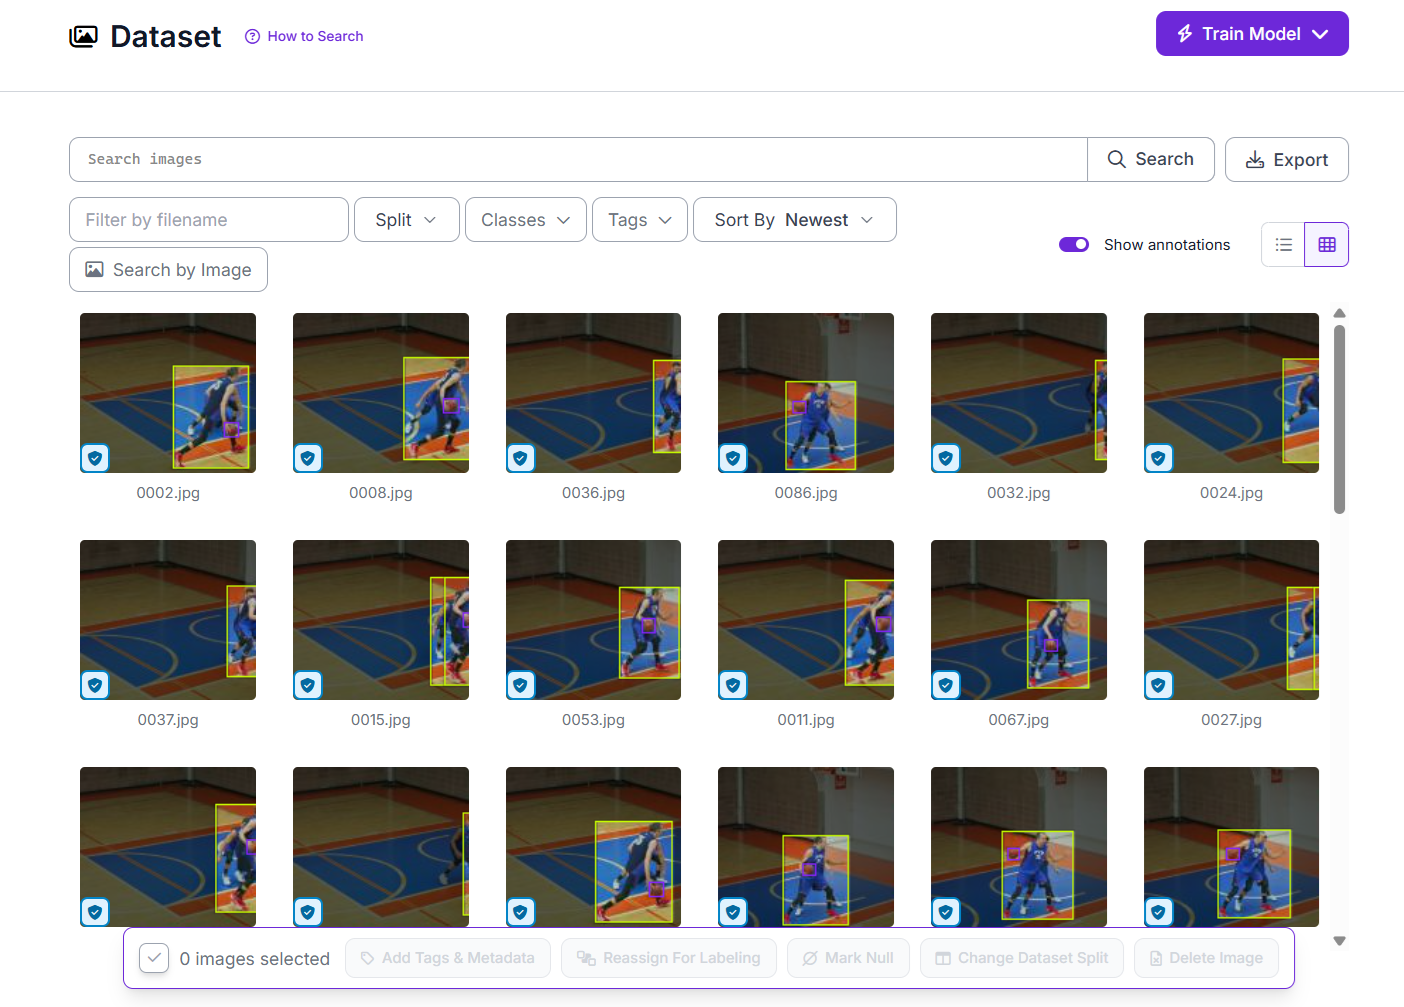
)Because the labels were created by a VLM through Autodistill, they should be treated as predictions first, not final ground truth. Setting is_prediction=True uploads these labels as reviewable predictions in Roboflow. After reviewing and correcting them, you can use the approved annotations to train the YOLO target model. After upload, open the project in Roboflow Annotate and inspect the generated annotations.
Tutorial 2: Build a VLM-to-YOLO dataset pipeline with Roboflow Workflows
The Autodistill approach is great for a code-first tutorial. But if you want a more production-style pipeline, use Roboflow Workflows.
In our example workflow, a VLM (Gemini 3 in our example) labels images, the VLM output is converted into object detection predictions, and the predictions are uploaded to a Roboflow project as annotations.
This is useful when you want a repeatable labeling workflow that can run on batches of images and keep sending predictions back to a Roboflow project.
Step 1: Create an object detection project in Roboflow
Go to Roboflow and create a new project. Choose:
- Project type: Object Detection
- Classes: the objects you want YOLO to detect
Step 2: Create a new Workflow
Open the Workflows tab and create a new workflow. Start with a basic input:
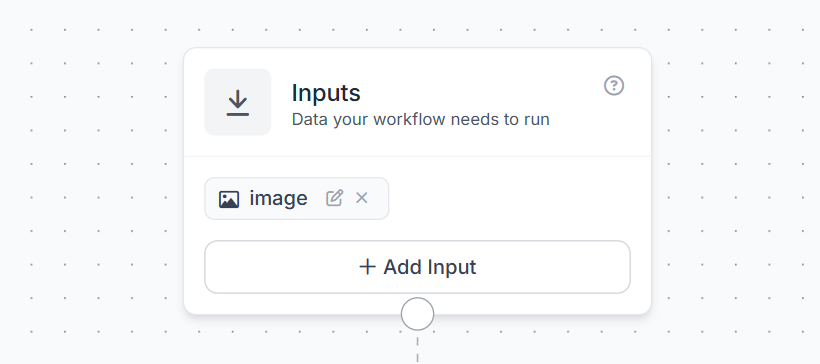
This input will receive each image that you want to label.
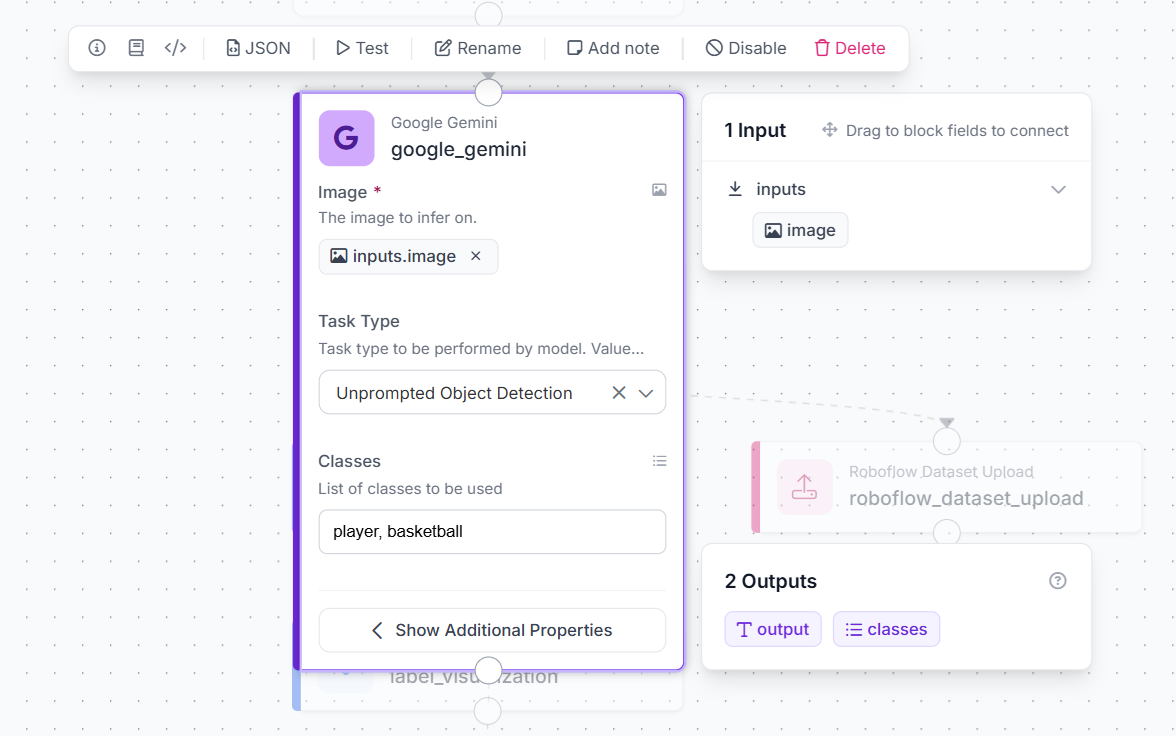
Step 3: Add a Google Gemini Block
Next, add a Google Gemini block to the workflow. This block acts as the large VLM base model that analyzes the input image and generates object detections.
Connect the workflow image input to the Gemini block by setting the Image field to inputs.image. Then, set the Task Type to Unprompted Object Detection. This allows Gemini to detect objects directly from the image without requiring a long text prompt.
In the Classes field, enter the object categories you want the model to find. For this example, we use:
player, basketballGemini will use these class names to identify the relevant objects in the image and return detection results.
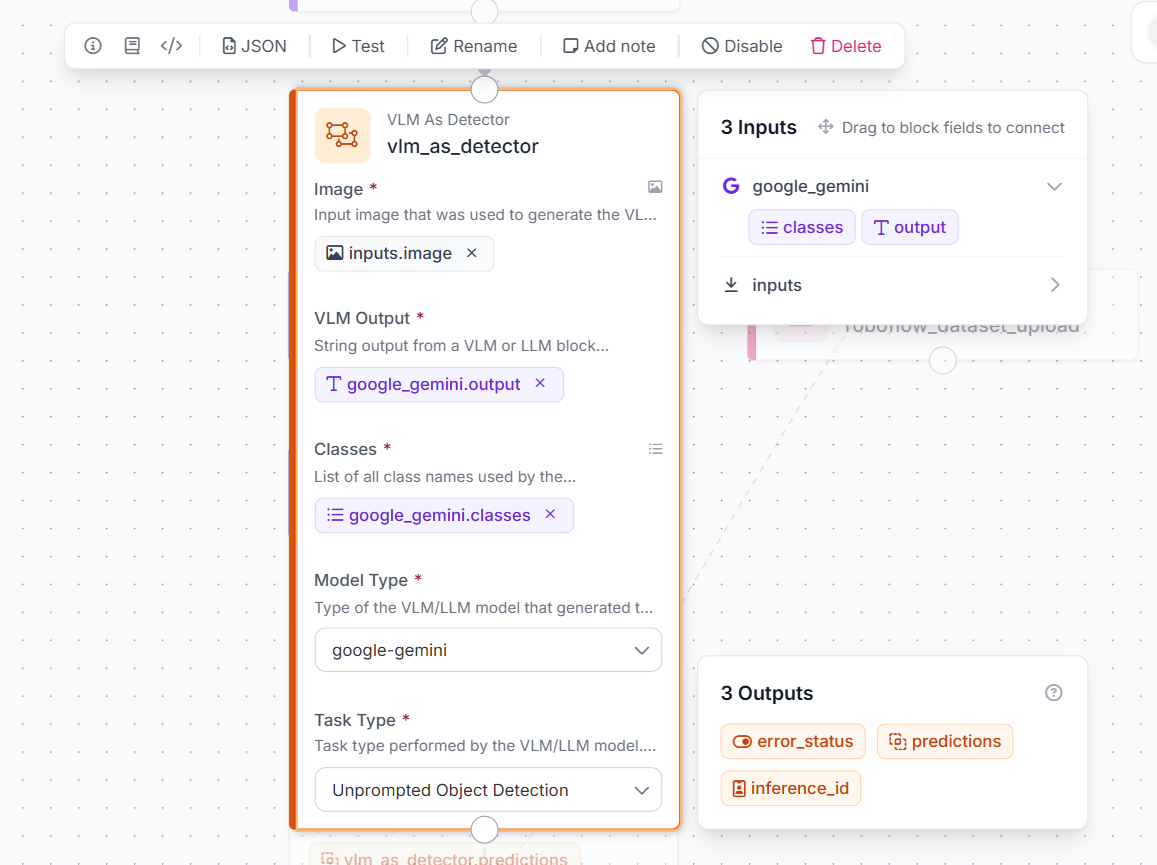
Step 4: Add a VLM as Detector Block
Next, add a VLM as Detector block. The Google Gemini block generates the object detection output, but we need to convert that output into a standard detection format that Roboflow can use. Connect the same input image to the Image field by selecting:
inputs.image
Then connect the Gemini output to the VLM Output field:
google_gemini.output
For the Classes field, use the classes returned from the Gemini block:
google_gemini.classes
Set the Model Type to:
google-gemini
Finally, set the Task Type to the same task used in the Gemini block:
Unprompted Object Detection
This block converts Gemini’s VLM output into object detection predictions, such as bounding boxes, class names, and confidence values.
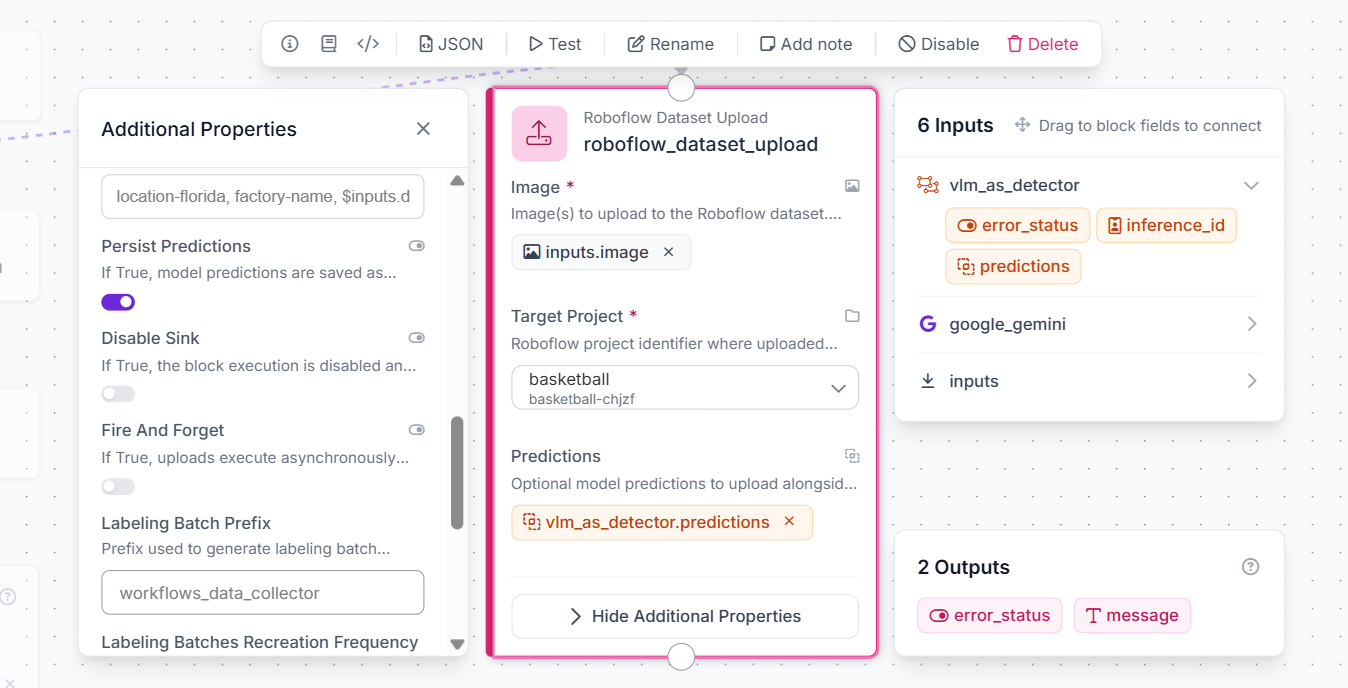
Step 5: Add a Roboflow Dataset Upload Block
After converting the Gemini output into standard object detection predictions, add a Roboflow Dataset Upload block. This block uploads the input image and the generated predictions to your Roboflow project. Connect the Image field to:
inputs.image
Then select the target Roboflow project where the labeled images should be uploaded. In this example, the target project is the basketball object detection project. Next, connect the Predictions field to the output from the VLM as Detector block:
vlm_as_detector.predictions
This step is important because the predictions contain the bounding boxes and class labels generated from the Gemini block. If you only upload the image without connecting the predictions field, the image will be added to the project without labels. With this setup, the workflow sends both the original image and the VLM-generated detections to Roboflow.
Step 6: Add Visualization Blocks
You can also add visualization blocks to check the labels before uploading or using them for training. This step is optional, but it is useful because it lets you confirm whether the VLM-generated detections are correct.
First, add a Bounding Box Visualization block. Connect the input image and the predictions from the vlm_as_detector block. This block draws the predicted bounding boxes on the image.
Next, add a Label Visualization block. This block adds the class names, such as player and basketball, on top of the detected objects.
These visualization blocks help you quickly inspect whether Gemini is detecting the correct objects and whether the bounding boxes are placed properly. If the boxes or labels look wrong, you can adjust the class names, task settings, or model configuration before uploading the predictions to your Roboflow project.
Step 7: Configure the Workflow Output
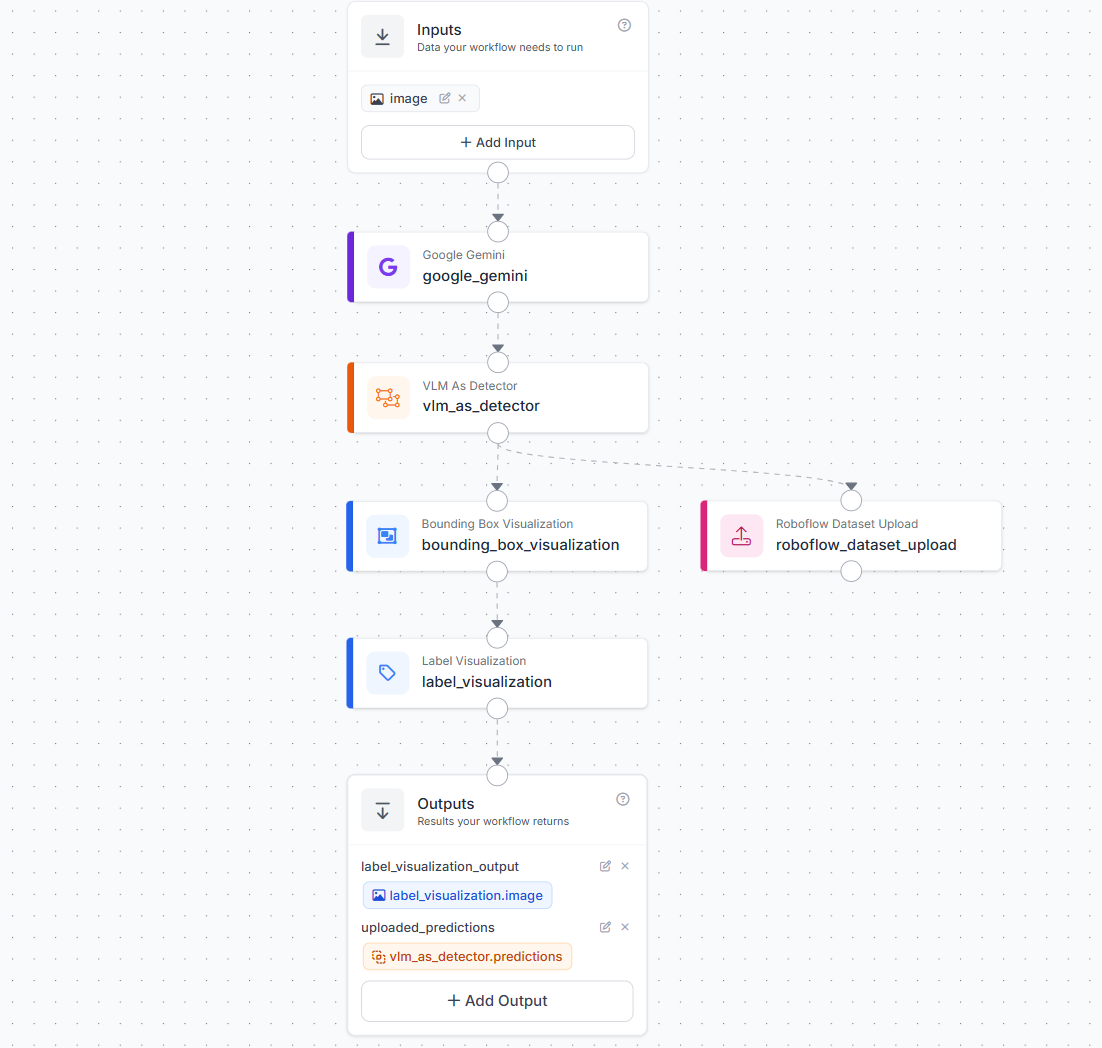
Finally, configure the Outputs block to choose what the workflow should return after it runs. This helps you check whether the VLM-generated labels are correct. Add the first output as:
label_visualization_output = label_visualization.image
This returns the image with bounding boxes and labels drawn on it, so you can visually inspect the detections. Then add another output as:
uploaded_predictions = vlm_as_detector.predictions
This returns information about the labels generated by the VLM as Detector block. These predictions include details such as detected class names and bounding box data. The visual output helps you quickly inspect the detections, while the uploaded_predictions output helps you confirm what label information was generated and sent for upload. After the upload, the labels should still be reviewed and corrected in Roboflow before they are used to train the YOLO target model.

Step 8: Run the workflow on images
You can run the workflow in the Roboflow UI or with the Inference SDK. EThe code below sends each image from the ./images folder to the workflow:
from inference_sdk import InferenceHTTPClient
from concurrent.futures import ThreadPoolExecutor, as_completed
import glob

client = InferenceHTTPClient(
    api_url="https://detect.roboflow.com",
    api_key="YOUR_ROBOFLOW_API_KEY"
)

workspace = "tim-4ijf0"
workflow_id = "yolo-distillation-workflow"

def run_one(image_path):
    return image_path, client.run_workflow(
        workspace_name=workspace,
        workflow_id=workflow_id,
        images={"image": image_path},
        use_cache=True
    )

images = glob.glob("./images/*")

with ThreadPoolExecutor(max_workers=5) as executor:
    futures = [executor.submit(run_one, img) for img in images]

    for future in as_completed(futures):
        image_path, result = future.result()
        print(image_path, result)
This script uses ThreadPoolExecutor to process multiple images in parallel. For each image, the workflow runs Gemini-based object detection, converts the result into standard predictions, uploads the generated labels to the Roboflow project, and returns the configured workflow outputs. After the run finishes, open the Roboflow project and review the uploaded labels before using them to train the YOLO model.
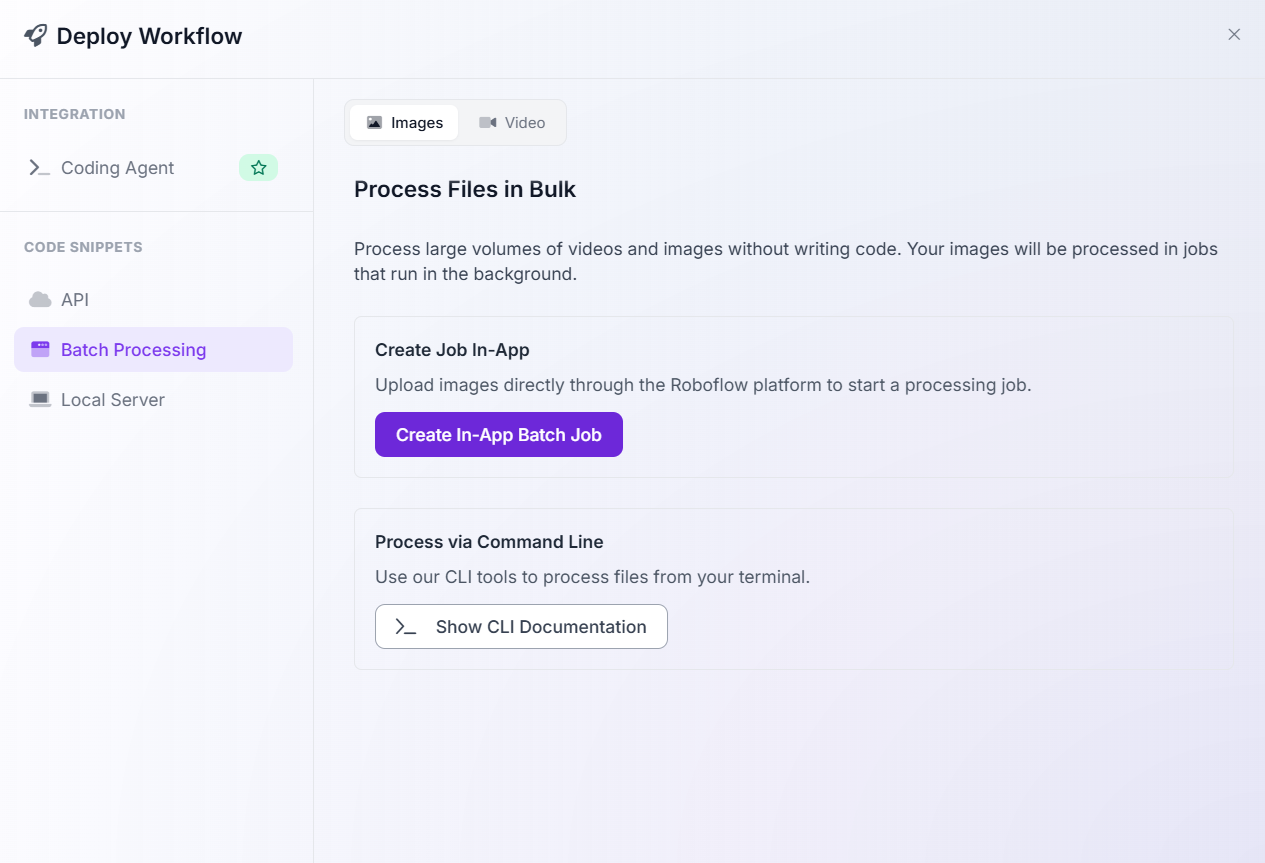
As an alternative to deployment code, you can also configure batch processing within the Roboflow interface or use Roboflow CLI.
Step 9: Review labels in Roboflow
This is one of the most important steps. Auto-labeling saves time, but the labels still need quality control. In Roboflow, review:
- Missing boxes
- Incorrect classes
- Duplicate boxes
- Loose boxes
- Objects that should not be labeled
- Edge cases under different lighting, camera angles, and object sizes
Step 10: Generate a dataset version
After reviewing labels, generate a new dataset version. At this stage, you can apply preprocessing and augmentation in Roboflow, such as:
- Resize images
- Auto-orient images
- Normalize image dimensions
Keep augmentations realistic. The goal is not to create random variation, but to simulate the conditions your YOLO model will see in production.
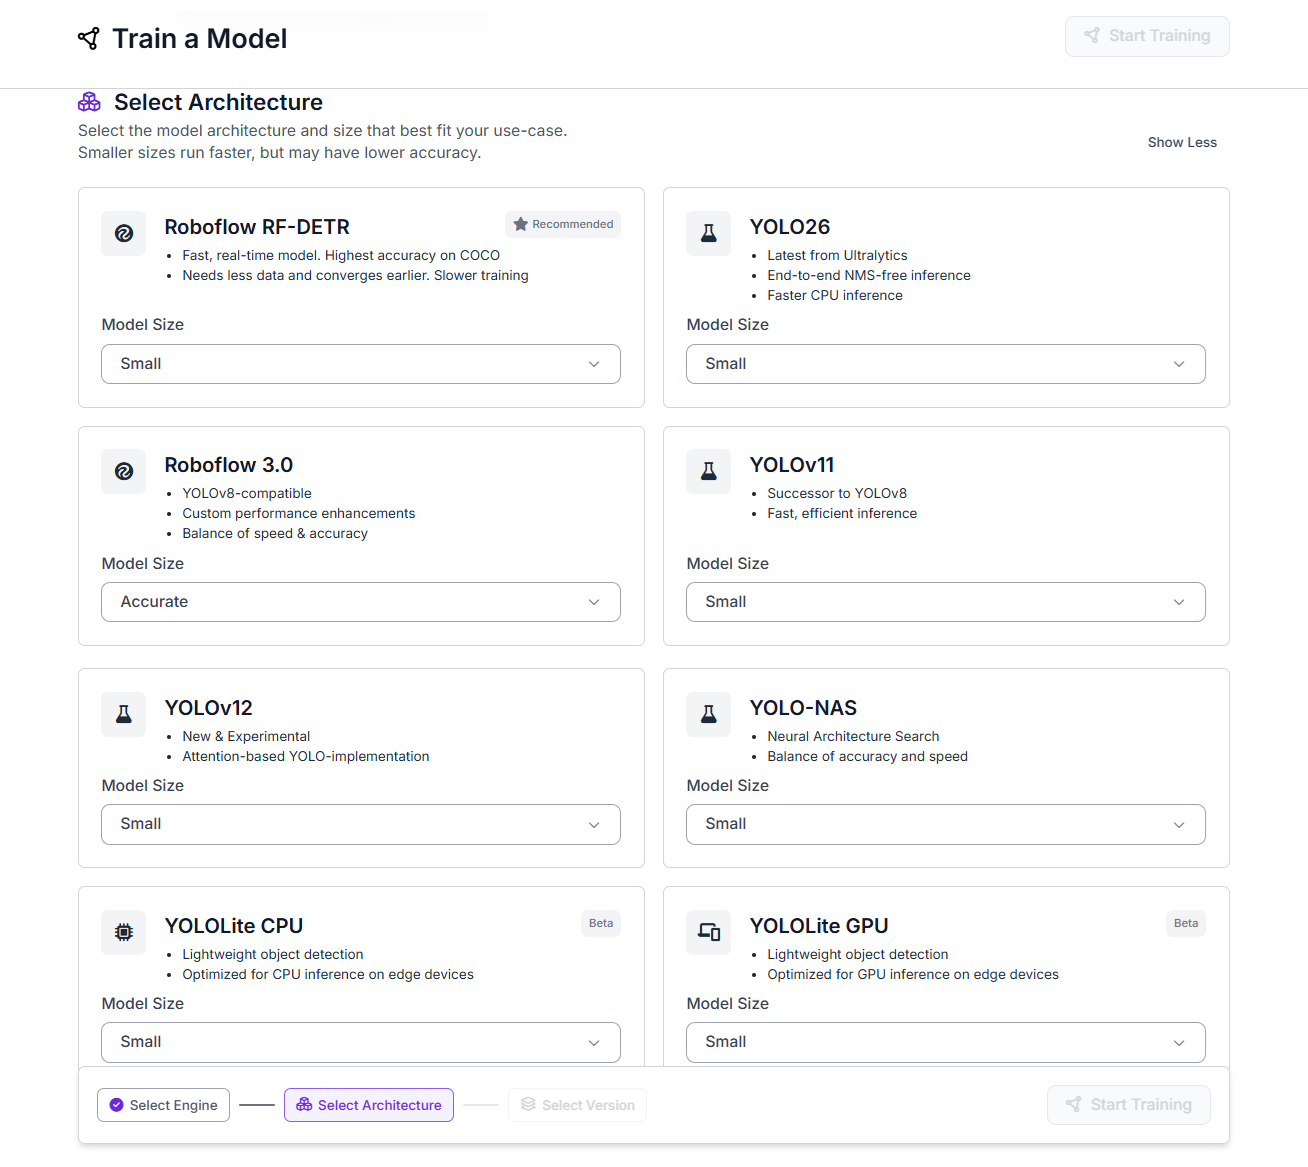
Step 11: Train the YOLO model
Now train your YOLO model. Choose the YOLO architecture that you want to train.
Step 12: Compare the YOLO with the VLM
The purpose of YOLO distillation is not to make the target model as general as the VLM. The goal is to make it good at your specific task. Compare:
- Accuracy on your validation set
- False positives
- False negatives
- Inference speed
- Cost per image
- Deployment target
- Edge performance
The VLM may understand more concepts, but the YOLO model should be faster and cheaper for your fixed object detection task.
Autodistill vs Workflows: which should you use?
Use Autodistill when:
- You want a code-first approach.
- You are working in Colab or Python.
- You want to quickly label a folder and train YOLO.
- You are experimenting with prompts and base models.
Use Roboflow Workflows when:
- You want a repeatable labeling pipeline.
- You want to upload predictions directly to a Roboflow project.
- You want batch processing.
- You want a visual pipeline that can be reused by a team.
- You want to connect VLM predictions with dataset management and annotation review.
In practice, both approaches are useful. Choose them as per your need.
Best Practices for YOLO Distillation
- Start with a small test batch: Do not run the Gemini workflow on the full dataset immediately. First, test it on 10–20 basketball images to check whether it correctly detects
playerandbasketball. - Check Gemini predictions before uploading many images: Use the Bounding Box Visualization and Label Visualization blocks to inspect the output. Make sure the boxes are placed around the correct players and basketballs.
- Treat VLM labels as pre-labels: The labels generated by Gemini should not be treated as final ground truth immediately. They are auto-generated predictions, so review and correct them in Roboflow before training the YOLO model.
- Review difficult cases carefully: Basketball images can include motion blur, small balls, overlapping players, crowds, and partial objects. These cases should be checked manually because the VLM may miss the ball or label a player incorrectly.
- Keep a clean validation set:
Use human-reviewed labels for validation. If the validation labels are also noisy, the YOLO model’s accuracy numbers may look wrong or misleading. - Track how the labels were generated: Use a clear batch name such as
gemini-yolo-distillation-basketball. This helps you remember that the labels were generated using Gemini and should be reviewed before final training. - Connect the correct predictions to the upload block:
In the Roboflow Dataset Upload block, make sure thePredictionsfield usesvlm_as_detector.predictions. This ensures that the bounding boxes and class labels generated from Gemini are uploaded with the image. - Use clear class names:
Keep the class names simple and consistent. For example, useplayer,basketball. Avoid changing the same class name in different places, such asbasket ball,ball,sports ball, orbasketball_ball. - Try different VLMs and model versions: Gemini is used in this tutorial, but Roboflow Workflows also supports other VLM options depending on your workflow setup. You can test models such as Gemini, Florence-2, OpenAI models, Claude, or other available VLM blocks to see which one gives the best labels for your dataset. Even within Gemini, different model versions may give different results in terms of accuracy, speed, and cost. For this basketball example, test a small batch first and choose the model version that detects
playerandbasketballmost reliably.
YOLO Knowledge Distillation Conclusion
YOLO knowledge distillation is a practical way to use the visual understanding of a large model to train a smaller, faster YOLO model for deployment. Instead of running a large VLM or foundation model every time, you can use it as a base to generate labels, review those labels, and train a YOLO target model that is optimized for your specific task. You can use following ways with Roboflow:
- Autodistill: Use a large foundation model to automatically label images, then train a YOLO model from the generated dataset.
- Roboflow Workflows: Build a full labeling pipeline using a VLM such as Google Gemini, convert the VLM output into object detection predictions, and upload those predictions to a Roboflow project for review.
- Roboflow Auto Label: Use Roboflow’s built-in Auto Label feature, including foundation models such as SAM 3, to generate labels directly inside Roboflow. This can also be viewed as a practical distillation-style workflow because a large foundation model creates annotations that are later reviewed and used to train a smaller YOLO model.
In all cases, the most important step is review. VLM-generated and foundation-model-generated labels should be treated as pre-labels, not final ground truth. After correcting the annotations in Roboflow's powerful interface, you can generate a clean dataset version and train a YOLO model that is faster, cheaper, and easier to deploy.
Cite this Post
Use the following entry to cite this post in your research:
Timothy M. (May 28, 2026). YOLO Distillation. Roboflow Blog: https://blog.roboflow.com/yolo-distillation/