
This article was contributed to the Roboflow blog by Abirami Vina.
As AI advances and becomes a part of our daily lives, it’s becoming more and more important to develop and deploy AI models effectively. Tools like Intel’s OpenVINO are key because they help streamline the deployment of AI applications across various platforms.
OpenVINO, short for Open Visual Inference & Neural Network Optimization, is a toolkit that helps speed up and optimize AI models. It also gives developers the tools and libraries they need to deploy AI solutions quickly and with less computational effort.
In this article, we'll learn exactly what OpenVINO is, some benefits of using it, and how it can be used in different applications. We'll also guide you through a simple code example using OpenVINO to implement image segmentation in your computer vision projects. Let's get started!
What is OpenVINO?
OpenVINO is an open-source software toolkit designed to help developers optimize and deploy computer vision models efficiently on various Intel hardware, such as CPUs, GPUs, FPGAs, and Neural Compute Sticks. Optimizing AI models for applications like facial recognition makes real-time processing possible.
The OpenVINO toolkit follows a "write-once, deploy-anywhere" approach. What this means is that developers can train deep learning models using frameworks like TensorFlow or PyTorch within OpenVINO.
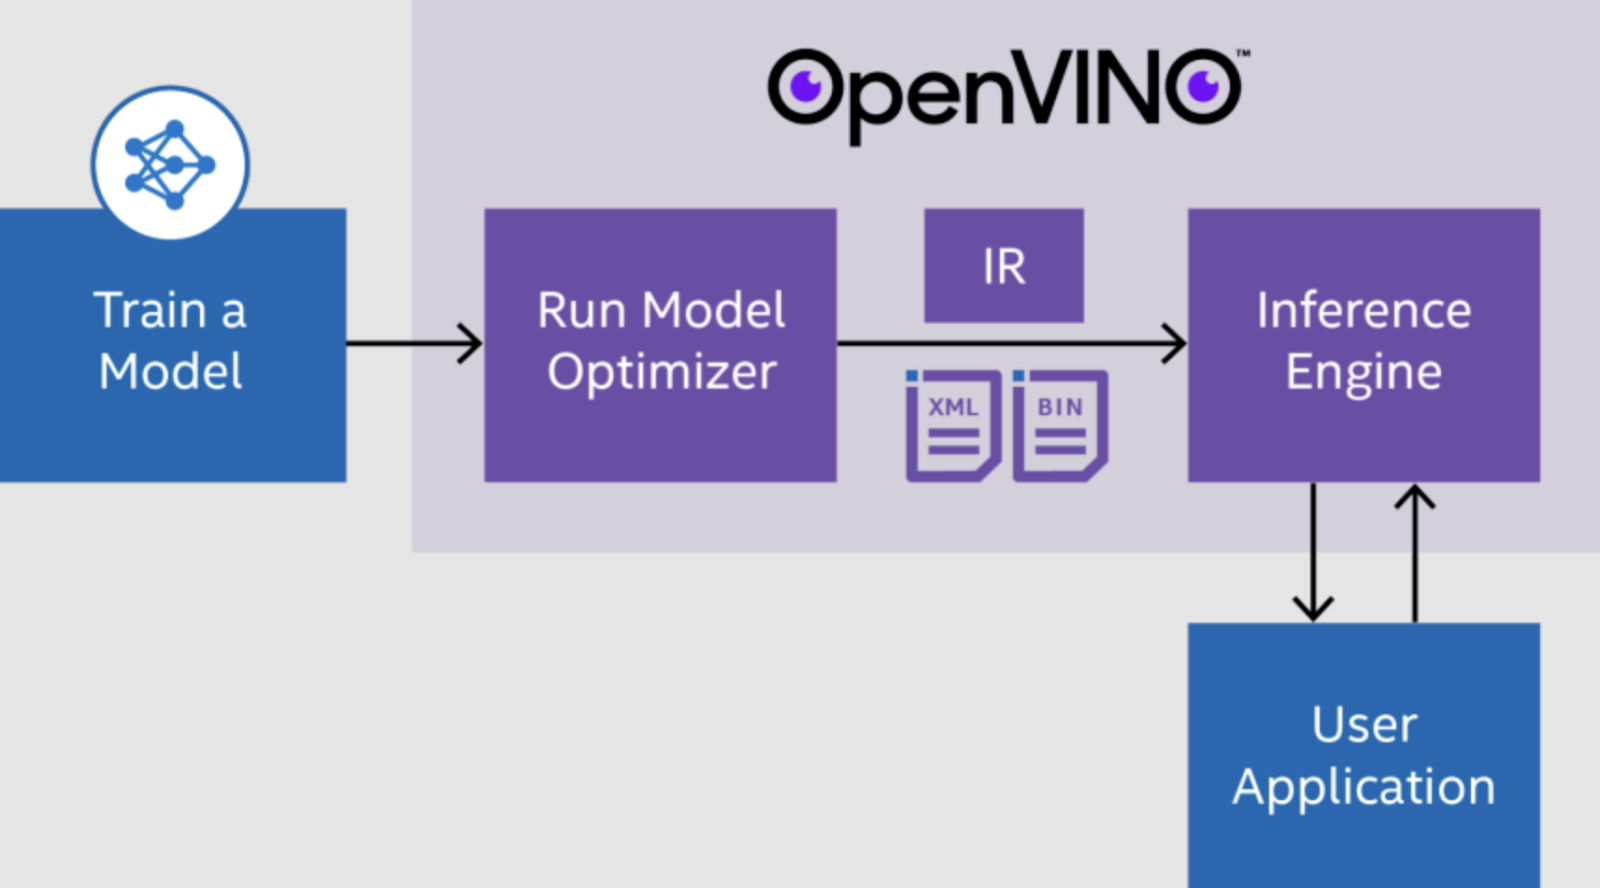
Then, as shown above, these models are optimized for deployment by the Model Optimizer to create a standardized Intermediate Representation (IR) that is hardware-agnostic. Finally, the Inference Engine executes this optimized model on various hardware platforms like CPUs, GPUs, Intel Vision Processing Units (VPUs), and Field-Programmable Gate Arrays (FPGAs).
OpenVINO provides programming interfaces (APIs) for C/C++ and Python, which makes it easy for developers to integrate high-performance model execution into their applications.
Benefits of Using OpenVINO
OpenVINO offers several benefits that make it a great choice for computer vision projects. First and foremost, OpenVINO is interoperable with a range of frameworks, as shown below. Developers can seamlessly integrate their existing models and workflows into the OpenVINO ecosystem.
Also, OpenVINO makes running AI models faster and more efficient using various techniques like quantization and pruning. It optimizes the model's structure and data layouts and combines multiple operations into single steps.
In case you are looking for a pre-trained model to start your project with, OpenVINO provides a large collection of pre-built, ready-to-use models in its Model Zoo. These models cover various computer vision tasks like object detection, image segmentation, pose estimation, and more. Instead of building everything from scratch, you can use these models as a starting point and customize them as needed.
Another interesting benefit is OpenVINO’s integration with OpenCV, which is a popular library for computer vision tasks. This integration combines OpenCV's strong image processing and analysis with OpenVINO's efficient AI model execution. It becomes possible to create complete computer vision pipelines that take in images, process them, analyze them with AI models, and produce the desired outputs.
Use Cases of OpenVINO
The great benefits of OpenVINO make it perfect for all sorts of computer vision tasks in different industries. Now, let's check out some use cases of how people are putting it to use.
Retail Analytics
Have you ever been frustrated while waiting in a very long checkout queue? Computer vision can step in and solve this. Specifically, OpenVINO can be used to create applications that help with various tasks aimed at improving customer experiences and optimizing operations. For example, by analyzing customer wait times, retailers can optimize staffing levels and improve service efficiency.

Similarly, retailers can use computer vision applications created using OpenVINO to count people and track customer movement within a store. This helps them understand foot traffic patterns and optimize store layouts for better flow. Another important use is shelf monitoring. AI can be used to detect when items are out of stock and analyze product placement to enhance inventory management and increase sales.
Industrial Inspection
High-quality products are very important for businesses. They help them keep a good reputation and make customers happy. In manufacturing, checking for problems during production can save time and money that would be needed to fix or replace low-quality products later.
Using OpenVINO, businesses can develop highly accurate systems to detect anomalies or defects in their products. Computer vision techniques like image segmentation can be used. Image segmentation helps precisely identify and isolate problematic areas in product images.
Other than this, AI can be used in industrial inspection to predict when machinery needs maintenance and to monitor industrial environments for potential safety hazards.
Smart Cities and Transportation
Finding available parking spots can be time-consuming for drivers in busy cities. Poor parking management leads to more traffic jams, air pollution, and an overall lower quality of life. OpenVINO can be used to create smart parking system applications.
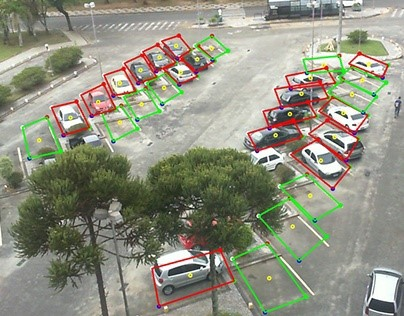
These applications use smart cameras to monitor parking lots and garages. The cameras can see when cars come in or leave and track where they go in the lot. By analyzing the video feed in real time, the system can tell if a parking spot is taken or free. This data can be used to direct drivers to free parking spaces.
Healthcare and Medical Imaging
Healthcare and medical imaging, particularly X-rays, are used for diagnosing and treating various conditions. However, analyzing X-ray images manually can be time-consuming and leave room for human error, which may delay diagnoses and affect patient outcomes. OpenVino makes it easy to develop and deploy advanced computer vision and deep learning algorithms for medical image analysis.
For example, GE Healthcare's Critical Care Suite is a set of AI algorithms designed to detect critical findings on chest X-rays. These AI algorithms have been optimized using OpenVINO's deep learning inference tools and convolutional image-based classification models to quickly identify potential critical conditions, such as pneumothorax (collapsed lung). Then, the algorithms were deployed using OpenVINO into their Optima XR240amx X-ray systems. By doing so, GE Healthcare can analyze X-ray images in real-time while caring for patients.
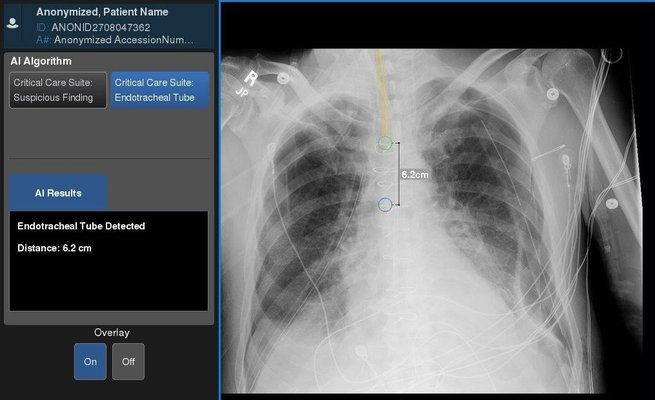
An example of how GE Healthcare's Critical Care Suite is used. (Source)
Try It Yourself
Let’s check out a simple OpenVINO code example for implementing image segmentation using a pre-trained road segmentation model from the OpenVINO Model Zoo.
We’ll run our inferences on an image of a street from the internet, you can use the same or any image of a road you’d like to segment! Also, we suggest that you try running the following steps in Google Collab or Jupyter Notebook.
Step 1: Install the OpenVINO package
To get started, install the OpenVINO package using pip:
pip install openvinoStep 2: Import the Required Dependencies
Next, we’ll import all the needed packages and libraries. In this step, we’ll also download the `notebook_utils` module from the OpenVINO repository, which contains utility functions.
import cv2
import matplotlib.pyplot as plt
import numpy as np
import openvino as ov
from pathlib import Path

# Fetch `notebook_utils` module
import urllib.request
urllib.request.urlretrieve(
    url='https://raw.githubusercontent.com/openvinotoolkit/openvino_notebooks/latest/utils/notebook_utils.py',
    filename='notebook_utils.py'
)

from notebook_utils import segmentation_map_to_image, download_file
Step 3: Download the Segmentation Model
Then, we’ll download the pre-trained road segmentation model from the OpenVINO Model Zoo.
base_model_dir = Path("./model").expanduser()

model_name = "road-segmentation-adas-0001"
model_xml_name = f'{model_name}.xml'
model_bin_name = f'{model_name}.bin'

model_xml_path = base_model_dir / model_xml_name
model_xml_url = "https://storage.openvinotoolkit.org/repositories/open_model_zoo/2023.0/models_bin/1/road-segmentation-adas-0001/FP32/road-segmentation-adas-0001.xml"
model_bin_url = "https://storage.openvinotoolkit.org/repositories/open_model_zoo/2023.0/models_bin/1/road-segmentation-adas-0001/FP32/road-segmentation-adas-0001.bin"

file_xml = download_file(model_xml_url, model_xml_name, base_model_dir)
file_bin = download_file(model_bin_url, model_bin_name, base_model_dir)
Step 4: Select the Inference Device
This step allows the user to select the device (CPU, GPU, etc.) to run the inference.
import ipywidgets as widgets

core = ov.Core()
device = widgets.Dropdown(
    options=core.available_devices + ["AUTO"],
    value="AUTO",
    description="Device:",
    disabled=False,
)

device
Step 5: Load the Model
After selecting our device, we need to load the pre-trained model and compile it for inference on the selected device.
core = ov.Core()

model = core.read_model(model=model_xml_path)
compiled_model = core.compile_model(model=model, device_name=device.value)

input_layer_ir = compiled_model.input(0)
output_layer_ir = compiled_model.output(0)
Step 6: Load an Image
Now, we can download an image to run inferences on, preprocess it, and prepare it for inferencing.
image_filename = download_file(    "https://storage.openvinotoolkit.org/repositories/openvino_notebooks/data/data/image/empty_road_mapillary.jpg",
    directory="data"
)

image = cv2.imread(str(image_filename))
rgb_image = cv2.cvtColor(image, cv2.COLOR_BGR2RGB)
image_h, image_w, _ = image.shape
N, C, H, W = input_layer_ir.shape
resized_image = cv2.resize(image, (W, H))

input_image = np.expand_dims(
    resized_image.transpose(2, 0, 1), 0
)
Step 7: Run Inference
The code snippet below is used to run an inference on the loaded image and obtain the segmentation mask.
result = compiled_model([input_image])[output_layer_ir]

segmentation_mask = np.argmax(result, axis=1)
Step 8: Preparing Data for Visualization
Then, we can prepare the data for visualization by applying a colormap to the segmentation mask and overlaying it on the original image.
# Define colormap, each color represents a class.
colormap = np.array([[68, 1, 84], [48, 103, 141], [53, 183, 120], [199, 216, 52]])


alpha = 0.3

# Use function from notebook_utils.py to transform mask to an RGB image.
mask = segmentation_map_to_image(segmentation_mask, colormap)
resized_mask = cv2.resize(mask, (image_w, image_h))

# Create an image with mask.
image_with_mask = cv2.addWeighted(resized_mask, alpha, rgb_image, 1 - alpha, 0)
Step 9: Visualize the Results
Finally, we can display the original image, the segmentation mask, and the masked image side by side for visualization.
data = {"Base Photo": rgb_image, "Segmentation": mask, "Masked Photo": image_with_mask}

fig, axs = plt.subplots(1, len(data.items()), figsize=(15, 10))

for ax, (name, image) in zip(axs, data.items()):
    ax.axis('off')
    ax.set_title(name)
    ax.imshow(image)

plt.show(fig)
The image below is an example of what you can expect to see as the output.

Conclusion
OpenVINO provides developers with a powerful toolkit for optimizing and deploying computer vision models efficiently and flexibly. We've seen its applications in various fields like retail analytics and industrial inspections. Through a coding exercise, we've also learned how to implement image segmentation using OpenVINO. As industries increasingly use computer vision and AI, options like OpenVINO are driving innovation and changing how we interact with the world!
Continue your Learning!
Here are some resources to help you get started with OpenVINO:
- A collection of interactive tutorials that introduce you to the OpenVINO toolkit and explain how to use the Python API and tools for optimized deep learning inference.
- Examples of OpenVINO simple console applications that show you how to use specific OpenVINO API capabilities within an application.
- A blog post on how to accelerate PyTorch Models via OpenVINO integration with Torch-ORT.
- Check out this blog post on YOLOv5 object detection with the OpenVINO Toolkit.