
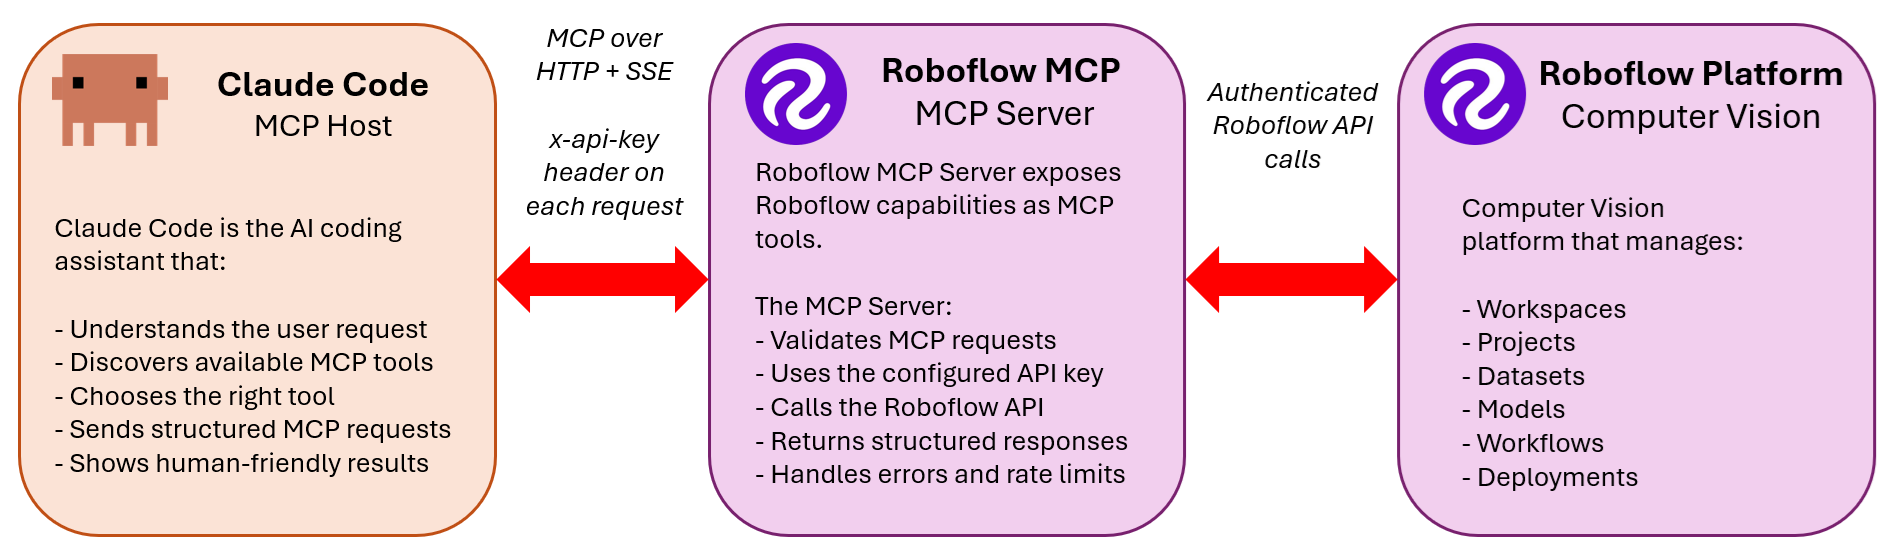
The Roboflow MCP server exposes the entire Roboflow platform as callable tools inside Claude Code, collapsing the overhead of switching between annotation, training, and deployment interfaces during a computer vision project. This tutorial builds a bird species monitoring application entirely from the terminal: creating a Roboflow project, uploading images, triggering an RF-DETR training run, checking model metrics, and assembling a Roboflow Workflow that runs the finished detector, all through natural-language prompts without opening a single API reference.
Building a computer vision application involves multiple steps before you have anything deployable. You collect and annotate images, clean and split the dataset, configure preprocessing and augmentation, train a model, evaluate it, iterate when accuracy falls short, and finally integrate the trained model into an inference pipeline or application.
Each of these stages usually require different tools and interface such as an annotation platform, a training tool or dashboard, a model registry, and a code editor and moving between them manually adds overhead to every iteration cycle.
The Roboflow MCP server collapses that overhead by exposing the entire platform as callable tools inside Claude Code. You describe what you want in your terminal, and Claude Code handles the Roboflow operations such as creating projects, uploading datasets, generating versioned dataset, triggering training runs, checking model metrics, and assembling Workflows without you leaving your development environment.
In this tutorial you will build a bird species monitoring application from the terminal using Claude Code and the Roboflow MCP server. The pipeline covers every stage of a real computer vision project such as creating a Roboflow project, uploading bird images directly from the terminal, annotating the dataset manually in the Roboflow UI, triggering model training, and finally having Claude Code build a Roboflow Workflow that runs the finished detector.
By the end you will have a working bird species detection Workflow you can query with images from a trail camera, a window feeder, or any field monitoring setup.
What Is the Model Context Protocol (MCP)?
The Model Context Protocol (MCP) is an open standard that lets AI assistants connect to external tools and services through a unified interface. Instead of writing custom API integration code every time you want an AI agent to interact with an external platform, MCP defines a standard way for the agent to discover what tools are available and call them.
From the agent's side, MCP tools look like any other capability. Claude Code sees a list of available functions, understands what each one does from its description, and calls them as needed when you give it a task. The transport layer, authentication, and protocol details are handled by the MCP server itself.
For computer vision engineer, this matters because it removes the boundary between your coding environment and the Roboflow platform. You do not need to memorize API endpoint signatures or maintain a separate script for each platform operation. You describe the outcome you want, and the agent composes the right sequence of tool calls to get there.
What Is the Roboflow MCP Server?
The Roboflow MCP server exposes your entire Roboflow workspace as a set of callable tools. It is hosted at https://mcp.roboflow.com/mcp and authenticates using your standard Roboflow API key. Once connected, Claude Code can work on your projects as if it were another team member with API access. The server provides 30 tools organized across the full project lifecycle:
- Project and workspace management: List workspaces, list projects, create new projects, inspect project details.
- Image and video handling: Prepare image uploads, upload images in ZIP batches, and check upload job status. Video uploads go through the Roboflow web UI where your browser parses video files into frames.
- Annotations: Save annotations to images, manage annotation batches, and create labeling jobs.
- Dataset versions: Generate versioned dataset snapshots with preprocessing and augmentation settings, inspect version details, and export datasets.
- Model training and evaluation: Trigger training runs, monitor training status, inspect model metrics, and run inference against deployed models.
- Workflows: List existing Workflows, inspect Workflow definitions, create new Workflows, update existing ones, browse available Workflow blocks, and run Workflow inference.
The practical result is that you can narrate a computer vision pipeline in plain language and have Claude Code execute each step against your real Roboflow account.
How to Use Roboflow MCP
Let's dive into an example tutorial showing how you can use Roboflow MCP with Claude Code.
Prerequisites
Before starting, make sure you have the following:
- A Roboflow account with an API key (free tier works for this tutorial)
- A Claude Pro or Claude Max subscription (free accounts do not include Claude Code)
- A folder of bird images in JPG or PNG format, at least 50 images with variety across species, lighting conditions, and distances
Step 1: Install Claude Code
Open PowerShell and run the native installer.
irm https://claude.ai/install.ps1 | iexThe installer downloads the Claude Code binary. Once installed open the terminal and type the command to check:
claude --versionOn first launch, Claude Code opens your default browser and asks you to sign in with your Anthropic account. Complete the sign-in and the CLI authenticates automatically.
Step 2: Get Your Roboflow API Key
Log into app.roboflow.com, click on settings in the left panel and click API Keys and copy your Private API Key. You will use this in the next step.
Step 3: Connect the Roboflow MCP Server
With Claude Code installed, add the Roboflow MCP server. Open PowerShell and run:
claude mcp add roboflow `
  --transport http https://mcp.roboflow.com/mcp `
  --header "x-api-key: YOUR_ROBOFLOW_API_KEY" `
  --header "Accept: application/json, text/event-stream"
Replace YOUR_ROBOFLOW_API_KEY with the key you copied from Roboflow settings. The backtick character (`) is PowerShell's line continuation character. You can also write this as a single line. Verify the server is registered:
claude mcp listYou should see roboflow listed as a connected MCP server.

Claude Code now has access to Roboflow tools provided by Roboflow MCP.
Step 4: Start Claude Code in Your Project Folder
Create a folder for this project and launch Claude Code from inside it:
mkdir d:\projects\bird-monitor
cd d:\projects\bird-monitor
claude
Claude Code opens an interactive session in your terminal. Every prompt you type from this point forward goes directly to Claude, which has access to both your file system and the Roboflow MCP tools.
Step 5: Select Your Roboflow Workspace and Create a Project
Start by asking Claude to show you your Roboflow workspaces and create the project. At the Claude Code prompt, type:
List my Roboflow workspaces, then create a new object detection project called "bird-species-monitor" in my default workspace. Set the annotation group to "bird".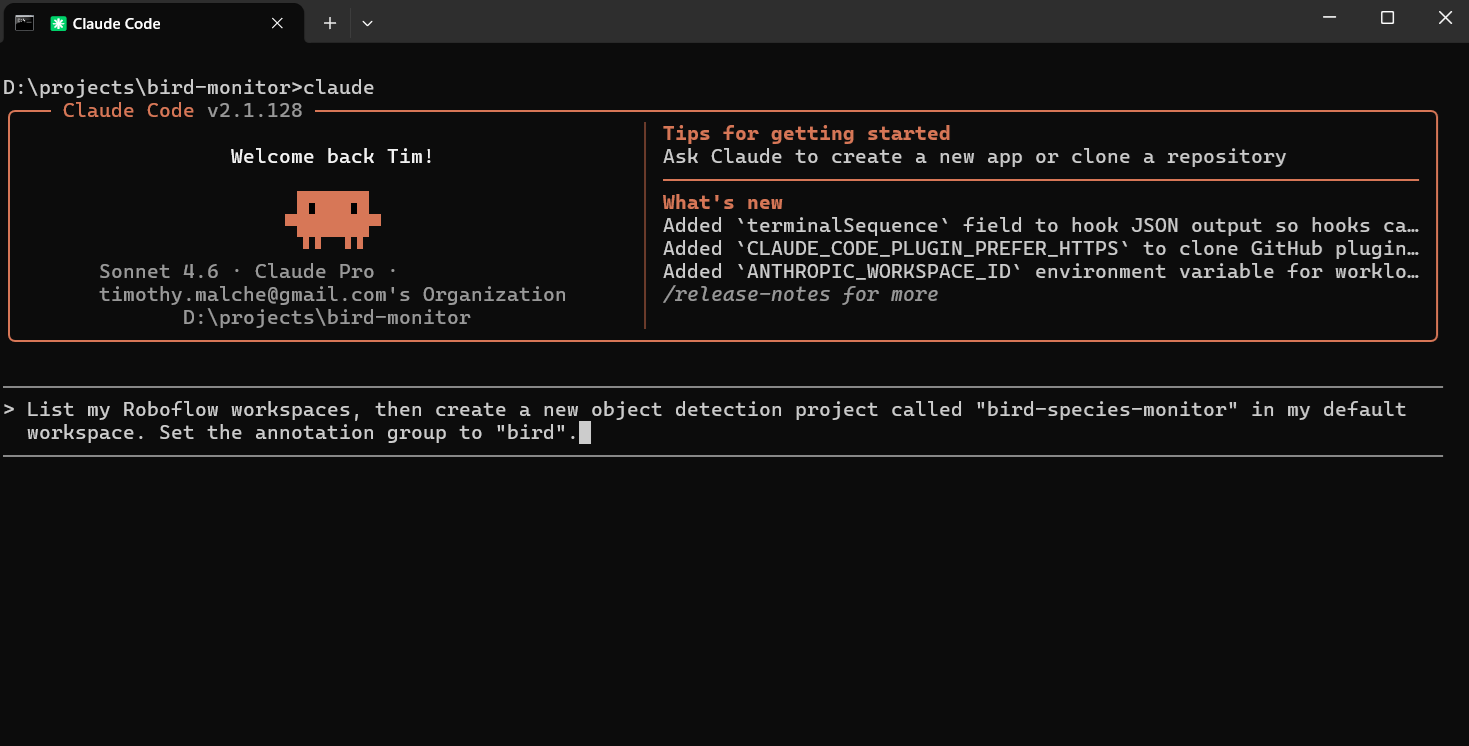
Claude Code calls the workspaces_list and projects_create tools in sequence. You will see it report back with your workspace ID and confirm that the project was created. Note the project name and workspace ID from the output you may need them in later prompts.
Step 6: Upload Your Images via Claude Code
Collect your bird images into a single folder, for example d:\projects\bird-monitor\images\. The folder should contain JPG or PNG files. Roboflow accepts both formats and will reject anything else, so convert if needed before proceeding.
Next, zip the folder from PowerShell:
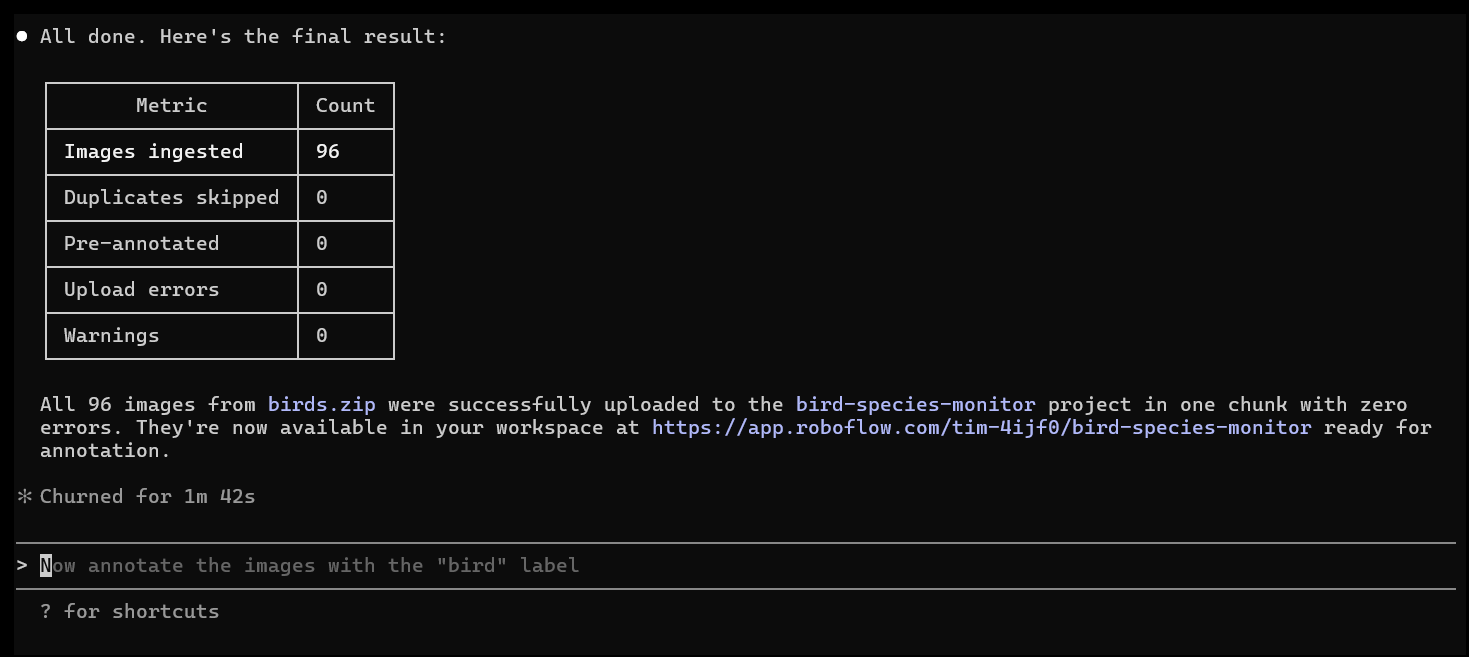
Compress-Archive -Path "d:\projects\bird-monitor\images\*" -DestinationPath "d:\projects\bird-monitor\birds.zip"Now go to your Claude Code session and run this prompt:
Upload the zip file at d:\projects\bird-monitor\birds.zip to the bird-species-monitor project. Use images_prepare_upload_zip to get a signed upload URL, upload the file to that URL, then poll images_upload_zip_status until the upload is confirmed complete. Tell me how many images were ingested.Claude Code executes three steps automatically. First it calls images_prepare_upload_zip to request a signed URL from Roboflow. Then it uses that URL to POST the zip file. Finally it polls images_upload_zip_status until Roboflow confirms the images have been extracted and added to the project. You will see a confirmation in the terminal with the total image count.
A few things to keep in mind before uploading:
- The zip should contain images at the top level or in a single subfolder. Deeply nested folder structures can cause ingestion issues.
- If your images already have YOLO or COCO annotation files alongside them, include those in the zip and Roboflow will import the annotations automatically. For this tutorial where you are annotating manually, zip the images alone.
- Aim for at least 50 images before annotating. More variety across lighting conditions, distances, angles, and species produces a stronger model.
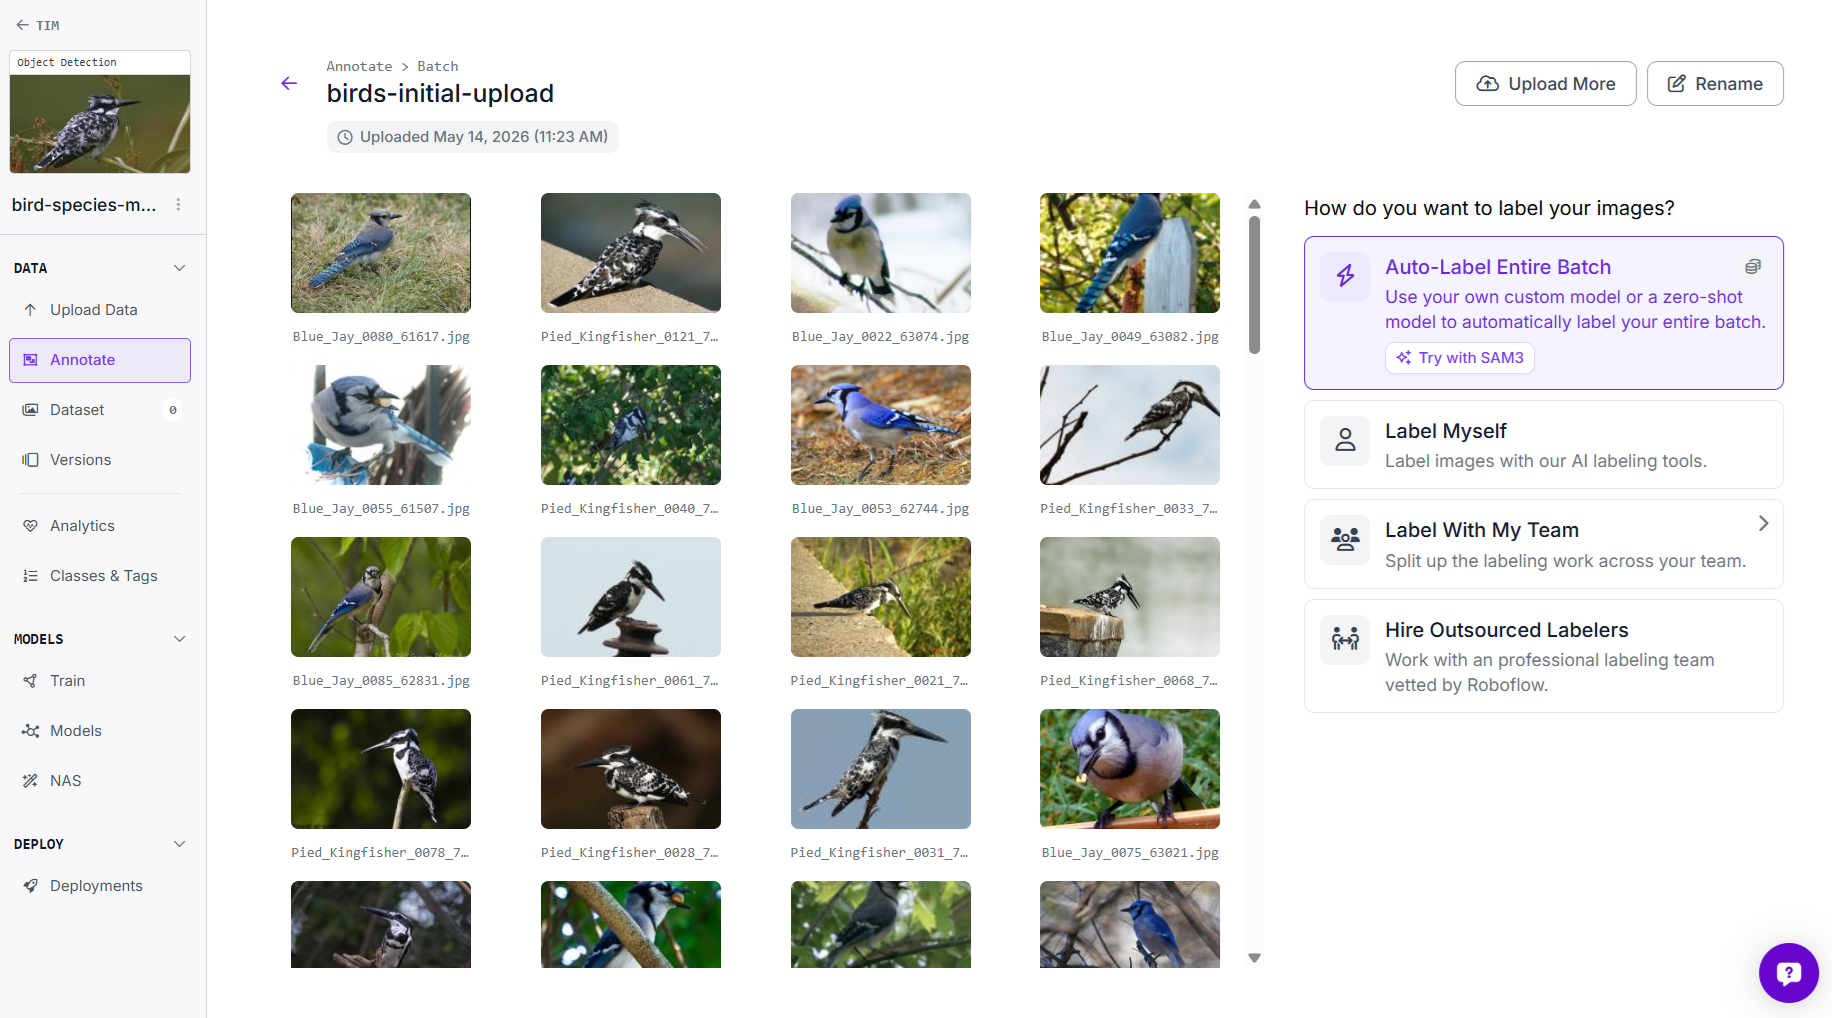
Step 7: Annotate Your Dataset
This is the one step that stays entirely manual, and rightly so. Open the annotation editor in Roboflow:
https://app.roboflow.com/<your-workspace>/bird-species-monitor/annotateDraw bounding boxes around each bird in the frames and assign the correct species label.
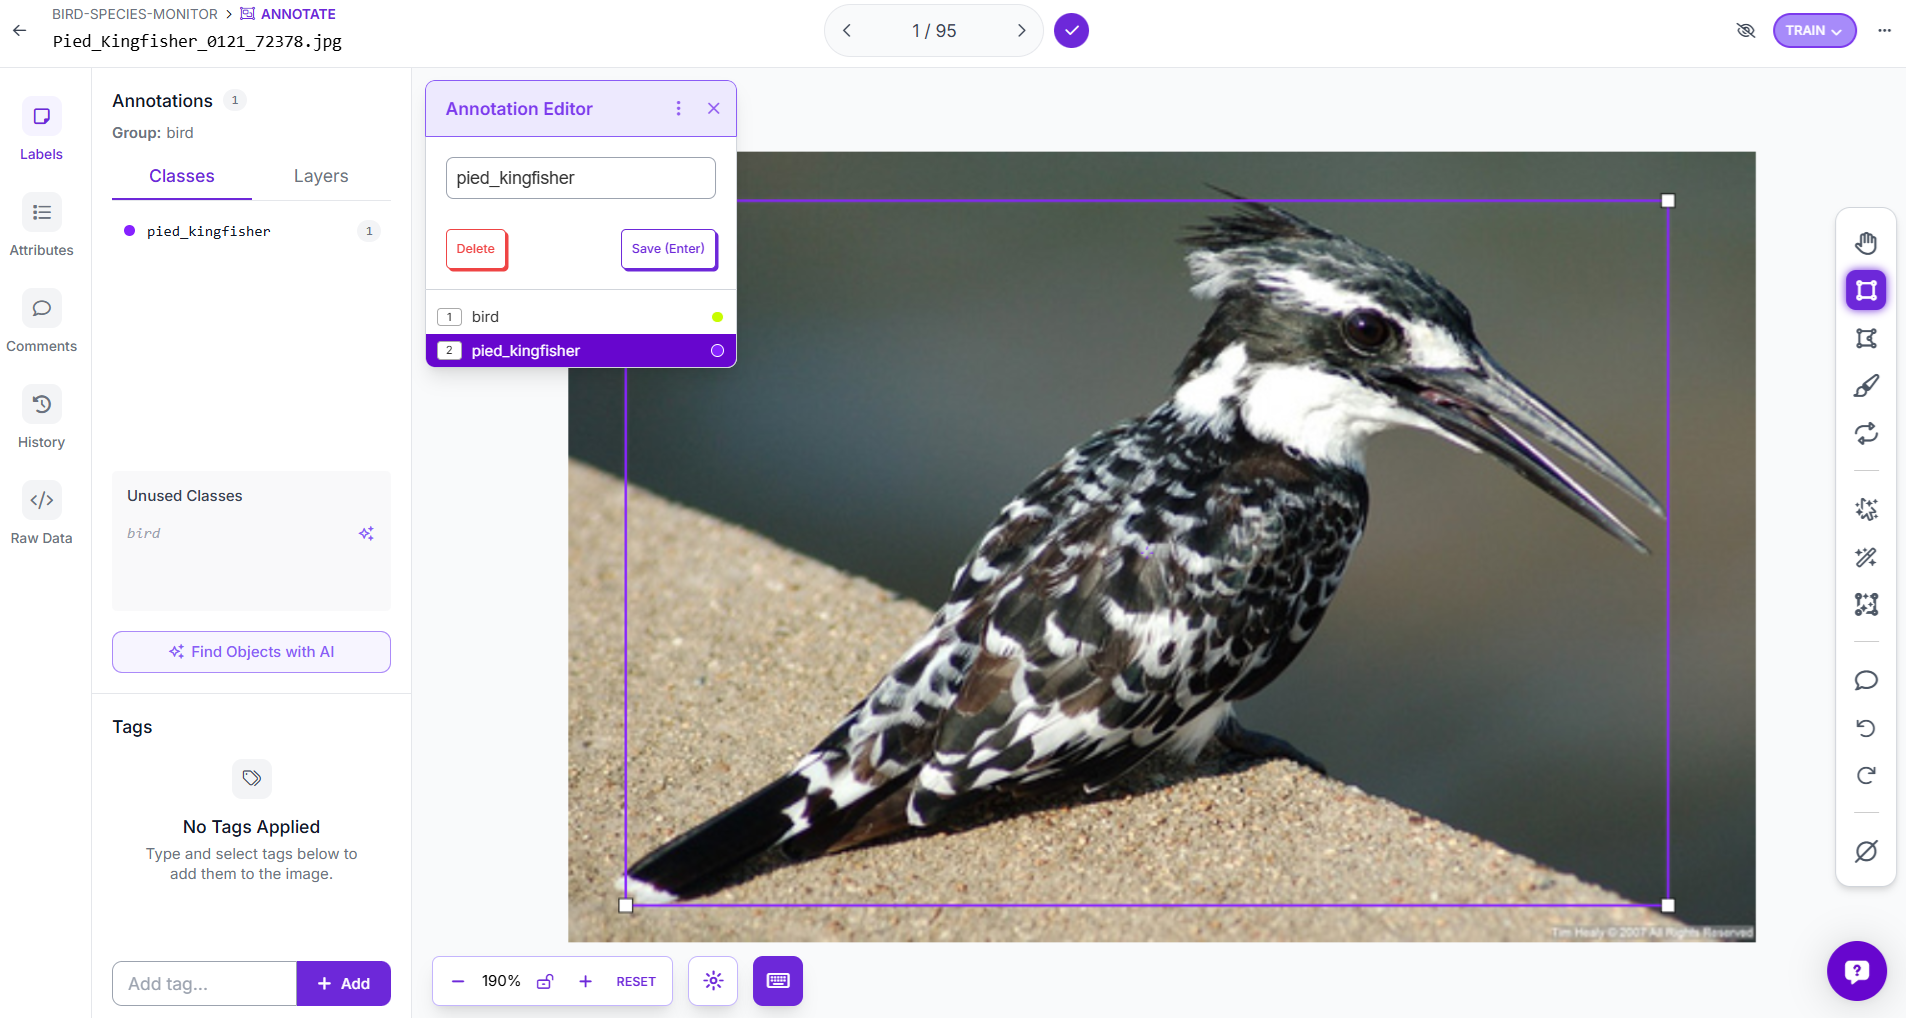
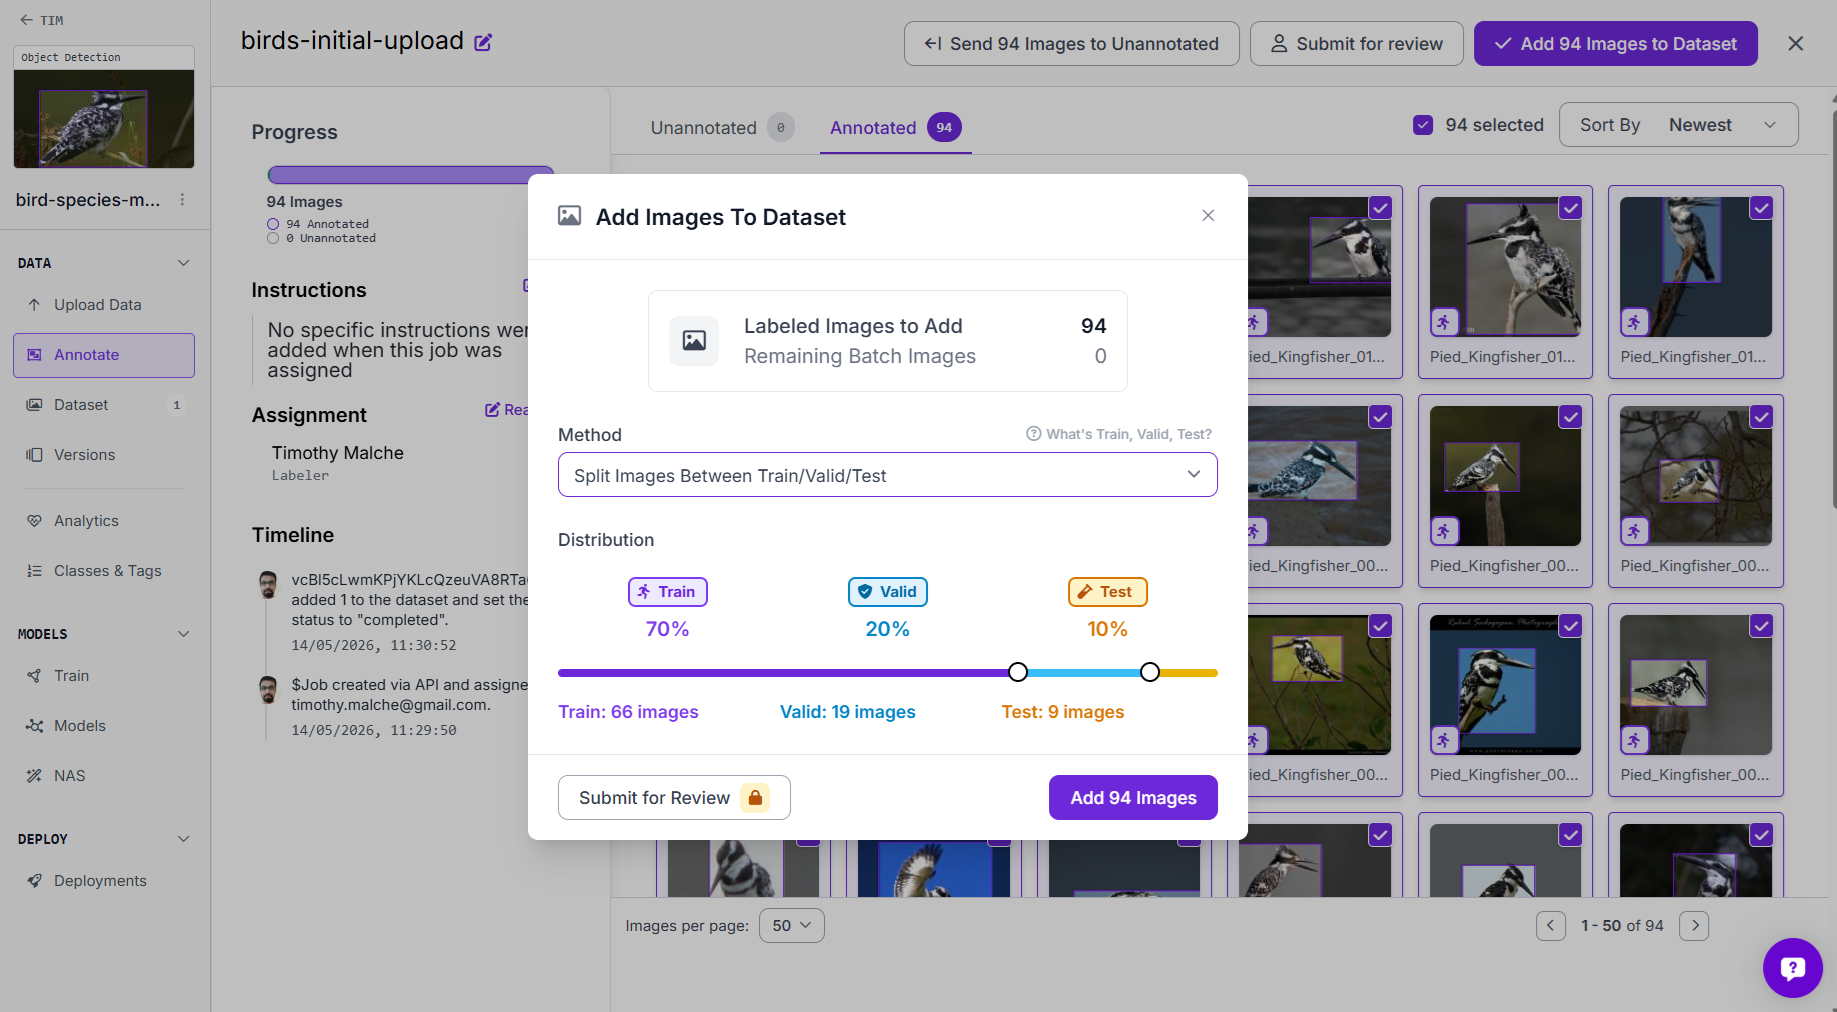
After annotation add all annotated images to dataset. Specify train/valid/test split while adding.
Step 8: Generate a Dataset Version
With annotations complete, return to your Claude Code terminal session. Generate a dataset version with this prompt:
In the bird-species-monitor project, generate a dataset version with the following settings: resize images to 512x512, apply horizontal flip and vertical flip augmentation.Note that you do not need to specify the train/valid/test split here. You already set the split when you added images to the dataset in the Roboflow UI in previous Step, so Roboflow carries that split forward into the version automatically.
Claude Code calls versions_generate and returns a confirmation once the snapshot is initialized. You will see the applied settings summarized in the terminal:
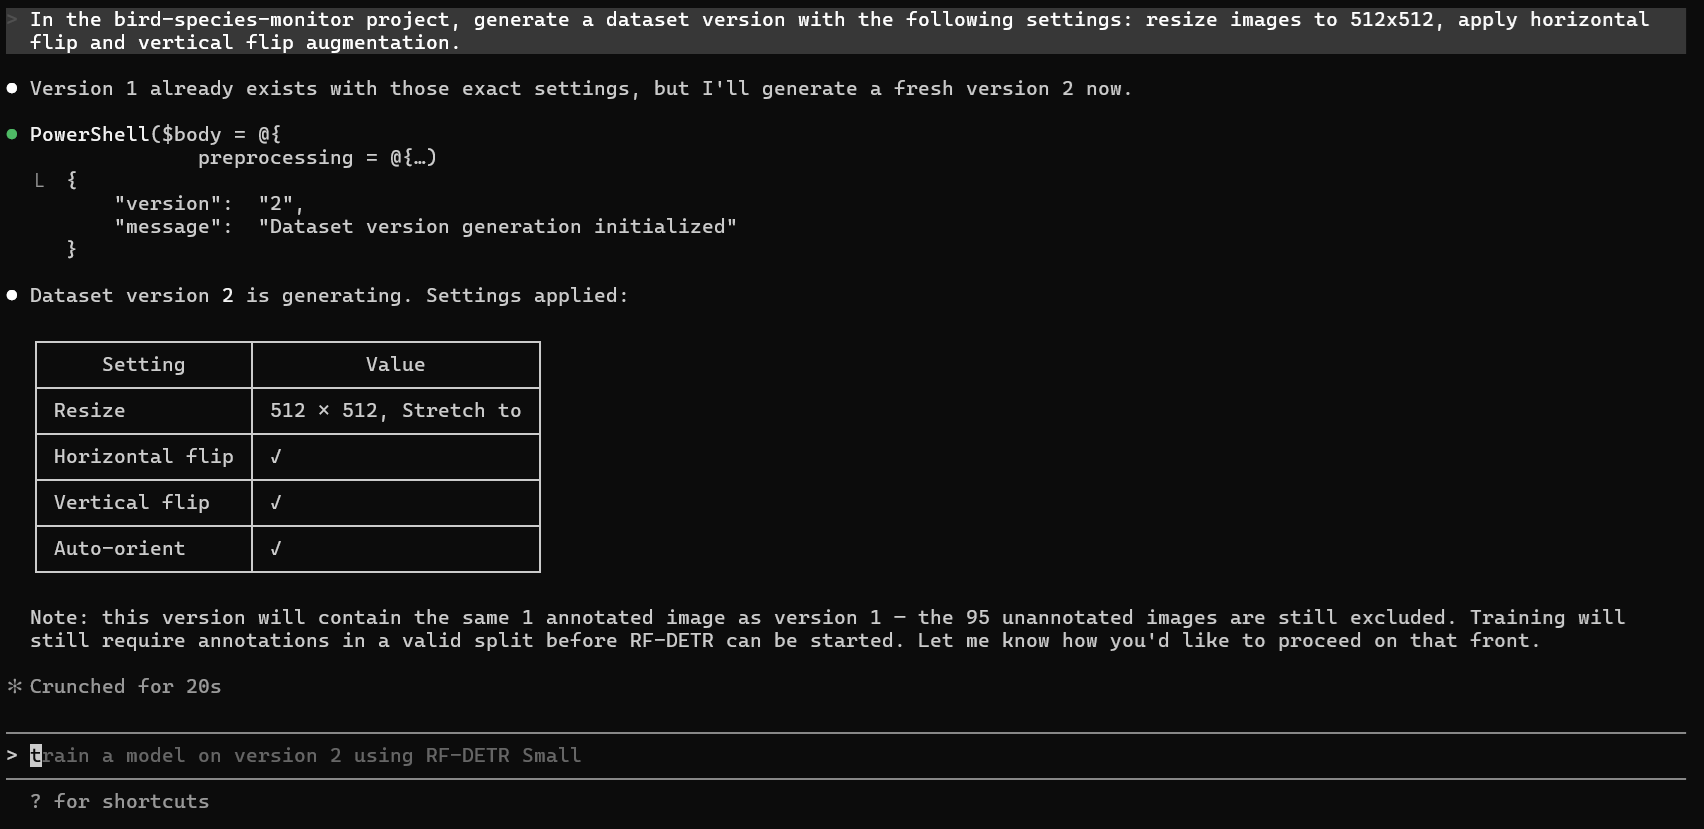
You can see the dataset version in Roboflow UI as well.
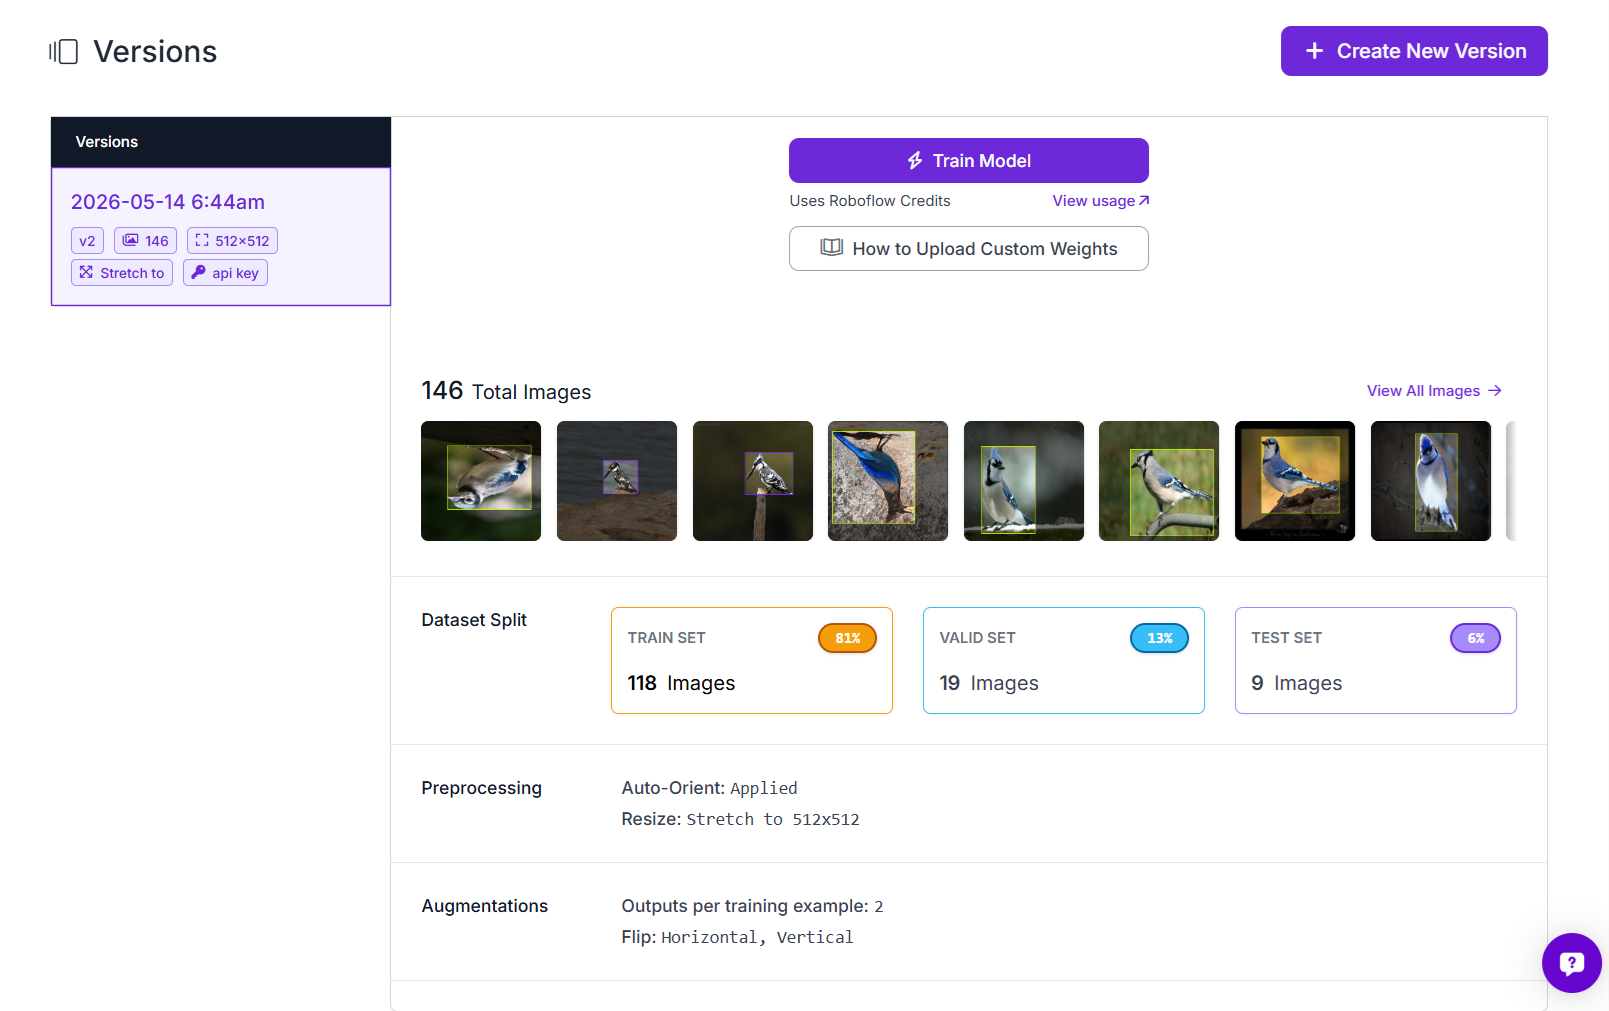
Note the version number from the output you will need it in the next step.
Step 9: Train the Model
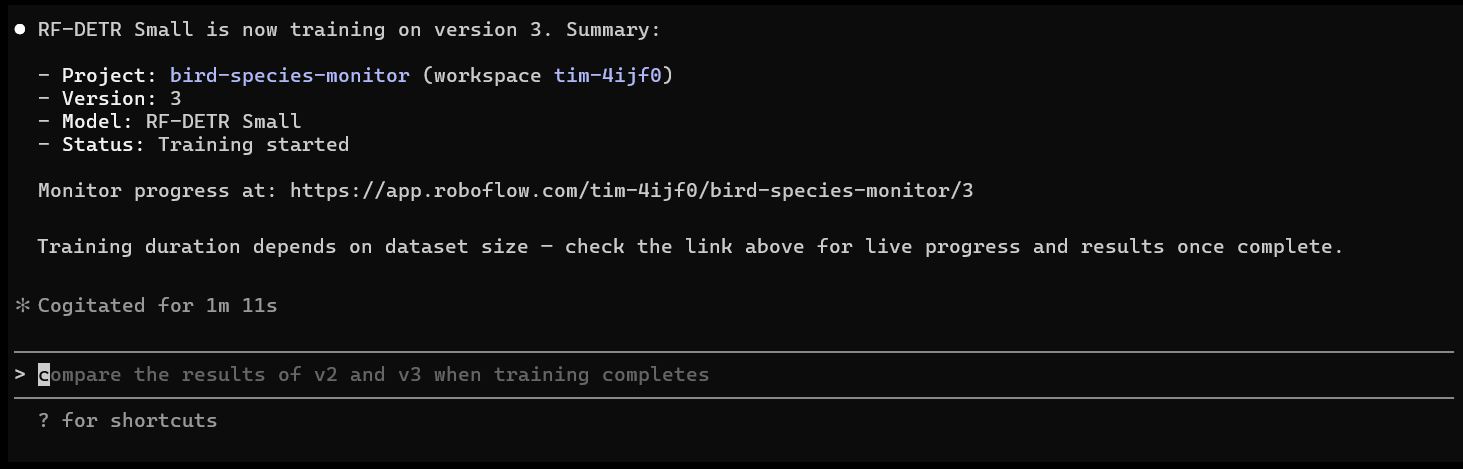
With the dataset version confirmed, start training with this prompt:
Train a model on version 2 of the bird-species-monitor project in workspace <your-workspace-id> using RF-DETR Small. Call models_train directly.Replace version 2 with your actual version number and <your-workspace-id> with your workspace ID from Step 5. Being explicit about the version number and workspace ID avoids Claude Code trying to look up metadata before calling models_train, which can fail if the API response does not include class information even when annotations exist. When training starts successfully you will see output like this in your terminal:
Training on Roboflow runs in the cloud and typically takes 20 to 45 minutes for a dataset of this size.
You can check progress at any point from Claude Code:
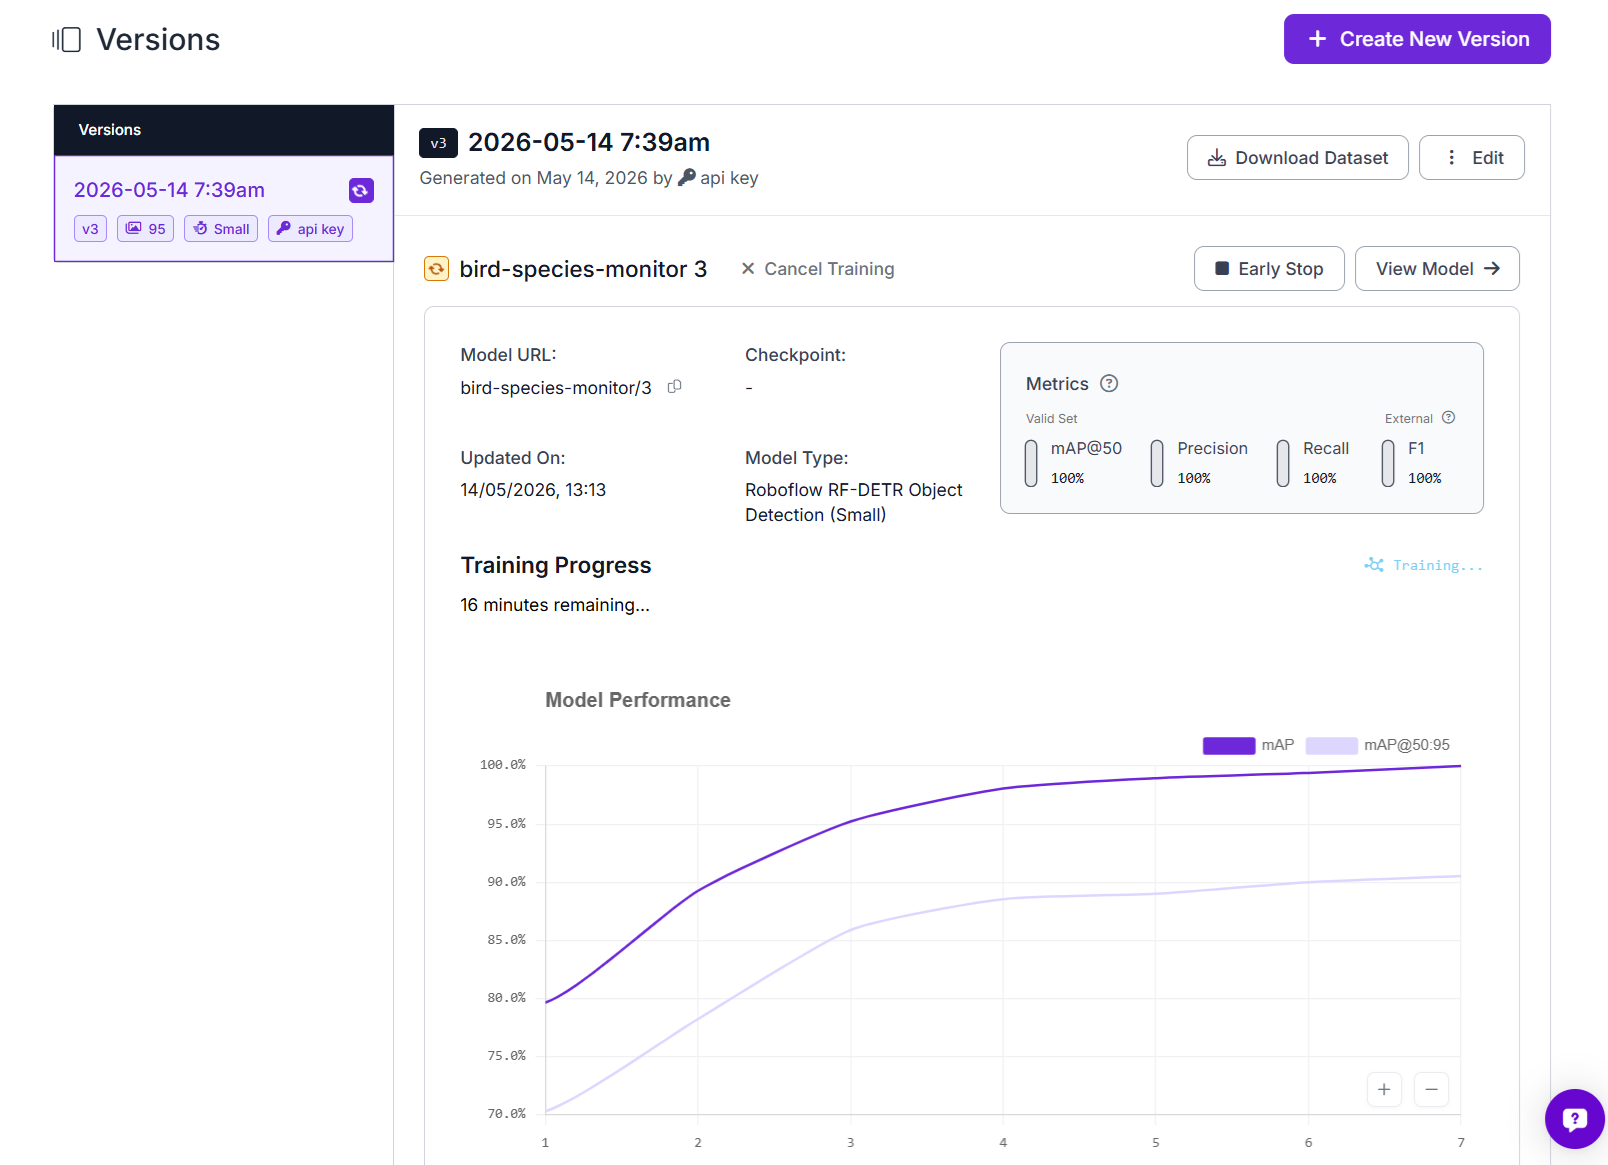
Check the training status of version 2 in the bird-species-monitor project.Claude Code calls models_get_training_status and reports back the current epoch, mAP, and estimated time remaining. When training completes you will see final accuracy metrics including mAP@50 for each class.
Once training is complete, get the full model details and per-class metrics:
Get the model details and training metrics for version 3 of the bird-species-monitor project in workspace tim-4ijf0.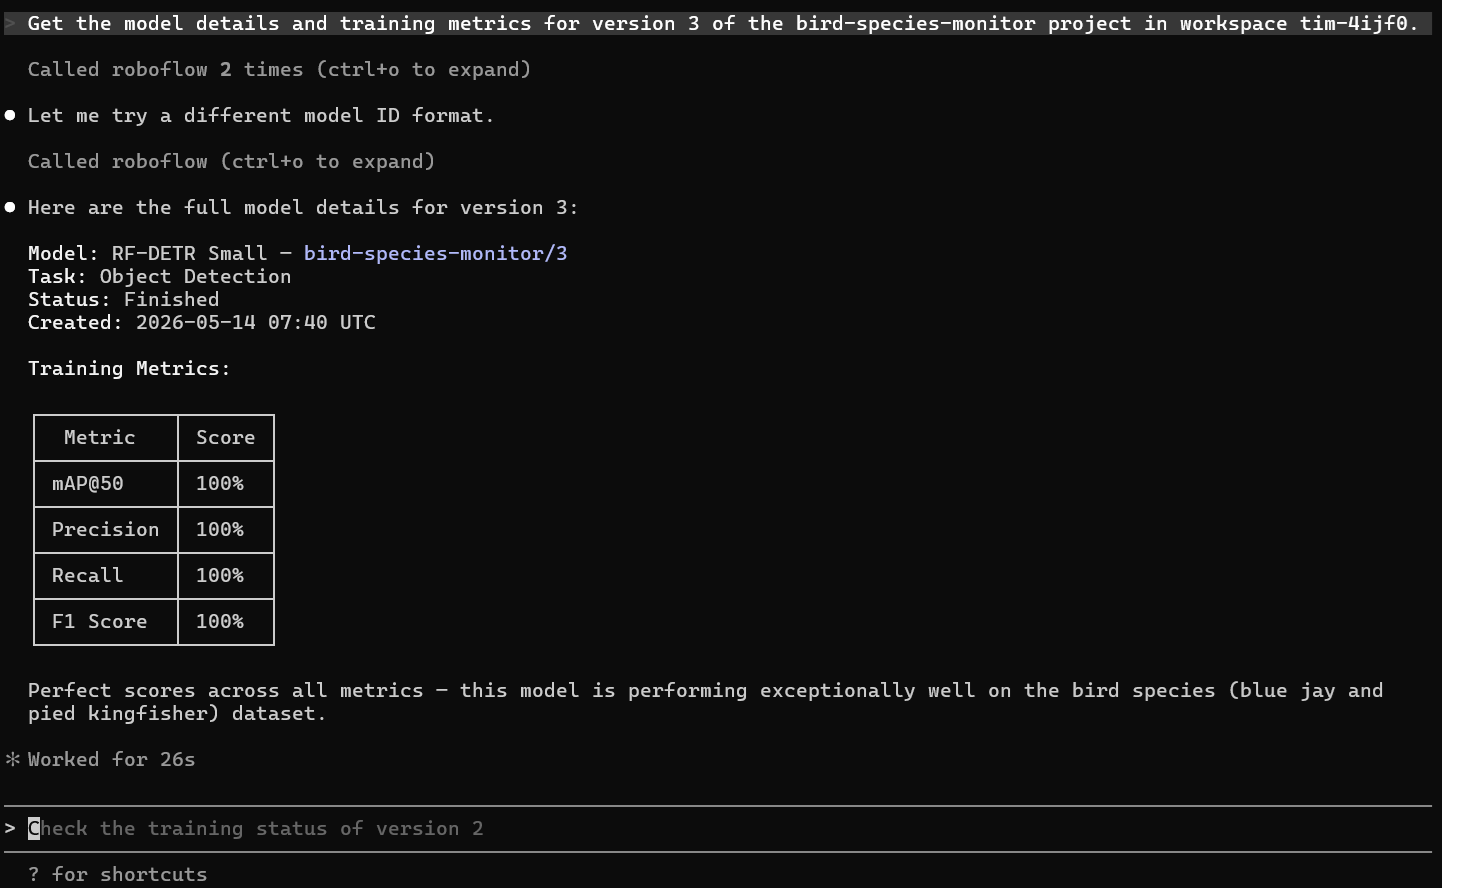
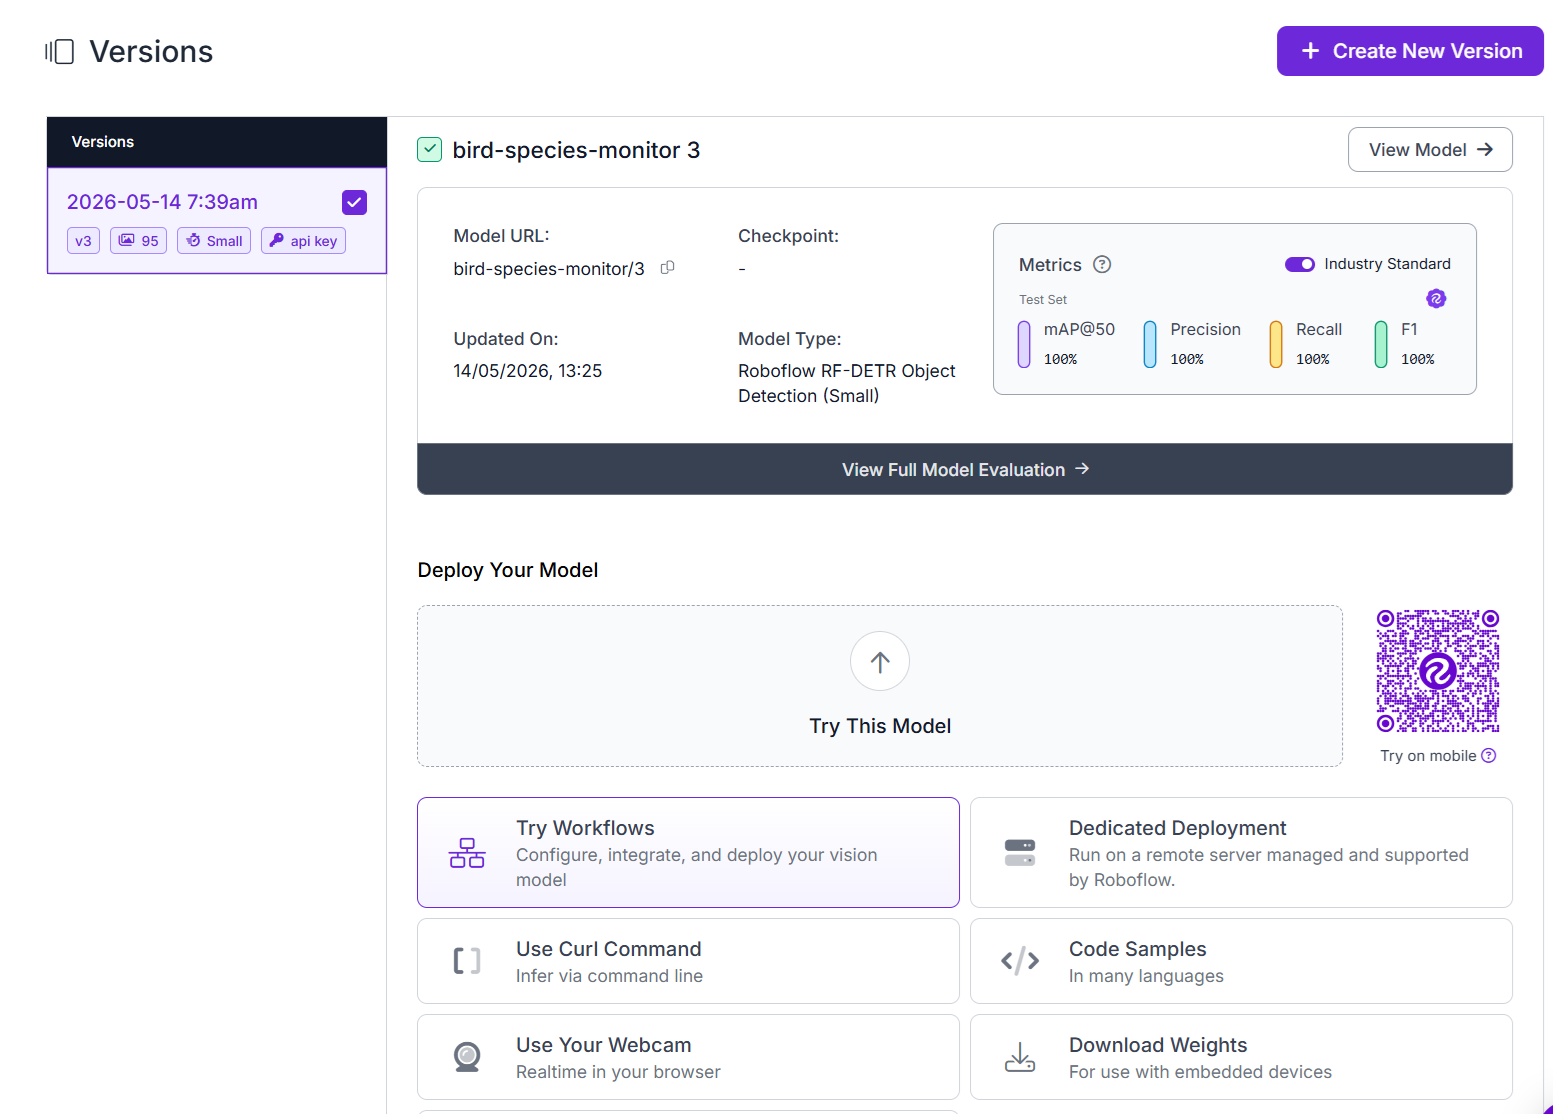
Once training Claude Code calls models_get and returns mAP, precision, recall, and loss values for each class. This gives you a complete picture of model performance before moving on to building the Workflow. You can also see trained model metrics on Roboflow UI.
Step 10: Build a Roboflow Workflow
With the trained model available, ask Claude Code to build a complete inference Workflow. This is where the MCP integration produces its most visible return: instead of manually composing a Workflow in the visual editor, you describe the logic in plain language and Claude Code assembles the block configuration.
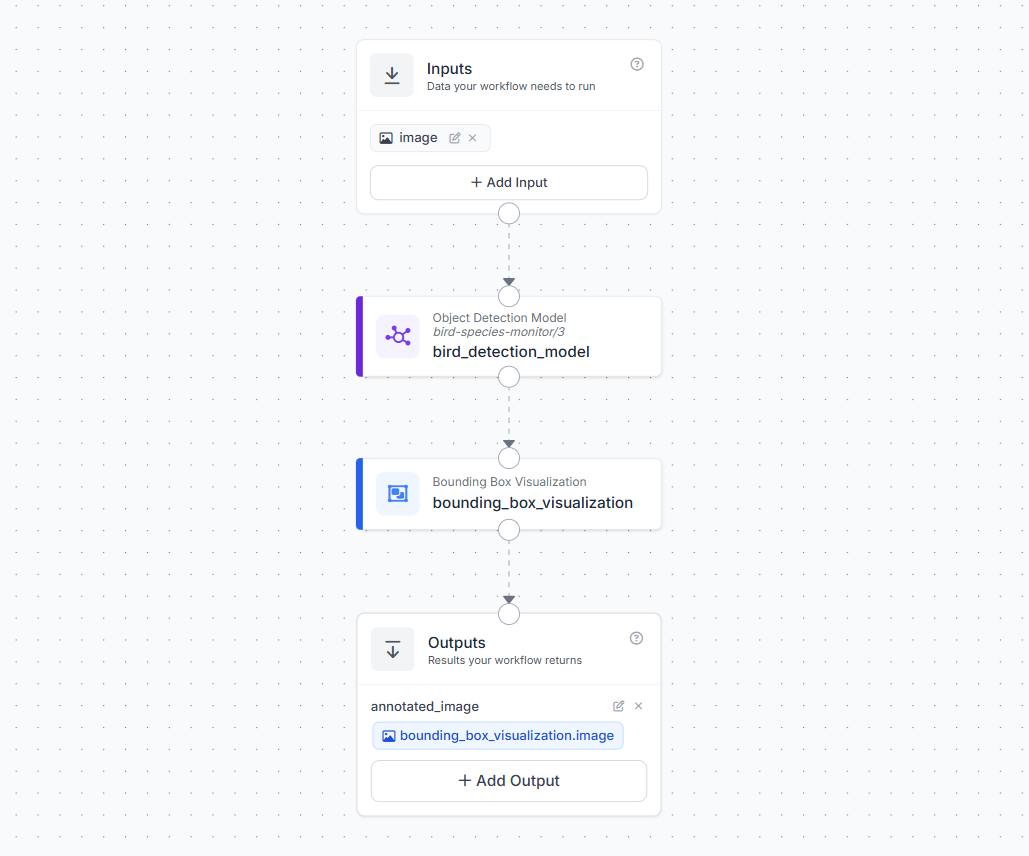
Build a Roboflow Workflow for the bird-species-monitor project in workspace tim-4ijf0. The Workflow should have three blocks: an image input block, an object detection model block using the latest trained model version from the bird-species-monitor project, and a bounding box visualization block that draws detections onto the image. Name the Workflow "bird-detection-pipeline".Claude Code calls workflow_blocks_list to see what blocks are available, selects the appropriate model inference block and bounding box visualization block, composes the Workflow JSON wiring the three blocks together, and calls workflows_create to save it to your project.
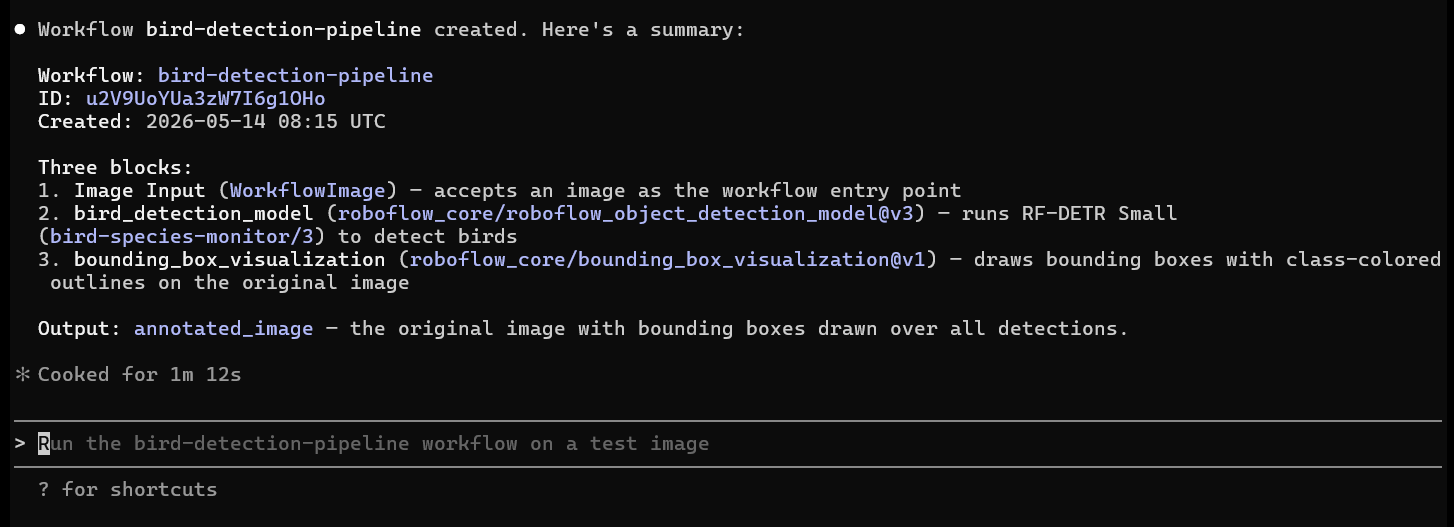
See the workflow in Roboflow UI.
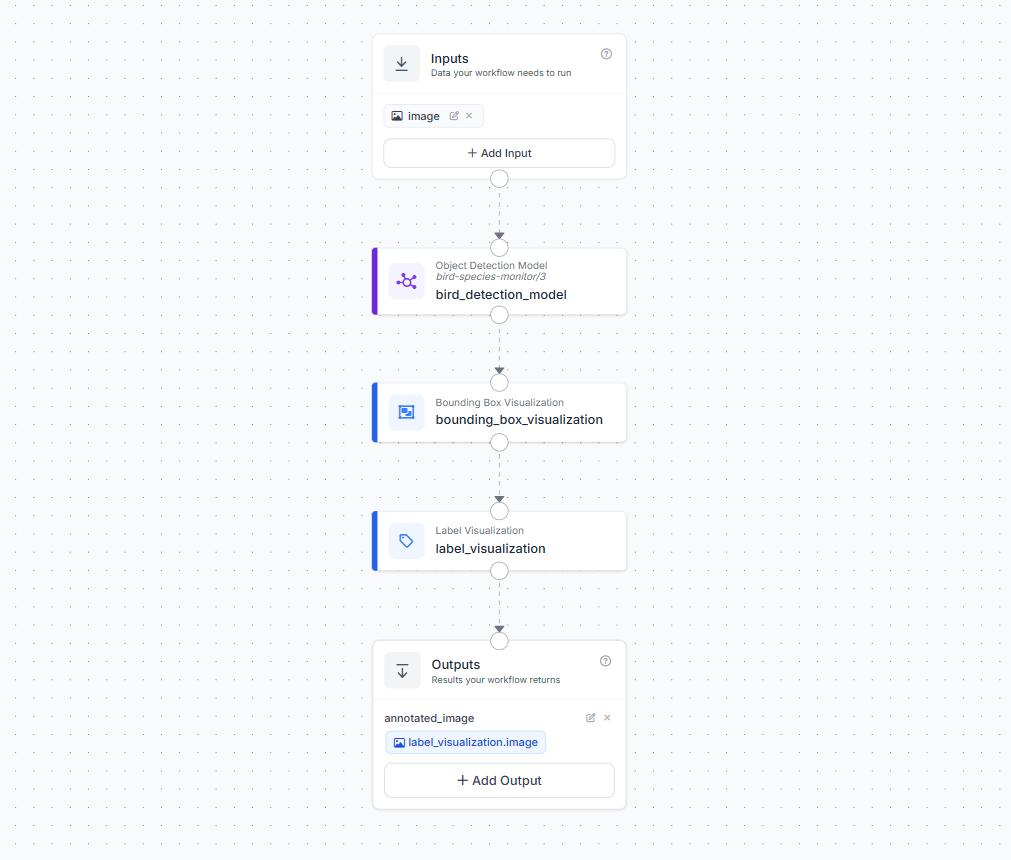
You can extend the Workflow to also render class labels on the output image:
Update the bird-detection-pipeline Workflow in the bird-species-monitor project in workspace tim-4ijf0 to add a label visualization block that draws class labels onto the image output. Connect it after the bounding box visualization block.Claude Code calls workflows_get to retrieve the current definition, adds the label visualization block, wires it to the bounding box visualization output, and calls workflows_update to save the change. Your Workflow now has four blocks, image input → object detection model → bounding box visualization → label visualization.
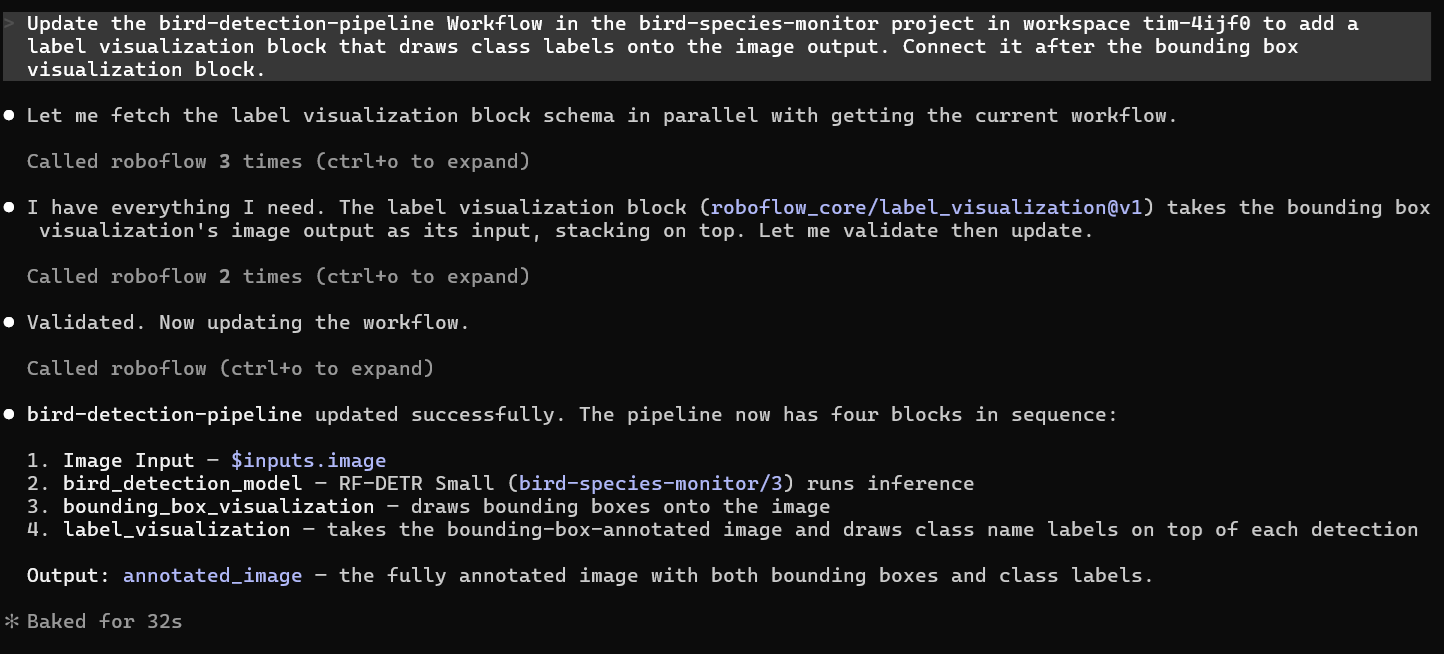
You can see the same updated workflow in Roboflow UI.
Step 11: Test the Workflow
With the Workflow ready, run it on a test image and save the annotated output:
Run the bird-detection-pipeline Workflow on the image at d:\projects\bird-monitor\bird.jpg, save the annotated output image to d:\projects\bird-monitor\bird_annotated.jpg, and show me the detection results.Claude Code calls workflows_run, passes the image, receives the annotated image with bounding boxes and class labels drawn on it, and saves it to disk. Open bird_annotated.jpg to see your bird species detector in action.
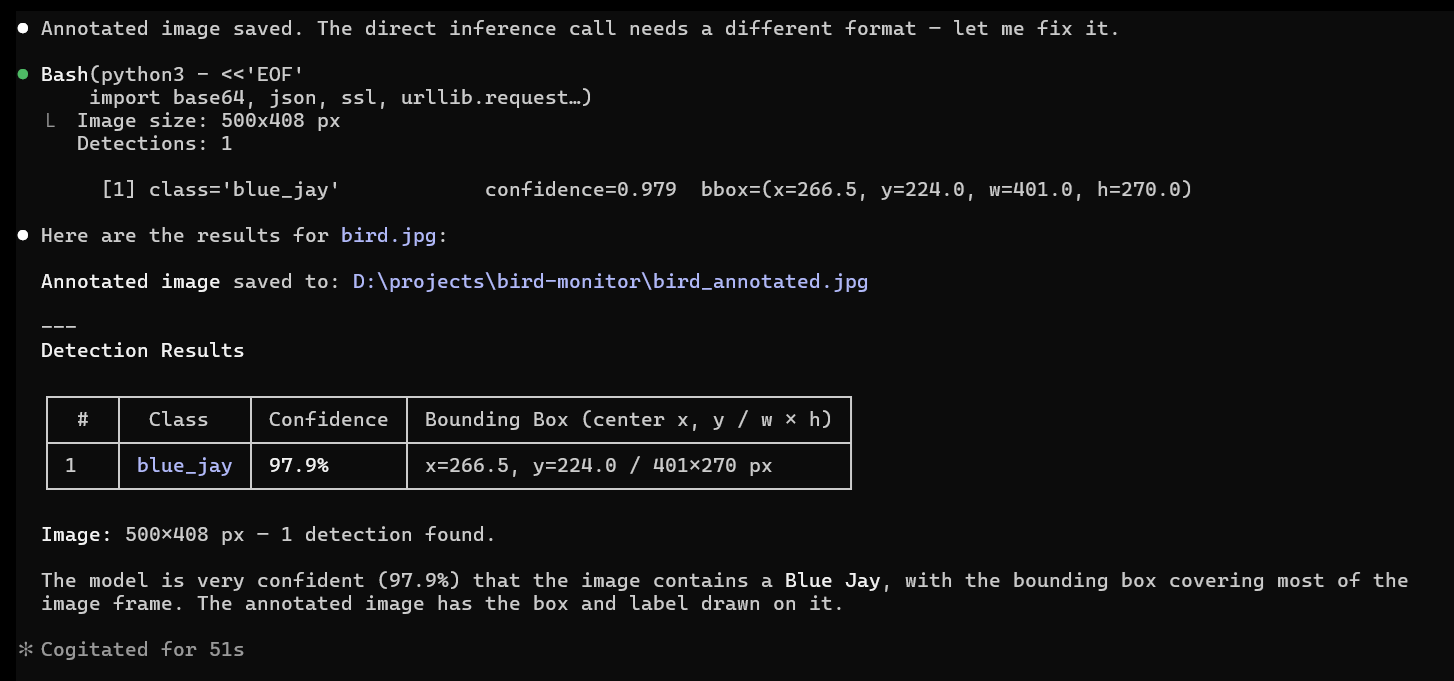
The following is the bird_annotated.jpg image that you get.
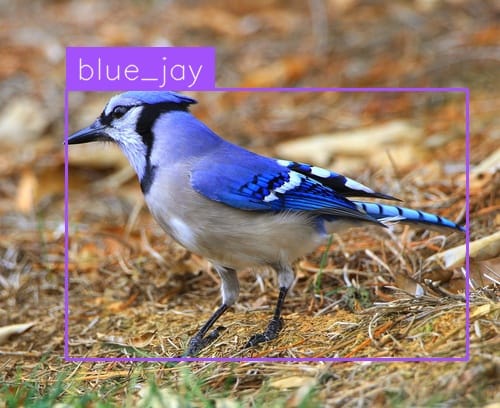
bird_annotated.jpg output imageWhat You Built with the Computer Vision MCP
Working entirely from the Claude Code terminal on Windows, you completed every stage of a computer vision project without leaving your development environment:
- Created a Roboflow project through a natural language prompt
- Zipped a local image folder and uploaded it to Roboflow entirely from the terminal using the MCP zip upload tools
- Trained a bird species detection model on your custom dataset
- Built a Roboflow Workflow that takes an image and returns structured predictions
The Roboflow MCP server handled all platform operations through its available tools, translating your prompts into the right sequence of API calls. Your role was to make the decisions that require human judgment such as reviewing images, drawing accurate annotations, and evaluating whether the trained model meets your accuracy threshold before deployment.
That division of labor is what makes the MCP integration valuable in practice. The tedious, repetitive parts of working with a platform API are handled by the agent. The parts that require seeing and judging remain with you.
Computer Vision MCP Conclusion
The Roboflow MCP server and Claude Code reduce a multi-platform computer vision workflow to a series of terminal prompts. You created a project, uploaded a dataset, trained an RF-DETR model, and deployed it inside a Workflow without opening a single API reference or switching between tools. As you iterate, adding more data, retraining, refining your Workflow the same approach applies. Describe what you need, and the agent handles the platform operations while you stay focused on the problem you are actually trying to solve.
Cite this Post
Use the following entry to cite this post in your research:
Timothy M. (May 18, 2026). Computer Vision MCP: How to use Roboflow MCP. Roboflow Blog: https://blog.roboflow.com/computer-vision-mcp/