
Imagine training a robot to understand the world through its eyes. You show it a photo of a cat and tell it, "This is a cat." Then a photo of a dog, "This is a dog." But the robot doesn’t just need to recognize them, it needs to know “where the cat is sitting?”, “which part is the tail?”, or “does dog has something in its mouth?”. To make this possible, you must label images with detailed information. This process is called data annotation, and it’s the foundation of teaching machines to see like humans. In the vast field of computer vision, the accuracy of a model depends heavily on the quality and precision of the data it's trained on. Today we'll share some of the best data annotation platforms to set your computer vision projects up for success.
What Is Data Annotation in Computer Vision?
Data annotation is a fundamental step in building computer vision systems. It involves labeling visual data, such as images or video frames, with information that a machine learning model can use to learn how to recognize and interpret visual patterns. These labels act as the ground truth, guiding the model during training so it can learn to make accurate predictions when exposed to new, unseen data.
In the context of computer vision, the type and format of annotation vary depending on the specific task the model is being trained for. Below are the most common types of data annotation techniques used to prepare datasets for tasks such as image classification, object detection, segmentation, pose estimation, and more.
Classification Label
Classification label assigns a single tag or class to an entire image. This means that the image is labeled as a whole, without specifying where objects are located within it. Classification labels are used in image classification tasks, where the goal is to teach the model to categorize images into predefined classes. For example, in a plant disease dataset, one image might be labeled as “healthy” while another as “early blight”. The model learns to classify new images into one of these categories based on visual patterns.
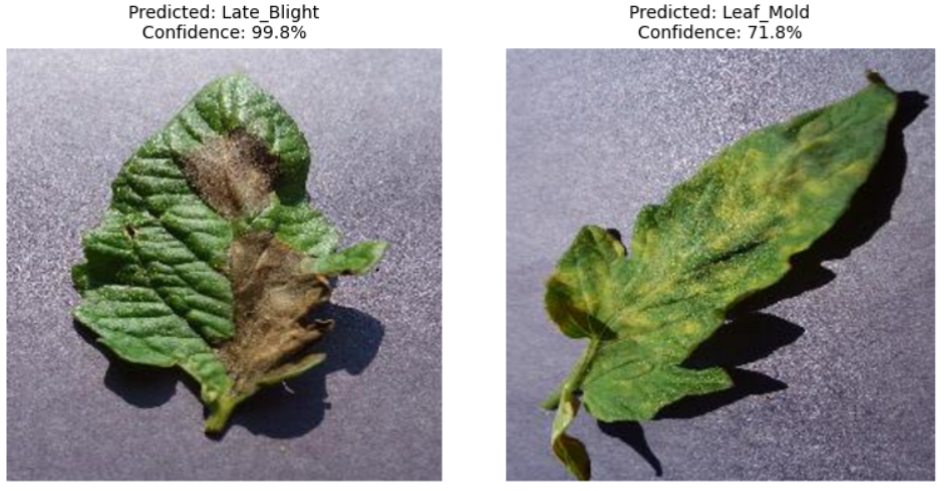
Classification labels are the simplest form of annotation and are highly effective when object location isn't necessary, only the category is important.
Bounding Box
Bounding box is a rectangular annotation drawn around objects in an image. Each box is typically associated with a class label, indicating what the enclosed object is. Bounding box is used in object detection tasks where the model needs to both locate and classify multiple objects in an image. For example, detecting and labeling all cars, people, and bicycles in a street scene. Each object is enclosed in a box labeled “car”, “person”, etc.

Bounding box offer a balance between annotation detail and efficiency, making it ideal for real-time applications like autonomous vehicles and video surveillance.
Polygon
Polygon annotations are made by connecting a series of points to outline the exact shape of an object. Unlike bounding boxes, which are always rectangular, polygons can follow an object’s true contours. Polygons can be used in instance segmentation and semantic segmentation tasks where precise object boundaries are needed. For example, outlining the silhouette of a dog, the exact boundary of a road sign, or the shape of a building’s roof in satellite imagery.
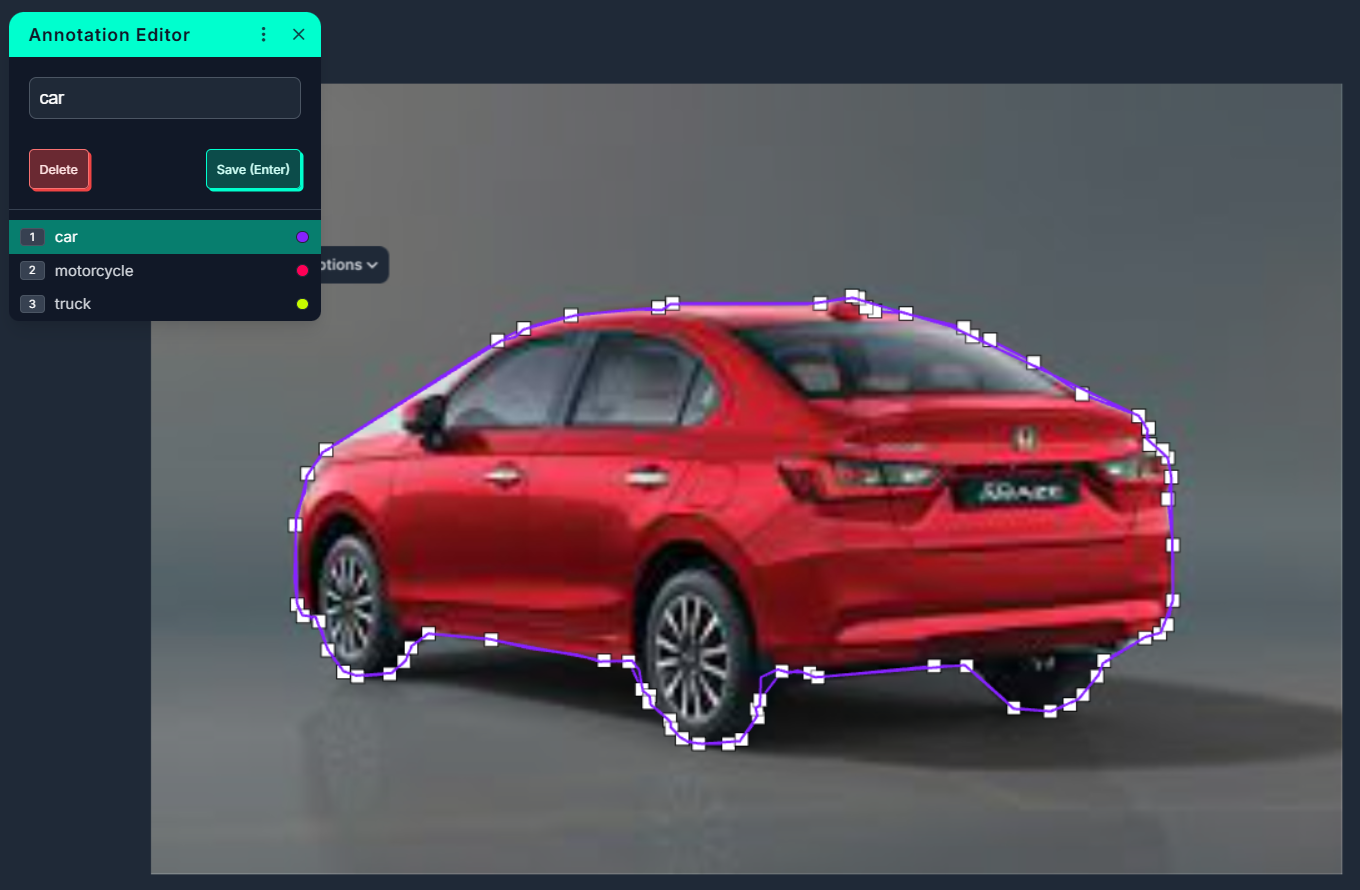
Polygons provide more accuracy than bounding boxes, especially when dealing with irregular shapes or when objects are tightly packed together or overlapping.
Keypoint
Keypoints are individual coordinates marked on specific parts of an object. These are often used to track motion or structure by highlighting critical points. Keypoints are used in pose estimation, facial recognition, and gesture detection tasks. Examples of keypoints are marking joints like shoulders, elbows, and knees in human pose datasets, or identifying the corners of the eyes, nose, and mouth in facial landmark detection.

Keypoint annotations are crucial for understanding fine-grained object structure and movement, enabling applications like fitness tracking, virtual try-ons, and sign language interpretation.
Segmentation Mask
Segmentation involves labeling every pixel in an image with a class. There are two main types:
- Semantic segmentation assigns a class to every pixel (e.g., road, tree, building).
- Instance segmentation not only classifies pixels but also distinguishes between different instances of the same object class.
Segmentation masks are used when pixel-level precision is required, such as in medical imaging, autonomous driving, or agriculture. For example, in an aerial farm image, labeling each pixel as “crop”, “soil”, or “weed”. In a CT scan, marking every pixel that represents a tumor.
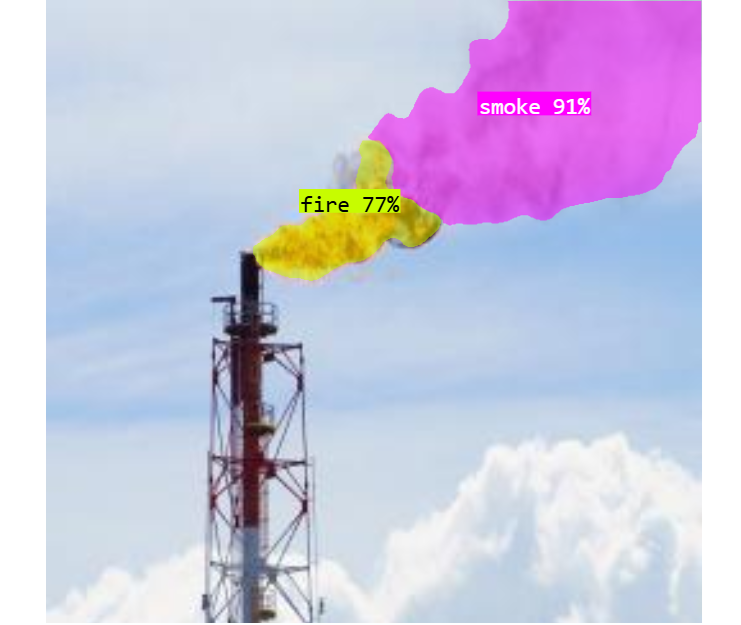
Segmentation masks provide the most detailed understanding of the visual content and are essential for tasks where exact object boundaries matter.
How to Evaluate the Best Data Annotation Platforms
Selecting the right data annotation platform is one of the most critical decisions in any machine learning or computer vision pipeline. A high-quality annotation tool directly impacts the accuracy of your AI models, the efficiency of your team, and the cost and scalability of your labeling process. But with so many tools available, how do you determine what is best for your use case?
Here are the most important factors that define a great data annotation platform:
Annotation Tool Capabilities
At its core, an annotation platform must support the types of tasks your model is being trained for. These include:
- Classification Labels: Labeling an entire image with a single class.
- Bounding Boxes: Drawing rectangles to locate objects (used in object detection).
- Polygons: Outlining irregular object shapes for instance or semantic segmentation.
- Keypoints: Identifying specific coordinates (e.g., facial landmarks or body joints).
- Segmentation Masks: Pixel-level annotations for detailed scene understanding.
- Video Annotation: Labeling objects across multiple frames with interpolation.
- 3D Annotation: Labeling volumetric data like LiDAR or CT/MRI scans (less commonly supported).
While looking for such features key questions to ask are:
- Does it support all required annotation types?
- Can it handle video annotation, not just images?
- Does it support multi-class and multi-label annotations in the same image?
- Can it annotate nested structures (e.g., objects within objects)?
- Does it support 3D annotation (if needed)?
The performance of AI model largely depends on the quality and structure of annotations. If your use case needs pixel-perfect masks, a tool limited to bounding boxes won't be enough.
User Interface & Usability
A smooth, intuitive user interface is essential especially when thousands of images need to be annotated. The platform should feel natural, ergonomic, and non-frustrating for both individual annotators and teams. Good UI features include:
- Hotkeys and shortcuts to reduce repetitive clicks.
- Zoom/pan and object snapping for precision work.
- Undo/redo, object cloning, and label autocomplete.
- A clean layout that doesn’t distract from the image being labeled.
- Dark/light mode and accessibility support for diverse users.
A well-designed UI can double productivity and significantly reduce annotation fatigue or errors. The user interface should be intuitive, fast, and minimize user fatigue. The UI related features that you should be looking for are:
- Smooth drawing tools (snapping, zoom, drag-and-drop).
- Hotkeys and shortcuts for faster labeling.
- Image navigation (next/prev, filter by label, bulk actions).
- Keyboard vs. mouse efficiency.
- Auto-save and undo/redo functionality.
Annotation is repetitive. A clean, easy-to-use UI reduces annotation time, errors, and fatigue especially on large datasets.
Speed & Automation in Labeling
Manually labeling thousands of images is time-consuming. The best platforms accelerate this with automation tools, which may include:
- Pre-labeling with AI models (e.g., SAM, Grounding DINO).
- Smart drawing tools like auto-segmentation or polygon expansion.
- Active learning loops, where models learn from user corrections and improve labeling over time.
- Interpolation tools for labeling objects across video frames without redoing each frame.
These features reduce annotation time, improve consistency, and allow human annotators to focus on edge cases and corrections rather than every label. An annotation platforms must help in speed up labeling through automation. While looking for such features in a tool you may ask:
- Can it use pre-trained models to suggest annotations?
- Can you connect your own models for active learning or pre-labeling?
- Does it support interpolation tools especially for video and time-series annotation?
- Does it provide semi-automatic labeling feature like click to outline, smart polygon, or image segmentation wizards?
Manual labeling is costly. The ability to automate 60-90% of annotations can save thousands of hours and reduce project timelines.
Project & Workflow Management
In real-world scenarios, annotation is rarely done by one person. It involves teams, review cycles, and quality assurance. The annotation tool should have the following capabilities in managing project and workflow:
- User roles: Assign different permissions (Annotator, Reviewer, Manager).
- Task assignment: Distribute images across users or groups.
- Quality control tools: Compare annotations from multiple users, calculate agreement scores.
- Commenting and issue tracking: Resolve label disputes or flag uncertainty.
- Progress tracking: Dashboards to monitor how much is labeled, reviewed, or needs fixing.
A good platform acts as a collaboration hub, not just a drawing tool because annotation often involves teams and multiple review stages. While looking for such features in a tool you may ask:
- Does the tool allow you to assign tasks to users?
- Are there roles and permissions (annotator, reviewer, admin)?
- Is there quality control (e.g., consensus scoring, inter-annotator agreement)?
- Can you track progress, stats, and annotator performance?
Large projects require scalable team workflows. Without built-in QA and task management, data quality and team coordination suffer.
Format & Dataset Export Support
The platform should integrate cleanly into your ML workflow by supporting all the necessary data formats. It should provide following features:
- Import support for images, videos (in case of Computer Vision model training).
- Export formats like YOLO, COCO, Pascal VOC, TFRecord, CSV, and JSON.
- Ability to convert between formats or export custom fields.
Flexibility in how data is stored, imported, and exported is key. While looking for these features you may ask:
- Can it import/export in popular formats? (YOLO, COCO, Pascal VOC, CSV, TFRecord, etc.)?
- Can you easily convert datasets between formats?
AI models often require specific formats. A good tool reduces the need for post-processing and format conversion headaches.
Extensibility & Integration
Modern AI workflows are complex. A good annotation platform must be programmable and extensible so that it can plug into your training and evaluation pipelines. A good annotation platform must provide:
- Python SDK and REST APIs to automate imports, task creation, and exports.
- CLI tools for scripting and integration with CI/CD pipelines.
- Model integration support (e.g., connect your model for auto-labeling).
- Cloud storage support: import/export from AWS S3, GCS, Azure.
The goal is for your annotation platform to act like a component in your AI system, not a siloed GUI. Great tools integrate seamlessly into your ML workflow. While looking for these features you may ask:
- Is there a Python SDK, REST API, or CLI tool?
- Can it integrate with cloud storage (S3, GCP, Azure)?
- Can it plug into training pipelines or MLOps platforms?
- Can you write plugins for custom logic or labeling workflows?
The best platforms act as part of your ML lifecycle, not a silo. Integration reduces friction between annotation and model training.
Cost, Licensing & Scalability
Annotation tools come in all shapes and pricing models such as:
- Open-source tools are free but may lack enterprise support.
- SaaS tools charge per seat, per task, or per dataset but also provides support and rich features.
- Some tools are standalone (local), while others are cross-platform or web-based.
- Evaluate limits in free plans (e.g., export restrictions, dataset caps).
Choose a platform that balances cost, features, and support for your team’s size and growth. Practical considerations often determine tool selection in real-world scenarios. The questions to ask are:
- Is it free, open-source, or subscription-based?
- Are there limits on dataset size, users, or annotation types in the free version?
- Does it scale to millions of images or support team collaboration?
- Is pricing based on seats, tasks, or storage?
- Does the tool provide plans for academic and research?
Startups and researchers may need cost-effective or open-source tools. Enterprises may require support, uptime guarantees, and data hosting.
A good annotation platform depends on the type of data you’re working with (images, video etc.), the complexity of the task (classification vs segmentation vs multi-modal), the team size and whether you require collaboration or automation and your need for privacy, customization, and cost-effectiveness. By carefully evaluating platforms across the criteria above, you can choose the tool that best aligns with your annotation workflow and ultimately produces better training data for your machine learning models.
The Best Data Annotation Platforms
In this section we will discuss some useful data annotation to meet the requirements of your computer vision projects.
1. Roboflow
Roboflow is an all-in-one platform for managing computer vision datasets, performing data annotation, augmentation, model training, and deployment. It supports a wide range of annotation types and formats and is widely used in both research and industry.
Following are the key features of Roboflow:
- Smart Annotation Tools: Supports bounding boxes, polygons, segmentation, keypoints and classification.
- AI Assisted labeling: Supports auto-labeling with pre-trained models and tools Label Assist, Smart Polygon, Box Prompting, Auto Label.
- Automated Preprocessing and Augmentation: Full support to pre-processing like auto-orientation, resizing, and data augmentation.
- Active Learning: Prioritizes labeling for images that improve model performance the most.
- Roboflow Universe: Open dataset repository with 200,000+ pre-labeled datasets.
- Model Training & Deployment: Train models using different architectures such as YOLO, RF-DETR etc., and deploy via API or edge devices.
- User Friendly UI: Provides a web-based, user-friendly GUI interface.
- Dataset versioning: Supports creation of different dataset versions.
- Integration: Supports seamless Integration with popular ML frameworks and direct dataset import and export.
- SDK Support: Provides REST API and Roboflow Python SDK for automation.
What’s unique about Roboflow?
Roboflow stands out with robust AI-powered annotation including Label Assist, Smart Polygon, Box Prompting, Auto Label, and recently launched Roboflow Instant which fully automates labeling for object detection, instance segmentation, and keypoint tasks using foundation models like Segment Anything and CLIP. Beyond annotation, Roboflow offers end-to-end model training and evaluation within its dashboard, supporting state‑of‑the‑art architectures (e.g., YOLOv11, YOLOv12, RF‑DETR, Roboflow 3.0), with built-in metrics like confusion matrices, precision, recall, and mAP making iteration fast and seamless.
What truly sets it apart is Roboflow Instant, which automatically trains a few-shot object detection model as soon as you approve annotations (or manually trigger training), and makes it available instantly in the platform for inference and labeling workflows empowering rapid prototyping with minimal data and no infrastructure setup. This seamless integration of annotation, instant model training, evaluation, and deployment paired with Roboflow Workflow which is an entirely visual, low-code pipeline builder that combines custom-trained or foundation models (like CLIP, SAM-2, or GPT‑4 with Vision) with classical CV blocks, conditional logic, LLM APIs, and visualizers. You can prototype your logic in-browser using pre-built blocks and deployment templates, then export a code snippet or deploy directly to the cloud, dedicated servers, or edge devices without additional infrastructure hassle. This makes Roboflow uniquely capable of bridging dataset creation, inference, application logic, and deployment in one interactive environment something not available in tools alone.
Annotating Images for Object Detection in Roboflow
Here are the steps to annotate dataset for training object detection model in Roboflow.
Step #1: Create a Project & Upload Data
Sign into Roboflow and create a new project, choosing “Object Detection” as the project type. Upload your images (and existing annotations if available). Roboflow will then process your dataset and let you define train/validation/test splits.
Step #2: Launch the Annotation Interface
From the Annotate, assign images click on an image to open the Roboflow Annotate interface. This is where you'll draw your boxes.
Step #3: Draw Bounding Boxes
Bounding Box Tool ("B"): Click and drag to create a new box, then choose or enter the class label.
Step #4: Use AI-Powered Tools
- Label Assist uses a pre-trained or your own custom model (from Roboflow Universe) to automatically generate bounding box predictions whenever you open an image, reducing manual effort significantly.
- Box Prompting learns from the first manually drawn bounding box examples and then predicts similar boxes across the image or dataset, improving as you provide examples and negative feedback.
- Auto Label runs a foundation model like Grounding DINO or CLIP to batch auto-label your images with bounding boxes in one go, ideal for large datasets and common object classes.
Step #5. Undo / Redo / Repeat
Use Undo/Redo for errors, and Repeat Previous to apply the same annotation layout across similar images to speed up workflow.
Step #6: Finalize & Add to Dataset
Once annotated, click "Add Images to Dataset" to include them in your labeled dataset for training.
Step #7: Train or Export
Train within Roboflow using built-in pipelines compatible with YOLOv8 and other state-of-the-art models or export annotations in formats like YOLO, COCO, or Pascal VOC for external training.
Annotating image in Roboflow
2. Autodistill
Autodistill is an open-source framework that automates the process of labeling image datasets by using large foundation models (called Base Models) like Grounding DINO or GroundedSAM to generate annotations based on natural language prompts or example images (defined in an Ontology). These automatically labeled datasets are then used to train smaller, efficient Target Models like YOLOv8 or DETR, producing a Distilled Model that can run quickly on edge devices or in production. This entire process (known as Distillation), from raw images to deployable model requires no manual labeling. Autodistill can be run on your own hardware or through Roboflow’s hosted infrastructure. It's especially useful for building fast, task-specific models when you need rapid iteration, active learning, or scalable dataset generation without human labeling bottlenecks.
Key features of Autodistill:
- Zero-Shot Labeling: Automatically labels images using large foundation models like Grounding DINO and Segment Anything, guided by simple text prompts, no manual annotations needed.
- Distillation Pipeline: Transforms unlabeled data into fast, deployable models (like YOLOv8) by distilling knowledge from large models into smaller ones optimized for edge use.
- Modular & Open Source: Plug-and-play architecture lets you swap base models, define custom ontologies, and integrate with tools like Roboflow and CVAT.
- Runs Anywhere: Works on local hardware or in the cloud, making it suitable for both offline development and scalable cloud pipelines.
- Task-Specific Optimization: Produces distilled models fine-tuned for your exact object detection or segmentation task, ensuring high performance with minimal overhead.
What’s unique about Autodistill?
Autodistill is a zero-annotation AI pipeline that lets you convert unlabeled images directly into deployable, edge-efficient models without any human labeling effort. It uses a pluggable, modular interface to connect large foundation models (like Grounding DINO, Grounded SAM, OWL‑ViT) with small supervised target models (like RF-DETR, YOLOv8), enabling a seamless distillation pipeline from raw data to production-ready model. Plus, it includes CVevals, an open-source evaluation framework that helps you test and refine natural language prompts before committing to large-scale annotation ensuring quality and minimizing wasted effort.
Annotating Image for Object Detection using Autodistill
Now, let’s see how to use Autodistill to annotate images for using bounding boxes for object detection tasks. We will also use Roboflow Supervision to visualize the annotation.
Step#1: Install the required libraries
!pip install autodistill autodistill-grounding-dino supervision -qStep #2: Prepare your dataset
I have all my images in the /images directory.
Step #3: Write code
In this example we will use the Base Model + Ontology combo to imports large model Grounding DINO to automatically create bounding box labels, without human input. Following is the code.
import cv2
from autodistill_grounding_dino import GroundingDINO
from autodistill.detection import CaptionOntology

ontology = CaptionOntology({
    "a car": "car"
})

base_model = GroundingDINO(ontology=ontology)
# Run auto label on a folder of images
base_model.label(
    input_folder="./images",
    output_folder="./dataset"
)
The above code runs the Grounding DINO base model (via Autodistill) to auto‑annotate all images in /images using the prompt "a car", generating YOLO-style bounding box labels in the /dataset folder, where "car" becomes the class name in those annotations.
Step #4: Visualize annotations (Optional)
We will now use Supervision, a helper library designed to visualize detections easily. Here we visualize bounding boxes on images. You can visualize using the code below.
import supervision as sv
from supervision import BoxAnnotator, LabelAnnotator, create_tiles
ds = sv.DetectionDataset.from_yolo(
images_directory_path="/content/dataset/train/images",
annotations_directory_path="/content/dataset/train/labels",
data_yaml_path="/content/dataset/data.yaml"
)
box = BoxAnnotator()
label = LabelAnnotator()
tiles = []
for _, image, det in ds:
if det is None or len(det.xyxy) == 0:
continue
labels = [ds.classes[cid] for cid in det.class_id]
img = box.annotate(scene=image.copy(), detections=det)
img = label.annotate(scene=img, detections=det, labels=labels)
tiles.append(img)
if tiles:
grid = create_tiles(tiles, grid_size=(2, 3), single_tile_size=(400, 400))
sv.plot_image(grid, size=(15, 15))
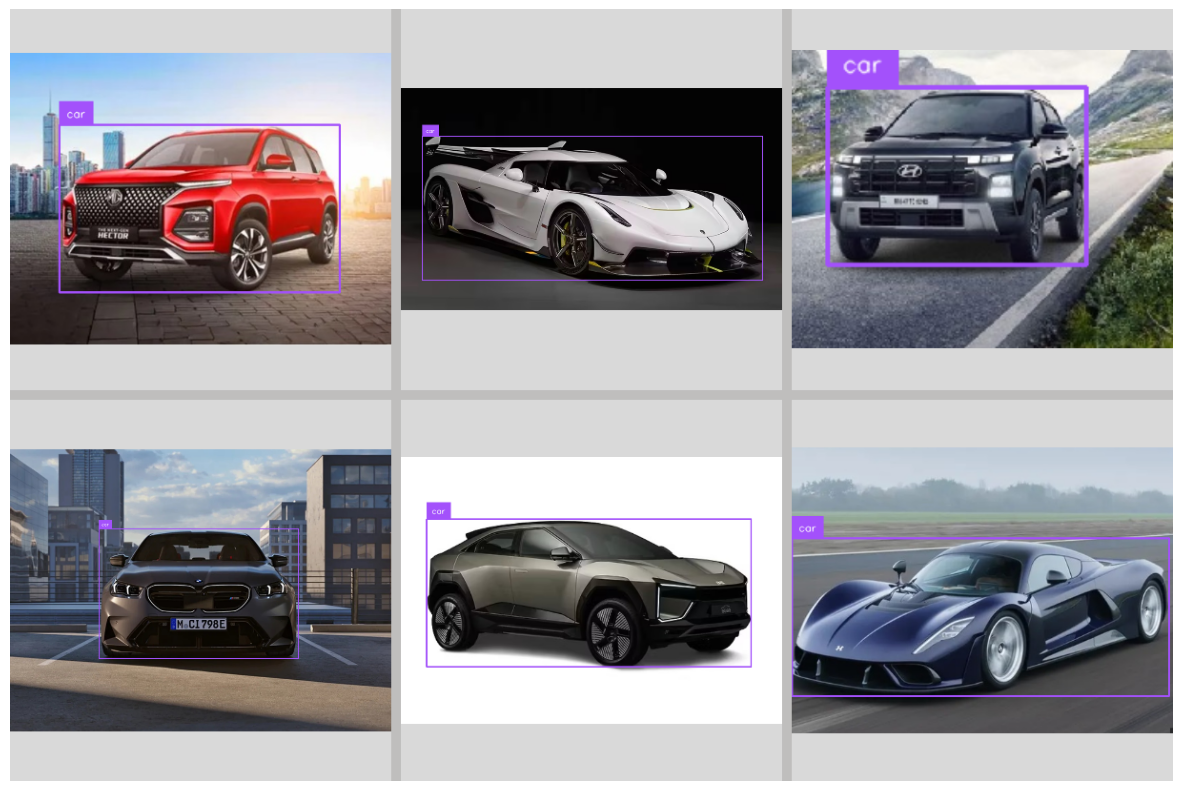
else:
print("No detections to visualize.")This code uses Roboflow’s Supervision library to load a YOLO‑formatted detection dataset (via sv.DetectionDataset.from_yolo), then iterates through each image and its detections, drawing bounding boxes around detected objects with BoxAnnotator and overlaying class labels using LabelAnnotator. It skips images with no detections, collects the annotated images into a list, and finally uses create_tiles to assemble them into a 2×3 grid (each resized to 400×400 px) which is displayed using sv.plot_image providing a quick visual overview of annotated samples for inspection. You will see output similar to following.
3. CVAT (Computer Vision Annotation Tool)
CVAT (Computer Vision Annotation Tool) is an open-source, web-based image and video annotation tool developed by Intel and maintained by OpenCV. It supports annotation tasks like object detection, classification, segmentation, tracking, and polygon labeling.
Key Features of CVAT:
- Rich Annotation Tools: Draw bounding boxes, polygons, polylines, ellipses, cuboids, and keypoints.
- Video & Image Support: Annotate frame-by-frame or across sequences with interpolation.
- AI-Assisted Labeling: Use integrated models (e.g., DEXTR, Mask R-CNN) or even Roboflow models for automatic annotation.
- Web-Based Interface: Access the full tool from your browser without local installation, or self-host with Docker for larger projects.
- Export Formats: Supports COCO, YOLO, Pascal VOC, and more for model training.
- Task Management: Organize datasets via tasks and jobs with semantic hierarchy and class setup.
- Integration Friendly: Works with Roboflow, and annotations can be exported for further model training pipelines.
What’s unique about CVAT?
CVAT stands out with its combination of fine-grained manual tools, rich semi-automated AI-assisted annotation, and efficient video interpolation features, all embedded in a self-hostable, open-source web interface. Users benefit from uncommon annotation primitives like cuboids, polylines, points, and ellipse tools, as well as deep-learning assisted interactor tools such as DEXTR, Mask R-CNN, HRNet, and integration with Roboflow models, enabling high-precision labeling with minimal manual effort. Additionally, CVAT offers task/job organization, project dashboards, keyboard shortcuts optimized for annotation speed, and support for frame interpolation in video, making it exceptionally suited for complex, large-scale, multi-frame computer vision labeling campaigns especially when control, extensibility, and precision matter.
Annotating Images for Object Detection in CVAT
Step #1: Access CVAT
Visit the CVAT web app (e.g., cvat.ai) or launch your self‑hosted CVAT instance via Docker. Log in or create an account. For local deployments, run `docker-compose up -d`, then visit `http://localhost:8080/` and create a superuser.
Step #2: Create a New Task
Go to the "Tasks" tab and click "Create New Task."
Give it a name, define your object classes (e.g., "car", "person"), and upload your images (drag-and-drop or via upload).
Step #3: Define Labels and Submit
Ensure you have added all necessary labels before annotation starts, as updates mid-labeling can be confusing. Click Submit and Open to create a Task, which may spawn one or more Jobs if using collaborative or large datasets.
Step #4: Annotate Bounding Boxes
Open the Job to enter the labeling interface. Select the Rectangle (bounding box) tool from the left toolbar. Choose the correct label and press "N" to start drawing. You can annotate by clicking two corners or by dragging a rectangle. Navigate between images using arrow keys or toolbar buttons.
Step #5: Use Advanced Shapes or Tools (Optional)
Beyond rectangles, CVAT supports polygons, polylines, ellipses, cuboids, and points for richer annotation. For semi-automatic annotation, use AI tools:
- Detectors (e.g., Mask R‑CNN, Faster R‑CNN, YOLO models)
- Interactors (e.g., DEXTR, HRNet, f‑BRS)
Select a model, match its labels to your classes, and run auto-labeling to speed up annotation.
Step #6: Save Your Work
CVAT does not auto-save, so click "Save" regularly while annotating each image or batch.
Step #7: Export Annotations
Once done, navigate to the Task page and click Menu -> Export task dataset. Choose from supported formats like COCO JSON, YOLO, or Pascal VOC XML depending on your training pipeline.
Data annotation using CVAT
4. LabelMe
LabelMe is an open-source annotation tool developed by MIT’s Computer Science & Artificial Intelligence Lab (CSAIL), designed to build image datasets for computer vision research. It runs in a web browser (or offline via downloadable tools), allowing users to manually annotate images and videos using polygon-based labeling workflows.
Key Features of LabelMe:
- Multiple Shape Types: Supports six annotation primitives—polygon, rectangle (bounding box), circle, line, point, and line strip—for versatile and precise labeling.
- Web-Based & Local Versions: Use the lightweight browser tool or desktop versions available for Windows, macOS, and Linux for flexible deployment.
- Batch Navigation: Open a folder of images for seamless sequential labeling, with the option to search and select files randomly from a file list.
- Annotation Export Formats: Exports your labeled dataset in Pascal VOC XML or COCO JSON, compatible with segmentation, detection, and instance segmentation workflows.
- Extensible & Open Source: Written in Python using Qt, LabelMe is fully open-source and modifiable; developers can customize its GUI, enable autosave, validation, and classification flags
What’s unique about LabelMe?
LabelMe’s standout feature is its simple, researcher-focused design that prioritizes lightweight annotation and open contributions. It powers a community-driven dataset where annotated images are shared publicly in real time enabling researchers to grow a continuously updated repository of diverse object classes and scenes. Unlike many tools that require heavy infrastructure, LabelMe’s interface emphasizes minimalism, instant sharing, and full control over annotations.
LabelMe empowers data scientists and researchers with a no-frills annotation tool that’s ideal for manual, polygon-based labeling and dataset creation in research or academic settings especially when privacy, openness, and dataset sharing matter.
Annotating Images for Object Detection in LabelMe
Following are the steps on how to label image for object detection model using LabelMe.
Step #1: Install LabelMe
Install via pip for cross-platform compatibility:
pip install labelmeThen launch the tool by running:
LabelmeYou’ll see a GUI window where annotations are saved as JSON files alongside your images.
Step #2: Open Folder of Images
In the LabelMe GUI, click “Open Dir” and select the folder containing all your images. A list of files will appear for easy navigation.
Step #3: Select the Annotation Shape
Click the "Create Polygon" button, then select “Create Rectangle”” from the toolbar to enable bounding box mode.
Step #4: Draw Bounding Boxes
Click to set one corner of the bounding box and drag to the opposite corner. After drawing, LabelMe will prompt you to enter a class label or choose from the list. You can add new labels on the fly.
Step #5: Switch Images & Annotate More
Navigate between images using the file list panel. Draw bounding boxes consistently across your dataset.
Step #6: Save Annotation Files
Press Ctrl+S (Windows) or Cmd+S (macOS) to save your annotated JSON file. LabelMe calls the file <image_name>.json, saved in the same folder as the image.
Step #7: Convert Annotations (Optional)
If you need a format like COCO or Pascal VOC, use Roboflow for conversion by JSON annotation files along with the corresponding images and then generate a dataset version in Roboflow and export to desired format.
Data Annotation using LabelMe
5. VGG Image Annotator (VIA)
VGG Image Annotator (VIA) is an ultra-lightweight, open-source annotation tool developed by the Visual Geometry Group at Oxford University. It’s delivered as a single HTML file (~400 KB) that runs entirely in your browser no installation, dependencies, or external libraries required. VIA supports annotation across images, video, and audio, offering shapes like rectangles, polygons, circles, ellipses, points, and polylines.
Key Features of VIA:
- Zero-install browser app: Run VIA by simply opening the HTML file in Chrome, Firefox, or Safari. Ideal for quick setup or offline use.
- Multiple annotation primitives: Supports six region types i.e. rectangle, polygon, circle, ellipse, point, and polyline for flexible annotation tasks.
- Custom region attributes: Define dropdowns, radio buttons, images, or text fields for attributes to enforce label consistency across.
- Image Grid View: Enables reviewing and filtering groups of images annotated automatically through CV algorithms (such as YOLO, RF-DETR etc.), allowing bulk updates or cleanup great for semi-automatic workflows.
- Audio & Video support: VIA lets you annotate temporal segments in video/audio as well as spatial regions in frames, useful for multimodal labeling projects.
- Export formats: Save annotations as plain JSON or CSV that integrate easily into machine learning pipelines or conversion scripts.
What makes VIA unique?
- Single-file portability: Unlike most tools requiring installation or server setup, VIA runs offline from a single self-contained HTML file making it instantly deployable and shareable via email or USB.
- No external dependencies: Built with pure HTML, JavaScript, and CSS, VIA doesn’t rely on frameworks, it’s just one file, no Node/Python/Docker needed.
- Collaborative-friendly design: The Image Grid View allows teams to review and filter auto-generated annotations as groups, speeding up quality control and cleaning of large datasets.
- Extremely lightweight UI: Minimalist interface with grayscale styling and straightforward annotation controls makes it easy for non-technical annotators to use immediately.
VIA’s uniqueness lies in its minimalistic, dependency-free design, unmatched portability, and lightweight yet flexible annotation capabilities, particularly suited to academic or small-team workflows, quick deployments, or settings where installation isn't practical.
Annotating Images for Object Detection in VIA
Step #1: Launch VIA
Open the VIA HTML file in your browser (Chrome, Firefox, Safari) no installation required, and it works fully offline. You can also download it from here.
Step #2: Load Your Images
Go to Project -> Add local files (or Add files from URL) to upload your images. They will appear in the left sidebar.
Step #3: Define Region Attribute for Class Labels
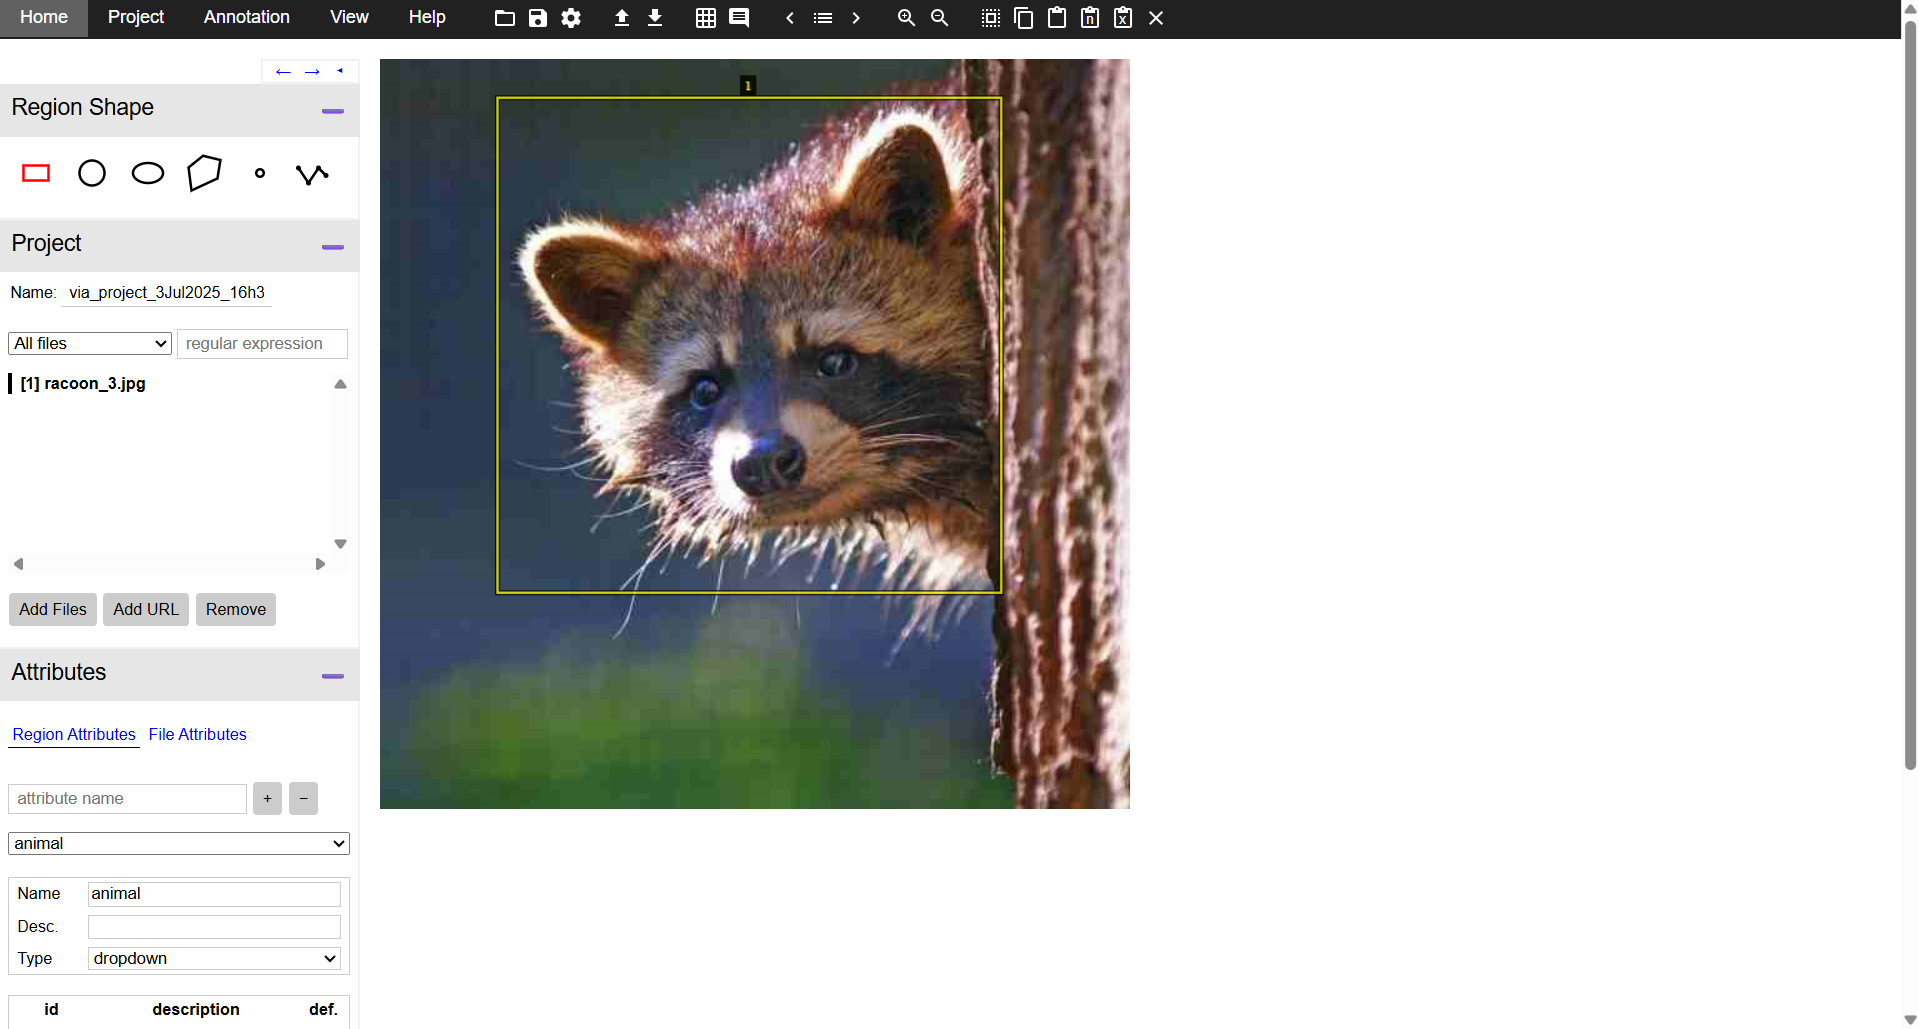
Click Attributes on left pane and create a new region attribute (e.g. "class_label"). Set this attribute as a dropdown menu with your object class names (e.g., “cat”, “dog”, “raccoon”). This enables consistent class selection.

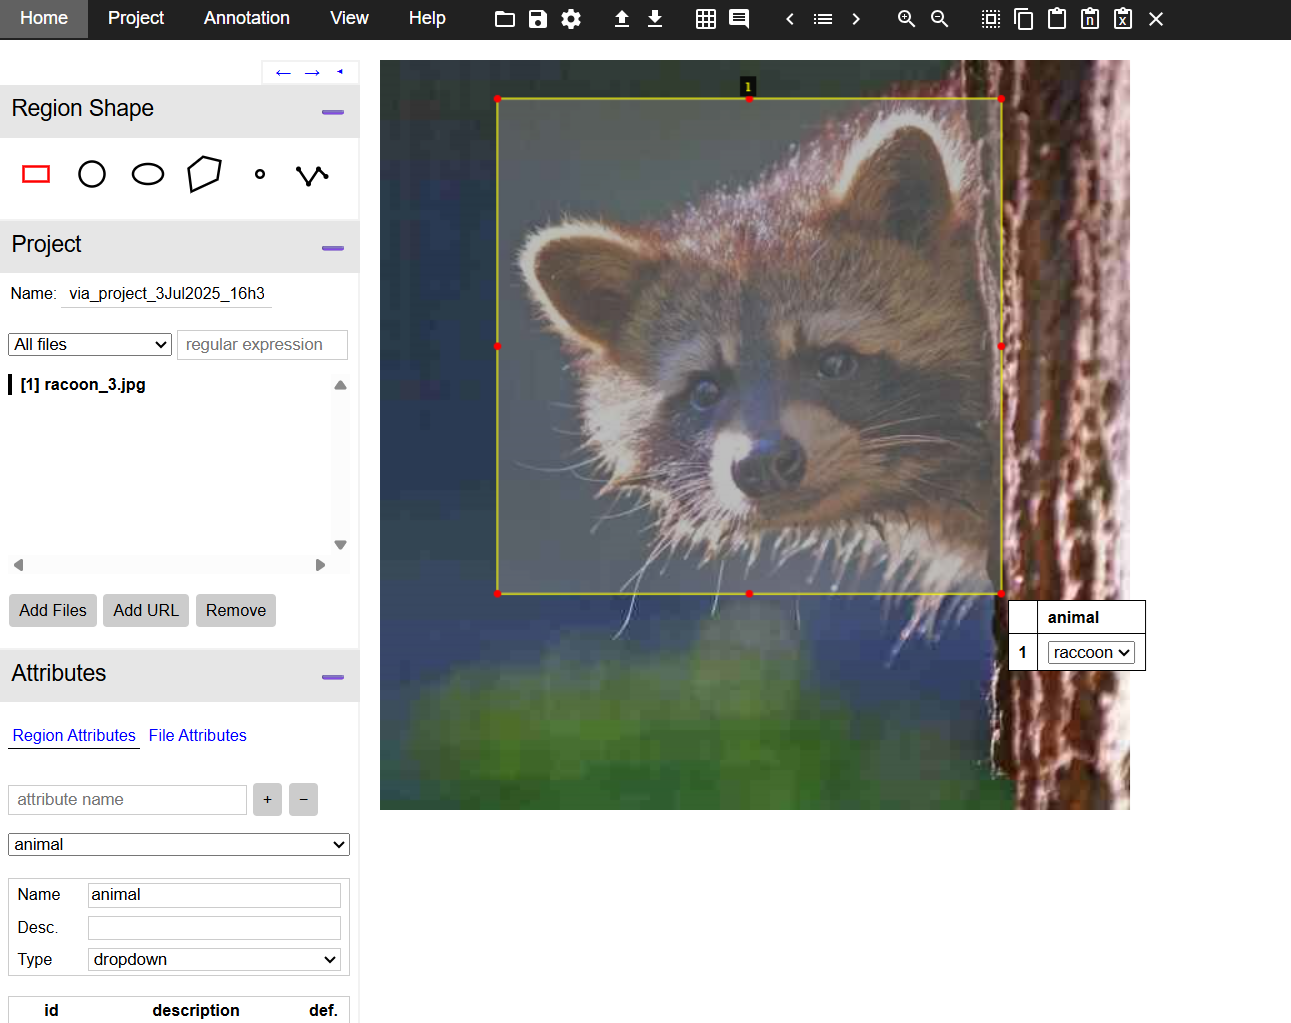
Step #4: Annotate Bounding Boxes
Select the Rectangle shape tool from the left sidebar. Click and drag on the image to draw a box around each object. After drawing, press the Space bar to open the annotation pane, where you assign the label using the dropdown attribute.
Step #5. Navigate Between Images & Annotate
Use the file list in the left panel to navigate to the next image and continue annotating until all images are labeled.
Step #6: Save Your Annotations
Go to Project -> Save project to store your work within the browser session. To export final annotations, go to Annotations -> Export as CSV or Annotations → Export as JSON. These files include bounding-box coordinates, filenames, and class attributes.
Step #7: Convert VIA Output for Model Training (Optional)
VIA exports can be converted to COCO, Pascal VOC, YOLO, etc., using Roboflow (drag and drop images + VIA JSON). Generate a dataset version and export in any format you need.
6. RectLabel
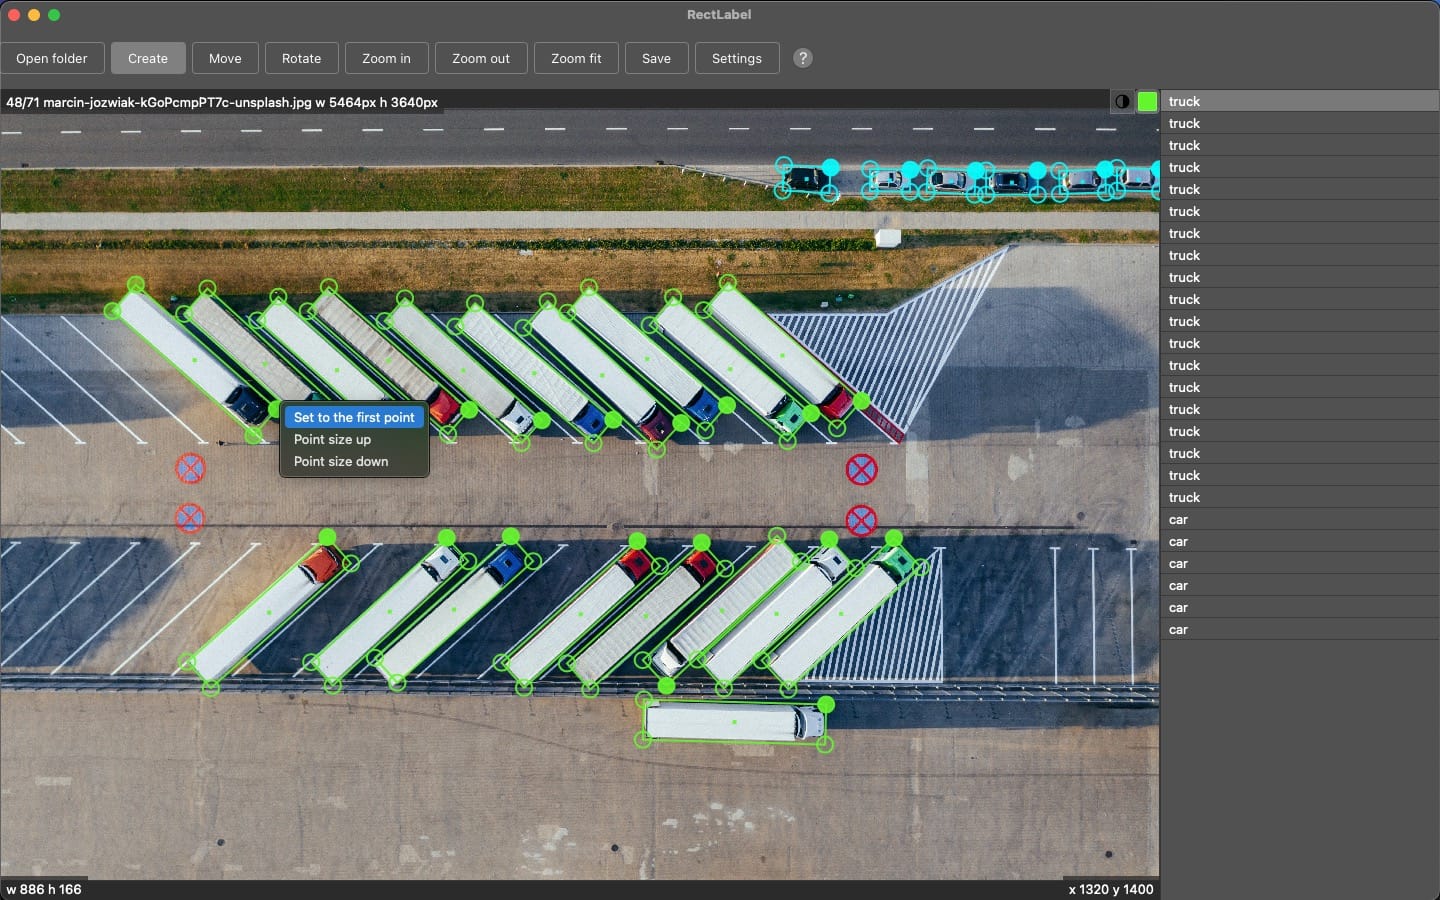
RectLabel is a macOS-native, offline image annotation tool tailored for object detection and segmentation tasks. It supports a wide range of annotation primitives such as oriented bounding boxes (especially useful for aerial imagery), polygons, cubic Bézier curves, keypoints, pixel-level masks with brushes and superpixels, and even OCR-based text labeling, making it a versatile choice for diverse annotation needs.
Key Features of RectLabel:
- Offline & macOS native: Runs locally without any server or cloud dependency, enabling high responsiveness and complete data privacy.
- Segment Anything Model (SAM‑2) integration: Automatically generates precise polygons and pixel masks with minimal manual input.
- Core ML model support: Apply pretrained models for auto-labeling, ideal for rapid annotation or initializing datasets.
- Oriented bounding boxes and keypoints with skeletons: Especially important for aerial or pose estimation tasks.
- Pixel-level label tools: Use brush or superpixel tools for fine-grained segmentation workflows.
- Advanced export formats: Export directly to YOLO, COCO JSON, CreateML, Pascal VOC, DOTA formats, including support for indexed or grayscale masks.
- Customizable label dialog & hotkeys: Speed up annotation with one‑click label selection and customizable attribute-based dialogs, plus searchability across object, attribute, and image names.
- Video processing & image augmentation: Convert video into frames and perform augmentations in-app (crop/resize/rotate).
What’s Unique About RectLabel?
RectLabel stands out as one of the few fully-featured offline annotation apps built specifically for macOS, combining SAM-2 polygon/mask auto-labeling, Core ML integration, and pixel-level editing, all within a native GUI app that doesn't rely on Docker, servers, or web browsers. Its support for oriented bounding boxes, Bézier curves, skeleton-based keypoints, and searchable galleries are features rare in most annotation tools. Additionally, it offers swift export to multiple machine learning formats and interactive gallery-based search for labels and attributes, making it particularly powerful for professional annotators and researchers working on Mac environments.
Annotating Images for Object Detection in ReactLabel
Step #1: Install RectLabel (macOS App)
Download and install RectLabel (or RectLabel Pro) from the Mac App Store. Launch the app, no Docker or browser needed everything runs natively on macOS.
Step #2: Create or Import a Project
Open RectLabel and either start a new annotation project or load an existing image directory.
Step #3: Define Object Classes & Attributes
Use the settings panel to create object categories, configure attribute labels, and customize hotkeys and label dialogs for speed and consistency.
Step #4: Draw Bounding Boxes
Select the Rectangle tool and draw a bounding box around each object. Use smart guides to align and resize boxes accurately. Press configured hotkeys or select class from the dialog to label the box instantly.
Step #5: Use Advanced Editing & Auto-Labeling (Optional)
Zoom into existing boxes or use layers to manage overlapping annotations. Integrate Core ML models to auto-generate bounding boxes when applicable.
Step #6: Navigate and Annotate Sequentially
Move between images in your dataset, applying rectangle tool and class label per image until all objects are annotated.
Step #7: Save & Export Annotations
Save your project regularly within the app. Export bounding box annotations in formats like PASCAL VOC XML, COCO JSON, YOLO TXT, or DOTA directly supported by RectLabel.
7. HumanSignal Label Studio
HumanSignal is the company behind Label Studio, an open-source, multimodal annotation platform designed for image, video, text, audio, and time-series labeling. The Community Edition is fully free and extensible, while the Enterprise Edition adds features like QA workflows, SSO, role-based access, audit logs, and LLM-powered automation including prompt-based auto-labeling and model comparison tools for enterprise users.
Key Features of Label Studio:
- Multi-Modal Annotation Support: Label Studio supports images, video, text, audio, and time-series all within one platform.
- Fully Customizable Interface: Define custom labeling interfaces using XML-like configs, add templates, relation labels, layout settings, and UI widgets for tailored tasks.
- ML Backend Integration & Active Learning: Connect your custom ML models via its ML Backend SDK to pre-label data, enable active learning loops, and refine model predictions during annotation.
- LLM-Prompt Automation & Evaluation (Enterprise Only): Use HumanSignal’s LLM-based “Prompts” interface to auto-generate labels (e.g., via GPT-4), compare LLM outputs, bootstrap datasets, and fine-tune prompts with evaluation tools.
- Robust Review & QA Workflows: Enterprise includes role definitions (Annotator, Reviewer), automatic task assignment, inter-annotator agreement scoring (e.g. Krippendorff’s alpha), dashboards for coverage and quality, and annotation commenting & conflict resolution.
- Plugin & Developer Framework: Extend the labeling interface using custom JavaScript plugins, open-source configurations, and widely shared community templates & UI layouts.
- Multi-View Video Annotation Plugin: Unique to HumanSignal, this plugin lets annotators view multiple synchronized frames (before, during, after) when editing video labels, aiding accuracy in motion-based annotations.
What’s Unique About HumanSignal?
HumanSignal (Label Studio Enterprise) offers capabilities rarely combined in a single platform:
- Prompt-driven annotation automation using LLMs, alongside built-in LLM evaluation tools enabling users to fine-tune prompts and compare models based on cost and accuracy.
- End-to-end human+AI workflows, where automated predictions are systematically reviewed, scored, and refined via built-in agreement analytics and review assignment pipelines.
- Fully open-source core paired with enterprise-grade team features let users scale from academic prototyping to secure, enterprise production usage without changing tooling.
- Extensibility through plugins and shared config libraries, enabling advanced custom tasks (relations, time series, multimodal data) assembled and reused from community templates.
- Advanced video annotation UX (multi-view sync) and relations support between annotations especially uncommon in open-source tools.
HumanSignal (Label Studio) is especially valuable for teams needing scalable, secure, and AI-assisted data operations workflows bridging human annotation and model automation under one platform.
Annotating Images for Object Detection in Label Studio (HumanSignal)
Step #1: Install & Launch Label Studio
Install using one of the available methods:
pip install -U label-studioThen run:
label-studioAfter launching, open http://localhost:8080/ in your browser to complete sign-up.
Step #2: Create a New Project
From the dashboard, click “Create project”. Name your project and optionally describe it. Click “Data Import” to upload images (max 100 via the UI or use API for larger sets).
Step #3: Configure the Labeling Interface
Click “Labeling Setup” and choose template " Object Detection with Bounding Boxes" as the task type. Remove any default labels and add your object classes (e.g., "cat", "dog"). Save the template.
Step #4. Begin Annotation
On the project page, click “Label All Tasks” (or select specific tasks/images). To draw a box, select a label (click or press its number shortcut), then click and drag over the object. You can zoom in/out (Ctrl + / Ctrl -) for precision.
Step #5: Submit & Navigate
After annotating each image, click “Submit” to save and move to the next. Use the data manager to filter, sort, or label specific subsets if needed.
Step #6: Export Annotations
Go to the project home, click “Export”. Choose your desired format: COCO JSON, Pascal VOC XML, YOLO TXT, etc., based on your downstream model.
Data Annotation using Label Studio
Get Started with the Best Data Annotation Companies
Choosing the right data annotation platform is a crucial step in any computer vision pipeline it can make the difference between a model that performs reliably and one that fails in real-world conditions. Whether you're building a quick prototype or scaling up a production-grade AI system, your annotation tool should align with your project’s complexity, data types, automation needs, and team workflow.
From Roboflow’s end-to-end automation and visual pipelines, to CVAT’s self-hosted precision tools, and from lightweight open-source solutions like LabelMe and VIA to enterprise-ready platforms like Label Studio, there’s a tool for every use case. The key is to match the tool to your specific needs balancing usability, extensibility, and accuracy to create high-quality datasets that set the foundation for successful model training and deployment.
Cite this Post
Use the following entry to cite this post in your research:
Timothy M. (Jul 7, 2025). Best Data Annotation Platforms. Roboflow Blog: https://blog.roboflow.com/data-annotation-platforms/