
Roboflow Inference runs as a Docker microservice on a Raspberry Pi 4 or 400 (64-bit Ubuntu, aarch64), giving you a local inference server at localhost:9001 that can process images, videos, and live streams without sending data to the cloud. Setup comes down to installing Docker, running pip install inference, and starting the server with one command. From there you can call any trained model via the Inference API, making a Raspberry Pi a viable edge deployment target for computer vision applications that require low latency or offline operation.
At Roboflow, our goal is to simplify all of the parts of the computer vision process from collecting images, to choosing which ones to label, to annotating datasets, to training and deploying models so that you can focus on solving the problems that are unique to your business and creating value instead of building redundant CV infrastructure.
One major component of simplifying deployment is support for the myriad of platforms and edge devices our customers want to use. Roboflow supports deploying into the cloud, onto a web browser, to smartphone apps, or directly to edge devices like NVIDIA Jetson and Luxonis OAK. You can also deploy to a Raspberry Pi.
Before You Deploy
The below post assumes you have a model ready to deploy to your Raspberry Pi, and only walks through deployment of that model. If you're looking to start from images and no trained model, follow this guide: how to deploy computer vision on a Raspberry Pi.
System Requirements
You'll need a Raspberry Pi 4 (or Raspberry Pi 400) running the 64bit version of Ubuntu. To verify that you're running a compatible system, type arch into your Raspberry Pi's command line and verify that it outputs aarch64.
Setup and Installation
Our inference server runs as a microservice via Docker. You'll need to install Docker on your Raspberry Pi; we recommend using the Docker Ubuntu convenience script for installation.
 curl -fsSL https://get.docker.com -o get-docker.sh
 sudo sh get-docker.sh
You can then set up and start an Inference server with the following code:
pip install inference
inference server start
Your Inference server will start running at localhost:9001.
You can verify that the inference server is running by visiting http://localhost:9001 in your browser on the Raspberry Pi (or curling the URL if you're running in headless mode). If everything's running correctly, you'll see a page with HTML:
Using Inference
You can run models on images, videos, and live streams using your Raspberry Pi and Roboflow Inference. You can also run Workflows created with Roboflow Workflows.
To run a Workflow, create a new file and add the following code:
from inference_sdk import InferenceHTTPClient

client = InferenceHTTPClient(
    api_url="http://localhost:9001", # use local inference server
    # api_key="<YOUR API KEY>" # optional to access your private data and models
)

result = client.run_workflow(
    workspace_name="roboflow-docs",
    workflow_id="model-comparison",
    images={
        "image": "https://media.roboflow.com/workflows/examples/bleachers.jpg"
    },
    parameters={
        "model1": "yolov8n-640",
        "model2": "yolov11n-640"
    }
)

print(result)
Above, set:
API_KEYto your Roboflow API key.- Your workspace name, Workflow ID, and inputs.
You can find your workspace name, Workflow ID, and supported inputs from the Deploy Workflow panel on any Workflow created in Roboflow Workflows:
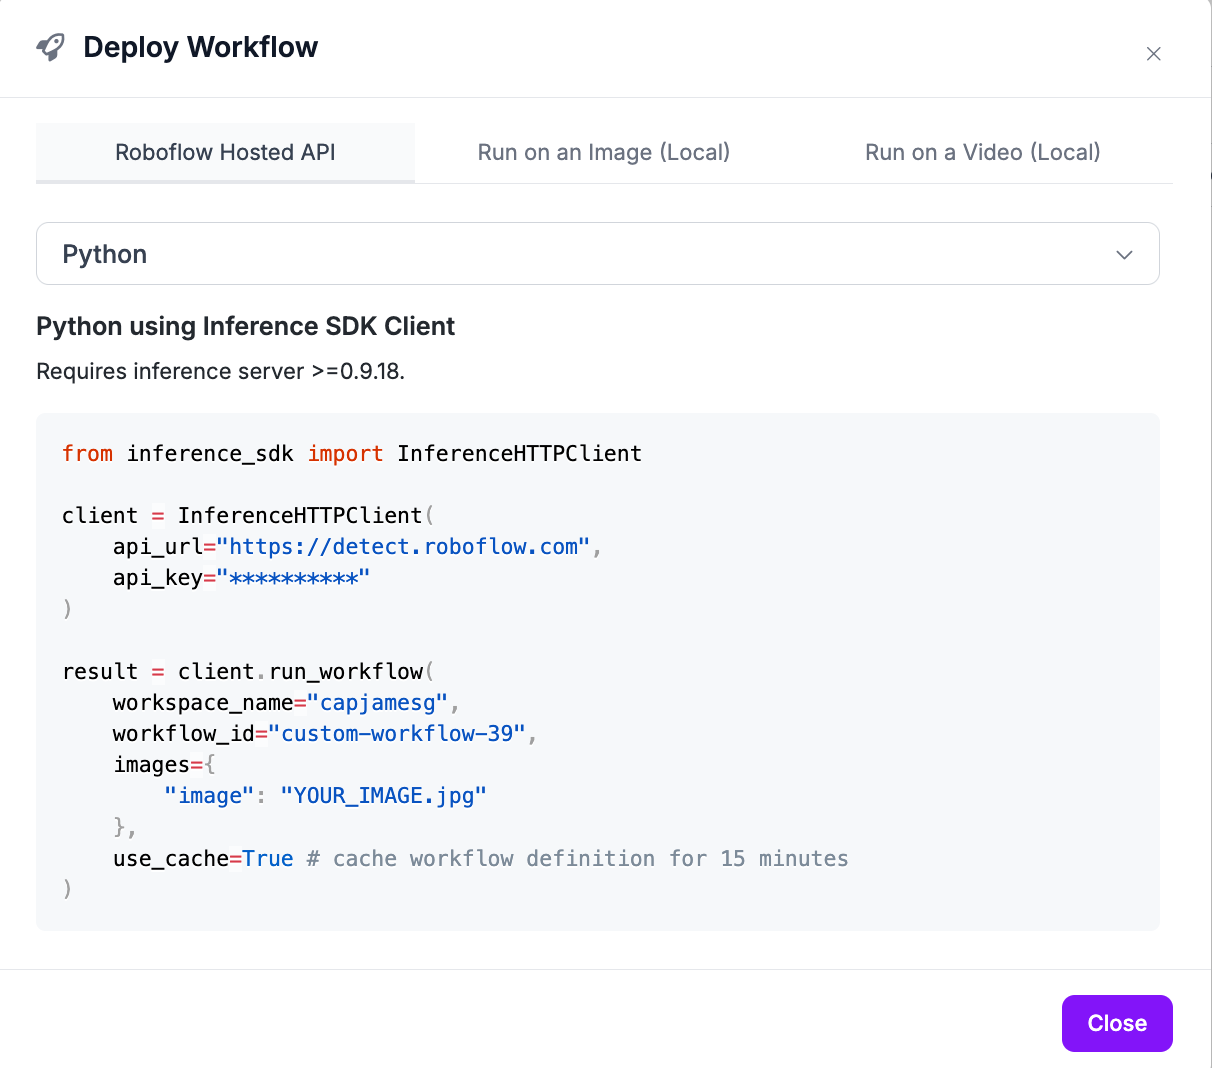
Replace the API URl with http://localhost:9001.
This code will return the results from your Workflow. For example, if you have a Workflow that runs a detection model, crops detections, then classifies them, the Workflow will return the results from all steps in the process.
All Workflows deployed with the Inference SDK run on your hardware (unless you use a block that uses a cloud service, like the Slack Notification block).
Next Steps
If you have images already, create a dataset and train a model. Otherwise, all 7000+ Pre-Trained models on Roboflow Universe are now supported on Raspberry Pi, so you can browse the models other users have already shared to find one that suits your fancy and jump right to building a vision-powered application.
Cite this Post
Use the following entry to cite this post in your research:
Brad Dwyer, James Gallagher. (Jan 15, 2025). How to Deploy Computer Vision Models to a Raspberry Pi. Roboflow Blog: https://blog.roboflow.com/raspberry-pi-computer-vision/