
Road infrastructure is one of the most heavily used and least monitored public assets in the world. Roads deteriorate continuously under traffic load, weather cycles, subsurface movement, and the simple passage of time.
Yet in most cities and municipalities, the process for identifying where that deterioration has reached a critical point remains largely manual. A crew drives a route, observes conditions, and files a report. As report waits in a queue, the pothole or cracks gets bigger.
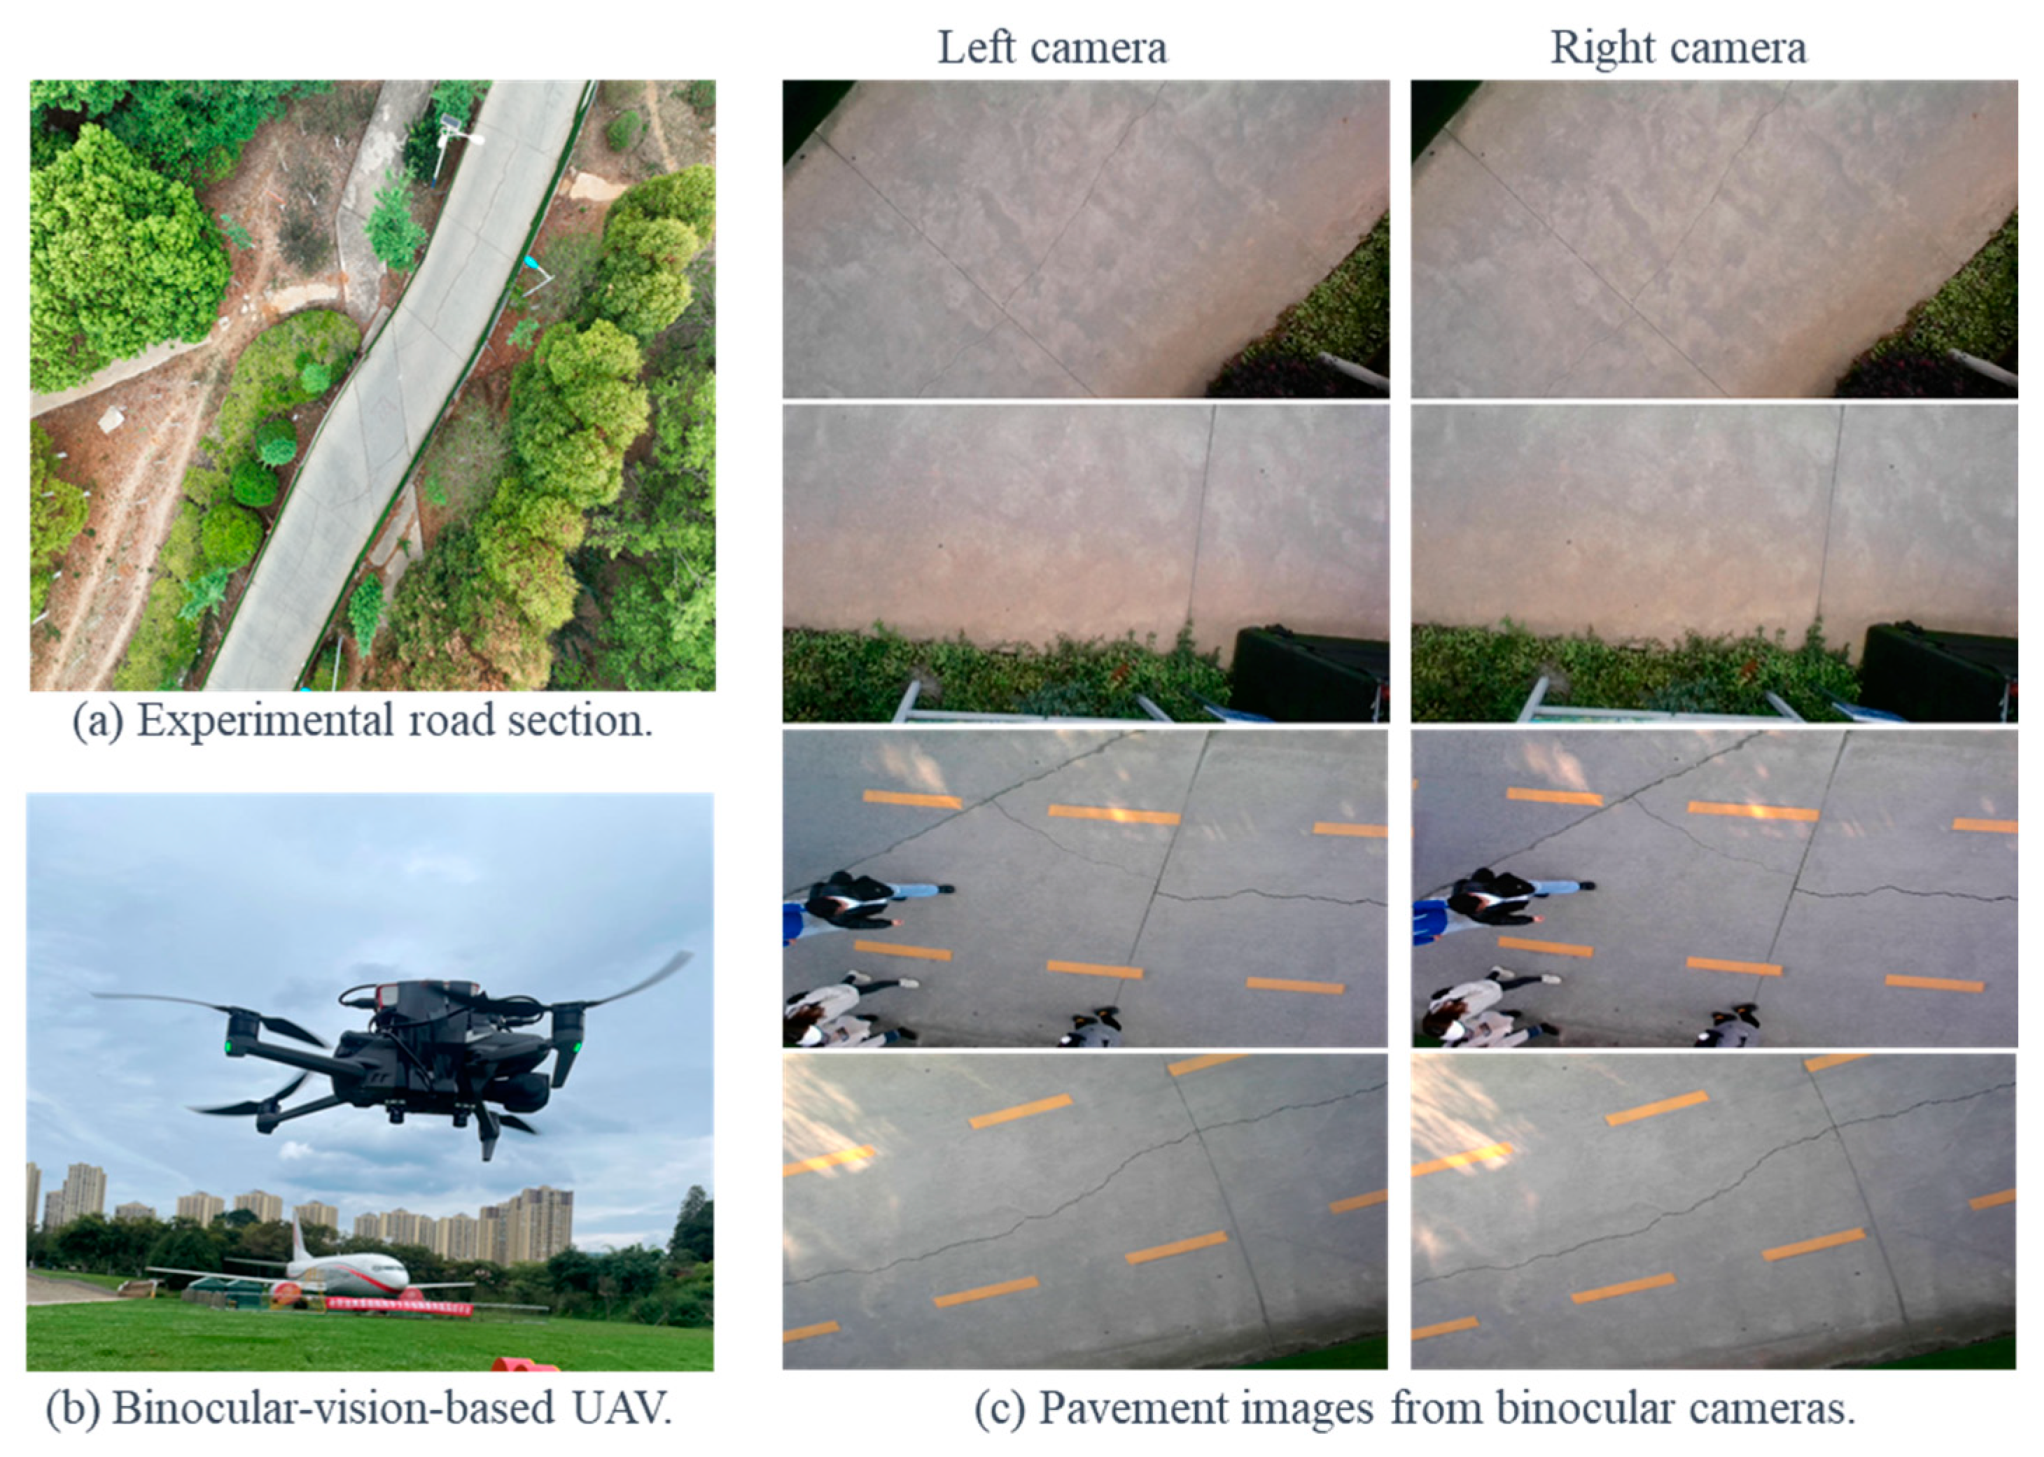
Computer vision offers a practical alternative for road condition assessment. A camera mounted on an inspection vehicle or drone can capture road imagery continuously. A trained detection model can process that image or video frame by frame and automatically identifying and classifying defects.
In this tutorial, we will build a road defect detection system with a custom trained RF-DETR object detection model, and we'll deploy it through a Roboflow Workflow. We will cover two deployment paths that reflect how road inspection actually happens in the field:
UAV (drone) aerial imagery: A drone surveys a road corridor from above, capturing high-resolution still images.
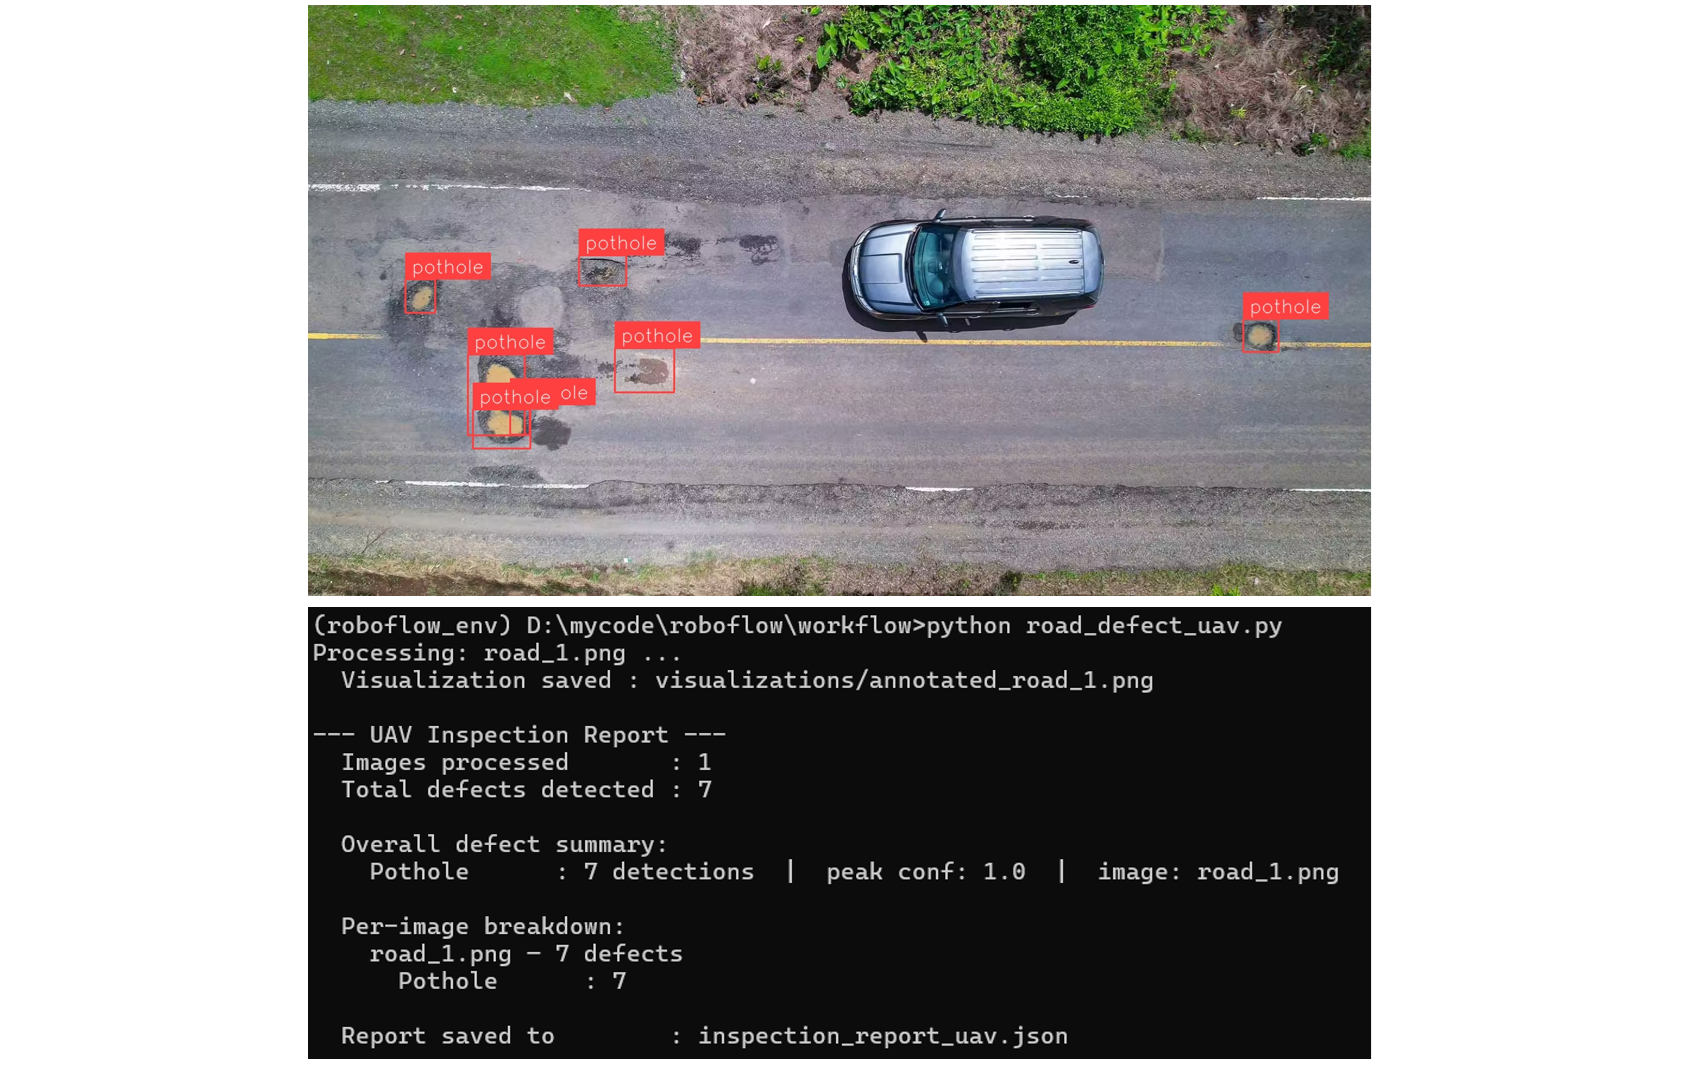
Since defects in the aerial images appear small relative to the full image at altitude, we use the SAHI technique in Roboflow Workflows to ensure small cracks and potholes are not missed. Each image is processed individually and the detections are written to an inspection report. Here is the output of the UAV based system that we will be building:
Vehicle dashcam video: An inspection vehicle drives a route with a dashcam recording continuously. The video is processed frame by frame, with the model analyzing each frame as it passes. Detections are logged per frame and aggregated into an end-of-run report.
Here's the output of our vehicle-based road defect detection system:
Vehicle based road defect detection system
In both cases, automated report generation is the core deliverable. The goal is to give road maintenance teams a structured, timestamped, per-run inspection record they can act on. The system does the documentation automatically, so the team can focus on the repairs.
So, let's get started!
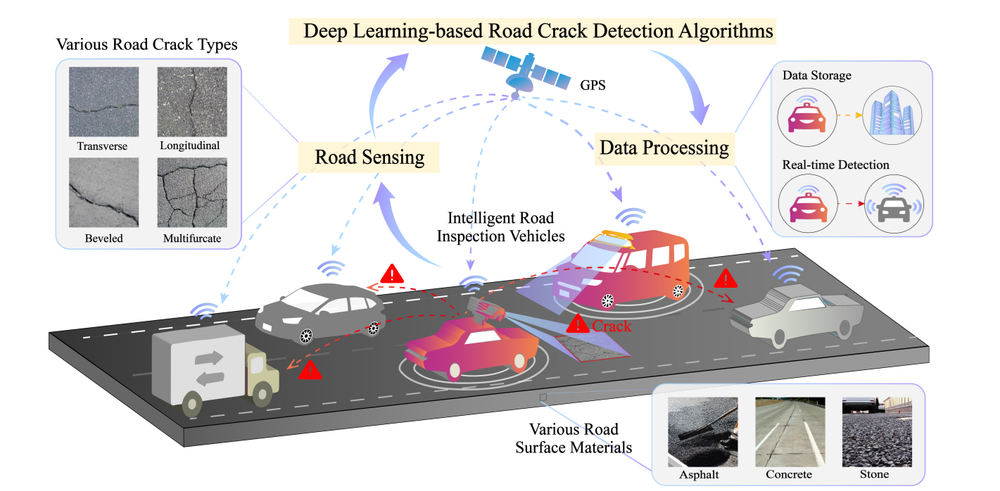
Types of Road Defects Computer Vision Can Detect
Computer vision systems can identify different types of road defects. Below is a simple explanation of what each defect is:
- Potholes: Visible holes or cavities on the road surface that create uneven driving conditions.
- Longitudinal Cracks: Cracks that run along the length of the road, parallel to the direction of traffic.
- Transverse Cracks: Cracks that run across the road, perpendicular to the direction of travel.
- Alligator Cracking: A group of interconnected cracks forming a pattern similar to reptile skin on the road surface.
- Rutting: Long, narrow depressions or grooves formed in the wheel paths on the road.
- Edge Deterioration: Damage or breaking of the road edges, where the surface starts to wear away from the sides.
In this project, the model mainly focuses on potholes and cracks, but it can be extended to other defect types with proper data.
Automated Road Defect Detection System Overview
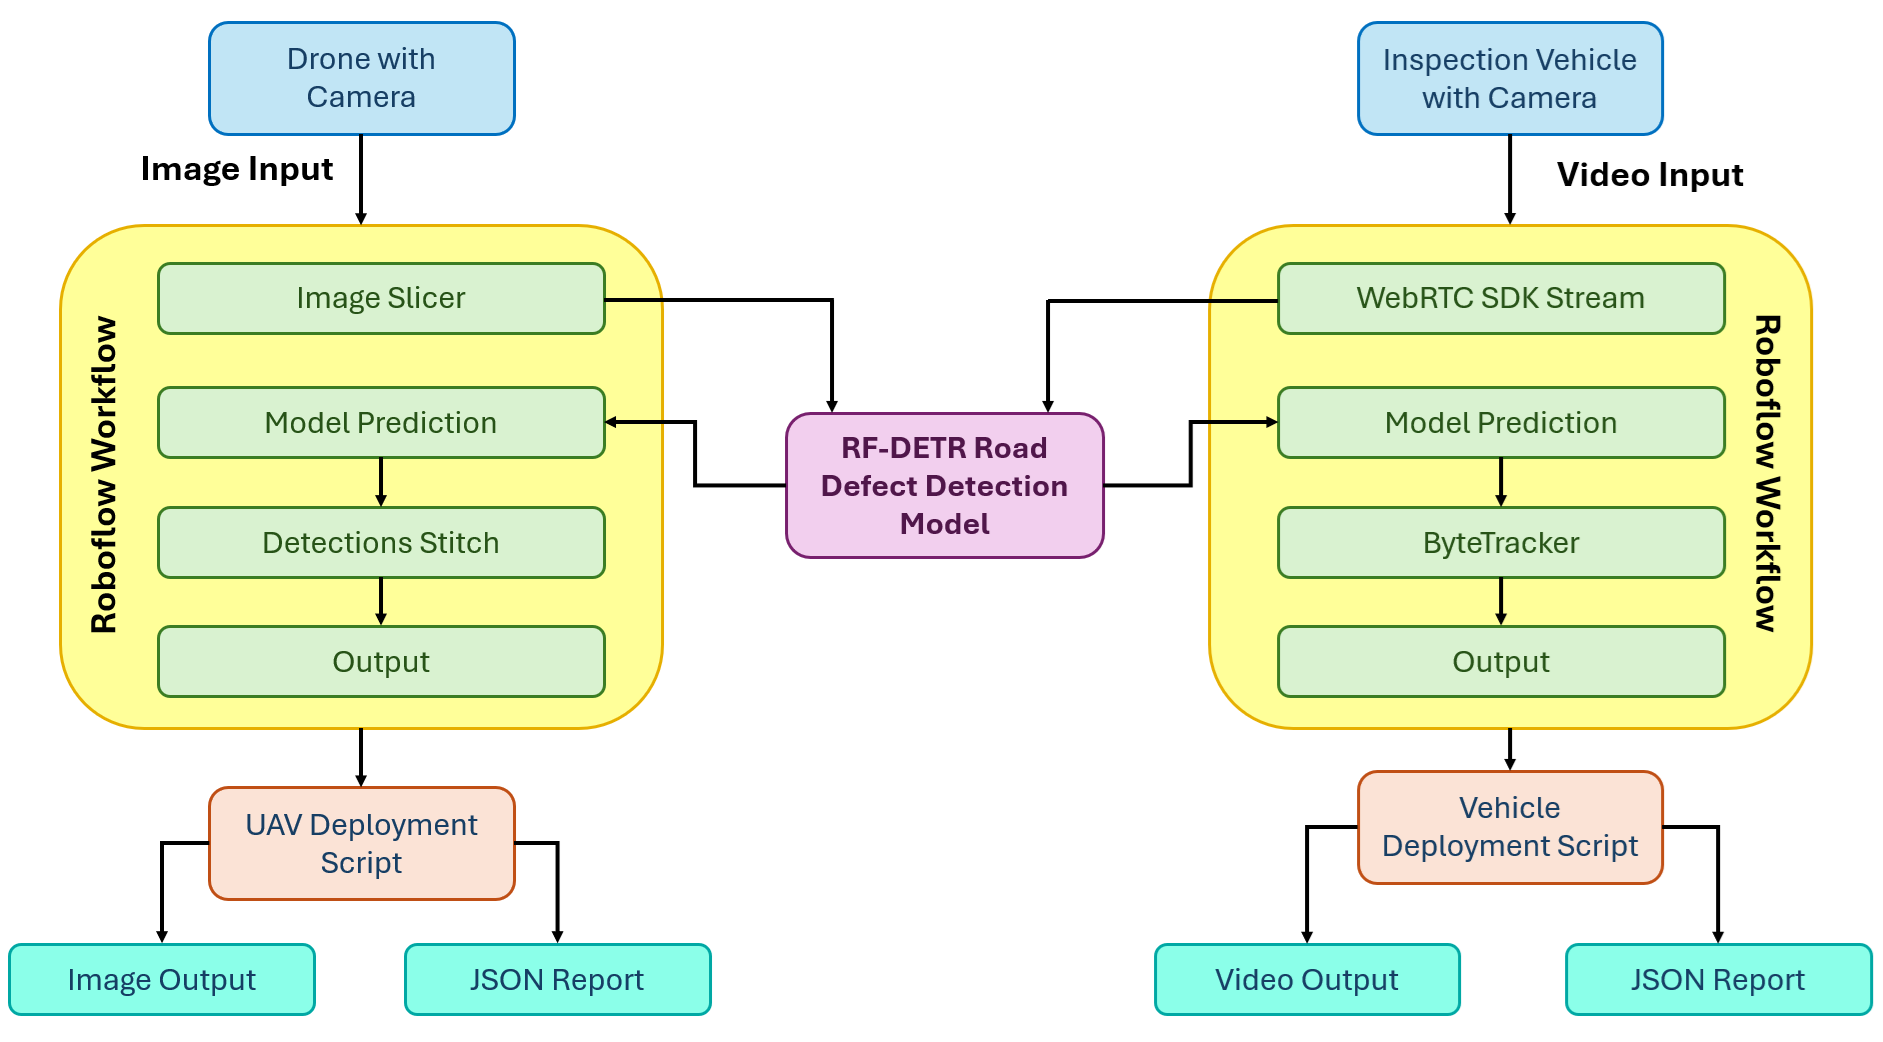
Here's how the system we'll build works. The system has two independent deployment paths that share the same trained RF-DETR model but differ in how imagery is captured, processed, and reported on.
Path 1: UAV Aerial Imagery
A drone flies a road corridor and captures high-resolution still images. After the flight, images are processed in batches through the UAV Roboflow Workflow. The workflow applies SAHI, splitting each image into overlapping tiles with the Image Slicer block, running the RF-DETR model on each tile, then reassembling all detections back into the original image space with the Detections Stitch block. The deployment script reads the clean, deduplicated detections from each image and writes a structured JSON inspection report for the full batch.
Path 2: Vehicle Dashcam Video
An inspection vehicle drives a road route with a dashcam recording continuously. The video is streamed frame by frame through the video Roboflow Workflow using Roboflow's WebRTC SDK. The RF-DETR model detects defects in each frame, and the ByteTrack Tracker block assigns a persistent tracker_id to each defect across frames so the same physical defect is not counted multiple times as the vehicle passes it. The deployment script collects unique tracker IDs across the full run, stitches the annotated frames into an output video, and writes a structured JSON inspection report built from unique defects only.
Building the Road Defect Detection System
Here are the steps to build the road defect detection system using Roboflow.
Step 1: Build Your Dataset
Start by creating a free account at roboflow.com and creating a new Object Detection project. Name it something like road-defect-detection.
For this tutorial, I used the Road Defect Detection dataset from Roboflow Universe covering images of potholes and cracks across a range of road surfaces and conditions.
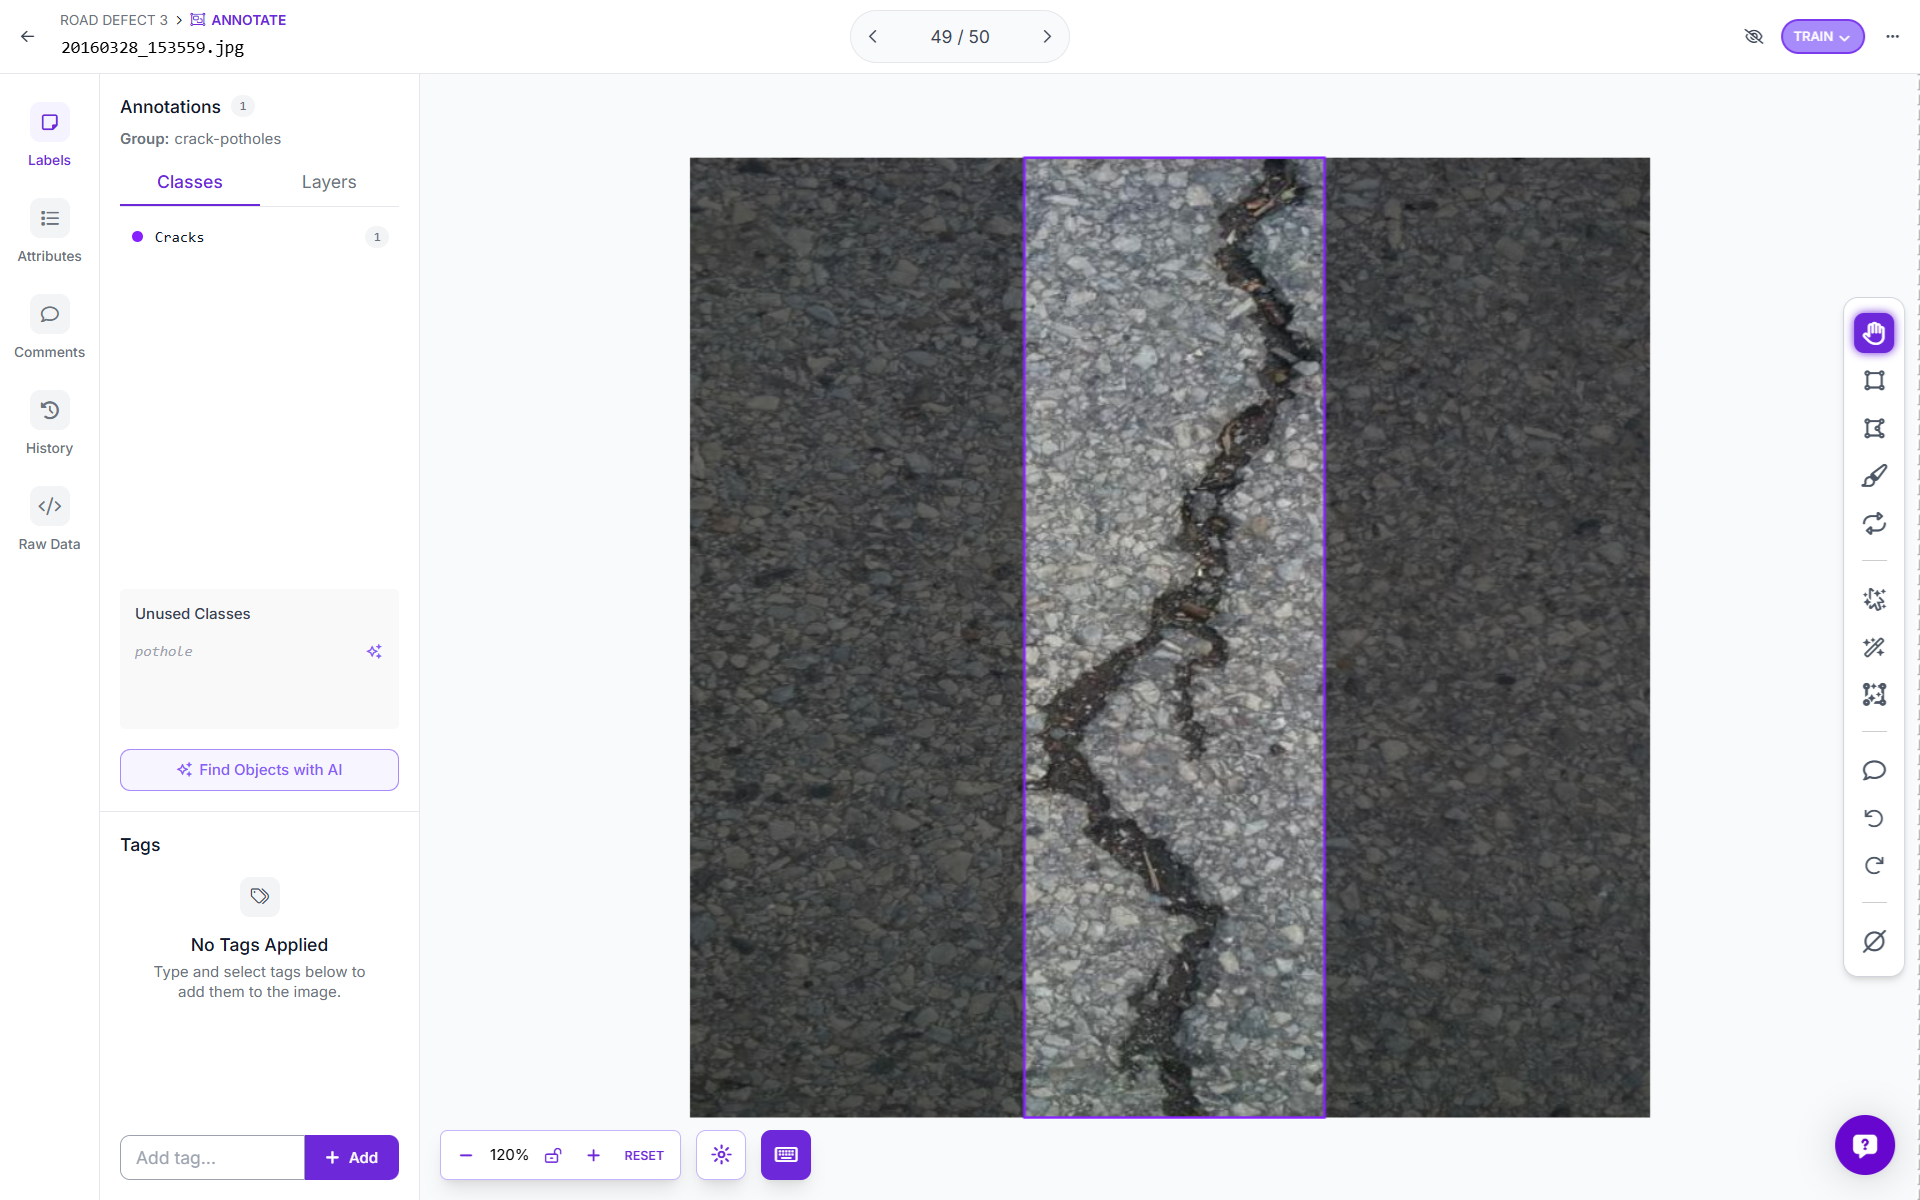
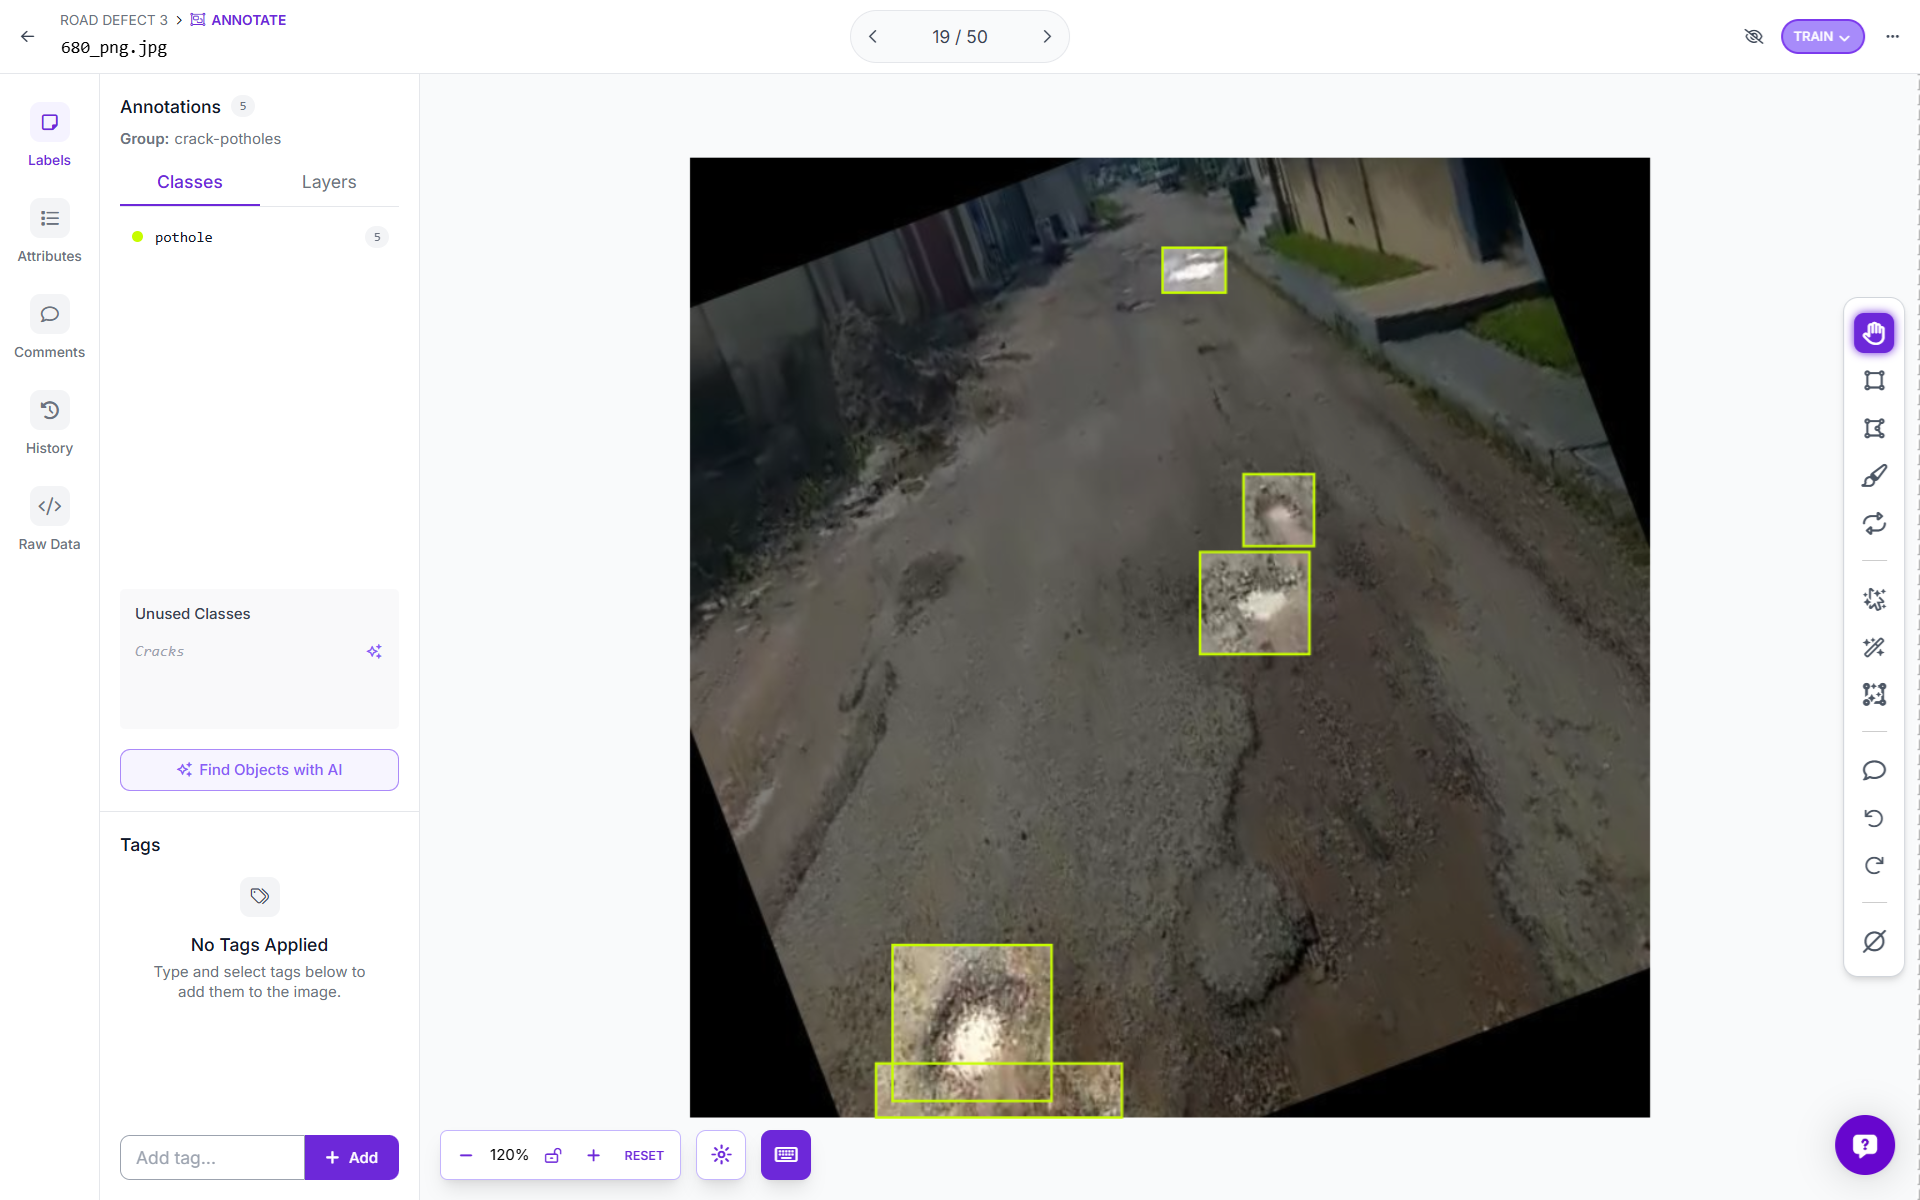
You can also upload your own dataset and annotate images using Roboflow. Use Roboflow's AI-Assisted labeling to annotate images quickly.
Step 2: Generate a Dataset Version
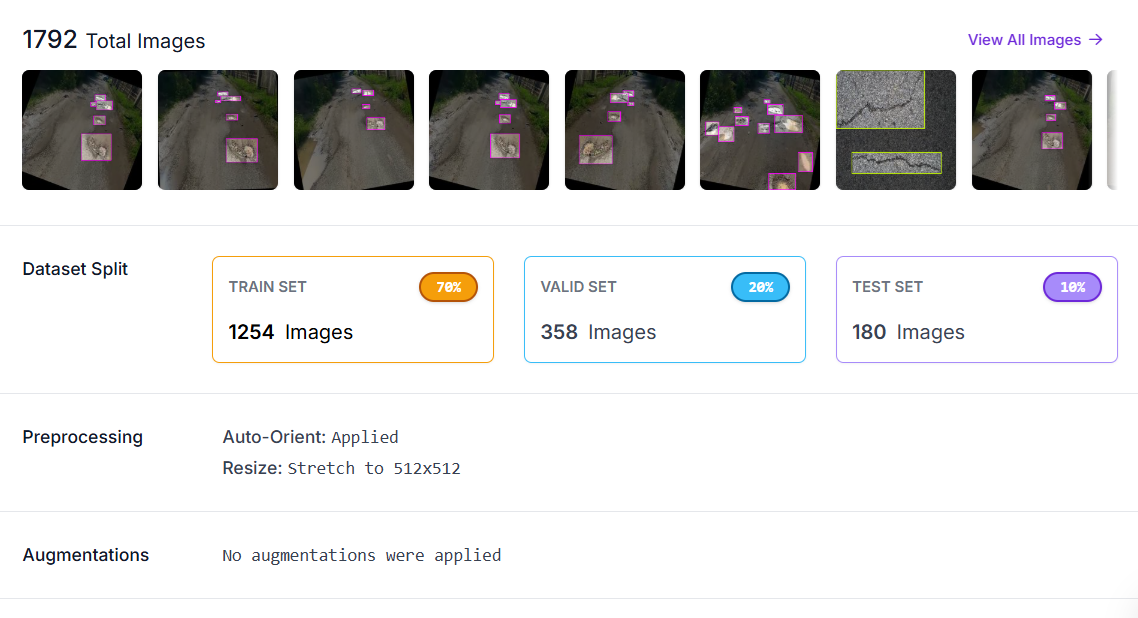
With your images annotated, click Generate to create a dataset version. In the preprocessing step, apply:
- Auto-Orient: corrects camera EXIF rotation so all images are consistently upright regardless of how the camera was held or mounted.
- Resize to 512×512: standardizes input dimensions for training.
No augmentations were applied at the dataset level for this project, as RF-DETR handles augmentation internally during its training loop.
Step 3: Train RF-DETR Object Detection Model
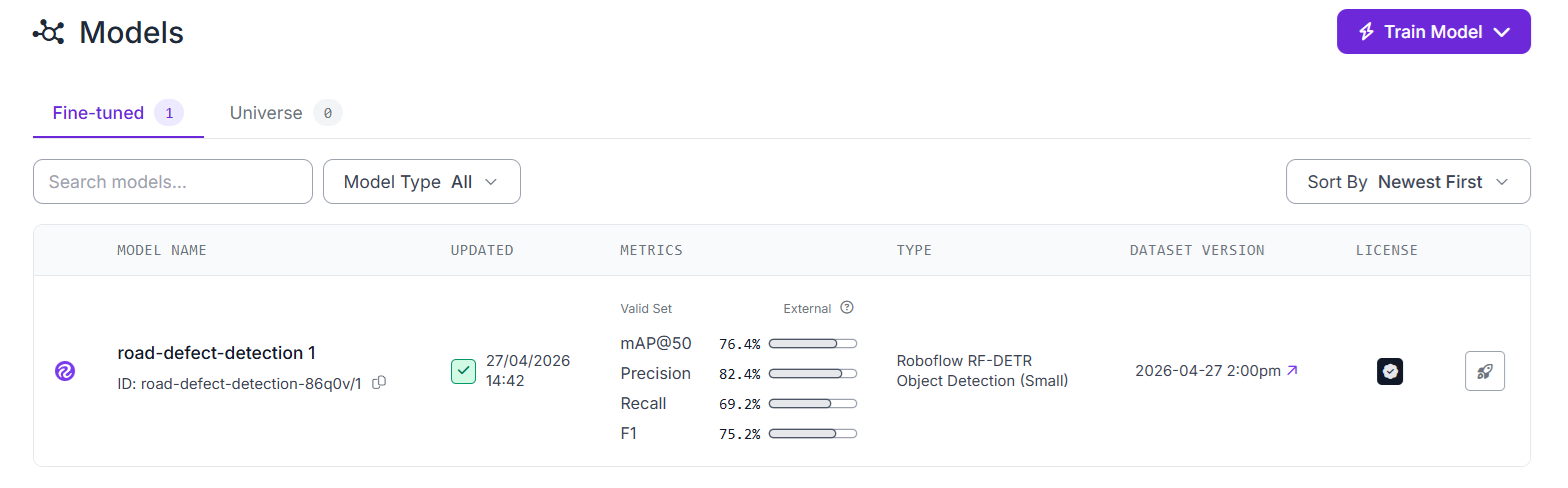
With your dataset version ready, click Train a Model. Select the Roboflow RF-DETR architecture. RF-DETR achieves the highest accuracy on COCO benchmarks among the models available in Roboflow Train, converges well with relatively small datasets, and is optimized for real-time inference. Select Small model size for the best balance of speed and accuracy on a dataset of this scale.
Click Start Training. Roboflow handles GPU provisioning, the full training loop automatically.

Once training completes, review the mAP, precision, and recall metrics. You can also use training graphs to understand the performance of your model.
Step 4: Build the Roboflow Workflows
Now we build two separate workflows from the same trained model, one for UAV aerial imagery, and another for vehicle dashcam video.
Workflow A: UAV Aerial Imagery with SAHI
Aerial drone images present a small object detection challenge. A road defect that is physically significant, a 40 cm pothole, may occupy only 20×20 pixels in a high-resolution image taken from 60 meters altitude. Standard inference over the full image will frequently miss objects at this scale because the model was trained on images where defects occupied a much larger relative portion of the frame.
The solution is Slicing Aided Hyper Inference (SAHI). SAHI works by splitting a large image into smaller overlapping tiles, running inference on each tile individually at full resolution, and then stitching the results back together into the original image coordinate space. The key insight is that each tile is at the same scale the model was trained on, so defects that are invisible at full-image resolution become clearly detectable within their tile.
In Roboflow Workflows, SAHI is implemented using two blocks working together:
- Image Slicer - splits the input image into overlapping sub-images (tiles) according to your configured slice dimensions and overlap ratio.
- Detections Stitch - takes the per-tile predictions from the model, maps them back into the original image coordinate space, and applies Non-Maximum Suppression (NMS) to remove any duplicate detections where tiles overlap.
Build the UAV workflow as follows:
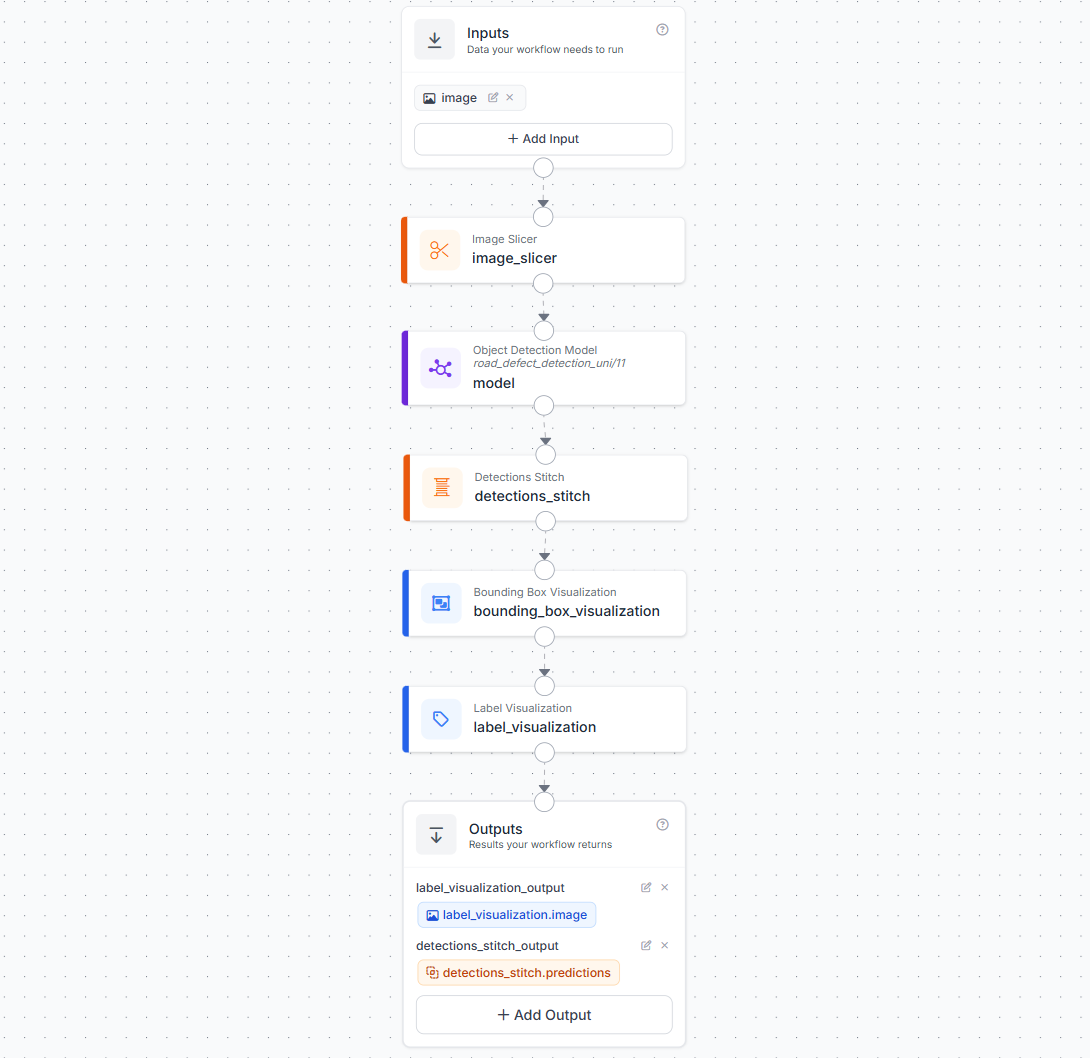
- Add an Image input block.
- Add an Image Slicer block. Connect it to the image input. Configure
slice_width,slice_height, andoverlap_ratio. The 20% overlap ensures defects sitting near tile boundaries are fully captured by at least one tile. - Add an Object Detection block pointing to your trained RF-DETR model (
road_defect_detection_uni/1). Connect its image input to the Image Slicer's slice output, the model will run once per tile. - Add a Detections Stitch block. Connect its images input to the Image Slicer output and its detections input to the Object Detection predictions. This completes the SAHI pipeline by merging all tile predictions back into the original frame and deduplicating overlapping detections with NMS.
- Add a Bounding Box Visualization block. Connect it to the stitched detections and the original image.
- Add a Label Visualization block. Connect it to the Bounding Box Visualization output and the stitched detections.
- In the Outputs block, add two outputs:
label_visualization_output(mapped tolabel_visualization.image) anddetections_stitch_output(mapped todetections_stitch.predictions).
The detections_stitch_output , which carries the stitched, NMS-deduplicated predictions in the original image coordinate space, is what the deployment script reads to build the inspection report.
Workflow B: Vehicle Dashcam Video with ByteTrack
The video workflow adds a ByteTrack Tracker block between the model and the visualization layers. ByteTrack is a multi-object tracking algorithm that assigns a persistent tracker_id to each detected object across frames. As the inspection vehicle drives past a pothole, that pothole receives a single tracker_id that stays consistent across every frame it remains visible, whether that is 5 frames or 50. This is what makes accurate unique defect counting possible in video.
Build the video workflow as follows:
- Add an Image input block.
- Add an Object Detection block pointing to your trained RF-DETR model.
- Add a ByteTrack Tracker block. Connect it to the Object Detection predictions output.
- Add a Bounding Box Visualization block. Connect it to the ByteTrack output.
- Add a Label Visualization block. Connect it to the Bounding Box Visualization output and the ByteTrack detections.
- In the Outputs block, add two outputs:
label_visualization_output(mapped tolabel_visualization.image) andbyte_track_tracker_output(mapped tobyte_track_tracker.tracked_detections).
Step 5: Deploy the Workflows
Both workflows are deployed via Roboflow's serverless hosted API, no local infrastructure required. The UAV workflow uses InferenceHTTPClient to process images directly. The video workflow uses Roboflow's WebRTC SDK to stream video frames through the pipeline efficiently.
For offline or edge deployment, the Roboflow Inference Server can host both workflows locally. Point the client api_url at http://localhost:9001 instead of https://serverless.roboflow.com.
Install Dependencies
pip install inference-sdkUAV Aerial Image Deployment Script
This script processes a folder of drone images through the Image Slicer workflow using InferenceHTTPClient. Predictions come from detections_stitch_output, the stitched, NMS-deduplicated detections in the original image coordinate space. The annotated image from label_visualization_output is decoded and saved to a visualizations/ folder alongside each result. The report covers total detections, per-class breakdown, per-image class summary, and the highest-confidence detection of each class across the full batch.
import os
import json
import base64
import cv2
import numpy as np
from datetime import datetime
from inference_sdk import InferenceHTTPClient

API_KEY           = "ROBOFLOW_API_KEY"
WORKSPACE         = "tim-4ijf0"
WORKFLOW_ID       = "road-defect-detection-uav"
AERIAL_IMAGES_DIR = "aerial_images/"
REPORT_PATH       = "inspection_report_uav.json"
VIS_OUTPUT_DIR    = "visualizations/"

client = InferenceHTTPClient(
    api_url="https://serverless.roboflow.com",
    api_key=API_KEY
)

def run_workflow(image_path):
    result = client.run_workflow(
        workspace_name=WORKSPACE,
        workflow_id=WORKFLOW_ID,
        images={"image": image_path},
        use_cache=True
    )
    return result[0] if isinstance(result, list) else result

def parse_predictions(result):
    """Extract predictions from detections_stitch_output."""
    detections = []
    raw = result.get("detections_stitch_output", [])

    if isinstance(raw, list):
        predictions = raw
    elif isinstance(raw, dict):
        predictions = raw.get("predictions", [])
    else:
        predictions = []

    for pred in predictions:
        cls = pred.get("class")
        if not cls:
            continue
        detections.append({
            "class":      cls,
            "confidence": round(pred.get("confidence", 0), 3),
            "bbox": {
                "x":      round(pred.get("x", 0), 1),
                "y":      round(pred.get("y", 0), 1),
                "width":  round(pred.get("width", 0), 1),
                "height": round(pred.get("height", 0), 1)
            }
        })
    return detections

def save_visualization(result, image_file, output_dir):
    """Decode and save the annotated image from label_visualization_output."""
    os.makedirs(output_dir, exist_ok=True)

    vis_data = result.get("label_visualization_output")
    if not vis_data:
        print(f"  No visualization output for {image_file}")
        return None

    b64_value = vis_data.get("value") if isinstance(vis_data, dict) else vis_data
    if not b64_value:
        return None

    img_array = np.frombuffer(base64.b64decode(b64_value), np.uint8)
    img       = cv2.imdecode(img_array, cv2.IMREAD_COLOR)
    if img is None:
        return None

    out_filename = f"annotated_{image_file}"
    out_path     = os.path.join(output_dir, out_filename)
    cv2.imwrite(out_path, img)
    print(f"  Visualization saved : {out_path}")
    return out_path

def run_uav_inspection(images_dir):
    report = {
        "inspection_timestamp":     datetime.now().isoformat(),
        "inspection_type":          "aerial_uav",
        "workflow_id":              WORKFLOW_ID,
        "images_processed":         0,
        "total_defects_detected":   0,
        "defect_summary":           {},
        "peak_detection_per_class": {},
        "image_results":            []
    }

    image_files = sorted([
        f for f in os.listdir(images_dir)
        if f.lower().endswith((".jpg", ".jpeg", ".png"))
    ])

    if not image_files:
        print(f"No images found in: {images_dir}")
        return

    for image_file in image_files:
        image_path = os.path.join(images_dir, image_file)
        print(f"Processing: {image_file} ...")

        result     = run_workflow(image_path)
        detections = parse_predictions(result)
        vis_path   = save_visualization(result, image_file, VIS_OUTPUT_DIR)

        for d in detections:
            cls = d["class"]

            # Per-class count
            report["defect_summary"][cls] = report["defect_summary"].get(cls, 0) + 1

            # Track highest-confidence detection per class across all images
            current_peak = report["peak_detection_per_class"].get(cls)
            if current_peak is None or d["confidence"] > current_peak["confidence"]:
                report["peak_detection_per_class"][cls] = {
                    "class":      cls,
                    "confidence": d["confidence"],
                    "image":      image_file,
                    "bbox":       d["bbox"]
                }

        # Build per-class summary for this image
        image_class_summary = {}
        for d in detections:
            cls = d["class"]
            image_class_summary[cls] = image_class_summary.get(cls, 0) + 1

        report["image_results"].append({
            "image":              image_file,
            "annotated_image":    vis_path,
            "defects_detected":   len(detections),
            "class_summary":      image_class_summary,
            "detections":         detections
        })
        report["images_processed"]       += 1
        report["total_defects_detected"] += len(detections)

    # Build per-image class summary for top-level JSON
    report["per_image_class_summary"] = {
        img_result["image"]: img_result["class_summary"]
        for img_result in report["image_results"]
    }

    # Save report
    with open(REPORT_PATH, "w") as f:
        json.dump(report, f, indent=2)

    # Print summary
    print(f"\n--- UAV Inspection Report ---")
    print(f"  Images processed       : {report['images_processed']}")
    print(f"  Total defects detected : {report['total_defects_detected']}")
    print(f"\n  Overall defect summary:")
    for cls, count in report["defect_summary"].items():
        peak = report["peak_detection_per_class"].get(cls, {})
        print(
            f"    {cls.capitalize():<12} : {count} detections  |  "
            f"peak conf: {peak.get('confidence', 'N/A')}  |  "
            f"image: {peak.get('image', 'N/A')}"
        )
    print(f"\n  Per-image breakdown:")
    for img_result in report["image_results"]:
        print(f"    {img_result['image']} — {img_result['defects_detected']} defects")
        for cls, count in img_result["class_summary"].items():
            print(f"      {cls.capitalize():<12} : {count}")
    print(f"\n  Report saved to        : {REPORT_PATH}")

if __name__ == "__main__":
    run_uav_inspection(AERIAL_IMAGES_DIR)
Dashcam Video Deployment Script
This script streams a dashcam video through Roboflow's WebRTC SDK. Both label_visualization_output and byte_track_tracker_output are requested via data_output. The ByteTrack Tracker in the workflow assigns a persistent tracker_id to each defect across frames, the script registers each ID the first time it appears and updates its peak confidence on subsequent frames. The report is built entirely from unique tracker IDs so each physical defect is counted exactly once. Annotated frames are displayed live in a window as they arrive and stitched into an output video at the end.
import cv2
import json
import base64
import numpy as np
from datetime import datetime
from collections import defaultdict
from inference_sdk import InferenceHTTPClient
from inference_sdk.webrtc import VideoFileSource, StreamConfig, VideoMetadata

API_KEY      = "ROBOFLOW_API_KEY"
WORKSPACE    = "tim-4ijf0"
WORKFLOW_ID  = "road-defect-detection"
VIDEO_PATH   = "road.mp4"
OUTPUT_VIDEO = "output_annotated.mp4"
REPORT_PATH  = "inspection_report_video.json"

VIDEO_OUTPUT   = "label_visualization_output"
TRACKER_OUTPUT = "byte_track_tracker_output"

client = InferenceHTTPClient.init(
    api_url="https://serverless.roboflow.com",
    api_key=API_KEY
)

source = VideoFileSource(VIDEO_PATH, realtime_processing=False)

config = StreamConfig(
    stream_output=[],
    data_output=[VIDEO_OUTPUT, TRACKER_OUTPUT],
    requested_plan="webrtc-gpu-medium",
    requested_region="us",
)

tracker_registry = {}
frames = []
debug_logged = False

session = client.webrtc.stream(
    source=source,
    workflow=WORKFLOW_ID,
    workspace=WORKSPACE,
    image_input="image",
    config=config
)

@session.on_data()
def on_data(data: dict, metadata: VideoMetadata):
    global debug_logged
    timestamp_ms = metadata.pts * metadata.time_base * 1000

    # --- Print full data structure once ---
    if not debug_logged and data:
        debug_logged = True
        print("\n=== DEBUG: first non-empty data frame ===")
        for key, val in data.items():
            if key == VIDEO_OUTPUT:
                print(f"  key: '{key}' -> type: {type(val).__name__}, "
                      f"dict keys: {list(val.keys()) if isinstance(val, dict) else 'not a dict'}")
            else:
                print(f"  key: '{key}' -> type: {type(val).__name__}, value: {str(val)[:300]}")
        print("=========================================\n")

    # Collect annotated video frame + display live
    vis = data.get(VIDEO_OUTPUT)
    if vis is not None:
        b64_value = vis.get("value") if isinstance(vis, dict) else vis
        if b64_value:
            img = cv2.imdecode(
                np.frombuffer(base64.b64decode(b64_value), np.uint8),
                cv2.IMREAD_COLOR
            )
            if img is not None:
                frames.append((timestamp_ms, metadata.frame_id, img))

                # --- Real-time display ---
                cv2.imshow("Road Defect Detection - Live", img)
                if cv2.waitKey(1) & 0xFF == ord("q"):
                    session.stop()

    # Process ByteTrack detections
    tracked_raw = data.get(TRACKER_OUTPUT)
    if tracked_raw is not None:
        if isinstance(tracked_raw, list):
            detections = tracked_raw
        elif isinstance(tracked_raw, dict):
            detections = (
                tracked_raw.get("tracked_detections")
                or tracked_raw.get("predictions")
                or []
            )
        else:
            detections = []

        for det in detections:
            tracker_id = det.get("tracker_id")
            cls        = det.get("class") or det.get("class_name")
            if tracker_id is None or not cls:
                continue

            confidence = round(det.get("confidence", 0), 3)
            bbox = {
                "x":      round(det.get("x", 0), 1),
                "y":      round(det.get("y", 0), 1),
                "width":  round(det.get("width", 0), 1),
                "height": round(det.get("height", 0), 1)
            }

            if tracker_id not in tracker_registry:
                tracker_registry[tracker_id] = {
                    "tracker_id":       tracker_id,
                    "class":            cls,
                    "peak_confidence":  confidence,
                    "first_seen_frame": metadata.frame_id,
                    "first_seen_ts_ms": round(timestamp_ms, 1),
                    "bbox_at_peak":     bbox
                }
            else:
                if confidence > tracker_registry[tracker_id]["peak_confidence"]:
                    tracker_registry[tracker_id]["peak_confidence"] = confidence
                    tracker_registry[tracker_id]["bbox_at_peak"]    = bbox

    print(f"Frame {metadata.frame_id} | keys: {list(data.keys())} | "
          f"frames collected: {len(frames)} | trackers: {len(tracker_registry)}")

session.run()
cv2.destroyAllWindows()

if frames:
    frames.sort(key=lambda x: x[1])
    fps = (
        (len(frames) - 1) / ((frames[-1][0] - frames[0][0]) / 1000)
        if len(frames) > 1 else 30.0
    )
    h, w = frames[0][2].shape[:2]
    out  = cv2.VideoWriter(OUTPUT_VIDEO, cv2.VideoWriter_fourcc(*"mp4v"), fps, (w, h))
    for _, _, frame in frames:
        out.write(frame)
    out.release()
    print(f"\nAnnotated video saved: {len(frames)} frames @ {fps:.1f} FPS -> {OUTPUT_VIDEO}")
else:
    print("\nNo video frames collected.")

unique_defects = list(tracker_registry.values())
defect_summary = defaultdict(int)
peak_per_class = {}

for defect in unique_defects:
    cls = defect["class"]
    defect_summary[cls] += 1
    if cls not in peak_per_class or defect["peak_confidence"] > peak_per_class[cls]["peak_confidence"]:
        peak_per_class[cls] = defect

report = {
    "inspection_timestamp":     datetime.now().isoformat(),
    "inspection_type":          "dashcam_video_bytetrack",
    "workflow_id":              WORKFLOW_ID,
    "video_file":               VIDEO_PATH,
    "annotated_video":          OUTPUT_VIDEO,
    "total_frames_processed":   len(frames),
    "unique_defects_detected":  len(unique_defects),
    "defect_summary":           dict(defect_summary),
    "peak_detection_per_class": peak_per_class,
    "unique_defect_log":        unique_defects
}

with open(REPORT_PATH, "w") as f:
    json.dump(report, f, indent=2)

print(f"\n--- Video Inspection Report ---")
print(f"  Frames processed         : {len(frames)}")
print(f"  Unique defects detected  : {len(unique_defects)}")
for cls, count in defect_summary.items():
    peak = peak_per_class.get(cls, {})
    print(
        f"  {cls.capitalize():<12} : {count} unique  |  "
        f"peak conf: {peak.get('peak_confidence', 'N/A')}  |  "
        f"first seen frame: {peak.get('first_seen_frame', 'N/A')} "
        f"@ {peak.get('first_seen_ts_ms', 'N/A')} ms"
    )
print(f"  Report saved to          : {REPORT_PATH}")
Reading the Inspection Reports
Both scripts produce a structured JSON report automatically at the end of each run.
UAV report
{
  "inspection_timestamp": "2026-04-29T11:07:28.351213",
  "inspection_type": "aerial_uav",
  "workflow_id": "road-defect-detection-uav",
  "images_processed": 2,
  "total_defects_detected": 14,
  "defect_summary": {
    "pothole": 9,
    "Cracks": 5
  },
  "per_image_class_summary": {
    "road_1.jpg": { "pothole": 9, "Cracks": 1 },
    "road_2.jpg": { "Cracks": 4 }
  },
  "peak_detection_per_class": {
    "pothole": {
      "class": "pothole", "confidence": 0.999,
      "image": "road_1.jpg",
      "bbox": { "x": 432.5, "y": 57.5, "width": 51.0, "height": 23.0 }
    },
    "Cracks": {
      "class": "Cracks", "confidence": 0.999,
      "image": "road_2.jpg",
      "bbox": { "x": 275.0, "y": 100.5, "width": 86.0, "height": 199.0 }
    }
  },
  "image_results": [
    {
      "image": "road_1.jpg",
      "annotated_image": "visualizations/annotated_road_1.jpg",
      "defects_detected": 10,
      "class_summary": { "pothole": 9, "Cracks": 1 },
      "detections": [
        { "class": "pothole", "confidence": 0.999,
          "bbox": { "x": 432.5, "y": 57.5, "width": 51.0, "height": 23.0 } },
        { "class": "Cracks", "confidence": 0.617,
          "bbox": { "x": 241.0, "y": 487.0, "width": 88.0, "height": 72.0 } }
      ]
    },
    {
      "image": "road_2.jpg",
      "annotated_image": "visualizations/annotated_road_2.jpg",
      "defects_detected": 4,
      "class_summary": { "Cracks": 4 },
      "detections": [
        { "class": "Cracks", "confidence": 0.999,
          "bbox": { "x": 275.0, "y": 100.5, "width": 86.0, "height": 199.0 } },
        { "class": "Cracks", "confidence": 0.998,
          "bbox": { "x": 224.0, "y": 259.0, "width": 122.0, "height": 196.0 } }
      ]
    }
  ]
}
The per_image_class_summary at the top gives an instant at-a-glance breakdown per image without needing to drill into image_results. The peak_detection_per_class records the single highest-confidence detection of each class across the full batch, with its source image filename — useful for jumping straight to the worst-case example of each defect type. Each entry in image_results includes the path to the saved annotated image alongside the detection list and per-image class count.
Video report
The video report is built entirely from unique ByteTrack tracker IDs. Every entry in unique_defect_log is one physical defect on the road — not one frame.
{
  "inspection_timestamp": "2026-04-29T11:52:53.719892",
  "inspection_type": "dashcam_video_bytetrack",
  "workflow_id": "road-defect-detection",
  "video_file": "road.mp4",
  "annotated_video": "output_annotated.mp4",
  "total_frames_processed": 145,
  "unique_defects_detected": 3,
  "defect_summary": {
    "pothole": 1,
    "Cracks": 2
  },
  "peak_detection_per_class": {
    "pothole": {
      "tracker_id": 98, "class": "pothole",
      "peak_confidence": 0.999,
      "first_seen_frame": 2, "first_seen_ts_ms": 41.7,
      "bbox_at_peak": { "x": 291.0, "y": 226.5, "width": 92.0, "height": 33.0 }
    },
    "Cracks": {
      "tracker_id": 99, "class": "Cracks",
      "peak_confidence": 1.0,
      "first_seen_frame": 17, "first_seen_ts_ms": 666.7,
      "bbox_at_peak": { "x": 232.0, "y": 400.5, "width": 122.0, "height": 333.0 }
    }
  },
  "unique_defect_log": [
    {
      "tracker_id": 98, "class": "pothole",
      "peak_confidence": 0.999,
      "first_seen_frame": 2, "first_seen_ts_ms": 41.7,
      "bbox_at_peak": { "x": 291.0, "y": 226.5, "width": 92.0, "height": 33.0 }
    },
    {
      "tracker_id": 99, "class": "Cracks",
      "peak_confidence": 1.0,
      "first_seen_frame": 17, "first_seen_ts_ms": 666.7,
      "bbox_at_peak": { "x": 232.0, "y": 400.5, "width": 122.0, "height": 333.0 }
    },
    {
      "tracker_id": 100, "class": "Cracks",
      "peak_confidence": 0.996,
      "first_seen_frame": 95, "first_seen_ts_ms": 3916.7,
      "bbox_at_peak": { "x": 517.0, "y": 531.5, "width": 86.0, "height": 57.0 }
    }
  ]
}
Across 145 processed frames, ByteTrack identified exactly 3 unique physical defects, 1 pothole and 2 cracks. Without tracking, a naive per-frame counter would have recorded the same defects dozens of times as the vehicle drove past them. The first_seen_ts_ms field ties each unique defect to a precise moment in the footage — a reviewer can jump to 41.7 ms for the pothole or 666.7 ms for the first crack in output_annotated.mp4 for visual verification, without scrubbing through the full clip.
What do the report fields tell you?
defect_summary gives an instant class-level count for the entire run. For example a UAV survey showing 43 cracks and 18 potholes across a 2 km corridor is at a fundamentally different stage of deterioration than a route with 40 potholes and 3 cracks, and the maintenance response crack sealing versus pothole patching is different in each case.
peak_detection_per_class records the single highest-confidence detection of each class across the entire run, along with the image filename (UAV) or first_seen_ts_ms (video). For video, this gives a reviewer a precise timestamp to jump to in the footage for visual verification, without scrubbing through the full clip.
unique_defect_log (video only) is the complete unique-defect registry. Each entry is one tracked physical defect. This is the raw record that feeds downstream analysis: defect density per route, trend comparisons across inspection cycles, and integration with GPS or route metadata for location-aware reporting.
Bounding box geometry as a severity indicator: Even without explicit area measurement, bounding box dimensions carry useful signal. A pothole with a large width and height (210×180) is a spatially extensive cavity, high repair priority. A tight box (60×55) indicates an early-stage pothole. A crack with high width and very low height (310×28) is a long longitudinal crack. A crack where width and height are roughly equal points to localized alligator-pattern cracking.
Infrastructure Management Applications
The system that we built does more than detect defects. It generates structured reports that can be directly used for managing road infrastructure.
- Accurate Defect Counts Enable Accurate Prioritization: The system counts only unique defects instead of repeated detections from multiple frames. This ensures the numbers are correct, so maintenance teams can confidently use them to plan repairs.
- Defect Density and Route Scoring: The system calculates defects per kilometer, which helps compare different road segments fairly. This allows authorities to rank roads and prioritize maintenance based on actual need.
- Trend Tracking Across Inspection Cycles: Each inspection is saved with a timestamp, making it easy to compare results over time. This helps identify roads that are getting worse and take action before major damage occurs.
- Confidence Distribution as a Data Quality Signal: The confidence values show how reliable the detections are. Lower confidence indicates uncertain conditions, while higher confidence suggests that the model is performing well.
- Digital Audit Trail: Every inspection creates a stored record with time, location, and detection details. This is useful for audits, insurance claims, and compliance reporting.
- Scaling to Smart City Infrastructure: The structured data can be integrated with GIS systems and dashboards. This supports better planning and helps build smart city infrastructure solutions.
Limitations and Responsible Use
Computer vision augments inspection workflows, it does not replace the judgment of a trained road engineer. It also depends on the data on which the model is trained and the model performance in real conditions. Therefore in such systems, all detection outputs should be treated as flags for human review before repair dispatch. The system produces a prioritized queue, the final decision to dispatch a crew remains with the maintenance team. The main goal of the system is to automate the reporting process to save time.
Further Applications
The same model and workflow architecture can be repurposed for:
- Airport runway and taxiway inspection where surface integrity is safety-critical and inspection frequency requirements are stringent.
- Parking lot condition auditing for facility management companies monitoring surface degradation across large commercial properties.
- Post-disaster rapid road assessment after floods or earthquakes, where a drone survey can identify impassable sections before ground crews can safely access the area.
- Highway concession monitoring to verify that road surfaces maintained under concession agreements meet contractual surface quality standards.
- Rail track bed inspection by applying the same aerial workflow to ballast condition monitoring from UAV imagery.
Road Defect Detection Conclusion
In this tutorial, we built a road defect detection system using an RF-DETR model trained on Roboflow and deployed through two Roboflow Workflows, one for UAV aerial imagery using SAHI, and one for dashcam video using ByteTrack. Both paths produce structured JSON inspection reports automatically, giving maintenance teams a reproducible, timestamped record of defects without any manual documentation effort.
Cite this Post
Use the following entry to cite this post in your research:
Timothy M. (Apr 29, 2026). Detecting Road Defects with Computer Vision. Roboflow Blog: https://blog.roboflow.com/detecting-road-defects/