
This tutorial builds a privacy-first security monitoring pipeline in Roboflow Workflows using image slicing, ByteTracker, and Florence-2 scene captioning across two parallel branches. People inside a restricted zone are tracked and timed; everyone outside is immediately pixelated. The composable graph outputs an audit-ready JSON log and a privacy-respecting live view, and swapping a model or adding an alert means changing a block, not rewriting the pipeline.
Every security camera is a privacy decision waiting to be made.
When you install a camera in a restricted area, for example a server room, a warehouse floor or a private office, you're implicitly making a choice about who gets recorded, under what conditions, and with what protections for everyone else who happens to walk into frame. Most systems don't make that choice explicitly. They record everything, anonymize nothing, and leave compliance as someone else's problem.
This article builds a different kind of system. One where anonymization is the default, visibility is the exception, and every decision is logged. We'll use Roboflow Workflows to build a privacy-first security monitoring pipeline that detects heads in high-resolution footage, tracks individuals inside a restricted zone, pixelates everyone outside it all in a single composable graph.
If you've used Roboflow Workflows before but haven't pushed them into multi-branch, stateful territory, this is where it gets interesting. Here's the advanced workflow we'll build.
What are we building?
Before diving into individual blocks, here's the full picture.
We have a single high-resolution camera feed pointed at a restricted area, think of a server room entrance or a secure office floor. The pipeline needs to answer three questions on every frame:
- Who is inside the restricted zone? Track them, time them, keep a log.
- Who is outside it? Anonymize them immediately.
- What is happening in the scene overall? Generate a periodic natural language description for the audit trail.
The pipeline splits into two branches after detection. The main branch handles the zone logic: routing faces inside the polygon to a visible, tracked visualization and pixelating everything outside it. A second branch runs scene captioning through Florence-2, rate-limited so it doesn't bottleneck the main detection loop. Both branches feed into a single JSON output at the end.
One thing worth noting upfront: this isn't a face recognition system. We're detecting and tracking heads, not identifying people by identity. The tracker assigns anonymous session IDs, enough for security logging, not enough to build a surveillance profile. However, if necessary, this kind of profiling could be incorporated.
The Advanced Roboflow Workflow
Stage 1: Handling High-Resolution Input
The first challenge with security footage isn't detection, it's resolution.
A typical wide-angle security camera captures a large area at high resolution. Heads in that frame are small, often occupying only a fraction of the total pixels. If you feed that image directly into a detection model, you're asking it to find small objects and most models struggle with that, not because they're bad, but because they were trained on images where the subject fills a reasonable portion of the frame.
The solution is the Image Slicer block. Instead of resizing the full frame down to model input size (which makes small heads even smaller), it tiles the image into overlapping crops and runs detection on each tile independently. One important consequence of slicing: your detection model runs once per tile, not once per frame. On a frame divided into 9 tiles, you're running 9 inference passes. That's the tradeoff, a better recall for small objects at the cost of latency.
The output of this stage is a list of detections spread across tile coordinate spaces, which is exactly the problem that the next stage solves.
Stage 2: Detection + Reassembly
Each tile from the Image Slicer is now an independent image with its own coordinate space. A head detected in tile 3 has coordinates relative to that tile's top-left corner, not the original frame. This is a two-block stage: the Detection Model and the Detections Stitch block.

The Detection Model, which has been selected from Roboflow Universe, runs on each tile independently. Detections Stitch then does the coordinate remapping. It takes every detection from every tile, converts its coordinates back to the full-frame space, and resolves duplicates. The output is a clean list of detections as if the model had run on the full frame directly, but with the recall benefits of having run on smaller crops.
Stage 3: Identity Tracker
At this point we have a clean list of head detections per frame. But detections alone are stateless, meaning that every frame is a fresh snapshot with no memory of what came before.
That's what ByteTracker provides. ByteTracker assigns a persistent ID to each detection and maintains it across frames by predicting where each tracked object will be in the next frame and matching it to the closest new detection. As long as someone stays in frame, their ID stays consistent, even if the detector briefly misses them for a few frames.
A deliberate design decision: ByteTracker runs here, before the polygon filter. The reason is boundary behavior. If someone steps out of the zone temporarily and comes back, a tracker placed after the filter would assign them a new ID on re-entry. Your log would show two separate sessions for the same person. Tracking before the split means the ID survives zone transitions, giving you a continuous, accurate dwell time even for people who move in and out.
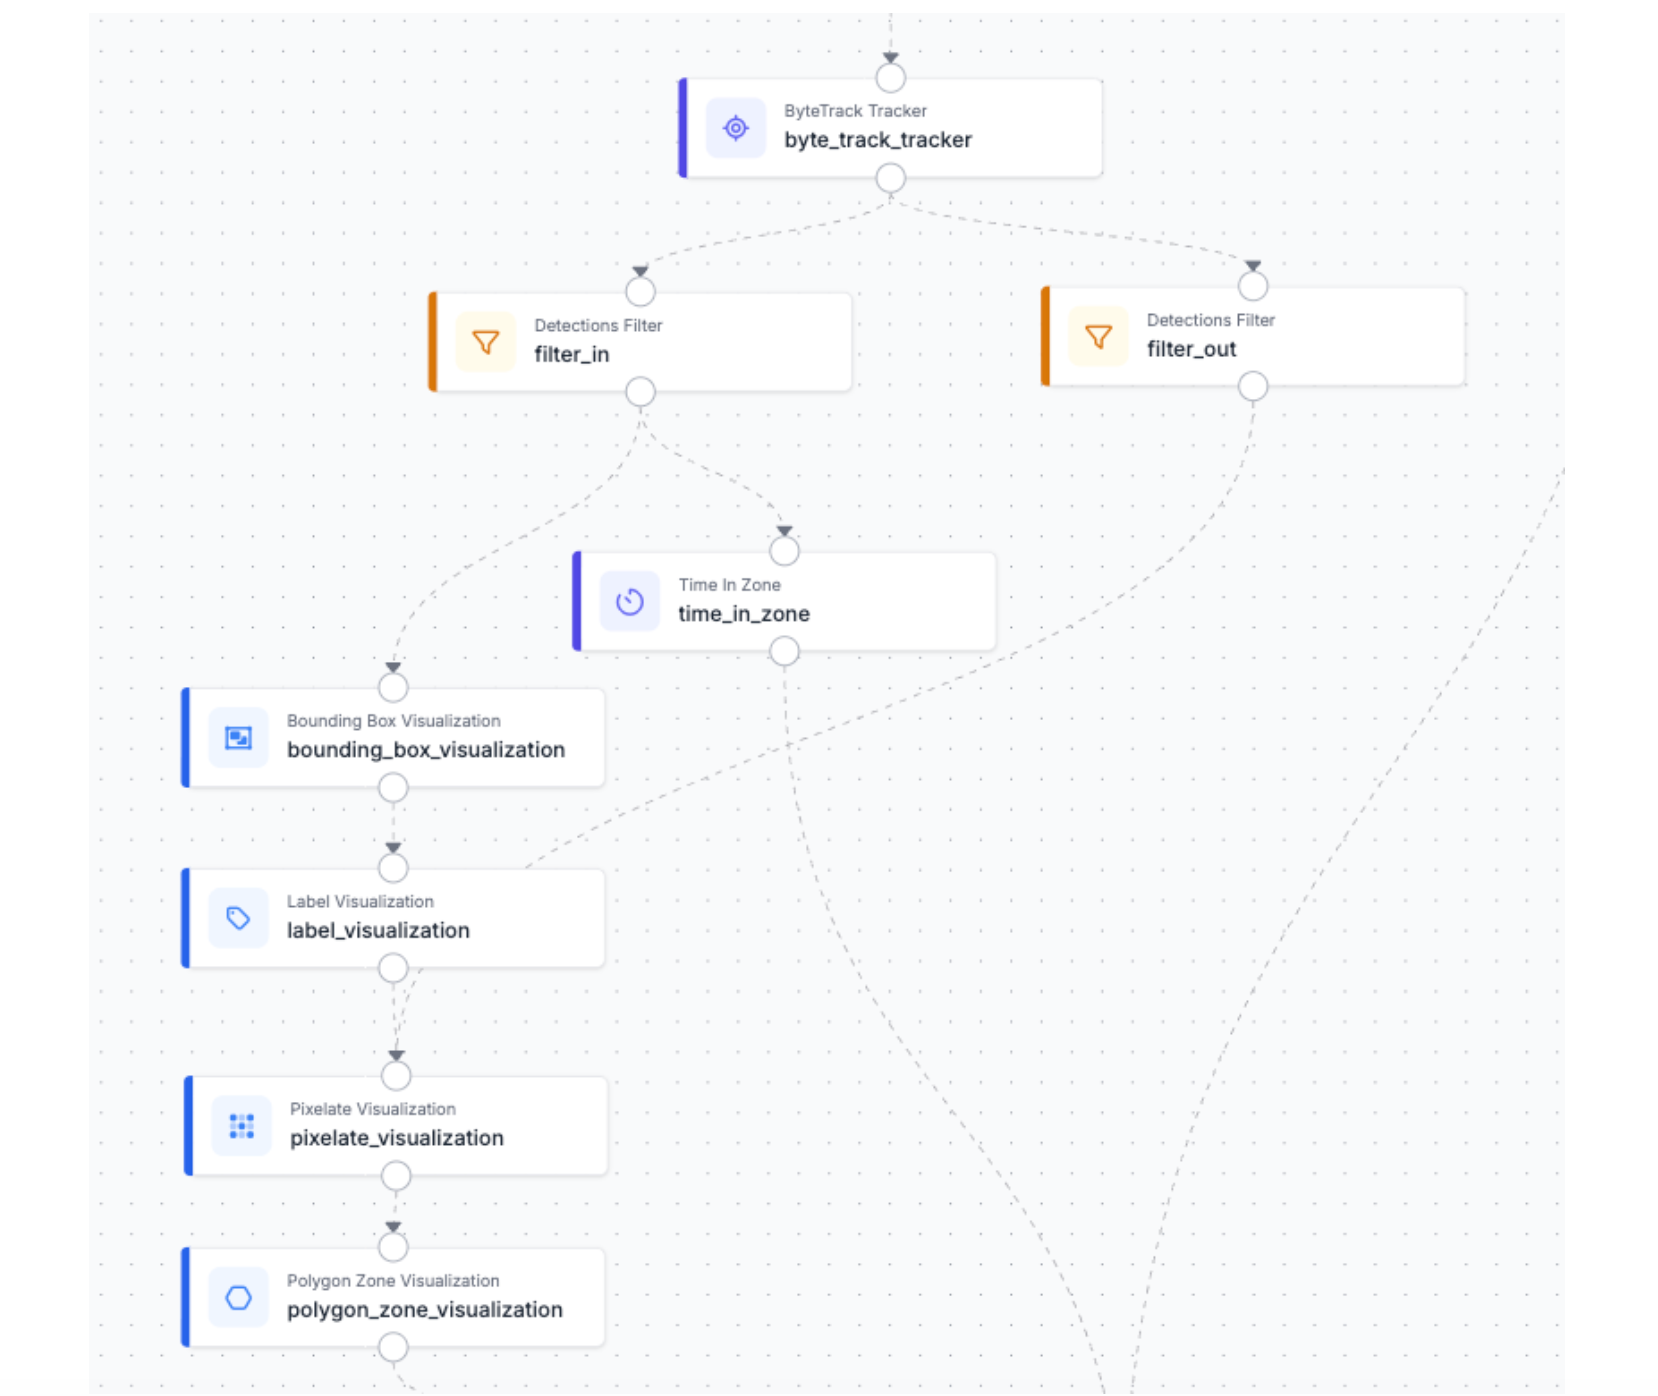
Stage 4: Zone-Based Privacy Splitting & Visualization
This is where the privacy logic and the visual output come together in a single branched stage. Every tracked detection leaving ByteTracker hits one of two paths:
Branch One - Inside the Zone
Detections whose center point falls within the polygon pass this filter. These are the people the system has a legitimate operational reason to monitor. Two visualization blocks run in sequence:
- Bounding Box Visualization: draws a box around each tracked head, making their position explicit in the output frame.
- Label Visualization: overlays the tracker ID directly into each bounding box.
The rendered output is a frame where monitored individuals are clearly marked, identifiable by session, and timestamped. This is your compliance-visible layer.
Additionally, the Time in Zone block takes over. It works in conjunction with the polygon we have defined in order to register the time that each individual spends inside the surveillance area.
Branch Two - Outside the Zone
Every detection outside the polygon takes this path. These are people the camera happens to capture but who are not the subject of monitoring.
- Pixelate Visualization: immediately obscures each detected head for anonymization purposes.
- Polygon Zone Visualization: then draws the zone boundary on the frame, making the inside/outside distinction spatially explicit in the output.
The two branches then converge downstream, feeding both their rendered outputs and their detection data into the captioning and logging stages.
Edge cases worth knowing:
- Boundary detections: a head whose center sits exactly on the polygon edge will resolve to one branch or the other. If your zone has a high-traffic threshold line, a small inset margin on the polygon prevents ambiguous assignments.
- Dense crowds near the boundary: consider the Detections Stabilizer block if overlapping bounding boxes near the zone edge cause flickering between branches across frames.
Stage 5: Scene Understanding
The first block in this branch isn't a model, it's a Rate Limiter.
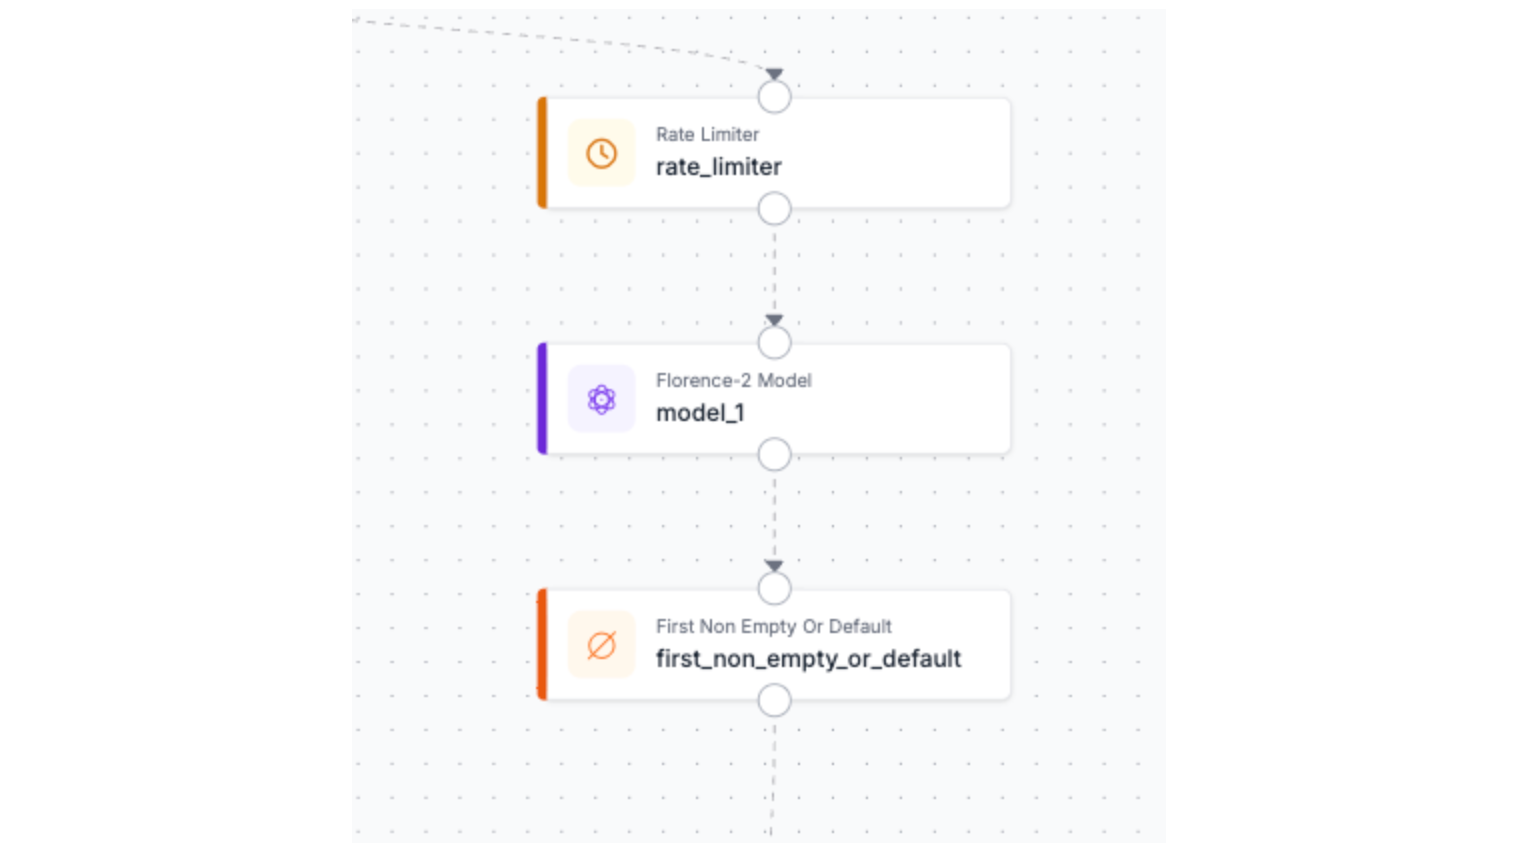
Florence-2 is not a lightweight block. Running it on every frame would create a bottleneck that degrades the entire pipeline's throughput, burning compute on captions that are nearly identical frame-to-frame anyway. A scene description that updates every X seconds captures meaningful change without taxing the system.
The Rate Limiter gates the captioning branch so Florence-2 only receives a frame when enough time has passed since the last caption was generated. The main detection branch runs unaffected at full frame rate. The two branches are deliberately decoupled; detection latency and captioning latency are independent problems.
Two things worth noting about this branch before we move on:
- Captioning model: Florence-2 is used here as a concrete example, but this block is interchangeable. Claude, Gemini, GPT-4o, or any other VLM supported by Roboflow Workflows slots in without changing anything else in the pipeline. The choice of model depends on your deployment constraints.
- Triggering captions conditionally: Right now the Rate Limiter fires on a fixed time interval regardless of what's happening in the scene. A more targeted approach is to trigger the captioning branch only when at least one person is detected inside the zone, so you're generating descriptions when there's actually something to describe, and staying silent when the restricted area is empty.
Results
The best way to understand what this pipeline produces is to watch it run on real footage.
Frame by frame, a few things become immediately apparent. The Image Slicer is doing real work, heads that would be missed by a model running on the full resolution frame are caught cleanly across tile boundaries and stitched back into coherent detections. The zone boundary makes the privacy split visually unambiguous. Step inside the polygon and bounding box appears. Step outside and you will be pixelated immediately, no label, no ID. The transition is per-frame and automatic, no manual intervention needed.
Below, you can see an example of a json result that your application could process for further logic:
{
  "captioning": "\"A large group of people walking across a white floor.\"",
  "time_in_zone_output": {
    "image": {
      "width": 1920,
      "height": 1080
    },
    "predictions": [
      {
        "width": 14,
        "height": 19,
        "x": 937,
        "y": 497.5,
        "confidence": 0.7519588470458984,
        "class_id": 0,
        "tracker_id": 1,
        "class": "0",
        "detection_id": "89c21ec0-386a-41d4-b6db-532caac2ed14",
        "time_in_zone": 1.8685314685314687,
        "parent_id": "image.[0]"
      }
    ]
  }
}
The JSON output tells the same story in structured form: detection coordinates, tracker IDs, occupation times and a caption tied to the moment the zone was occupied.
Next Steps
This pipeline is a foundation, a few directions worth exploring depending on your deployment needs:
- Swap the captioning model: Florence-2 is one option among many. Claude, Gemini or GPT can be dropped in without touching the rest of the pipeline.
- Add alerting: a Slack or Twilio notification block triggered when dwell time exceeds a threshold turns this from a passive logging system into an active security tool. Someone has been in the restricted zone for 10 minutes? The right person gets a message.
- Review documentation: If you want to go further, Roboflow's workflow documentation is the best place to start, the full block library is larger than what we used here, and browsing it with a specific problem in mind tends to spark ideas you wouldn't find by searching directly.
How to Create Advanced Workflows in Roboflow Conclusion
Security and privacy are usually framed as opposing forces, more of one means less of the other. This pipeline challenges that assumption.
By making anonymization the default and visibility the exception, you end up with a system that is both more privacy-respecting and more useful as a security tool. Every person outside the zone is protected without any manual configuration. Every person inside it is tracked, timed, and logged with enough detail to be operationally meaningful. And because the whole thing is a composable Roboflow Workflow, swapping a model, adding an alert, or redirecting the output is a matter of changing a block, not rewriting a pipeline.
Written by David Redó
How do I create an advanced workflow in Roboflow?
To create an advanced workflow in Roboflow, you drap-and-drop to connect functional blocks - such as image slicers, object detectors, and identity trackers -into a single, composable multi-branch pipeline. By applying conditional logic such as zone-based filters and rate limiters to these interconnected blocks, you can build complex, stateful applications that simultaneously track, analyze, and anonymize data in real time.
Cite this Post
Use the following entry to cite this post in your research:
Contributing Writer. (Apr 27, 2026). How to Create Advanced Workflows in Roboflow. Roboflow Blog: https://blog.roboflow.com/how-to-create-advanced-workflows/