
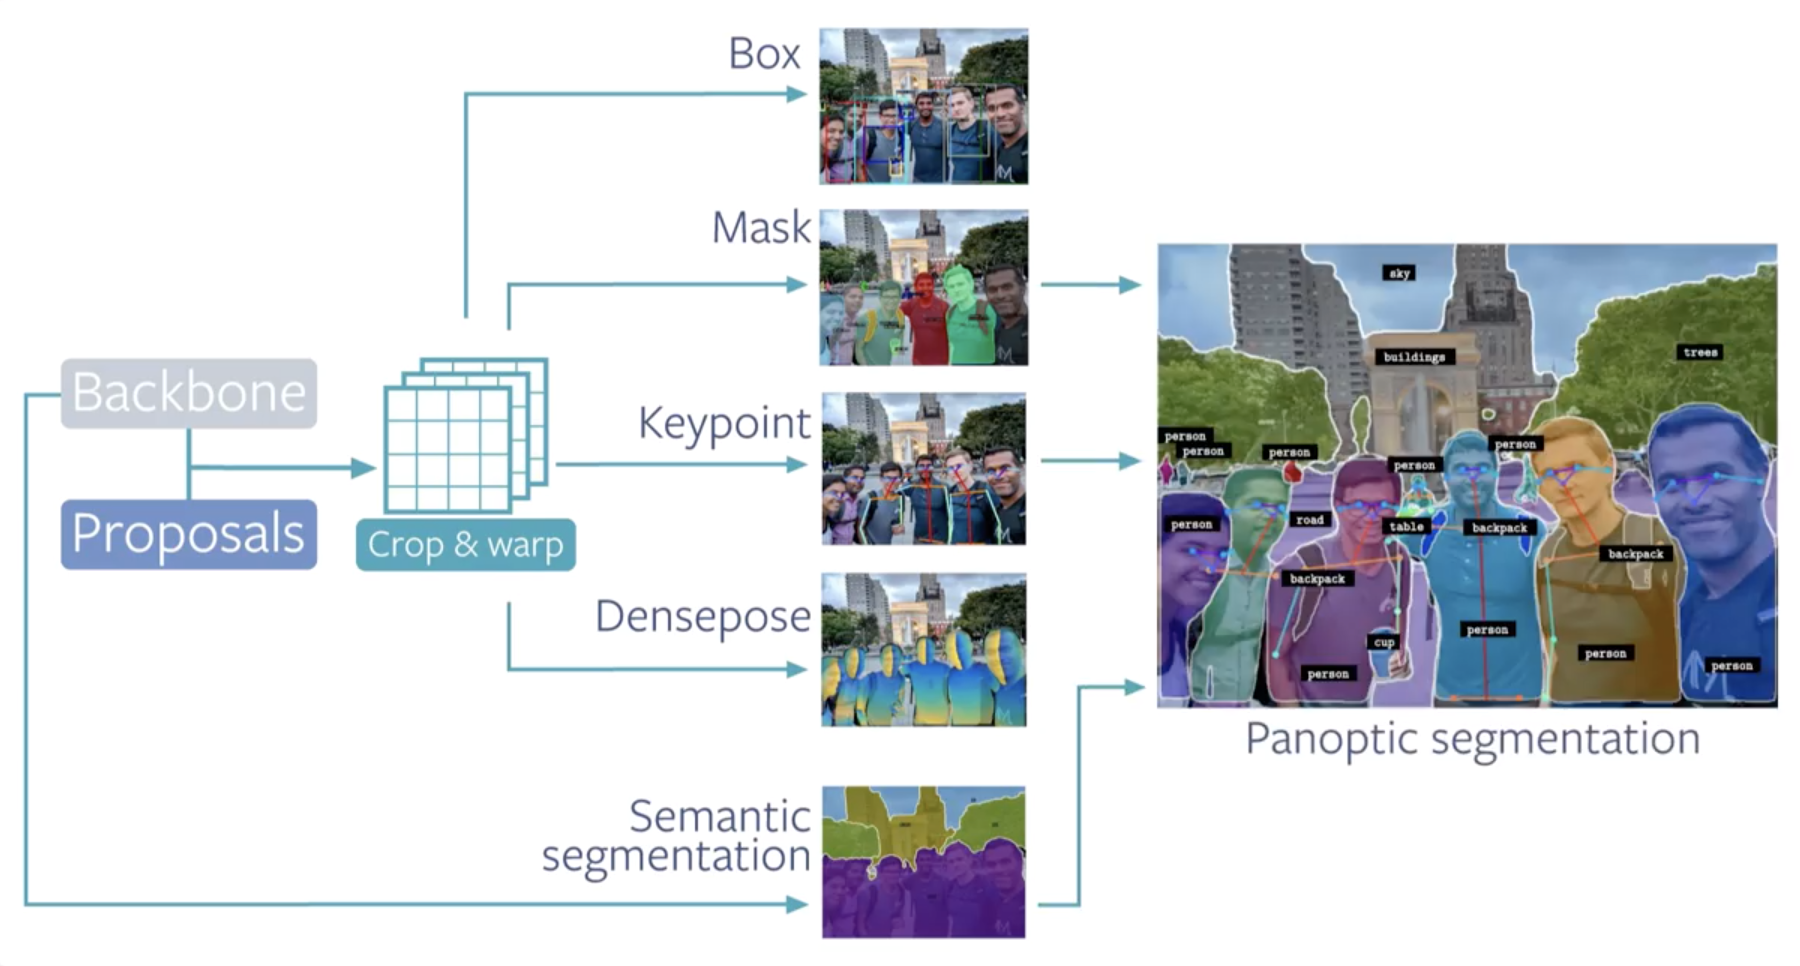
Detectron2 is a PyTorch-based modular computer vision library from Facebook AI Research that supports Faster R-CNN, Mask R-CNN, Cascade R-CNN, and Panoptic FPN, among other architectures. This tutorial trains a custom Detectron2 object detector on a public blood cell detection dataset (red blood cells, white blood cells, and platelets), covering dependency installation, dataset download from Roboflow, training configuration, evaluation, and test-image inference in a Colab notebook. Changing a single line of the data import handles swapping in any custom dataset.
In this post, we will walk through how to train Detectron2 to detect custom objects in this Detectron2 Colab notebook. After reading, you will be able to train your custom Detectron2 detector by changing only one line of code for your custom data import.
Article Outline
- Overview of Detectron2
- Overview of our custom computer vision dataset
- Install Detectron2 dependencies
- Download custom Detectron2 object detection data
- Visualize Detectron2 training data
- Write our Detectron2 training configuration
- Run Detectron2 training
- Evaluate Detectron2 performance
- Run Detectron2 inference on test images
Custom Detectron2 Training Resources
Video tutorial for training Detectron2 for object detection
Overview of Detectron2
Detectron2 is a popular PyTorch based modular computer vision model library. It is the second iteration of Detectron, originally written in Caffe2. The Detectron2 system allows you to plug in custom state of the art computer vision technologies into your workflow. Quoting the Detectron2 release blog:
Detectron2 includes all the models that were available in the original Detectron, such as Faster R-CNN, Mask R-CNN, RetinaNet, and DensePose. It also features several new models, including Cascade R-CNN, Panoptic FPN, and TensorMask, and we will continue to add more algorithms. We’ve also added features such as synchronous Batch Norm and support for new datasets like LVIS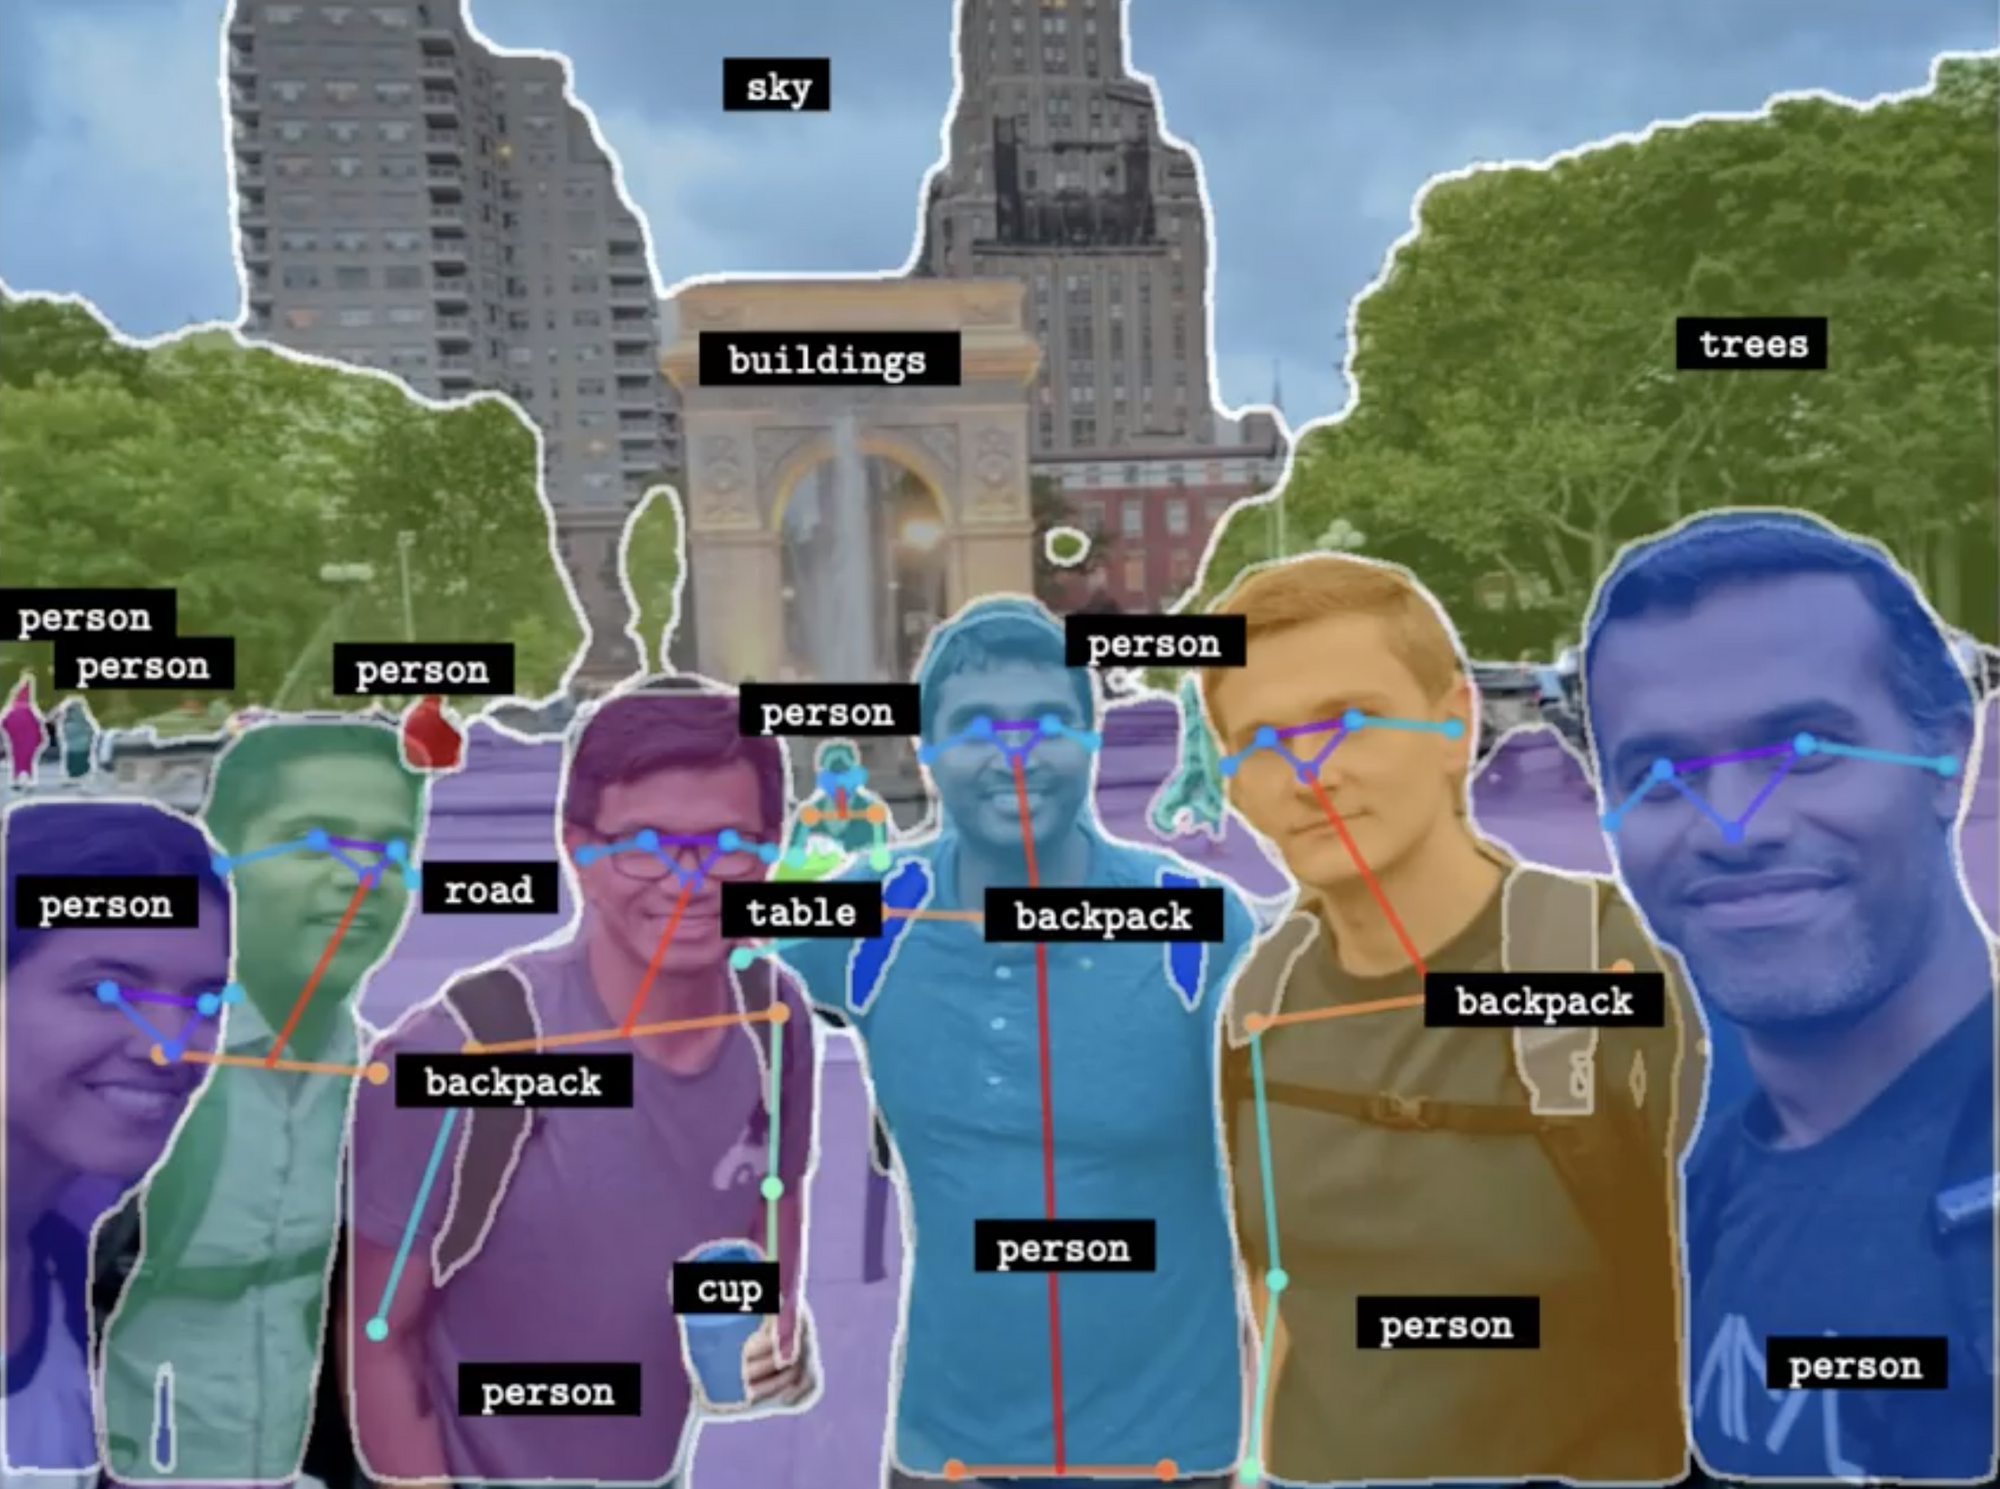
In this post, we review how to train Detectron2 on custom data for specifically object detection. Though, after you finish reading you will be familiar with the Detectron2 ecosystem and you will be able to generalize to other capabilities included in Detectron2 (such as how to train Detectron2 for custom instance segmentation).
Overview of the Custom Data
We will be training our custom Detectron2 detector on public blood cell detection data hosted for free at Roboflow. The blood cell detection dataset is representative of a small custom object detection dataset that one might collect to construct a custom object detection system. Notably, blood cell detection is not a capability available in Detectron2 - we need to train the underlying networks to fit our custom task.
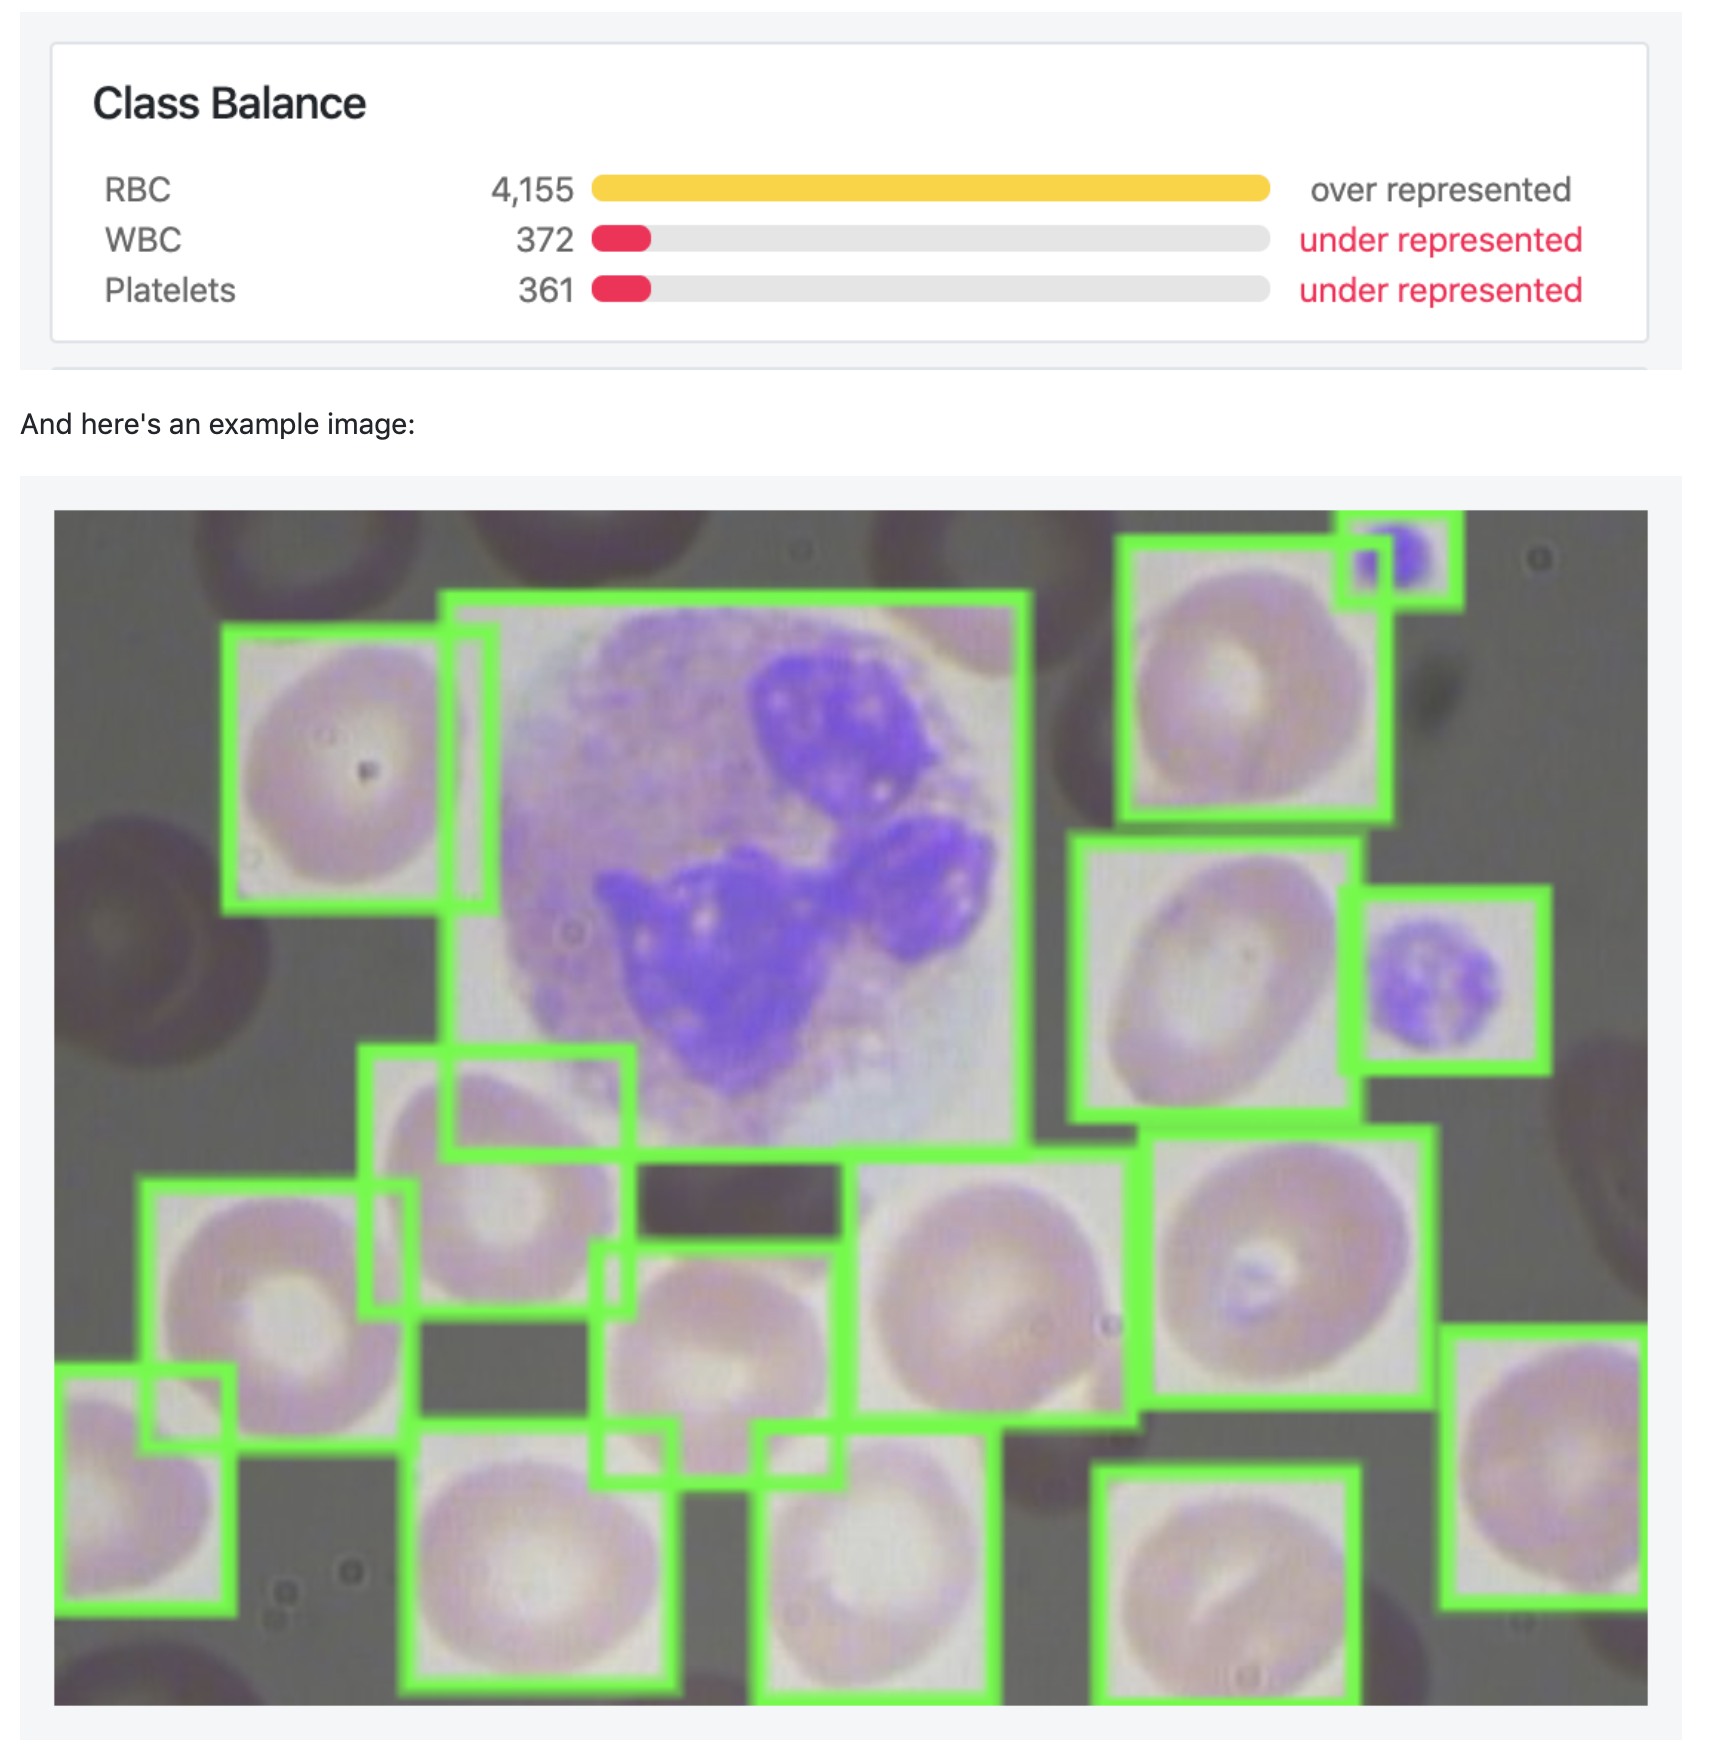
If you want to follow along step by step in the tutorial, you can fork this public blood cell dataset. Otherwise you can upload your own dataset in any annotation format.
Using Your Own Data with Detectron2
To export your own data for this tutorial, sign up for Roboflow and make a public workspace, or make a new public workspace in your existing account. If your data is private, you can upgrade to a paid plan for export to use external training routines like this one or experiment with using Roboflow's internal training solution.
Install Detectron2 dependencies
To get started make a copy of this Colab Notebook Implementing Detectron2 on Custom Data. Google Colab provides us with free GPU resources so make sure to enable them by checking Runtime --> Change runtime type --> GPU.
To start training our custom detector we install torch==1.5 and torchvision==0.6 - then after importing torch we can check the version of torch and make doubly sure that a GPU is available printing 1.5.0+cu101 True.
Then we pip install the Detectron2 library and make a number of submodule imports.
!pip install detectron2==0.1.3 -f https://dl.fbaipublicfiles.com/detectron2/wheels/cu101/torch1.5/index.html

import detectron2
from detectron2.utils.logger import setup_logger
setup_logger()

# import some common libraries
import numpy as np
import cv2
import random
from google.colab.patches import cv2_imshow

# import some common detectron2 utilities
from detectron2 import model_zoo
from detectron2.engine import DefaultPredictor
from detectron2.config import get_cfg
from detectron2.utils.visualizer import Visualizer
from detectron2.data import MetadataCatalog
from detectron2.data.catalog import DatasetCatalog
Installing Detectron2 Dependencies
Download custom Detectron2 object detection data
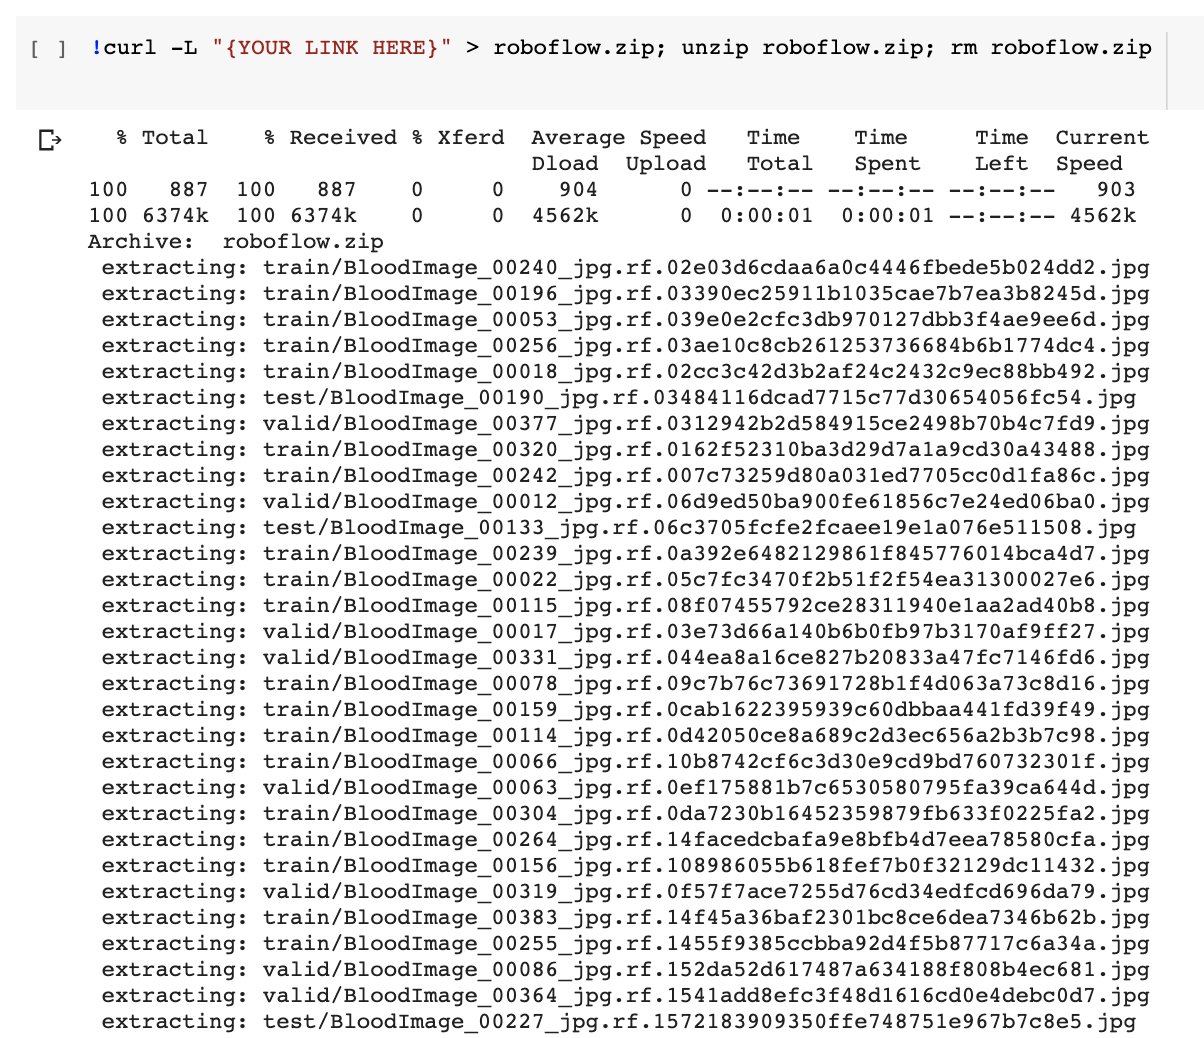
We download our custom data in COCO JSON format from Roboflow with a single line of code - this is the only line of code you need to change to train on your own custom objects!
NOTE: In this tutorial we export object detection data with bounding boxes. If you're looking to train a semantic segmentation model, Roboflow also supports annotation, dataset export, custom model training notebooks, and AutoML training and deployment solutions.
If you have unlabeled images, you will first need to label them. For free open source labeling tools, we recommend the following guides on getting started with LabelImg or getting started with CVAT (or LabelMe or VoTT) annotation tools. Try labeling ~50 images to proceed in this tutorial. To improve your model's performance later, you will want to label more.
You may also consider building a free object detection dataset from Open Images.
Once you have labeled data, to get move your data into Roboflow, create a free account and then you can drag your dataset in in any format: (CreateML JSON, TensorFlow Object Detection CSV, etc).
Once uploaded you can choose preprocessing and augmentation steps:
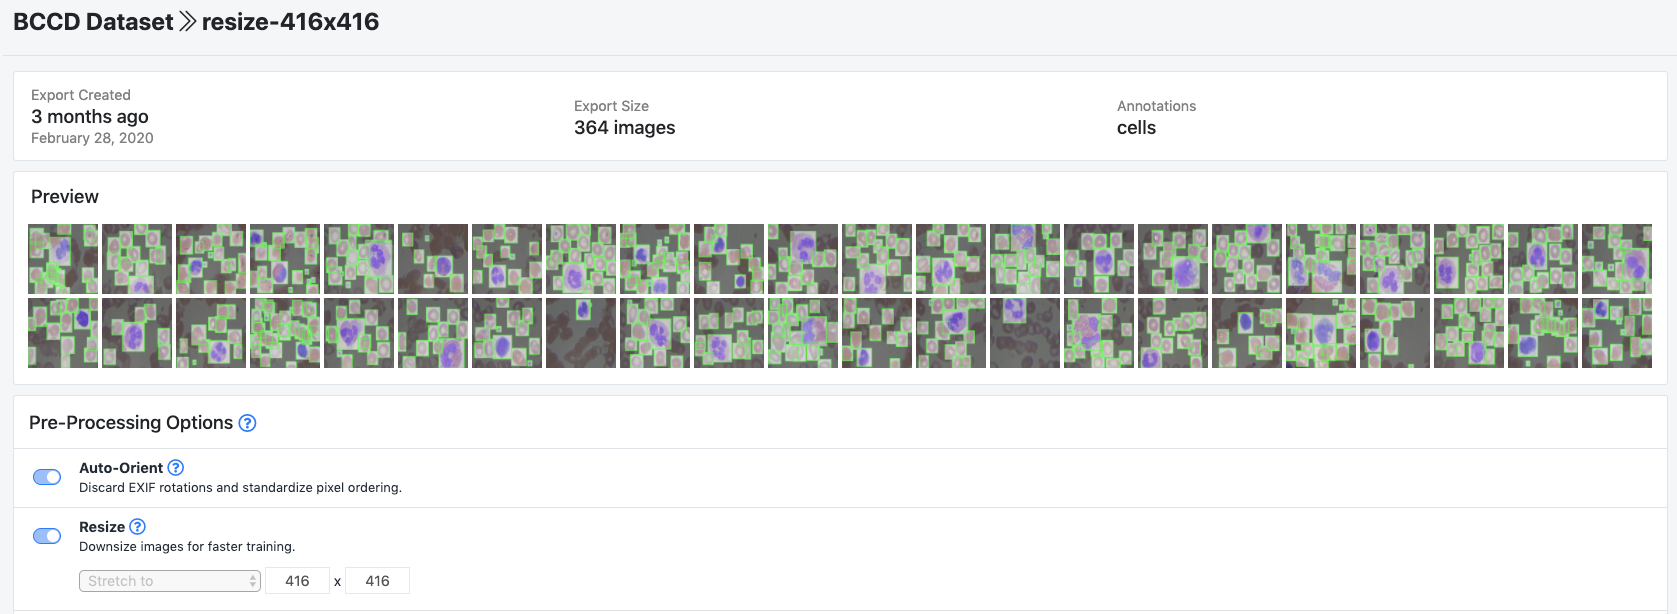
Then, click Generate and Download and you will be able to choose COCO JSON format.
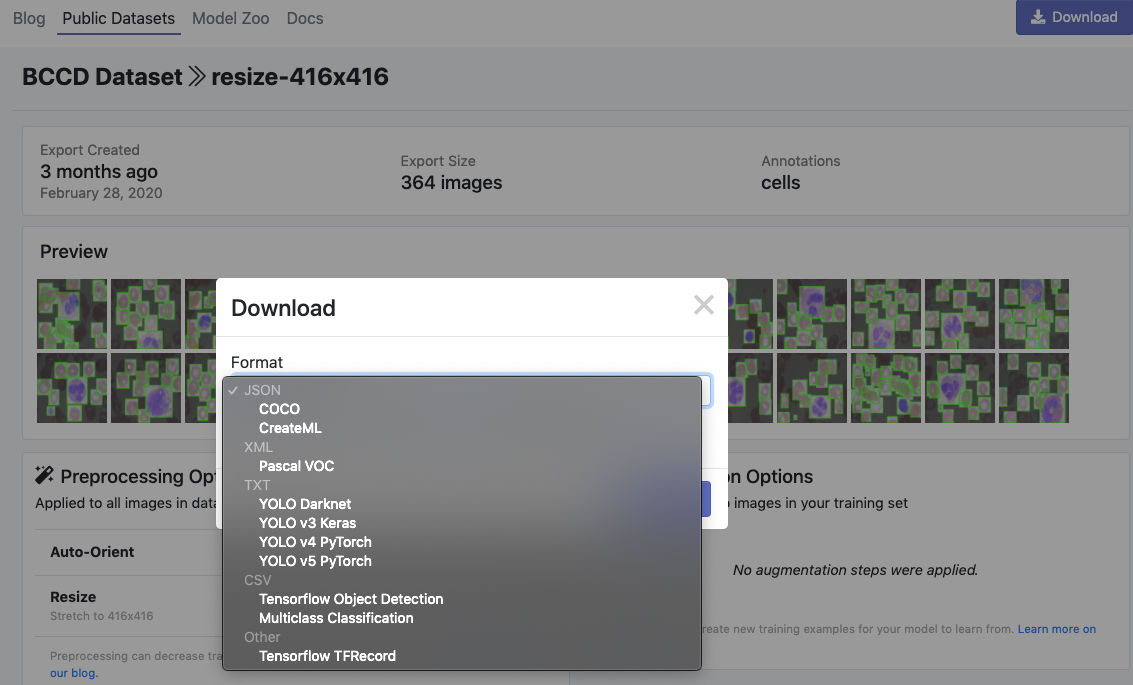
When prompted, be sure to select "Show Code Snippet." This will output a download curl script so you can easily port your data into Colab in the proper object detection annotation format.
Then, Detectron2 keeps track of a list of available datasets in a registry, so we must register our custom data with Detectron2 so it can be invoked for training.
from detectron2.data.datasets import register_coco_instances
register_coco_instances("my_dataset_train", {}, "/content/train/_annotations.coco.json", "/content/train")
register_coco_instances("my_dataset_val", {}, "/content/valid/_annotations.coco.json", "/content/valid")
register_coco_instances("my_dataset_test", {}, "/content/test/_annotations.coco.json", "/content/test")
Registering custom Detectron2 data
Visualize Detectron2 training data
Detectron2 makes it easy to view our training data to make sure the data has imported correctly. We do so with the following
#visualize training data
my_dataset_train_metadata = MetadataCatalog.get("my_dataset_train")
dataset_dicts = DatasetCatalog.get("my_dataset_train")

import random
from detectron2.utils.visualizer import Visualizer

for d in random.sample(dataset_dicts, 3):
    img = cv2.imread(d["file_name"])
    visualizer = Visualizer(img[:, :, ::-1], metadata=my_dataset_train_metadata, scale=0.5)
    vis = visualizer.draw_dataset_dict(d)
    cv2_imshow(vis.get_image()[:, :, ::-1])
Code to visualize training data
Looks like our dataset registered correctly!
Write our Detectron2 training configuration
Next we write our custom training configuration.
cfg = get_cfg()
cfg.merge_from_file(model_zoo.get_config_file("COCO-Detection/faster_rcnn_X_101_32x8d_FPN_3x.yaml"))
cfg.DATASETS.TRAIN = ("my_dataset_train",)
cfg.DATASETS.TEST = ("my_dataset_val",)

cfg.DATALOADER.NUM_WORKERS = 4
cfg.MODEL.WEIGHTS = model_zoo.get_checkpoint_url("COCO-Detection/faster_rcnn_X_101_32x8d_FPN_3x.yaml")  # Let training initialize from model zoo
cfg.SOLVER.IMS_PER_BATCH = 4
cfg.SOLVER.BASE_LR = 0.001


cfg.SOLVER.WARMUP_ITERS = 1000
cfg.SOLVER.MAX_ITER = 1500 #adjust up if val mAP is still rising, adjust down if overfit
cfg.SOLVER.STEPS = (1000, 1500)
cfg.SOLVER.GAMMA = 0.05

cfg.MODEL.ROI_HEADS.BATCH_SIZE_PER_IMAGE = 64
cfg.MODEL.ROI_HEADS.NUM_CLASSES = 4

cfg.TEST.EVAL_PERIOD = 500
Writing training configuration
The biggest fixtures we have invoked here are the type of object detection model - the large Faster RCNN. Detectron2 allows you many options in determining your model architecture, which you can see in the Detectron2 model zoo.
For object detection alone, the following models are available:
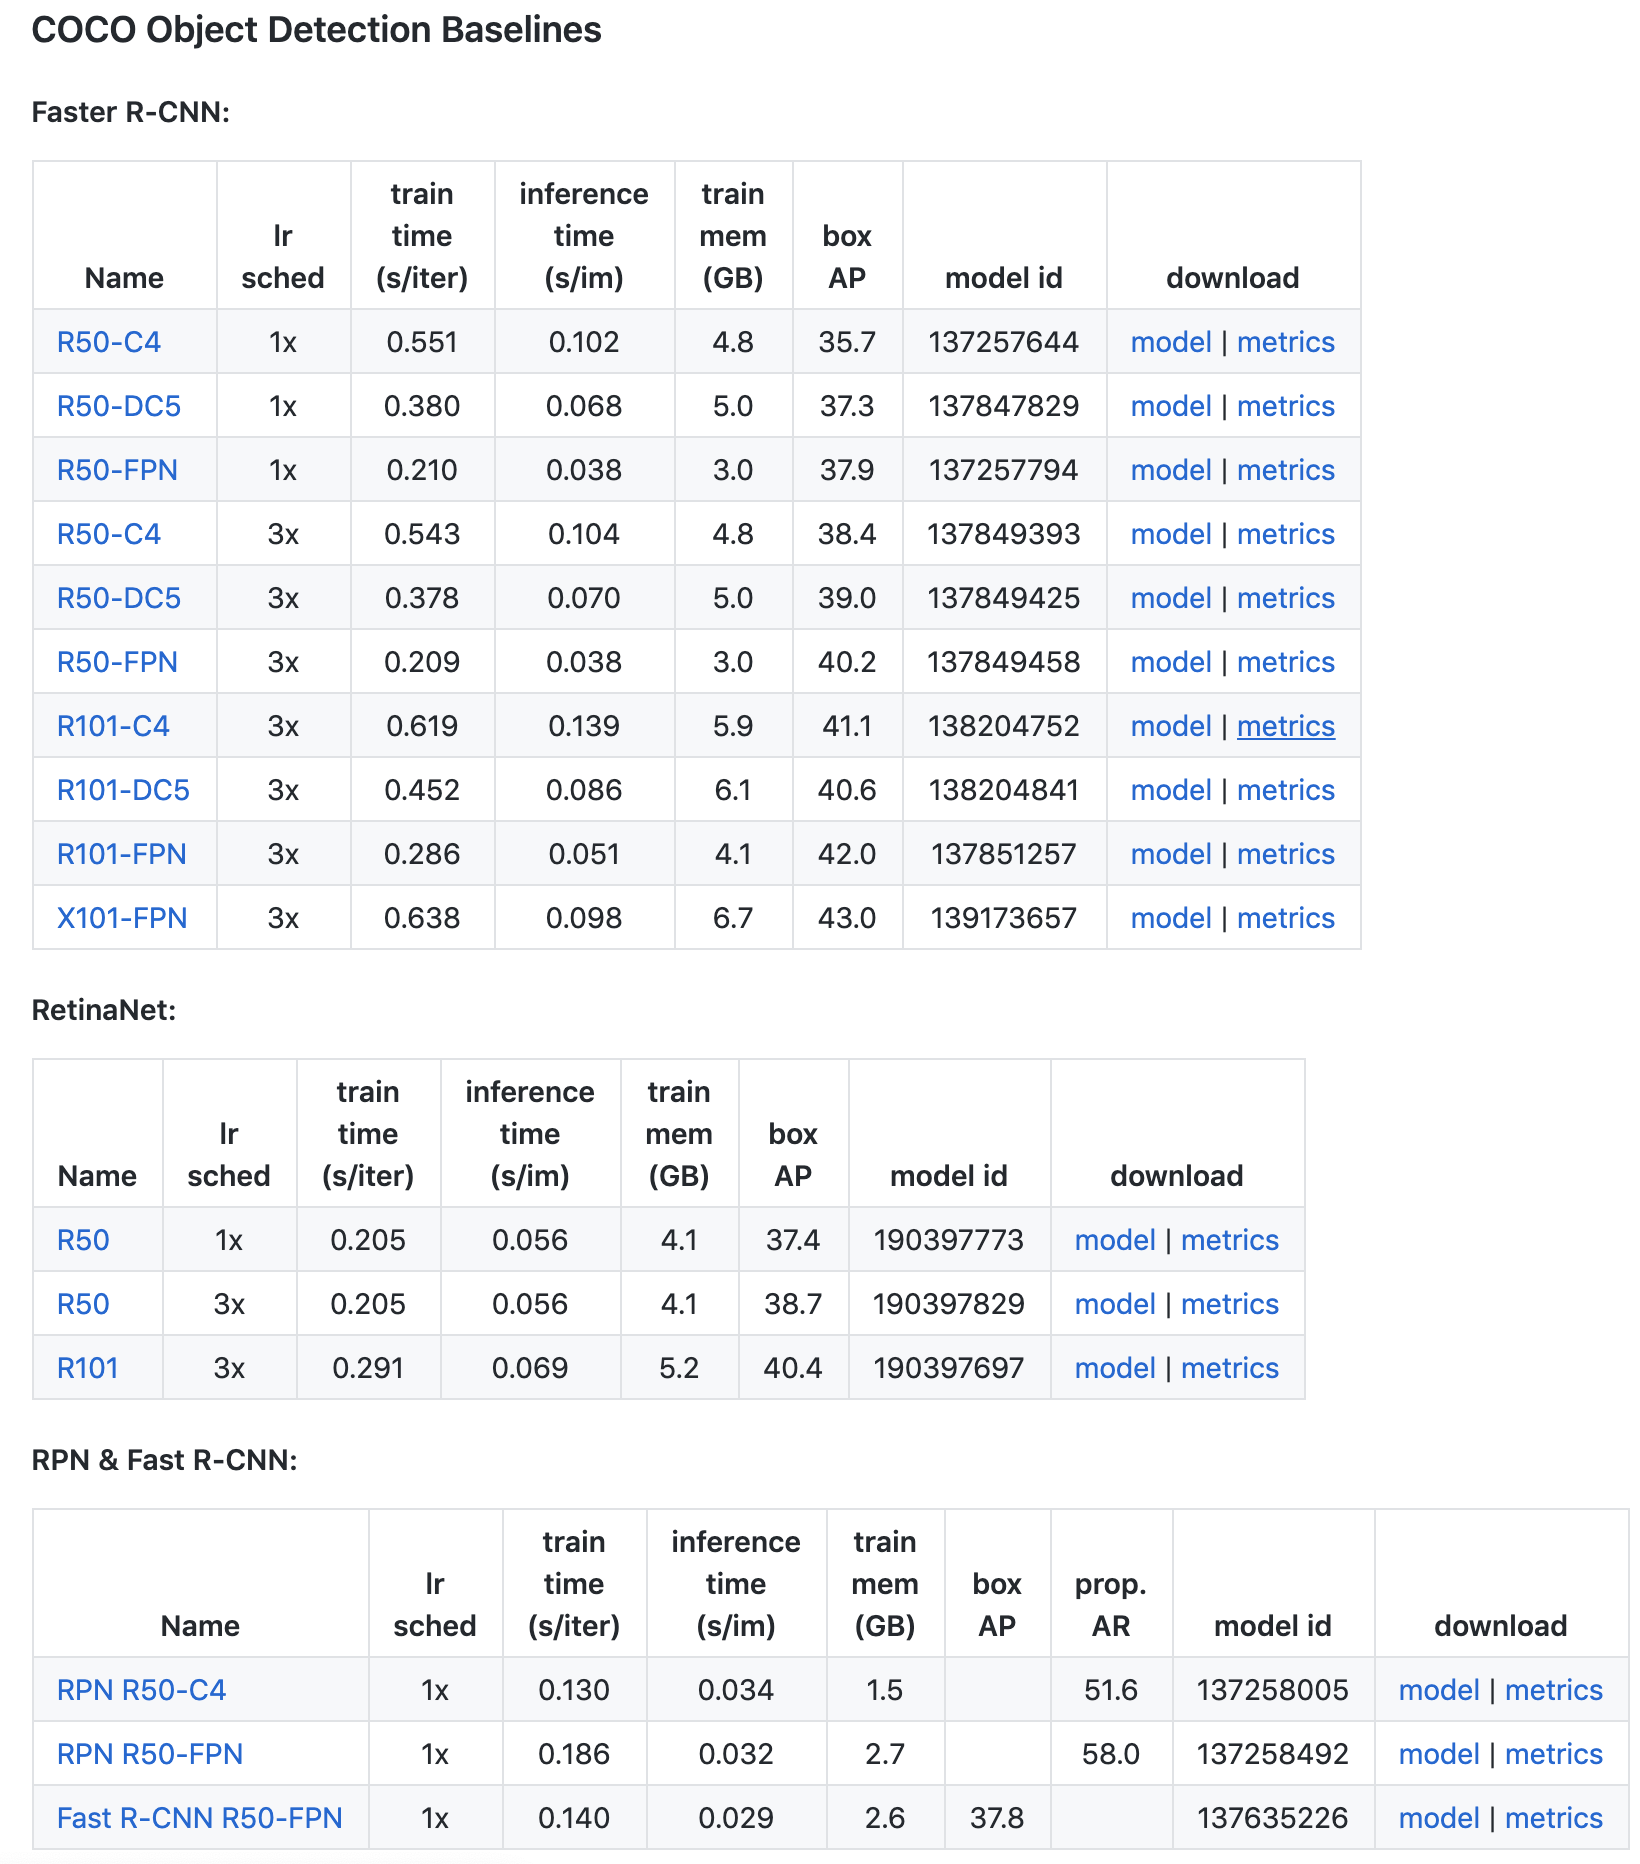
The other large config choice we have made is the MAX_ITER parameter. This specifies how long the model will train for, you may need to adjust up and down based on the validation metrics you are seeing.
Run Detectron2 training
Before starting training, we need to make sure that the model validates against our validation set. Unfortunately, this does not happen by default 🤔.
We can easily do this by defining our custom trainer based on the Default Trainer with the COCO Evaluator:
from detectron2.engine import DefaultTrainer
from detectron2.evaluation import COCOEvaluator

class CocoTrainer(DefaultTrainer):

  @classmethod
  def build_evaluator(cls, cfg, dataset_name, output_folder=None):

    if output_folder is None:
        os.makedirs("coco_eval", exist_ok=True)
        output_folder = "coco_eval"

    return COCOEvaluator(dataset_name, cfg, False, output_folder)
Ok now that we have our COCO Trainer we can kick off training:
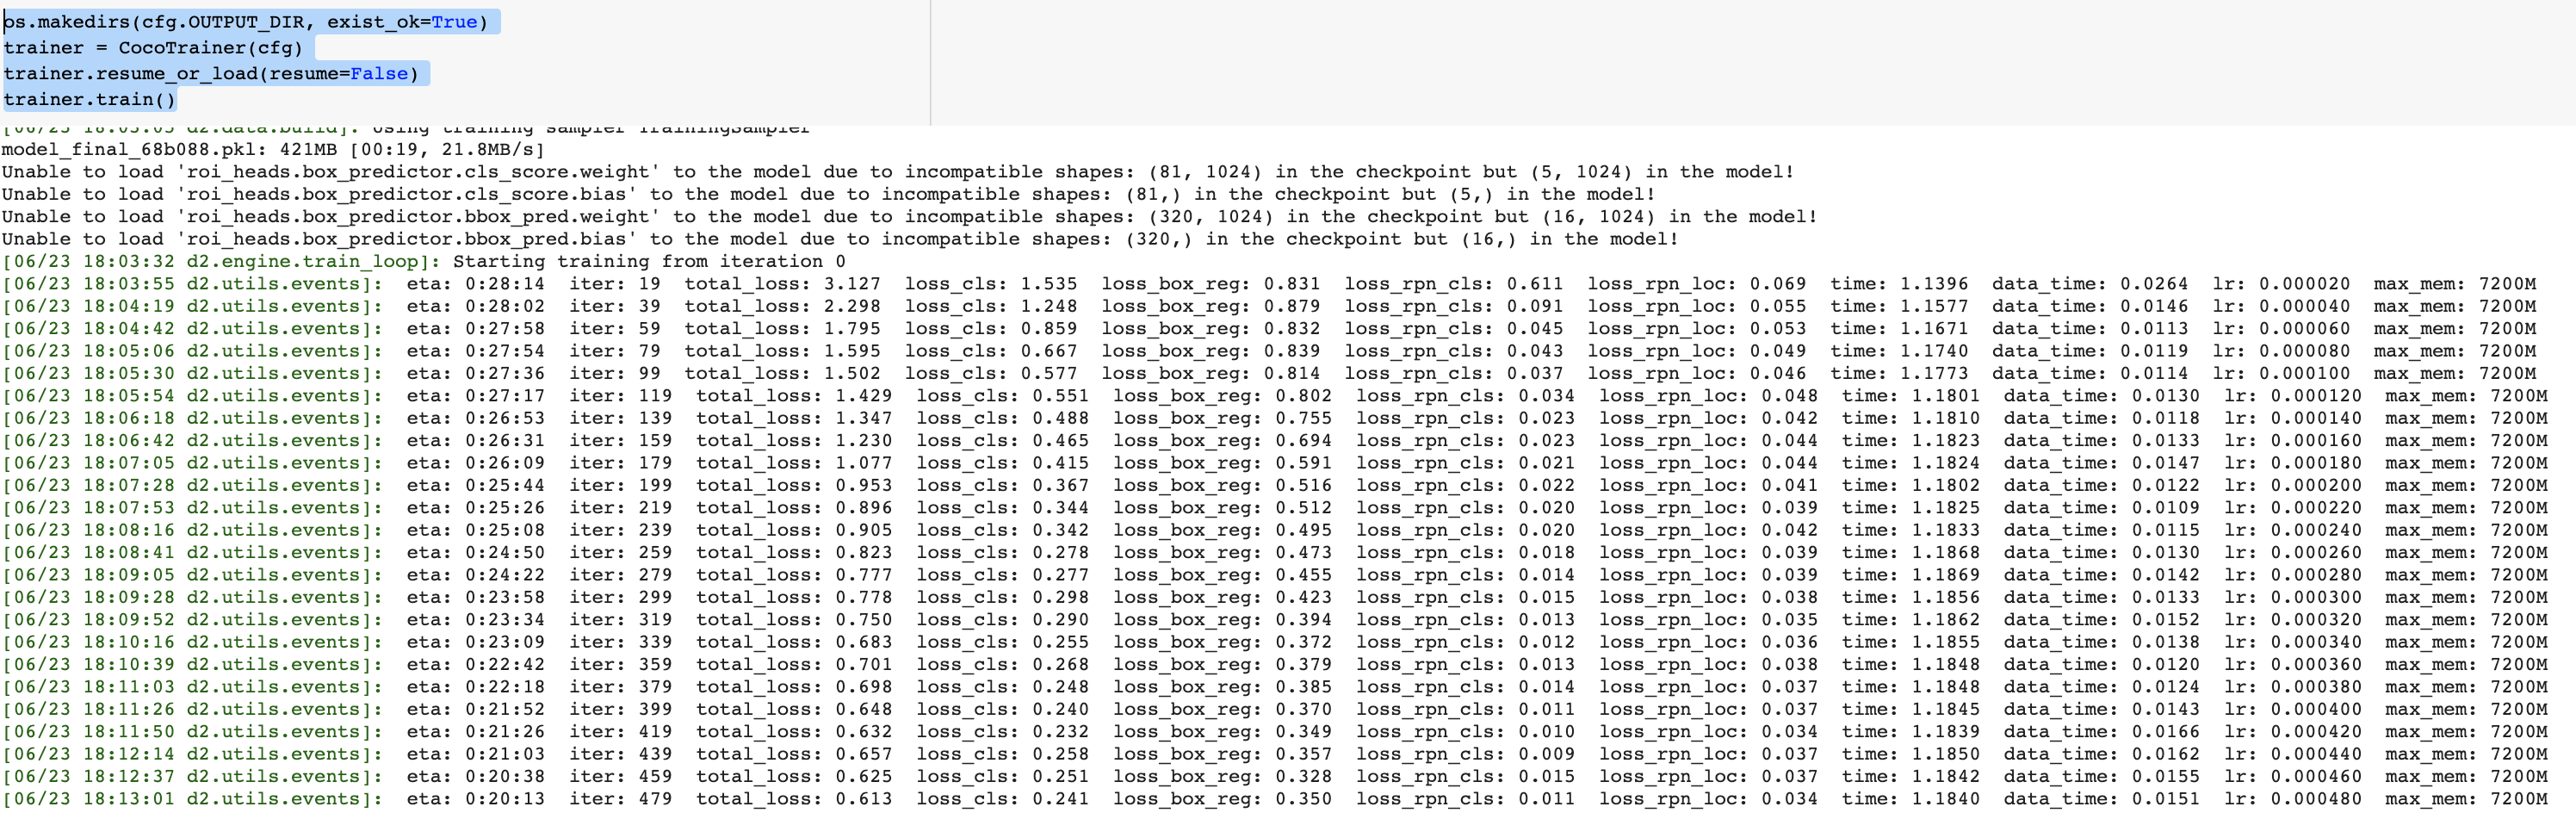
The training will run for a while and print out evaluation metrics on our validation set. Curious to learn what mAP is for evaluation? Check out this article on breaking down mAP (mean average precision).
Once training is finished, we can move on to evaluation and inference!
Evaluate Detectron2 performance
First, we can display a tensorboard of results to see how the training procedure has performed.
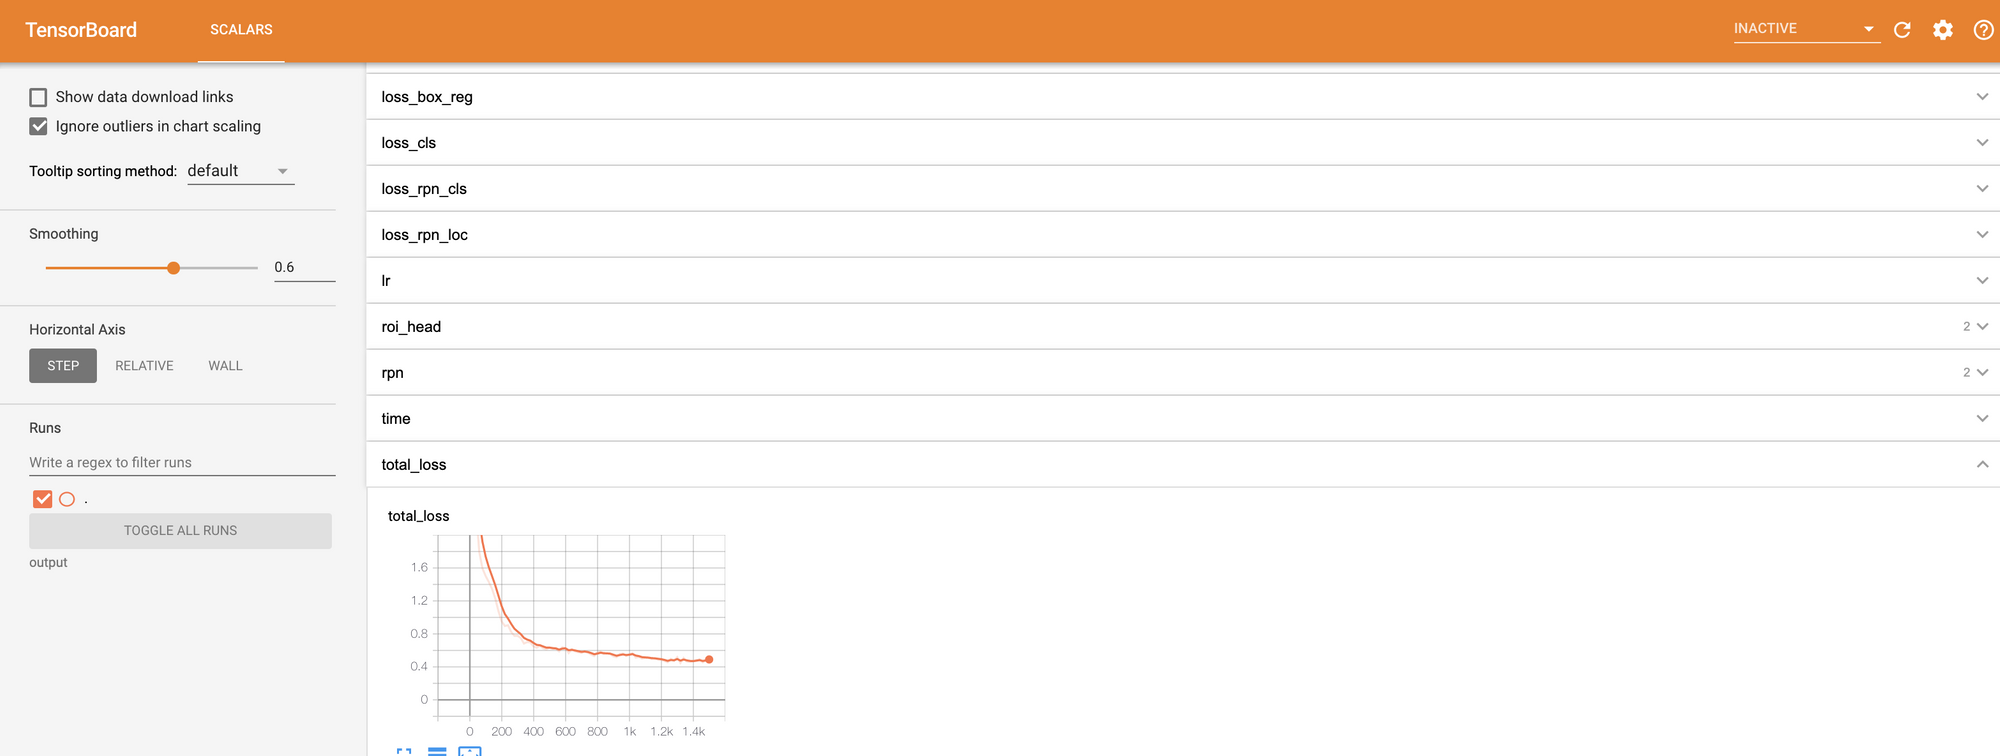
There are a lot of metrics of interest in there - most notably total_loss and validation mAP.
We run the same evaluation procedure used in our validation mAP on the test set.
from detectron2.data import DatasetCatalog, MetadataCatalog, build_detection_test_loader
from detectron2.evaluation import COCOEvaluator, inference_on_dataset

cfg.MODEL.WEIGHTS = os.path.join(cfg.OUTPUT_DIR, "model_final.pth")
cfg.MODEL.ROI_HEADS.SCORE_THRESH_TEST = 0.85
predictor = DefaultPredictor(cfg)
evaluator = COCOEvaluator("my_dataset_test", cfg, False, output_dir="./output/")
val_loader = build_detection_test_loader(cfg, "my_dataset_test")
inference_on_dataset(trainer.model, val_loader, evaluator)
Yielding:
Accumulating evaluation results...
DONE (t=0.03s).
 Average Precision  (AP) @[ IoU=0.50:0.95 | area=   all | maxDets=100 ] = 0.592
 Average Precision  (AP) @[ IoU=0.50      | area=   all | maxDets=100 ] = 0.881
 Average Precision  (AP) @[ IoU=0.75      | area=   all | maxDets=100 ] = 0.677
 Average Precision  (AP) @[ IoU=0.50:0.95 | area= small | maxDets=100 ] = 0.178
 Average Precision  (AP) @[ IoU=0.50:0.95 | area=medium | maxDets=100 ] = 0.613
 Average Precision  (AP) @[ IoU=0.50:0.95 | area= large | maxDets=100 ] = 0.411
 Average Recall     (AR) @[ IoU=0.50:0.95 | area=   all | maxDets=  1 ] = 0.392
 Average Recall     (AR) @[ IoU=0.50:0.95 | area=   all | maxDets= 10 ] = 0.633
 Average Recall     (AR) @[ IoU=0.50:0.95 | area=   all | maxDets=100 ] = 0.684
 Average Recall     (AR) @[ IoU=0.50:0.95 | area= small | maxDets=100 ] = 0.257
 Average Recall     (AR) @[ IoU=0.50:0.95 | area=medium | maxDets=100 ] = 0.709
 Average Recall     (AR) @[ IoU=0.50:0.95 | area= large | maxDets=100 ] = 0.439
[06/23 18:39:47 d2.evaluation.coco_evaluation]: Evaluation results for bbox:
|   AP   |  AP50  |  AP75  |  APs   |  APm   |  APl   |
|:------:|:------:|:------:|:------:|:------:|:------:|
| 59.169 | 88.066 | 67.740 | 17.805 | 61.333 | 41.070 |
[06/23 18:39:47 d2.evaluation.coco_evaluation]: Per-category bbox AP:
| category   | AP     | category   | AP     | category   | AP     |
|:-----------|:-------|:-----------|:-------|:-----------|:-------|
| cells      | nan    | Platelets  | 40.141 | RBC        | 60.326 |
| WBC        | 77.039 |            |        |            |        |
Test Evaluation Metrics
This will give you a good idea of how your new custom Detectron2 detector will perform in the wild. Again, if you are curious to learn more about these metrics see this post breaking down mAP.
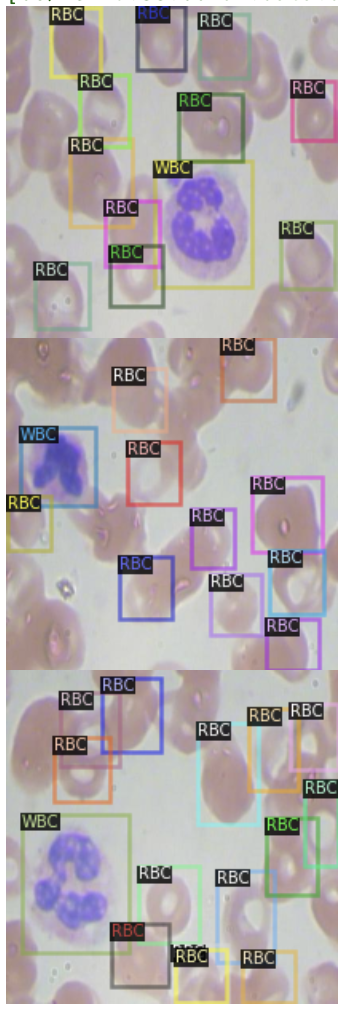
Run Detectron2 inference on test images
And finally, we can run our new custom Detectron2 detector on real images! Note, these are images that the model has never seen.
cfg.MODEL.WEIGHTS = os.path.join(cfg.OUTPUT_DIR, "model_final.pth")
cfg.DATASETS.TEST = ("my_dataset_test", )
cfg.MODEL.ROI_HEADS.SCORE_THRESH_TEST = 0.7   # set the testing threshold for this model
predictor = DefaultPredictor(cfg)
test_metadata = MetadataCatalog.get("my_dataset_test")

from detectron2.utils.visualizer import ColorMode
import glob

for imageName in glob.glob('/content/test/*jpg'):
  im = cv2.imread(imageName)
  outputs = predictor(im)
  v = Visualizer(im[:, :, ::-1],
                metadata=test_metadata,
                scale=0.8
                 )
  out = v.draw_instance_predictions(outputs["instances"].to("cpu"))
  cv2_imshow(out.get_image()[:, :, ::-1])
Yielding:
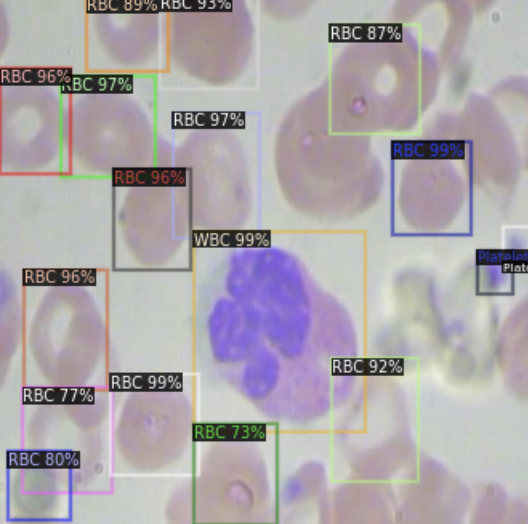
Our model makes good predictions showing that it has learned how to identify red blood cells, white blood cells, and platelets.
You may consider playing with the SCORE_THRESH_TEST to change the confidence threshold that the model requires to make a prediction.
You can now save the weights in the os.path.join(cfg.OUTPUT_DIR, "model_final.pt") for future inference by exporting to Google Drive.
You can also see the underlying prediction tensor in the outputs object to use elsewhere in your app.
Using your Trained Detectron2 Model
Now you know how to train your own custom Detectron2 detector on a completely new domain.
Not seeing the results you need to move forward? Object detection models have been improved since the release of the Detectron2 model zoo - consider checking out some of our other tutorials such as how to train RF-DETR.
Cite this Post
Use the following entry to cite this post in your research:
Jacob Solawetz. (Jun 24, 2020). How to Train Detectron2 on Custom Object Detection Data. Roboflow Blog: https://blog.roboflow.com/how-to-train-detectron2/