
YOLOX is an anchor-free object detection model that decouples the detection head into separate classification and regression branches, improving training convergence and accuracy compared to earlier YOLO variants. This tutorial walks through training YOLOX on a custom blood cells dataset using Roboflow for data management and export, covering environment setup, downloading pretrained weights, running training, evaluating performance with COCO AP metrics, running inference on test images, and exporting saved weights for future use.
The YOLO family of models continues to grow with the next model: YOLOX. In this post, we will walk through how you can train YOLOX to recognize object detection data for your custom use case.
We use a public blood cells object detection dataset for the purpose of this tutorial. However, you can import your own data into Roboflow and export it to train this model to fit your own needs.
The YOLOX notebook used for this tutorial can be downloaded here.
Thanks to the Megvii team for publishing the underlying repository that formed the foundation of our notebook.
In this guide, we take the following steps:
- Install YOLOX dependencies
- Download custom YOLOX object detection data via Roboflow
- Download Pre-Trained Weights for YOLOX
- Run YOLOX training
- Evaluate YOLOX performance
- Run YOLOX inference on test images
- Export saved YOLOX weights for future inference
Prefer YouTube?
Video guide to training YOLOX on custom data
What is YOLOX?
YOLOX is the latest in the YOLO object detection model family. YOLOX removes box anchors, boosting portability to edge devices. YOLOX also decouples the YOLO detection head into separate feature channels, boosting model accuracy and training time. pushing the limit in terms of speed and accuracy.
YOLOX won the Streaming Perception Challenge at the CVPR 2021 Workshop on Autonomous Driving.
The following graphic shows how YOLOX compares to four other models commonly used in object detection:
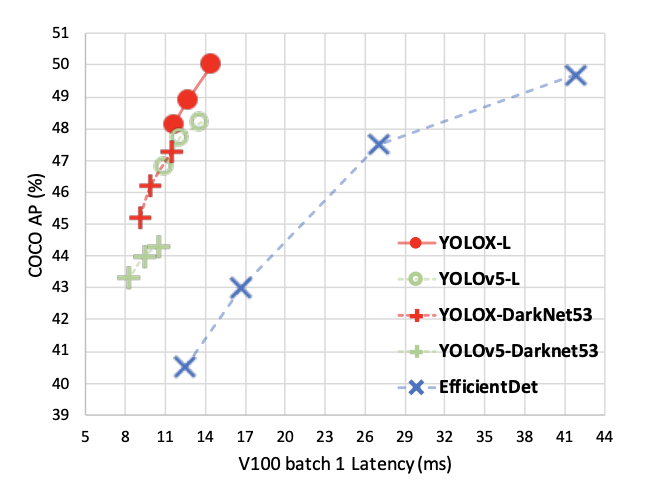
As you can see above, YOLOX has both a low batch latency and a high Average Precision (AP), as measured by benchmarks against the Microsoft COCO dataset.
Compared to previous YOLO models, YOLOX:
- Removes box anchors, which improves the portability of the model to edge devices);
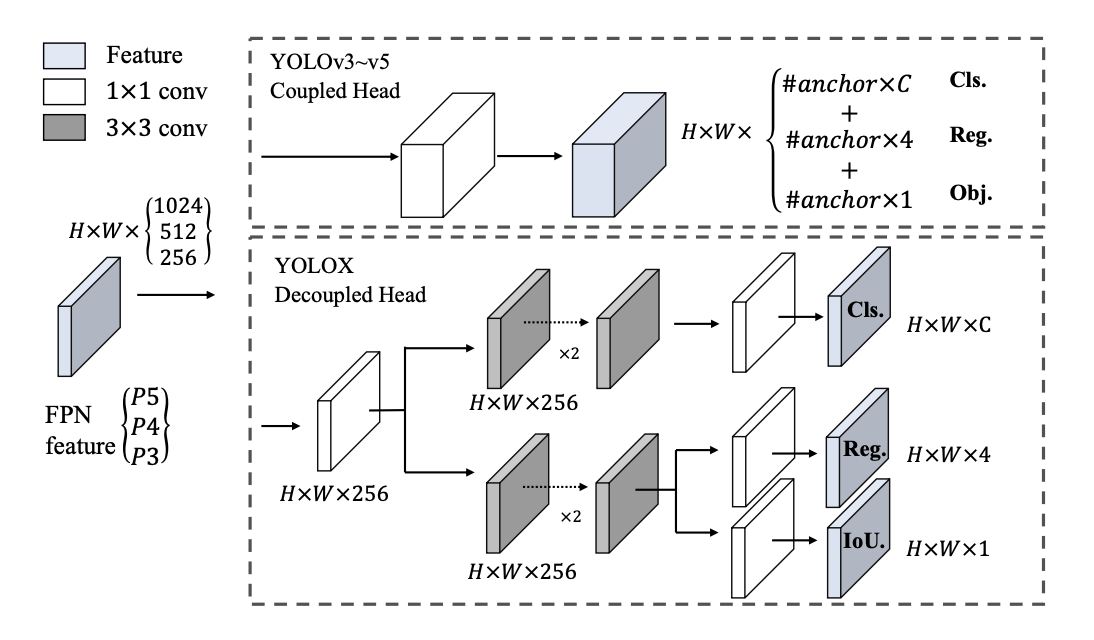
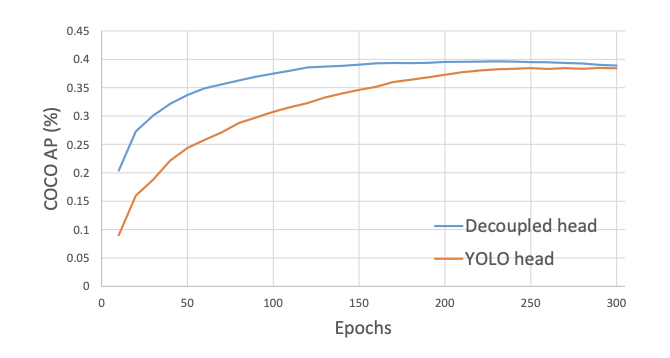
- Decouples the YOLO detection head into separate feature channels for box classification and box regression, which improves training convergence time and model accuracy.
- Uses a DarkNet53 backbone.
Combined, these improvements make YOLO a key development in the evolution of building faster, more accurate computer vision models.
The chart below illustrates the decoupled head present in the YOLOX model:
Many other exciting training and inference considerations are included in the paper. You can dive in deeper here at the YOLOX paper or in this video.
Video breakdown of YOLOX
How to Use YOLOX
Let's walk through the steps you need to take to use YOLOX.
Step 1: Install required dependencies
To setup our development environment, we will first clone the base YOLOX repository and download the necessary requirements:
!git clone https://github.com/roboflow-ai/YOLOX.git
%cd YOLOX
!pip3 install -U pip && pip3 install -r requirements.txt
!pip3 install -v -e .
!pip uninstall -y torch torchvision torchaudio
# May need to change in the future if Colab no longer uses CUDA 11.0
!pip install torch==1.7.1+cu110 torchvision==0.8.2+cu110 torchaudio==0.7.2 -f https://download.pytorch.org/whl/torch_stable.html
We will also install NVIDIA Apex and PyCocoTools to make this repository work as intended:
%cd /content/
!git clone https://github.com/NVIDIA/apex
%cd apex
!pip install -v --disable-pip-version-check --no-cache-dir --global-option="--cpp_ext" --global-option="--cuda_ext" ./

!pip3 install cython; pip3 install 'git+https://github.com/cocodataset/cocoapi.git#subdirectory=PythonAPI'
Step 2: Download custom YOLOX object detection data
We need data on which we can train our model. In this tutorial, we're going to get data from Roboflow and deploy our model in Python.
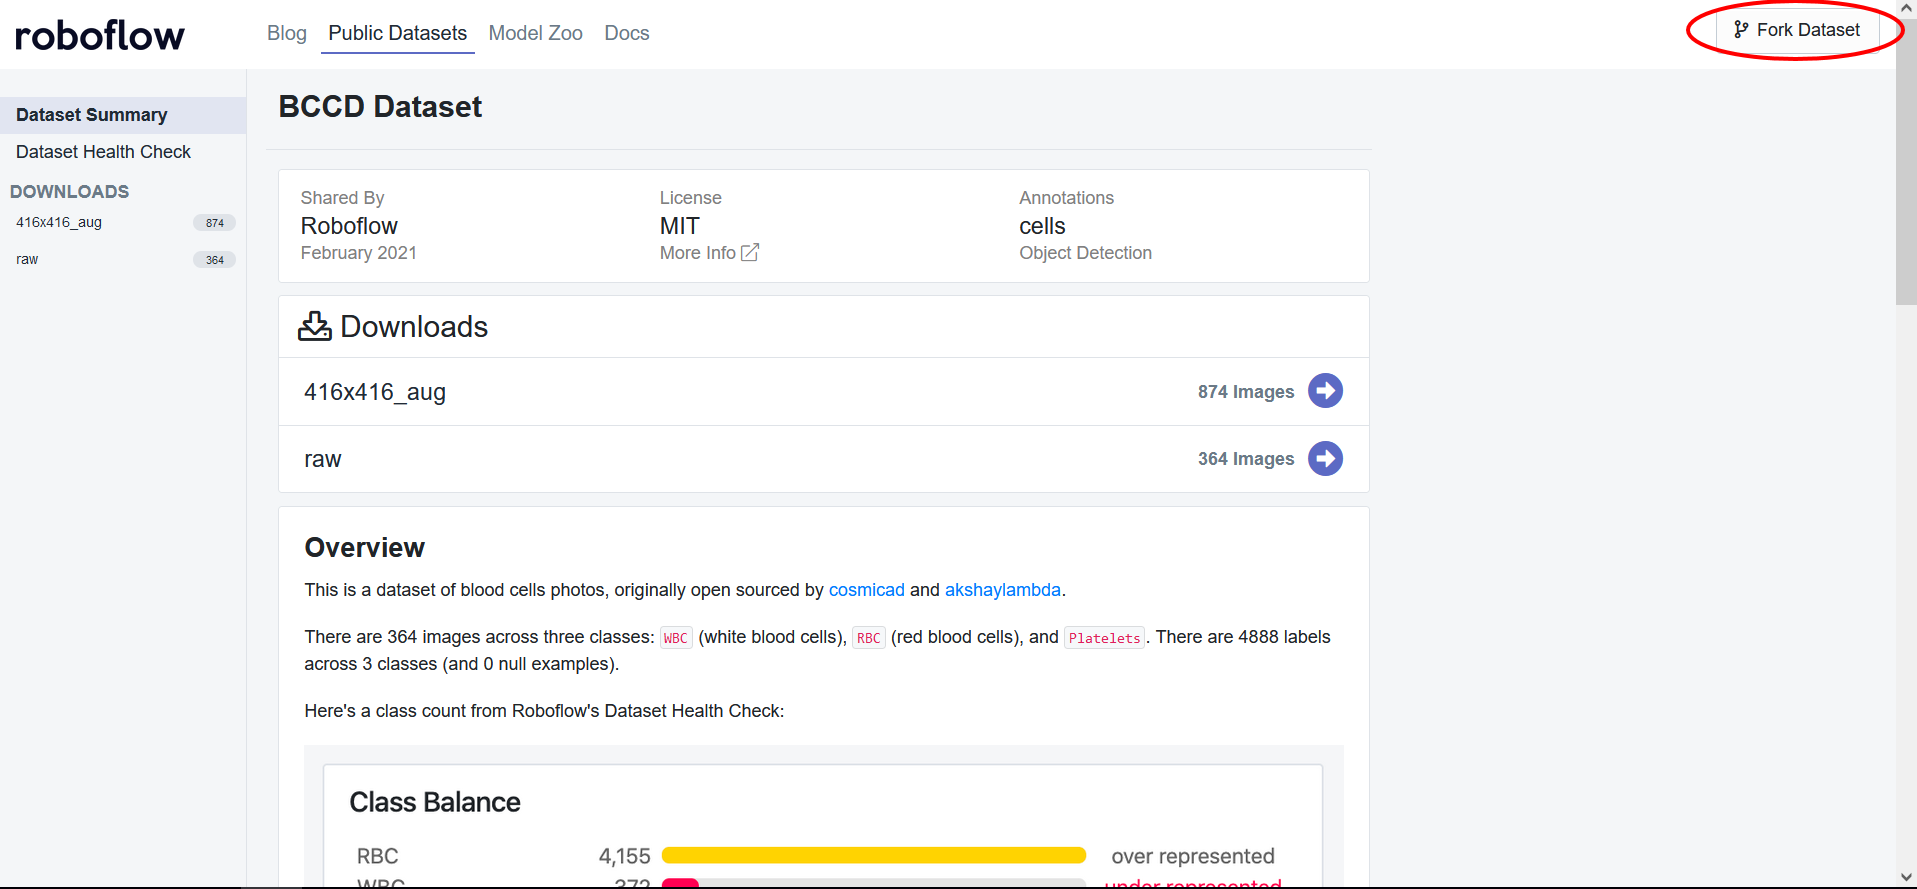
To retrieve the required data, you will need to create a Roboflow account. We will be using this blood cells dataset but you are welcome to use any dataset whether it be your own dataset loaded into Roboflow or another public dataset.
Step 3: Preprocess your data and generate a dataset version
To export your own data for this tutorial, sign up for Roboflow and make a public workspace, or make a new public workspace in your existing account.
For this notebook, we will need to apply some preprocessing steps to ensure that the data will work with YOLOX. To get started, create a Roboflow account if you haven't already and fork the dataset:
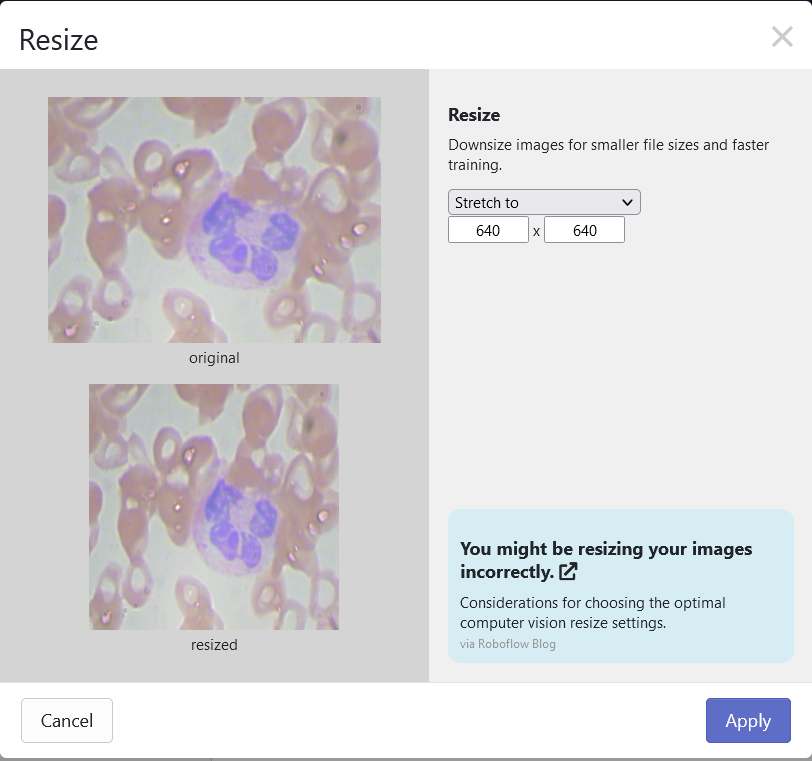
After forking the dataset, you will want to add one preprocessing step which would be to resize all of the images to a size of 640 x 640:
Then simply generate a new version of the dataset and export with a "Pascal VOC". You will receive a Jupyter notebook command that looks something like this:
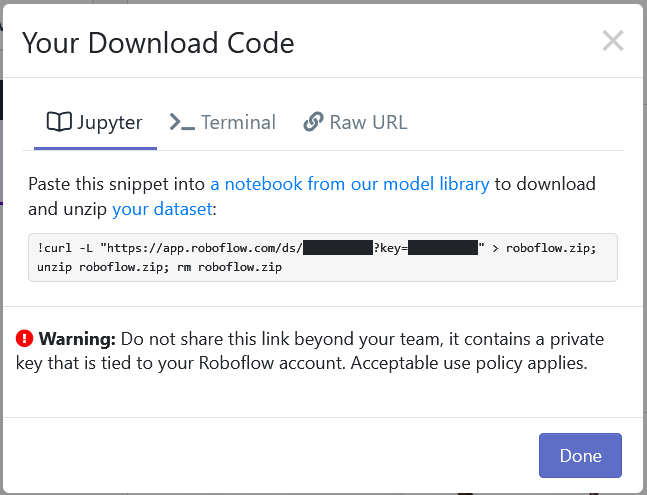
Copy the command, and replace the line below in the notebook with the command provided by Roboflow:
Note: Data download has switched over to the Roboflow PIP package.
#from roboflow import Roboflow
#rf = Roboflow(api_key="YOUR_API_KEY", model_format="voc")
#project = rf.workspace().project("mushrooms-slim")
#dataset = project.version("YOUR_VERSION").download("voc")
Step 4: Label your data
If you are bringing your own dataset, you can annotate your images in Roboflow. If you are using a dataset that has already been labeled, you can skip this step!
Label and Annotate Data with Roboflow for free
Use Roboflow to manage datasets, label data, and convert to 26+ formats for using different models. Roboflow is free up to 10,000 images, cloud-based, and easy for teams.
Step 5: Download pre-trained weights for YOLOX
YOLOX comes with some pre-trained weights to allow the model to train faster and achieve higher accuracies. Using these pre-trained weights will reduce the time it takes us to get started with our YOLOX model.
There are many sizes of weights but the size of weights we use will be based on the small YOLOX model (YOLOX_S). We can download this as follows:
%cd /content/
!wget https://github.com/Megvii-BaseDetection/storage/releases/download/0.0.1/yolox_s.pth
%cd /content/YOLOX/
Step 6: Run YOLOX training
To train the model, we can run the tools/train.py file:
!python tools/train.py -f exps/example/yolox_voc/yolox_voc_s.py -d 1 -b 16 --fp16 -o -c /content/yolox_s.pth
The arguments for running this command are:
- Experience file: This file allows us to change certain aspects of the base model to apply when training
- Devices: The number of GPUs our model will train with--1 is the value as Colab provides 1
- Batch size: Number of image in each batch
- Pre-trained weights: Specify the path to the weights you want to use--this can be weights we downloaded or an earlier checkpoint of your model
After about 90 epochs of training, we get the following Average Precision metrics:
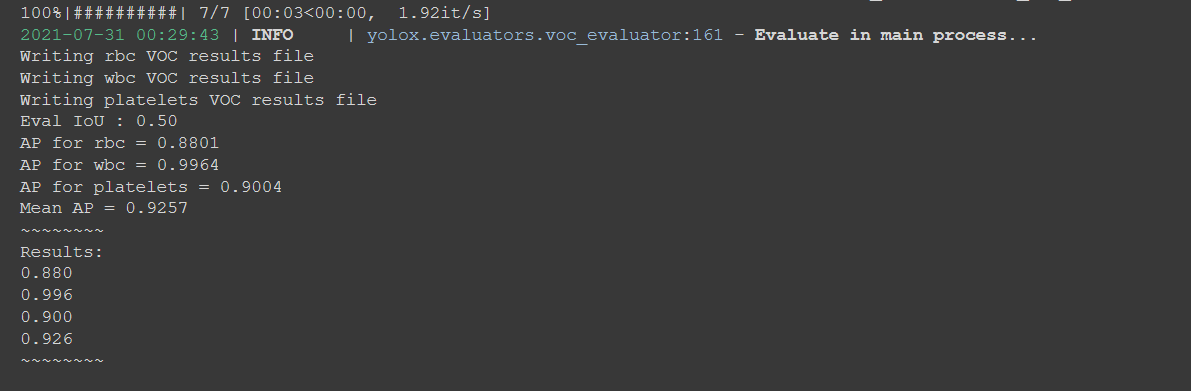
In the image above, we show that our model returns a 0.9257 Mean AP. That's a great result for our first try.
Step 7: Evaluate YOLOX performance
To evaluate YOLOX performance we can use the following command:
MODEL_PATH = "/content/YOLOX/YOLOX_outputs/yolox_voc_s/latest_ckpt.pth.tar"

!python3 tools/eval.py -n  yolox-s -c {MODEL_PATH} -b 64 -d 1 --conf 0.001 -f exps/example/yolox_voc/yolox_voc_s.py
After running the evaluation, we get the following results:
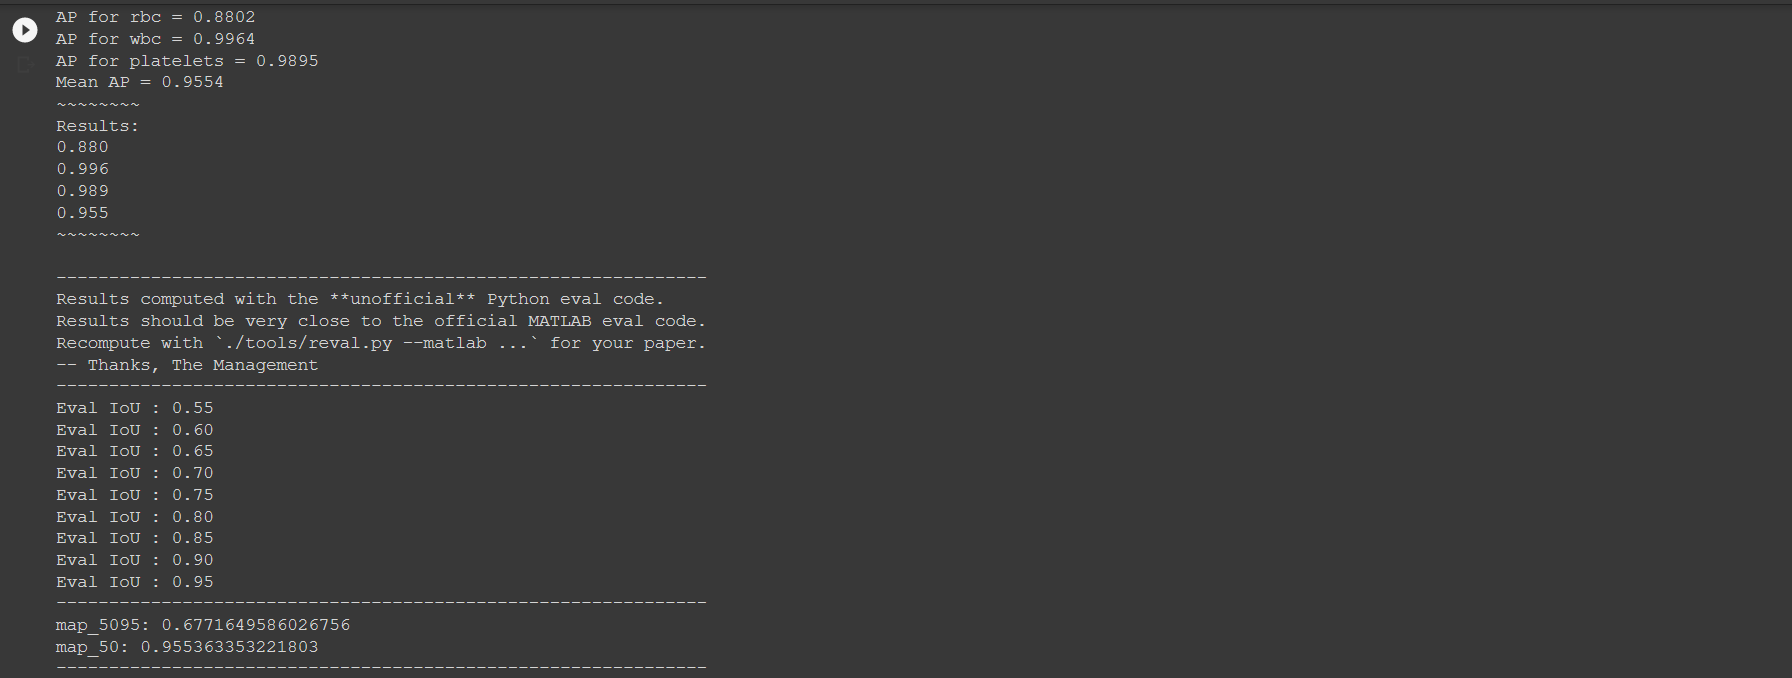
The above image shows that we get a 0.955 mAP. That's a strong result.
Run YOLOX inference on test images
We can now run YOLOX on a test image and visualize the predictions. To run YOLOX on a test image:
TEST_IMAGE_PATH = "/content/valid/BloodImage_00057_jpg.rf.1ee93e9ec4d76cfaddaa7df70456c376.jpg"

!python tools/demo.py image -f /content/YOLOX/exps/example/yolox_voc/yolox_voc_s.py -c {MODEL_PATH} --path {TEST_IMAGE_PATH} --conf 0.25 --nms 0.45 --tsize 640 --save_result --device gpu
To visualize the predictions on the image:
from PIL import Image
OUTPUT_IMAGE_PATH = "/content/YOLOX/YOLOX_outputs/yolox_voc_s/vis_res/2021_07_31_00_31_01/BloodImage_00057_jpg.rf.1ee93e9ec4d76cfaddaa7df70456c376.jpg"
Image.open(OUTPUT_IMAGE_PATH)
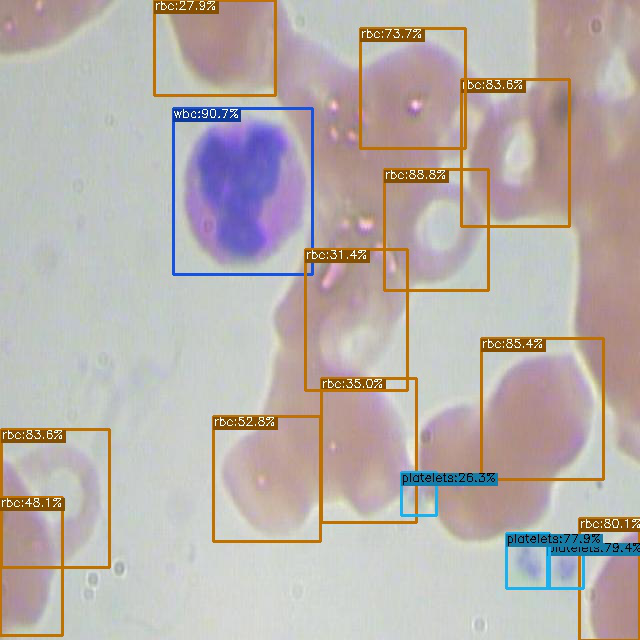
Looks like the model works as intended.
Export saved YOLOX weights for future inference
Finally we can export the model into our Google Drive as follows:
from google.colab import drive
drive.mount('/content/gdrive')

%cp {MODEL_PATH} /content/gdrive/My\ Drive
Conclusion
YOLOX is an incredibly powerful, state-of-the-art object detection model. In this tutorial you were able to learn how to:
- Prepare the YOLOX Environment
- Download Custom Object Detection Data using Roboflow
- Run the YOLOX Training Process
- Using your trained YOLOX model for inference
- Export your model to Google Drive
Happy training!
Cite this Post
Use the following entry to cite this post in your research:
Samrat Sahoo, Jacob Solawetz. (Aug 2, 2021). How to Train YOLOX On a Custom Dataset. Roboflow Blog: https://blog.roboflow.com/how-to-train-yolox-on-a-custom-dataset/