

Use a pretrained cloud API when its fixed label set already covers what you need and you live in that cloud; use Roboflow when you need your own classes, real-time video, or edge and on-prem inference where cost doesn't scale with every frame. Before you commit, run the same 50 or so representative images through each candidate, price it at your real frame volume, and confirm you can export the model, since Rekognition and Cloud Vision's pretrained detectors can't leave and Azure retires Custom Vision on September 25, 2028.
An object detection API takes an image and returns the objects it finds, usually as class labels, confidence scores, and bounding-box coordinates that tell you where each object appears. For example, an API might return person, car, and dog, together with a confidence value and the location of each object in the image. Roboflow's object detection response uses x, y, width, height, class, and confidence fields for this purpose.
The bigger decision is whether you want to use predictions from a provider's existing model or own a model trained to recognize your objects and control where that model runs. A generic cloud API is convenient when you need common categories such as people, cars, animals, landmarks, text, or other objects already covered by a provider's taxonomy. A custom model becomes more useful when the class is specific to your application such as a cracked weld, a particular component, an empty shelf position, a manufacturing defect, or SKU 4471.
Use a pretrained cloud API when its existing labels solve the problem and you already operate inside that cloud. Use Roboflow when you need your own object classes, want a fast dataset-to-model iteration loop, need real-time video or edge/on-prem inference, or want deployment options whose cost does not have to increase one-for-one with every frame processed. Roboflow supports serverless inference, hourly dedicated deployments, and self-hosted inference on hardware including NVIDIA Jetson devices.
Object Detection APIs
This table distinguishes the pretrained API from associated custom-training products. Export means obtaining a runnable model artifact, it is different from downloading prediction results or annotations.
Microsoft Custom Vision also lets you export compact models, while Clarifai supports model exports and on-premises deployment. Google’s “No” entries apply only to Cloud Vision’s pretrained detector and Vertex AI offers other options. Microsoft plans to retire both Image Analysis and Custom Vision on September 25, 2028.
The Problem with Hosted Detection APIs
A fixed-label hosted API is excellent when its taxonomy already matches the problem. But the generic endpoint usually gives you a prediction interface rather than the underlying model.
If it recognizes car but your application needs cracked-weld, missing-cap, or SKU-4471, you either need a separate custom-training product or your own detector. Similarly, you cannot simply retrain a provider's generic endpoint every time it fails on one of your domain-specific examples.
There are also operational differences. Sending every frame to an image API adds a network round trip and usually ties cost to requests or processing volume, whereas a dedicated or self-hosted detector can process a continuous camera feed on provisioned hardware. Roboflow, for example, bills Dedicated GPU deployments by server time and self-hosted video by camera-minutes rather than charging separately for every individual frame.
That does not make generic cloud APIs a bad choice. Amazon Rekognition provides labels, faces, moderation and text capabilities. Google Cloud Vision combines object localization with OCR, labels, landmarks and other image-analysis features. Azure Vision covers objects, OCR, brands, people and other visual features. If these capabilities already match the application and the rest of the system runs in AWS, Google Cloud, or Azure, using the native vision API can be the simplest architecture.
How to Choose an Object Detection API
Consider following points while choosing the object detection API.
Generic objects or your own classes?
Start by writing down exactly what the model has to detect. If the requirement is simply person, car, dog, bicycle, or another generic category, test the pretrained APIs first. Amazon Rekognition DetectLabels, Google Cloud Vision Object Localization, Azure object detection and models available on Roboflow Universe can all reduce the amount of training work needed. Roboflow Universe currently indexes 1 million+ datasets and 250,000+ fine-tuned models, so a pretrained model may also exist for a more specialized use case.
If the requirement is damaged-insulator, missing-screw, weld-crack, empty-slot, or a particular product variant, move quickly to a custom-data test. A generic API's impressive demo performance on COCO-style objects does not prove that it can separate the exact visual categories your application needs.
Test accuracy on your own images
Build a small acceptance set of around 50 representative images before choosing a provider. Include normal cases, hard cases, small objects, partial occlusion, different lighting, different camera angles and examples where the correct result is “nothing detected.”
Do not compare APIs using only vendor demo images. Run the same images through every candidate and record false positives, false negatives and localization quality. If you eventually train your own detector, keep those acceptance images out of the training set so they remain useful for comparison.
Decide where inference needs to run
There are three fundamentally different deployment requirements:
- Cloud: images can leave the site and internet connectivity is reliable.
- On-prem: inference needs to stay inside your infrastructure.
- Edge: inference runs close to the camera on equipment such as an NVIDIA Jetson or local GPU system.
Roboflow Inference can run models and Workflows on self-hosted CPUs, NVIDIA GPUs, NVIDIA Jetson systems and other supported environments, while the same Roboflow project can also use Serverless or Dedicated cloud deployment. Self-host Roboflow Inference
Google and Azure also have edge paths, but they are tied to particular custom-model products and formats. Google AutoML Edge object detectors can be exported as TensorFlow Lite, SavedModel containers or TensorFlow.js; Azure Custom Vision's compact object-detection domain can export models for local execution.
Calculate cost at your real volume
For video applications, calculate how many frames you will process each month:
number of cameras × processed FPS × seconds per day × days per month
Use this total to compare API charges with the cost of dedicated or self-hosted hardware that can handle the same workload. As the example above shows, one camera processing 5 FPS continuously produces almost 13 million frames in a 30-day month.
Ask whether you can leave with your model
Finally, distinguish between three different things that are often described as “custom AI”:
- you own the dataset;
- you can call a custom hosted endpoint;
- you can actually download or export the model artifacts and run them somewhere else.
They are not the same capability. Roboflow lets eligible users download weights for supported models, and Roboflow Inference automatically downloads and caches model weights locally when a model is first used. After the local cache is populated, subsequent local predictions use the cached weights rather than sending the input images to Roboflow Cloud. Download Roboflow model weights
Google's AutoML Edge and Azure's compact Custom Vision models also have export paths, so portability should be tested against the exact model you intend to train-not the vendor name alone.
The Best Object Detection APIs
An object detection API can be part of a much larger computer vision service. The providers also offer other vision AI services such as OCR, face analysis, content moderation, visual search, and video analysis. It may also let you train custom models and combine several tasks in one application. In this guide I cover all of these capabilities along with custom training, deployment, pricing, and model export. Each code example makes one object detection request.
Roboflow
Roboflow lets you build an object detection API around the objects that matter to your application. You can train a model to detect a particular product, machine part, package, or visible defect etc. then run it in the cloud or on your own hardware. The capabilities include:
- Object detection to return bounding boxes, class labels, and confidence scores.
- Instance segmentation to return a separate mask for each object, and semantic segmentation to label image pixels by class.
- Image classification to assign labels to an image or a cropped object.
- Keypoint detection to locate specific points on a person or object.
- OCR to read text.
- Multimodal models and embeddings for tasks that combine images and text.
- Depth estimation and gaze detection, depending on the model and deployment option.
You can also start with Roboflow Universe, which offers thousands of pretrained community models. For common objects, the COCO-pretrained RF-DETR checkpoints provide another starting point. Check the classes and test the model on your own images before using it.
Train on your data
Upload your images and add annotations for the objects you want to detect. Auto Label with Gemini and GPT-6 Astra can create bounding boxes from your class names. You can also use SAM 3 for automatic labeling to find and segment objects from text prompts. Review the annotations and correct missing objects, wrong classes, or inaccurate boundaries.
Next, create a dataset version and train RF-DETR in the browser. Roboflow runs the training job on hosted GPUs. You can review the evaluation results and try the model before adding it to your application.
When the model makes mistakes in production, you can improve it. Collect useful failure images, correct their annotations, add them to the dataset, retrain, and redeploy. Active learning and model monitoring help you choose which images need attention. Keep a separate test set so you can check whether the new version performs better.
RF-DETR
RF-DETR is a real-time detection transformer family built for object detection and related vision tasks. It has open weights for core models and reports state-of-the-art results on named benchmarks. Its different sizes let you choose a balance between accuracy and inference latency.
RF-DETR Nano achieved 48.4 COCO mAP50:95 at 2.32 ms using an NVIDIA T4 with TensorRT 10 FP16.
The RF-DETR supports Apache 2.0 licensing for core detection models from Nano to Large. XLarge and 2XLarge use the Platform Model License. Check the specific model because the terms vary between RF-DETR variants.
Deploy anywhere
You can choose how to run your trained detector:
- Serverless Cloud API for managed inference requests without setting up a server.
- Dedicated Deployments for provisioned CPU or GPU compute.
- Open-source Roboflow Inference for execution on your own computer, GPU server, or on-premises system.
- Edge deployment for supported devices such as NVIDIA Jetson.
- Batch processing for collections of images and video files.
For a supported model, you can keep the same trained model and model ID across hosted and self-hosted Inference. Changing where inference runs does not require training a new detector. The same Python client can connect to these endpoints by changing api_url.
Model weight downloads are available for eligible models and paid plans. However RF-DETR NAS and SAM 3 models do not support weight downloads. Standard local Inference fetches and caches model assets and fully disconnected operation uses the Enterprise deployment options.
Workflows
Roboflow Workflows lets you connect models, processing steps, and business logic in a visual editor. You can combine:
- Object tracking to follow detections across video frames.
- OCR models to read text from images or detected regions.
- Vision-language models (VLMs) to answer questions about an image or return structured information.
- Counting, cropping, filtering, measurement, and visualization blocks to turn predictions into useful results.
- Custom blocks to apply your own rules.
- Integrations to send results to other systems.
For example, a workflow could detect a package, crop its label, run OCR, and check whether the text matches an expected SKU. You can call the complete workflow through one API request.
For tracking, use a video pipeline that keeps state between frames. Blocks that call an external cloud API still need connectivity when the workflow runs locally.
Pricing
Roboflow uses plans and usage credits for features such as training and hosted execution. Dedicated or local compute can make costs easier to plan for continuous video. Include the hardware, maintenance, and applicable license in your estimate, and add capacity when the workload outgrows the device.
Sample request and response
Run pip install -U inference-sdk, then set ROBOFLOW_API_KEY and ROBOFLOW_MODEL_ID using the values from your deployment panel. This Python SDK request sends a local image to your model:
import cv2
import supervision as sv
from inference_sdk import InferenceHTTPClient, InferenceConfiguration

image = cv2.imread("bird.jpg")  # Your image filename
if image is None:
    raise FileNotFoundError("Could not read bird.jpg")

client = InferenceHTTPClient(
    api_url="https://serverless.roboflow.com",
    api_key="ROBOFLOW_API_KEY",
).configure(InferenceConfiguration(api_key_transport="header"))

result = client.infer(image, model_id="bird-species-monitor/4")
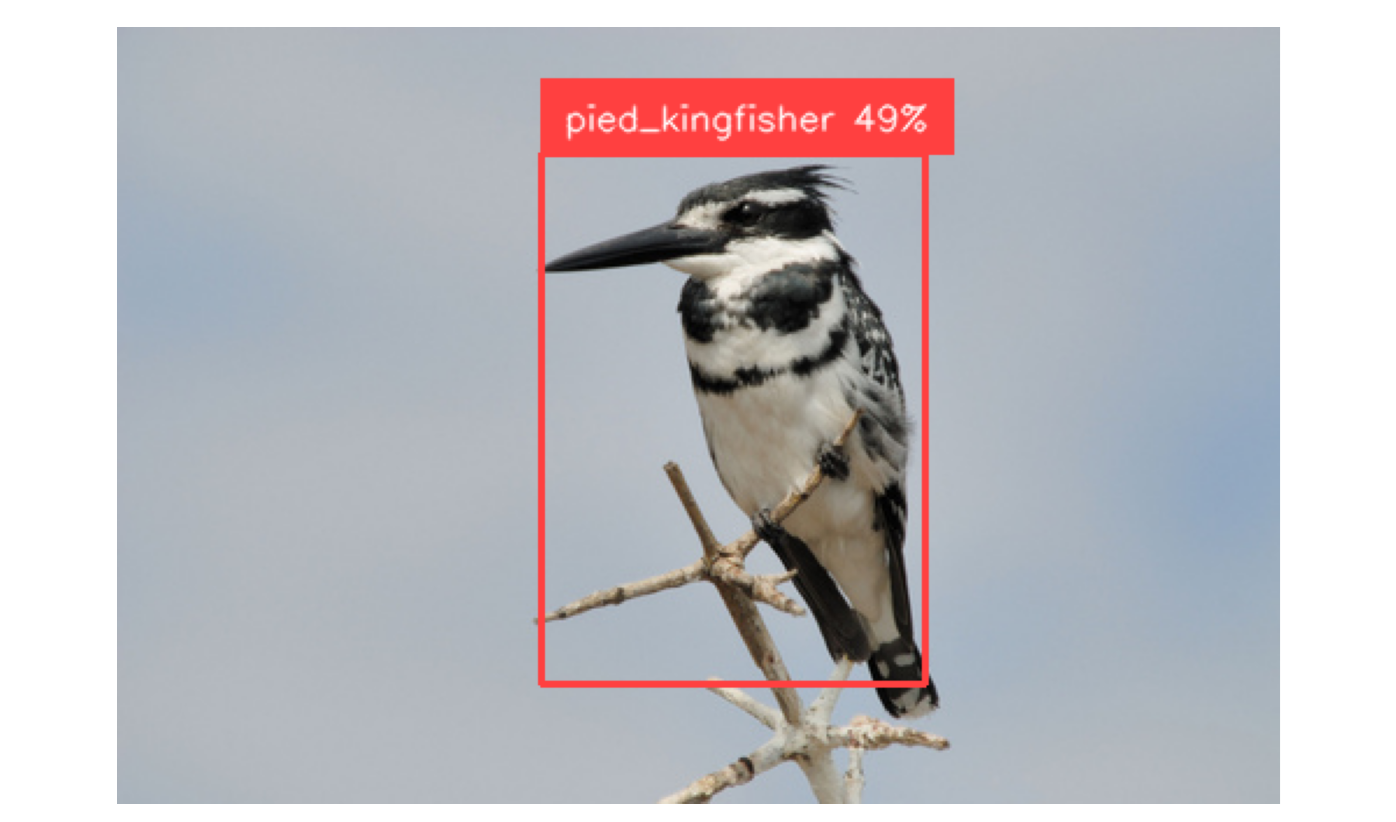
The output will be generated in JSON form.
{
  "inference_id": "1f9b5cca-75fe-454f-a431-17271f8b5b37",
  "time": 0.07913496112450957,
  "image": {
    "width": 500,
    "height": 334
  },
  "predictions": [
    {
      "x": 264.5,
      "y": 168.0,
      "width": 165.0,
      "height": 228.0,
      "confidence": 0.49215561151504517,
      "class": "pied_kingfisher",
      "class_id": 1,
      "detection_id": "3e54ed03-baa5-48ec-b1a8-6eac65152ee3"
    }
  ]
}
The Supervision library can be used to convert the results variable to draw bounding boxes and labels on image.
detections = sv.Detections.from_inference(result)
labels = [
    f"{p['class']} {p['confidence']:.0%}"
    for p in result["predictions"]
]

annotated = sv.BoxAnnotator().annotate(
    scene=image.copy(), detections=detections
)
annotated = sv.LabelAnnotator().annotate(
    scene=annotated, detections=detections, labels=labels
)

sv.plot_image(annotated)
The output will look like this:
Amazon Rekognition
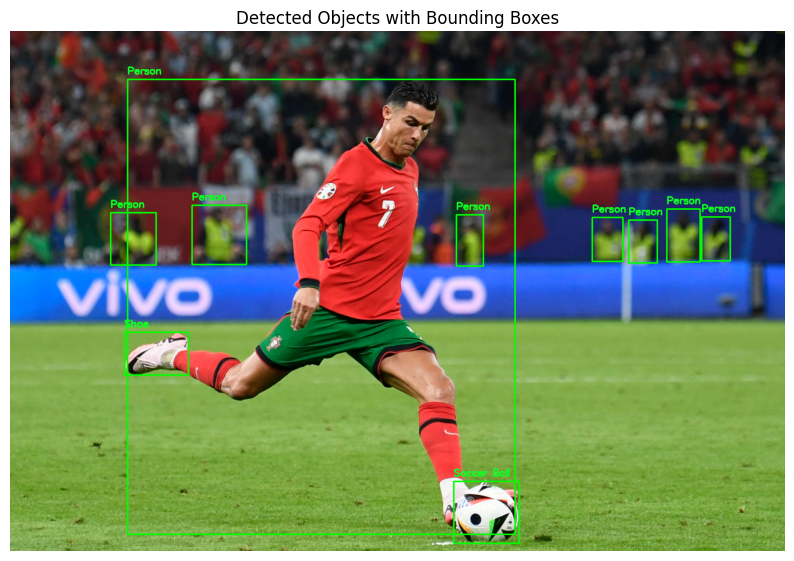
Amazon Rekognition is a managed image and video analysis service. Object detection is one part of it. The service also supports face analysis, identity-related checks, OCR, content moderation, and media analysis. Its capabilities include Object, scene, activity, and concept detection, Image properties, Face detection and analysis, Face comparison, face search, Face Liveness, Celebrity recognition, Text detection, Content moderation, PPE detection, Stored video analysis and video segment detection. For object detection, use DetectLabels and read the Instances inside each label.
Custom training
Rekognition Custom Labels lets you train models for your own objects and scenes, such as a company logo or machine part. Custom Moderation is a separate option for adapting moderation predictions to your images.
Deployment
Inference runs through AWS-managed endpoints. Custom Labels models are started and run within Rekognition. There is no supported model-weight download for independent edge inference.
Pricing
Rekognition pricing depends on the operation. Image analysis is billed per image and feature, stored video by duration, and Face Liveness per check. Custom Labels has separate training and inference-hour charges. Calling several features on one image can create several charges.
Sample request and response
Install boto3 and configure AWS credentials with permission to call rekognition:DetectLabels:
import boto3
import cv2
import numpy as np
from PIL import Image
import matplotlib.pyplot as plt

# Load image using OpenCV
image_path = "soccer.png"
image = cv2.imread(image_path)
height, width, _ = image.shape

# Load image bytes
with open(image_path, "rb") as image_file:
    image_bytes = image_file.read()

# Initialize Rekognition client
client = boto3.client(
    'rekognition',
    aws_access_key_id='AWS_ACCESS_KEYID',
    aws_secret_access_key='AWS_ACCESS_SECRET_KEY',
    region_name='us-east-1'
)
# Call Rekognition
response = client.detect_labels(
    Image={'Bytes': image_bytes},
    MaxLabels=10,
    MinConfidence=70
)

# Draw bounding boxes
for label in response['Labels']:
    if 'Instances' in label:
        for instance in label['Instances']:
            if 'BoundingBox' in instance:
                box = instance['BoundingBox']
                left = int(box['Left'] * width)
                top = int(box['Top'] * height)
                box_width = int(box['Width'] * width)
                box_height = int(box['Height'] * height)

                # Draw rectangle and label
                cv2.rectangle(image, (left, top), (left + box_width, top + box_height), (0, 255, 0), 2)
                cv2.putText(image, label['Name'], (left, top - 10),
                            cv2.FONT_HERSHEY_SIMPLEX, 0.6, (36, 255, 12), 2)

# Convert BGR to RGB for display in matplotlib
image_rgb = cv2.cvtColor(image, cv2.COLOR_BGR2RGB)

# Show the image
plt.figure(figsize=(10, 8))
plt.imshow(image_rgb)
plt.axis('off')
plt.title('Detected Objects with Bounding Boxes')
plt.show()
You will see output similar to the below:
Best for: AWS-native teams that need generic object detection together with faces, moderation, OCR, or media analysis.
Pros: a broad set of pretrained capabilities and managed AWS deployment.
Cons: custom detection uses a separate training and billing path, model weights cannot be exported, and some older video features are restricted or retired.
Google Cloud Vision
Google Cloud Vision provides pretrained image analysis through an API. It is useful when an application needs common object detection together with OCR, image labels, and visual search features. Its capabilities include Object localization, Label detection, OCR, document text detection, Logo detection, Landmark detection, Face detection, SafeSearch, Image properties, crop hints, Web detection, Vision API Product Search, and Batch image analysis.
Custom training and deployment
Cloud Vision’s pretrained detector runs in Google’s cloud and cannot be retrained or downloaded through this API. For your own classes, use a separate Vertex AI custom detection training project. Its costs and deployment options are separate from Cloud Vision. Google also has export options for eligible AutoML Edge models. Those options do not export Cloud Vision’s pretrained detector. AutoML Edge object detection is now in maintenance mode, so check the training guide before choosing that route. Cloud Vision processes images rather than maintaining a continuous video session. Google’s Video Intelligence API is a separate service for video analysis.
Pricing
Pricing is per image feature. Object localization costs $2.25 per 1,000 units in the tier from 1,001 to 5 million monthly units. The first 1,000 units of each feature are free each month. Requesting OCR and object localization on the same image uses separate feature units.
Sample request and response
Install google-cloud-vision, enable the API, and configure Application Default Credentials. Authenticate user first,
from google.colab import auth
auth.authenticate_user(project_id='tim-prj-1')
and then send a local image using the code below:
from google.cloud import vision
from PIL import Image
import numpy as np
import cv2
import os

# 1. Initialize Vision client
client = vision.ImageAnnotatorClient()

# 2. Load local image bytes
image_path = 'baseball.png'
with open(image_path, 'rb') as f:
    content = f.read()

# 3. Send image for object localization
image = vision.Image(content=content)
response = client.object_localization(image=image)

objects = response.localized_object_annotations

# 4. Load image with OpenCV to draw on
cv_img = cv2.imread(image_path)
height, width = cv_img.shape[:2]

# 5. For each detected object, compute pixel bounding box and annotate
for obj in objects:
    # Convert normalized vertices to pixel coords
    pixels = [
        (int(v.x * width), int(v.y * height))
        for v in obj.bounding_poly.normalized_vertices
    ]
    # Derive xmin, ymin, xmax, ymax
    xs = [p[0] for p in pixels]
    ys = [p[1] for p in pixels]
    xmin, ymin = min(xs), min(ys)
    xmax, ymax = max(xs), max(ys)

    # Draw the bounding box
    cv2.rectangle(cv_img, (xmin, ymin), (xmax, ymax), color=(0, 0, 255), thickness=2)

    # Overlay label and confidence
    label = f"{obj.name} {obj.score:.2f}"
    cv2.putText(cv_img, label, (xmin, ymin - 10),
                fontFace=cv2.FONT_HERSHEY_SIMPLEX, fontScale=0.6,
                color=(0, 255, 0), thickness=2)

# 6. Convert to RGB and show in notebook
cv_rgb = cv2.cvtColor(cv_img, cv2.COLOR_BGR2RGB)

import matplotlib.pyplot as plt
plt.figure(figsize=(8, 8))
plt.imshow(cv_rgb)
plt.axis('off')
plt.title('Detected Objects with Bounding Boxes')
plt.show()
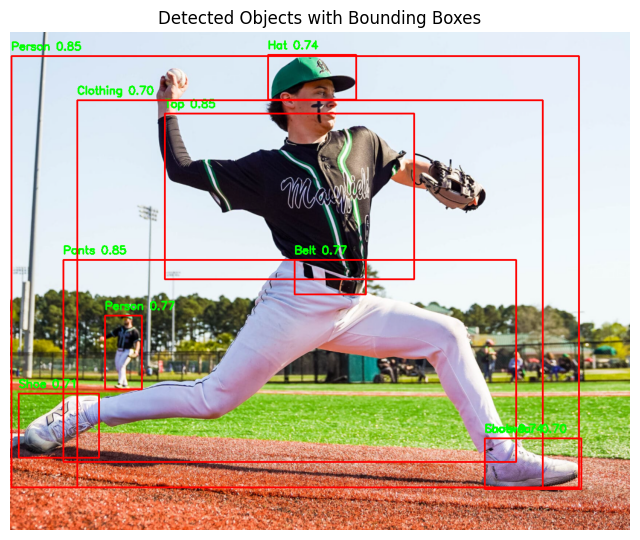
You will see an output similar to this:
Best for: GCP teams and document-heavy applications that also need generic image analysis.
Pros: a broad OCR feature set, object localization, and useful image and product search options.
Cons: No custom classes or model export within the pretrained API, and additional features add to the bill.
Azure AI Vision
Azure AI Vision Image Analysis combines several image analysis features in one service. The available features depend on the API version. Image Analysis 4.0 provides object detection, image tags, OCR, image captions and dense captions, people detection, smart crops, multimodal embeddings.
Custom training and deployment
The separate Custom Vision service supports custom image classification and object detection. You can deploy trained models through its prediction API or export supported compact models for local execution. This export option applies to Custom Vision models, not the general Image Analysis detector.
Pricing
Image Analysis pricing uses feature transactions, with rates that depend on the feature and region. The Free (F0) tier includes 5,000 transactions per month, where available. Custom Vision training and predictions have separate pricing.
Sample request and response
Set AZURE_VISION_ENDPOINT to your resource endpoint without a trailing slash, and set AZURE_VISION_KEY.
from azure.ai.vision.imageanalysis import ImageAnalysisClient
from azure.ai.vision.imageanalysis.models import VisualFeatures
from azure.core.credentials import AzureKeyCredential
from PIL import Image, ImageDraw

endpoint = "ENDPOINT"
key = "AZURE_VISION_KEY"
client = ImageAnalysisClient(endpoint, AzureKeyCredential(key))
Then send object detection API request using following code:
local_image_path = "baseball.png"

# Read image as bytes
with open(local_image_path, "rb") as f:
    image_data = f.read()

# Call Azure analyze API with OBJECTS feature --
result = client.analyze(
    image_data=image_data,
    visual_features=[VisualFeatures.OBJECTS]
)

img = Image.open(local_image_path)
draw = ImageDraw.Draw(img)

raw_objects = list(result.objects.values()) if result.objects else []

objects = raw_objects[0] if len(raw_objects) > 0 and isinstance(raw_objects[0], list) else raw_objects

# Draw boxes
if objects:
    print("Detected objects:")
    for obj in objects:
        bbox = obj["boundingBox"]
        tags = obj.get("tags", [])

        name = tags[0]["name"] if tags else "unknown"
        conf = tags[0]["confidence"] if tags else 0.0

        x, y, w, h = bbox["x"], bbox["y"], bbox["w"], bbox["h"]
        draw.rectangle([x, y, x + w, y + h], outline="red", width=2)
        draw.text((x, y), f"{name} ({conf:.2f})", fill="red")

        print(f" {name}: {conf:.2f}, bbox=[{x}, {y}, {w}, {h}]")
else:
    print("No objects detected.")

# Show result (in Colab)
from IPython.display import display
display(img)
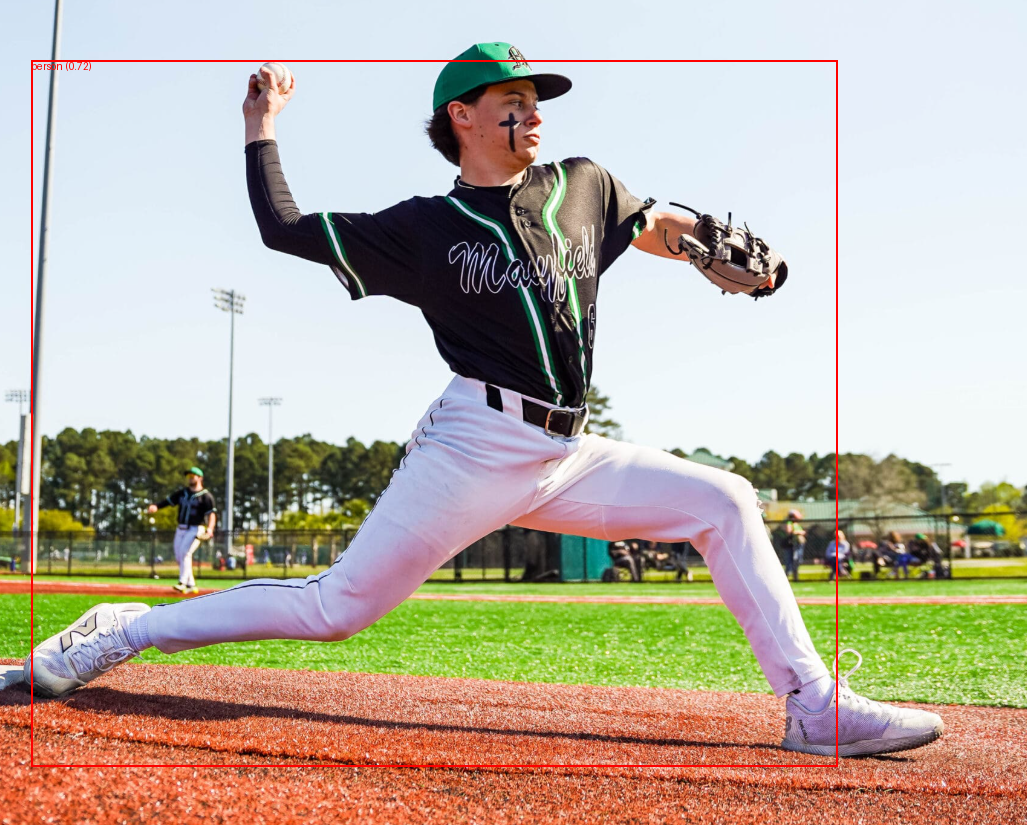
You will see an output similar to the below:
Best for: Microsoft-stack teams maintaining existing applications and planning their next deployment.
Pros: several image features in one API, with local export available for supported compact Custom Vision models.
Cons: features vary by API version and region, custom training is separate, and both services have a retirement deadline.
Clarifai
Clarifai provides prebuilt models, custom training, and workflows for different AI tasks. Its object detection API is one part of a wider platform that also handles images, video, text, and audio. Its capabilities include model types such as visual detector, visual classifier, visual segmenter, optical character recognizer (ocr), visual keypoint, visual embedder, visual anomaly, zero shot image classifier, zero shot image segmenter, multimodal to text etc. and workflows . These capabilities come from different models and operators. Choosing a general object detector does not automatically add OCR, or every other feature to its response.
Custom training
You can train a visual detector on your own bounding-box annotations through the UI or CLI. You can also upload a model and make it available through the platform.
Deployment
Compute Orchestration supports managed compute, your own cloud infrastructure, and on-premises deployment. Full platform deployment can place both the control and compute components in your environment.
Local Runners let you connect locally running models to Clarifai’s API. That connected setup needs internet access; fully disconnected operation requires a suitable platform deployment.
For eligible trained models, the Python SDK’s model export feature creates a package for Triton Inference Server. Check eligibility for the exact model you want to use.
Pricing
Clarifai uses pay-as-you-go billing. Costs depend on the model and deployment, including operation charges, compute usage, or tokens for applicable generative models. A workflow can include several billable steps, so calculate the cost of the complete workflow.
Sample request and response
Following is the API example that uses Python SDK object detection.
from clarifai.client.model import Model

model = Model(
    url="https://clarifai.com/clarifai/main/models/general-image-detection",
    pat="YOUR_CLARIFAI_PAT",
)

result = model.predict_by_filepath(
    "image.jpg",
    input_type="image",
)

print(result)
Replace YOUR_CLARIFAI_PAT with your token.
Best for: teams that want to combine prebuilt and custom models for several AI tasks within one vendor.
Pros: many model types, workflow tools, custom training, and multiple deployment choices.
Cons: pricing and portability depend on the selected model and deployment. You also need to check model versions and replacements when older endpoints retire.
Host Your Own Object Detection API with RF-DETR (Tutorial)
In this walkthrough I will explain how you can host your own object detection API with Roboflow. You will need a Roboflow account, representative images, Python environment, and an API key. The local deployment also requires Docker and a supported CPU/GPU system. The getting started guide covers account and project setup, while the Inference installation documentation covers the runtime.
Step 1: Upload your images
Create an Object Detection project and upload images from the camera and environment you intend to use. Include examples with and without the defect, along with variation in angle, lighting, and object size. Use separate training, validation, and test sets. Keep images of the same physical item or near-duplicate video frames together to avoid an unrealistically easy test.
Step 2: Auto Label, then review
Select an unannotated batch, open Auto Label, and choose an available Gemini or SAM 3 labeling option. Enter the classes and inspect a preview before processing the batch. The Gemini Auto Label tutorial covers that sequence.
Correct missing objects, inaccurate boxes, and wrong labels. For a specialized defect, treat foundation-model annotations as proposals: if the preview cannot distinguish the defect reliably, label those cases manually. Move reviewed images into the dataset.
Step 3: Train RF-DETR
Create a dataset version, open the training action, and select RF-DETR. Nano or Small is a sensible starting point when you plan to evaluate on an edge device; compare candidates against your own accuracy and latency requirements. Follow the RF-DETR training guide for the available training paths.
After training, evaluate the model on held-out images and inspect its errors. A high aggregate mAP can still hide weak performance on your most important class; use the per-class detection metrics to decide whether the model is ready for an API trial.
Step 4: Use the hosted endpoint
Open your trained model’s deployment panel and copy its model ID from the generated snippet. Use that exact ID, it may be a project/version identifier or another supported model identifier. Roboflow’s hosted API documentation and SDK guide describe the request interface. First install the SDK:
pip install inference-sdkSend a local image with curl using the REST API interface:
curl -F "file=@bird.jpg" \
  -H "Authorization: Bearer $ROBOFLOW_API_KEY" \
  "https://serverless.roboflow.com/bird-species-monitor/4?confidence=0.5"
For Python SDK deployment, save the following as detect.py:
from inference_sdk import InferenceHTTPClient, InferenceConfiguration

image = cv2.imread("bird.jpg")  # Your image filename
if image is None:
    raise FileNotFoundError("Could not read bird.jpg")

client = InferenceHTTPClient(
    api_url="https://serverless.roboflow.com",
    api_key="ROBOFLOW_API_KEY",
).configure(InferenceConfiguration(api_key_transport="header"))

result = client.infer(image, model_id="bird-species-monitor/4")

print(result)
and run it:
python detect.pyStep 5: Run the same model in Docker or on a Jetson
Install Docker using the platform instructions linked from the Inference installation guide. NVIDIA systems also require a compatible GPU runtime. For Jetson, follow the Jetson-specific guide and its supported JetPack/container combinations. Install the CLI and start the server:
python -m pip install inference-cli
inference server start
The CLI starts an appropriate Inference container. On Jetson, the installation guide documents automatic JetPack detection. Use this route rather than assuming a generic desktop CUDA image will work on the board. Once the server is running, change the endpoint to api_url="http://localhost:9001" and reuse detect.py:
python detect.pyThe model ID stays the same. The SDK sends the image to your local server, which retrieves the model assets when needed and executes inference on that machine. Our local Inference guide explains the server and SDK relationship. Standard local deployment needs initial model retrieval and the applicable platform connectivity; use the documented Enterprise deployment options for fully disconnected operation.
Step 6: Connect a live stream
Use the Inference SDK’s RTSP streaming support to process video from a live camera. The SDK reads the RTSP stream and sends frames over WebRTC to your Inference server. The server runs your workflow and returns processed video and prediction data.
In your workflow, select the trained model you want to use and add a visualization block to draw its predictions. This example expects an image output named visualization and a data output named predictions. Change those names in the code if your workflow uses different ones. Save the following code as stream.py. Replace the API key and RTSP URL with your own values:
import cv2
from inference_sdk import InferenceHTTPClient
from inference_sdk.webrtc import RTSPSource, StreamConfig, VideoMetadata

# Initialize client
client = InferenceHTTPClient.init(
    api_url="http://localhost:9001",
    api_key="ROBOFLOW_API_KEY"
)

# Configure video source (RTSP stream)
source = RTSPSource("rtsp://demo.roboflow.com:8554")

# Configure streaming options
config = StreamConfig(
    processing_timeout=3600,
)

# Create streaming session
session = client.webrtc.stream(
    source=source,
    workflow="bird-species-monitor",
    workspace="tim-4ijf0",
    image_input="image",
    config=config
)

# Handle incoming video frames
@session.on_frame
def show_frame(frame, metadata):
    cv2.imshow("Workflow Output", frame)
    if cv2.waitKey(1) & 0xFF == ord("q"):
        session.close()

# Handle prediction data via datachannel
@session.on_data()
def on_data(data: dict, metadata: VideoMetadata):
    print(f"Frame {metadata.frame_id}: {data}")

# Run the session (blocks until closed)
session.run()
Run the script:
python stream.pyThe workflow runs on the server at http://localhost:9001, using the hardware configured in Step 5. The Python script handles the camera stream and displays the results. Press Q while the video window is selected to stop.
The realtime_processing=True setting allows frames to be dropped when processing cannot keep up, helping reduce delay. It does not set a five-FPS limit or guarantee a particular processing speed. To use Roboflow Cloud instead, change api_url to https://serverless.roboflow.com. The workflow will then run on hosted compute.
Conclusion
A hosted object detection API is a good starting point when its pretrained labels match your needs. For custom objects or greater control over deployment, train a model you can improve with your own data and run where your application needs it.
Create a free Roboflow account, follow the RF-DETR training guide, and use the Inference documentation to move from your first API prediction to deployment on your own hardware.


Cite this Post
Use the following entry to cite this post in your research:
Timothy M. (Aug 27, 2026). Object Detection API: Best Hosted Options in 2026 (and When to Own Your Model). Roboflow Blog: https://blog.roboflow.com/object-detection-api/