

Open vocabulary segmentation lets you segment any object you can describe in text, like "door", with no labeled dataset, fixed class list, or training: SAM 3 returns pixel-level masks for every match in one pass. This tutorial builds a Roboflow Workflow that segments car parts from a comma-separated prompt and outputs an annotated image plus a per-class coverage report.
Open vocabulary segmentation lets you segment objects by describing them in text. Instead of relying on a predefined class list, you type a prompt like "door" or "bumper", and the model interprets it, locates matching instances, and returns pixel-level masks, with no labeled dataset or training process required.
Vehicle inspection shows why this matters. The automated vehicle damage detection market reached $1.43 billion in 2025 as insurers, rental fleets, and repair shops replace manual inspections with computer vision, but most existing systems rely on models trained on fixed part classes. Adding a new part type means collecting data, labeling it, and retraining.
SAM 3 is Meta's foundation model for prompt-based concept segmentation. In this tutorial, you will run SAM 3 inside Roboflow Workflows: provide an image and a text prompt, and the workflow returns a segmented image with masks over every detected instance, using the Car Parts dataset from Roboflow Universe as the example. Prompts like "door", "bumper", or "wheel" segment different vehicle parts without changing the workflow.
What Is Open Vocabulary Segmentation?
Open vocabulary segmentation is the task of segmenting arbitrary object categories described by free-form text, without being constrained by the fixed label set the model was trained on.
The approach became practical with vision-language models like CLIP, which embed images and text in a shared space so visual regions can be matched against arbitrary words. Most early open-vocabulary segmentation methods work in two stages: first generate class-agnostic mask proposals covering everything in the image, then use a CLIP-style model to score each masked region against the text query. It works, but the two stages fail independently, and the CLIP matching step was never trained on masked regions, which limits accuracy.
Newer models collapse the pipeline. SAM 3 handles the full task in a single model: a text encoder processes the prompt, a fusion encoder matches it against image features, and a mask decoder produces instance masks directly, with a presence token that first checks whether the concept exists in the image at all.
Open-Vocabulary Segmentation Models
The research landscape falls into three families:
- CLIP-based two-stage methods like OVSeg and FreeSeg pioneered the task for semantic segmentation.
- Open-vocabulary detectors like Grounding DINO and YOLO-World return boxes rather than masks, and are often paired with a SAM model to add masks (the Grounded SAM pattern).
- SAM 3 is the current single-model option for open-vocabulary instance segmentation: trained on 4 million annotated concepts and supporting 270,000 concepts at inference, it detects and segments every instance of a prompted concept in one pass. That's why this tutorial uses it: one block, one prompt, masks out.
Related Terms
Literature uses several overlapping names. Open-vocabulary segmentation means the class list is unrestricted, defined by text at inference time. Zero-shot segmentation emphasizes that the model receives no training examples for the target classes; open-vocabulary models are used zero-shot, so the terms largely coincide in practice.
Promptable concept segmentation is Meta's term for SAM 3's specific formulation: prompt with a short noun phrase or image exemplar, get every instance back. Open-set detection is the box-only relative, locating arbitrary described objects without masks.
How Open-Vocabulary Segmentation Works
SAM 3 uses four components:
- Vision encoder: Extracts image features.
- Text encoder: Converts the prompt into meaning.
- Fusion encoder: Matches the prompt with image regions.
- Mask decoder: Generates pixel-level masks.
A presence token checks whether the concept exists first, reducing false positives.
When to Use SAM 3 vs. Trained Models
Use SAM 3 for unknown or changing classes. For fixed classes requiring high precision, use a trained model such as RF-DETR, Roboflow’s real-time detection and segmentation model built for production workloads.
Build the Workflow
The workflow takes a car image and a comma-separated list of part names, segments each part using SAM 3, and returns an annotated image with per-class masks and a structured coverage report. Here's the workflow we'll build.
Here is what each block does:
- Inputs: car image and a part_prompt string, default "door, bumper, wheel"
- Prompt To Classes: splits the prompt into a class list for SAM 3
- SAM 3: runs zero-shot segmentation and returns a mask per matching instance
- Mask Visualization: draws a colored mask per class on the image
- Property Definition: counts total detected regions
- Coverage Estimator: calculates surface coverage percentage per class
- Clean Detections: formats predictions into a compact JSON with color map and counts
- Text Display: overlays parts, region count, and total coverage on the image
- Outputs: annotated image, detection summary, and coverage report
Step 1: Create a new Workflow in Roboflow
Go to the Workflows tab in your Roboflow project and create a new Workflow. The required Image Input and Outputs blocks are already included.
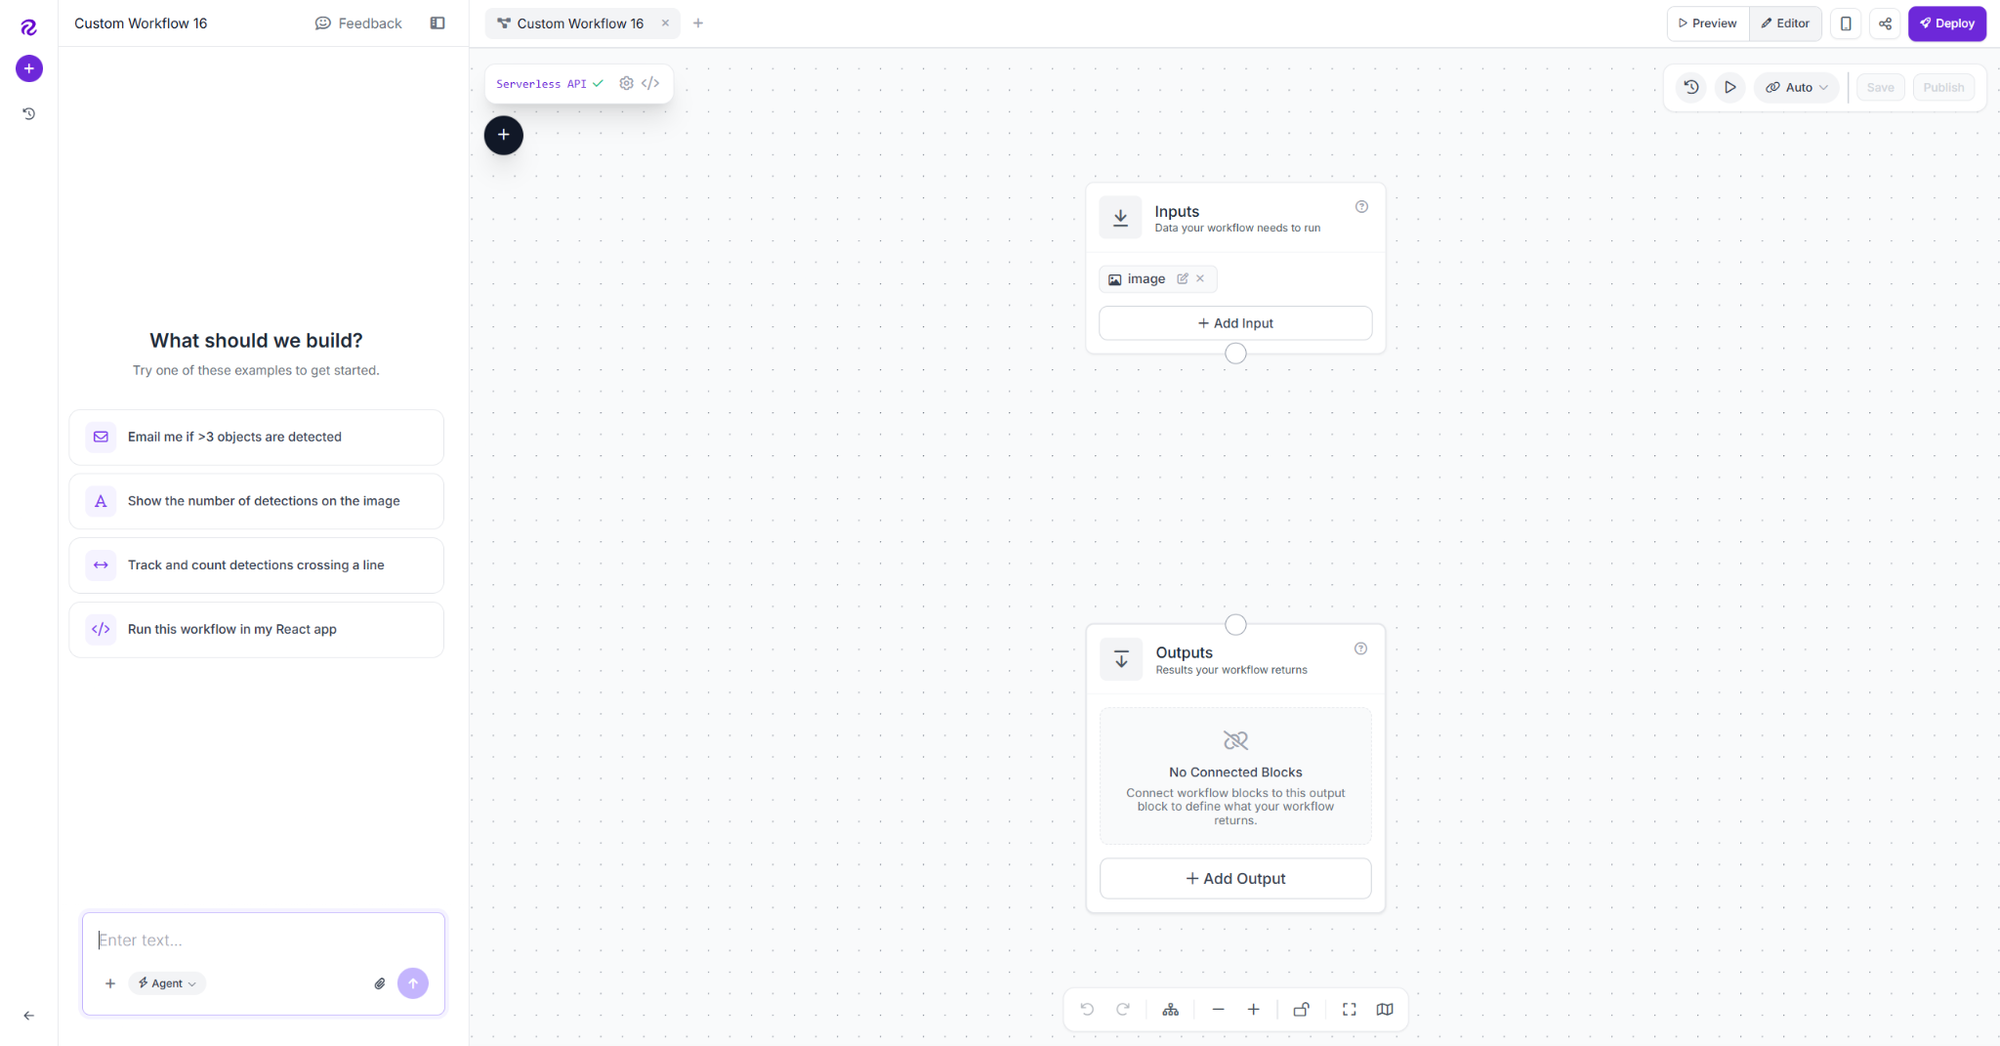
Add image and part_prompt inputs. Set part_prompt default to "door, bumper, wheel".
Step 2: Add the Prompt To Classes block
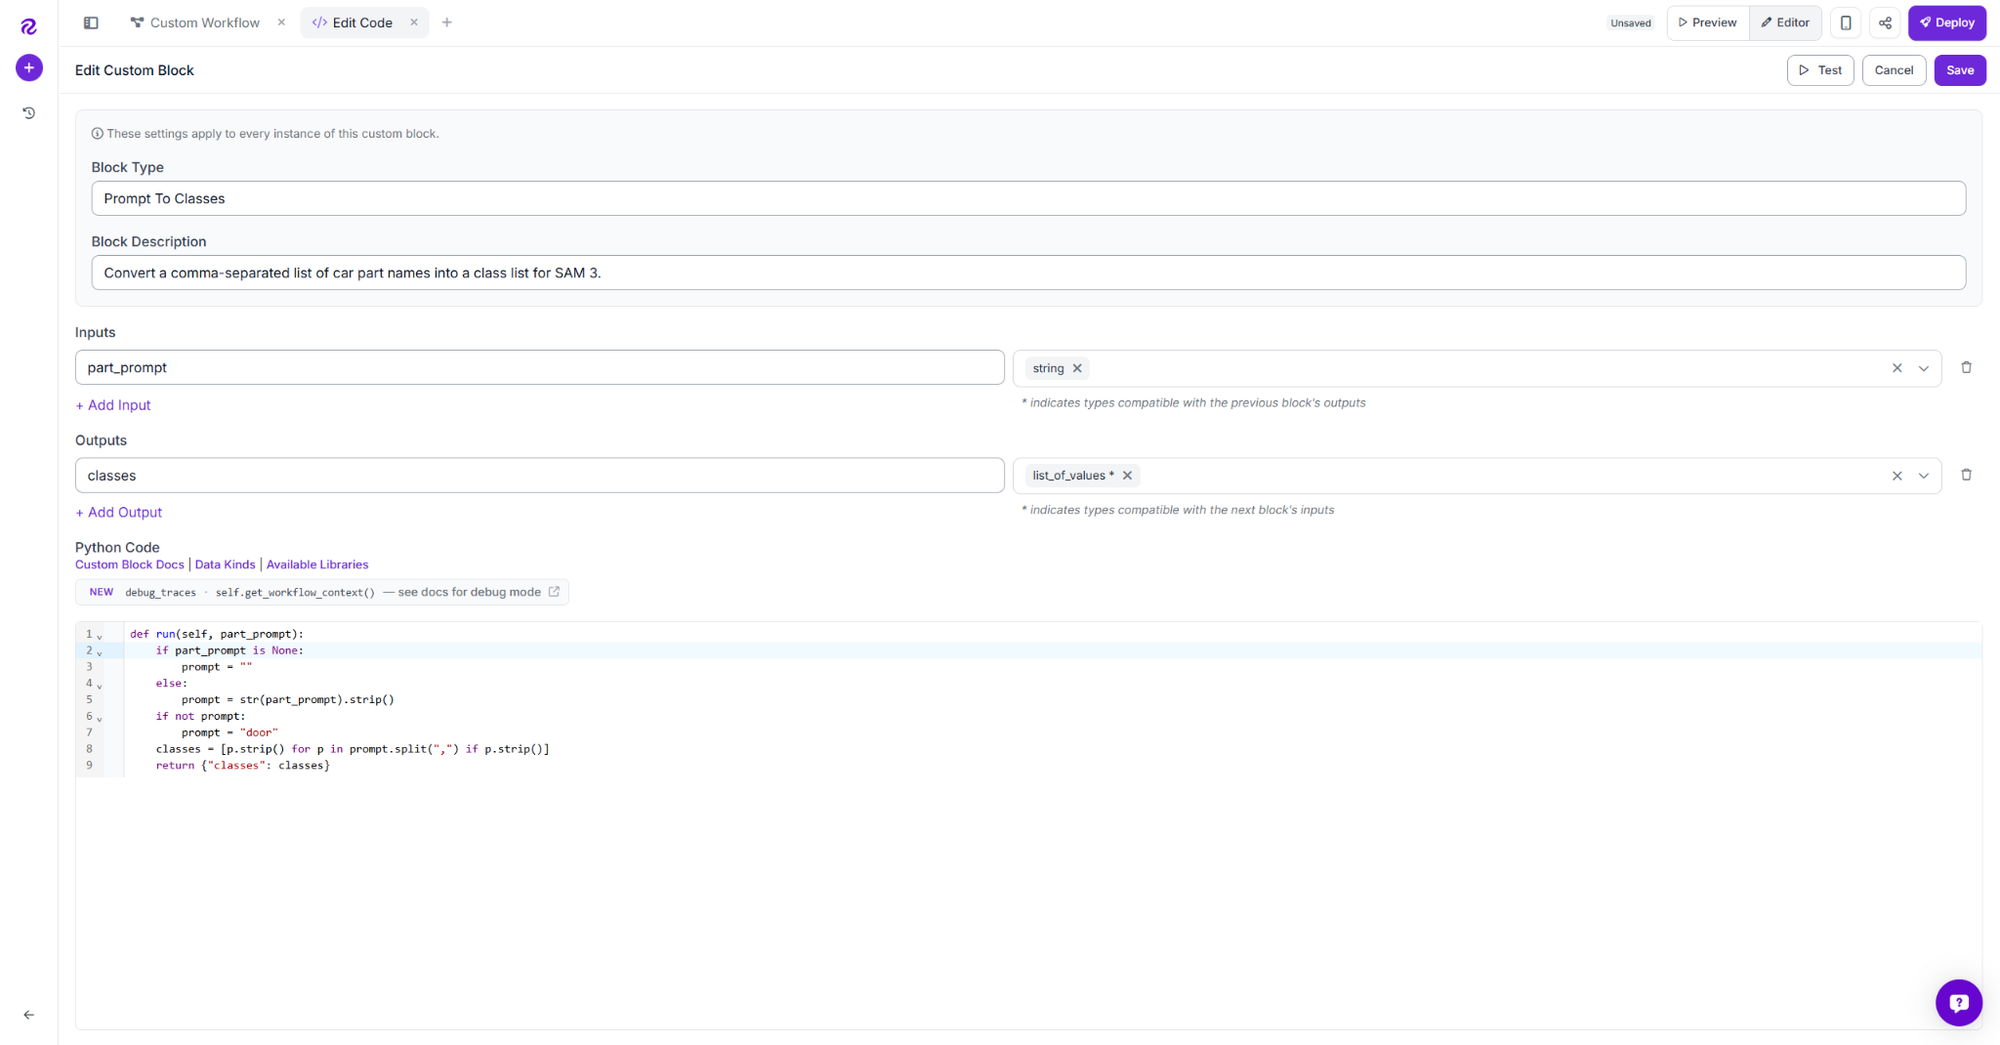
Add a Custom Python block named prompt_to_classes. Set the type to Prompt To Classes, add part_prompt as input connected to inputs.part_prompt, and output classes (list_of_values).
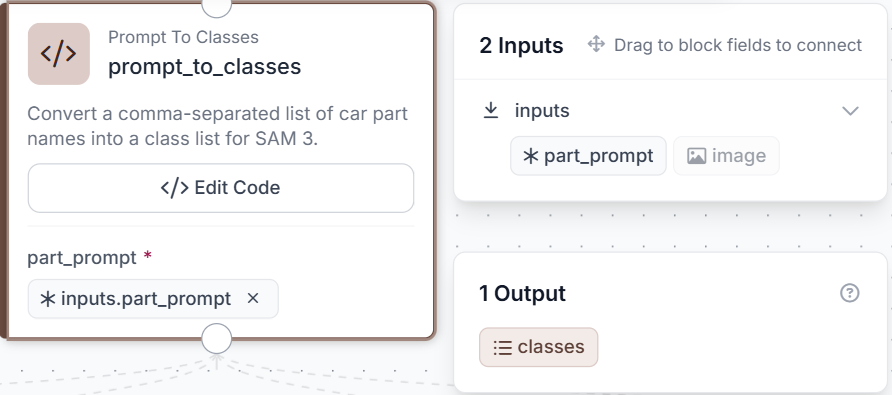
Open the code editor, set the type to Prompt To Classes, add part_prompt (string) and classes (list_of_values), then paste the code.
def run(self, part_prompt):
    if part_prompt is None:
        prompt = ""
    else:
        prompt = str(part_prompt).strip()
    if not prompt:
        prompt = "door"
    classes = [p.strip() for p in prompt.split(",") if p.strip()]
    return {"classes": classes}
The code splits the prompt into class names and removes extra spaces. If empty, it defaults to ["door"].
This block converts user prompts into SAM 3 class lists used by the following blocks.
Step 3: Add the SAM 3 block
Add SAM 3 as sam3_segmentation. Connect Image to inputs.image and Class Names to prompt_to_classes.classes.
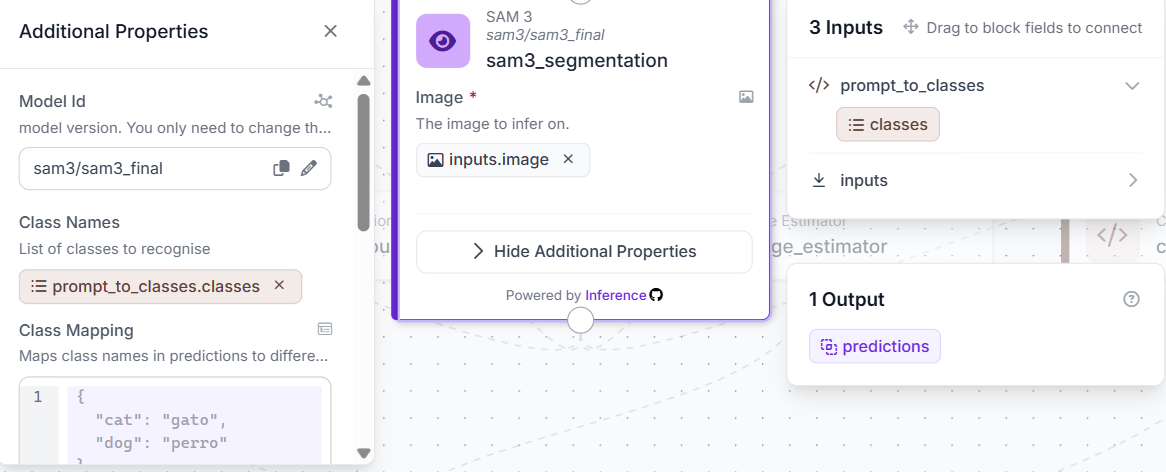
The Model ID defaults to sam3/sam3_final. No training or dataset is needed. It uses the class list to generate masks, boxes, labels, and confidence scores.
Step 4: Add the Mask Visualization block
Add a Mask Visualization block named mask_visualization. Connect Input Image to inputs.image and Predictions to sam3_segmentation.predictions. Set a custom palette, keep the size at 10, and enable Copy Image.
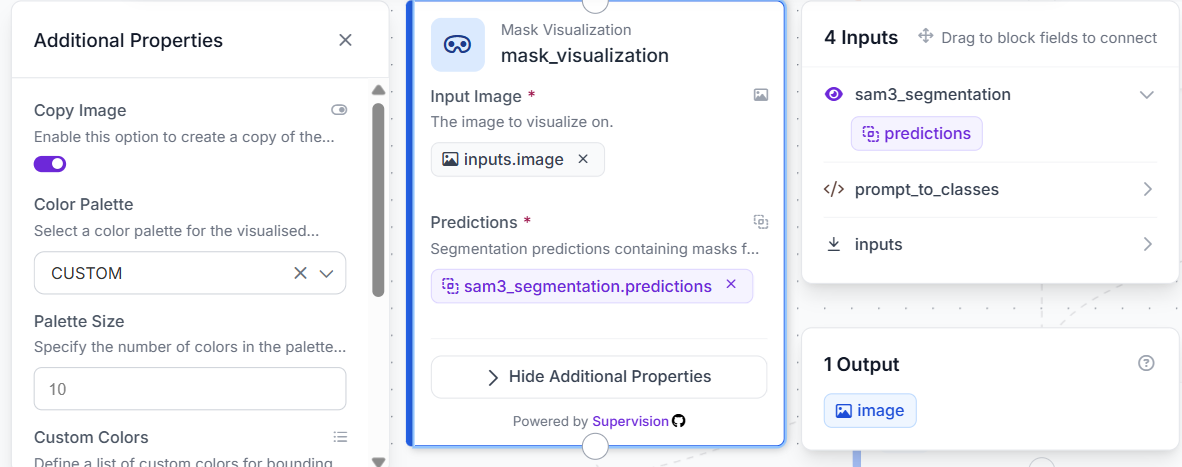
Colors are assigned by prompt order, so reordering classes automatically changes their colors.
Step 5: Add the Property Definition block
Add a Property Definition block named detection_count. Connect Data to sam3_segmentation.predictions and set the operation to Count Items.
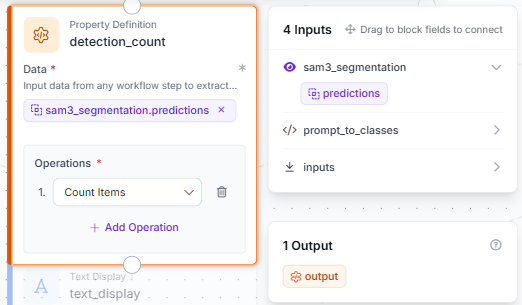
This block counts all detected regions across classes and passes the total to Text Display.
Step 6: Add the Coverage Estimator block
Add a Custom Python block named coverage_estimator with two inputs: predictions (instance_segmentation_prediction) and image (image), connected to sam3_segmentation.predictions and inputs.image. Add outputs: coverage_report (dictionary) and total_coverage_percentage (float).
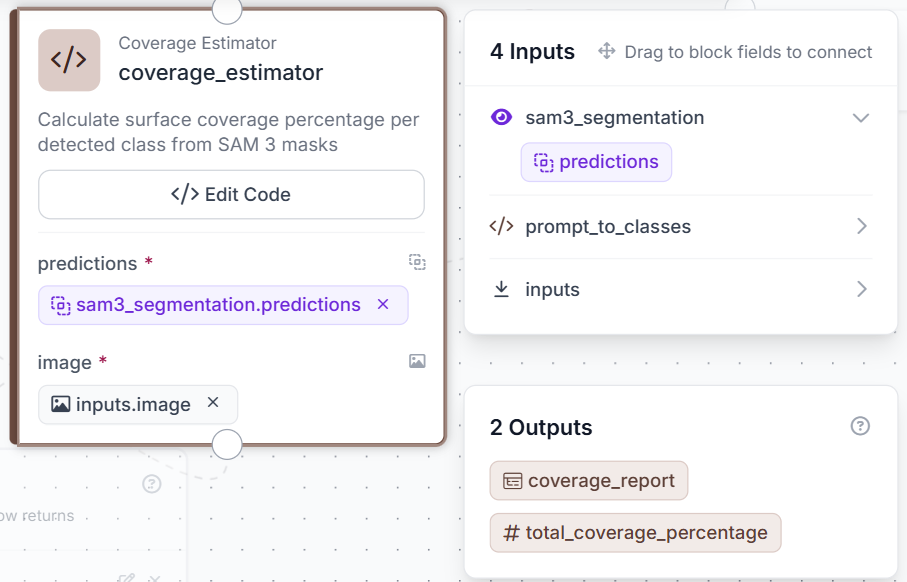
Click Edit Code and paste the following code:
def run(self, predictions, image):
    try:
        import numpy as np
        empty = {"total_coverage_percentage": 0.0, "coverage_per_class": {}, "total_regions": 0}
        if predictions is None:
            return {"coverage_report": empty, "total_coverage_percentage": 0.0}
        img = image.numpy_image if hasattr(image, 'numpy_image') else np.array(image)
        image_area = img.shape[0] * img.shape[1]
        class_names = predictions.data.get("class_name", [])
        class_names = class_names.tolist() if hasattr(class_names, 'tolist') else list(class_names)
        coverage_per_class = {}
        total_mask_area = 0
        total_regions = 0
        if hasattr(predictions, 'mask') and predictions.mask is not None:
            for mask, name in zip(predictions.mask, class_names):
                area = int(np.sum(mask > 0))
                coverage_per_class[str(name)] = coverage_per_class.get(str(name), 0) + area
                total_mask_area += area
                total_regions += 1
        elif hasattr(predictions, 'xyxy') and predictions.xyxy is not None:
            for box, name in zip(predictions.xyxy, class_names):
                x1, y1, x2, y2 = box
                area = int((x2 - x1) * (y2 - y1))
                coverage_per_class[str(name)] = coverage_per_class.get(str(name), 0) + area
                total_mask_area += area
                total_regions += 1
        total_coverage = round((total_mask_area / image_area) * 100, 2) if image_area > 0 else 0.0
        report = {
            "total_coverage_percentage": total_coverage,
            "coverage_per_class": {k: round((v / image_area) * 100, 2) for k, v in coverage_per_class.items()},
            "total_regions": total_regions
        }
        return {"coverage_report": report, "total_coverage_percentage": float(total_coverage)}
    except Exception:
        empty = {"total_coverage_percentage": 0.0, "coverage_per_class": {}, "total_regions": 0}
        return {"coverage_report": empty, "total_coverage_percentage": 0.0}
The code calculates mask coverage by class. If masks are unavailable, it estimates coverage using bounding boxes.
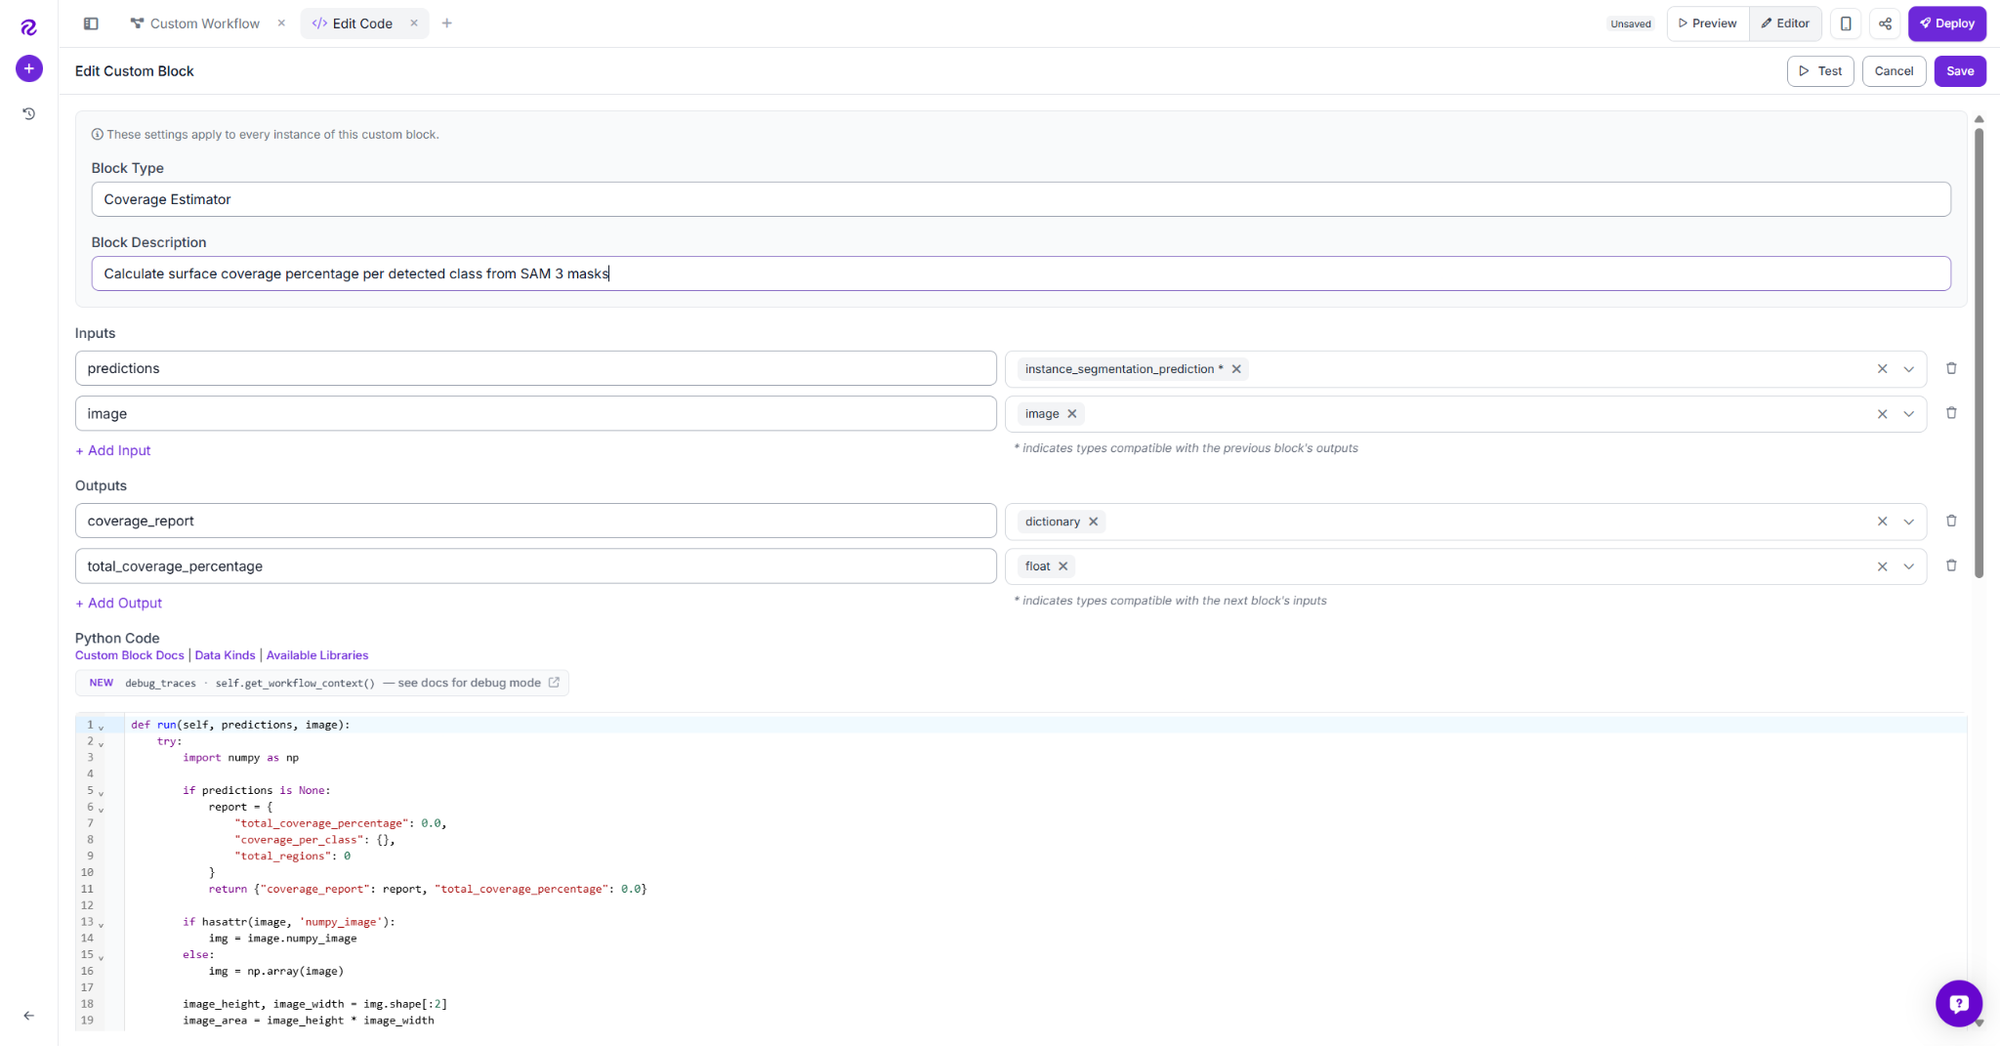
This block generates class coverage percentages for the JSON report and sends total coverage to the Text Display block.
Step 7: Add the Text Display block
Add a Text Display block named text_display. Connect Input Image to mask_visualization.image.
Set the Text field to:
Parts: {{ $parameters.parts }} | Regions: {{ $parameters.count }} | Coverage: {{ $parameters.coverage }}%Set Text Parameters to:
{
    "parts": "$inputs.part_prompt",
    "count": "$steps.detection_count.output",
    "coverage": "$steps.coverage_estimator.total_coverage_percentage"
}
Set Text Color to WHITE, Background Color to BLACK, Background Opacity to 1, and Position Mode to relative.
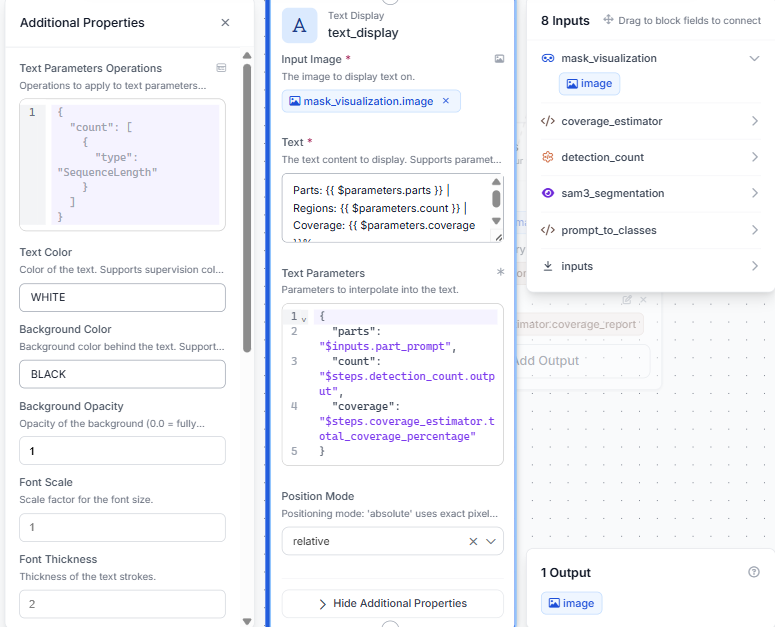
This block overlays detected parts, region count, and coverage on the output image for quick viewing without checking the JSON.
Step 8: Add the Clean Detections block
Add a Custom Python block named clean_detections with input predictions (instance_segmentation_prediction) connected to sam3_segmentation.predictions, and output summary (dictionary).
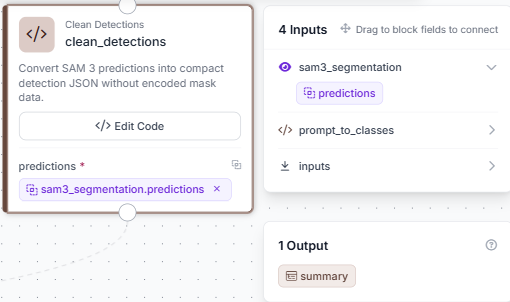
Click Edit Code and paste the following code:
def run(self, predictions):
    palette = ["blue", "red", "green", "amber", "purple", "pink", "cyan", "lime"]
    empty = {"total_detections": 0, "classes_found": [], "count_per_class": {}, "color_map": {}}
    if predictions is None:
        return {"summary": empty}
    try:
        class_names = predictions.data.get("class_name", [])
        class_names = class_names.tolist() if hasattr(class_names, 'tolist') else list(class_names)
        count_per_class = {}
        class_order = []
        for name in map(str, class_names):
            if name not in count_per_class:
                count_per_class[name] = 0
                class_order.append(name)
            count_per_class[name] += 1
        return {
            "summary": {
                "total_detections": len(class_names),
                "classes_found": class_order,
                "count_per_class": count_per_class,
                "color_map": {cls: palette[i % len(palette)] for i, cls in enumerate(class_order)}
            }
        }
    except Exception:
        return {"summary": empty}
The code assigns colors by class order using the Mask Visualization palette: first class blue, second red, and so on.
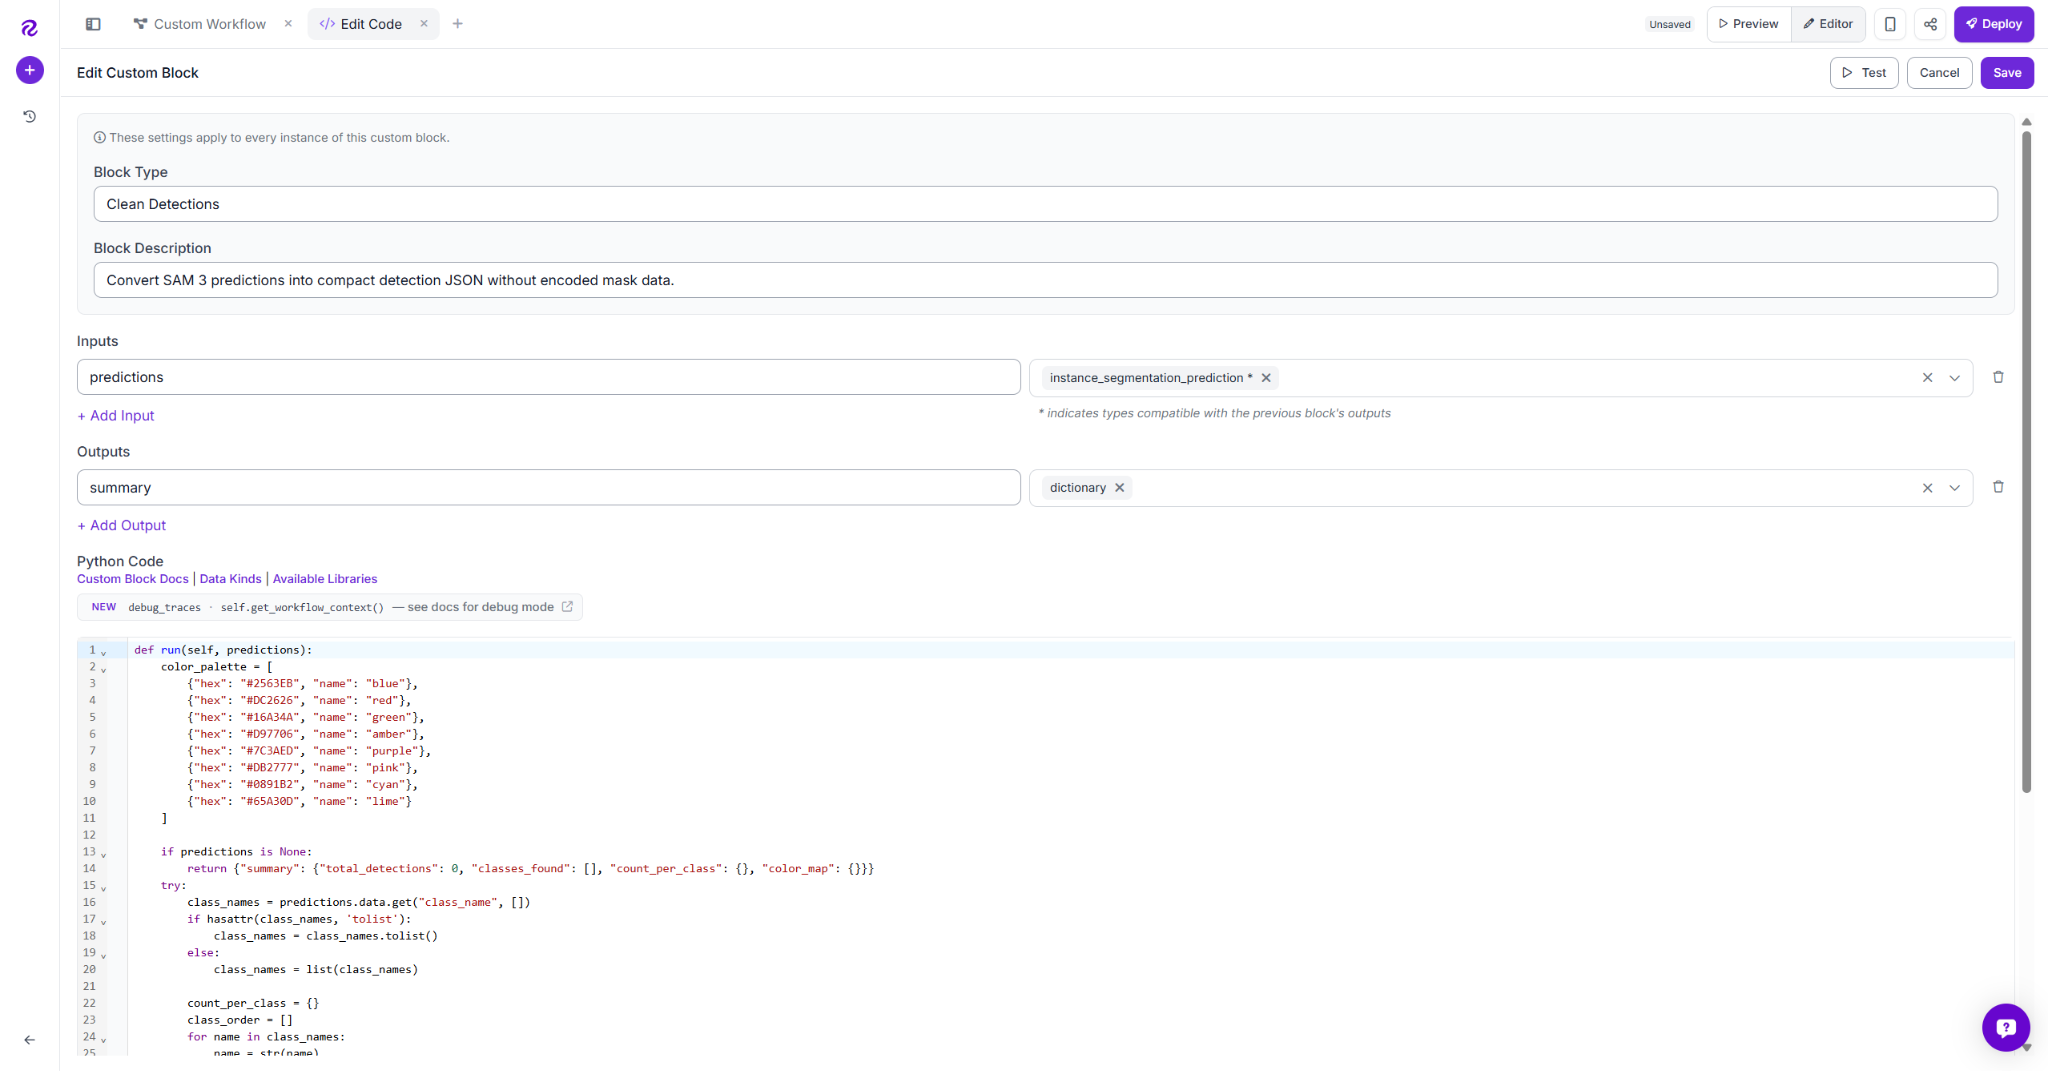
Converts SAM 3 output into a summary of detected parts, counts, and colors.
Step 9: Configure Outputs
Set three outputs: output_image from text_display.image, detection_summary from clean_detections.summary, and coverage_report from coverage_estimator.coverage_report.
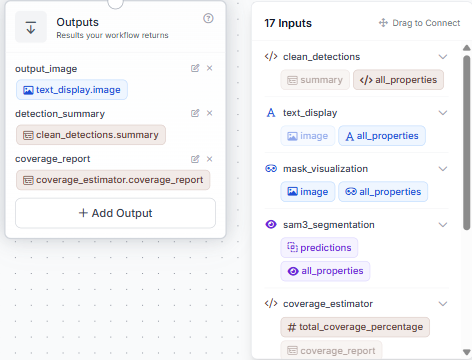
With everything connected, the full Workflow looks like this:
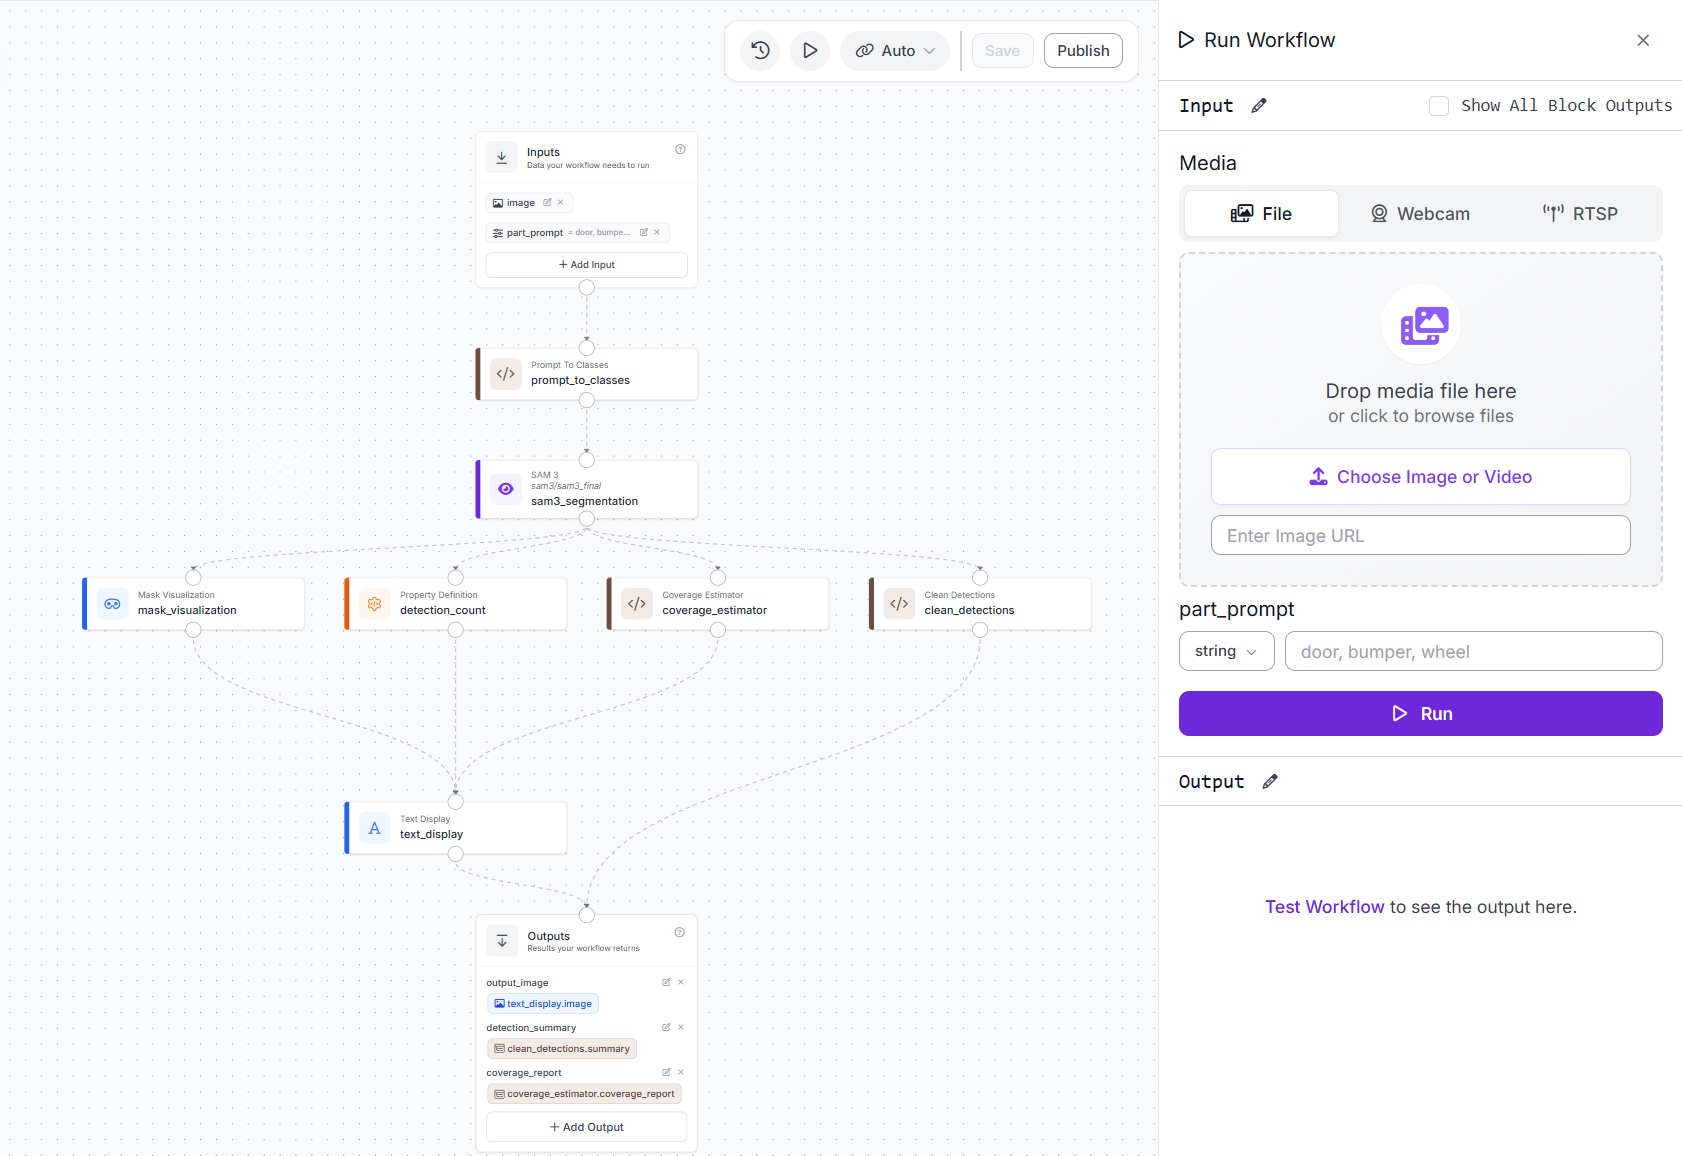
The Workflow returns a labeled image, detection summary, and coverage report for each detected part.
Results
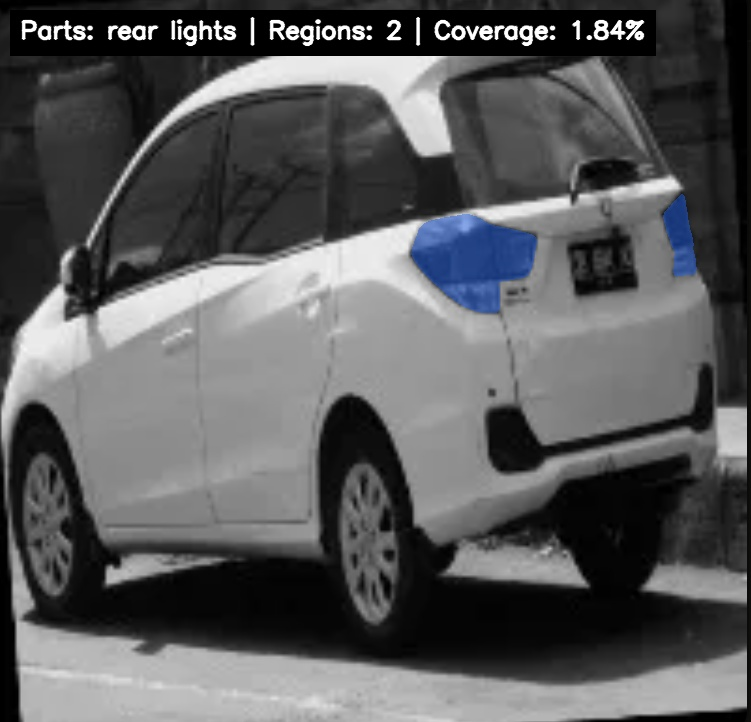
Test Case 1: Segmenting rear lights on a rear-facing car
With the prompt set to "rear lights", SAM 3 detects both rear light clusters and generates accurate masks covering 1.84% of the image area.
The JSON output confirms the result cleanly:
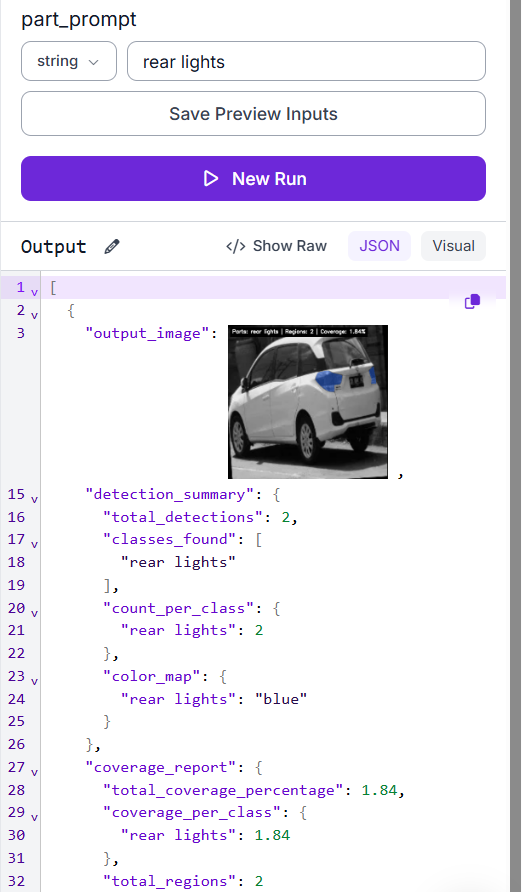
Both light units are detected in one pass without training data. The color map confirms the blue "rear lights" masks.
Test Case 2: Segmenting multiple parts on the same image
With the prompt "door, wheel, rear window", SAM 3 detects 6 instances across three classes. Each class receives a color based on its prompt order: doors in blue, wheels in red, and the rear window in green.
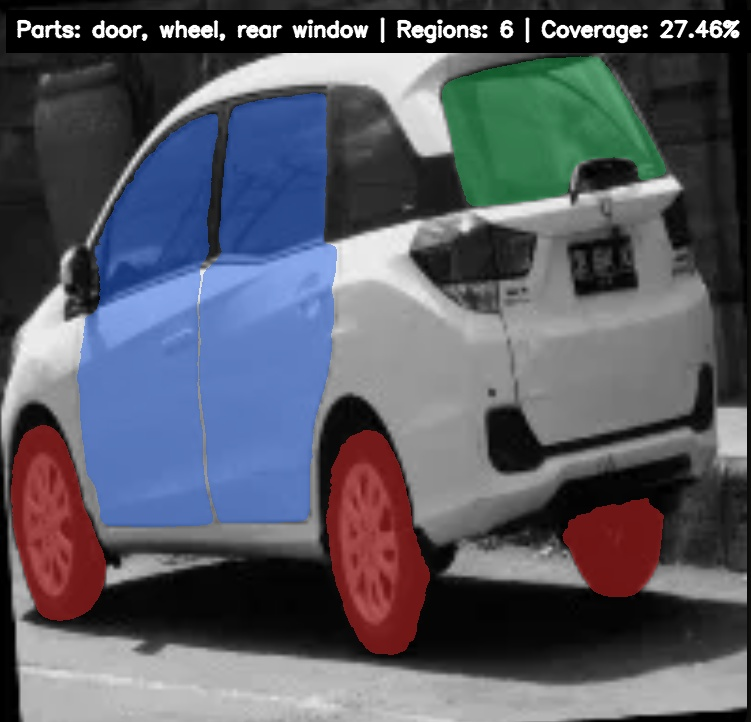
The JSON output confirms the result:
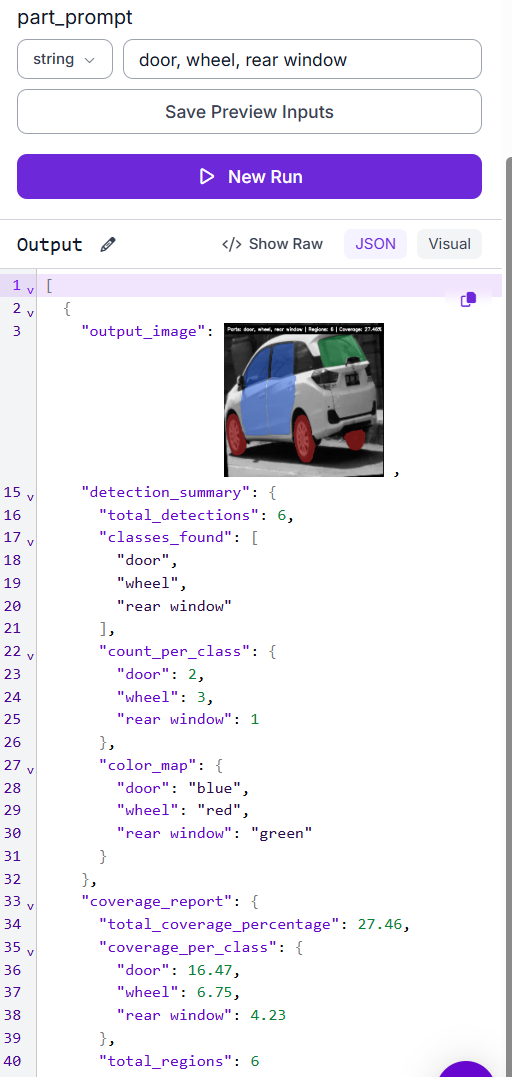
Detects 2 doors, 3 wheels, and 1 rear window. Changing the prompt generates new segmentations without workflow changes.
Test Case 3: Segmenting front-end parts on a different car
With the prompt "grille, headlight, bumper", SAM 3 detects 6 instances across three classes, with masks covering 32.88% of the image area.
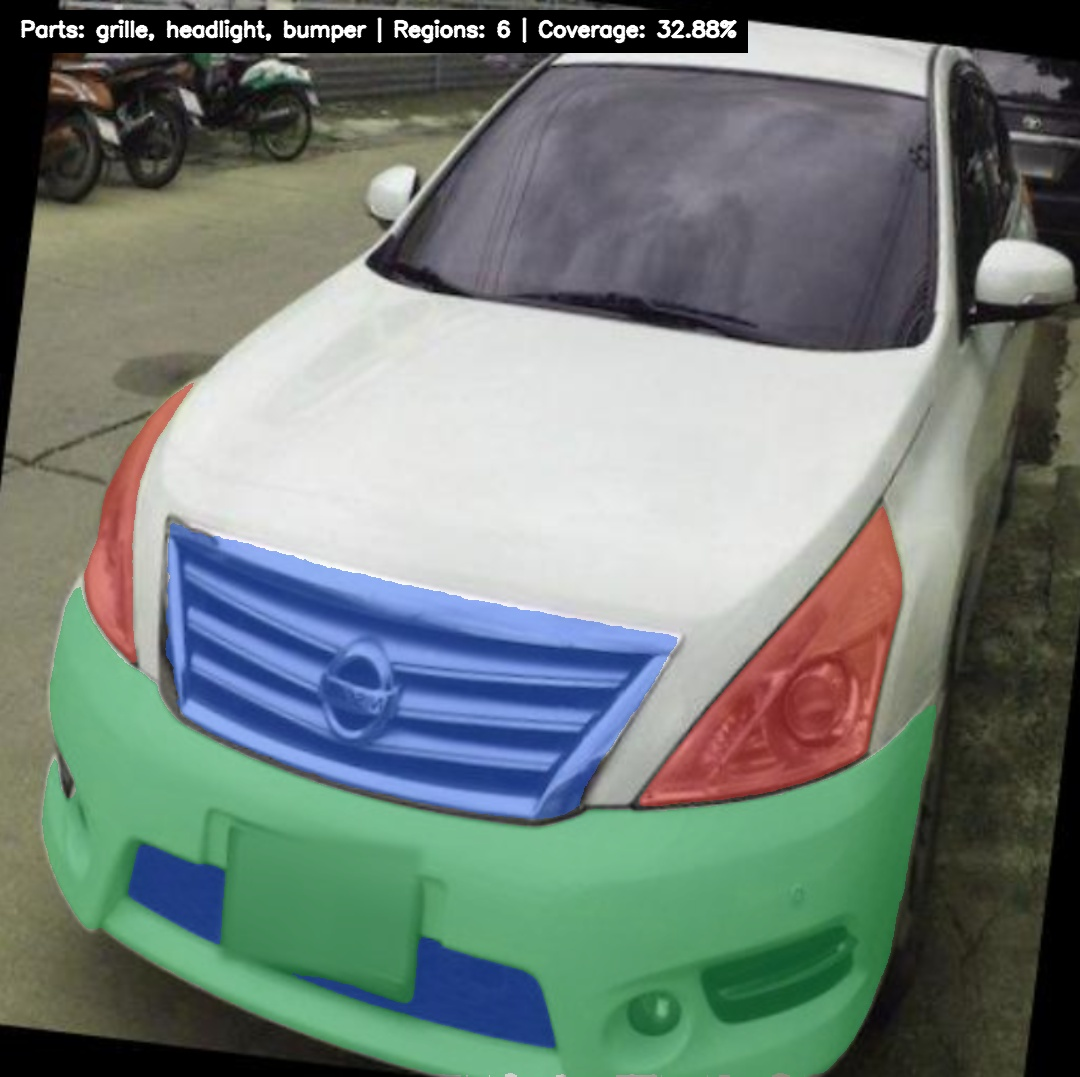
The JSON output breaks down the result per class:
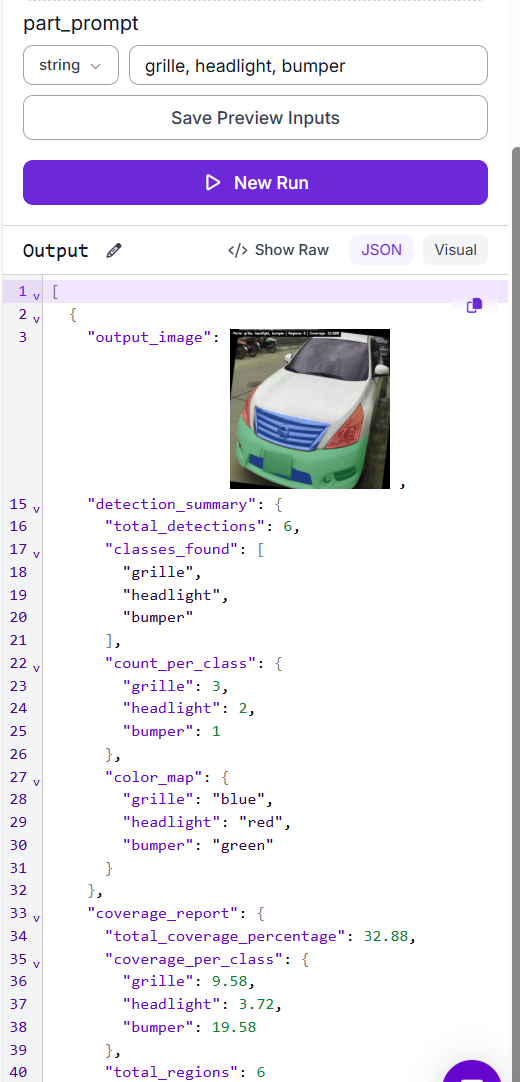
The Workflow detects 3 grille regions, 2 headlights, and 1 bumper. The coverage report shows bumper: 19.58%, grille: 9.58%, and headlights: 3.72% of the image area. The same Workflow works on different cars by only changing the image and prompt.
Prompt Engineering Tips
SAM 3 works best with short noun phrases, keeping each class name to one to three words.
- Use specific but simple terms: "headlight" works better than "damaged front headlight".
- Prompt order controls colors: first class = blue, second = red, third = green.
- Separate classes with commas: "door, wheel, mirror".
- Avoid broad classes with specific parts: "car, door" may cause overlap.
- If detection fails, start broader: "bumper" before "front bumper".
SAM 3 performs best with common object names seen frequently during training.
Production and Deployment
Deployment considerations
After publishing, the Workflow can be called through the Roboflow API. Each request is independent: send an image and prompt, and receive the segmented output image with its JSON report. The Workflow definition remains unchanged as it scales across requests.
Performance considerations
SAM 3 processes each class separately, so prompts with more classes require more inference time. For latency-sensitive use cases, limit prompts to one or two classes or distribute multi-class requests across parallel calls.
Production deployment
For higher throughput or on-premises deployments, run the Workflow with Roboflow Inference, which supports batching and self-hosted GPU execution.
Prompt consistency
Keep prompts standardized across applications by using lowercase class names separated by commas with no extra spaces. This ensures consistent class parsing by the Prompt To Classes block.
Open Vocabulary Segmentation with Roboflow Agent
If assembling these blocks manually feels like overhead, describe the task to Roboflow Agent instead: a prompt like "segment car parts from a text list with SAM 3 and report coverage per class" and it builds, wires, and tests the workflow for you. It's open vocabulary at both layers: text prompts define what SAM 3 segments, and plain English defines the pipeline around it.
How is open-vocabulary segmentation different from semantic segmentation?
Traditional semantic segmentation assigns every pixel to one of a fixed set of trained classes. Open vocabulary segmentation removes the fixed set: any category you can describe in text becomes segmentable at inference time, including classes absent from the training data.
Which models support open vocabulary segmentation?
SAM 3 is the leading single-model option for instance masks from text prompts. CLIP-based methods like OVSeg and FreeSeg handle semantic segmentation, while Grounding DINO and YOLO-World detect open-vocabulary boxes and are often paired with SAM for masks.
Does open vocabulary segmentation need training data?
Not for inference. Models like SAM 3 work zero-shot from a text prompt. Training data becomes relevant later: if you need higher precision on a fixed class list, open-vocabulary masks can be reviewed and used to train a dedicated model like RF-DETR.
Conclusion
This Workflow takes a car image and a list of part names, then uses SAM 3 to return a color-masked image and a JSON report with detection counts, color assignments, and coverage per class. No dataset, training, or fixed classes are required.
Across the three tests, only the image and prompt change. The Workflow, blocks, and code stay the same.
The tradeoff is precision. SAM 3 works best with common part names and clear visual boundaries. For complex cases, the generated masks can be reviewed and corrected to create a labeled dataset for fine-tuning.
The same approach extends beyond cars. Change the prompt to segment warehouse assets, construction equipment, or other changing object categories without rebuilding the Workflow.
Further Reading:


Cite this Post
Use the following entry to cite this post in your research:
Mostafa Ibrahim. (Jul 14, 2026). Open Vocabulary Segmentation. Roboflow Blog: https://blog.roboflow.com/open-vocabulary-segmentation/