

Robotics training data includes the images, sensor readings, demonstrations, and outcome labels used to train a robot’s perception and decision-making models. The data you need depends on what the model must learn: identifying a component requires different training examples from learning the sequence of movements needed to pick it up.
For visual perception, start with images that represent the objects, camera views, and operating conditions your robot will encounter. Roboflow helps you turn those images into annotated, versioned datasets, train perception models, and deploy them on the computer connected to your robot.
In this guide, you’ll build a robotics perception dataset from egocentric video, annotate objects and 2D grasp-point targets, train RF-DETR models, and use model failures to decide what data to collect next. The result is a visual perception component you can connect to your robot’s planning and control software.
What Robotics Training Data Do You Need?
Start with the output your model needs to produce. For object detection, annotate object locations with bounding boxes. For instance segmentation, label object boundaries with masks. For landmark detection, annotate the specific keypoints the perception model needs to locate.
For imitation learning, preserve sequences of observations, robot states, and actions rather than reducing demonstrations to unrelated images. Success and failure labels provide additional information about whether the task was completed.
The collection method and camera viewpoint are separate decisions. A teleoperated demonstration can include wrist-camera images, external-camera images, robot states, and actions in the same recording. Choose which information to retain based on the model you plan to train.
This tutorial focuses on the visual perception dataset: images of a metal_block, its bounding box, and a labeled 2D target called grasp_point.
Choose the Right Camera Setup for Data Collection
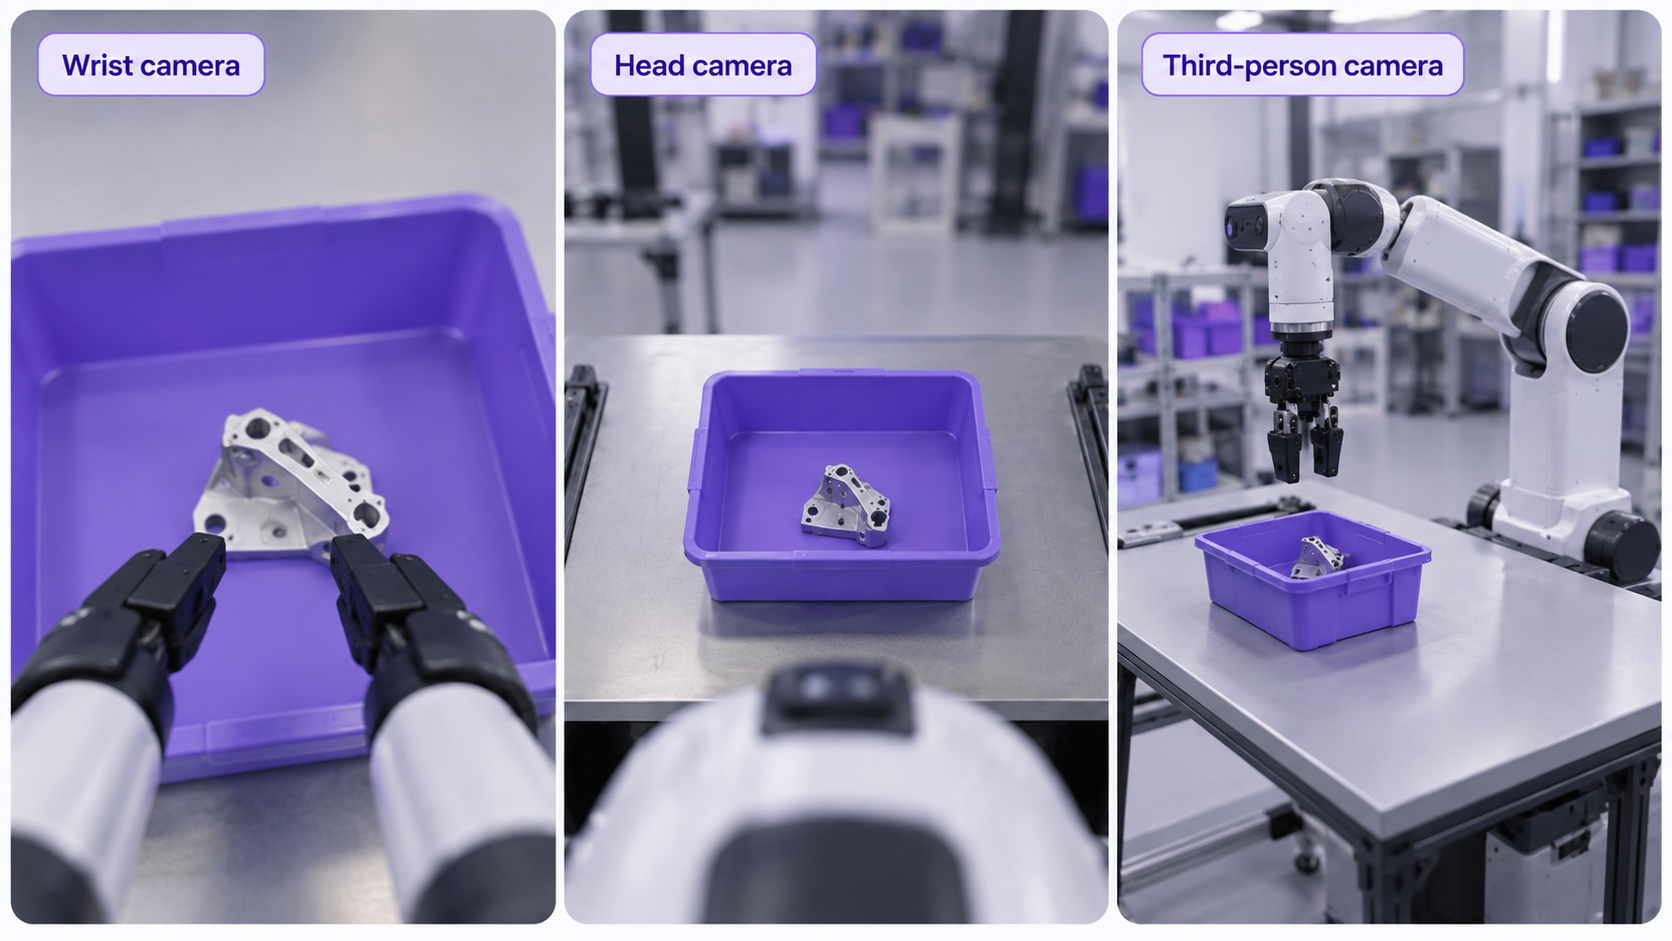
The camera should capture a view that closely matches what the robot will use when it is working. Training on footage from a different angle or setup can leave the dataset missing conditions that matter at deployment.
A wrist camera gives a close view of the target and grasp area, although the gripper can block part of the object as the arm moves. A head camera shows more of the workspace, but smaller targets may occupy fewer pixels.
An external camera can also provide the robot’s deployed perception view. In an eye-to-hand pick-and-place setup, for example, a fixed camera observes the workspace while the arm moves beneath it. Collect data from that view when it is the one your model will process; use additional third-person footage for task review when appropriate.
If several cameras are recording at the same time, synchronize the streams and preserve their timestamps. Give each camera a fixed ID, keep its resolution and frame rate consistent across sessions, and record any changes to the setup.
For each recording session, save the task, object set, camera IDs and settings, session ID, and success or failure result. Keep extracted frames linked to their source recording so you can trace errors and compare conditions across sessions.
How Much Robotics Training Data Do You Need?
There is no single amount of training data that works for every robotics task. The useful question is whether the dataset covers the conditions your perception model needs to handle.
For this tutorial, we started with a controlled recording of about 10 seconds. That gave us 41 frames before curation. These numbers demonstrate the workflow; they are not a recommended dataset size for a production robot.
For a pick-and-place task, vary the objects, lighting, object position, orientation, background, and camera angle within the range expected in deployment. Failed attempts can also be useful when they reveal a condition the system struggles with, such as an object being partly hidden or placed in an unfamiliar position. Our initial recording focused on one object in the workspace, giving us a baseline for the first training round.
Recording the same object in the same position repeatedly adds limited visual variation when the scene stays nearly identical. Collect additional recordings that cover missing conditions instead, and keep a session log showing what each recording contributes.
Start with a baseline, evaluate it on separate recordings, and use the failures to decide what to collect next. The goal is not the largest possible frame count. It is enough distinct, relevant examples to meet your perception requirements.
Where to Find Robotics Training Datasets
Existing datasets can provide a starting point, but match the resource to the learning objective before downloading it.
Check the task, camera viewpoint, annotation format, and usage terms before choosing a dataset. For the hands-on example below, we use footage collected from our own workspace.
Curate Egocentric Video into a Roboflow Dataset
After collecting the robot footage, create an object detection project in Roboflow and upload the video. Roboflow can then extract frames from the video for training.
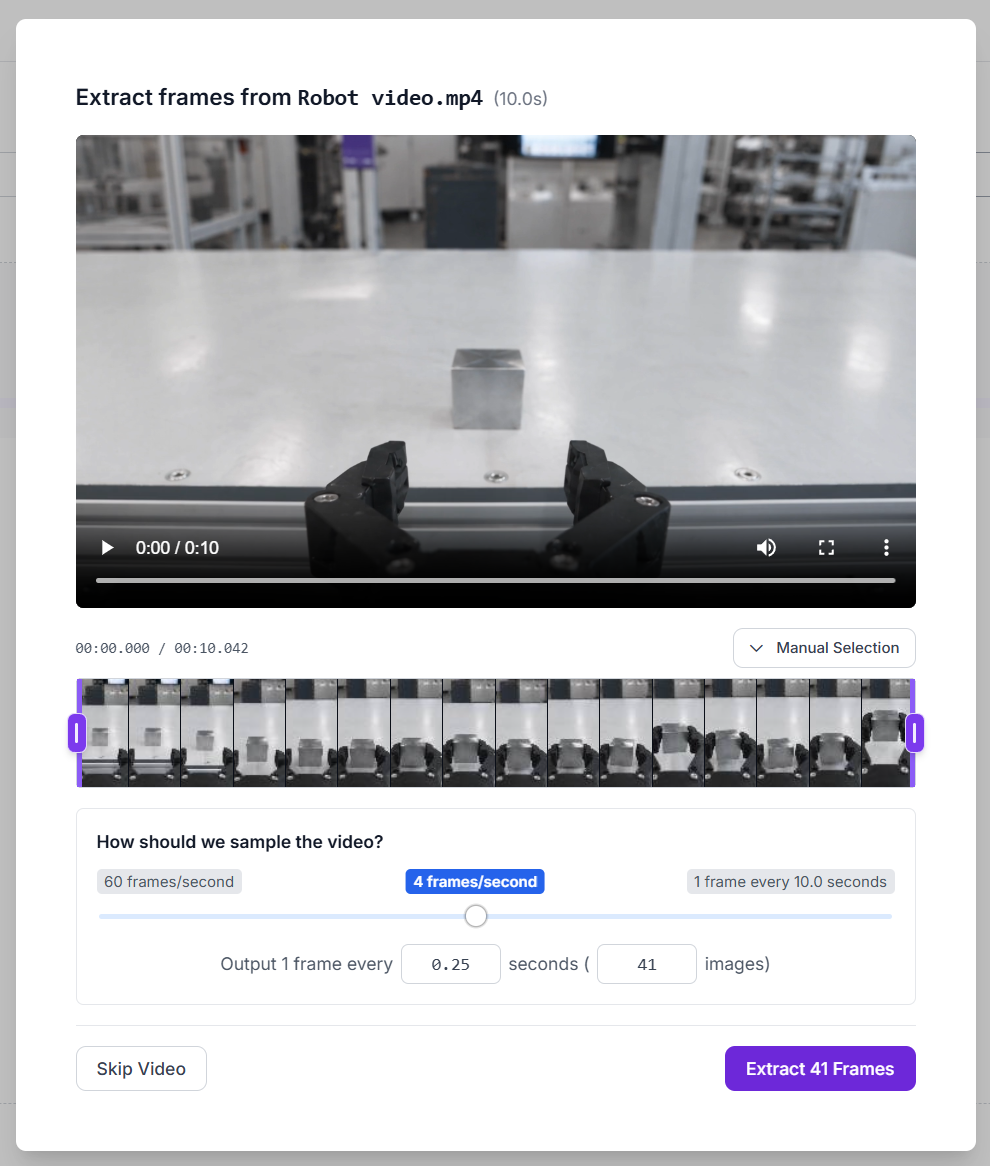
Video often contains many frames that look almost identical. Review the extracted frames and remove near-duplicates before labeling so annotation effort goes toward examples that add useful variation.
Keep frames that show different object orientations, partial occlusion by the gripper, backgrounds, and lighting. Include motion blur when it represents a condition the deployed camera will encounter and the target can still be labeled reliably.
Split the Data by Recording Session
For your own dataset, assign recording sessions to training, validation, and test sets before generating dataset versions. Use training images to fit the model, validation images to guide model selection and threshold settings, and separate test recordings for the final evaluation.
Keep frames from the same session—including synchronized camera views—in the same split. Do not distribute neighboring frames randomly across all three sets: nearly identical scenes can make evaluation look stronger than performance on a new recording.
Label Objects and 2D Grasp Targets
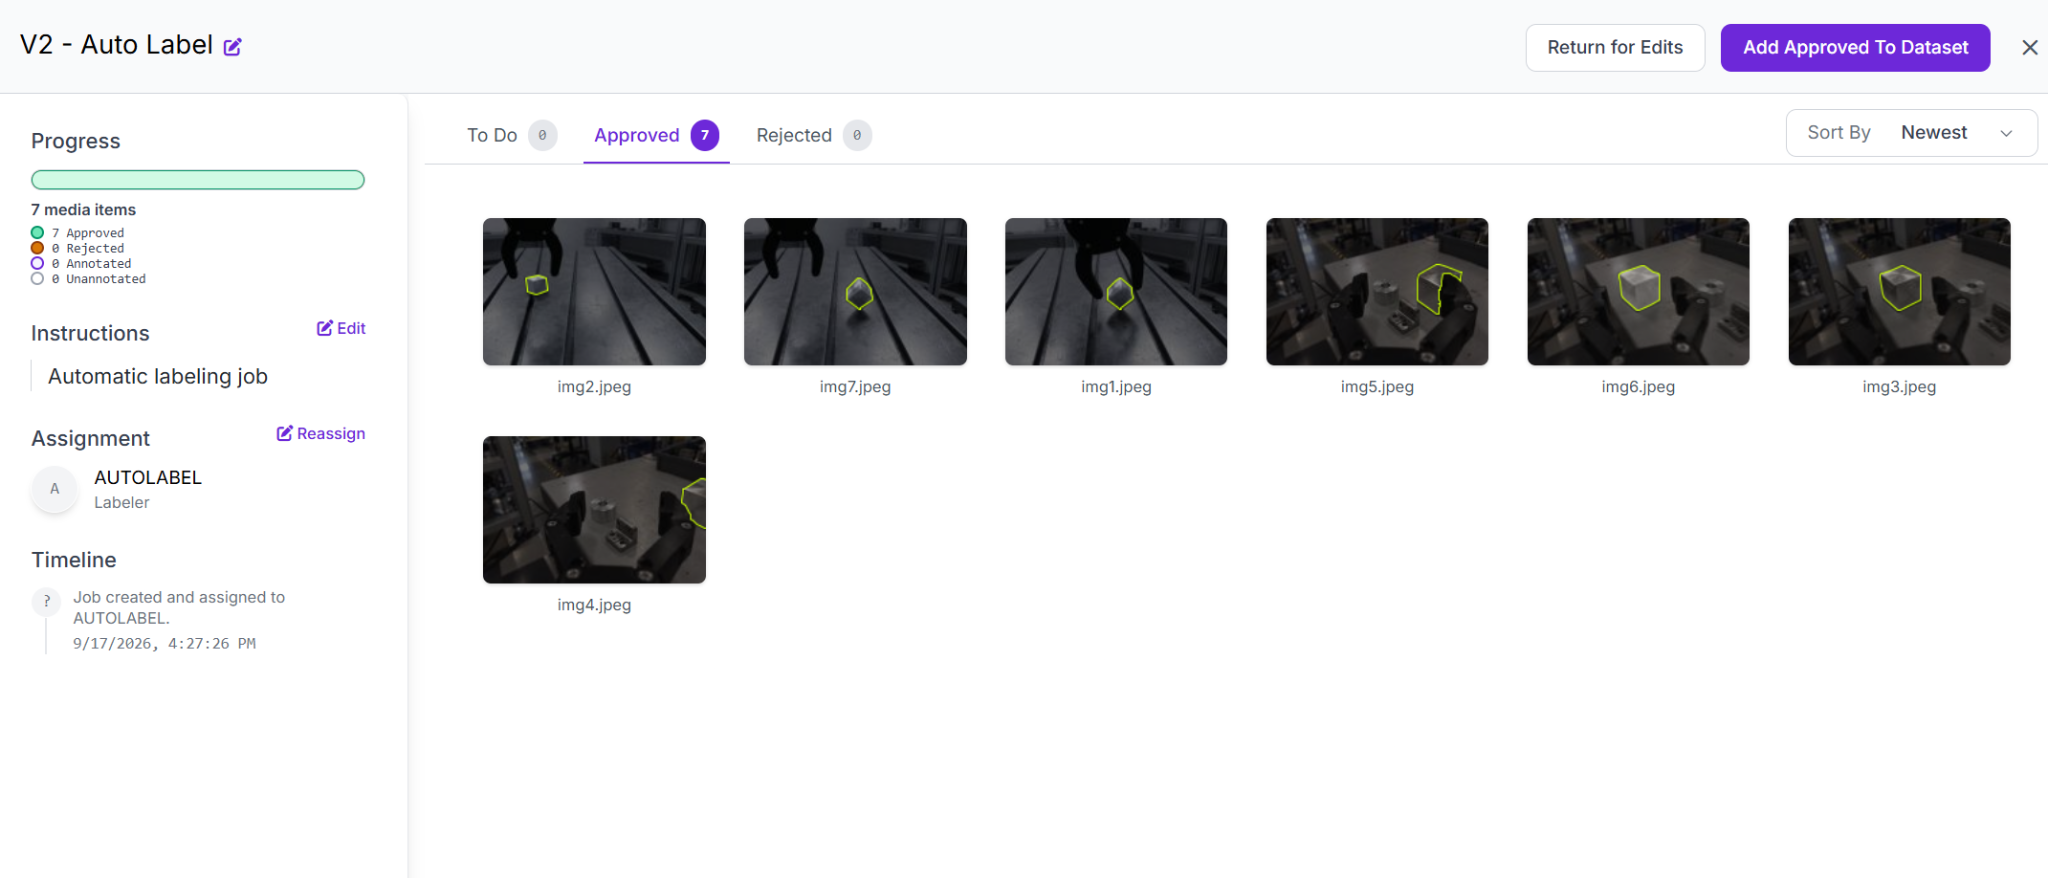
After curating the frames, start labeling the remaining images. Define the target class as metal_block, then use Roboflow Annotate with SAM 3 to generate an initial annotation around the object. Check each annotation before accepting it, especially when the object is small, partly hidden, blurred, or covered by the gripper.
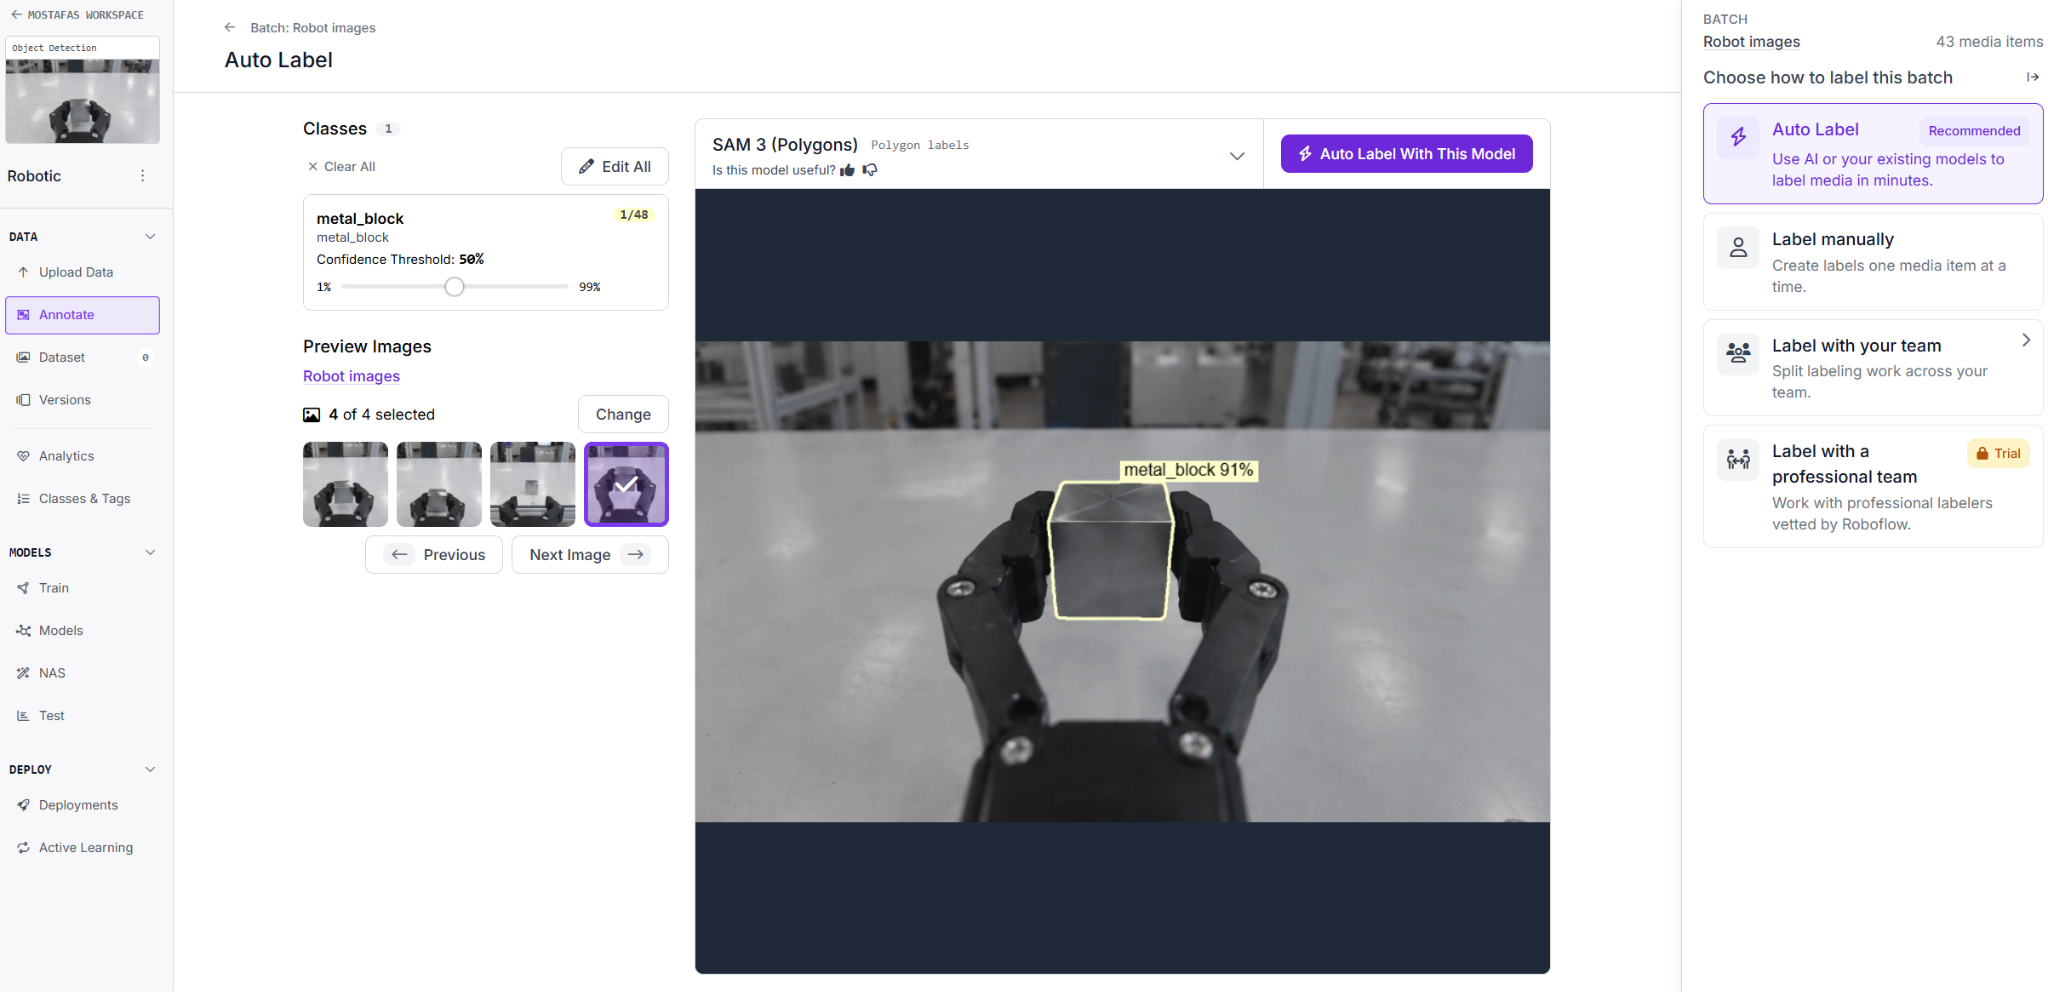
Keep the object labels consistent throughout the dataset. Once the annotations are reviewed, generate the first object detection dataset version.
For grasp-point detection, create a separate keypoint detection project and upload the curated images. Define the metal_block class and add a grasp_point keypoint. Draw a box around the object, then place the point manually near the center of the object’s visible top surface. Once the annotations are checked, generate the first keypoint dataset version.
Create a Version for Each Training Experiment
Once the annotations and splits are checked, generate the first dataset version in each project. Roboflow dataset versions are snapshots of your images and labels, with the preprocessing and augmentation settings used to prepare them for training.
Keep a record of each version’s session assignments, image counts after curation, label definitions, and training settings. When you add examples later, create another version rather than replacing the baseline. This lets your team identify what changed between training rounds and which data produced a deployed model.
Train RF-DETR for Object and Grasp-Point Perception
With both dataset versions ready, train RF-DETR for the two perception tasks. Use the object detection dataset to train an RF-DETR model that locates the metal_block.
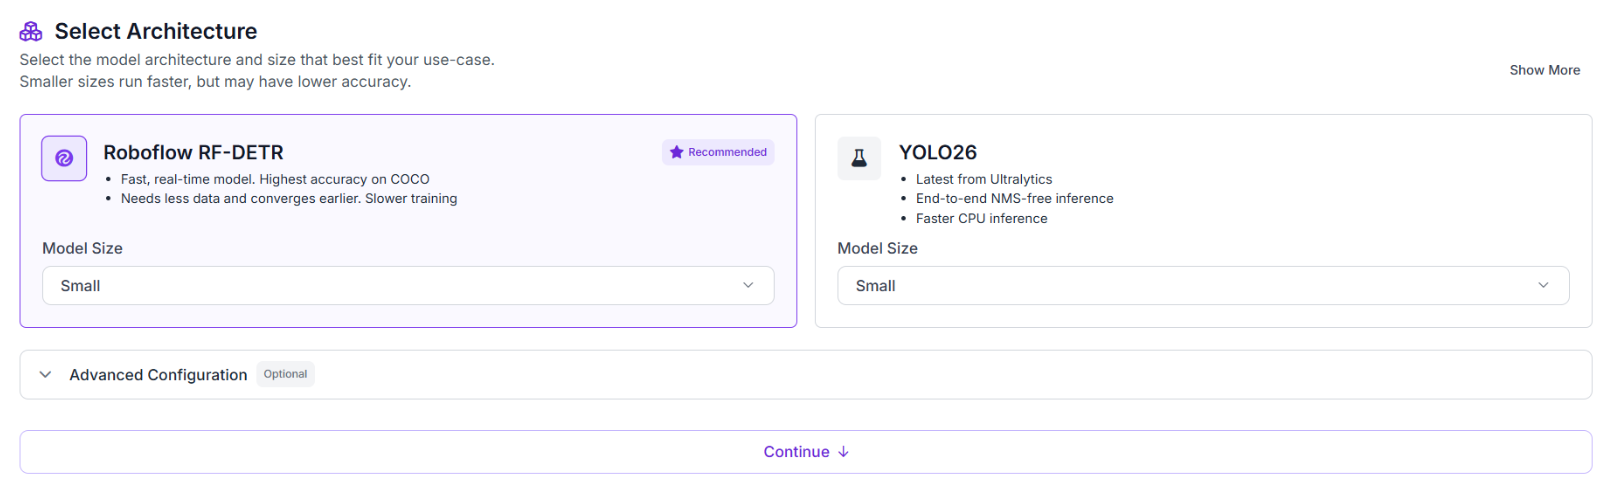
Then train a separate RF-DETR Keypoint Preview model using the keypoint dataset to predict the object’s bounding box and the grasp_point.
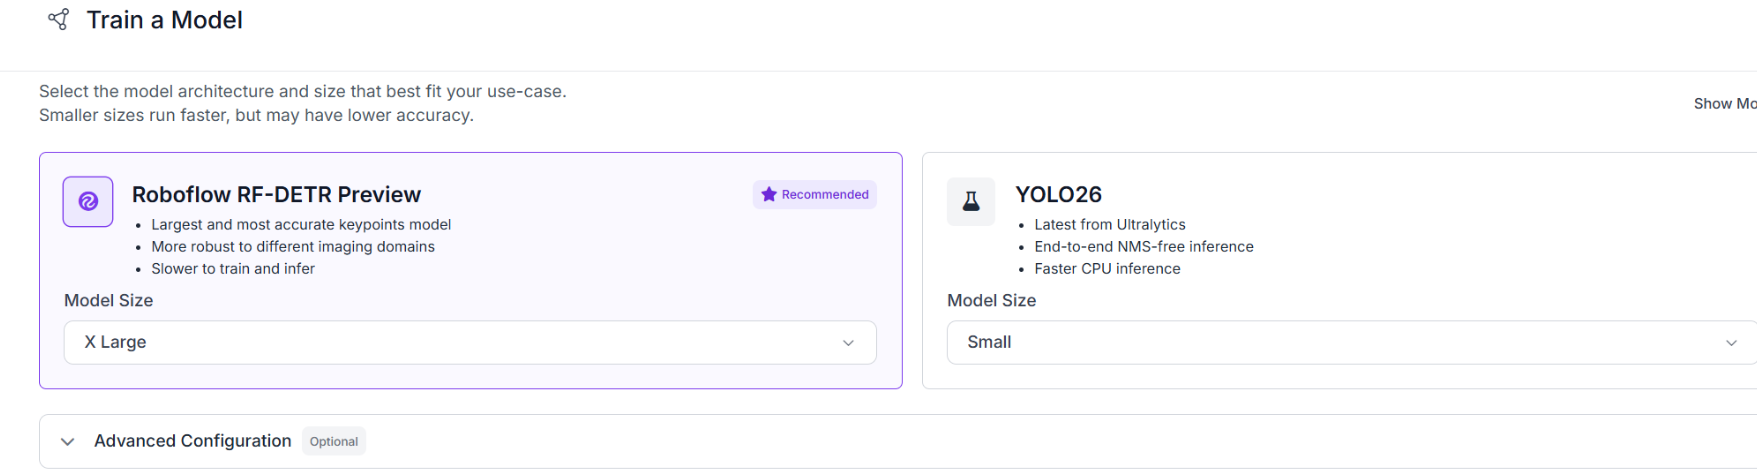
These models handle the perception side of the robotics system. The object detector tells the robot where the target is, while the keypoint model adds a 2D point that can be used later in the manipulation workflow. They do not decide how the robot should move or which action it should take.
Evaluate the Models on Separate Recordings
After training, test the models on held-out images and on examples that represent the conditions the robot will face in its deployment environment, including similar lighting, backgrounds, object positions, and clutter. You can also review the object detection model's Evaluation page in Roboflow for its reported metrics, but manually inspecting predictions helps reveal cases where the model fails.
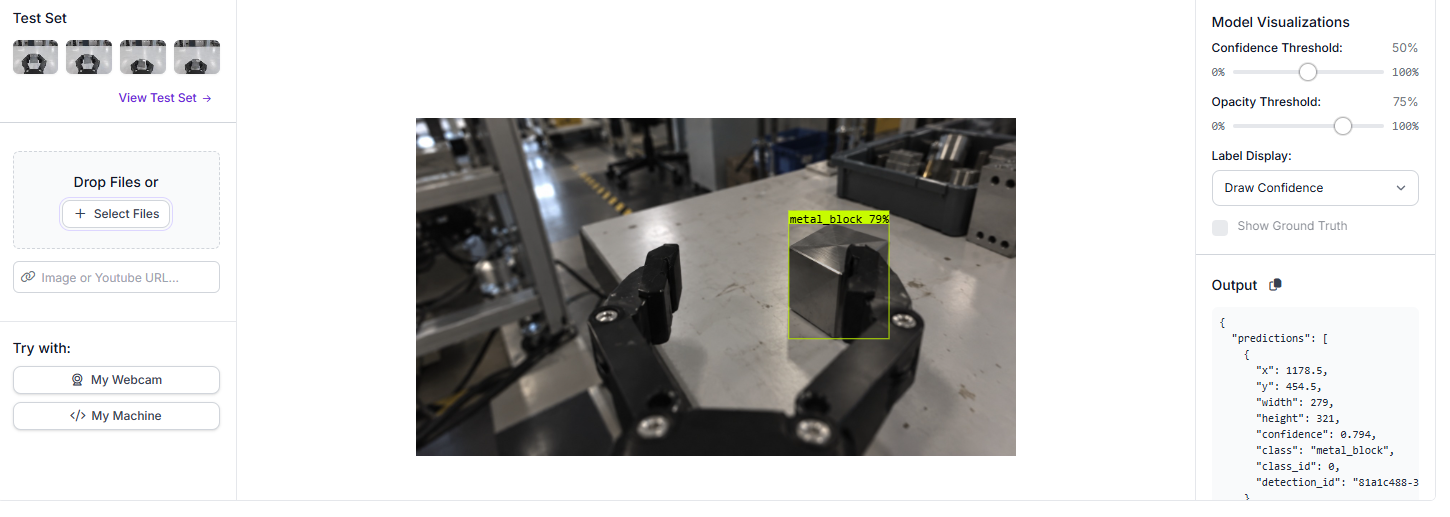
In our object detection test, the model detected the metal_block in a familiar example.
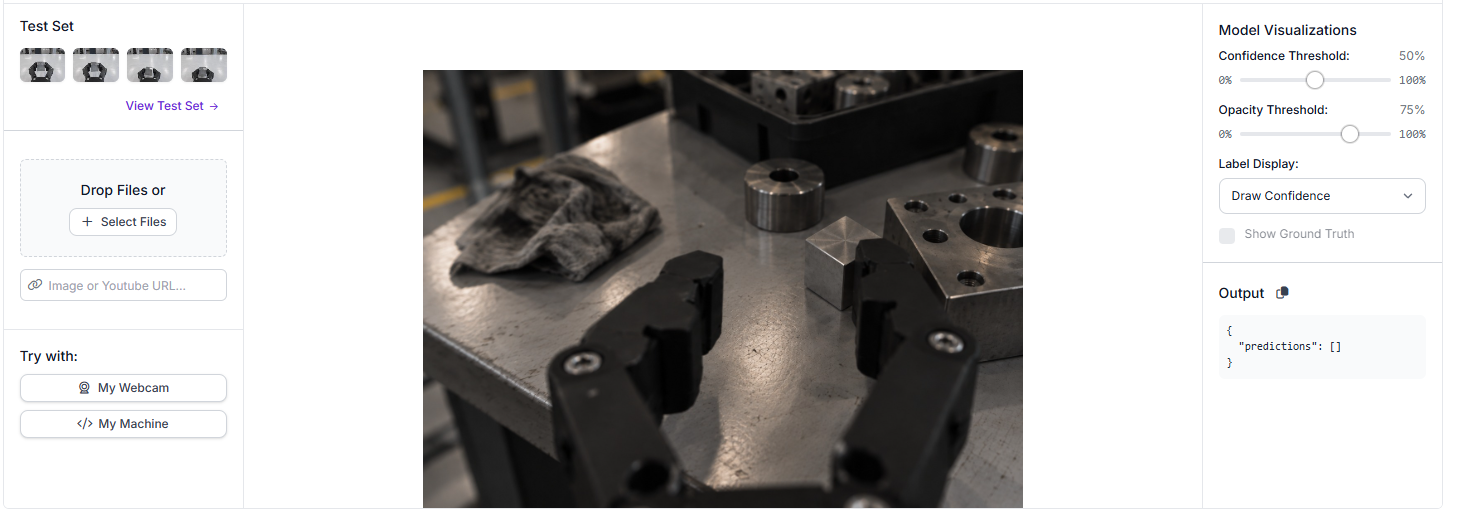
A harder test image produced no detection, so we used that failure to guide the next data collection and curation cycle.
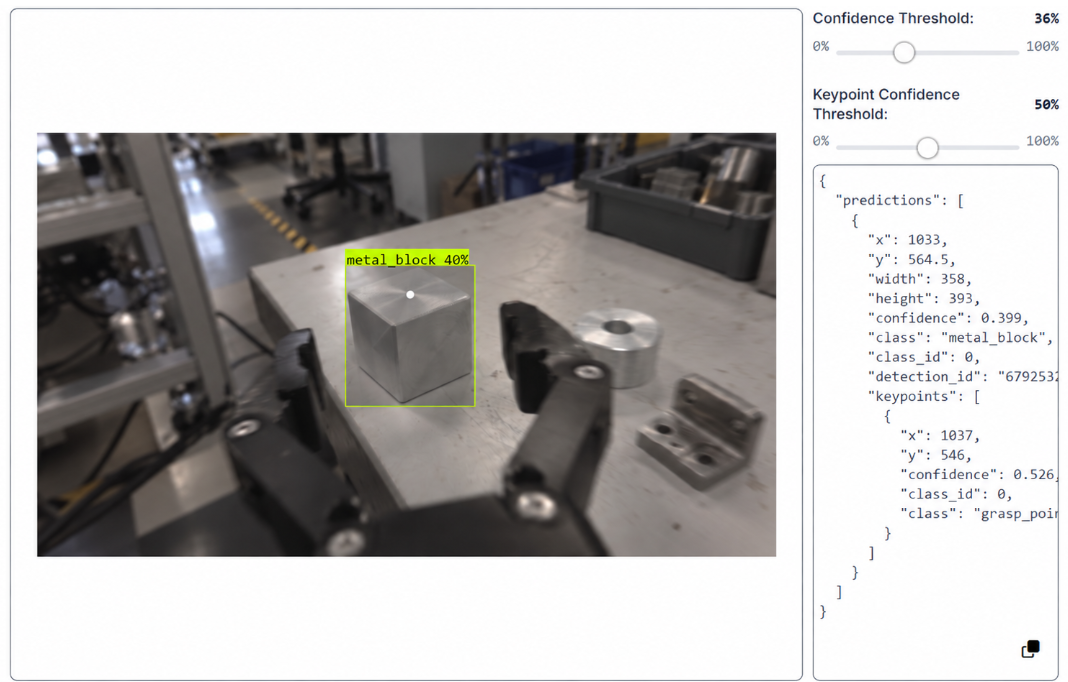
For the keypoint model, check whether the predicted object box is correct and whether the grasp_point is in the intended area on the object's top surface. We tried a few detection confidence thresholds and found that 36% worked best for this image. The keypoint confidence threshold remained at 50%.
Use Failure Cases to Curate the Next Dataset Version
Create a dataset version for each training experiment so you can identify the images, annotations, preprocessing, and augmentation settings behind the resulting model. When you add examples of a new failure condition, create another version and compare its results with the baseline.
Once a model failure is identified, turn it into a specific data requirement instead of collecting more footage at random. Keep the failed test images held out so you can use them again after retraining.
Next, collect and add examples that cover the same type of failure. Review the new images before labeling and remove near-duplicates, just as you did with the original footage. The goal is to add examples that address the weakness without filling the dataset with repeated frames.
Add the new images to the existing Roboflow project and label them using the same metal_block definition. Then create a new dataset version rather than replacing the version used to train the first model. This keeps each training cycle separate and makes it easier to compare changes over time.
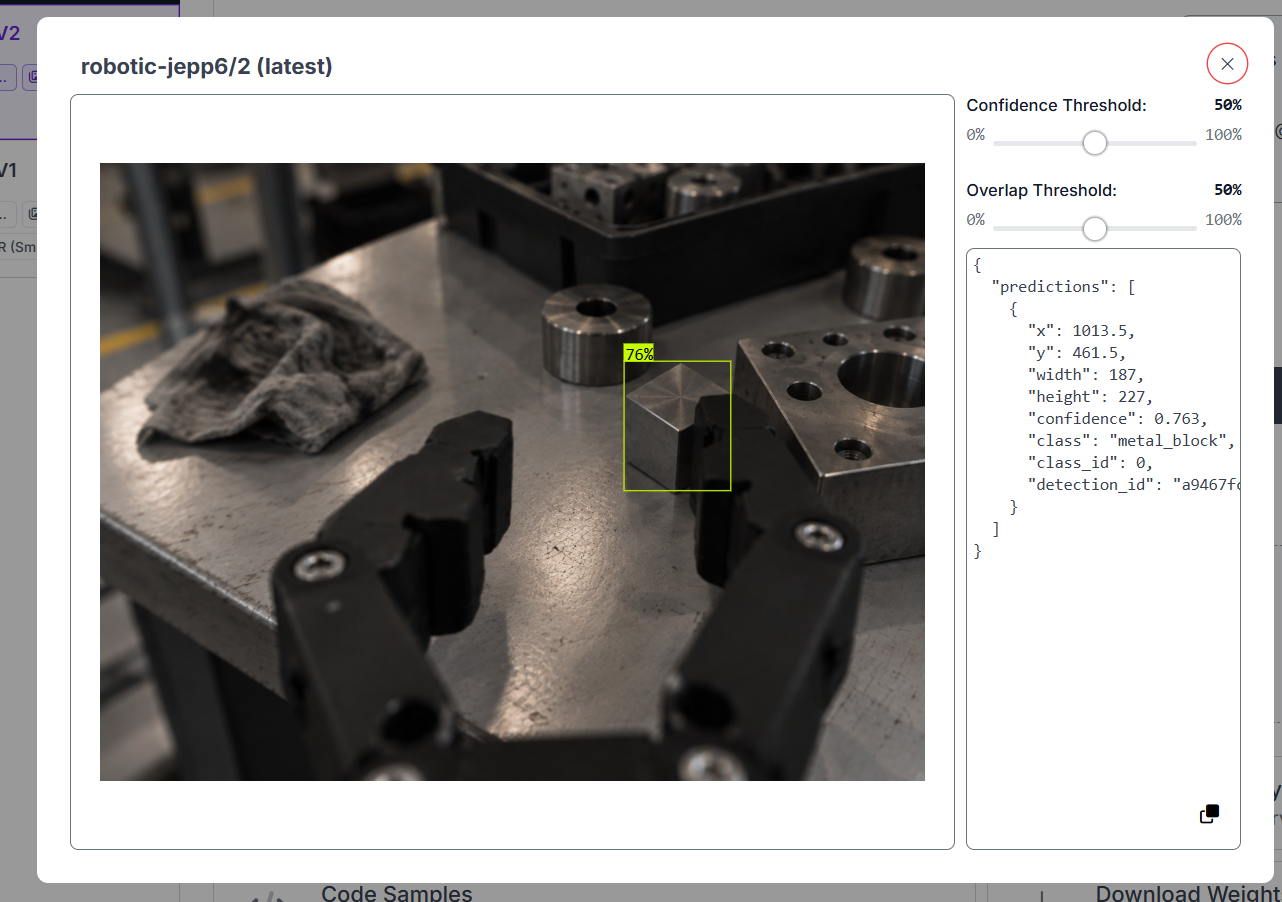
Retrain RF-DETR on the updated dataset, then test it again on the same held-out failure image. The first model returned no detection for this image. After adding the new examples and retraining, the updated model detected the object at about 76% confidence.
That is a confidence score for one detection, not 76% accuracy or a measured grasp-success rate. The example shows that the updated model produced a detection on a previously missed image; it does not establish a dataset-wide improvement.
For your own comparison, record the number of sessions and images in each split and evaluate both versions on the same held-out recordings under consistent settings. Compare detection metrics, missed objects, and false detections, not just confidence scores. Check that the update addresses the targeted failure without introducing errors in conditions the earlier model handled.
The same process applies to grasp-point perception. If the object box is correct but the grasp_point is misplaced, review the keypoint labels and add examples that cover that type of error before creating the next keypoint dataset version.
Deploy on the Robot and Keep the Data Loop Running
Once the model meets your evaluation criteria, use Roboflow Inference to run it on supported hardware connected to the robot. The self-hosted deployment options include an Inference Server that serves predictions over HTTP and a Python library for running inference within your application.
Test the complete path from image capture to the prediction reaching the consuming application, including how the system handles a missed detection or an unusable point.
Keep physical actions separate from the perception output. Converting a point in an image into a robot target requires the appropriate coordinate transformations; motion planning and execution remain responsibilities of the robot system.
For ongoing monitoring, you can configure Vision Events to capture images, predictions, and custom metadata such as robot_id, camera_id, and session_id. Review incorrect predictions and move selected event images into a Roboflow project for annotation and the next training round.
Keep task outcomes alongside the visual evidence. Investigate failed picks, don't assume that the perception model was wrong. Review whether the target was detected and localized correctly, before deciding that more perception training data is the appropriate fix.
Assign reviewed production examples to training or held-out evaluation according to the split strategy above. Create a new dataset version, retrain, and compare the updated model against both previous failure cases and representative operating conditions before replacing the deployed version.
Conclusion
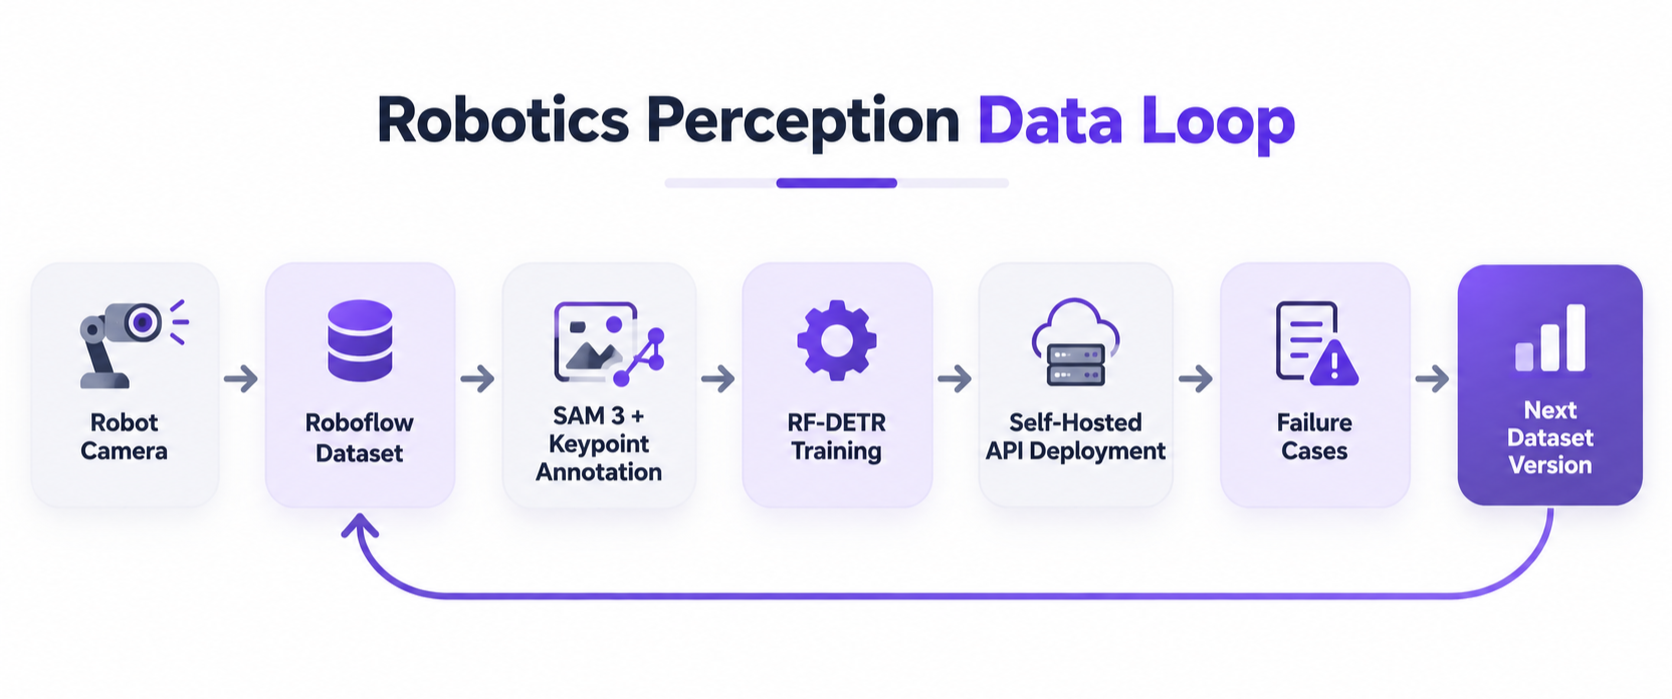
Building robotics training data is an iterative process: collect examples from the operating environment, label the information your perception model needs, and use evaluation results to identify what is missing.
Roboflow connects that process from annotation and dataset versioning to model training, deployment, and review of production examples. Start with one task and data from your own robot.
Further reading:


Cite this Post
Use the following entry to cite this post in your research:
Mostafa Ibrahim. (Aug 22, 2026). Robotics Training Data. Roboflow Blog: https://blog.roboflow.com/robotics-training-data/