
In a perfect world, your production line would give you a balanced dataset across all defect types. But in the real world, some classes dominate. You might have 100,000 images of "normal" PCBs, 5,000 "missing hole", and exactly three images of a "solder bridge".
This creates a severe class imbalance bottleneck. If 99% of your data is one or two classes, a model can achieve 99% accuracy by always predicting the majority class. It looks great on a graph, but it's a catastrophic failure in production—rare defects slip through undetected.
So, how do you teach a model to recognize a pattern it has only seen a few times?
Let's walk through how to architect a vision system that generalizes from a handful of examples and maintains high sensitivity where it matters most.
Tips for Building Defect Detection Models with Rare Defects
Rare defects turn defect detection into a data imbalance problem. Here are some practical ways to break this imbalance and to force your model to learn meaningful representations of defects it almost never sees in the real world.
1. Start with high-resolution images and include normal samples
Rare defects are usually tiny. If you resize a 4032x3024 image down to 640x640, that hairline fracture becomes a single, blurry pixel.
- Use tiling. Divide your high-res frames into smaller, overlapping 640x640 patches. This forces the model to look at the defect at full resolution, making "small" features look "large" to the network.
- Always include plenty of defect-free (normal) examples. The model must learn what "normal" looks like so it doesn't flag harmless textures or reflections as defects. A healthy mix of normal and defective samples reduces false alarms in real deployments.
2. Annotate carefully and consistently
When defects are small, inaccurate or inconsistent annotations can ruin model performance. Bounding boxes that are too loose or misaligned teach the model the wrong visual signal. Take time to label defects precisely and consistently across images. If defects are irregular in shape, segmentation masks can work better than bounding boxes. Tools like SAM-based auto-annotation can speed up labeling while keeping boundaries tight, but always review and correct predictions manually.
3. Handle class imbalance deliberately
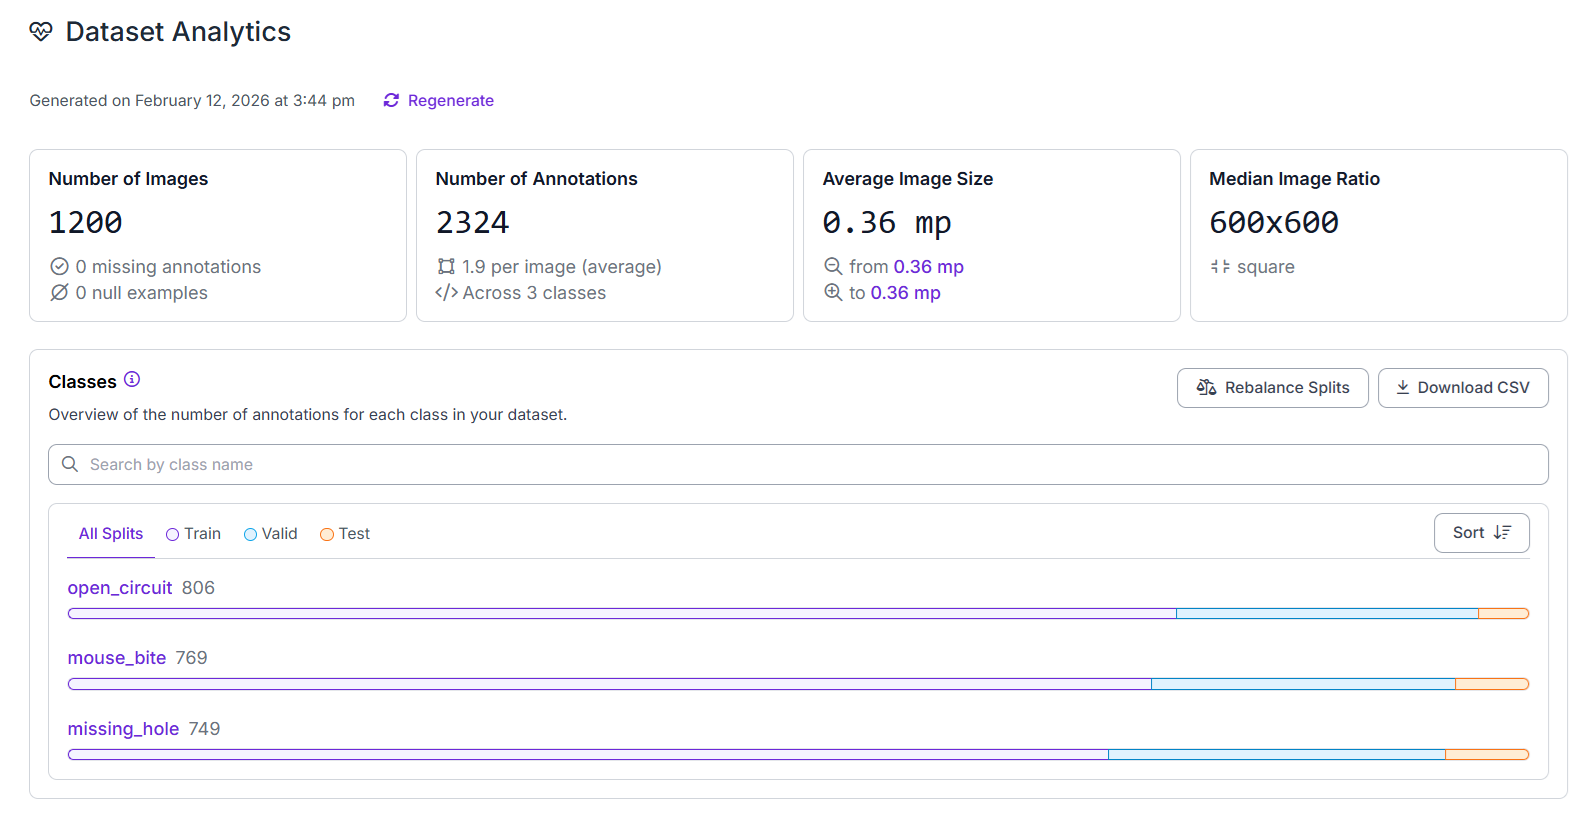
In rare defect datasets, common classes (like "normal" or frequent defect types such as "missing hole") often dominate. If left untreated, the model learns to predict only the majority class.
Avoid random oversampling (duplicating images)—it causes memorization. Instead:
- Undersample majority classes: When common samples vastly outnumber rare defects, reduce them so rare cases aren't drowned out.
- Use class-aware loss functions: Focal Loss or Weighted Cross-Entropy give rare defects more weight during training. The math learns: "Missing a rare defect is catastrophic; misclassifying a common class is minor." This forces the model to prioritize rare defects every epoch without bloating your dataset.
4. Use tiling and augmentations to make rare defects more visible
Tiny defects can disappear when images are resized for model input. Tiling large images into smaller patches makes small defects occupy more pixels, which helps the model learn their visual patterns.
Combine tiling with augmentations that reflect real-world variation in your manufacturing process such as horizontal/vertical flips, rotations, brightness changes, and mild blur.
Keep in mind that augmentations such as "Extreme Color Jitter" or "Aggressive Blurring" can be "bad" for rare defects. If a defect is defined by a subtle color change, like oxidation, or a fine texture, like a hairline crack, aggressive blurring will literally erase the signal you are trying to teach the model to find.
5. Generate smart synthetic defect examples
Use Physics-Based Rendering (PBR) or Generative AI (Stable Diffusion) to "inpaint" defects. The defect must interact with the light and shadows of the original image. Start small - mix in 10-20% synthetic data to fill specific gaps in your "failure library."
6. Use transfer learning and fine-tuning
Never train from scratch when data is scarce. Start from a pre-trained object detection model (such as YOLO, Faster R-CNN, RF-DETR, or similar architectures trained on COCO or ImageNet) and fine-tune it on your defect dataset. Pre-trained models already understand edges, textures, and shapes, which helps them learn rare defects with fewer examples.
Use moderate learning rates to avoid catastrophic forgetting of pre-trained features. Smaller batch sizes (8-32 rather than 128+) often work better when training data is limited, as they can provide helpful regularization and allow the model to see more parameter updates per epoch.
7. Add hard negatives
Teaching the model what is not a defect is just as important as what is. In PCB inspection, false positives are the biggest operational risk - copper reflections, silkscreen text, or via shadows mistaken for defects trigger unnecessary line stops.
Actively collect cases where the model fails: glare, drill marks, board texture confused with actual defects. Label these as background (hard negatives). This teaches the model to distinguish real defects from normal PCB patterns, reducing false alarms in production.
8. Use active learning to discover defects you almost never see
Rare defects often only appear after deployment. Use the model in production to surface uncertain predictions and failures. Set up a Roboflow Workflow that flags any prediction with a confidence between 30% and 60%. Prioritize labeling:
- False negatives (missed defects)
- Low-confidence predictions (model uncertainty often signals novel patterns)
- New visual patterns (defects the model hasn't seen before)
Adding these hard examples back into training steadily improves performance on rare cases over time, creating a virtuous cycle where the model becomes more robust with each iteration.
9. Keep evaluation realistic
Rare defects are often under-represented in test sets too. Don't rely solely on overall accuracy or mAP. Manually inspect model outputs on real production images and track recall for rare defect classes separately. A model with high overall accuracy but low rare-defect recall is failing at its most important job. Use confusion matrices and per-class metrics to ensure the model performs well on the defects that matter most, not just on the easy, common cases.
How to Train a Defect Detection Model for Rare Defects
Follow these steps to build a rare‑defect detection model using Roboflow. We will train RF-DETR, a transformer‑based detector that achieves high accuracy while running in real time, on a custom dataset.
Step 1: Create the Project
Create a new Object Detection project in Roboflow to identify “where the defect is” with bounding boxes. If defects are thin/irregular (e.g. cracks, scratches) and you care about boundaries, consider a Segmentation project instead.
If you have very few samples per defect type, start with defect (single class). Add more classes later when you have enough examples. Here we'll train a PCB circuit defect detection model with classes such as missing_hole, mouse_bite, open_circuit etc.
Why this matters:
If you start with 8 defect classes but only have 3 images for some classes, your model will learn noise. Starting with a single defect class gives you a usable detector sooner and reduces confusion.
Step 2: Upload Data
Upload images to your project. You need to upload:
- Normal images (where there is no defect)
- Rare defect images (images with defects)
- Near-miss images. These are images that look like defects but are not:
- reflections
- shadows
- glare
- harmless scratches that are “acceptable”
Why near-misses matter?
In rare defect detection, false positives are a big operational cost. Near-miss images teach the model “This is normal, don’t panic.”
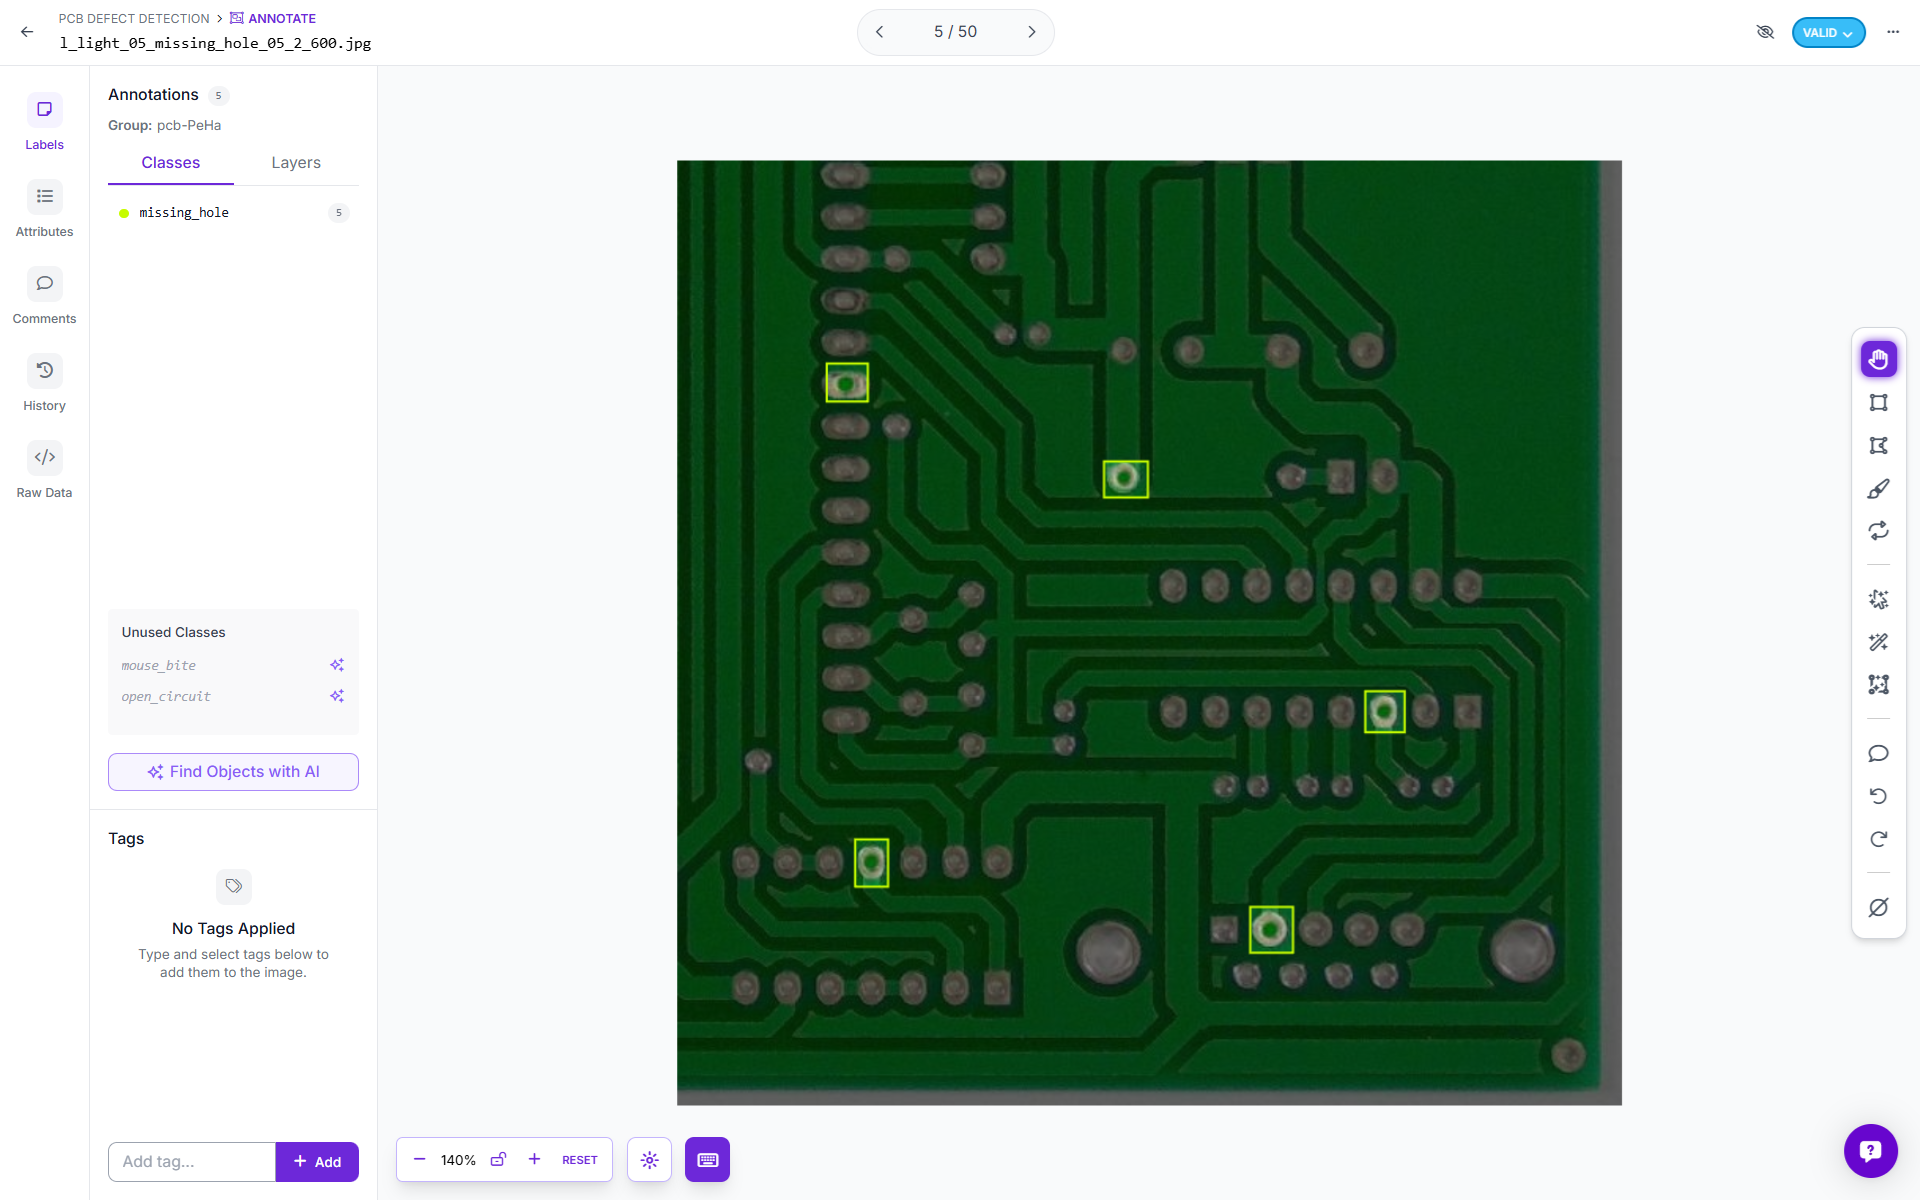
Step 3: Annotate
Draw tight boxes around the defect region using Roboflow's AI assisted tools.
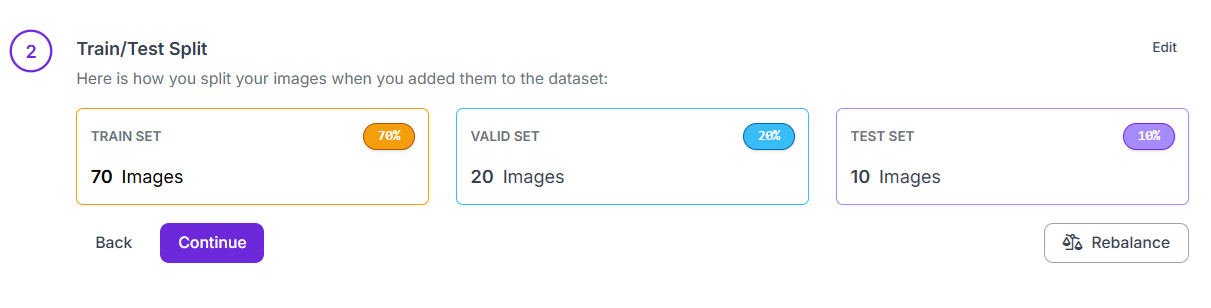
Step 4: Create a Dataset Version
Training in Roboflow happens on a Dataset Version. Go to the dataset tab and click “New dataset version.”
Train/Test Split: Divide the dataset into separate training and testing sets so the model is evaluated on images it has never seen before.
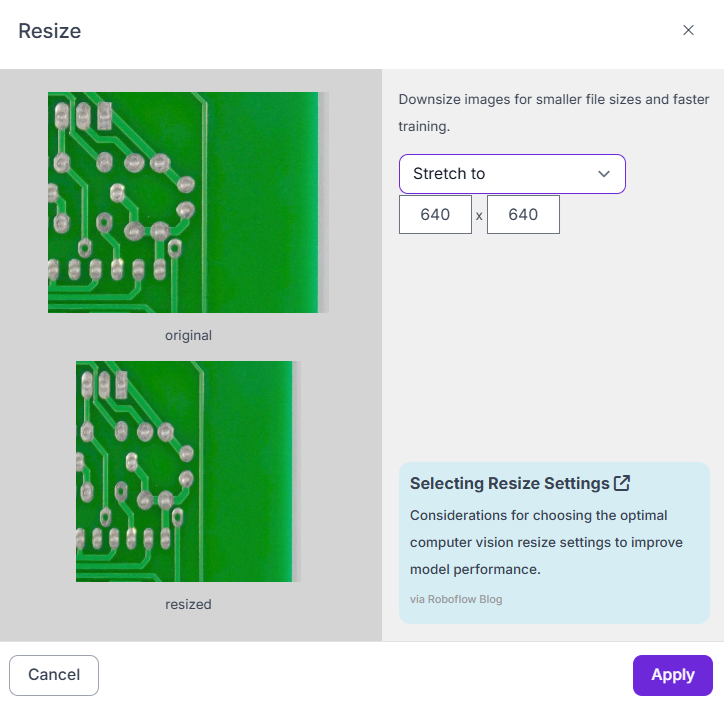
Preprocessing: This is the process of standardizing raw images to make inputs consistent and suitable for model training. It should match how your production camera behaves.
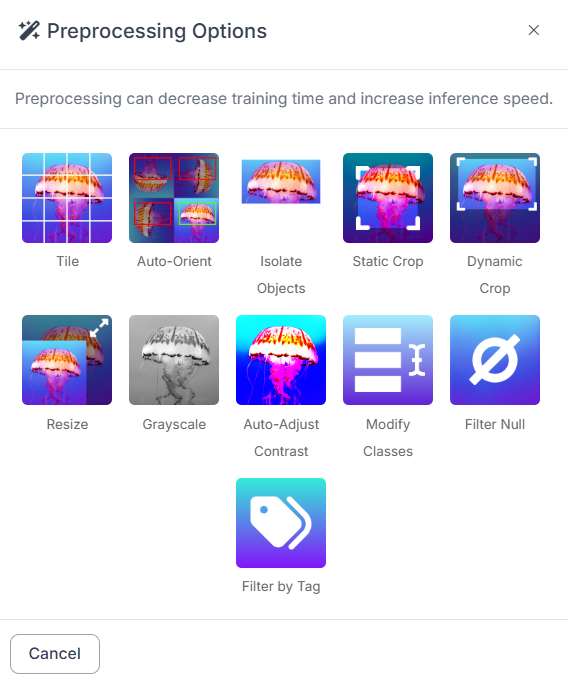
Common preprocessing choices:
- Auto-orient: Turn this on if images might rotate.

- Resize: Pick a size that preserves defect detail. If defects are small, avoid shrinking too much. If your originals are huge, resizing is necessary, but it shouldn’t destroy the signal.
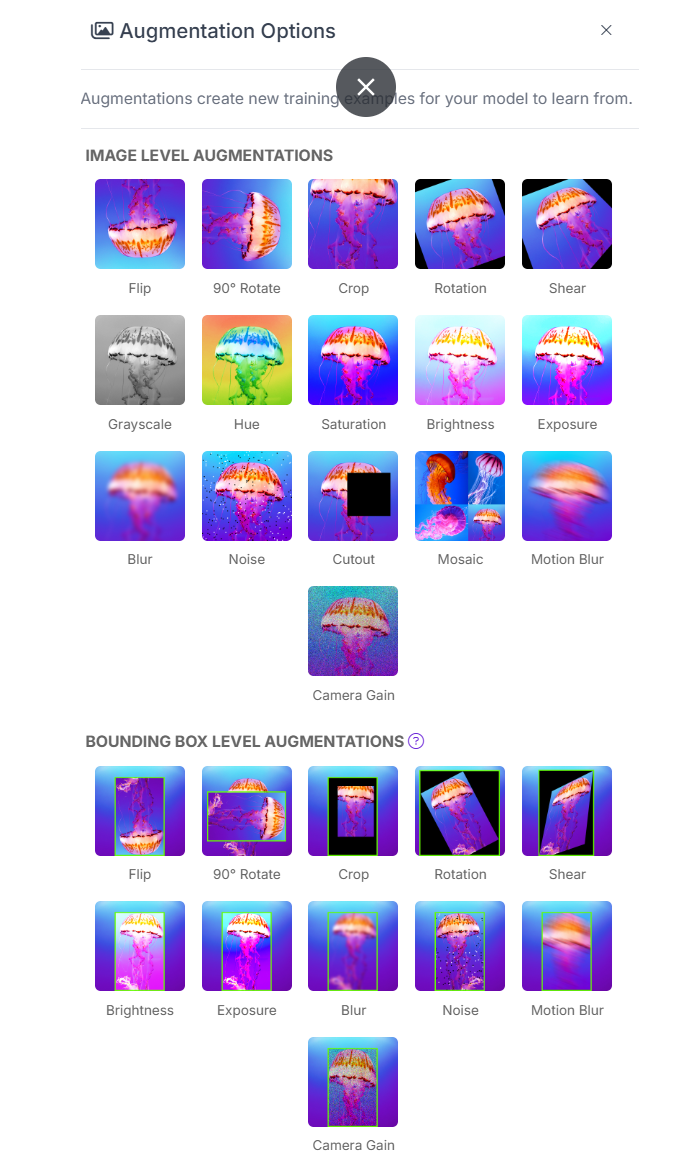
Augmentation: Augmentation creates a synthetic variety of images for training. For rare defects, augmentation is how you “multiply” your few defect examples.
Recommended augmentations for rare defects
- Horizontal / vertical flip
- Small rotations (especially if orientation varies)
- Brightness / contrast (to simulate lighting changes)
- Slight blur / noise (only if your real camera has blur/noise)
Augmentation should create the variations you expect in production:
- different lighting
- different camera angles
- motion blur
- slight scale changes
Step 5: Train the Model
Now start training. Go to your dataset version page and then click “Train Model” and choose “Custom Training”.
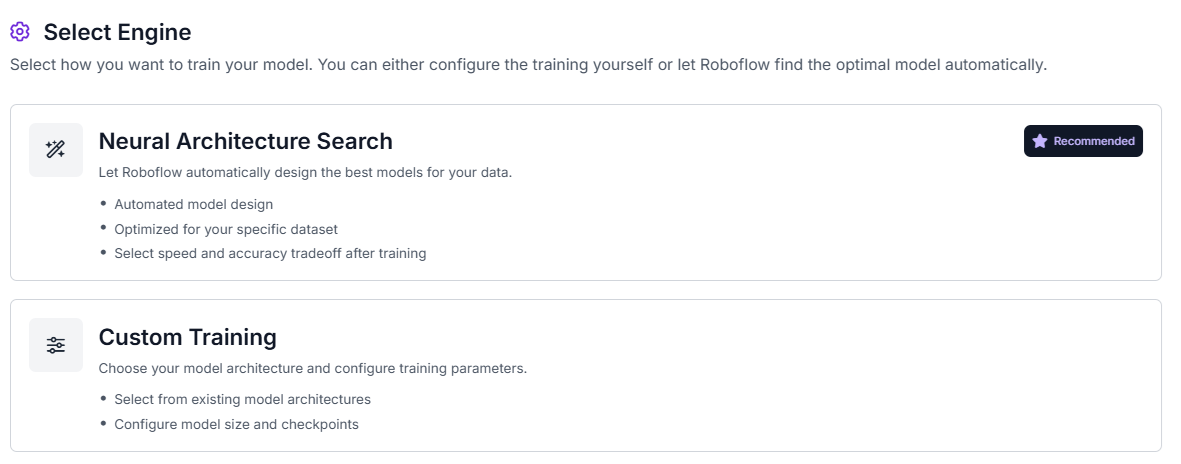
Choose RF-DETR, and select your model size.
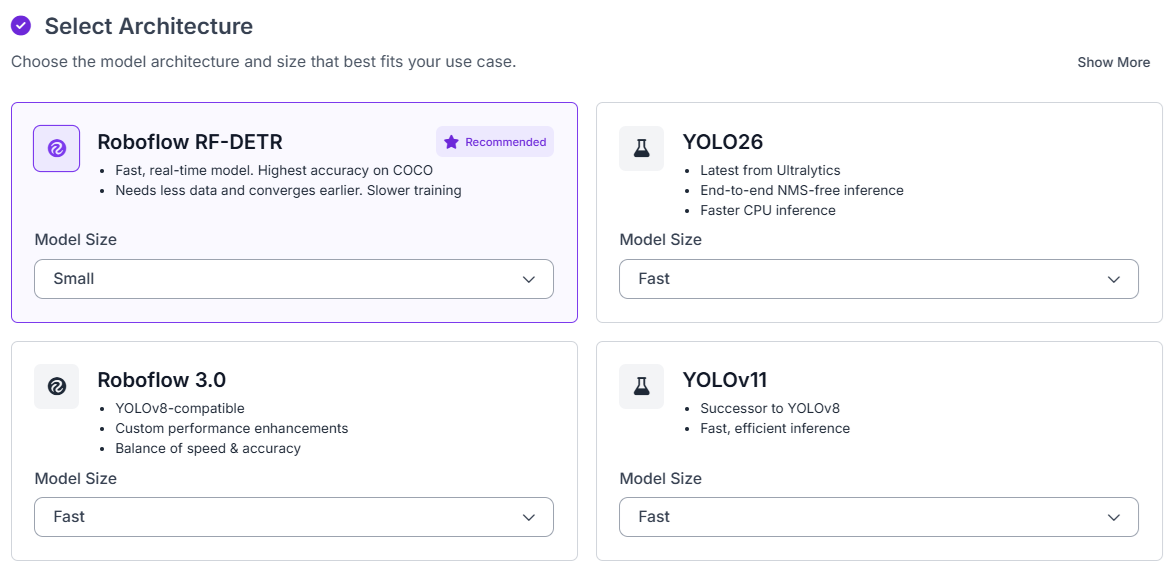
Now choose a checkpoint.
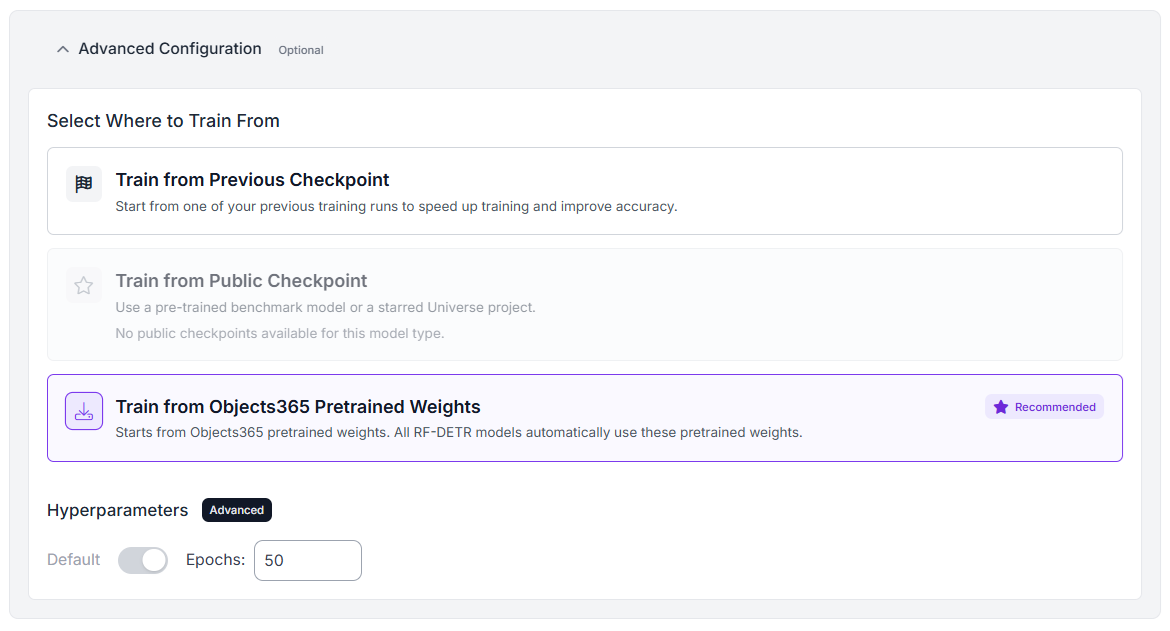
Check your dataset version, and then click Start Training.
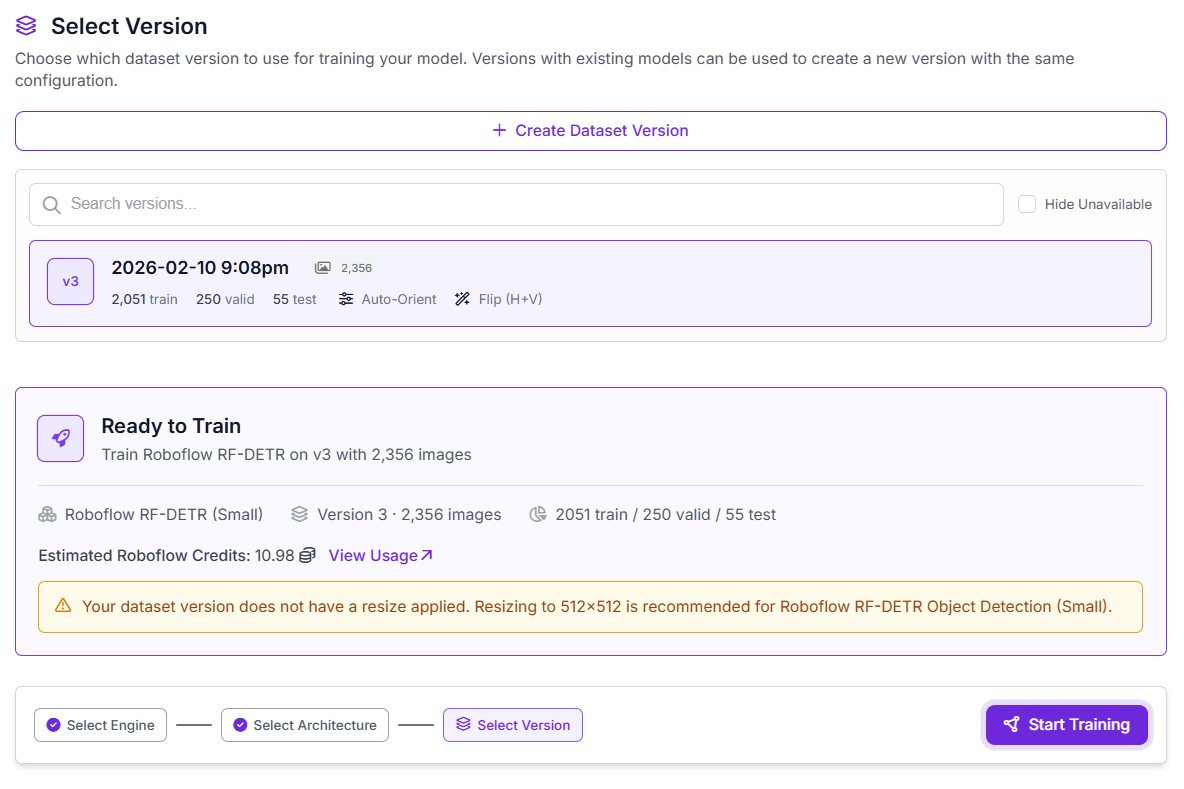
Roboflow will train the model. After training, the model will be available for use.
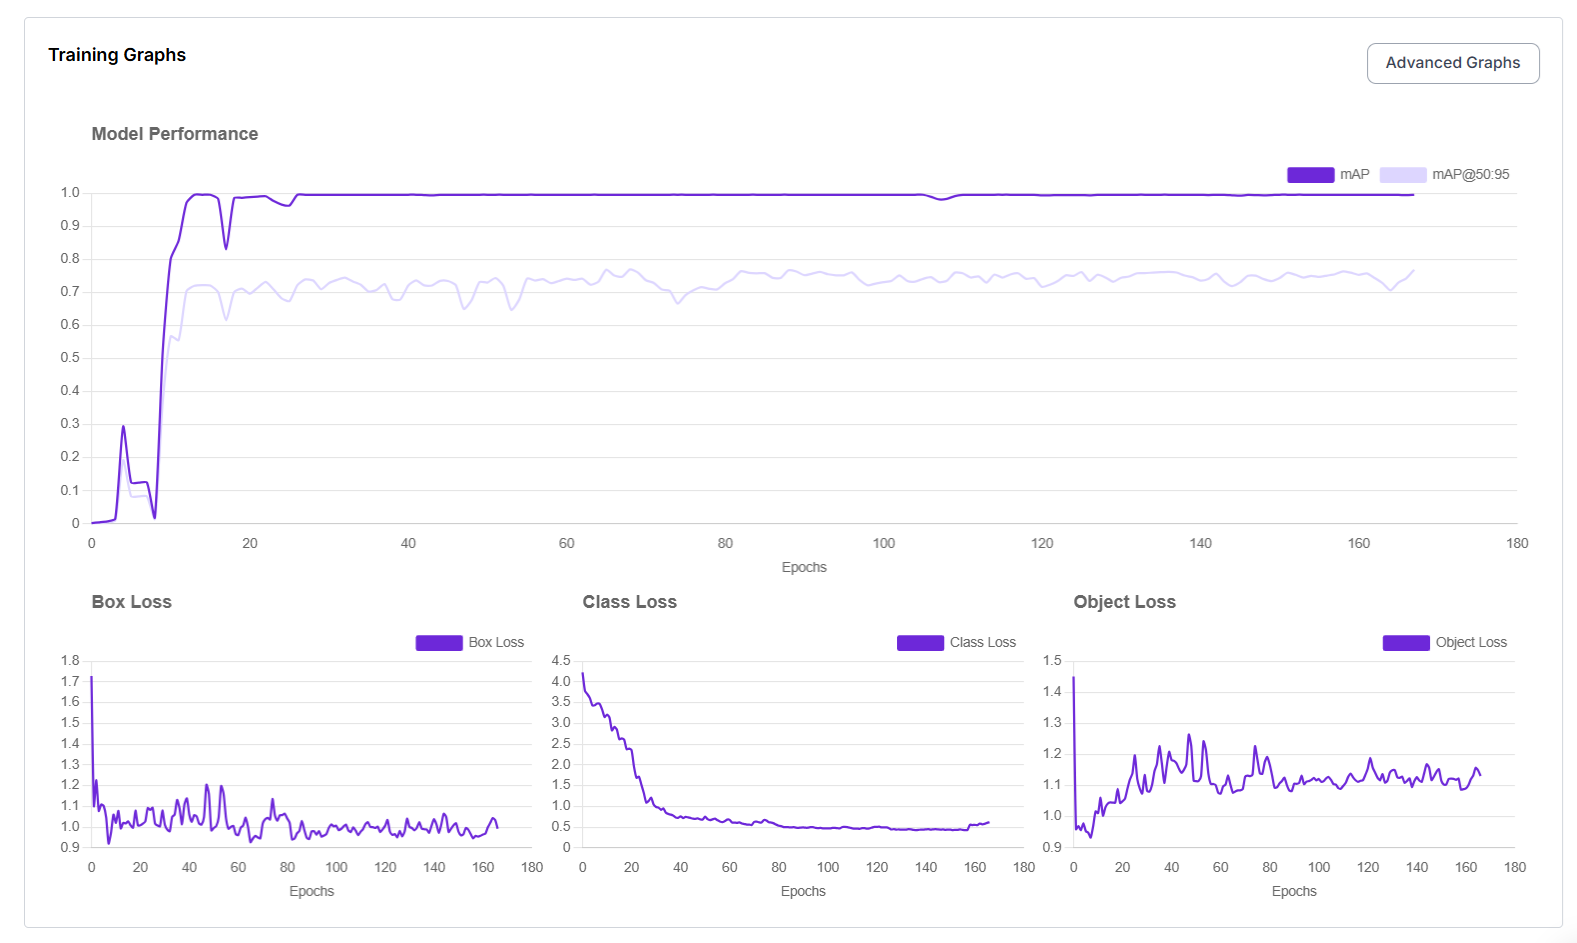
Step 6: Evaluate
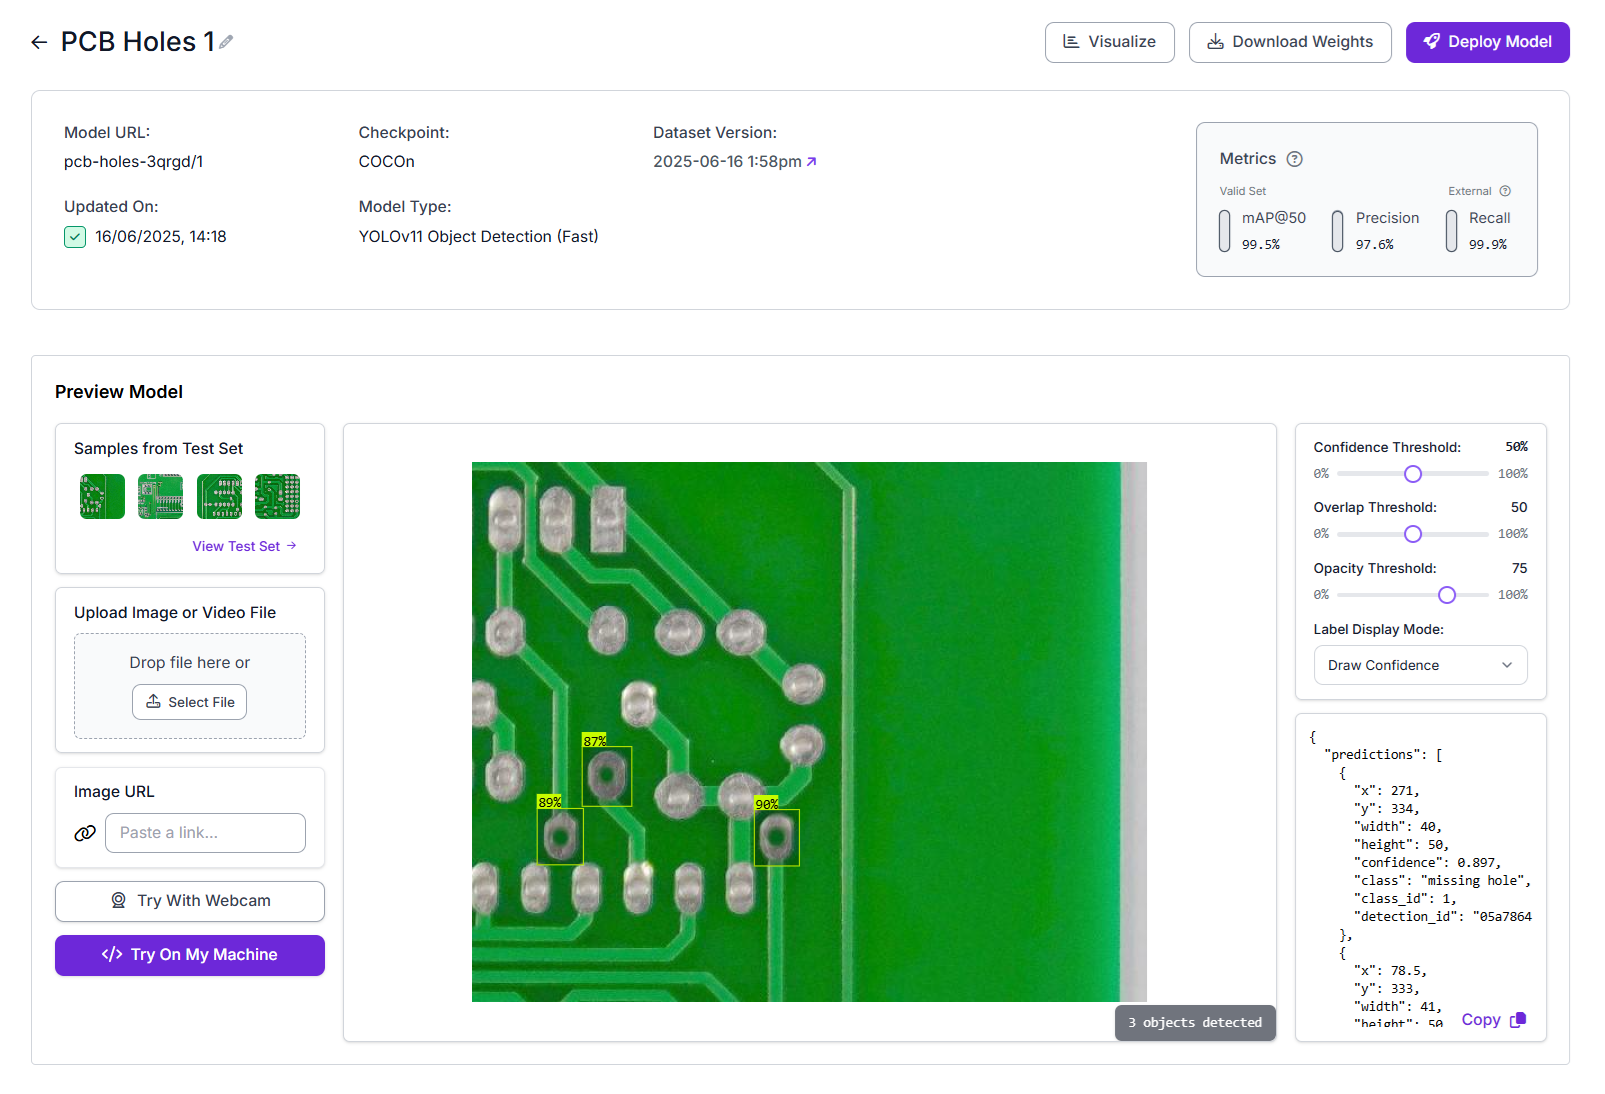
Manual testing is mandatory. After training run the model on:
- defect images not seen before
- normal images with tricky textures
- edge lighting cases (glare, shadow)
And inspect failures. Tune the confidence threshold. Rare defects often produce lower confidence scores. You may need to lower thresholds to improve recall. But lowering threshold increases false positives, so you need near-miss negatives and iteration.
Step 7: Deploy in Roboflow Workflows
Here we build a real inspection pipeline. A model alone isn’t a system. Roboflow Workflows turns it into one. Create a workflow as shown below:
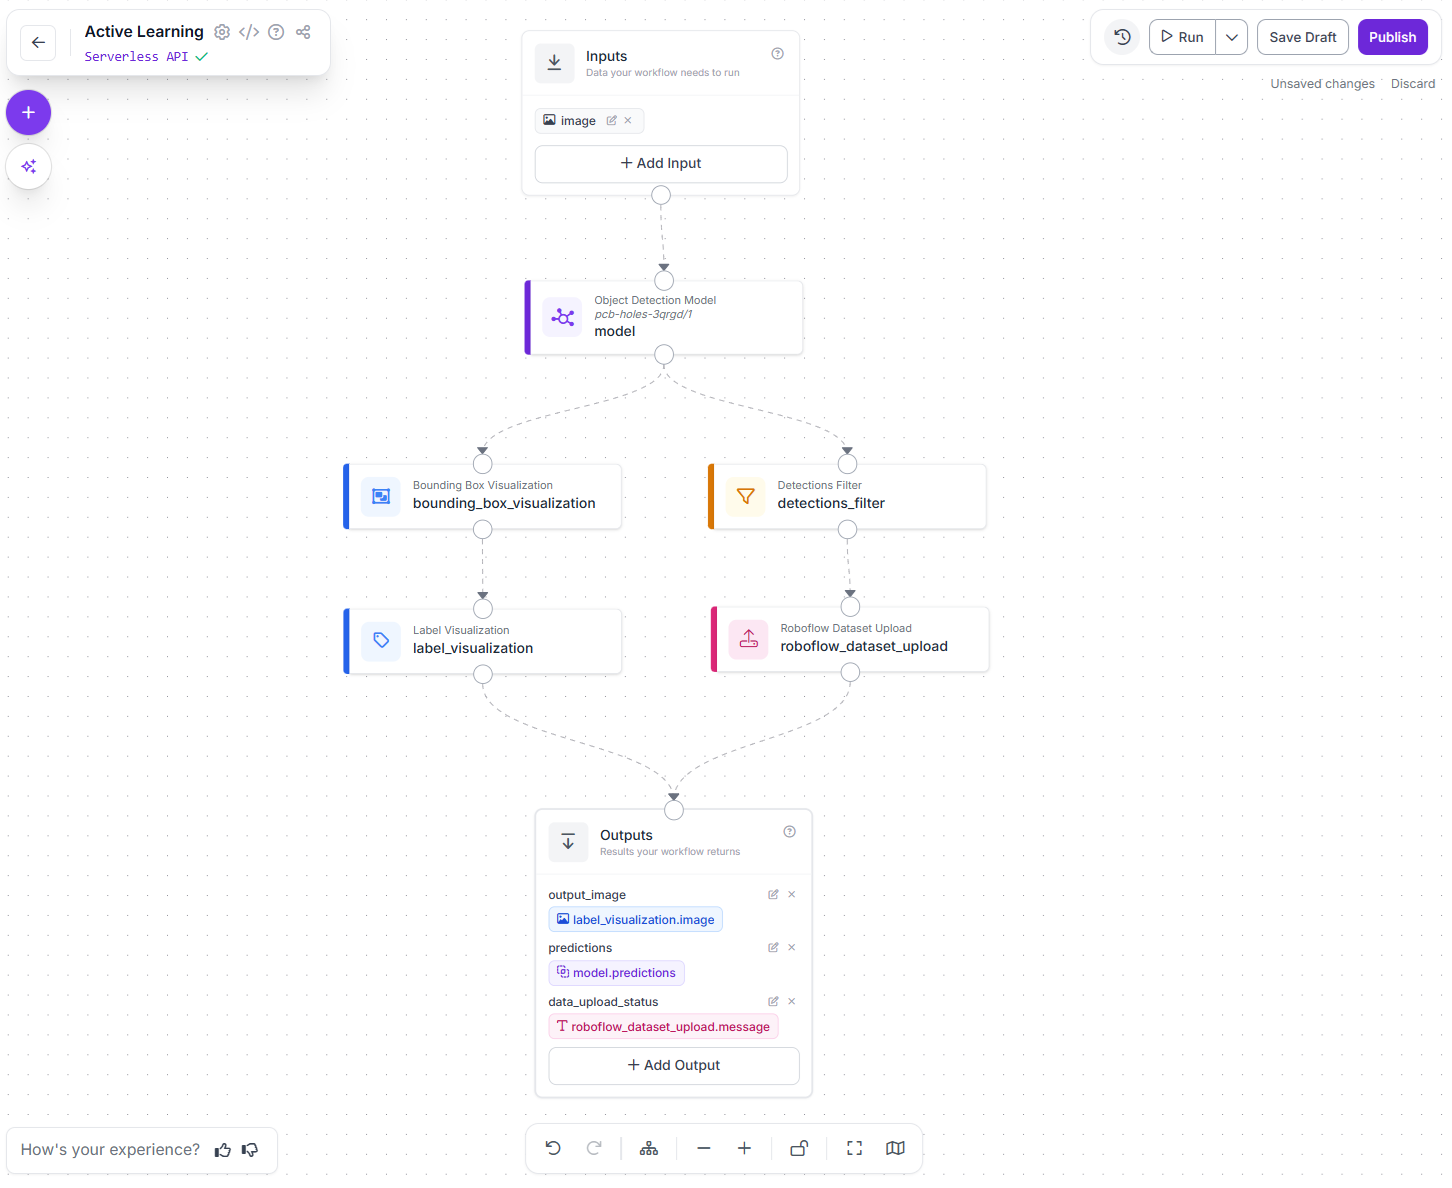
This workflow takes an input image, runs your trained object detection model on it, visualizes the detected defects, filters out low-confidence predictions, uploads selected examples back to your dataset for future training, and returns the final annotated image and predictions. In short, it performs detection, makes the results easy to inspect, and feeds useful new data back into your training loop.
Here are the components of this workflow:
Inputs (Image)
This is the entry point of the workflow. The image you provide here is the image that will be inspected by the model. In a real system, this could come from a camera on the production line, a mobile app, or a batch of uploaded images.
Object Detection Model (RF-DETR)
This block runs your trained RF-DETR model on the input image. The model looks for defects (for example, PCB holes or surface damage) and outputs bounding boxes with confidence scores. This is the core “inspection brain” of the workflow.
Bounding Box Visualization
This block draws boxes around the detected defects on the image. It makes the model’s output visible and easy to verify by humans. Visualization is important during development and debugging because it lets you quickly see what the model is detecting and where it is making mistakes.
Label Visualization
This block adds readable labels on top of the bounding boxes, such as the class name (e.g., “missing_hole”, “defect”) and the confidence score. This makes the output more interpretable for operators and engineers who want to understand why the model flagged something.
Detections Filter (Confidence Thresholding)
This block filters out low-confidence detections. For example, keeping only predictions with confidence <= 0.5 reduces false positives. This is useful in production systems where you don’t want the model to trigger alerts on very uncertain predictions. You can tune this threshold based on how sensitive you want the system to be to rare defects.
Roboflow Dataset Upload (Active Learning Block)
This block uploads selected images and predictions back to your Roboflow dataset. This is the key component that enables active learning. Instead of manually collecting new training data, the system automatically saves images from real usage. You can configure this to upload:
- Images where a defect is detected
- Low-confidence or uncertain cases
- A small sample of normal images
These uploaded examples can then be reviewed and labeled in Roboflow. Over time, this allows you to retrain your model on new rare defects that only appear after deployment. This closes the loop between deployment and training.
Outputs
The workflow returns:
- The final annotated image (with boxes and labels)
- The raw prediction data
- The status of whether the image was successfully uploaded for active learning
This makes it easy to integrate the workflow into applications, dashboards, or APIs.
Step 8: Retrain as a loop
This is the reliable strategy for rare defects. Your operational cycle becomes:
- Deploy workflow
- Collect hard/rare cases via dataset upload
- Review + correct labels in Roboflow Annotate
- Create a new dataset version (with updated preprocessing/augmentation)
- Retrain RF-DETR (start from previous checkpoint)
- Update workflow to use the new model
- Repeat
Conclusion: Train Models to Detect Rare Defects
Training for the 0.01% requires a fundamental shift from static modeling to active engineering. The secret to catching defects you almost never see isn't finding them all at once - it's building a pipeline that is ready for them when they inevitably appear. Get started with Roboflow Workflows.
Cite this Post
Use the following entry to cite this post in your research:
Timothy M. (Feb 12, 2026). How Do I Train a Model for Defects I Almost Never See?. Roboflow Blog: https://blog.roboflow.com/train-a-model-for-rare-defects/