
Discover the YOLO Autotrain Platform. Learn how to upload data, auto-label images, train YOLO models with one click, and deploy seamlessly with Roboflow.
Training a computer vision model used to mean writing training scripts, choosing model weights manually, configuring image sizes, exporting annotation formats, renting GPUs, and repeating the process every time the model missed something in production.
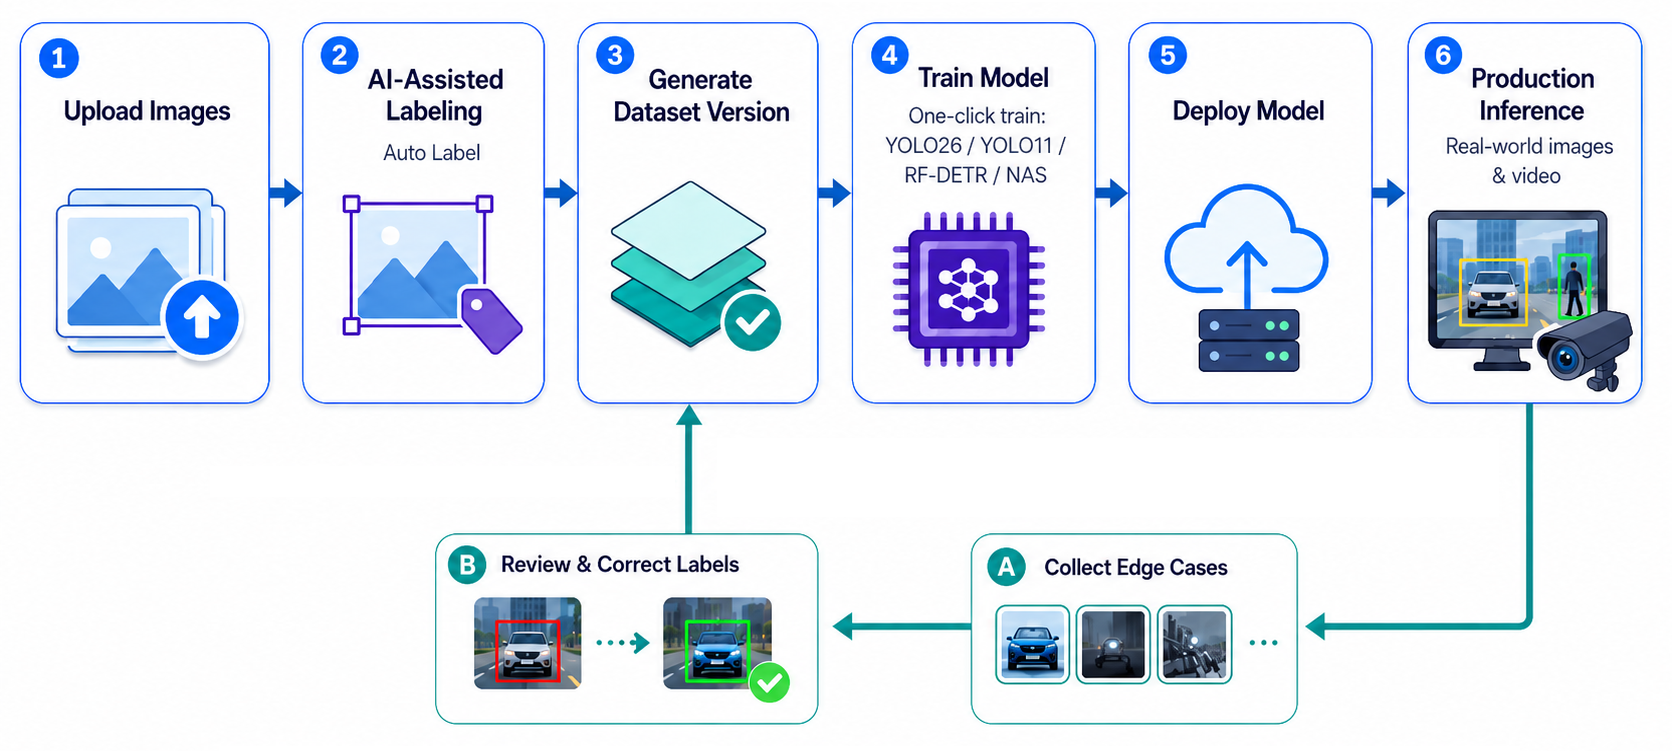
Roboflow makes this workflow much simpler. You can upload images, label them with AI assistance, generate a dataset version, train a model with a few clicks, deploy it, and then use new production data to improve the next version of your model.
In this tutorial, I will walk through a practical YOLO platform autotrain workflow using Roboflow where you will learn how to use Roboflow platform to autotrain (in just one click) YOLO models. Following are the simple steps of the entire training pipeline:
- Upload images to Roboflow
- Use Auto Label to create initial annotations
- Review and clean the labels
- Generate a dataset version
- Train a model with Roboflow Train using YOLO26, YOLO11, RF-DETR, or Roboflow Neural Architecture Search
- Deploy the trained model
- Use active learning to collect new data and improve the model over time
This workflow is useful when you want to build a production-ready computer vision model without managing the full training infrastructure yourself.
What Is YOLO Platform Autotrain?
YOLO platform autotrain means using the Roboflow managed computer vision platform to train YOLO computer vision models through a guided workflow instead of manually writing the entire training pipeline. In a traditional YOLO training workflow, you usually need to:
- Collect images
- Annotate objects
- Convert annotations into the right YOLO format
- Configure training parameters
- Download or select pretrained weights
- Train on a GPU
- Validate performance
- Export weights
- Deploy the model
- Repeat when performance drops
With Roboflow, these steps are handled inside one platform. You can upload data, label images, generate dataset versions, select a model architecture, start training, deploy the trained model, and collect more examples for future retraining.
This does not remove the need for good data. The model still depends on clear images, consistent labels, and representative examples. But it does remove much of the manual setup that slows down computer vision projects and also supports preparing the high quality training dataset which is more important.
How to Auto-Train a YOLO Model
Roboflow can be used auto-train YOLO models for different computer vision tasks, including object detection, instance segmentation, and keypoint detection. After you upload and label your dataset, Roboflow prepares the data, manages the training setup, and lets you train a YOLO model directly from the platform without writing a custom training script. This makes it easier to move from raw images to a trained model for detecting objects, segmenting regions, or identifying keypoints.
Roboflow as one platform for all computer vision tasks
Step 1: Create a Roboflow project
Start by creating a new project in Roboflow. Choose the project type that matches your use case. For YOLO-style object detection, select an object detection project. If your task needs masks around objects, choose instance segmentation. If you need pose points, choose keypoint detection. For example:
- Detect helmets, vests, and people on construction sites: object detection
- Segment damaged parts of a car: instance segmentation
- Detect human body joints: keypoint detection
Give your project a clear name and define your classes before uploading too much data. Good class names make your dataset easier to maintain. For example, use consistent names such as:
hard_hatVestperson
Avoid mixing names like helmet, hardhat, hard_hat, and hard-hat for the same object. Inconsistent class names can confuse the training process and make evaluation harder.
Step 2: Upload your images
Next, upload images into your Roboflow project. You can upload images directly from the Roboflow web interface. You can also upload datasets that already include annotations. Roboflow supports many annotation formats, so if your data is already labeled in COCO JSON, Pascal VOC, YOLO TXT, or another format, you can import it and convert it later.
For the first version of your model, do not start with thousands of images if your ontology is still unclear. Start with a smaller batch, such as 50–200 representative images. This lets you test whether your labels, class names, and training setup make sense before scaling. A good first dataset should include:
- Different lighting conditions
- Different camera angles
- Different object sizes
- Examples where the object is partly hidden
- Images without the target object, if those appear in production
- Real deployment images, not only clean sample images
The goal is not just to collect more data. The goal is to collect data that represents the environment where your model will run.
Step 3: Use Auto Label to create initial annotations
Manual annotation is often the slowest part of training a YOLO model. Roboflow's AI labeling tools, Auto Label can speed up this step by using large foundation vision models or Roboflow-trained models to create initial labels.
In this "Construction Satefy Monitoring" example, I'll be using Box Prompting to automatically generate labels.
Using "Box Prompting" to automatically generate label
Auto Label should be treated as a pre-labeling tool, not a replacement for review. Foundation models can miss objects, create loose boxes, or confuse visually similar classes. Always inspect the labels before training.
Step 4: Review and clean your annotations
After Box Prompting creates annotations, review them and look for common labeling issues:
- Missing boxes
- Boxes that are too loose
- Boxes that cut off part of the object
- Wrong class names
- Duplicate boxes on the same object
- Objects labeled in some images but ignored in others
- Tiny objects that are not useful for your deployment goal
This review step is important because YOLO models learn directly from your labels. If the labels are inconsistent, the model will learn inconsistent patterns.
For example, if you are training a model to detect construction worker, make sure every visible worker is labeled using the same rule. Do not label full-body in some images and only upper-body in others unless that is an intentional part of your ontology. Good labels are more important than simply having a large dataset.
Step 5: Generate a dataset version
Once your annotations are reviewed, generate a dataset version. A dataset version is a fixed snapshot of your images, annotations, preprocessing steps, and augmentations. This makes training reproducible. If model version 2 performs better than model version 1, you can compare exactly what changed. During version generation, you can configure preprocessing and augmentations. Common preprocessing steps include:
- Auto-orienting images
- Resizing images
- Standardizing image dimensions
Common augmentations include:
- Rotation
- Brightness adjustment
- Blur
- Noise
- Cropping
Use augmentations carefully. If your dataset is small, too much augmentation can create unrealistic examples. Start simple. Add augmentations only when they match real-world conditions.
Step 6: Choose the model architecture
After generating a dataset version, you can train directly in Roboflow. This is where Roboflow turns the workflow into an auto-train experience. Instead of exporting your dataset, writing a training script, and configuring GPUs yourself, you can select an architecture and start training from the Roboflow interface. For a YOLO platform autotrain workflow, you can consider several model options:
YOLO26: YOLO26 is a real-time YOLO model family available in Roboflow. Roboflow supports training YOLO26 object detection, instance segmentation, and keypoint detection models directly on the hosted platform. YOLO26 is designed for fast inference and edge deployment, making it a good option when latency matters.
YOLO11: YOLO11 is another popular YOLO model family supported by Roboflow. You can train YOLO11 models from the Roboflow web interface, deploy them with Roboflow Inference, and use them in Roboflow Workflows. YOLO11 is a good choice when you want a familiar YOLO workflow and strong ecosystem support.
For object detection and instance segmentation projects, Roboflow offers Neural Architecture Search (NAS) as a training mode inside Roboflow Train. This is different from YOLO-NAS, which is a specific model architecture. Roboflow NAS is a platform feature that automatically trains and compares multiple architectures on your dataset.
This is useful when you do not know which model size or configuration will work best for your use case. Instead of running several separate training experiments, NAS explores different options and helps you choose a model based on your accuracy and latency needs.
NAS is especially useful for edge deployment, where speed, model size, and accuracy all matter. For example, if you plan to run your model on an NVIDIA Jetson or Raspberry Pi, NAS can help you find a better tradeoff for your hardware. To use NAS correctly, your dataset version must include at least 15 validation images.
Step 7: Start one-click training
Once you choose the architecture, select a model size and checkpoint. For a first model, training from a public checkpoint is usually a good starting point. This uses transfer learning, where the model begins from weights already trained on a large dataset such as COCO. Transfer learning usually trains faster and performs better than starting from random weights, especially when your custom dataset is not huge. For later versions, you can train from a previous checkpoint. This is useful when you already have a strong model and want to improve it with newly labeled data.
YOLO Autotrain in Roboflow
Roboflow runs the training job in the cloud. When training is finished, you can inspect model results, test predictions, and deploy the model.
Step 8: Evaluate training results
After training, review the model metrics before deployment. For object detection, common metrics include:
- Precision
- Recall
- mAP
Precision tells you how many predicted detections were correct. Recall tells you how many real objects the model found. mAP gives a broader view of detection quality across classes and confidence thresholds. Do not look only at the overall mAP. Check class-wise performance.
For example, your model may have high overall mAP because it detects person well, but it may still miss vest or hard_hat. If those are the most important classes for your application, the model is not ready even if the average score looks good. Also test the model visually. Use images that look like your real deployment environment. Look for:
- Missed objects
- False positives
- Poor performance on small objects
- Poor performance in low light
- Confusion between similar classes
- Weak performance on crowded scenes
A model is only useful if it works on the kind of images it will see in production.
Testing model in Roboflow
Step 9: Deploy the trained model
Once your model performs well, you can deploy it with Roboflow. Roboflow supports deployment through:
- Hosted API
- Roboflow Inference
- Edge devices
- Roboflow Workflows
For low-latency applications, on-device deployment is often preferred. For quick testing and integration, the Hosted API is convenient. For multi-step vision applications, Roboflow Workflows lets you connect your model with logic blocks, visualization blocks, filters, tracking, alerts, or external integrations. For example, a safety monitoring workflow could:
- Run your custom trained YOLO model.
- Detect people, hard hats, and safety vests.
- Filter detections by confidence.
- Count missing PPE cases.
- Send results to a webhook or dashboard.
- Save selected images for active learning.
This turns a trained model into a complete computer vision application.
Step 10: Build an active learning loop
Training a model once is not the end of the workflow. Real-world conditions change. New camera angles appear. Lighting changes. Objects look different. Backgrounds vary. A model that works well on the first dataset may degrade when deployed in a new environment. This is where active learning helps.
Active learning is the process of collecting useful new examples from production, reviewing them, adding them back to the dataset, and training a better model version.
In Roboflow, you can use Workflows and active learning tools to collect images and predictions from your deployed model. These images can be saved back into your Roboflow project, reviewed, corrected, and used to train the next version. A simple active learning loop looks like this:
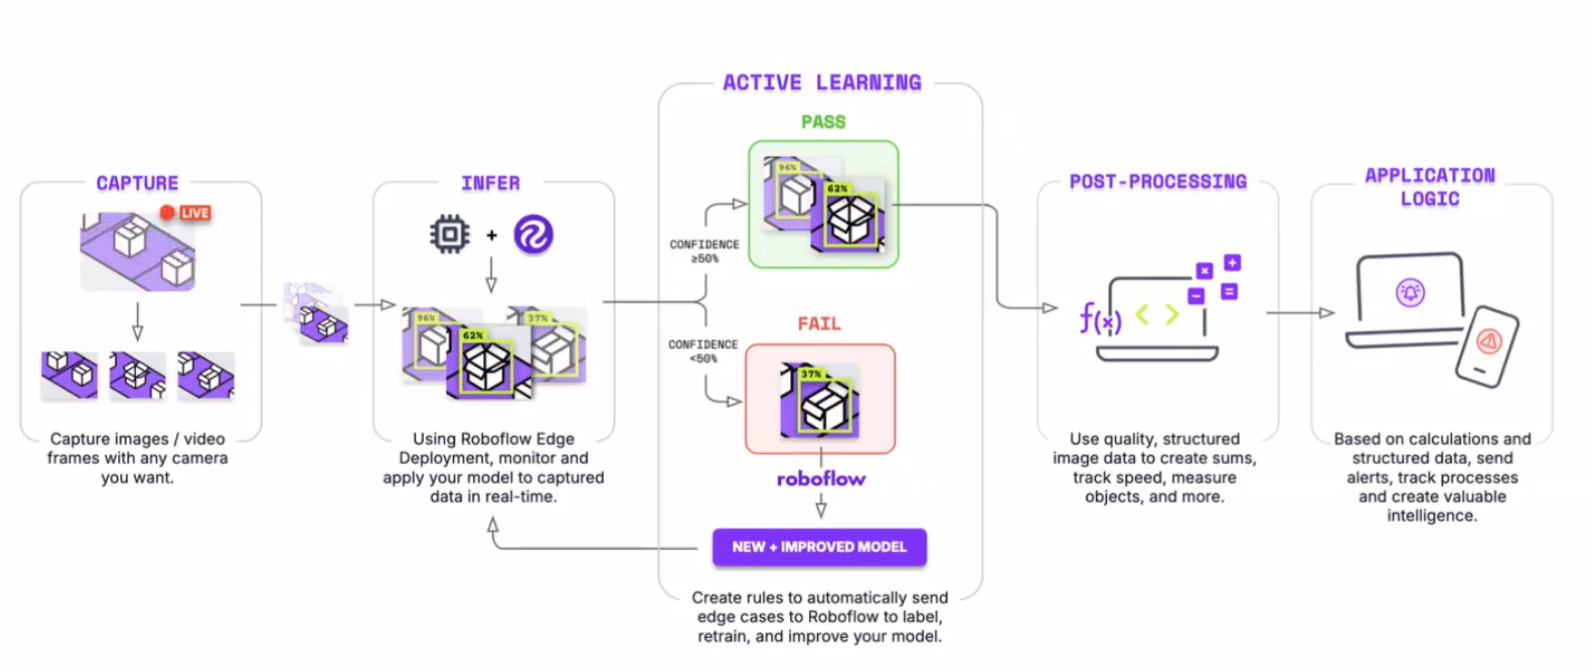
This loop is what makes the workflow powerful. You are not just training once. You are building a system that improves as it sees more real-world data.
Here's an example active learning workflow.
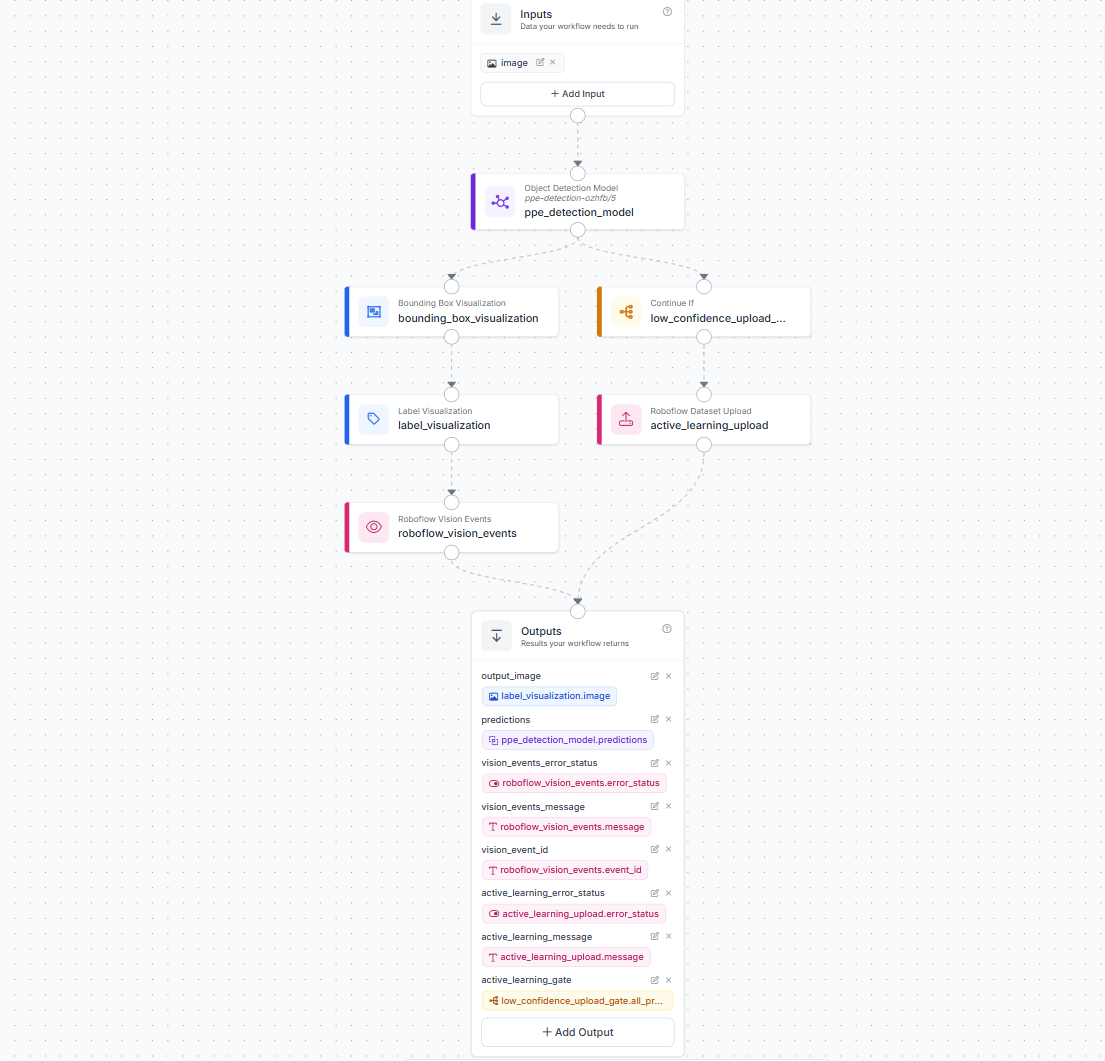
This workflow takes an input image or video frame, runs the public PPE detection model, draws bounding boxes and class/confidence labels on the frame, and logs the result as a medium-severity PPE safety event in Vision Events with the annotated image attached. If the model finds any PPE detection with confidence at or below 0.5, the workflow uploads that image and its predictions as pre-labels into the Roboflow project, tagged for PPE active learning and organized into weekly batches for review and retraining.
In this example, the active learning upload is triggered using a Low Confidence condition. This means the workflow only sends uncertain PPE detections for review, such as predictions with confidence at or below 0.5. These examples are useful because they show where the model is unsure and may benefit from more labeled training data. You can also choose other upload conditions depending on what kind of examples you want to collect:
- Any Detection uploads frames whenever the PPE model detects something. This is useful when you want more examples of real PPE appearances in production.
- No Detections uploads frames where the model finds nothing. This can help review possible missed detections or collect negative examples.
- Sampled uploads only a small random percentage of frames. This is useful when you have a high-volume video stream and do not want to save every frame.
- Specific Class uploads frames only when selected PPE classes appear, such as
helmet,vest, orperson. This is useful when you want to improve performance for a particular class.
Licensing YOLO Models
YOLO models such as YOLO26 and YOLO11 are distributed under the AGPL-3.0 license. AGPL-3.0 requires users to open-source any code changes they make, including code in other projects that connect directly to the model. Custom-trained versions of these models remain AGPL-3.0 by default. For businesses building proprietary products, this makes a commercial license necessary.
Roboflow is an authorized licensor of Ultralytics models, and the commercial license is bundled with your plan. No separate Ultralytics sales conversation required:
- All plans include a commercial license for Roboflow cloud deployments such as the Serverless Hosted API
- Paid plans include a commercial license for self-hosting via Roboflow Inference
- The Growth plan covers up to 10 self-hosted devices outside the Roboflow ecosystem; contact Sales for larger deployments
Roboflow can issue commercial licenses for YOLO26, YOLOv12, YOLO11, YOLOv10, YOLOv8, and YOLOv5. The full list is on the Roboflow Licensing page. A full side-by-side comparison of all licensing paths is at roboflow.com/ultralytics.
YOLO Platform Autotrain Conclusion
Roboflow makes it possible to auto-train YOLO computer vision models through a complete platform workflow i.e. upload data, label with AI assistance, train with one click, deploy, and improve with active learning.
YOLO26 and YOLO11 are strong choices when you want familiar YOLO model families with fast real-time performance. RF-DETR is a strong choice when you want a high-accuracy, Apache 2.0 licensed model suitable for commercial use. Roboflow Neural Architecture Search adds another layer by helping you automatically find the best model configuration for your data and deployment target.
The most important part of the workflow is the loop. A good computer vision model is not built in one training run. It improves through better data, cleaner annotations, stronger dataset versions, and continuous feedback from real-world deployment. With Roboflow, that full loop can happen in one platform.
Create a free Roboflow account and start training your first model today.
Cite this Post
Use the following entry to cite this post in your research:
Timothy M. (May 14, 2026). YOLO Platform Autotrain. Roboflow Blog: https://blog.roboflow.com/yolo-platform-autotrain/