

To train a YOLO model on your own objects, fine-tune a COCO-pretrained checkpoint on 50 to 100 labeled images, either fully in the browser with Roboflow Custom Training (YOLO26, YOLO11, or YOLOv12 on hosted GPUs, no CUDA setup) or from the CLI when you need control over epochs, batch size, and learning rate. Before deploying, check mAP@50-95, per-class AP, and predictions on real production images, then ship to the hosted API, self-hosted Inference, or a Workflow.
YOLO models are used to build computer vision (CV) applications for object detection, image classification, segmentation, and keypoint detection.
Today many different versions of YOLO are available as pre-trained models that you can use readily out of the box. However, these pretrained models only recognize the objects and visual patterns they have already learned.
Therefore a specific YOLO model version that you want to use for your CV task needs custom training, in order to recognize the new objects it has not yet learned about during training. For example, a YOLO model trained on the COCO dataset can detect common objects such as people, cars, and animals. But it cannot reliably identify custom products, defects, equipment, or industry-specific classes. Training adapts the model to your objects, camera conditions, backgrounds, and deployment environment.
To train a YOLO model you need:
- a labeled dataset
- a pretrained checkpoint
- a training environment
- a reliable evaluation process.
In this guide I'll show you two different methods to custom train a YOLO. I'll also show how to perform model evaluation, performance improvement, deployment of the trained YOLO model.
What YOLO Training Actually Means
YOLO is a family of real-time computer vision models. For object detection, a YOLO model predicts both:
- What objects are present in an image.
- Where each object is located using a bounding box.
YOLO is described as a one-stage detector because it predicts classes and object locations in a single model pass. This makes YOLO models useful for applications that require fast predictions, including video analytics, manufacturing inspection, robotics, retail monitoring, traffic analysis, and edge AI.
Training a YOLO model means adjusting the model’s internal weights so that it can recognize the objects defined in your custom dataset.
Transfer Learning from a COCO Checkpoint
The most common training method is transfer learning. A pretrained YOLO checkpoint has already learned general visual patterns, including:
- Edges.
- Shapes.
- Textures.
- Object boundaries.
- Common object structures.
- Relationships between image regions.
Many public YOLO checkpoints are trained on the Microsoft COCO dataset. COCO contains common object categories such as people, vehicles, animals, furniture, and household objects.
When you fine-tune a pretrained checkpoint, the model does not need to learn basic visual features again. Instead, it adapts its existing knowledge to your classes.
For example, a COCO-pretrained model may already understand the general shape and texture of vehicles. You can fine-tune it to recognize more specialized classes such as:
- Damaged car doors.
- Different vehicle models.
- Paint scratches.
- Missing wheel nuts.
- Manufacturing defects.
Roboflow recommends starting new object detection projects from a public checkpoint. Its default public training checkpoint is based on Microsoft COCO.
Anatomy of a YOLO Training Run
When training a YOLO model, several parameters control how the model learns, how much GPU memory it uses, and how long training takes.
- Epochs: An epoch is one complete pass through the training dataset. More epochs can improve learning, but too many may cause overfitting.
- Batch Size: Batch size is the number of images processed before the model updates its weights. Larger batches need more GPU memory, while smaller batches use less memory.
- Learning Rate: The learning rate controls how much the model changes its weights after each step. A high value can make training unstable, while a low value can make training slow.
- Optimizer: The optimizer decides how the model updates its weights based on the training error. Common optimizers include SGD, Adam, and AdamW.
- Image Size: Image size is the resolution used during training, such as 640 × 640 pixels. Larger images may help detect small objects but require more memory and processing time.
- Early Stopping: Early stopping ends training when the model stops improving. This saves time and helps prevent overfitting.
Signs of Overfitting
Overfitting occurs when the model learns the training images too closely but does not generalize to new images. Common signs include:
- Training loss continues to decrease while validation loss increases.
- Training mAP improves while validation mAP stops improving.
- The model works on familiar images but fails on new backgrounds.
- Predictions are strong for common examples but weak for unusual examples.
- The model memorizes repeated video frames or duplicate images.
Overfitting is especially common when the dataset is small, repetitive, or not representative of the production environment.
What You Need Before YOLO Training
Before starting training you need the following:
- A set of images.
- Annotations for the objects you want to detect.
- Clearly defined class names.
- Training, validation, and test splits.
- A Roboflow project and dataset version.
- A suitable YOLO architecture and model size.
Labeled Images
For object detection, each target object must have a bounding box and a class label. If an image contains three objects that should be detected, all three should normally be annotated. Leaving target objects unlabeled can teach the model that those objects are part of the background. Good bounding boxes should:
- Fit closely around the visible object.
- Avoid excessive background.
- Follow a consistent annotation policy.
- Use the correct class.
- Include partially visible objects when they are relevant to the application.
Annotation consistency is more important than making individual boxes perfect to the final pixel.
How Many Images Do You Need?
There is no universal minimum dataset size. The required number depends on:
- Number of classes.
- Visual similarity between classes.
- Background variation.
- Object size.
- Lighting variation.
- Camera position.
- Required accuracy.
- Frequency of rare cases.
It is recommende with approximately 50-100 images for the first model version. A production system may later require hundreds or thousands of images.
For a narrow task with one visually distinct object, 50-100 diverse images may be enough for a useful prototype. A multi-class system involving small, similar, or heavily occluded objects will normally require more data.
The number of annotations also matters. One image containing 20 labeled objects provides more object examples than an image containing only one.
Class Balance
Review how many images and annotations are available for each class.
Consider the following dataset:
| Class | Number of Annotations |
|---|---|
| Person | 5,000 |
| Helmet | 2,200 |
| Safety vest | 1,800 |
| Missing helmet | 90 |
The missing helmet class may perform poorly because it is underrepresented. You do not always need exactly the same number of annotations for every class. However, each important class should contain enough visual diversity to appear meaningfully in the training, validation, and test sets. When a rare class is important, collect more examples rather than relying only on oversampling or augmentation.
Train, Validation, and Test Split
A useful starting split is:
- 70% training.
- 20% validation.
- 10% testing.
The training set teaches the model. The validation set is used to monitor performance during model development. The test set provides a final evaluation on held-out data. Roboflow Dataset Versions let you set and rebalance the train, validation, and test split before training.
Annotate Faster with Auto Label
You can label images manually with Roboflow Annotate or use AI-assisted annotation tools. Roboflow Auto Label can use:
- Foundation models such as Grounding DINO.
- A previously trained Roboflow model.
- A saved Roboflow Workflow.
Auto Label is useful for common objects that a foundation model already understands. You should still review generated annotations before including them in a training version. For highly specialized objects, subtle defects, or visually similar product variants, manually reviewed annotations remain important.
Start with a Dataset from Roboflow Universe
Roboflow Universe contains public computer vision datasets across object detection, segmentation, classification, keypoint detection, and other tasks.
You can fork an existing Universe dataset directly into your workspace. Forking is preferable when you plan to train the dataset in Roboflow because it preserves the dataset structure and version information. A Universe dataset can be used as:
- A complete starter dataset.
- A source of additional images.
- A source of pretrained checkpoints.
- A reference for class definitions and annotation style.
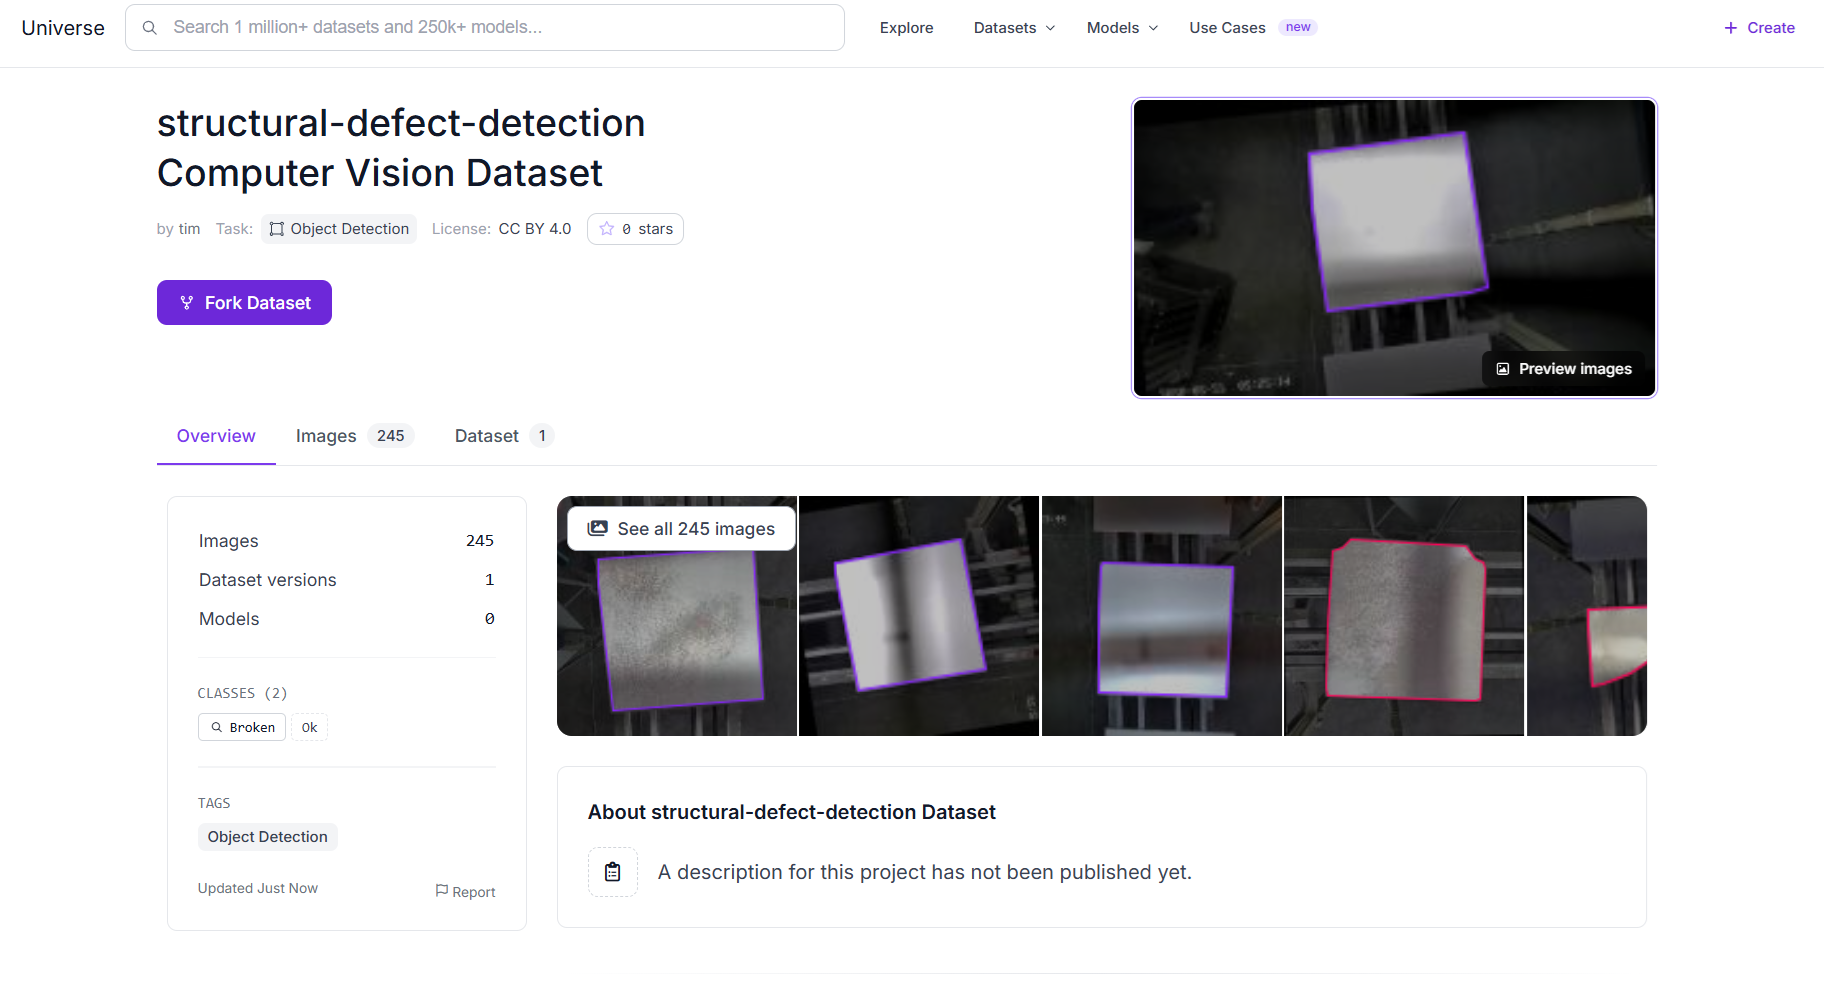
Review public datasets before training because annotation quality and licensing can vary between projects. For this example I am using structural defect detection dataset from Roboflow universe that I have already forked into my workspace.
Path 1: Train a YOLO Model in Roboflow Without Code
The simplest way to train a YOLO model is Roboflow Custom Training. This method runs entirely in the browser and does not require you to:
- Install CUDA.
- Configure PyTorch.
- Manage Python versions.
- Find a compatible GPU.
- Monitor a notebook session.
- Download model repositories.
- Resolve package conflicts.
Roboflow prepares the dataset and runs training on hosted infrastructure. Models trained on Roboflow can then be evaluated and deployed from the same project.
YOLO Models Supported in Roboflow Custom Training
The following current YOLO families can be trained directly in Roboflow:
| Architecture | Supported Tasks in Roboflow | Sizes |
|---|---|---|
| YOLO26 | Object detection, instance segmentation, keypoint detection | N, S, M, L, X |
| YOLO11 | Object detection, instance segmentation, keypoint detection | N, S, M, L, X |
| YOLOv12 | Object detection | N, S, M, L, X |
YOLO26 is available for object detection, instance segmentation, and keypoint detection across five sizes from Nano through Extra Large. The architecture options you see depend on the project type. For example:
- An object detection project shows object detection architectures.
- An instance segmentation project shows segmentation architectures.
- A keypoint project shows keypoint-compatible architectures.
Here are the steps to train the model using Roboflow.
Step 1: Create a Dataset Version
Before training, generate a Dataset Version. A Dataset Version is a frozen snapshot of:
- Images.
- Annotations.
- Classes.
- Train, validation, and test splits.
- Preprocessing steps.
- Augmentations.
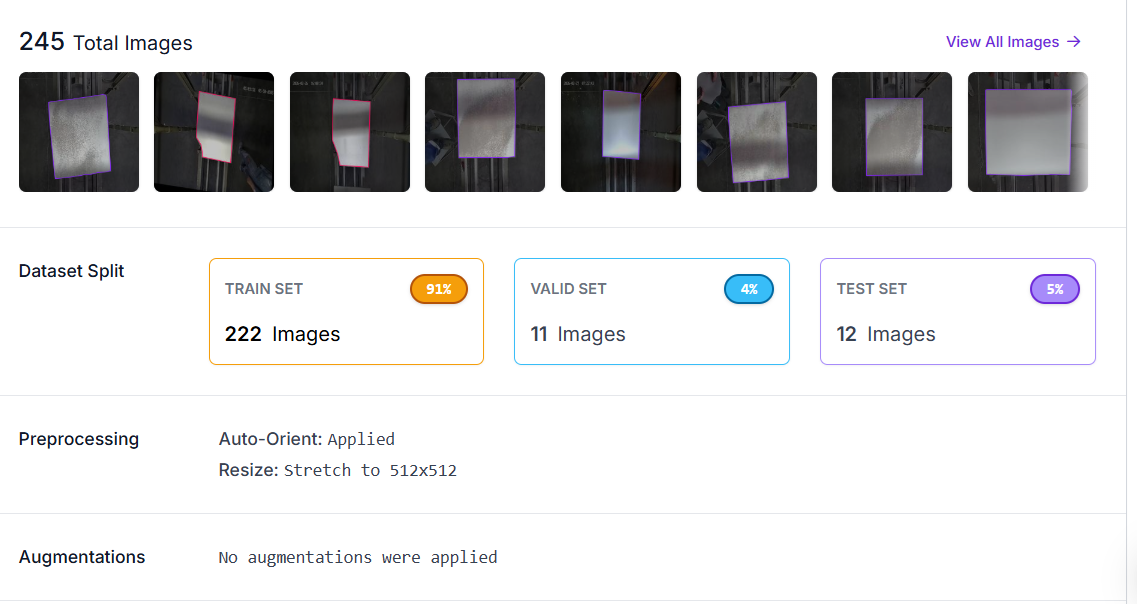
Creating a version makes experiments reproducible. You can train YOLO26 and YOLO11 on the same version and know that both models received the same data. To create one:
- Create an object detection project upload and annotate images.
- Go to Versions.
- Click Create New Version.
- Review the dataset split.
- Configure preprocessing.
- Add augmentations.
- Click Create.
A Dataset Version is required before training a model in Roboflow.
Step 2: Open Custom Training
Once the version has been generated:
- Open the project.
- Go to Models.
- Select Train.
- Click Custom Train.
- Select the dataset version when prompted.
Roboflow will open the model configuration flow.
Step 3: Select a YOLO Architecture
Choose one of the available architectures:
- YOLO26
- YOLO11
- YOLOv12
YOLO26 is a good current YOLO starting point. YOLO11 remains useful for teams with existing YOLO workflows, while YOLOv12 can be included as another object detection comparison.
Do not assume that the newest architecture will always produce the best result on your data. The best method is to train more than one candidate on the same dataset version.
Select a Model Size
YOLO model names commonly end in n, s, m, l, or x.
| Size | Meaning | General Characteristic |
|---|---|---|
| N | Nano | Lowest latency and memory usage |
| S | Small | Fast with greater capacity than Nano |
| M | Medium | Balanced accuracy and speed |
| L | Large | More capacity but higher compute cost |
| X | Extra Large | Highest capacity and deployment cost |
Larger models usually provide greater learning capacity, but they also require more computation during training and inference. Begin with Nano or Small when:
- Building the first dataset version.
- Testing annotation quality.
- Deploying on a CPU or edge device.
- Optimizing for low latency.
- Iterating under a limited training budget.
Consider Medium, Large, or Extra Large when:
- Small models are underfitting.
- Classes are visually similar.
- Scenes are complex or crowded.
- Accuracy is more important than latency.
- The target hardware has sufficient compute.
Step 4: Select a Checkpoint
Roboflow provides three main checkpoint options.
- Previous Checkpoint: Continue training from one of your earlier models.
- Public Checkpoint: Start from a similar public model available in Roboflow.
- COCO Pretrained Weights: Start from general COCO-trained weights. This is recommended for most new projects.
Step 5: Start Training
After selecting the architecture, size, and checkpoint:
- Review the training configuration.
- Click Start Training.
- Wait while Roboflow prepares the dataset.
- Review the estimated training duration.
- Monitor the training results in the model dashboard.
Structural defect detection YOLO26 model training
training time depends on:
- Dataset size.
- Image resolution.
- Model size.
- Task type.
- Number and density of annotations.
Roboflow provides an estimate after preparing the dataset. Its documentation states that most training jobs should complete in under 24 hours.
Path 2: Train with the YOLO CLI
The CLI path is useful when you need more control over:
- Epoch count.
- Batch size.
- Learning rate.
- Optimizer.
- Data loader settings.
- Image resolution.
- Augmentation parameters.
- Early stopping.
- Checkpoint frequency.
- GPU selection.
- Multi-GPU training.
- Export formats.
The exact installation and training commands may differ between YOLO generations. However, the general workflow contains following steps. Here, I trained the YOLO26 model in Google Colab environment. I'll be explaining the easiest method to train the model through CLI.
Step 1: Install Roboflow and Ultralytics
!pip install -q roboflow ultralyticsThe roboflow package provides the Roboflow CLI, while the ultralytics package provides the yolo training command.
Step 2: Add Your Roboflow API Key
Copy your private API key from your Roboflow account settings. Keep it secret because it provides access to your workspace and private projects. Then use following code and provide the key at runtime. This I feel the safest method.
import os
from getpass import getpass

os.environ["ROBOFLOW_API_KEY"] = getpass(
    "Enter your Roboflow API key: "
)
Step 3: Enter Your Dataset Details
A Roboflow dataset identifier follows this structure:
workspace-id/project-id/version-numberFor example (for this example particularly):
tim-4ijf0/structural-defect-detection-4mvsu/1Set your dataset identifier:
DATASET_ID = "tim-4ijf0/structural-defect-detection-4mvsu/1"
DATASET_PATH = "/content/roboflow-dataset"
You can find these values in the URL of your Roboflow dataset version.
Step 4: Download the Roboflow Dataset Using the CLI
!roboflow download \
    -f yolov8 \
    -l "$DATASET_PATH" \
    "$DATASET_ID"
The command downloads the images, annotations and dataset configuration file from the selected Roboflow dataset version.
Step 5: Train the YOLO Model Using the CLI
A general Ultralytics CLI training command looks like this:
!yolo detect train \
    model=yolo26n.pt \
    data="$DATASET_PATH/data.yaml" \
    epochs=50 \
    imgsz=640 \
    batch=16 \
    device=0 \
    project="/content/yolo-training" \
    name="custom-yolo-model"
Model-size options
You can replace yolo26n.pt with another model size:
yolo26n.pt    # Nano: fastest and smallest
yolo26s.pt    # Small
yolo26m.pt    # Medium
yolo26l.pt    # Large
yolo26x.pt    # Extra large
For an initial experiment, yolo26n.pt or yolo26s.pt is usually suitable. You can also use another Ultralytics model:
model=yolo11n.ptStep 6. Locate the Trained Model
The best model weights will be saved at:
/content/yolo-training/custom-yolo-model/weights/best.ptCheck the output:
!ls -lh /content/yolo-training/custom-yolo-model/weights/Step 7: Validate the Trained Model
!yolo detect val \
    model="/content/yolo-training/custom-yolo-model/weights/best.pt" \
    data="$DATASET_PATH/data.yaml" \
    imgsz=640 \
    device=0
Step 8: Test the Model on an Image
Upload an image:
from google.colab import files

uploaded = files.upload()
TEST_IMAGE = next(iter(uploaded))
print("Uploaded image:", TEST_IMAGE)
Run prediction:
!yolo detect predict \
    model="/content/yolo-training/custom-yolo-model/weights/best.pt" \
    source="$TEST_IMAGE" \
    conf=0.25 \
    save=True
Display the prediction:
from glob import glob
from IPython.display import Image, display

prediction_files = glob("/content/runs/detect/predict*/*")

for file_path in prediction_files:
    if file_path.lower().endswith((".jpg", ".jpeg", ".png")):
        display(Image(filename=file_path))
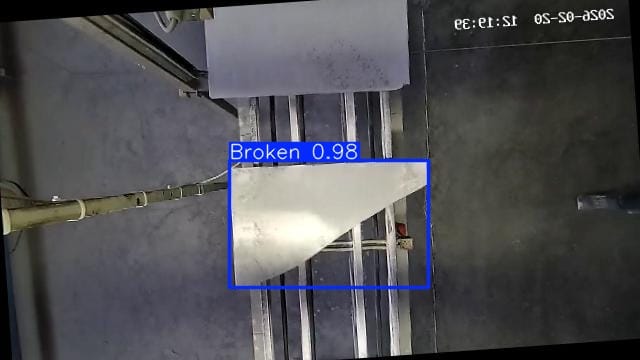
You should see output similar to following:
Evaluating Your Trained Model
Training loss alone does not tell you whether a model is ready for production. Evaluate:
- mAP@50.
- mAP@50–95.
- Precision.
- Recall.
- Per-class AP.
- Confusion matrix.
- Predictions on real-world images.
- Inference latency on the target hardware.
mAP@50: Mean Average Precision at an IoU threshold of 0.50 measures whether predictions are correctly classified and overlap sufficiently with the ground-truth boxes. It is a relatively forgiving localization metric.
mAP@50–95: mAP@50–95 averages model performance across IoU thresholds from 0.50 to 0.95. This metric is stricter because the predicted boxes need to align more precisely with the ground truth as the IoU requirement increases.
Precision: Precision measures how many predicted objects were correct. High precision means the model produces relatively few false positives. Prioritize precision when false detections are expensive. For example, a quality inspection system that automatically rejects products may require high precision to avoid rejecting acceptable items.
Recall: Recall measures how many ground-truth objects were detected. High recall means the model misses relatively few objects. Prioritize recall when missing an object is dangerous or expensive. Examples include:
- Safety equipment detection.
- Fire and smoke detection.
- Intrusion monitoring.
- Medical screening.
- Missing-component inspection.
Per-Class Performance: Always inspect performance for each class. A model can report a high overall mAP while performing poorly on a rare but important class.
Roboflow Model Evaluation includes performance by class, a confusion matrix, threshold analysis, recommendations, and an interactive vector explorer.
Evaluate your trained YOLO model in Roboflow
Common YOLO Training Problems
Even with a well-prepared dataset, YOLO training may not always produce good results on the first run. Most problems are caused by dataset quality, incorrect labels, unsuitable training settings, or the wrong export format. The following issues are common and can usually be fixed with a few checks.
Loss Is Not Decreasing
If the training loss remains high or does not improve, the model may not be learning correctly. Common causes include:
- Incorrect image or label paths.
- Corrupt images.
- Invalid class IDs.
- A learning rate that is too high.
- Incorrect dataset formatting.
- Empty or damaged annotation files.
- Training from scratch with too little data.
Start by visualizing a few training images and confirming that every bounding box matches the correct object and class.
The Model Is Overfitting
Overfitting happens when the model performs well on training images but poorly on validation or real-world images. This is common with small or repetitive datasets. To reduce overfitting:
- Add more diverse images.
- Remove duplicate or nearly identical images.
- Use realistic augmentations.
- Start from pretrained weights.
- Try a smaller model.
- Stop training earlier.
- Keep frames from the same video in the same dataset split.
Classes Are Imbalanced
If one class has many more examples than the others, the model may perform well on the common class but poorly on rare classes. To improve class balance:
- Collect more examples of rare classes.
- Add difficult and varied examples instead of repeated images.
- Ensure every class appears in the validation and test sets.
- Review whether similar classes should be combined.
- Check whether the class definitions are visually clear.
Labels Contain Errors
Poor annotations can reduce model performance even when the training settings are correct. Common labeling errors include:
- Missing objects.
- Incorrect class names.
- Boxes that contain too much background.
- Boxes that cover only part of an object.
- Inconsistent labeling between annotators.
- Class IDs that do not match the
data.yamlfile.
Reviewing and correcting annotations is often one of the fastest ways to improve a YOLO model.
The Dataset Uses the Wrong Export Format
Different YOLO versions may require different folder structures, label formats, package versions, and configuration files. If the training script cannot find the images or labels:
- Confirm that you selected the correct Roboflow export format.
- Open the
data.yamlfile and check the dataset paths. - Verify the training and validation folder locations.
- Confirm that class IDs use the expected numbering.
- Make sure image and label filenames match.
- Follow the training instructions for the exact YOLO version you are using.
YOLO or RF-DETR? Both Are One Click Apart
Choosing between YOLO and RF-DETR no longer requires building two completely different training pipelines. In Roboflow Custom Training, both architectures are available from the model selection interface. You can train them using:
- The same dataset version.
- The same project.
- The same annotations.
- The same hosted GPU workflow.
- The same evaluation and deployment tools.
The choice is therefore an architecture dropdown, not a recommendation to migrate your data to another platform.
When to Consider RF-DETR
RF-DETR is recommended when accuracy and real-time performance is the main objective for object detection. RF-DETR is a real-time transformer-based detector. Its Nano through Large object detection models are distributed under Apache 2.0. RF-DETR leads the RF100-VL benchmark, which measures how well models transfer to diverse real-world datasets beyond common COCO categories.
The Roboflow Object Detection Model Leaderboard provides an additional reference for comparing model accuracy and latency. Roboflow also publishes its RF-DETR benchmark methodology.
When to Consider YOLO
YOLO remains useful when:
- Your team already uses the YOLO ecosystem.
- Existing deployment scripts expect YOLO weights.
- You need a familiar CLI.
- Your hardware has an optimized YOLO runtime.
- You need compatibility with an existing YOLO-based pipeline.
- YOLO performs better on your own validation and production images.
The correct architecture should be selected using results from your dataset, not only a general benchmark.
Compare Licensing
Licensing may affect commercial deployment. Recent YOLO models, including YOLO26, YOLO11, and YOLOv12, are distributed under AGPL-3.0 by default. AGPL can require related software to be open-sourced unless a separate commercial license applies.
RF-DETR object detection models from Nano through Large use Apache 2.0, which is a permissive commercial license. RF-DETR XL and 2XL have different licensing, so verify the selected model size.
Roboflow offers commercial license coverage for supported YOLO models according to the plan and deployment method. Roboflow’s YOLO guidance also describes an Enterprise pass-through license for commercial YOLO use with Roboflow Inference. Confirm the exact scope with Roboflow before a commercial deployment.
Use Neural Architecture Search
You do not always need to manually choose between Nano, Small, Medium, and Large. Roboflow Neural Architecture Search evaluates thousands of candidate configurations and identifies models along a speed-accuracy trade-off. Candidate choices can include image resolution, patch size, and decoder configuration. NAS is useful when:
- You have a specific latency requirement.
- You do not know which model size is appropriate.
- Deployment hardware is constrained.
- You want to automate architecture selection.
- You want multiple candidate models from one search process.
A practical comparison workflow is:
- Train a small YOLO model.
- Train RF-DETR on the same version.
- Optionally run NAS.
- Compare mAP and per-class metrics.
- Test latency on the target hardware.
- Inspect predictions on production images.
- Select the model that meets both accuracy and deployment requirements.
Deploy Your YOLO Model
After training, you can deploy your YOLO model using one of the following Roboflow options:
- Serverless Hosted API: Run your model on Roboflow’s auto-scaling cloud infrastructure without managing servers. This is a simple option for adding predictions to web or cloud applications.
- Roboflow Inference: Self-host your model on a local computer, server, NVIDIA GPU, Jetson, or supported edge device. This provides greater control over latency, hardware, and data privacy.
- Roboflow Workflows: Combine your YOLO model with tracking, counting, filtering, OCR, visualizations, and custom logic. Workflows can run in the Roboflow cloud or on your own hardware.
Can You Train a YOLO Model in Roboflow?
Yes. Roboflow Custom Training supports YOLO26, YOLO11, and YOLOv12. YOLO26 and YOLO11 support detection, segmentation, and keypoints, while YOLOv12 supports object detection. Older YOLO models can be trained externally and uploaded to Roboflow.
How Long Does YOLO Training Take?
Training time depends on dataset size, image resolution, model size, epochs, and hardware. Small models may finish quickly, while larger models can take much longer.
How Many Images Do You Need?
A good starting point is 50-100 diverse images. The first model helps reveal missing scenarios, weak classes, and labeling issues. Production models often require hundreds or thousands of images.
Can You Train YOLO Without a GPU?
Yes. Roboflow uses hosted GPUs, so you can train from the browser without installing CUDA or using local hardware. A GPU is still recommended for CLI-based training.
Is YOLO Free for Commercial Use?
Not always. Many recent YOLO versions use the AGPL-3.0 license, which may affect commercial deployment. Roboflow provides commercial licensing options for supported models on eligible plans. Check the license for the exact model before deployment.
Should You Use YOLO26, YOLO11, or YOLOv12?
YOLO26 is a good starting point for the newest features. YOLO11 is useful for existing YOLO11 workflows, while YOLOv12 provides another modern detection option. Train them on the same dataset and compare accuracy, latency, memory use, and per-class results.
Should You Train YOLO or RF-DETR?
Try both. YOLO offers a familiar ecosystem and broad deployment support, while RF-DETR is a strong option when accuracy is the priority. Both can be trained from the same Roboflow project.
YOLO Model Training
Training a YOLO model starts with a well-labeled dataset, a pretrained checkpoint, and careful evaluation. Roboflow lets you train in the browser without setup or use the YOLO CLI for more control. Start small, test on real-world images, and improve the model through repeated data and training iterations. Try training with Roboflow for free today.
Further reading:


Cite this Post
Use the following entry to cite this post in your research:
Timothy M. (Jun 23, 2026). YOLO Training Guide: How to Train a YOLO Model. Roboflow Blog: https://blog.roboflow.com/yolo-training/