
Camera calibration is important to accurate vision AI systems that analyse sports. It allows the mapping of their movement on a video frame to real movement on the field, and thus the tracking of the distance they cover, the direction, and the speed at which they move.
Homography is commonly used for this purpose. It is a geometric transformation that maps points from one plane to another, enabling the correction of perspective distortions. To apply homography to a video frame and accurately map player movements to the field, we need to know the corresponding points between the video frame and the field.
However, cameras at sporting events are often placed in various locations and angles, and they frequently pan, tilt, and zoom during the game. This dynamic nature makes it challenging to manually determine the exact corresponding points between the video frame and the real-world field.
To overcome this challenge, we will train an Ultralytics YOLOv8 keypoint detection model to automatically identify specific characteristic points on the soccer field within each video frame. By detecting these points in the video frame and knowing their corresponding locations on the actual field, we can establish the necessary source and target points required for homography calculation.
This will allow us to accurately map the player movements captured in the video to their real-world positions on the field, enabling comprehensive analysis and tracking of their performance.
Using Keypoint Detection Models
Keypoint detection is a computer vision task that involves identifying specific points of interest in an image or video. Keypoints represent distinctive features or landmarks, such as facial features, body joints, or object corners. By accurately locating and tracking keypoints, we can gain insights into the structure, movement, and behaviour of objects within a scene.
Pitch Keypoints Dataset Labeling
The original data for this project comes from the DFL - Bundesliga Data Shootout Kaggle competition. Video frames were sampled every second and uploaded to Roboflow for annotation.
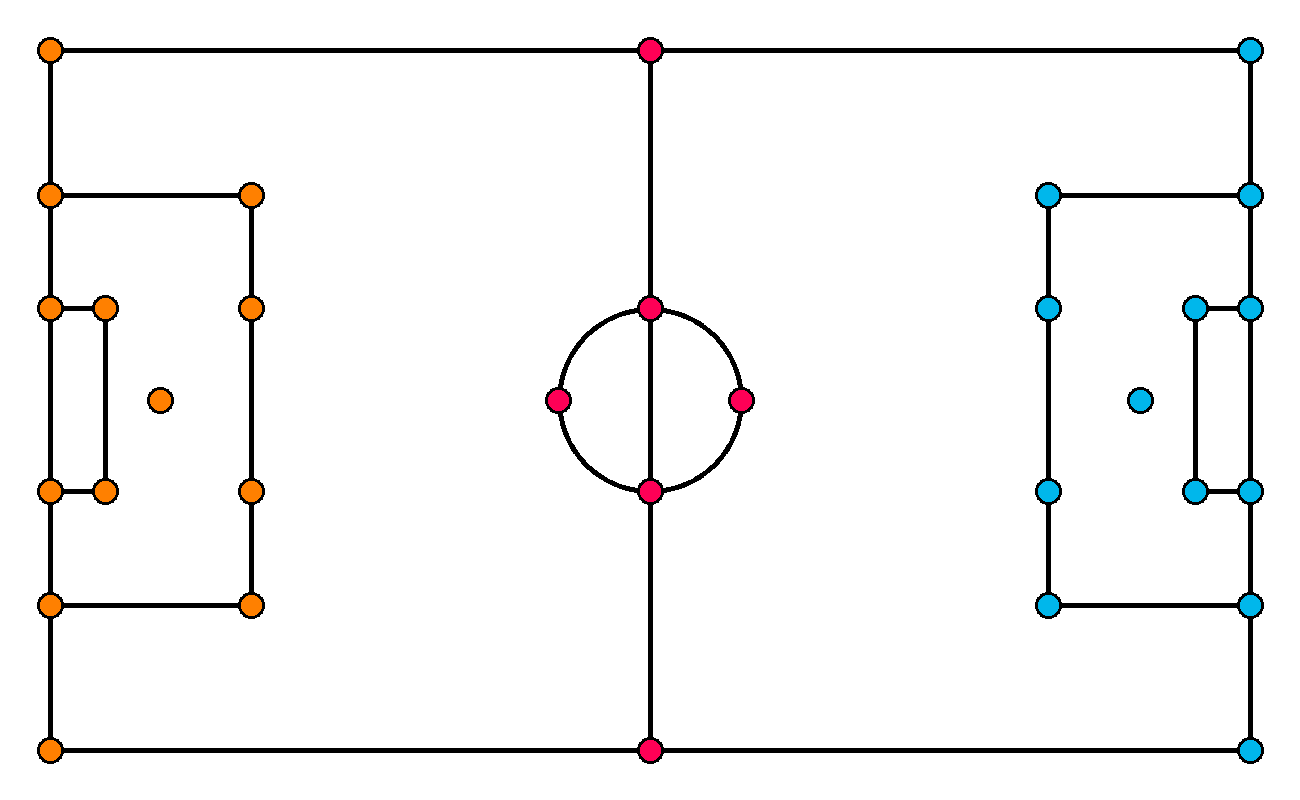
Before we start labeling the dataset, we need to determine which characteristic points of the pitch we want to detect. Since the camera can pan and zoom in and out freely, following the action of the game, we rarely see the entire field. Therefore, we need to define our points densely enough so that at any time - even when the camera is tightly following the action - at least four characteristic points are visible. This requirement comes from homography, which we will use to transform the perspective later in this tutorial. We ultimately defined 32 characteristic points, which were then manually annotated on the uploaded images.
After completing labeling, we applied post-processing steps where we rescaled each image to 640x640 by stretching them to the new format. In our tests, such a transformation led to better results compared to the letterbox.
Pitch Keypoints Detection Model Training
Use the roboflow pip package to download the annotated dataset to Google Colab or your local machine. Install the package in your Python environment and then follow the download instructions. Make sure to download the dataset in YOLO format.
pip install roboflowfrom roboflow import Roboflow
rf = Roboflow(api_key=<ROBOFLOW_API_KEY>)
workspace = rf.workspace("roboflow-jvuqo")
project = workspace.project("football-field-detection-f07vi")
version = project.version(14)
dataset = version.download("yolov8")We then trained a YOLOv8x-pose model for 500 epochs. During training, we disabled mosaic augmentations. We noticed that applying it worsened the training results. Depending on the hardware you have, it may be necessary to adjust your batch size. The model was trained on an NVIDIA A100, where a batch size of 48 was used.
pip install ultralyticsyolo task=pose mode=train model=yolov8x-pose.pt \
data={dataset.location}/data.yaml \
batch=48 epochs=500 imgsz=640 mosaic=0.0After training was completed, the model was uploaded to Roboflow, where you can test the model online.
Deploy Pitch Keypoints Detection
To load the trained model, install the inference and supervision packages using:
pip install inference supervisionThen, you can load the custom football-field-detection-f07vi/14 model and run it on a single image or video frame:
import supervision as sv
from inference import get_model

model = get_model(
    model_id="football-field-detection-f07vi/14",
    api_key=<ROBOFLOW_API_KEY>
)

image = cv2.imread(<SOURCE_IMAGE_PATH>)
result = model.infer(image, confidence=0.3)[0]

keypoints = sv.KeyPoints.from_inference(result)
To visualise the inference results, we will use one of the keypoint annotators available in the supervision library - VertexAnnotator.
import supervision as sv

vertex_annotator = sv.VertexAnnotator(radius=12)
annotated_image = vertex_annotator.annotate(image.copy(), keypoints)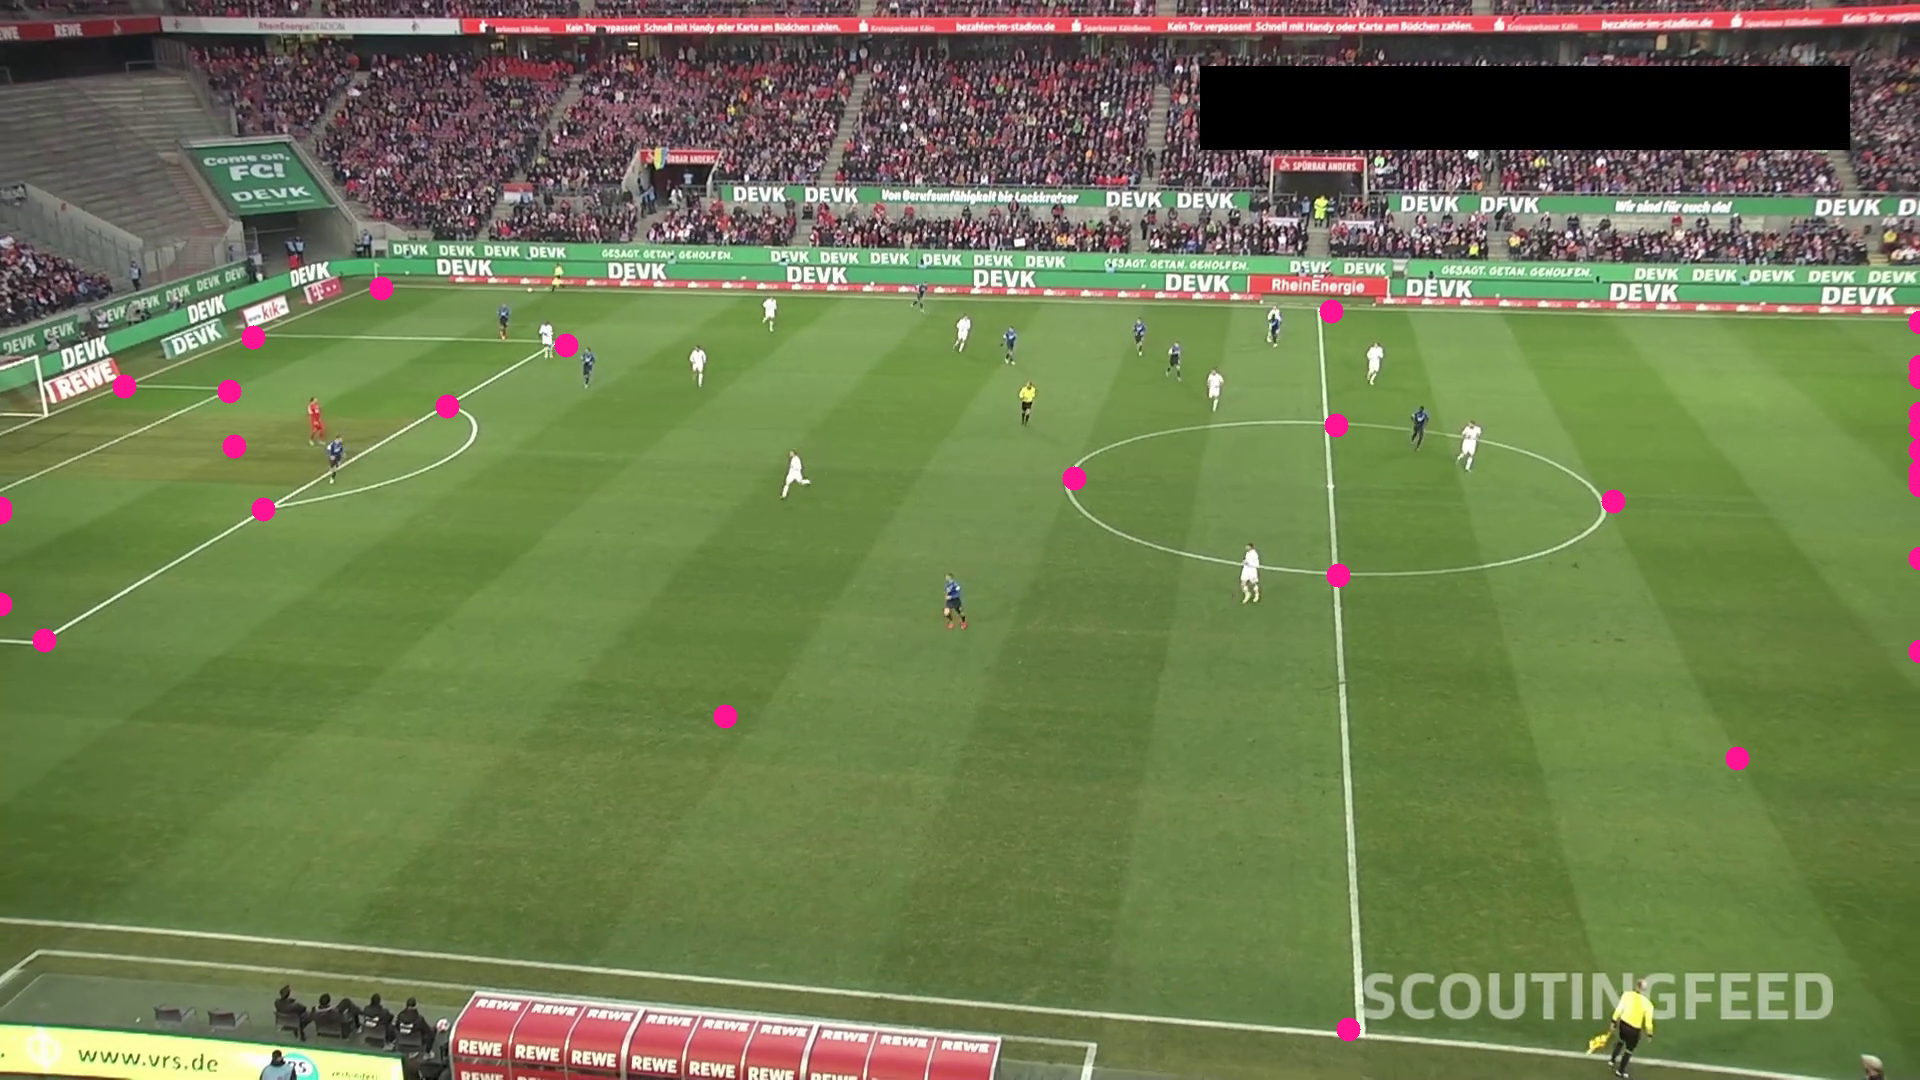
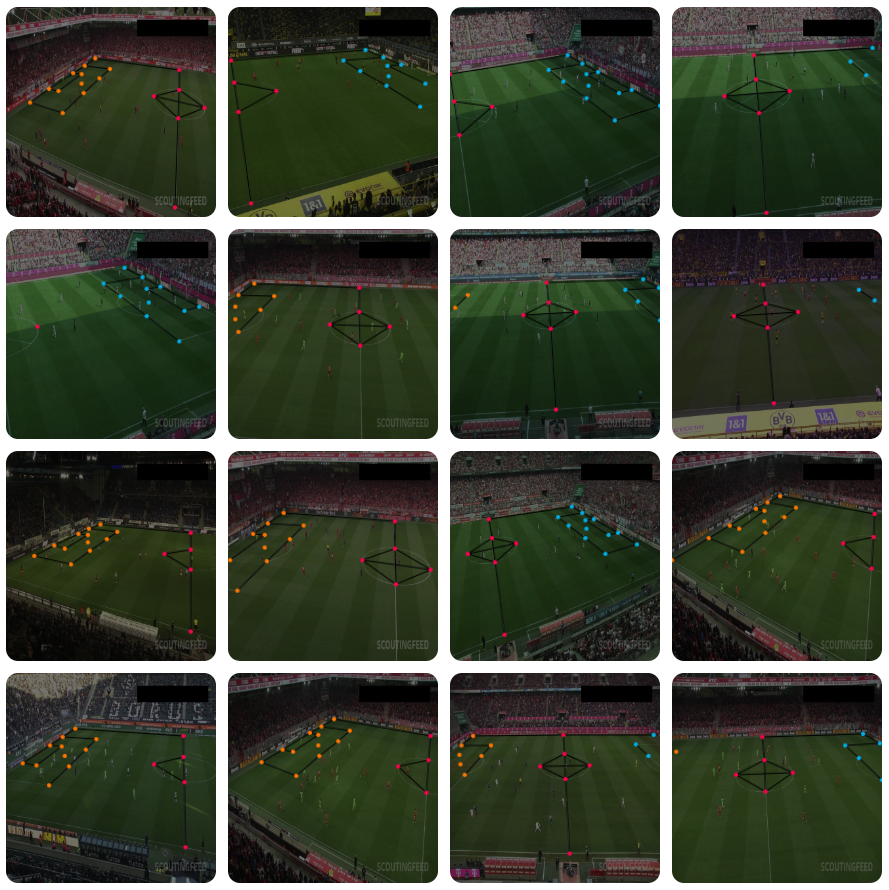
The model's output always has a fixed size, in our case 32 points, each with its own confidence level. When a keypoint is not visible in the image, the model still returns a prediction for it, but with a low confidence level. To obtain only the intended detections, we need to filter out the points with low confidence.
As we can see, some of the points are in the expected locations, while others are scattered randomly in the frame, mostly on the left and right edges. By filtering out the points with low confidence, we are left with only the points that are actually visible in the image.
import supervision as sv
from inference import get_model

model = get_model(
    model_id="football-field-detection-f07vi/14",
    api_key=<ROBOFLOW_API_KEY>
)

image = cv2.imread(<SOURCE_IMAGE_PATH>)
result = model.infer(image, confidence=0.3)[0]

keypoints = sv.KeyPoints.from_inference(result)

filter = keypoints.confidence > 0.5
keypoints.xy = keypoints.xy[filter][np.newaxis]
keypoints.confidence = keypoints.confidence[filter][np.newaxis]

vertex_annotator = sv.VertexAnnotator(radius=12)
annotated_image = vertex_annotator.annotate(image.copy(), keypoints)
Use Homography to Convert Perspective
A homography is a projective transformation that maps points from one plane to another. It can be represented by a 3x3 matrix, which is often used in computer vision to correct perspective distortion or align images.
In our case, the number of detected key points on the soccer field changes as the camera moves, so we used findHomography. This function computes the homography matrix m that best maps the set of source points to the corresponding target points. An alternative to findHomography is getPerspectiveTransform, requiring exactly 4 corresponding point pairs. In a project like this, findHomography is a better choice.
The ViewTransformer class allows us to reuse the calculated homography matrix m to transform new sets of points. It performs a perspective transformation on the input points using the homography matrix.
The transform_points method is the main function of the ViewTransformer class. It takes an array of 2D points and applies the perspective transformation defined by the homography matrix m, resulting in the transformed points.
import cv2
import numpy as np

class ViewTransformer:
    def __init__(self, source: np.ndarray, target: np.ndarray) -> None:
        if source.shape != target.shape:
            raise ValueError(
                "Source and target must have the same shape.")
        if source.shape[1] != 2:
            raise ValueError(
                "Source and target points must be 2D coordinates.")

        source = source.astype(np.float32)
        target = target.astype(np.float32)

        self.m, _ = cv2.findHomography(source, target)
        if self.m is None:
            raise ValueError(
                "Homography matrix could not be calculated.")

    def transform_points(self, points: np.ndarray) -> np.ndarray:
        if points.size == 0:
            return points

        if points.shape[1] != 2:
            raise ValueError("Points must be 2D coordinates.")

        points = points.reshape(-1, 1, 2).astype(np.float32)
        points = cv2.perspectiveTransform(points, self.m)
        return points.reshape(-1, 2).astype(np.float32)
Detections Perspective Transformation
It's time to test the ViewTransformer, but to do that, we'll need detections that we can then transfer from one plane to another. For this purpose, we will use an object detection model fine-tuned on the football-players-detection dataset to detect players and referees. Once again, we will use inference to load the model and visualise the results.
import supervision as sv
from inference import get_model

model = get_model(
    model_id="football-players-detection-3zvbc/10",
    api_key=<ROBOFLOW_API_KEY>
)

result = model.infer(frame, confidence=0.3)[0]

detections = sv.Detections.from_inference(result)

ellipse_annotator = sv.EllipseAnnotator(thickness=2)
frame = ellipse_annotator.annotate(frame, detections)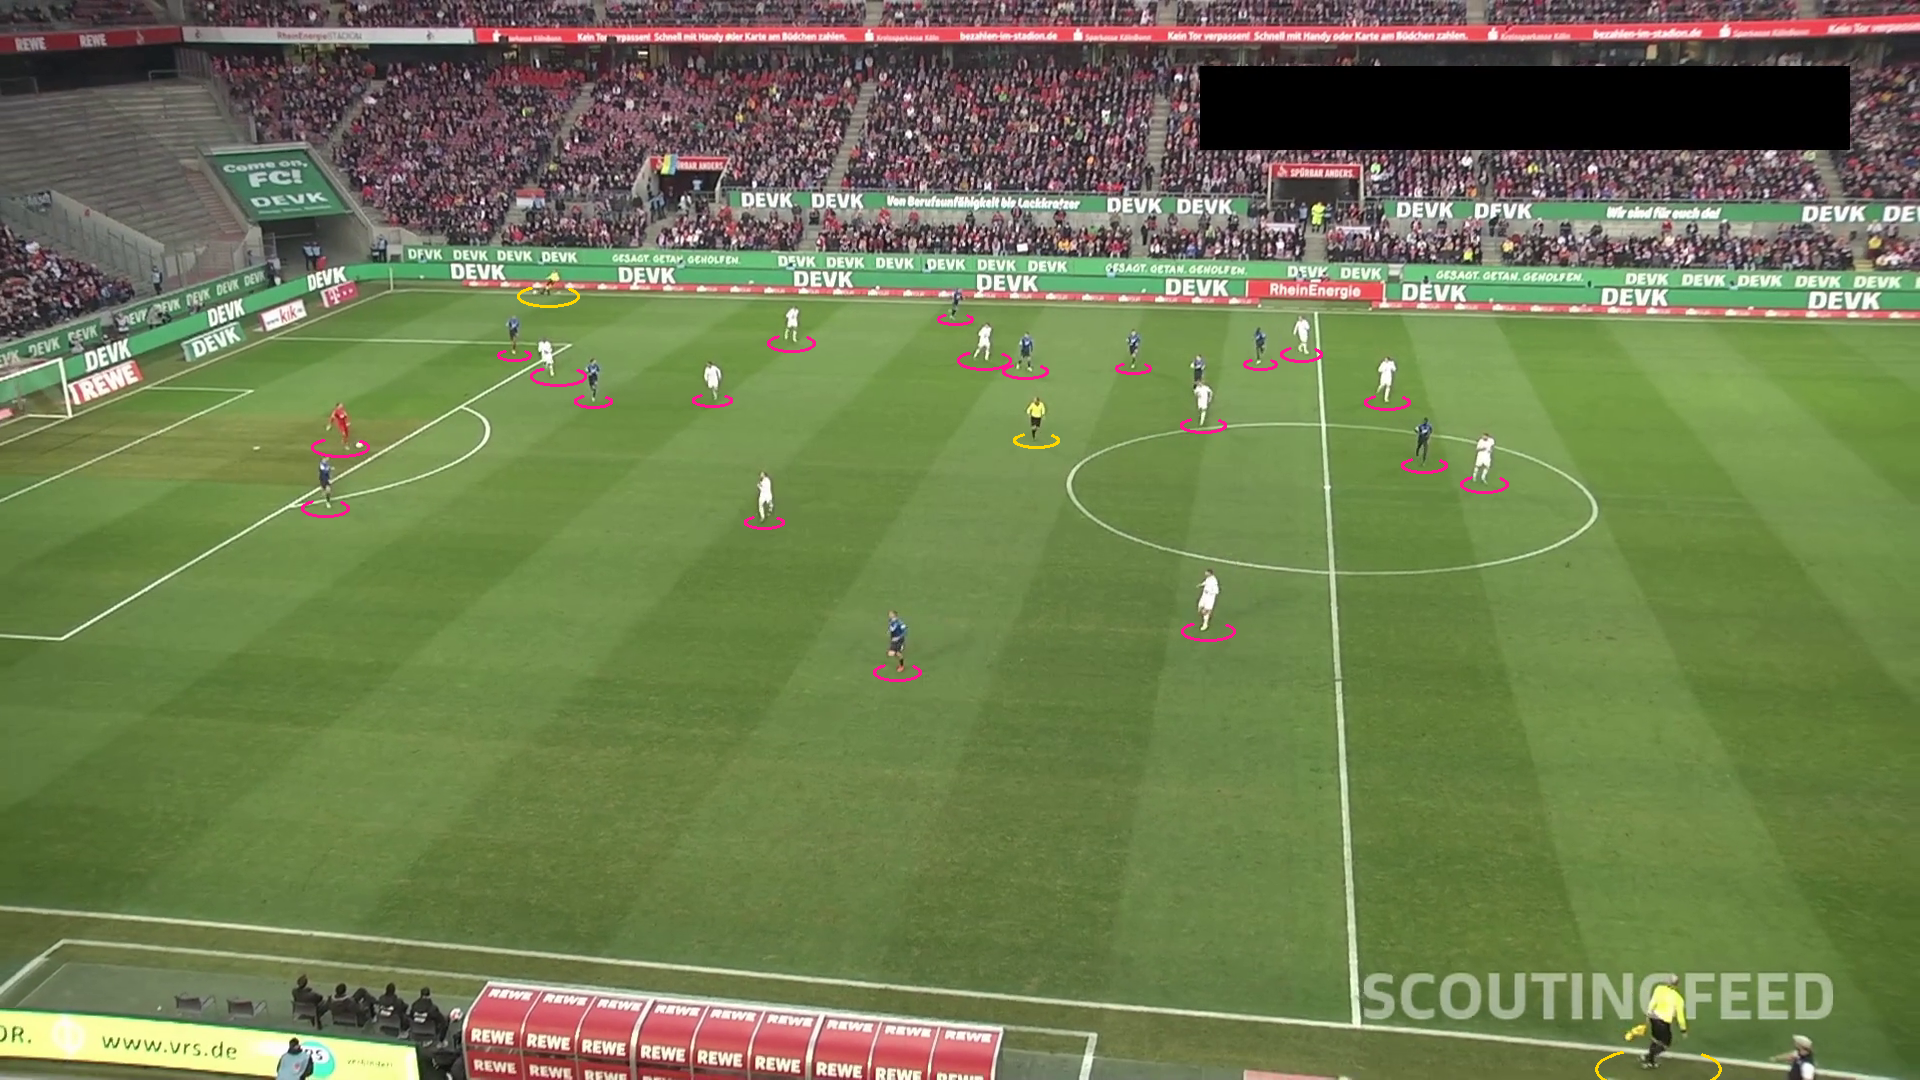
As mentioned earlier, we need a set of point pairs from two planes to perform perspective transformation using homography. Our trained keypoints detection model provides the points on the video frame, but we still lack points reflecting the position of our 32 characteristic points on the actual field. You can find these in the SoccerFieldConfiguration located in the sports repository. To load them, install the sports repository and then import the configuration.
pip install -q git+https://github.com/roboflow/sports.gitfrom sports.configs.soccer import SoccerFieldConfiguration
CONFIG = SoccerFieldConfiguration()
result = pitch_detection_model.infer(frame, confidence=0.3)[0]
keypoints = sv.KeyPoints.from_inference(result)
filter = keypoints.confidence[0] > 0.5
transformer = ViewTransformer(
source=keypoints.xy[0][filter].astype(np.float32),
target=np.array(CONFIG.vertices)[filter].astype(np.float32)
)
xy = detections.get_anchors_coordinates(anchor=sv.Position.BOTTOM_CENTER)
xy = transformer.transform_points(points=xy)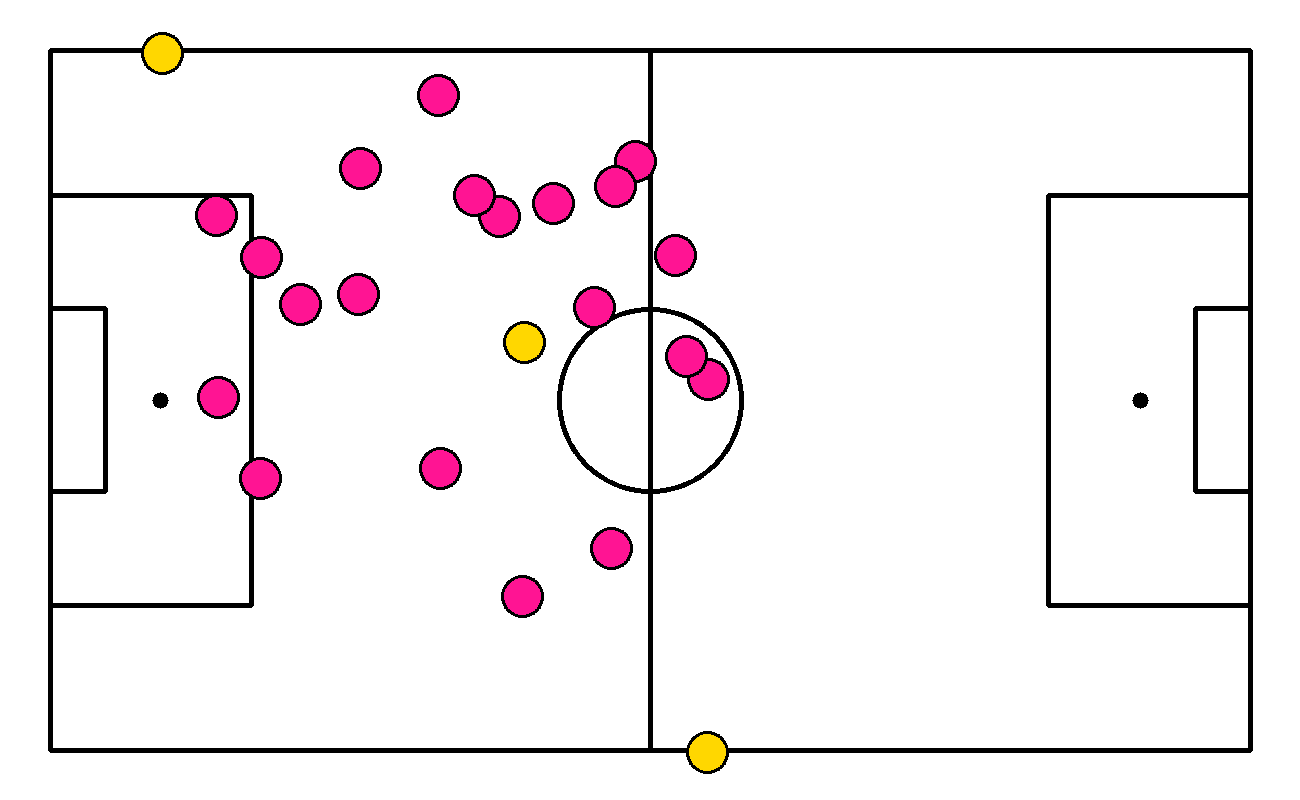
Conclusions
In this blog post, we explored the use of YOLOv8 keypoint detection and homography for camera calibration in soccer footage. We covered the labeling process for the dataset, the training of the keypoint detection model, and the application of homography for perspective transformation.
Camera calibration is just one of the components needed to create a soccer AI. Check out our sports repository to learn what else can be done by combining computer vision and sports.
Make sure to read our other sport-themed blog posts, especially the one showing how to track a ball on a soccer pitch using computer vision.
Cite this Post
Use the following entry to cite this post in your research:
Piotr Skalski. (Aug 8, 2024). Camera Calibration in Sports with Keypoints. Roboflow Blog: https://blog.roboflow.com/camera-calibration-sports-computer-vision/