

You can build human-object interaction detection without training an interaction model: train RF-DETR to detect workers, forklifts, pallets, and carts (77.5% mAP@50 here), then pass the annotated image to Gemini 2.5 Pro in a Roboflow Workflow to describe what each person appears to be doing. The output is one annotated warehouse image with bounding boxes and a short interaction summary suitable for safety review.
What Is Human-Object Interaction Detection?
Human-object interaction (HOI) detection is a computer vision task that identifies people, the objects around them, and the action connecting the two. A standard object detector tells you what is in an image. HOI detection tells you who is doing what with which object. The output is written as a triplet: human, verb, object - such as person, drive, forklift or person, push, cart.
The verb is the hard part. Two images can contain the same person and the same forklift at the same distance and show different situations: in one the person is operating the forklift, in the other they are walking past it. The visual evidence separating those cases is small: hand position, body orientation, whether the person is seated in the cab.
Research systems learn the verb from labeled interaction data. The two standard benchmarks are HICO-DET, which covers 600 interaction categories across 80 object classes, and V-COCO, a smaller benchmark built on COCO images with 29 action categories.
Models trained on them fall into two families. Two-stage methods run an object detector first and then classify each person-object pair. One-stage methods predict the full triplet directly, most recently with transformers.
This tutorial takes a different route. Instead of training an interaction classifier, we train RF-DETR to detect the people and objects, then ask Gemini 2.5 Pro to infer the verb from the annotated scene.
HOI detection vs. action recognition
HOI detection is a different task from human activity recognition. Activity recognition classifies what a person is doing, usually from video and often from pose, without tying the action to a specific object. Activity recognition returns "lifting." HOI detection returns "lifting that pallet." The distinction matters for warehouse monitoring because safety rules are written about person-equipment pairs (who is on the forklift, who is standing near it), not about body movements in isolation.
Why a detector and a VLM instead of an HOI model?
The classic approach is to label the verbs: collect warehouse images, annotate every person-object pair with an interaction class, and train a dedicated HOI model. That works, but interaction labels are expensive, and a model trained on a fixed verb list can only recognize the interactions you labeled.
Recent HOI research has moved toward zero-shot detection with vision-language models, and that is what this workflow does. RF-DETR does the localization, which VLMs are still weak at. Gemini names the interaction, and because it is not limited to a fixed verb list, the same workflow can report that a worker appears to be inspecting a fuse box or unloading a pallet without a single interaction label in the training data.
The trade-off is determinism. A trained HOI model returns a fixed class with a confidence score. A VLM returns a judgment in text. That is why the prompt in Step 6 limits Gemini to visible evidence and cautious wording, and why the output should be reviewed rather than treated as ground truth.
Why Human-Object Interaction Detection Matters
Warehouse workers regularly interact with forklifts, pallets, carts, boxes, and other equipment. Standard object detection can identify these objects, but it cannot explain whether a worker is operating a forklift, pushing a cart, or simply standing nearby.
This context is important for both safety and operational monitoring. OSHA has historically estimated that powered industrial truck incidents are associated with approximately 34,900 serious injuries and 85 fatalities annually in the United States.
This article builds two warehouse human-object interaction systems in Roboflow Workflows, both using RF-DETR for detection and Gemini for interpretation. The first analyzes the whole scene: RF-DETR detects workers and warehouse objects, and Gemini 2.5 Pro describes the likely interactions in the annotated image. The second narrows to one decision: it crops each detected person near a forklift and asks Gemini to classify the interaction as safe or unsafe, returning a structured safety report.
Together, the two workflows can detect and report:
- Apparent relationships between workers, forklifts, pallets, and carts
- Possible interactions such as operating a forklift, pushing a cart, or working near a pallet
- Per-person safe or unsafe classifications with a JSON safety report
- Interactions that may require human review, logged through Vision Events
The first tutorial's output is an annotated warehouse image with a Gemini-generated interaction summary. Here's the workflow we'll build.
Step 1: Prepare the Dataset
We use the warehouse computer vision dataset from Roboflow Universe. The project contains approximately 1,200 warehouse images and 12 original object-detection classes. For this workflow, we use five classes relevant to the selected warehouse interaction examples.
- person
- forklift
- pallet
- cart
- fuse_box
The dataset is suitable for this project because it contains people alongside multiple warehouse objects with which they may interact. The images include workers near forklifts, pallets, carts, and other equipment. This provides a broader foundation for human-object interaction analysis than a dataset containing only people and forklifts.
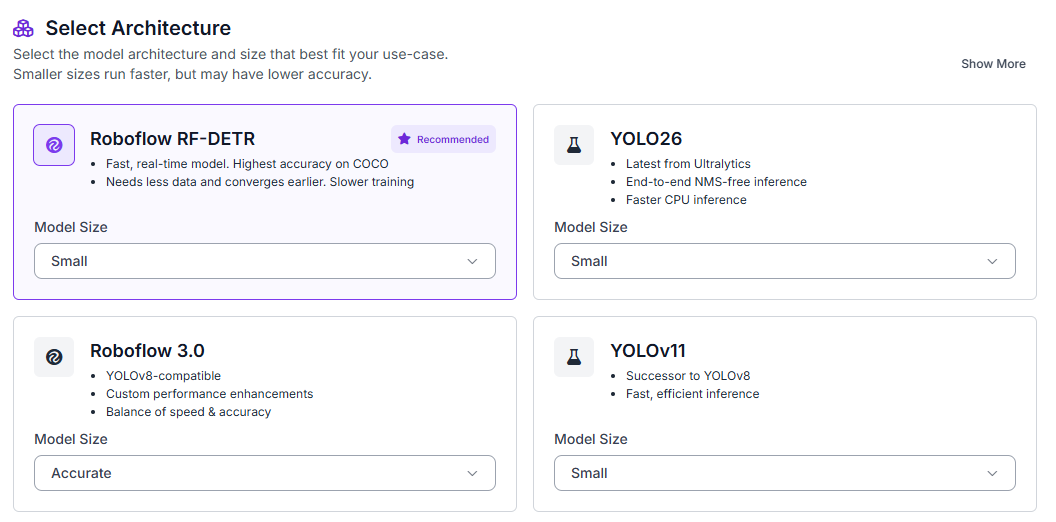
Fork the dataset into your Roboflow workspace. Open the Train tab, select Custom Training, choose RF-DETR, and set the model size to Small.
Generate a new dataset version and configure a 70/15/15 split for training, validation, and testing.
Enable:
- Auto-orientation
- Resize to 512 × 512
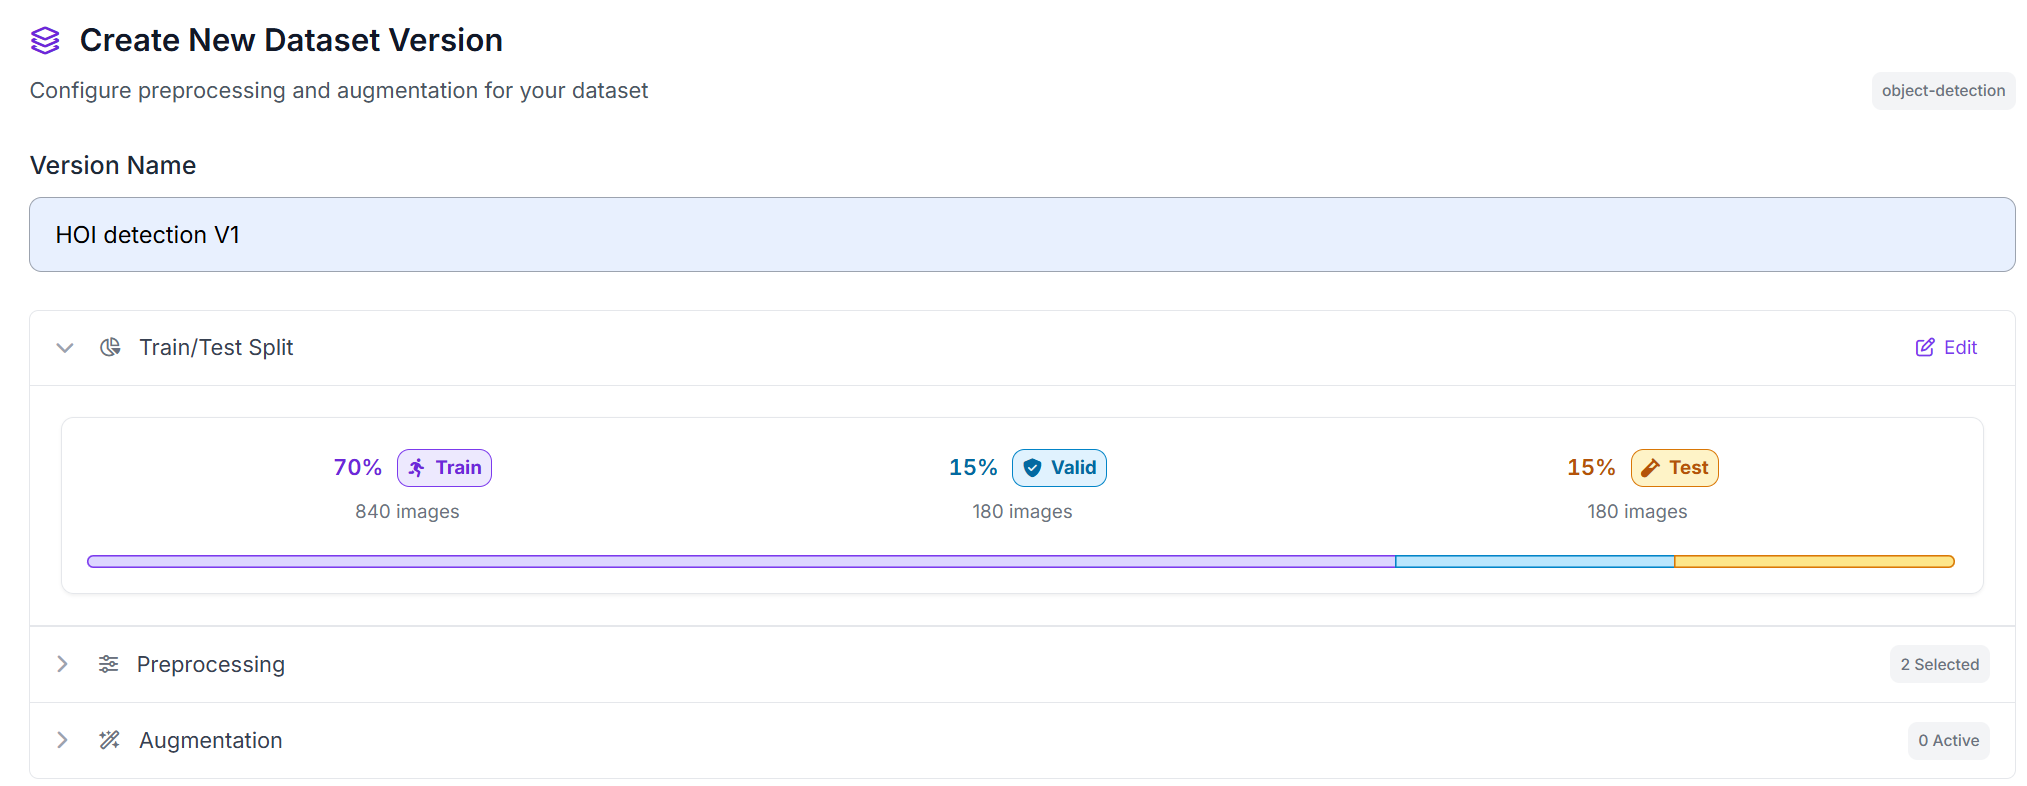
These preprocessing steps ensure that all images have a consistent orientation and resolution, providing standardized inputs for RF-DETR training.
Step 2: Train the RF-DETR Model
During training, RF-DETR learns to locate and classify each worker and warehouse object using the bounding-box annotations. The model returns a class label, confidence score, and bounding box for each detected person, forklift, pallet, cart, or fuse box.
These instance-level detections provide visual context for the interaction-analysis stage. The detector itself does not understand that a person is pushing a cart or operating a forklift. Instead, the workflow draws the detections on the complete image and sends the annotated scene to Gemini for contextual interpretation.
This separation keeps the system clear: RF-DETR identifies who and what are present, while Gemini interprets how they appear to be interacting.
Step 3: Evaluate Model Performance
The trained RF-DETR Small model achieved the following validation results on the warehouse object-detection task.
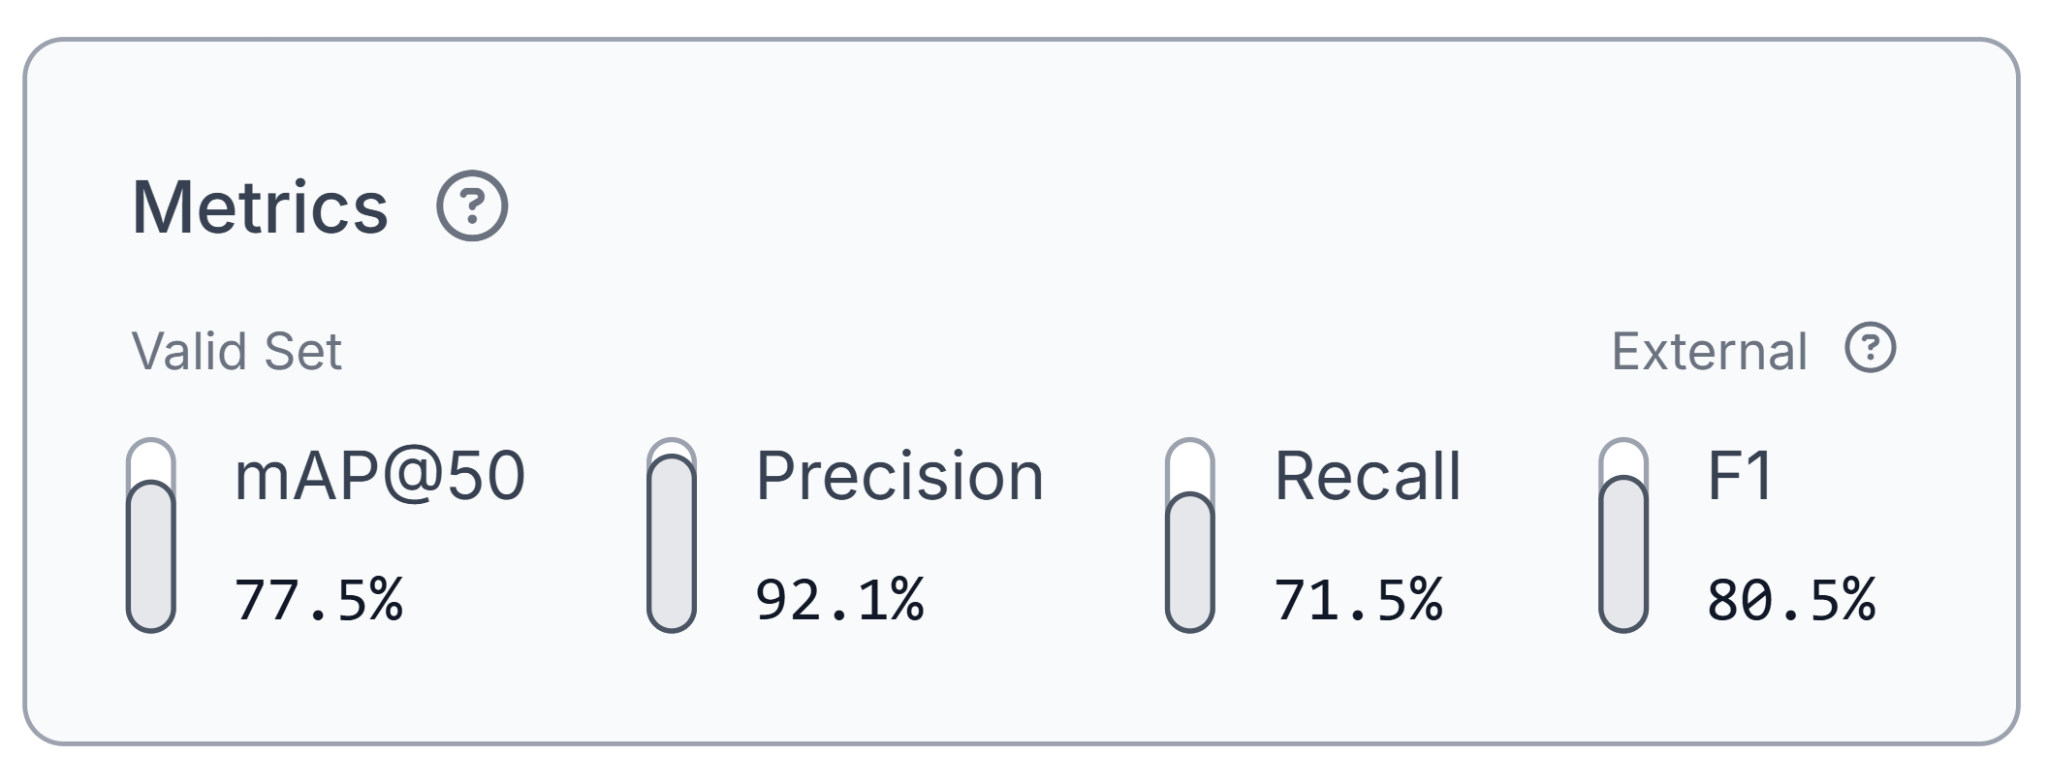
The model achieved 77.5% mAP@50, 92.1% precision, 71.5% recall, and an 80.5% F1 score on the validation set.
The high precision score indicates that most predicted bounding boxes correspond to real warehouse objects. This is important because false detections could cause Gemini to describe objects or interactions that are not actually present.
Recall is lower than precision, meaning the model may miss some visible workers or objects. A missed person, cart, or pallet can reduce the context available to Gemini and lead to an incomplete interaction summary.
The mAP@50 and F1 scores indicate that the model provides a useful foundation for detecting workers and common warehouse objects. However, performance may vary by class. Larger and more common objects, such as people and forklifts, may be easier to detect than smaller or less frequent objects.
Before deployment, test the model on images from the target warehouse. Camera angle, lighting, object size, aisle congestion, partial occlusion, worker uniforms, and warehouse layout may differ from the training data.
These metrics evaluate only the RF-DETR detection stage. They do not measure whether Gemini correctly identifies the interaction between a worker and an object.
Step 4: Deploy to Roboflow Workflows
After evaluating the model, deploy it in Roboflow Workflows to build the interaction-analysis pipeline.
The workflow accepts one warehouse image, runs RF-DETR, draws bounding boxes and class labels, sends the annotated image to Gemini 2.5 Pro, and overlays the generated interaction summary on the final image.
Open the trained model and click Deploy Model. Select Customize With Logic to open the Workflow editor with the model already connected.
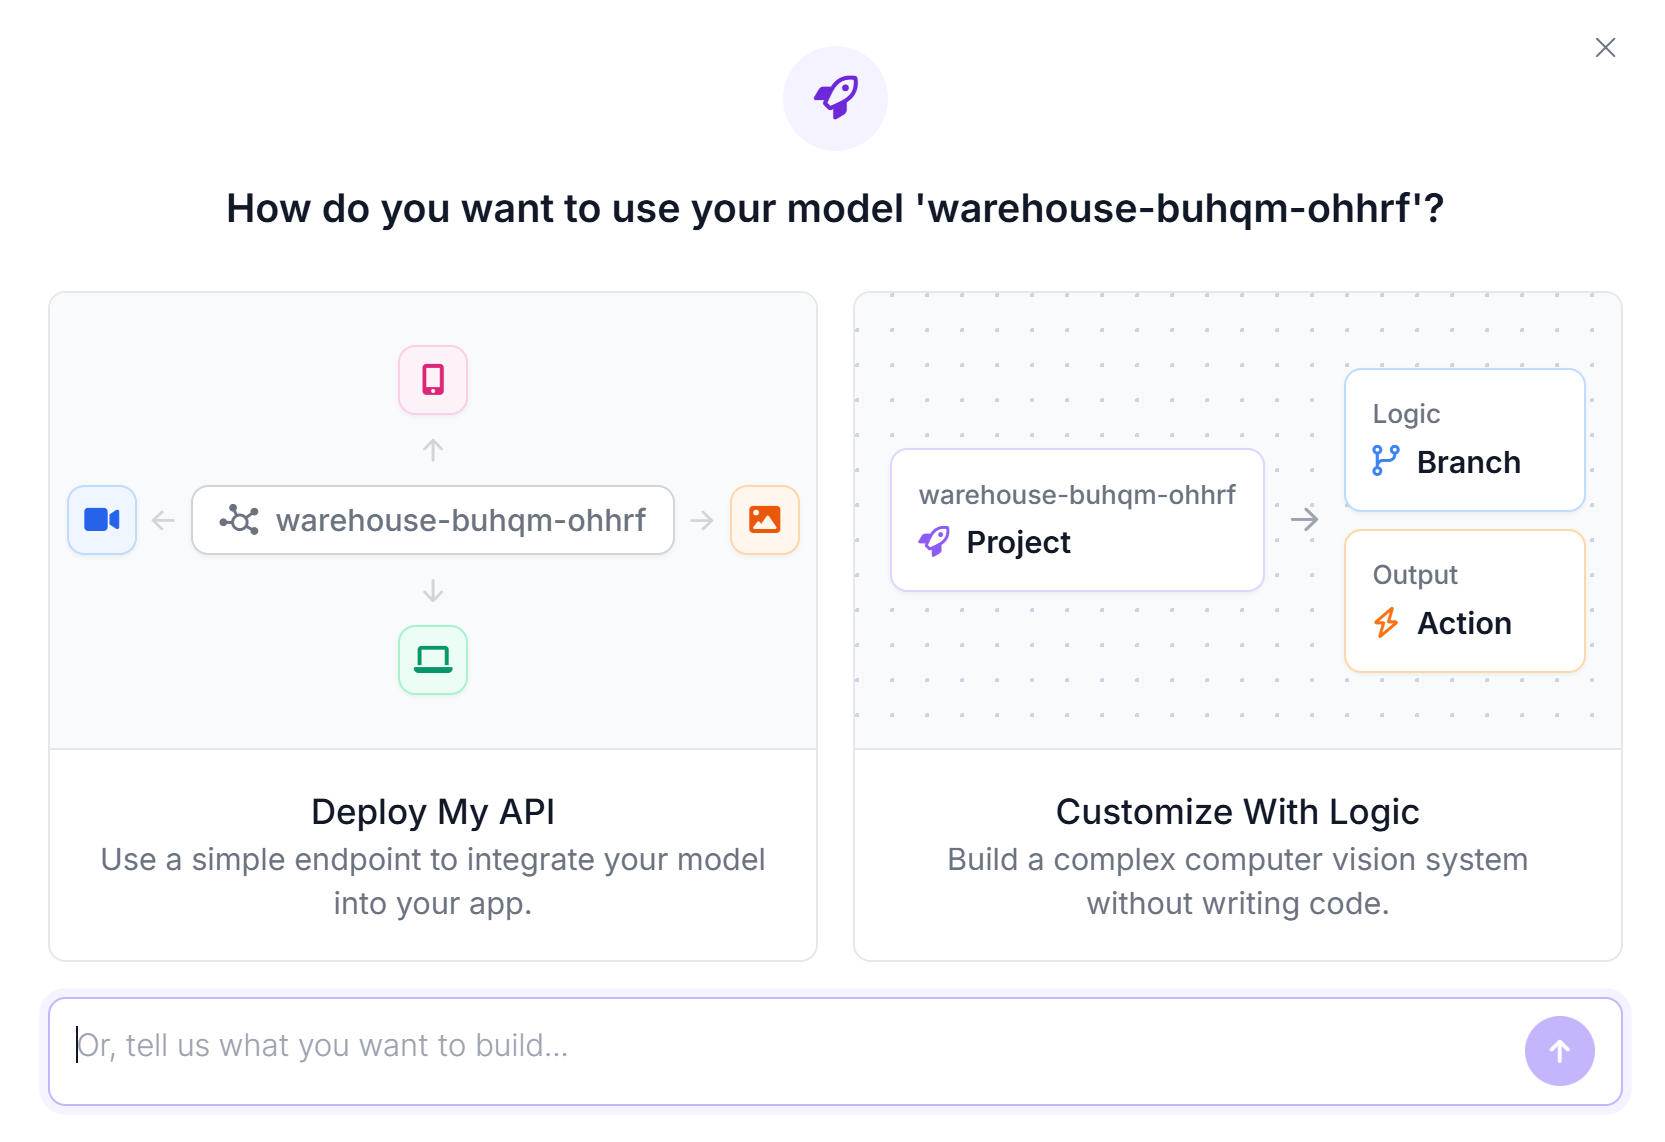
The completed workflow follows this structure:
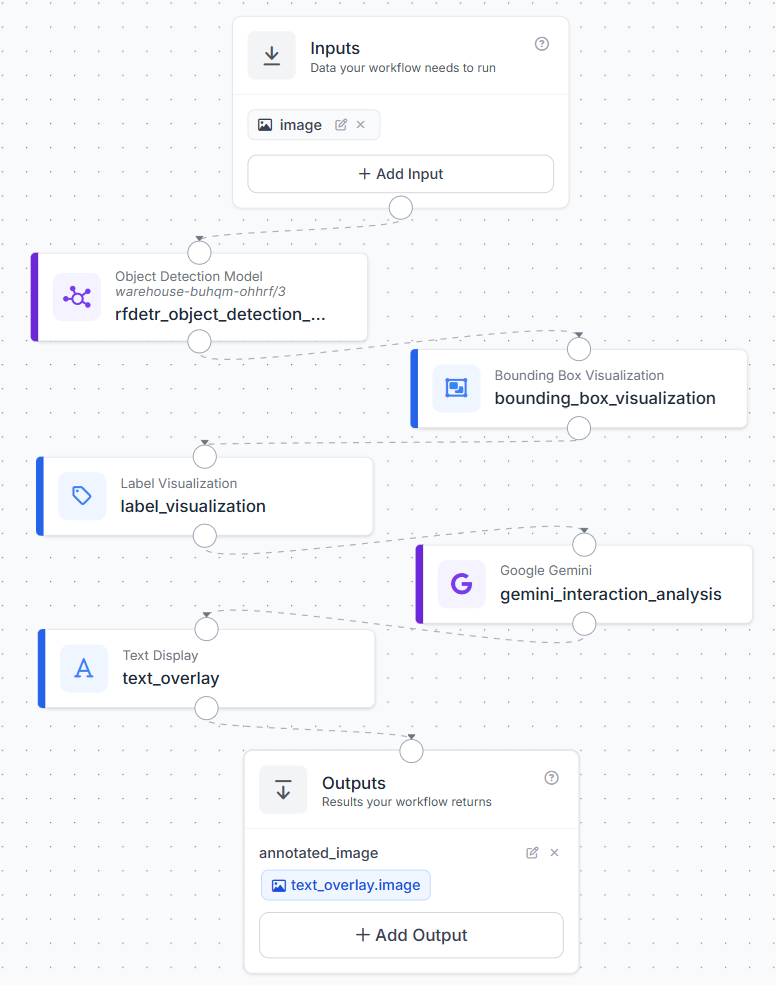
The image input connects to the RF-DETR model and the Bounding Box Visualization block. The model predictions connect to both visualization blocks. The labeled image is then passed to Gemini and used as the base image for the final text overlay. Gemini’s response is displayed on the image, which is returned as annotated_image.
This workflow does not use tracking, proximity calculations, zones, crops, or a Custom Python block. Gemini analyzes the complete annotated scene and describes the apparent interactions.
Step 5: Configure the Detection Visualizations
Add a Bounding Box Visualization block after the RF-DETR model.
Connect:
Image: inputs.image
Predictions: rfdetr_object_detection_model.predictions
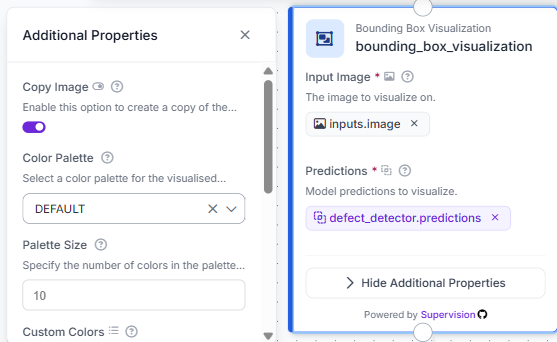
Set the bounding-box thickness to 1 and the color axis to CLASS. Thin boxes keep the image readable, while class-based colors make it easier to distinguish people, forklifts, pallets, and other objects.
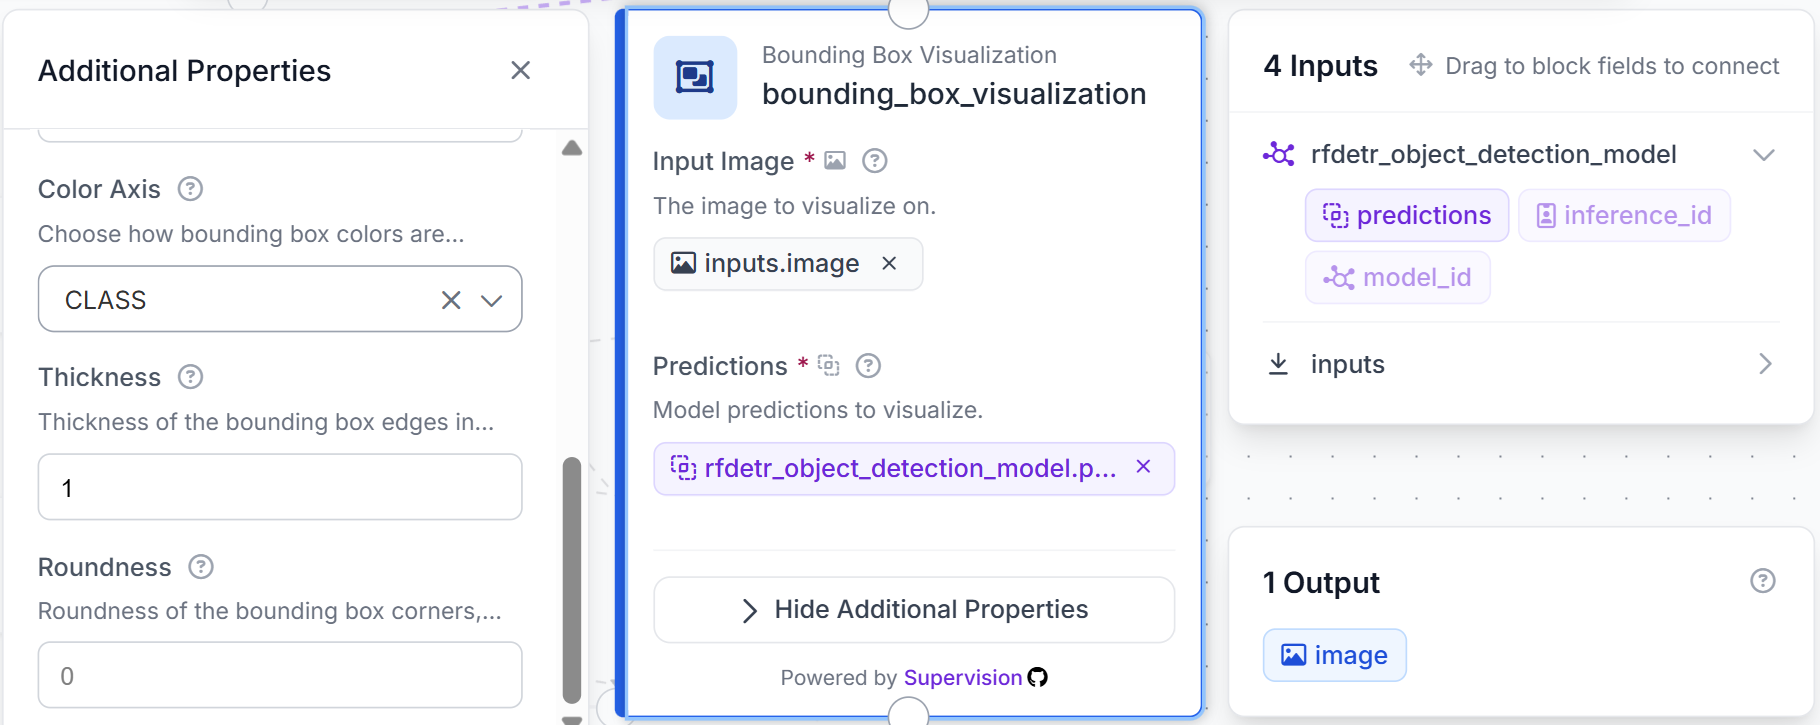
Next, add a Label Visualization block. Use the Bounding Box Visualization output as the base image and connect the RF-DETR predictions.
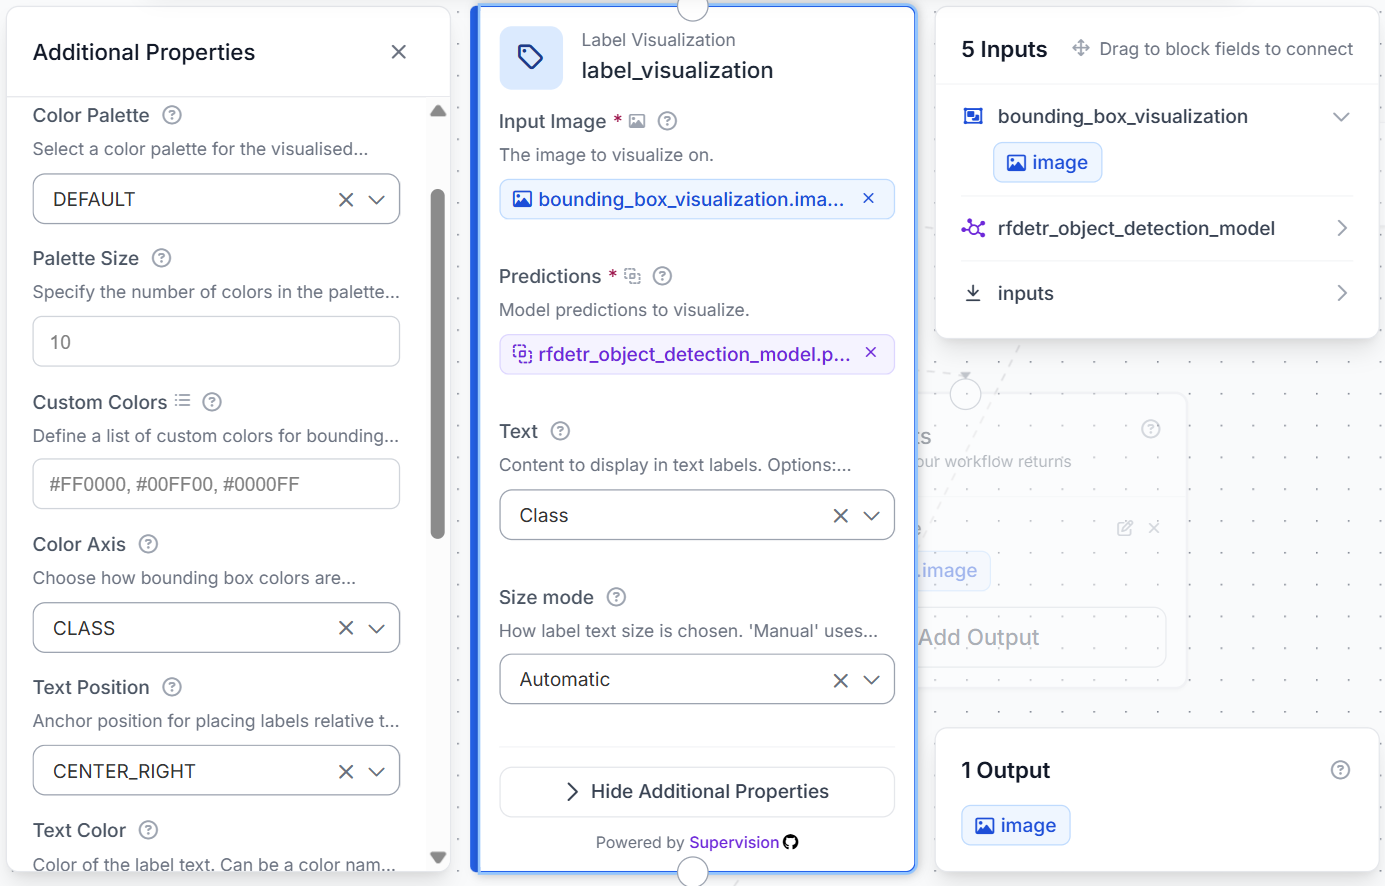
The visualization blocks do not determine the interaction. They make the model detections visible before Gemini analyzes the scene. For example, Gemini may observe that a detected person is seated inside a detected forklift or standing beside a detected pallet.
Step 6: Configure Gemini 2.5 Pro
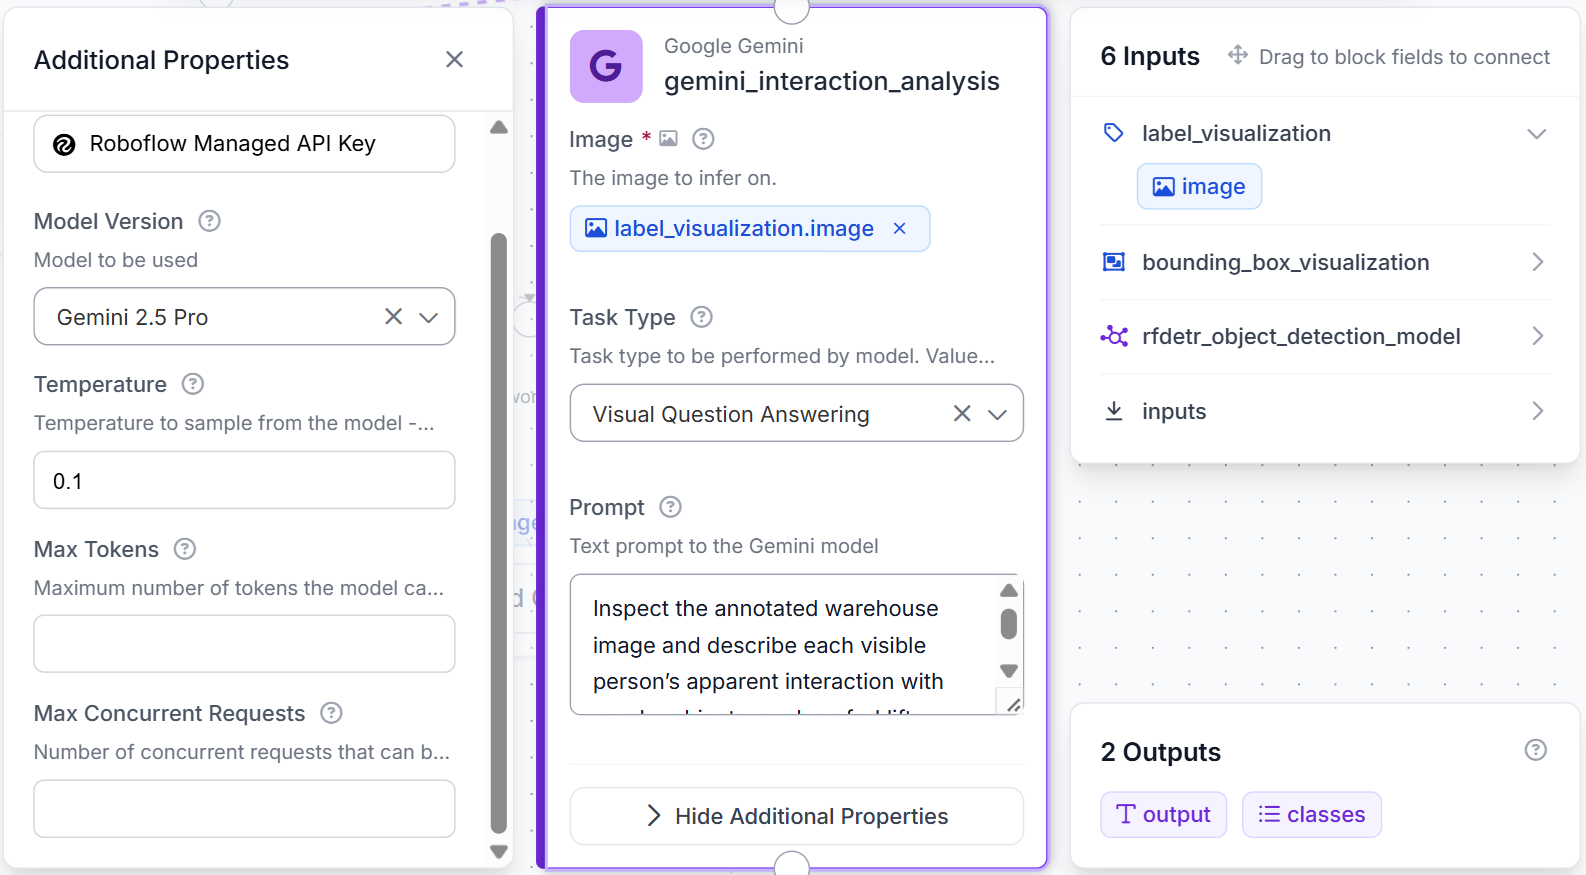
Add a Google Gemini block after Label Visualization.
Use these settings:
Image: label_visualization.image
Model: Gemini 2.5 Pro
Task type: Visual Question Answering
Temperature: 0.1
Use this prompt:
Inspect the annotated warehouse image and describe each visible person’s apparent interaction with nearby objects, such as forklifts, pallets, carts, fuse boxes.

Only report interactions supported by the image. Do not treat proximity alone as an interaction. Use “appears to be” when uncertain.

Return:

Warehouse Interaction Summary:
- [interaction]
- [interaction]

Review:
[State whether any interaction may need human review.]

If none are clear, return:
- No clear human-object interaction detected.

Keep the response under 70 words.
The prompt asks Gemini to describe visible relationships rather than simply list detected objects. It also reduces overinterpretation by stating that proximity alone does not confirm an interaction.
For example, a person near a forklift may be operating it, inspecting it, waiting beside it, or walking past. When the action is unclear, Gemini should use cautious wording.
Add a Text Display block and use label_visualization.image as the base image. Connect the Gemini output as the displayed text.
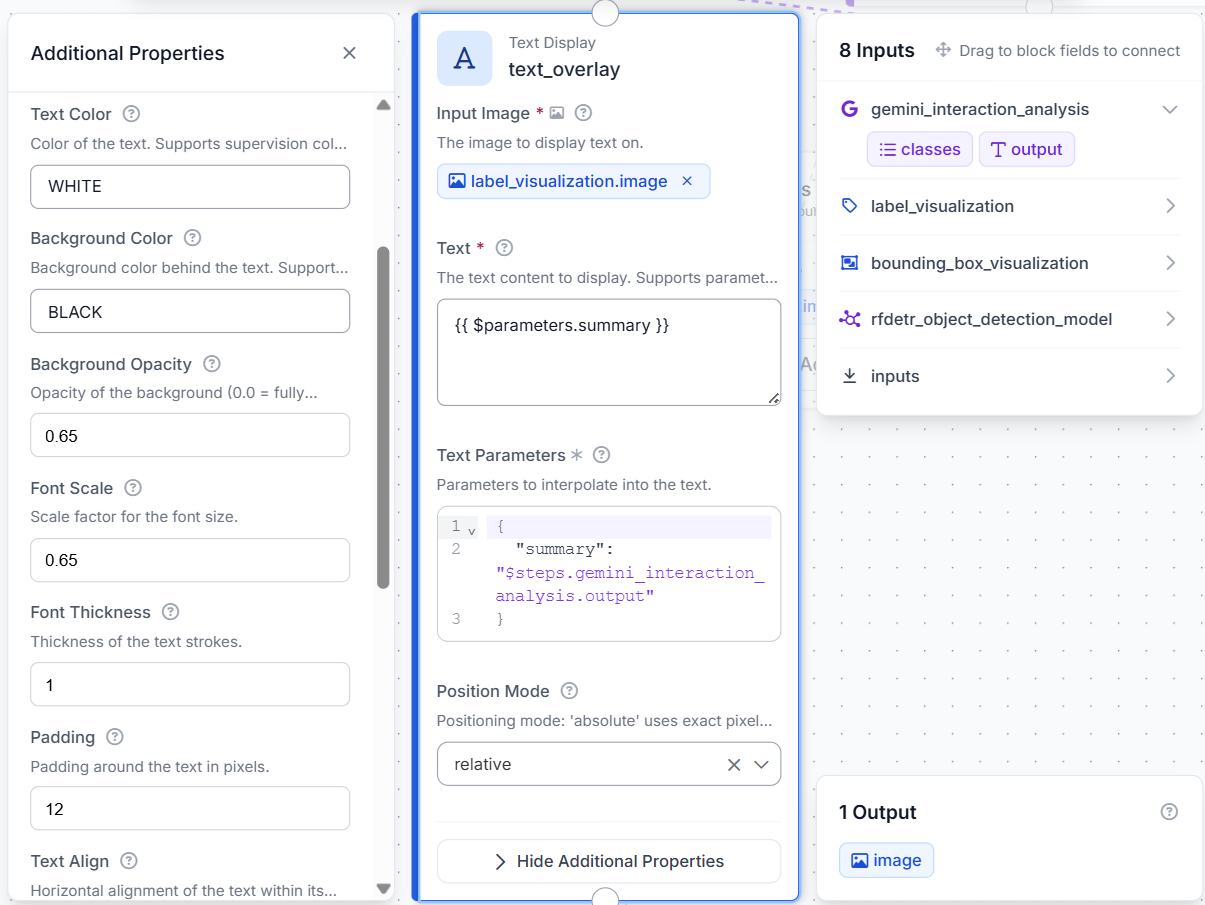
The workflow returns the resulting image as annotated_image.
Step 7: Test the Workflow
Click Run and upload a warehouse image containing at least one person and one warehouse object.
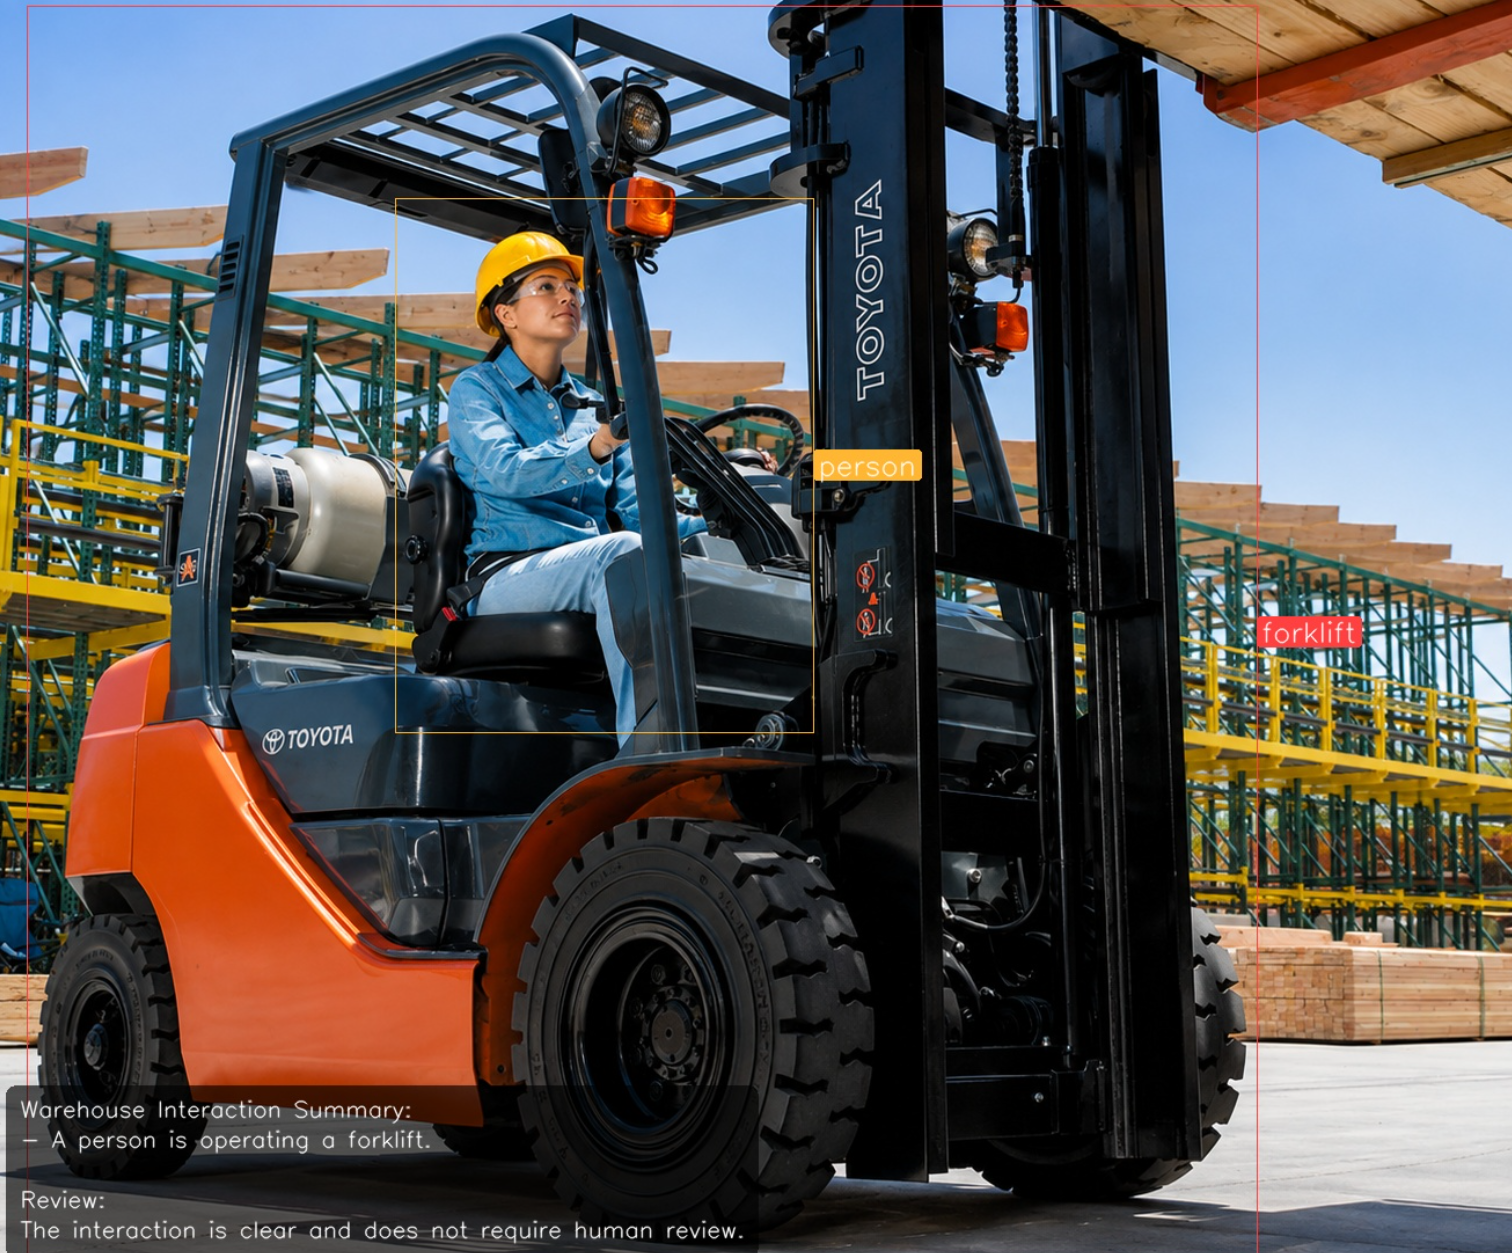
The final image should contain:
- RF-DETR bounding boxes
- Object class labels
- Gemini’s interaction summary
- A review statement, when applicable
Test several types of scenes:
- A worker operating a forklift
- A worker pushing or standing beside a cart
- A worker loading or unloading a pallet
- A person near an object without clearly interacting with it
- A warehouse image with no visible person
- A scene containing multiple workers and objects
The no-interaction and uncertain examples are especially important. They help verify that Gemini does not interpret every nearby person-object pair as a definite interaction.
Also test difficult conditions such as distant workers, overlapping detections, crowded aisles, low lighting, partial occlusion, and unusual camera angles. When the summary is incorrect, first check whether RF-DETR detected the relevant person and object correctly.
Extending the Workflow
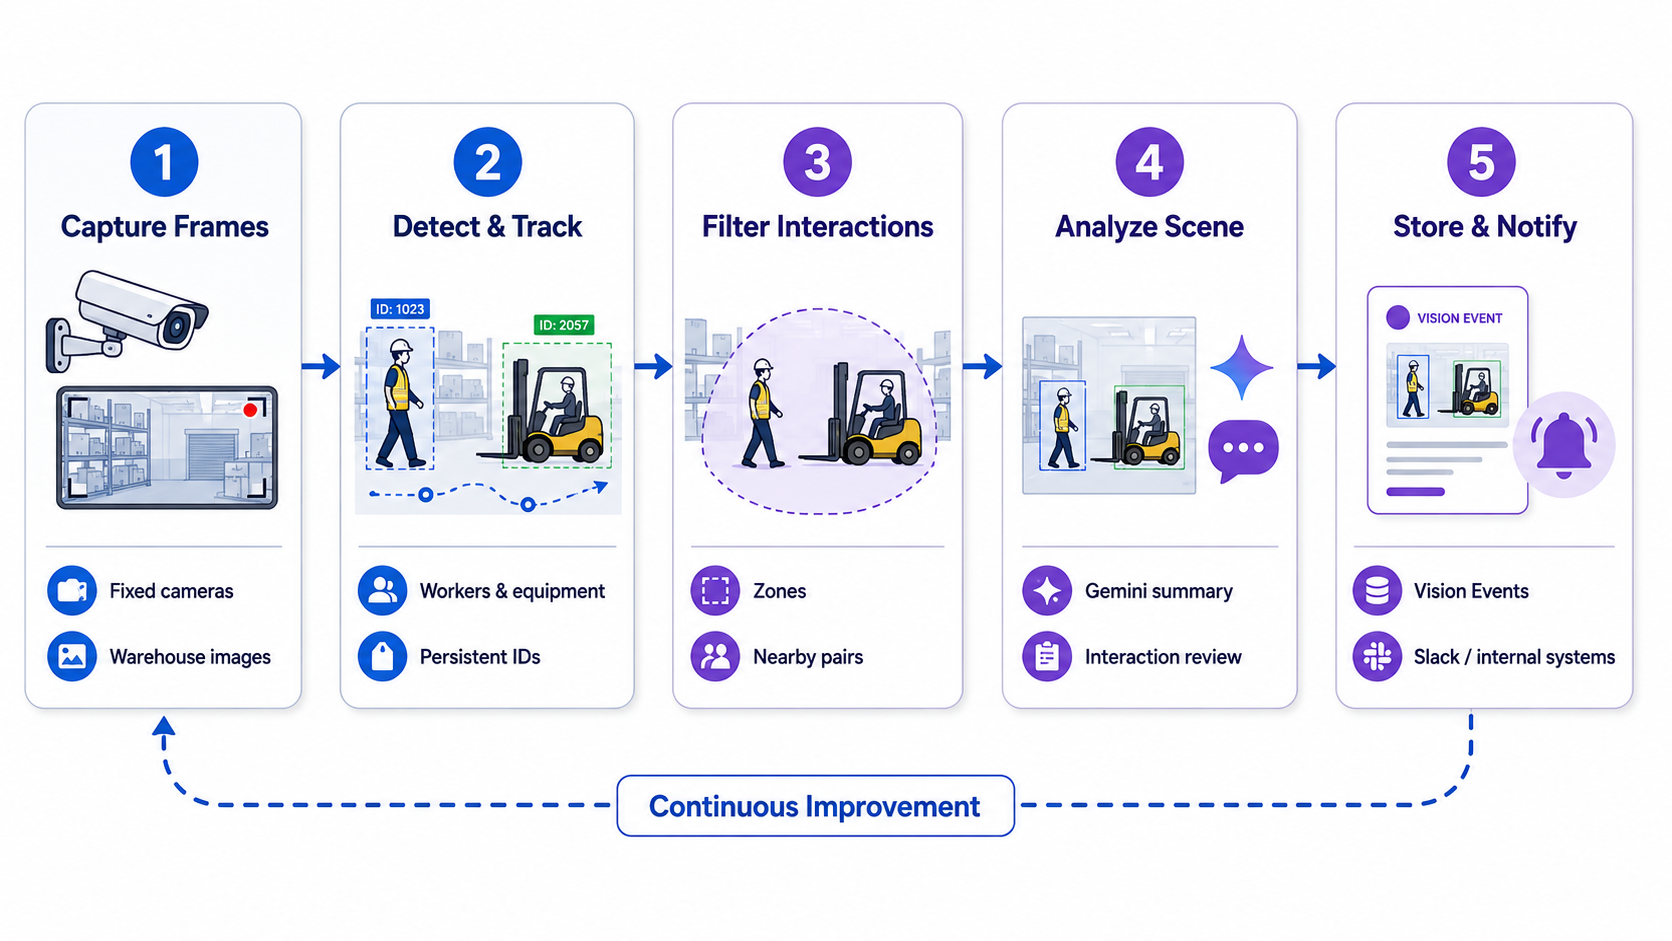
The workflow can be extended to process frames from fixed warehouse cameras. Adding object tracking would assign persistent IDs to workers and equipment, making it possible to analyze interactions across multiple frames.
Proximity or zone logic could also filter the scene before Gemini analysis. For example, the workflow could identify people entering a forklift operating zone or isolate nearby person-object pairs for more focused inspection.
Results could be stored with Roboflow Vision Events for later review. Each event could include the original image, annotated output, detected classes, timestamp, camera identifier, and Gemini summary. Selected events could also be sent to Slack or an internal warehouse system.
Use Roboflow Agent
You can also build this workflow by describing it instead of wiring it block by block. Roboflow Agent builds Workflows from a natural language prompt: ask for a workflow that runs your trained RF-DETR model, draws boxes and labels, and sends the annotated image to Gemini 2.5 Pro with your interaction prompt, and it connects the same blocks covered in Steps 4 through 6.
The agent also debugs: if a visualization block is wired to the wrong input or Gemini returns nothing, it can inspect the workflow and fix the configuration.
A Second Human-Object Interaction Workflow: Detect, Crop, Classify
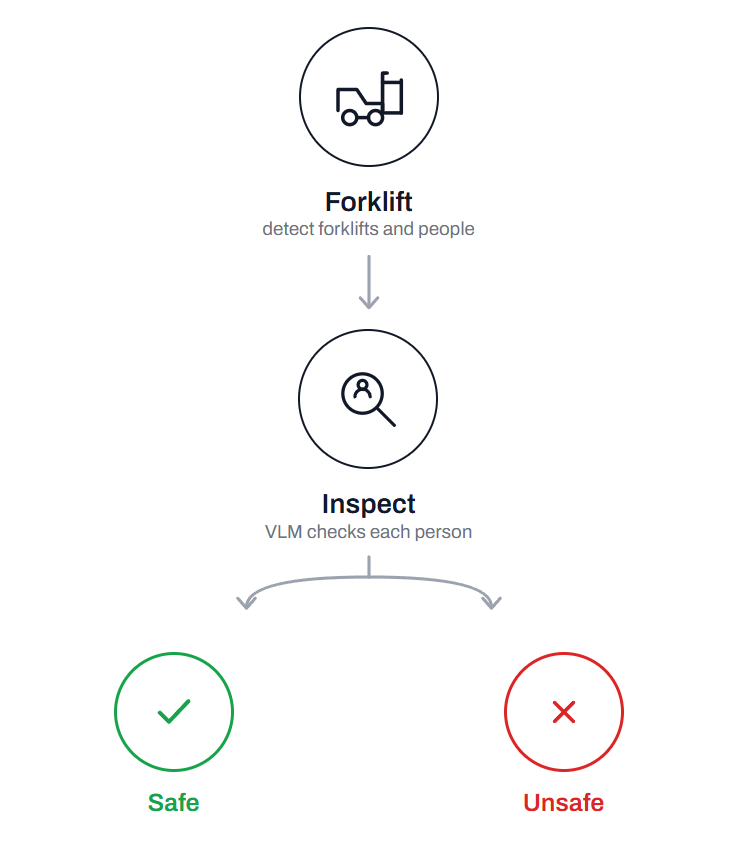
This tutorial builds a detect-crop-classify Workflow. An object detector finds forklifts and people, a Dynamic Crop block isolates each person, and a VLM analyzes the crop to classify the interaction as safe or unsafe. The VLM uses the surrounding scene to make decisions that object detection alone cannot.
By the end, you'll have a trained model and a Workflow that takes a single image, classifies each forklift-person interaction as safe or unsafe, and returns the annotated image.
Dataset
Go to Roboflow Universe and search for the Forklift-Person-Detector dataset. Universe hosts hundreds of thousands of open-source computer vision datasets covering a wide range of use cases.
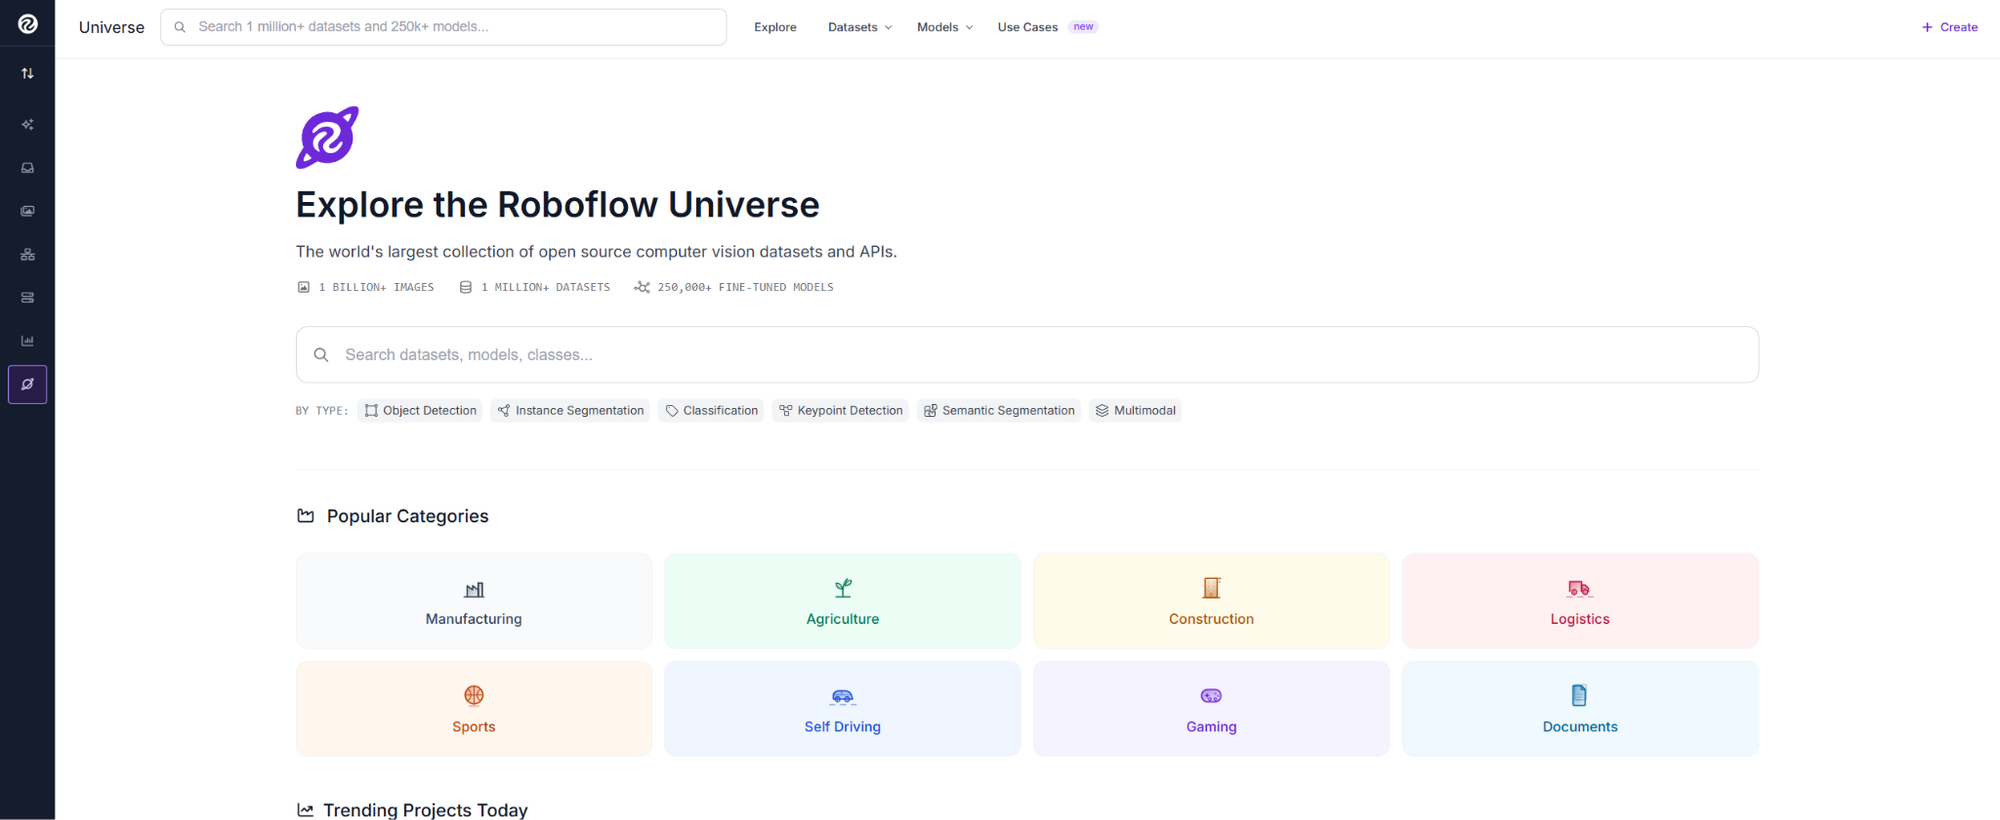
This dataset contains two annotated classes, forklift and person, with images from indoor and outdoor warehouses and lumber yards.
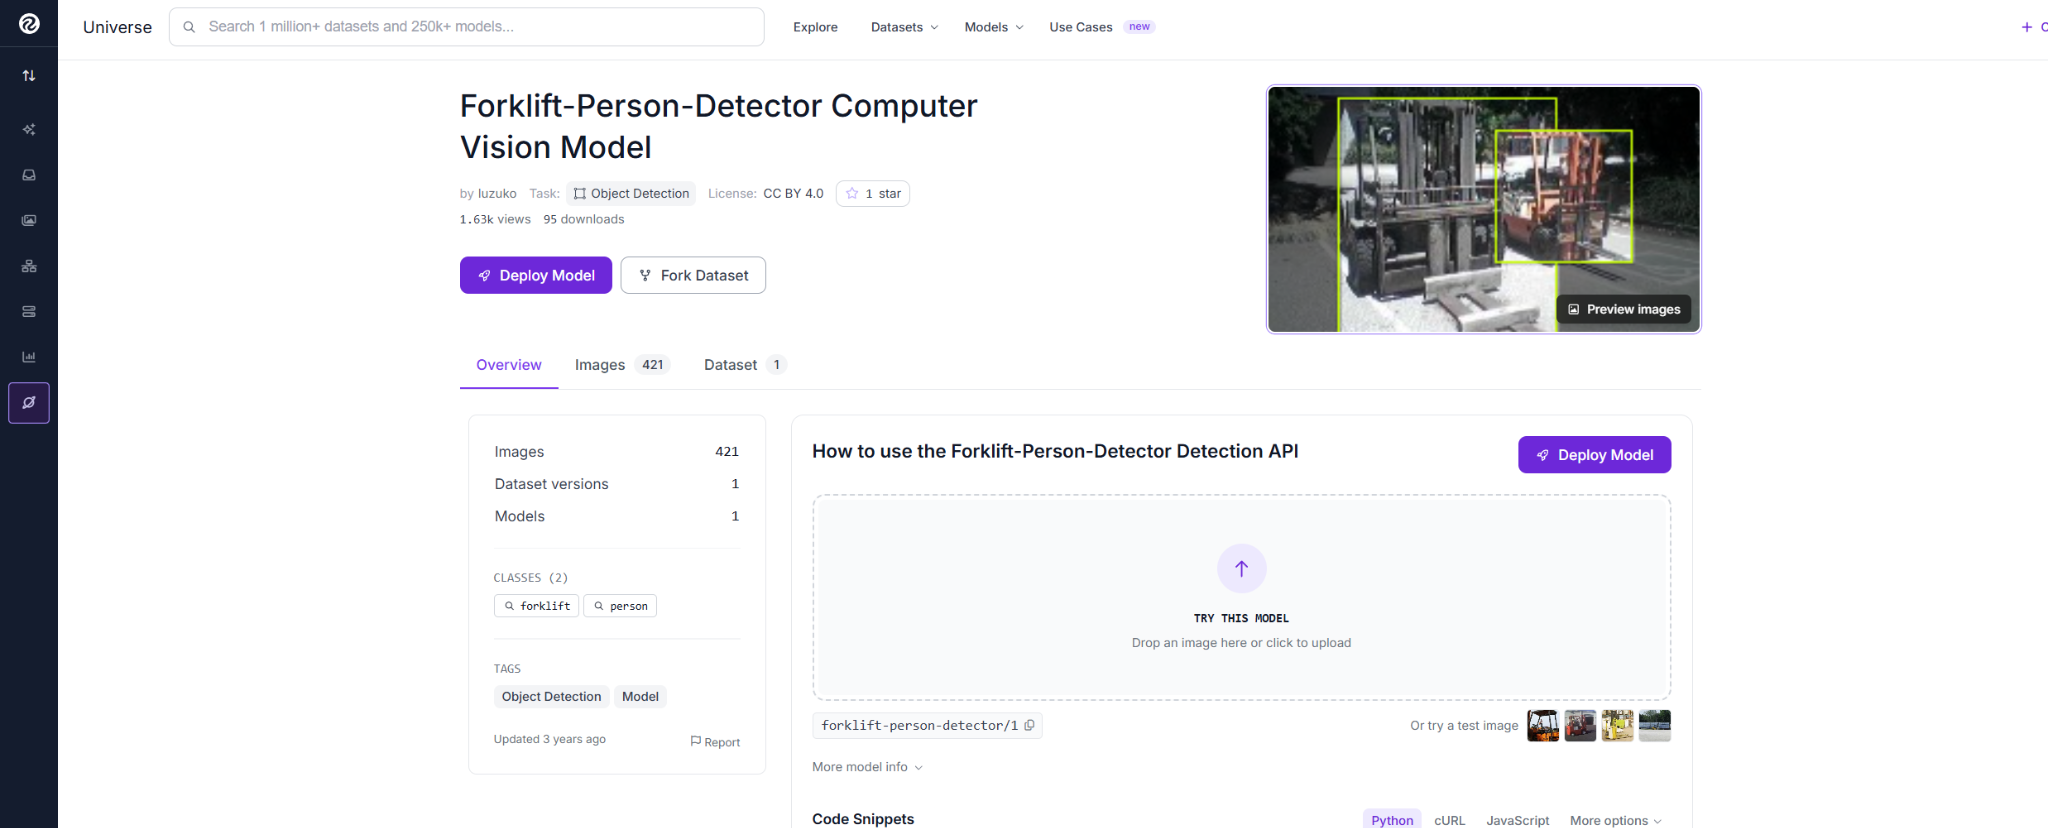
The dataset covers varied lighting, occlusion, distances, and real forklift-person scenarios. Fork it into your workspace with annotations included.
Train RF-DETR
Open the Versions tab in your forked project and generate a new version. Then click Custom Train and select RF-DETR (Small) as the training architecture.
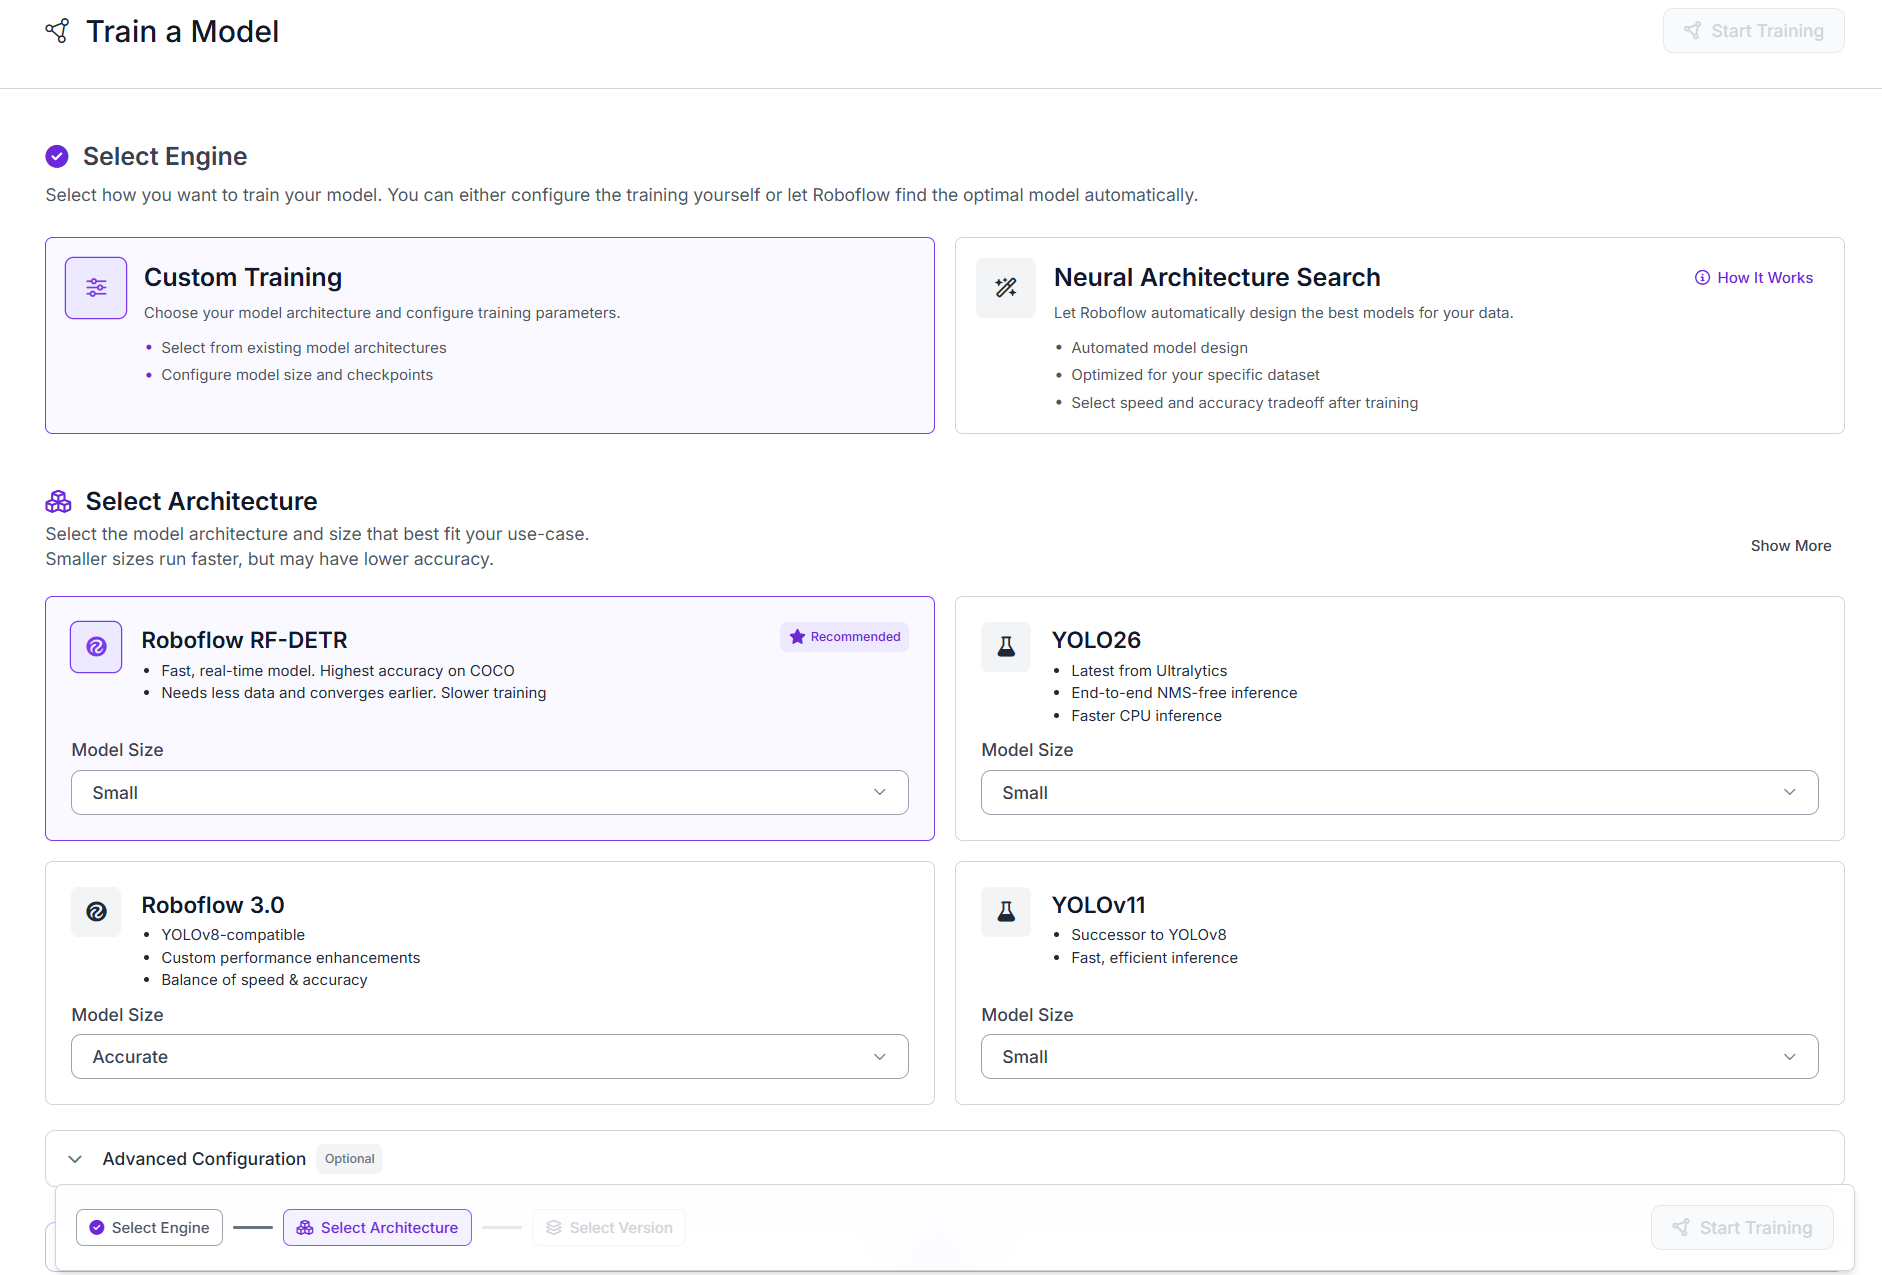
Once training starts, Roboflow handles the entire process in the cloud, so no local setup or GPU is required.

As training progresses, you can monitor the model's performance in real time as the mAP improves and eventually levels off.
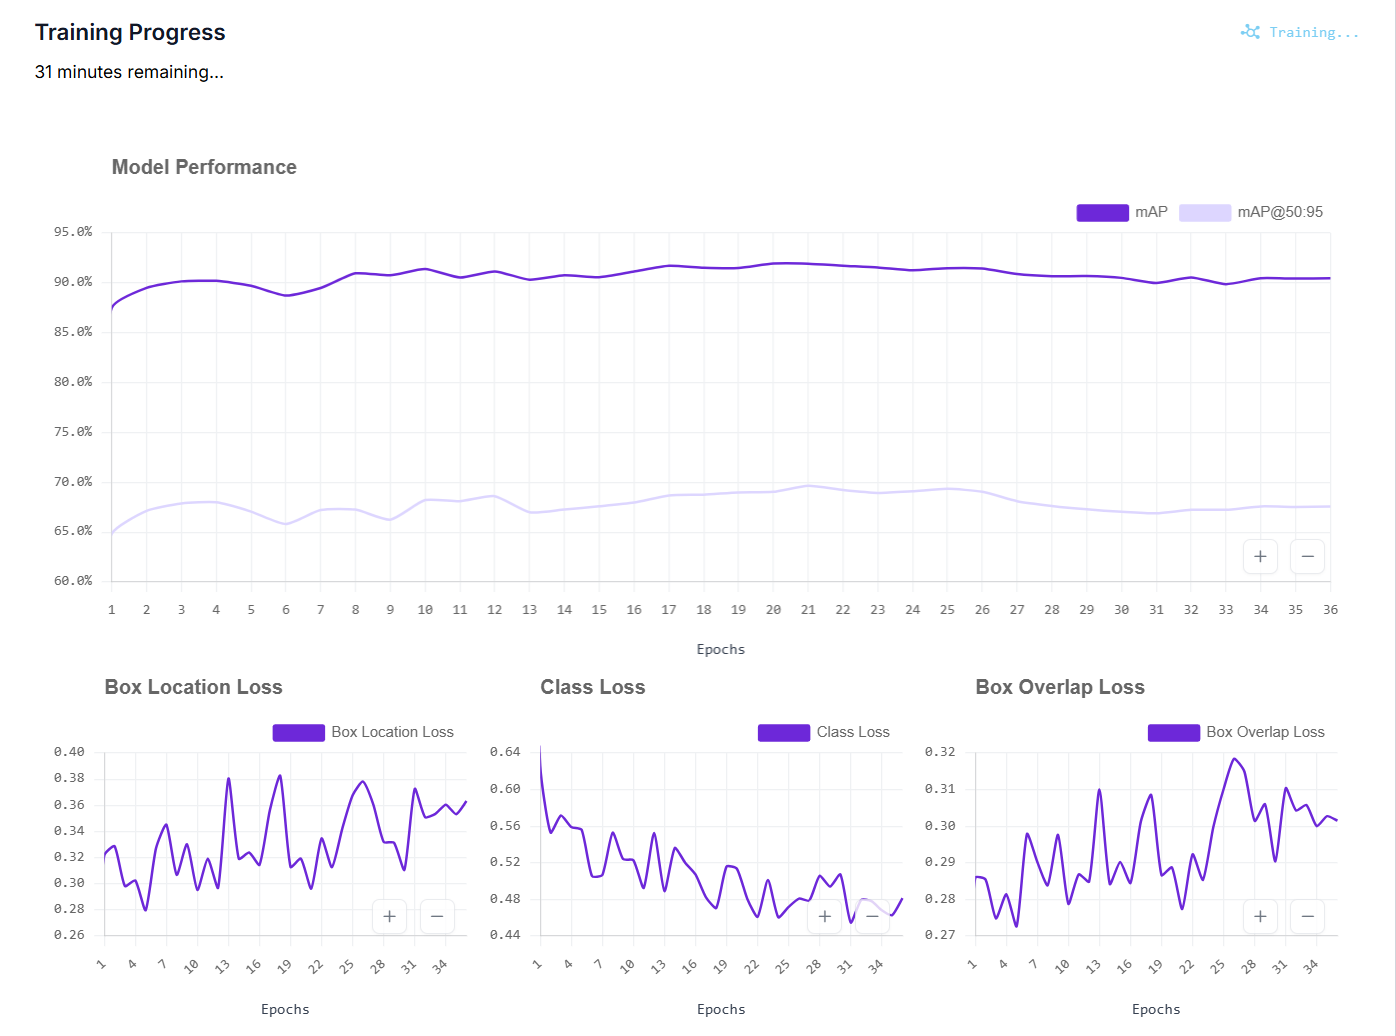
Once training is complete, the model is ready to use in a Workflow. Here's the workflow we'll build.
Build the Workflow
Here's what each block does in this Workflow.
- Object Detection Model: detects forklifts and people, with confidence scores.
- Detections Filter: keeps only person detections.
- Detection Offset: expands each person box with a margin for context.
- Dynamic Crop: crops each expanded person region.
- VLM Classifier: classifies each crop as safe or unsafe.
- Bounding Box Visualization: draws boxes on all detections.
- Label Visualization: adds class and confidence labels.
- Dimension Collapse: flattens per-crop results into one list.
- Custom Python Block: merges detections and VLM output into a safety report.
- Text Display: overlays the safety status on the image.
- Roboflow Vision Events: logs each inspection for monitoring.
- Outputs: returns the labeled image and JSON safety report.
Step 1: Add the trained model as an Object Detection block
Open the Workflows tab and create a new Workflow. Roboflow automatically adds the Image Input and Outputs blocks.
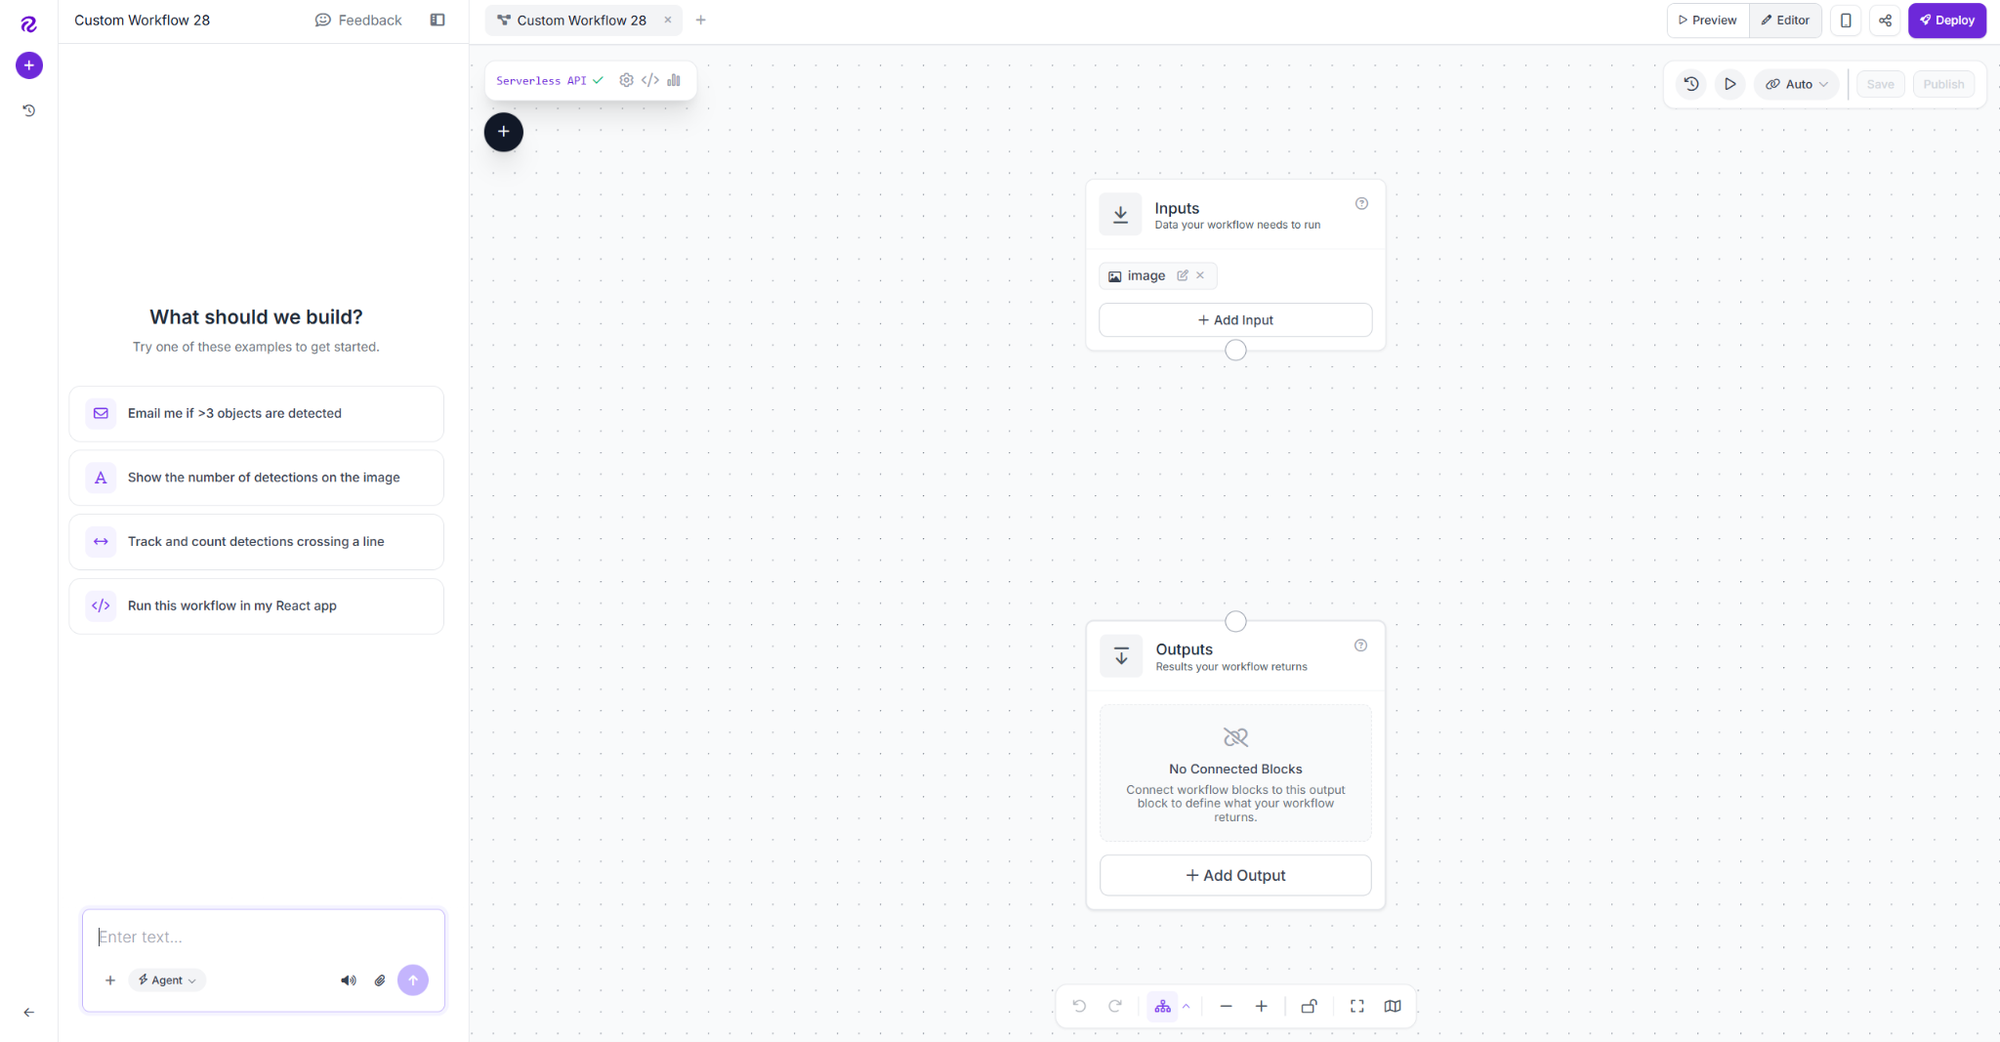
Add an Object Detection Model block named defect_detector, connect inputs.image, and select your trained model version.
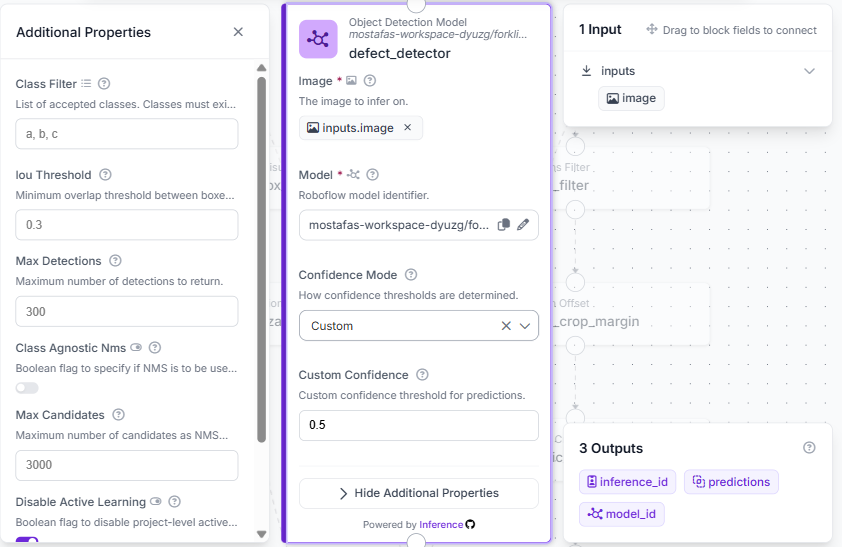
Set the confidence threshold to 0.5. Adjust later if needed. The block returns bounding boxes and confidence scores for detected forklifts and people.
Step 2: Add the Detections Filter
Add a Detections Filter block named person_filter. Connect Predictions to defect_detector.predictions.
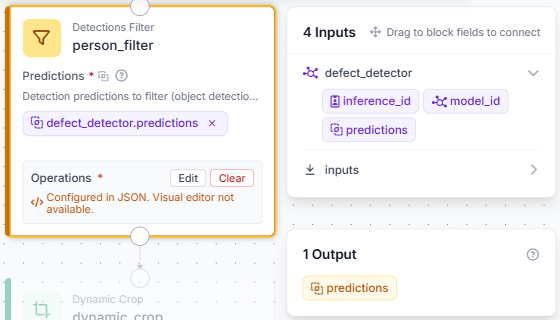
Configure the filter operation in JSON to keep only detections where class_name equals person (case-insensitive):
{
  "type": "roboflow_core/detections_filter@v1",
  "name": "person_filter",
  "predictions": "$steps.defect_detector.predictions",
  "operations": [
    {
      "type": "DetectionsFilter",
      "filter_operation": {
        "type": "StatementGroup",
        "operator": "or",
        "statements": [
          {
            "type": "BinaryStatement",
            "left_operand": {
              "type": "DynamicOperand",
              "operand_name": "_",
              "operations": [
                {
                  "type": "ExtractDetectionProperty",
                  "property_name": "class_name"
                },
                {
                  "type": "StringToLowerCase"
                }
              ]
            },
            "comparator": {
              "type": "=="
            },
            "right_operand": {
              "type": "StaticOperand",
              "value": "person"
            },
            "negate": false
          }
        ]
      }
    }
  ],
  "operations_parameters": {}
}
Outputs only person detections for cropping and VLM analysis, while forklift detections continue to the visualization steps.
Step 3: Add Detection Offset
Add a Detection Offset block named person_crop_margin. Connect Predictions to person_filter.predictions.
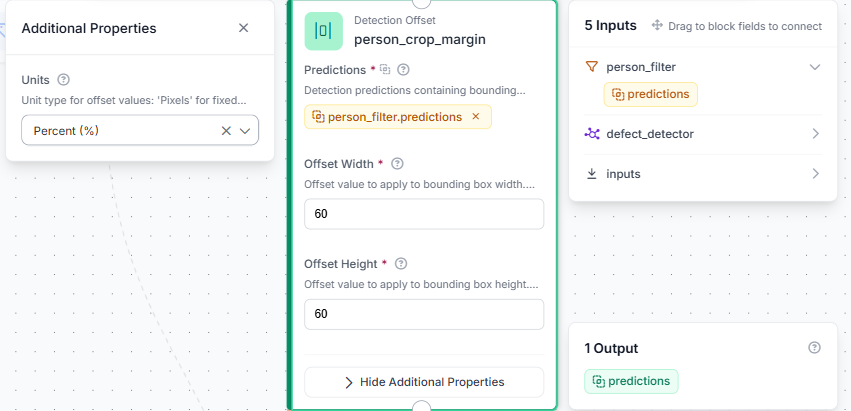
Set Units to Percent (%) and both offsets to 60. This expands each crop with surrounding context, helping the VLM judge risk more accurately.
Step 4: Add Dynamic Crop
Add a Dynamic Crop block named dynamic_crop. Connect Image to Crop to inputs.image, and Regions of Interest to person_crop_margin.predictions.
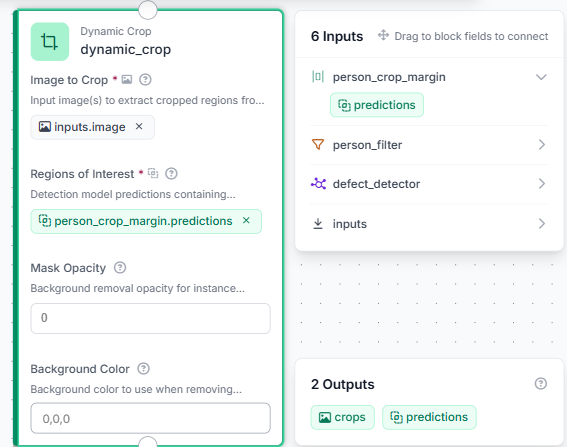
This crops out each expanded person region from the original image, producing one crop per detected person, ready to send to the VLM.
Step 5: Add the VLM Classifier
Add a Google Gemini block named vlm_classifier. Connect dynamic_crop.crops, set Open Prompt, choose Gemini 2.5 Flash-Lite, and set Temperature to 0.
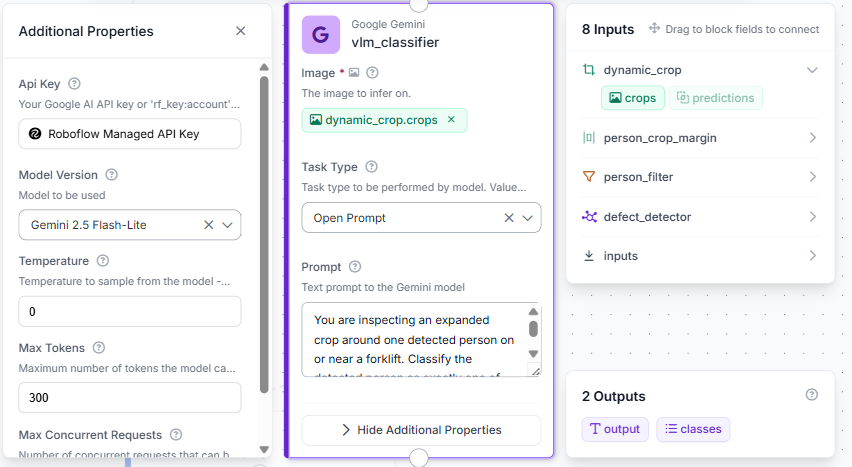
Prompt:
You are inspecting an expanded crop around one detected person on or near a forklift. Classify the detected person as exactly one of two values: safe or unsafe.

Important cab/operator rule: If the person appears seated inside the forklift cab, operator compartment, or driver's seat, classify as safe, even if forks or a load are raised elsewhere in the crop. A seated forklift operator is safe unless there is clear visual evidence they are not in the driver's seat or are riding on the load/forks/structure.

Classify as unsafe only when there is clear visual evidence that the person is outside the driver seat and is on, above, standing on, sitting on, or gripping the forks, load, mast, overhead guard, side rails, or any forklift structure other than the driver's seat, OR is on the ground directly under a raised load or clearly in the vehicle's path.

If the crop is ambiguous between a seated cab operator and a person on the forklift structure, choose safe unless you can clearly see they are outside the driver seat. If elevated above ground level and clearly not in the driver's seat, classify unsafe.

Return only this exact JSON with no extra text, no markdown code fences, no explanation: {"status":"safe"} or {"status":"unsafe"}
Classifies each person crop as safe or unsafe, distinguishing normal operators from hazardous positions.
Step 6: Add Dimension Collapse
Add a Dimension Collapse block named dimension_collapse. Connect Data to vlm_classifier.output.
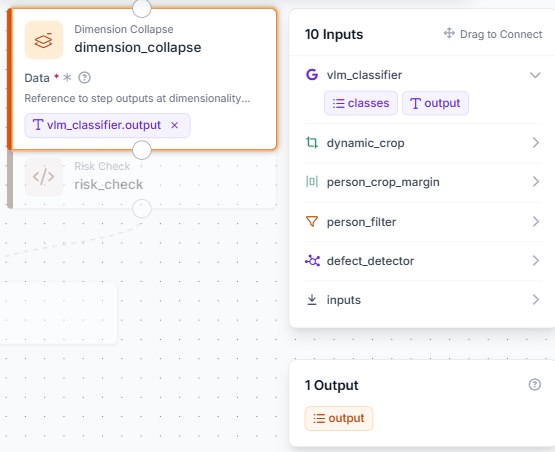
Flattens VLM crop results into one collection for image-level analysis.
Step 7: Add the Custom Python Block (safety logic)
Add a Custom Python Block named Risk Check. Connect classifications and predictions inputs, then add outputs for report, display_text, and safety_status.
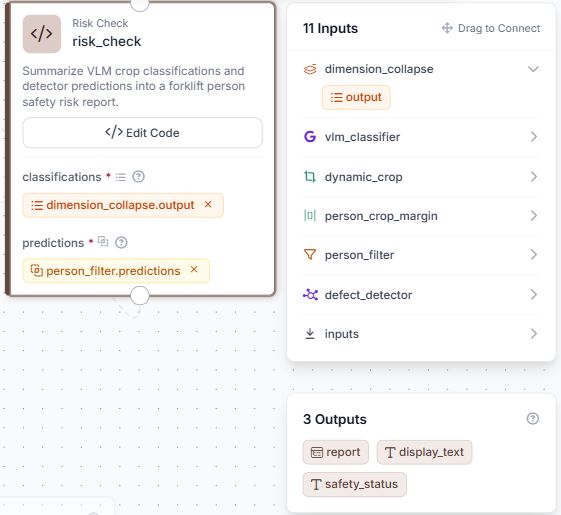
Click Edit Code to open the editor and add a block description, such as the safety risk report summary.
def run(self, classifications, predictions):
    def flatten_items(value):
        if value is None:
            return []
        if isinstance(value, (list, tuple, set)):
            out = []
            for item in value:
                out.extend(flatten_items(item))
            return out
        return [value]

    def parse_status(value):
        raw = value
        if isinstance(value, dict):
            for key in ["output", "parsed_output", "structured_output", "raw_output", "result", "value"]:
                if key in value:
                    raw = value.get(key)
                    break
            if raw is value and "status" in value:
                status = str(value.get("status", "")).strip().lower()
                return "unsafe" if status == "unsafe" else "safe"
        if isinstance(raw, dict):
            status = str(raw.get("status", "")).strip().lower()
            return "unsafe" if status == "unsafe" else "safe"
        text = "" if raw is None else str(raw).strip()
        if text.startswith("```"):
            text = text.strip("`").strip()
            if text.lower().startswith("json"):
                text = text[4:].strip()
        try:
            parsed = json.loads(text)
            status = str(parsed.get("status", "")).strip().lower()
            return "unsafe" if status == "unsafe" else "safe"
        except Exception:
            lower = text.lower()
            return "unsafe" if "unsafe" in lower else "safe"

    items_raw = flatten_items(classifications)

    try:
        people_evaluated = len(predictions)
    except Exception:
        people_evaluated = 0

    names = []
    boxes = []
    try:
        names = list(predictions.data.get("class_name", [])) if hasattr(predictions, "data") and predictions.data is not None else []
    except Exception:
        names = []
    try:
        boxes = predictions.xyxy.tolist() if getattr(predictions, "xyxy", None) is not None else []
    except Exception:
        boxes = []

    classifications_list = []
    unsafe_count = 0
    for i in range(people_evaluated):
        status = parse_status(items_raw[i] if i < len(items_raw) else None)
        if status == "unsafe":
            unsafe_count += 1
        item = {
            "index": i,
            "detected_class": str(names[i]) if i < len(names) else "person",
            "status": status,
            "bbox_xyxy": [float(v) for v in boxes[i]] if i < len(boxes) else []
        }
        classifications_list.append(item)

    safety_status = "UNSAFE" if unsafe_count > 0 else "SAFE"

    report = {
        "safety_status": safety_status,
        "people_evaluated": people_evaluated,
        "unsafe_count": unsafe_count,
        "classifications": classifications_list
    }
    display_text = f"Status: {safety_status} | People evaluated: {people_evaluated} | Unsafe: {unsafe_count}"

    return {"report": report, "display_text": display_text, "safety_status": safety_status}
Open the full editor:
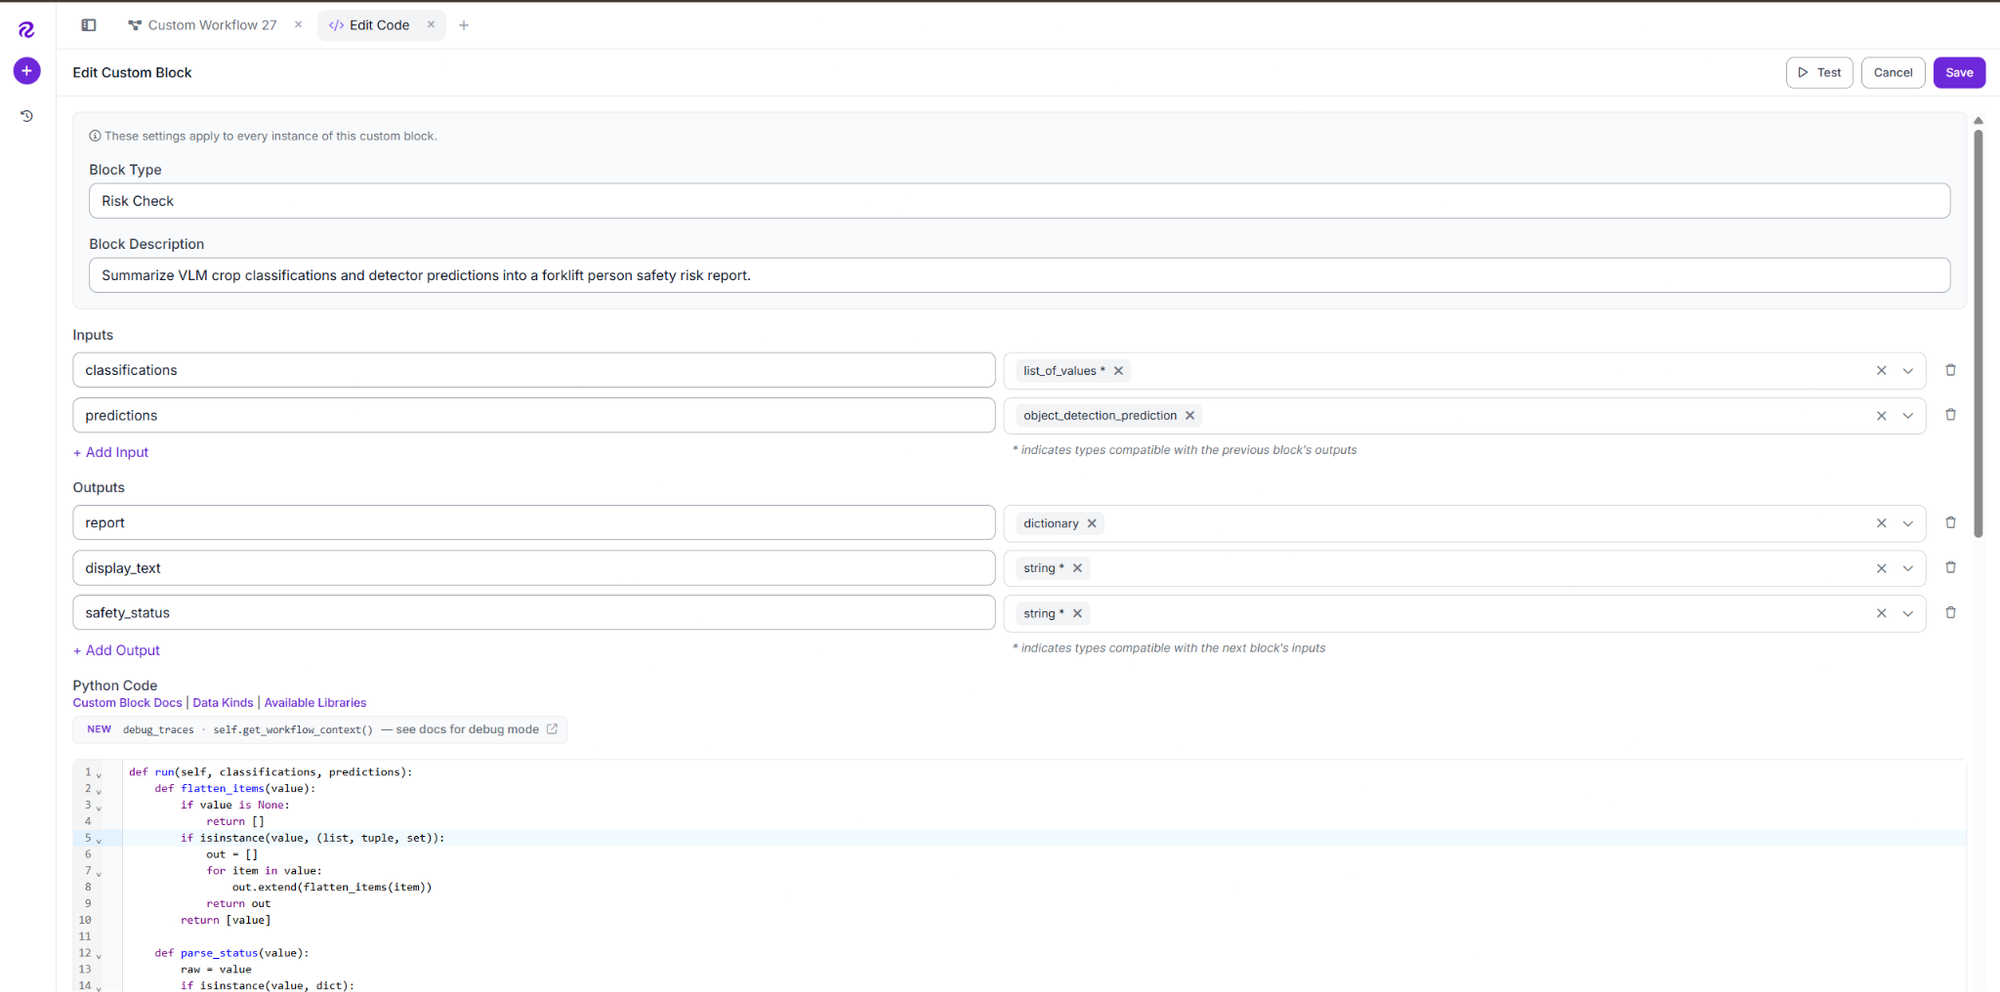
Converts VLM results into safe/unsafe labels, links them to detections, and marks the image unsafe if needed.
Step 8: Add Bounding Box and Label Visualization
Add a Bounding Box Visualization block. Connect the image input and defect_detector.predictions to show all detections.
Add a Label Visualization block, connect defect_detector.predictions, and set Text to Class.
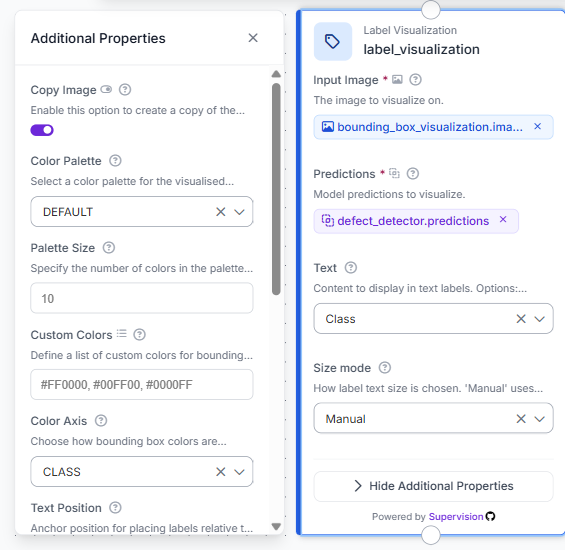
Adds class labels to each box, showing exactly what the detector found before safety analysis.
Step 9: Add Text Display
Add a Text Display block. Connect label_visualization.image and risk_check.display_text, then set the bottom-left white text overlay style.
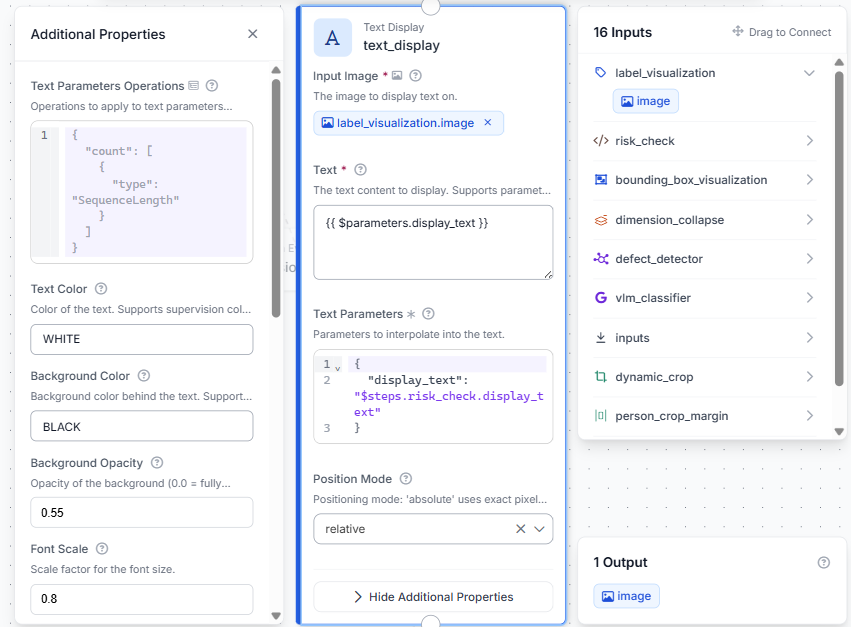
The image now shows both the detected boxes from Step 8 and the safety status from risk_check, all in one frame.
Step 10: Add Vision Events and configure Outputs
Add a Roboflow Vision Events block. Set Custom event type to Forklift Person Safety Monitoring and use risk_check.safety_status for the value and metadata.
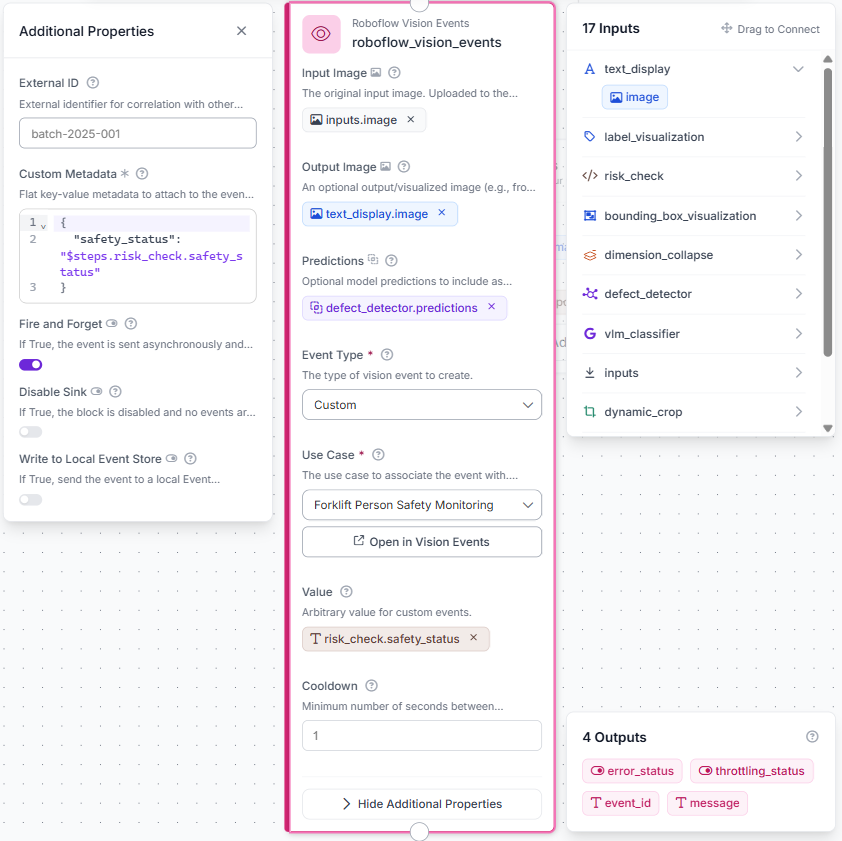
Logs each inspection with detections and safety status. Set outputs to output_image and safety_report.
Step 11: Configure Outputs
Set two outputs: output_image from text_display.image, and safety_report from risk_check.report.
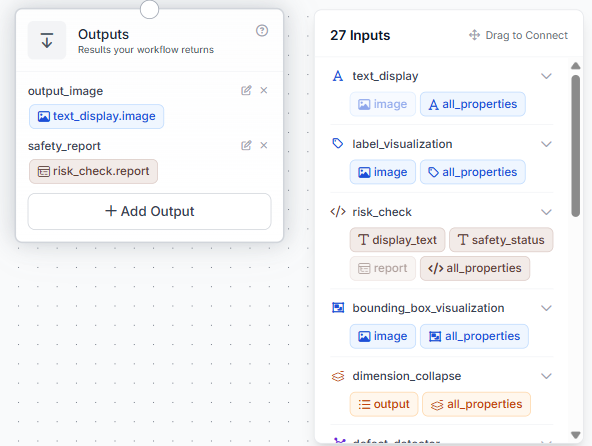
With everything connected, the full Workflow looks like this:
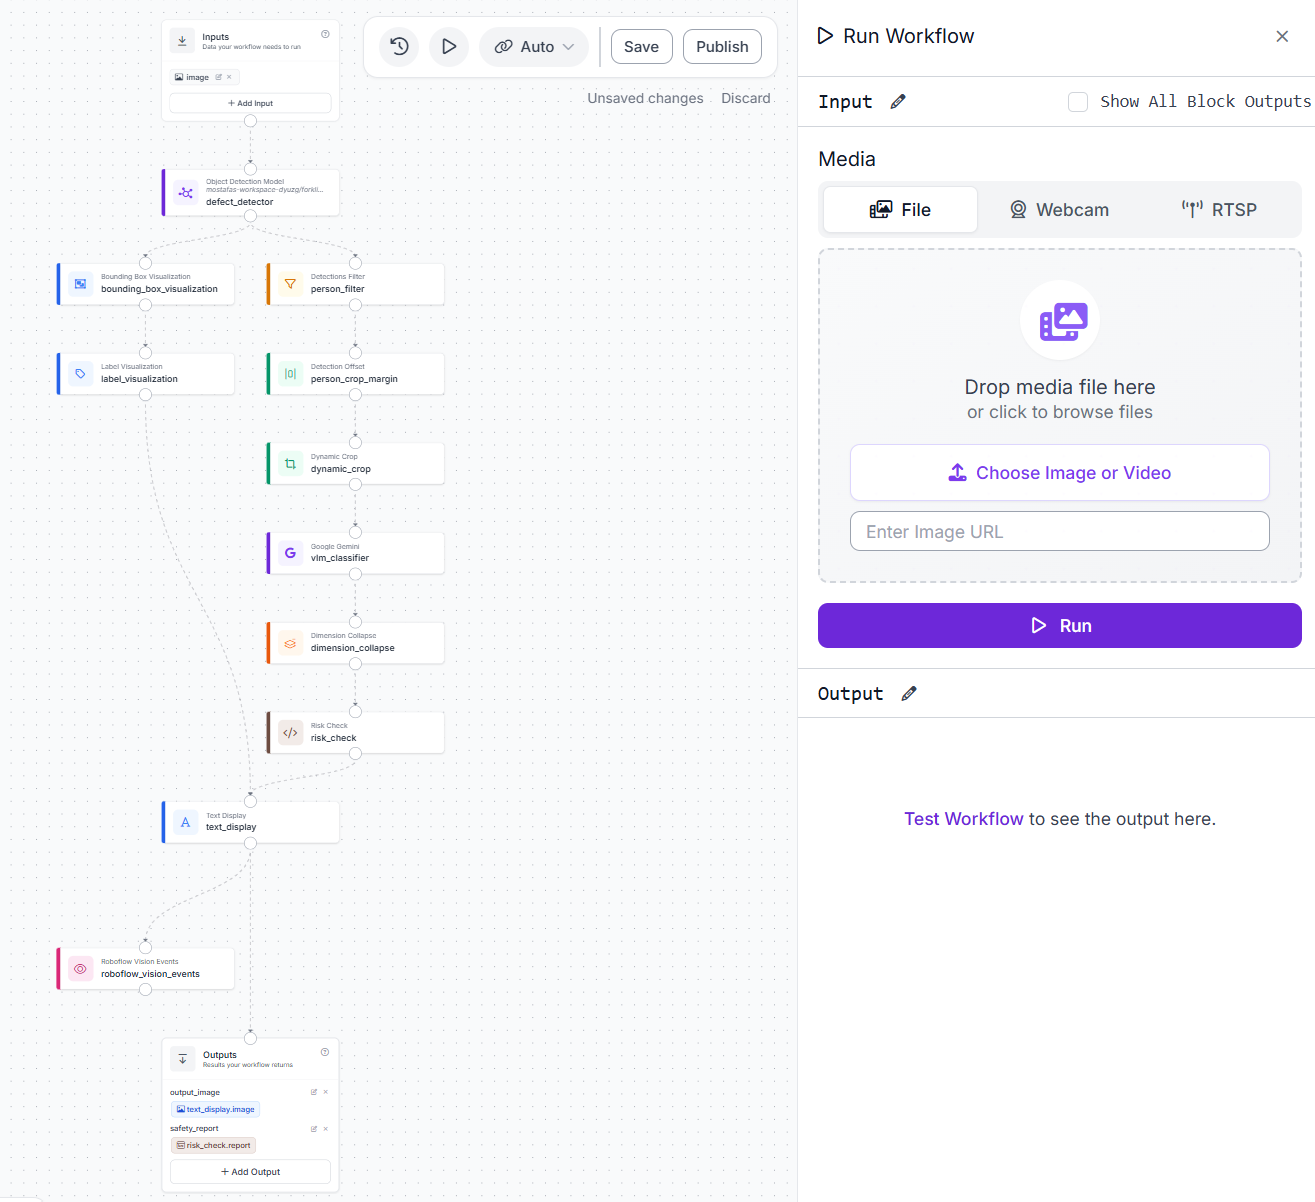
From here, every image that comes in gets a labeled result, a structured safety report, and a logged record; no extra steps needed.
Results
Test case 1: Two operators, status safe
Both people in this frame are seated inside their own forklift cabs, operating normally. Neither is standing in a forklift's path, on the forks, or near a raised load.
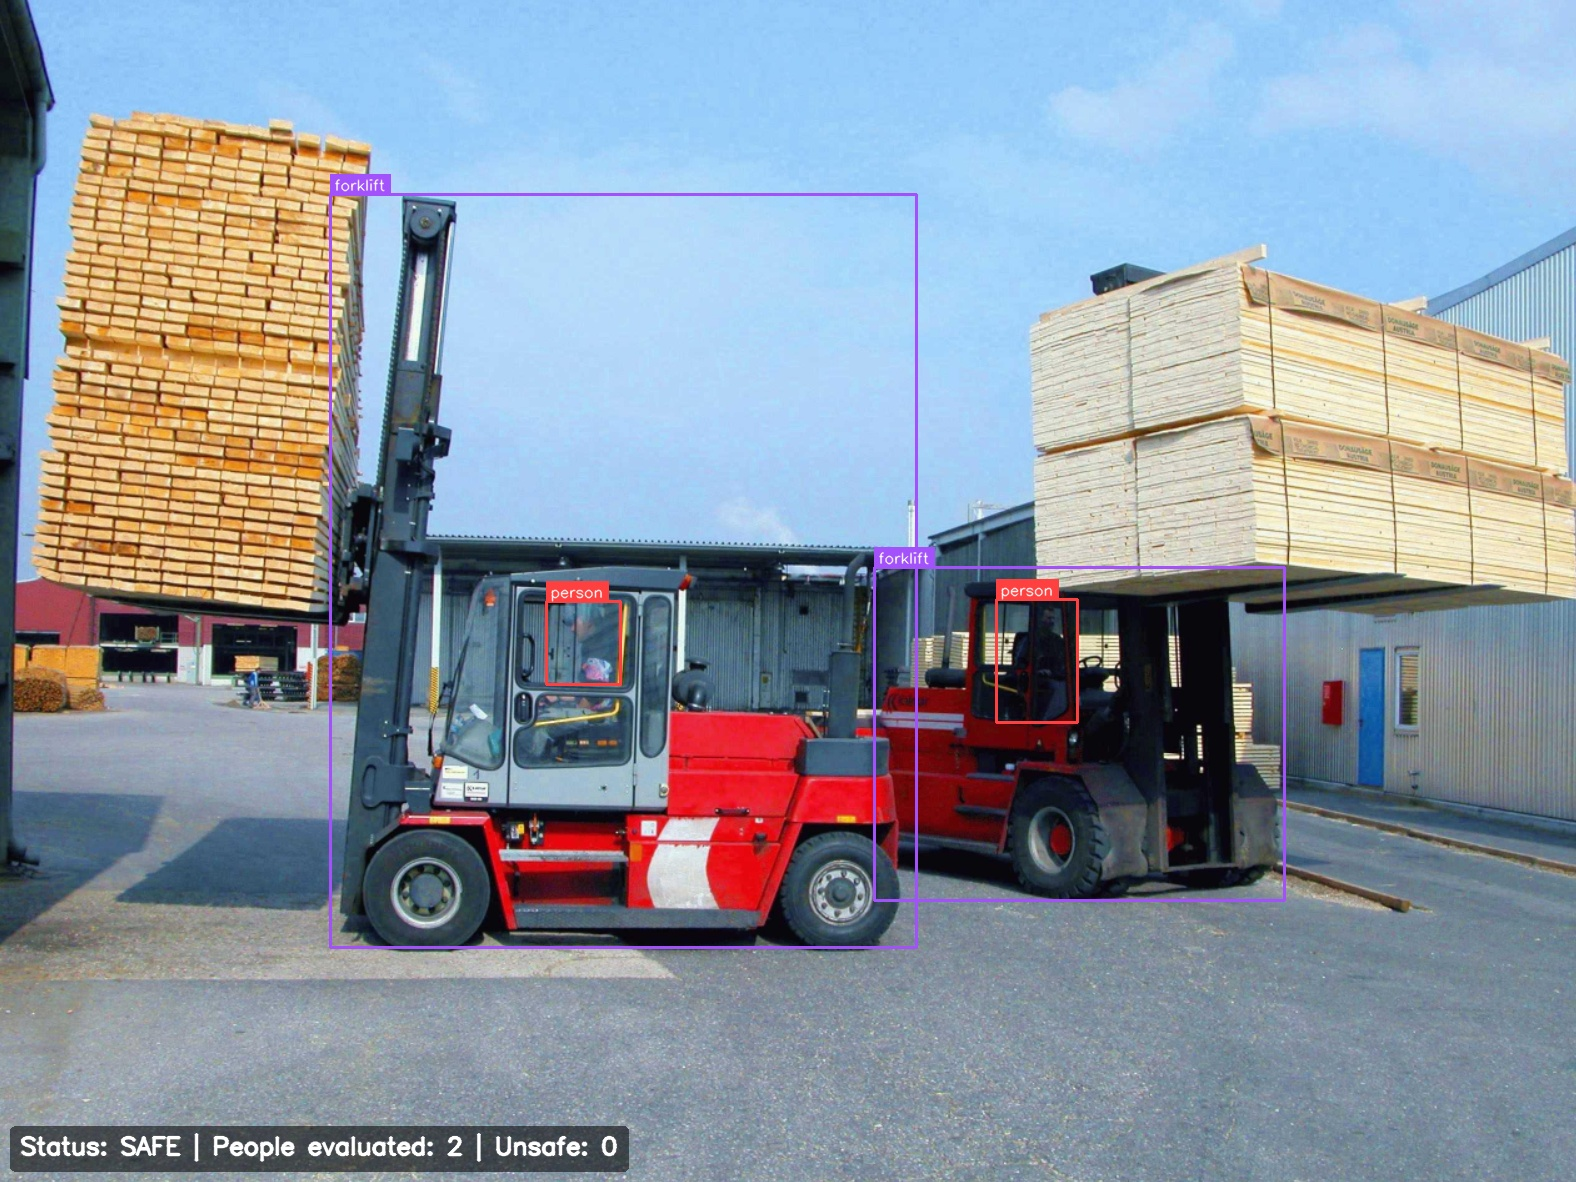
The safety report confirms both detections evaluated as safe, with zero unsafe flags.
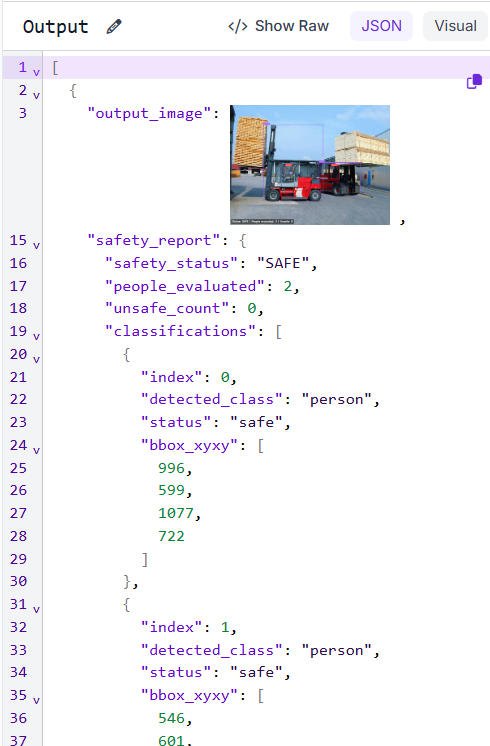
Both operators are correctly read as safe, with no false alarms despite each crop being small and partially occluded by cab glass.
Test case 2: Person on the forks, status unsafe
A person is riding on the raised forks themselves, not in the driver's seat, a clear and well-documented forklift hazard.
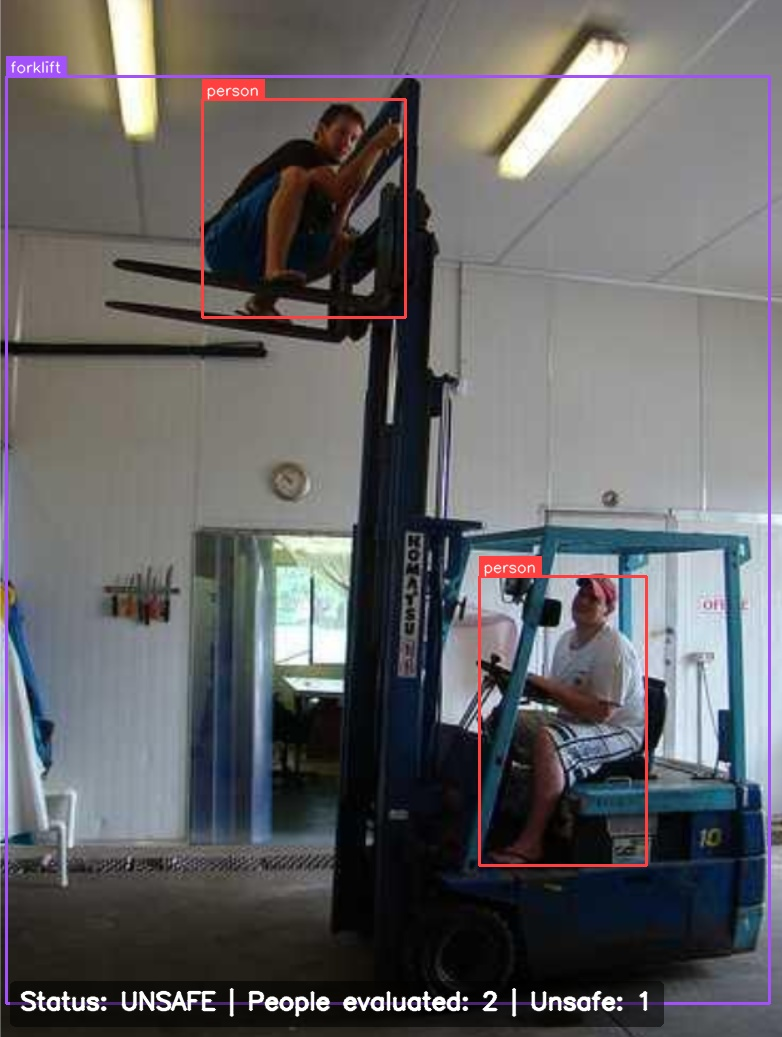
The report marks one person as unsafe and correctly classifies the seated operator as safe.
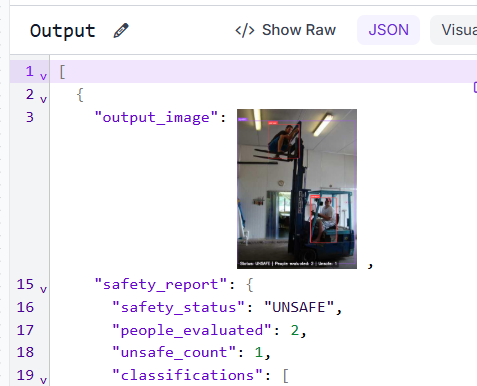
The model separates safe operator positions from hazardous placements, catching missed safety violations
Production Deployment
The safe/unsafe threshold is based on initial testing, but real deployments will uncover edge cases the prompt has not handled yet. Reviewing borderline cases helps improve the system by refining the prompt or adding new examples instead of relying on fixed assumptions.
Vision Events records every inspection, including the image, detections, and final safety status. Over time, this data can reveal incident trends by camera location, shift, or recurring risk zones.
The same Workflow can run through Roboflow's managed API or self-hosted with Roboflow Inference, allowing deployment across multiple cameras while keeping the same safe/unsafe output format for monitoring dashboards and alert systems.
Conclusion
Both workflows use the same division of labor: RF-DETR finds the people and equipment, and Gemini interprets how they relate. The difference is scope. The scene-level workflow sends one annotated image to Gemini 2.5 Pro and returns a written interaction summary, which suits open-ended monitoring and review. The detect-crop-classify workflow isolates each person, asks a narrower question, and returns a structured safe or unsafe report, which suits a specific safety rule that needs a machine-readable answer.
Use the first pattern to find out what is happening in a scene, and the second when you already know which interaction matters and need a consistent decision about it. Both analyze single images without tracking or deterministic proximity logic, so treat their output as an inspection aid and review flagged results before operational use. A good next step is running both on the same test images from your own warehouse, which shows quickly which pattern fits your monitoring needs.
Further reading
Cite this Post
Use the following entry to cite this post in your research:
Mostafa Ibrahim. (Aug 3, 2026). Human-Object Interaction Detection with RF-DETR. Roboflow Blog: https://blog.roboflow.com/human-object-interaction-detection-with-rfdetr/