
Blue Eco Line deploys cameras on bridges to measure plastic waste entering and leaving cities, then uses an autonomous conveyor belt guided by computer vision to physically remove pollution from rivers. The pipeline uses Roboflow to collect, upload, and label plastic waste images, then trains a YOLOv8 model on Intel C3 Sapphire Rapids hardware on GCP and deploys it in OpenVINO format for efficient edge inference. The full system is open source and applicable to infrastructure monitoring, environmental sensing, and transportation analytics beyond river cleaning.
Introduction
Over 150 million tons of plastic lie in the planet's oceans, with studies finding that only 20% of plastic waste at sea is linked to maritime activities. The remaining 80% of waste reaches the sea through rivers.
Blue Eco Line works with local government organizations to monitor and reduce pollution in rivers using computer vision. Blue Eco Line utilizes existing infrastructure (bridges) to place cameras before and after a city to measure the impact of their solution. This helps governments to understand how their local area relates to river pollution which, for the first time, allows them to assess their efforts and adjust investments or programs to positively impact the water system.
With a vision system in place capable of identifying and monitoring pollution, Blue Eco Line can then implement an autonomous river cleaning system to remove plastic from the river using a vision powered conveyor belt.
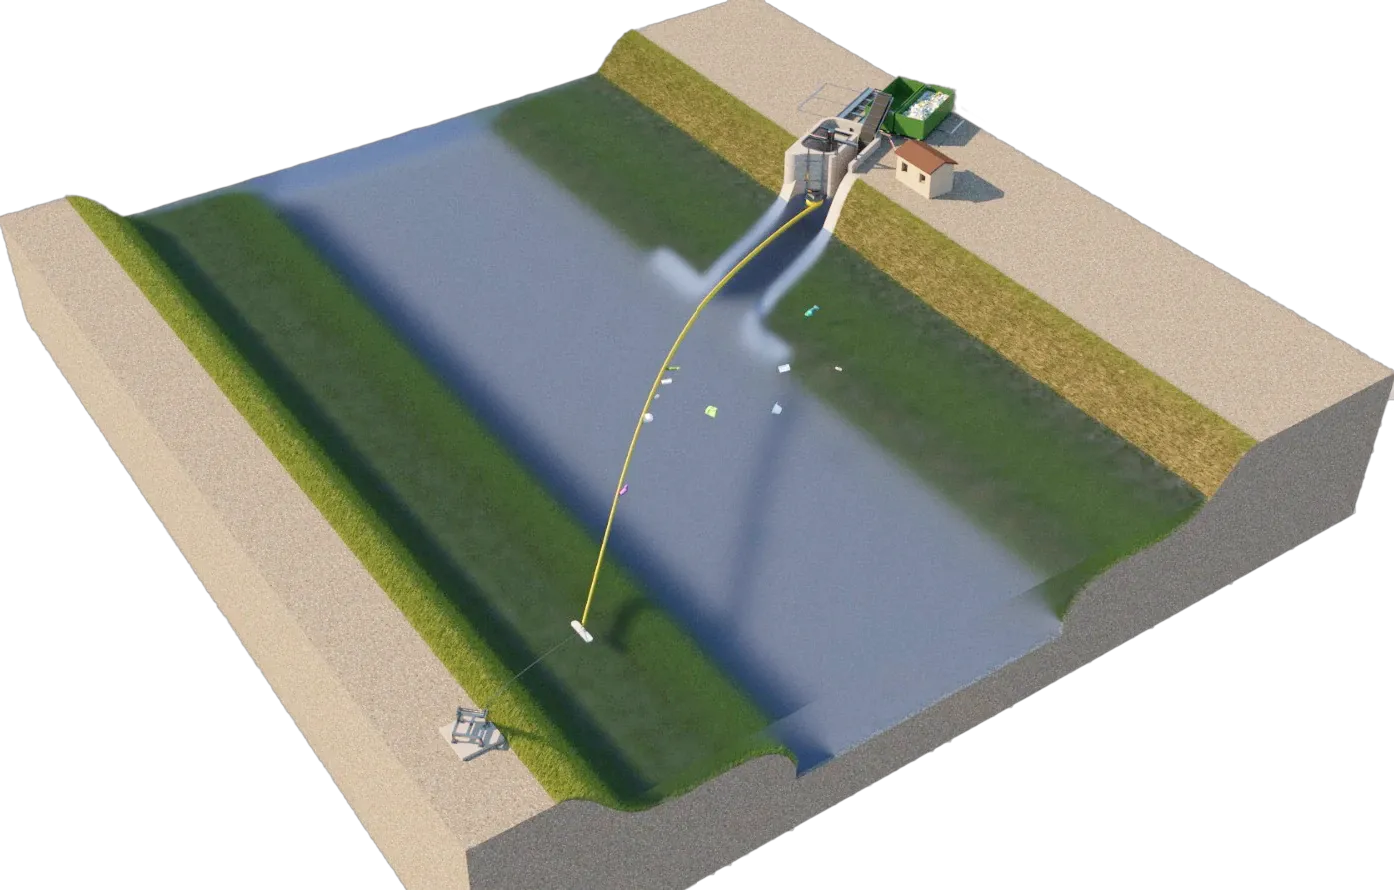
The system is able to identify, collect, and remove pollution from the river. Vision is then used to guide an autonomous conveyor belt that is used for retrieving pollutants and bringing them to the river bank for processing.
This autonomous solution takes the place of solutions reliant on human intervention, a factor that frequently leads to inadequate maintenance and consequently, lower levels of waste capture. These systems capture pollution but do not remove the waste which leads to capture devices reaching capacity and new waste is not collected.
In this technical guide, we will walk through the process of building an autonomous river monitoring and cleaning system. We will use Roboflow to collect, label, and process visual data, then use Intel C3 Sapphire Rapids for model training and model deployment.
We will focus on the implementation used by Blue Eco Line to showcase how you can create a vision system for remote environments. This same system can be used for infrastructure monitoring, environmental understanding, transportation analytics, and more.
The full system is open source and available for use in the GitHub repository here. Let's get started!
System Overview and Architecture
The Blue Eco Line system is currently installed to help clean three distinct rivers: in Adria for Canal Bianco river, Eraclea for Piave river, and Ficarolo for Po river (the largest river in Italy).
This system is architected to deal with the difficult and various constraints of deploying computer vision systems in remote and dynamic environments without wifi. Blue Eco Line uses a proprietary machine learning model to identify organic and inorganic material.

The cameras operate at the edge using a Raspberry Pi and two cameras within remote areas that do not have wifi. The cameras run from 30 minutes before sunrise and 30 minutes after sunset gathering 1 image every 5 seconds. When there is not enough sunlight to visually monitor the waterway, the system sends the data to a server for processing and understanding.
Now that you have an understanding of how the system works in practice, lets begin to build the system.
Collect, Upload, and Label Plastic Waste Data Using Roboflow
In order to build a proprietary computer vision model, you'll want to capture data that resembles the environment you want to analyze and understand. You can deploy an empty state model to capture data using active learning, start with an open source pre-trained model from Roboflow Universe, or use your existing images and videos.
Whether you're starting with no data, some data, or a model, capturing data from your real world environment will improve the accuracy of your model and tailor it to your performance needs.
Collect Images on the Edge
After Blue Eco line configures the Reolink camera in a remote environment near the river, the next step is collecting images from the RTSP stream to train the model using collect.py. If you already have the data you can skip this section.
import cv2
import os

class RTSPImageCapture:
    def __init__(self, rtsp_url, output_dir):
        self.rtsp_url = rtsp_url
        self.output_dir = output_dir
        self.cap = None
        self.image_count = 0

    def open_stream(self):
        # Create a VideoCapture object to connect to the RTSP stream
        self.cap = cv2.VideoCapture(self.rtsp_url)

        # Check if the VideoCapture object was successfully created
        if not self.cap.isOpened():
            print("Error: Could not open RTSP stream.")
            exit()

        # Create the output directory if it doesn't exist
        os.makedirs(self.output_dir, exist_ok=True)

    def capture_images(self):
        while True:
            # Capture a frame from the RTSP stream
            ret, frame = self.cap.read()

            # Check if the frame was captured successfully
            if not ret:
                print("Error: Could not read frame from RTSP stream.")
                break

            # Save the frame as a JPG image
            image_filename = os.path.join(self.output_dir, f'image_{self.image_count:04d}.jpg')
            cv2.imwrite(image_filename, frame)

            # Increment the image count
            self.image_count += 1

            # Display the captured frame (optional)
            cv2.imshow('Captured Frame', frame)

            # Exit the loop when 'q' is pressed
            if cv2.waitKey(1) & 0xFF == ord('q'):
                break

    def close_stream(self):
        # Release the VideoCapture object and close the OpenCV window
        if self.cap is not None:
            self.cap.release()
            cv2.destroyAllWindows()

    def main(self):
        try:
            self.open_stream()
            self.capture_images()
        finally:
            self.close_stream()

if __name__ == "__main__":
    # Define the RTSP stream URL and output directory
    rtsp_url = 'rtsp://your_rtsp_stream_url'
    output_dir = 'rivereye005_cam1_data'

    # Create an instance of the RTSPImageCapture class
    image_capture = RTSPImageCapture(rtsp_url, output_dir)

    # Run the main function of the class
    image_capture.main()
Upload Images to Roboflow
Next, upload the images to Roboflow and assign labeling jobs via API – load.py. Documentation on accessing your API key can be found here.
import os
import requests
from roboflow import Roboflow

class RoboflowUploader:
    def __init__(self, workspace, project, api_key, labeler_email, reviewer_email):
        self.WORKSPACE = workspace
        self.PROJECT = project
        self.ROBOFLOW_API_KEY = api_key
        self.LABELER_EMAIL = labeler_email
        self.REVIEWER_EMAIL = reviewer_email
        self.job_info = {}  # Initialize job_info as an instance variable

        self.rf = Roboflow(api_key=self.ROBOFLOW_API_KEY)
        self.upload_project = self.rf.workspace(self.WORKSPACE).project(self.PROJECT)

    def upload_images(self, folder_path):
        if not os.path.exists(folder_path):
            print(f"Folder '{folder_path}' does not exist.")
            return

        for image_name in os.listdir(folder_path):
            image_path = os.path.join(folder_path, image_name)

            if os.path.isfile(image_path):
                print('Image path:', image_path)

                response = self.upload_project.upload(image_path, batch_name='intelbatchtest', tag_names=['RE005'])
                print(image_path, response)

    def extract_batches(self):
        url = f"https://api.roboflow.com/{self.WORKSPACE}/{self.PROJECT}/batches"
        headers = {"Authorization": f"Bearer {self.ROBOFLOW_API_KEY}"}

        response = requests.get(url, headers=headers)

        if response.status_code == 200:
            batch = response.json()
            print(batch)
            for batch in batch['batches']:
                self.job_info[batch['id']] = batch['images']  # Store job_info as an instance variable
        else:
            print(f"Failed to retrieve data. Status code: {response.status_code}")

    def assign_jobs(self):
        url = f"https://api.roboflow.com/{self.WORKSPACE}/{self.PROJECT}/jobs"
        headers = {
            "Content-Type": "application/json",
        }

        for job_id in self.job_info.keys():
            data = {
                "name": "Job created by API",
                "batch": job_id,
                "num_images": self.job_info[job_id],
                "labelerEmail": f"{self.LABELER_EMAIL}",
                "reviewerEmail": f"{self.REVIEWER_EMAIL}",
            }
            params = {
                "api_key": self.ROBOFLOW_API_KEY,
            }

            response = requests.post(url, headers=headers, json=data, params=params)

            if response.status_code == 200:
                print("Job created successfully!")
            else:
                print(f"Error occurred: {response.status_code} - {response.text}")


if __name__ == "__main__":
    uploader = RoboflowUploader(
        workspace="workspace_name",
        project="project_name",
        api_key="api_key",
        labeler_email="labeler_email",
        reviewer_email="reviewer_email"
    )

    uploader.upload_images("rivereye005_cam1_data")
    uploader.extract_batches()
    uploader.assign_jobs()
Make sure to fill out the workspace name, project name, api key, labeler_email and reviewer_email.
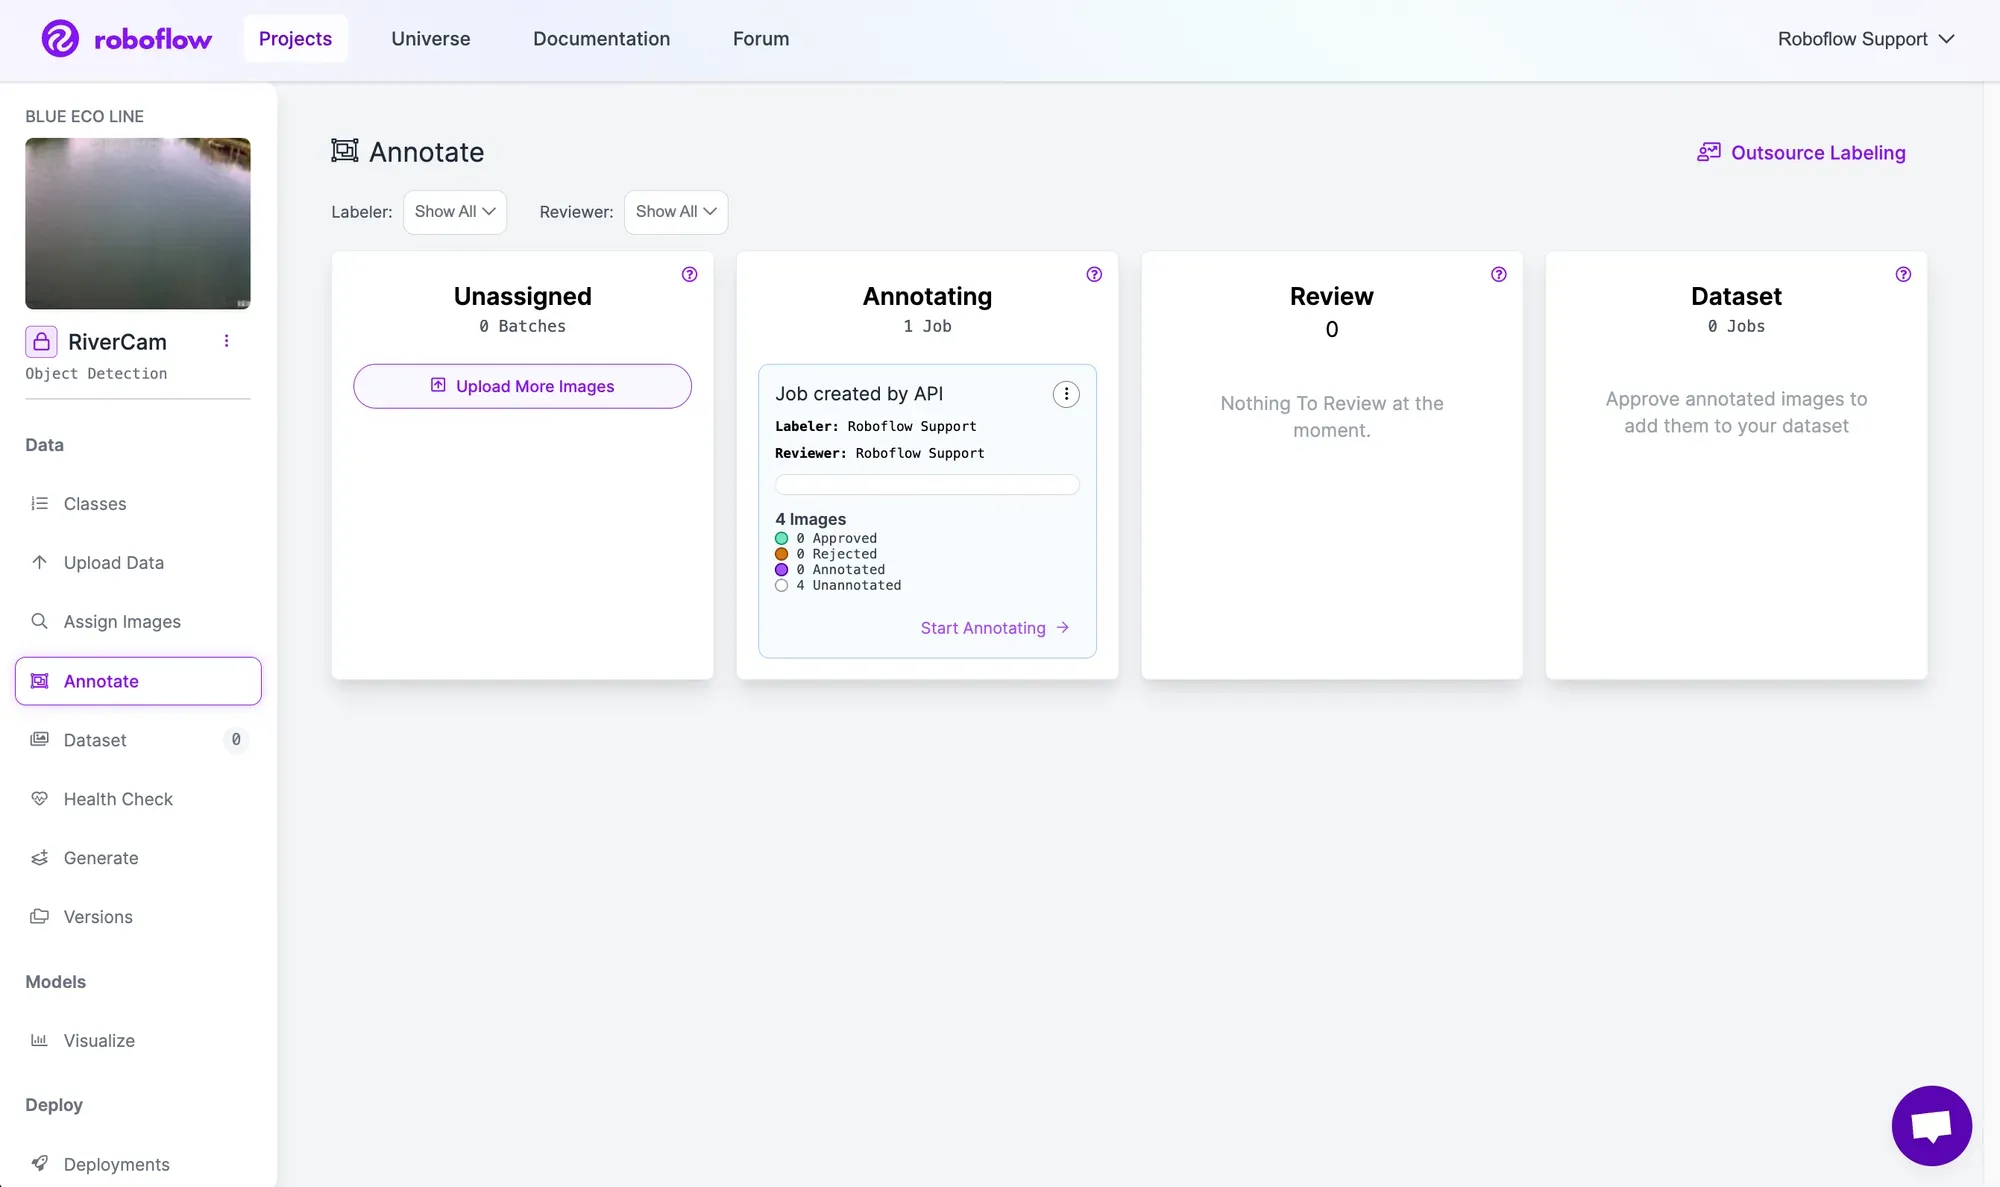
Once the images are added to Roboflow for labeling, they will show up as a Job in the Annotate dashboard. Image labeling can be done by multiple people and move through an approval workflow to ensure only high quality data is added to the Dataset.
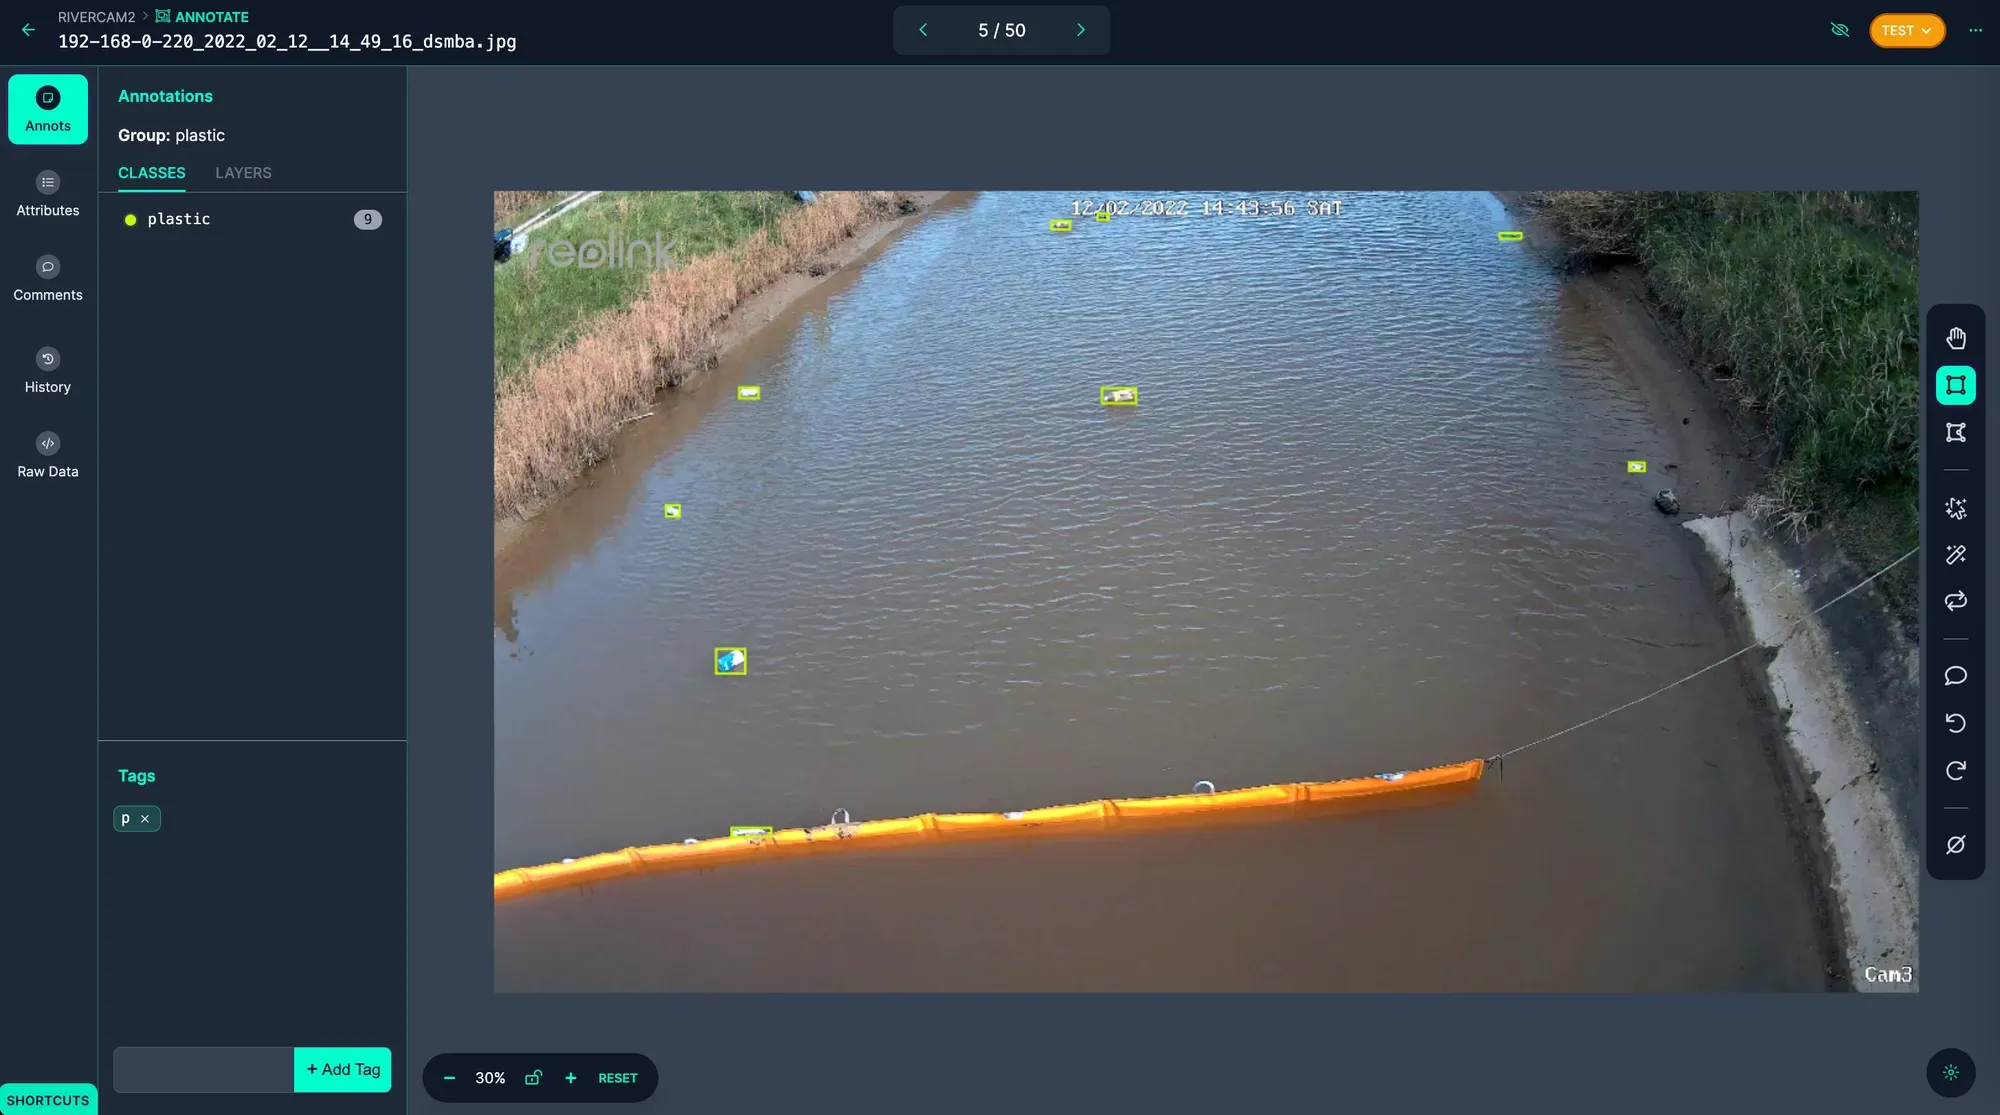
Label Images with Roboflow for Model Training
Within Roboflow, images can be labeled for object detection, instance segmentation, keypoint detection, and classification. Data labeling can be done by manual click and drag techniques, single-click object annotation, per image automatic labeling, or full dataset automated labeling. These tactics depend on the type of data you are using and scale of data labeling
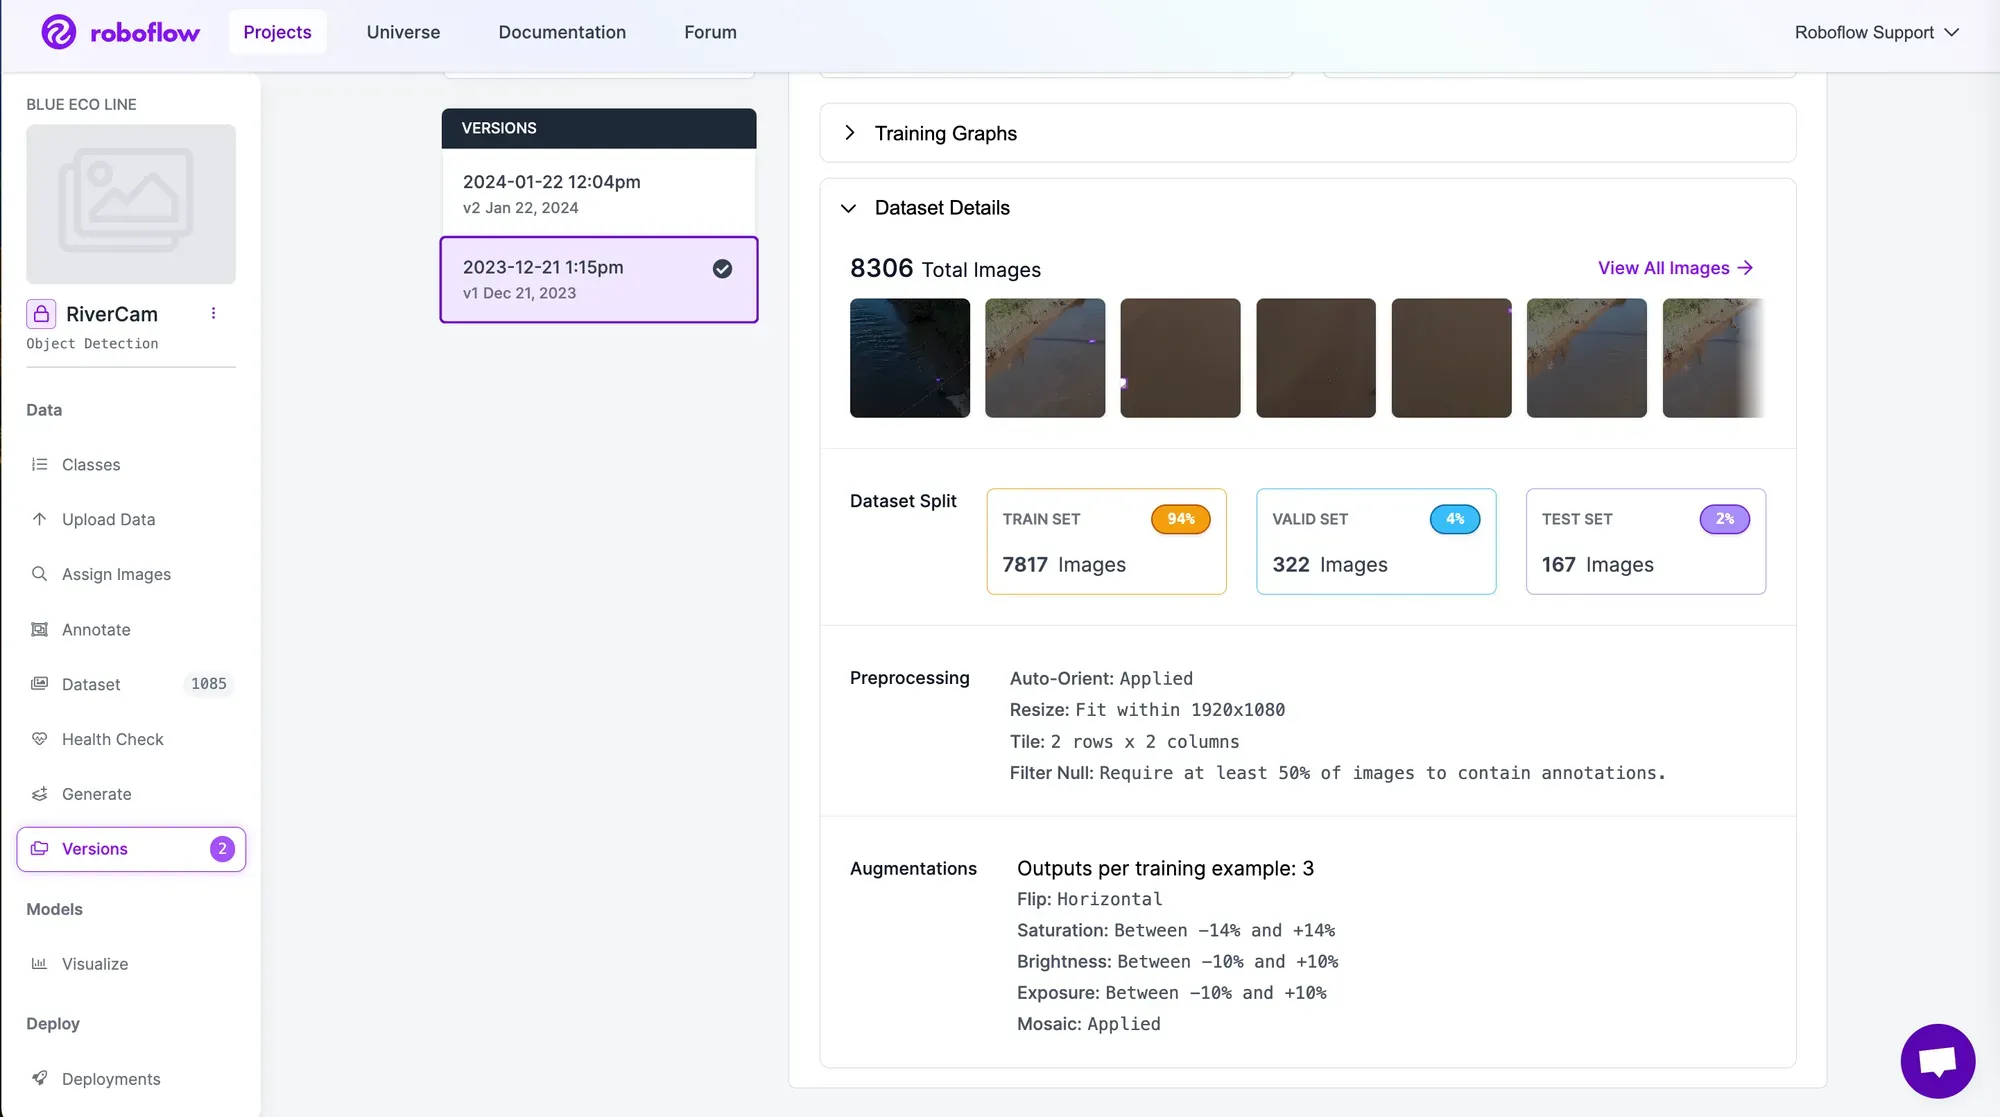
Generate a dataset Version for Model Training
Now that you have images with annotations, the next step is to generate a dataset Version. In the hosted Roboflow application (below screenshot), you will be able to select preprocessing and augmentations before created a Version. Each unique Version is then saved for you to keep as you iterate on experiments to improve model quality.
To create an automated deployment, you can use the Roboflow Python Package to generate a dataset version – generate.py.
This includes adding preprocessing and augmentations such as tiling, resizing, and brightness to improve the robustness of the model. For example, tiling can improve the accuracy of detecting small objects, such as plastic, by zooming your detector in on small objects while still being able to run fast inference.
from roboflow import Roboflow

API_KEY = "api_key"
WORKSPACE = "workspace_name"
PROJECT = "project_name"
rf = Roboflow(api_key= API_KEY)

project = rf.workspace(WORKSPACE).project(PROJECT)
settings = {
 "augmentation": {
    "bbblur": { "pixels": 1.5 },
    "bbbrightness": { "brighten": True, "darken": False, "percent": 91 }
    },
 "preprocessing": {
    "contrast": { "type": "Contrast Stretching" },
    "filter-null": { "percent": 50 },
    "grayscale": True,
    }

 }

versions = project.generate_version(settings=settings)
Now that the dataset version is generated, export the dataset to train a model on Google Cloud Platform (GCP) using Intel C3 Sapphire Rapids.
from roboflow import Roboflow

rf = Roboflow(api_key='YOUR_API_KEY')
project = rf.workspace('WORKSPACE').project('PROJECT')
dataset = project.version(1).download('yolov8')
Train an Ultralytics YOLOv8 model with Intel C3 Sapphire Rapids on GCP
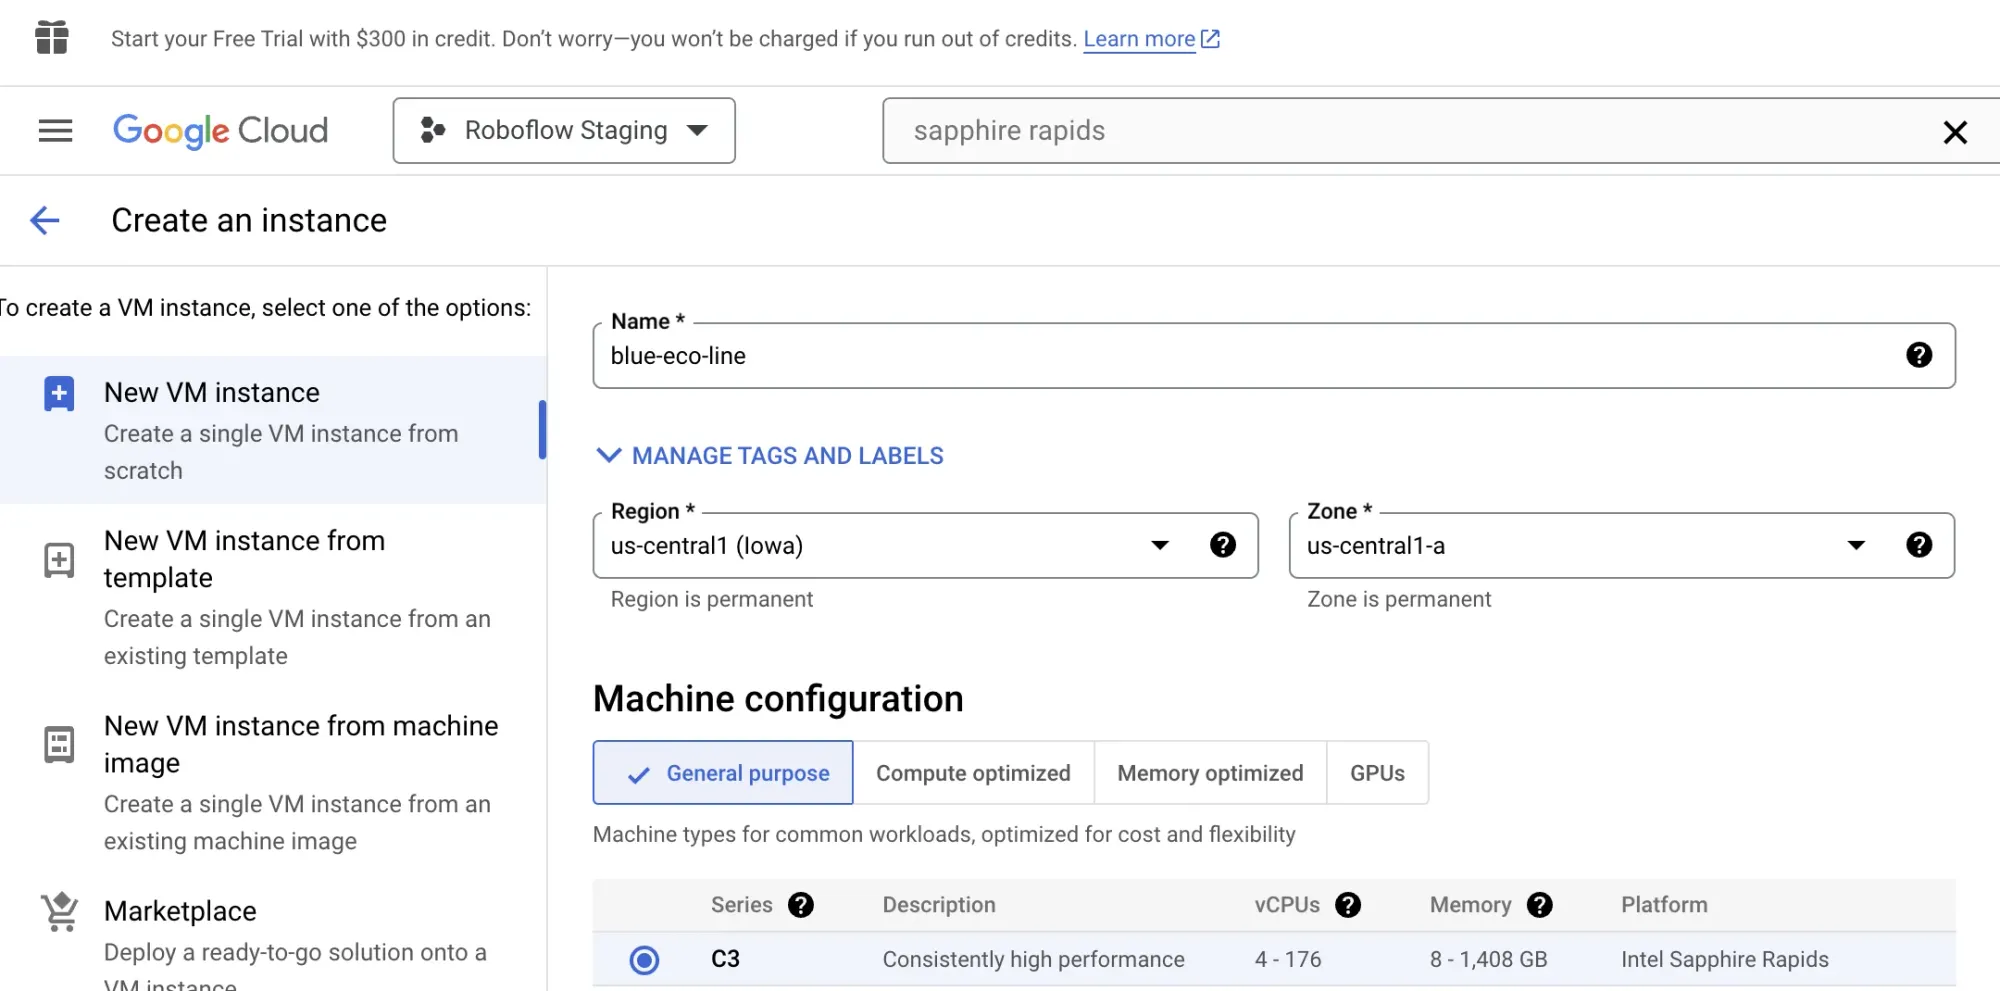
Here are the steps for using a C3 Sapphire Rapids Virtual Machine on GCP to train a YOLOv8 model.
Create an C3 VM instance using GCP to access the machine for model training.
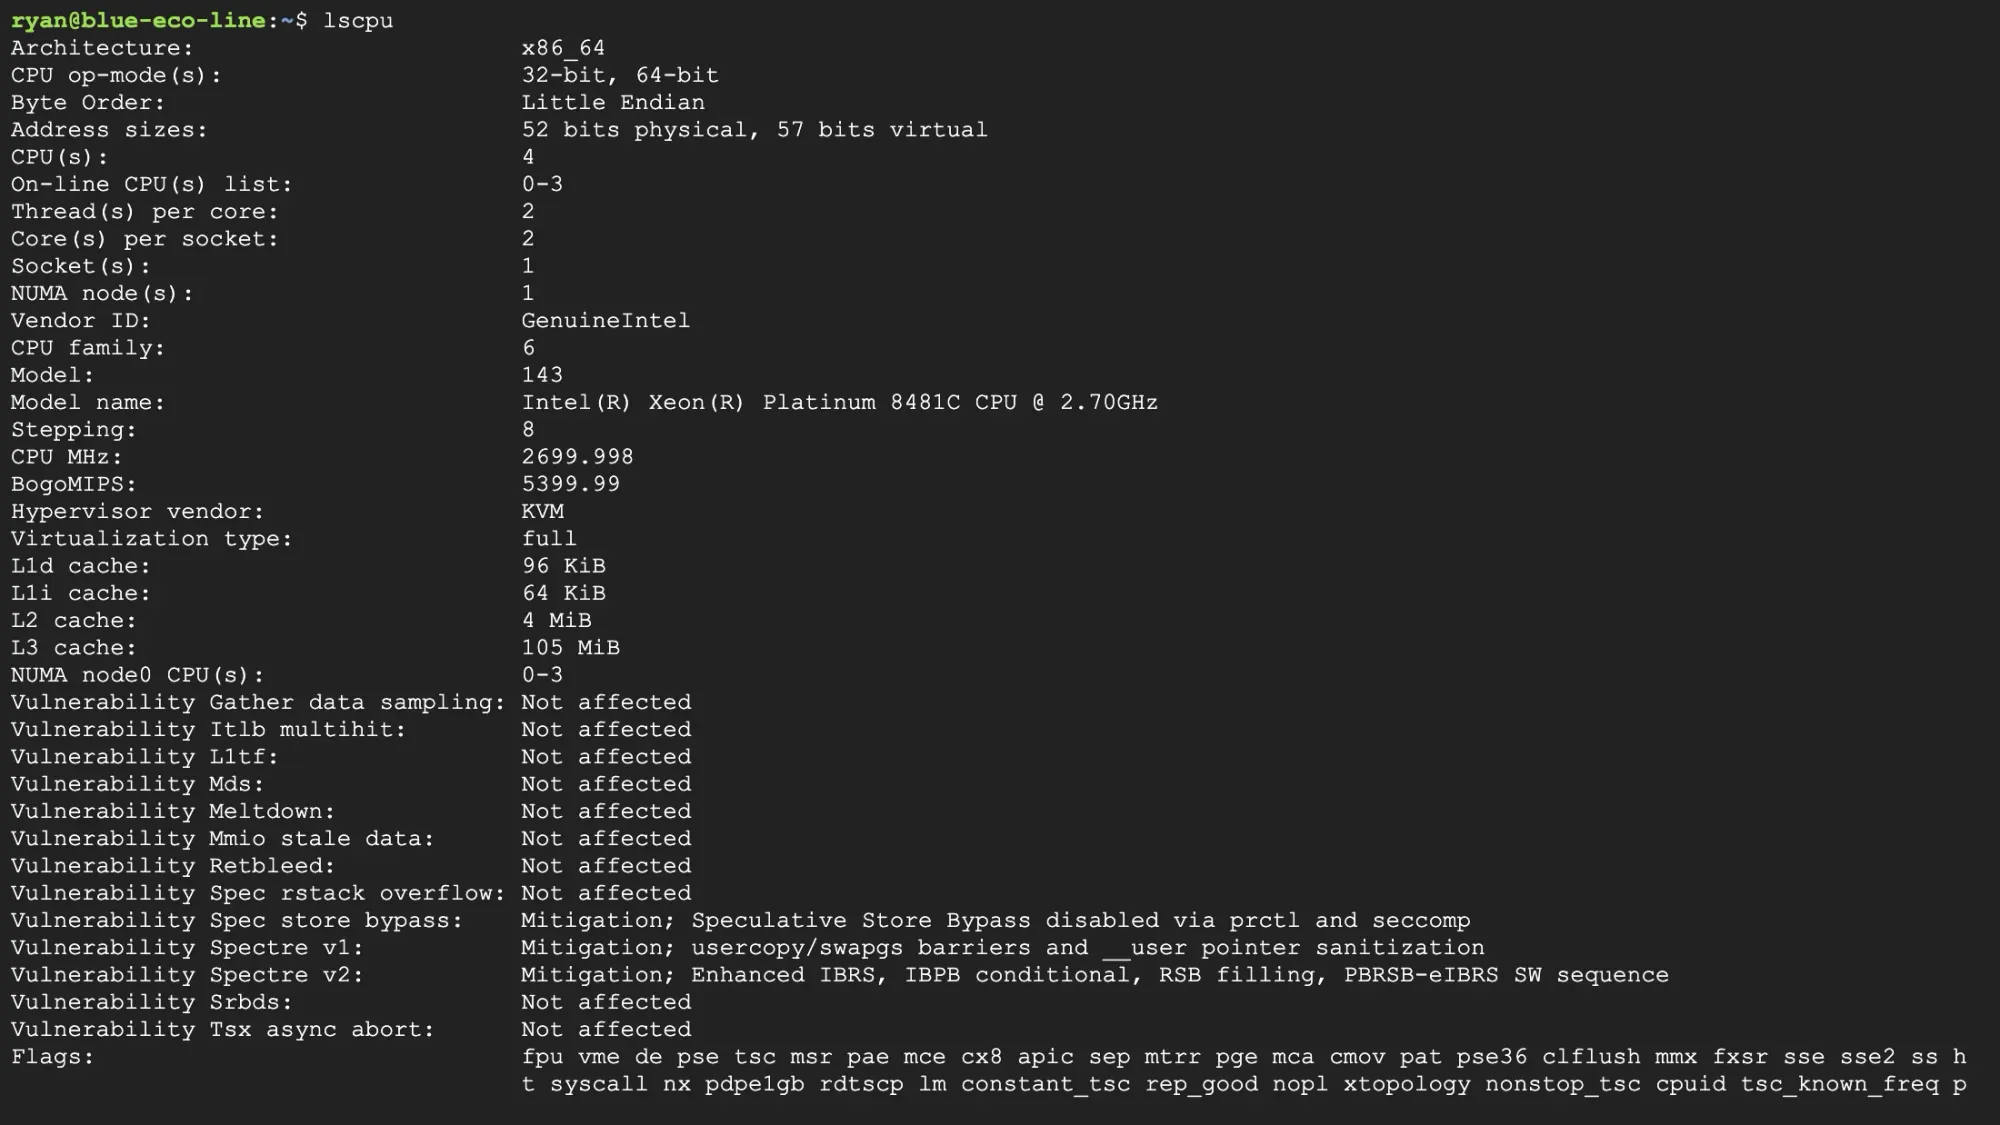
Once you SSH into your C3 Virtual Machine, you can see the Intel Hardware Specs below.
Using the notebook train_c3_sapphire_rapids.ipynb you can train a custom YOLOv8 model your dataset utilizing the C3 VM. Then install YOLOv8 & Check C3 Sapphire Rapids Hardware Specs.

Using the following command, train the custom model using the exported dataset.
%cd {HOME}

!yolo task=detect mode=train model=yolov8s.pt data=blue_eco_line.location}/data.yaml epochs=25 imgsz=800 plots=True
Train a custom YOLOv8 model
Once training is complete, you'll be able to see and evaluate training graphs related to the model. This is helpful for model comparisons when using various datasets, preprocessing, and augmentation techniques.
%cd {HOME}
Image(filename=f'{HOME}/runs/detect/train/results.png', width=600)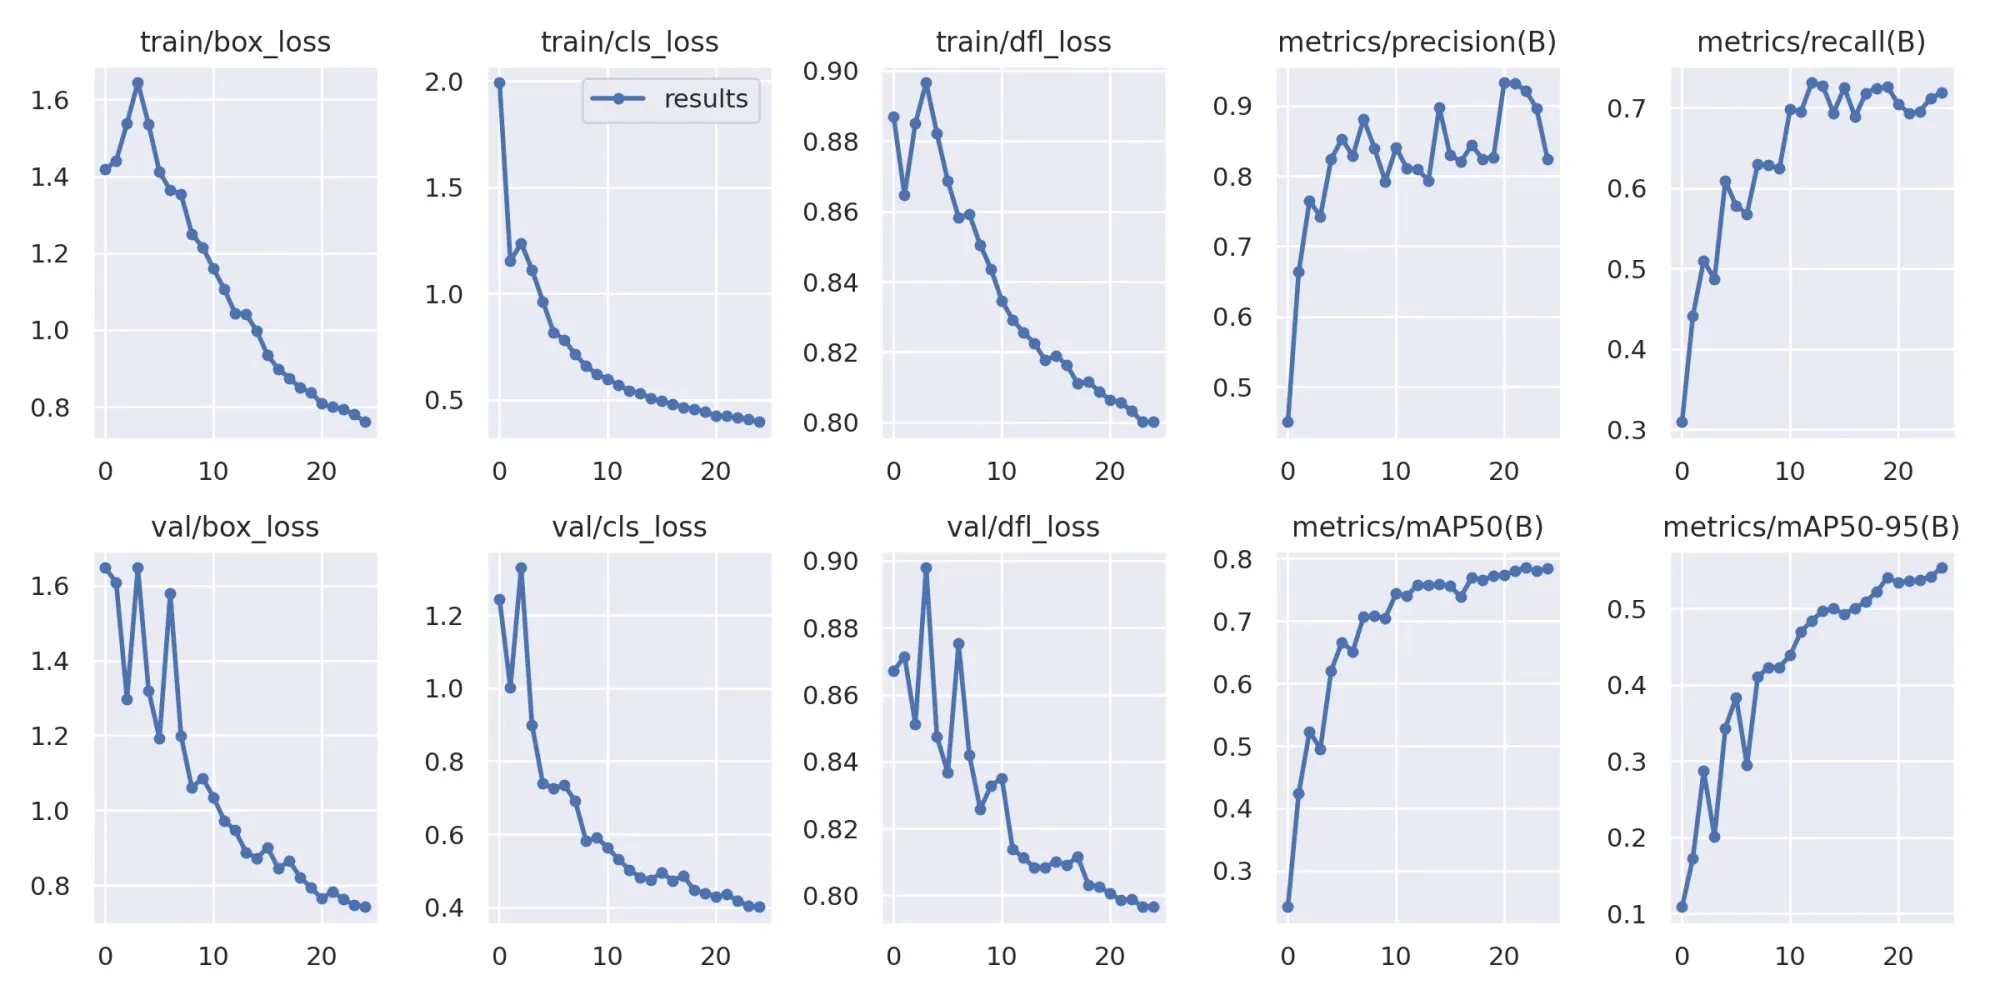
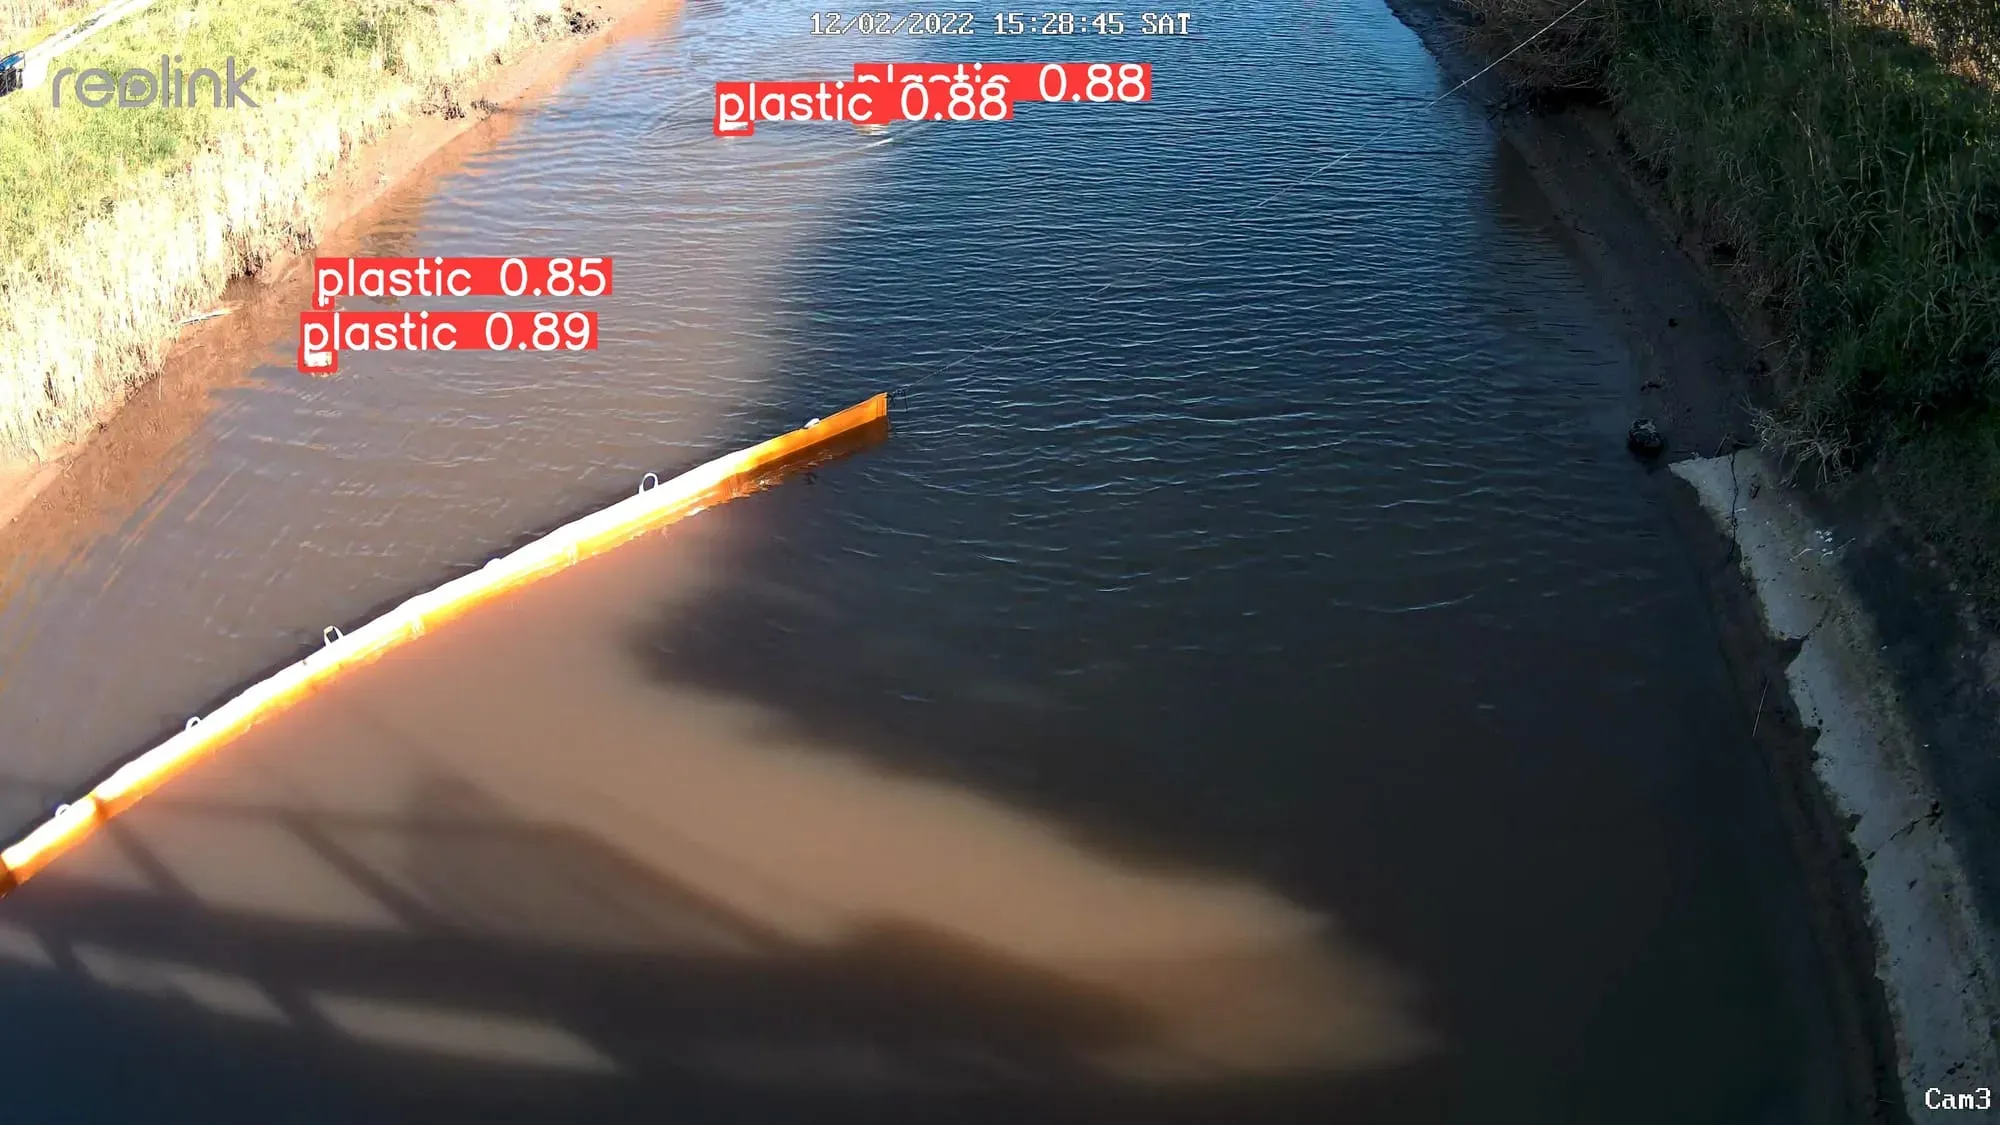
After the model is trained, you can visualize predictions to see performance with a specific image.
import glob
from IPython.display import Image, display

!yolo task=detect mode=predict model={HOME}/runs/detect/train/weights/best.pt conf=0.25 source={dataset.location}/test/images save=True


for image_path in glob.glob(f'{HOME}/runs/detect/predict/*.jpg')[:3]:
      display(Image(filename=image_path, width=600))
      print("\n")
Here are the prediction results, success!
Deploy YOLOv8 with OpenVINO Format and Intel C3 Sapphire Rapids
See our performance benchmarking of Sapphire Rapids to understand the benefits of using this over something like AWS Lambda. We observed the average response time per request is about 20% faster in the C3 Sapphire Rapids instance than that of AWS Lambda. Export the YOLOv8 model to OpenVINO format for up to 3x CPU speed up – deploy.ipynb
from ultralytics import YOLO
# Load a YOLOv8n PyTorch model
model = YOLO('best.pt')
# Export the model
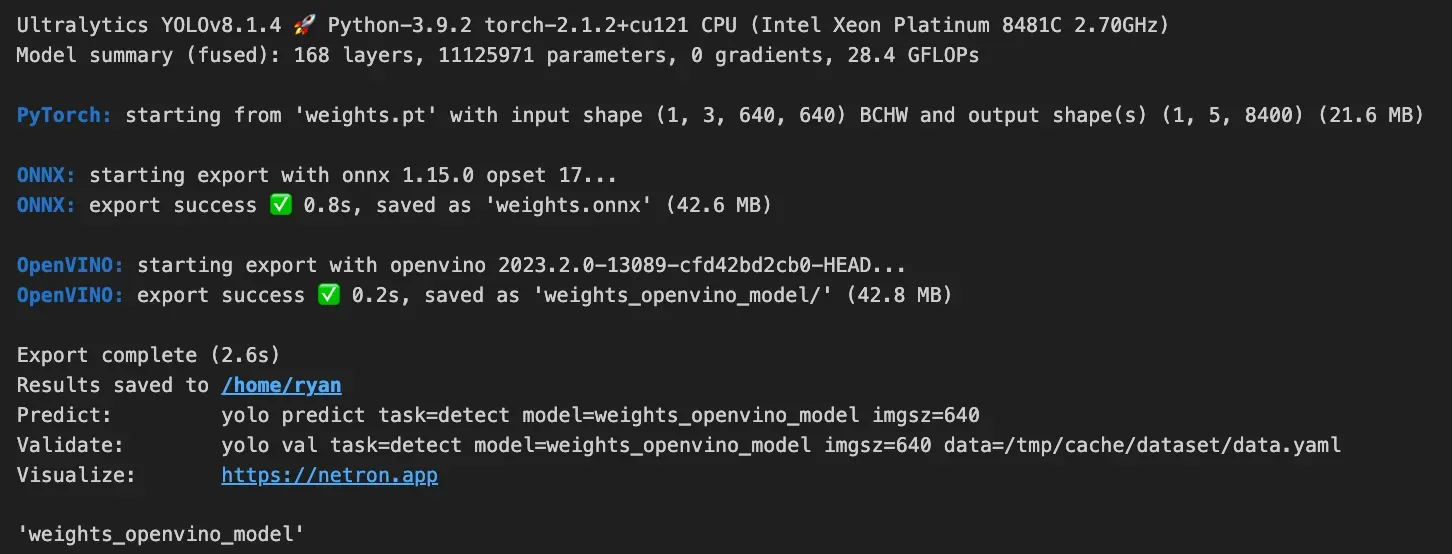
model.export(format='openvino',imgsz=[640,640])
#Load the OpenVINO Model
ov_model = YOLO('weights_openvino_model/')Once this is successful, you will see logs of a successful conversion and export of the model on Sapphire Rapids.
Next, deploy the model on Sapphire Rapids with Supervision annotations to visualize predictions:
import supervision as sv

bounding_box_annotator = sv.BoundingBoxAnnotator()
label_annotator = sv.LabelAnnotator()

for image in image_files:
    print(image)
    results = ov_model(image)
    detections = sv.Detections.from_ultralytics(results[0])
    print(f'supervision detections{detections}')


    image = cv2.imread(image)

    labels = [
        model.model.names[class_id]
        for class_id
        in detections.class_id
    ]

    annotated_image = bounding_box_annotator.annotate(
        scene=image, detections=detections)
    annotated_image = label_annotator.annotate(
        scene=annotated_image, detections=detections, labels=labels)

    sv.plot_image(annotated_image)
You are now able to pass images to the deployed model and receive predictions!
Conclusion
This completes the full implementation of deploying an autonomous river monitoring and cleaning system. With this tutorial and associated open source repo, you can replicate a similar system for various use cases of counting, tracking, and monitoring with computer vision.
Blue Eco Line is pushing the boundary for innovation in conservation using the latest technology for computer vision with Roboflow and Intel. Being able to monitor waste and autonomously remove pollution is a critical solution to improve the health of waterways across the world.
Cite this Post
Use the following entry to cite this post in your research:
Ryan Ball, Trevor Lynn. (Jan 29, 2024). Blue Eco Line Reduces River Pollution with Roboflow and Intel Sapphire Rapids. Roboflow Blog: https://blog.roboflow.com/autonomous-river-cleaning-computer-vision/