
OC-SORT (Observation-Centric SORT) improves on standard SORT by adding two mechanisms: Observation-Centric Re-Update corrects Kalman filter drift after occlusion using real observations, and Observation-Centric Momentum penalizes matches inconsistent with a track's recent motion direction. This makes it more reliable than SORT in crowded scenes, under occlusion, and with non-linear movement. This tutorial shows how to build an end-to-end OC-SORT tracking pipeline inside Roboflow Workflows, covering detection model integration, tracker configuration, bounding box visualization, and production deployment.
Tracking objects across video frames is a critical step in many computer vision applications. While object detection models can identify what is present in a single frame, they do not inherently capture motion or maintain continuity over time. This is where tracking algorithms come into play.
Tracking algorithms such as SORT, OC-SORT, and ByteTrack transform frame-by-frame detections into continuous object tracks, ensuring that each object is assigned a consistent identity as it moves across frames.
In a previous blog, we learned how to use SORT tracking within Roboflow Workflows to transform frame-by-frame detections into continuous object tracks for video streams. In this blog, we will discuss how to use OC-SORT tracking.
While SORT is fast and effective, it has notable limitations in real-world scenarios. It relies on simple linear motion assumptions and frame-to-frame matching, which makes it less reliable under occlusion, non-linear motion, and in noisy or crowded scenes.
These challenges often result in lost tracks and frequent identity switches. OC-SORT addresses these issues, allowing it to better handle occlusions, adapt to complex motion, and reduce sensitivity to detection noise, resulting in more stable and consistent tracking.
What is OC-SORT?
OC-SORT (Observation-Centric SORT) is an object tracking algorithm used in computer vision to follow objects across video frames while maintaining consistent identities.
It is an improved version of the earlier SORT tracking method. Both are designed to take object detections from a model and link them over time into continuous tracks.
OC-SORT extends SORT with two key mechanisms:
- Observation-Centric Re-Update (OCR): When a track reappears after occlusion, OC-SORT retroactively corrects the Kalman filter using real observations before and after the gap, reducing accumulated drift.
- Observation-Centric Momentum (OCM): A direction-consistency cost is blended with IoU during association, penalizing matches where the candidate detection is inconsistent with the track’s recent motion direction.
To learn more about the above concepts and how the SORT algorithm works, check out this blog.
It improves tracking in situations where:
- Objects move unpredictably
- Detections are noisy or missing for a few frames
- Objects briefly overlap or occlude each other
Compared to SORT, OC-SORT:
- Handles occlusions better
- Reduces identity switches (when two objects swap IDs)
- Works better in crowded or complex scenes
- Maintains more stable tracking over time
Building an End-to-End Object Tracking Workflow with OC-SORT in Roboflow
Roboflow Workflows allow you to visually design video AI pipelines by connecting blocks for detection, tracking, zone analysis, and visualization. This approach simplifies complex logic, reduces the need for extensive coding, and enables you to build scalable, production-ready workflows quickly.
In this blog, we will build a dancer tracking workflow that detects and tracks each dancer in a video using the OC-SORT tracker. Each object is assigned a consistent ID, allowing it to be followed reliably from frame to frame.
The video below shows the output of this workflow applied to this sample video.
Step 1: Set Up Your Roboflow Workflow
To get started, create a free account on Roboflow and log in. Next, create a workspace, navigate to Workflows from the left sidebar, and click Create Workflow.
A setup modal will appear, allowing you to choose from a variety of prebuilt templates such as segmentation, OCR, small object detection, and more.
For this tutorial, select Build My Own as shown below:

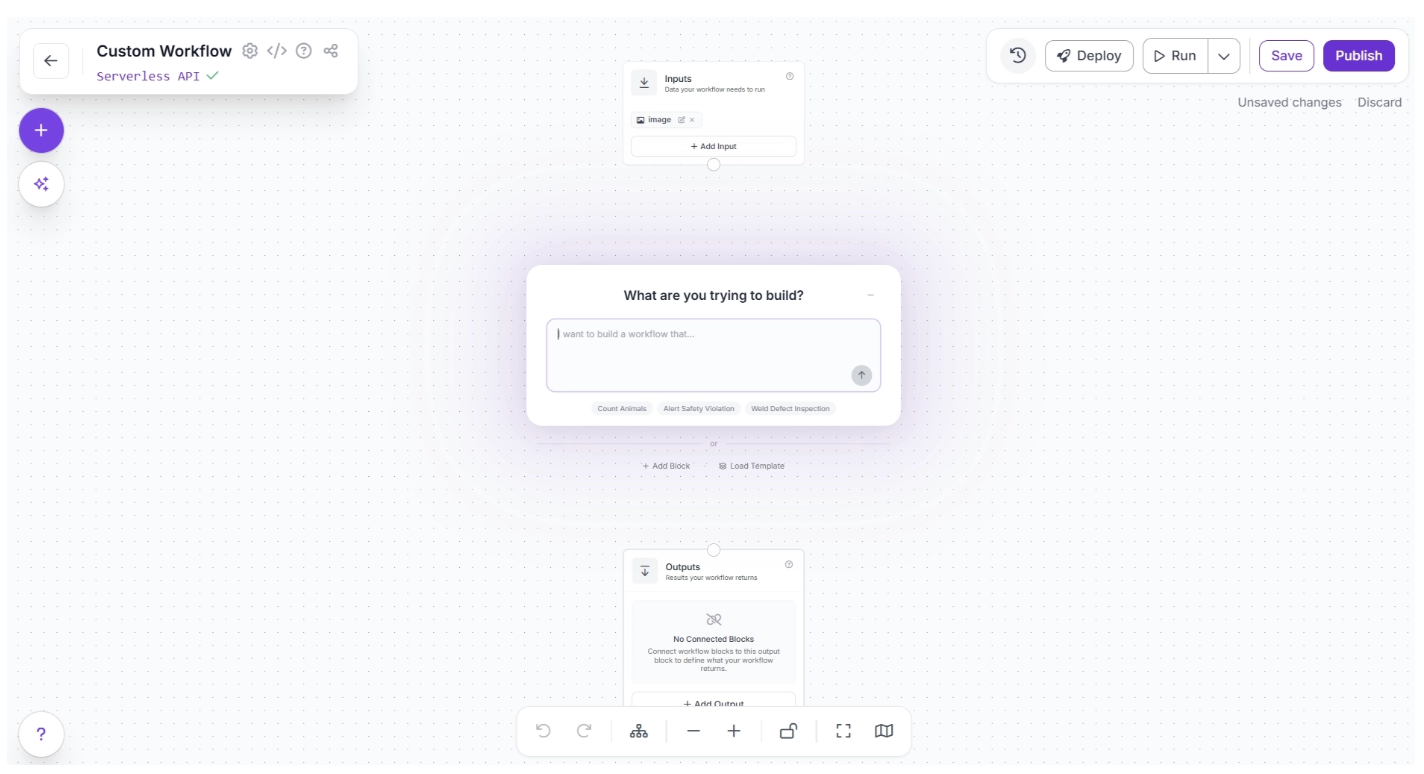
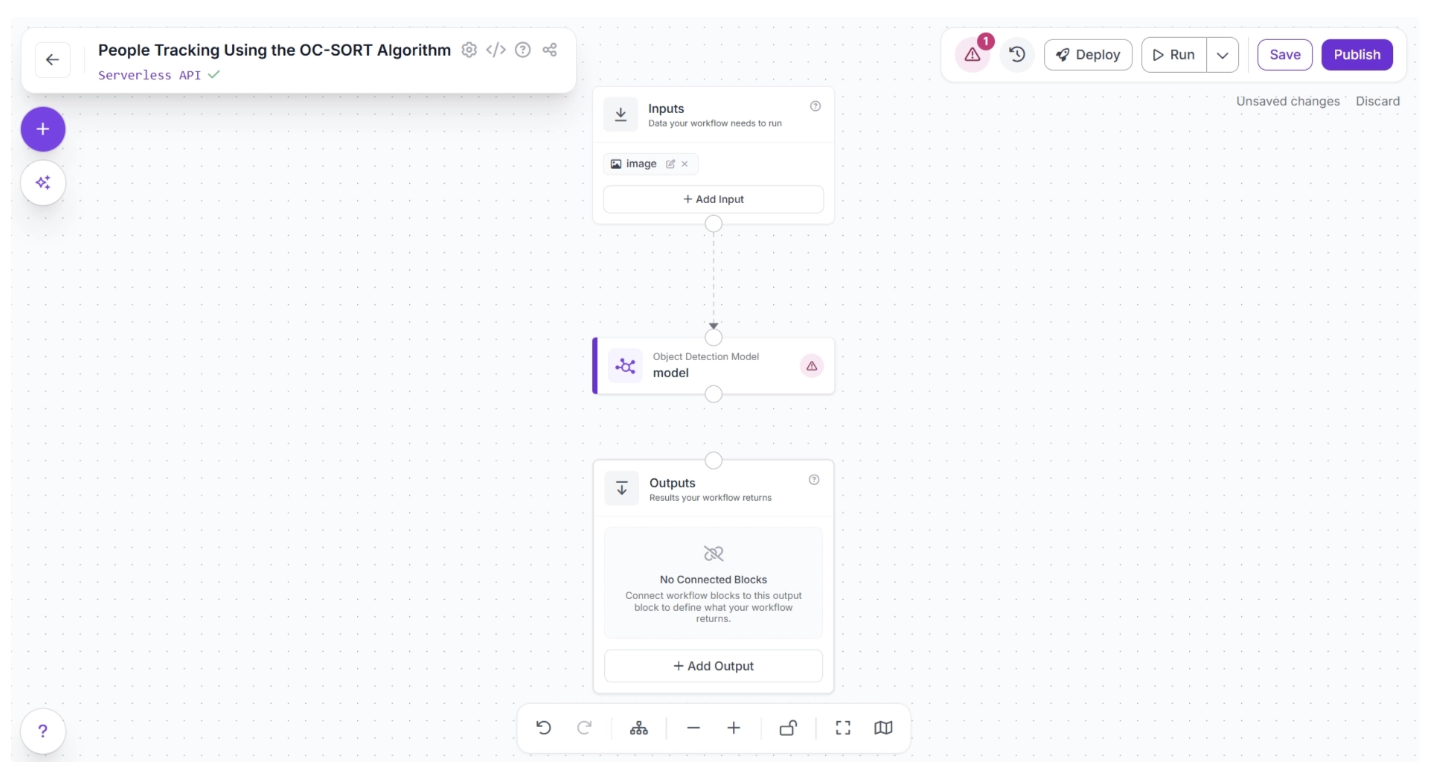
You will then be taken to a blank workflow editor, ready to start building your pipeline.
By default, you will see two blocks: Inputs and Outputs, along with an AI Assistant pop-up that can help generate workflows from prompts. You can minimize the pop-up for now and focus on building the workflow step by step.
An example prompt you can use to generate the workflow described in this blog is shown below. While you may need to adjust some parameters to better fit your specific use case, it provides a solid starting point.
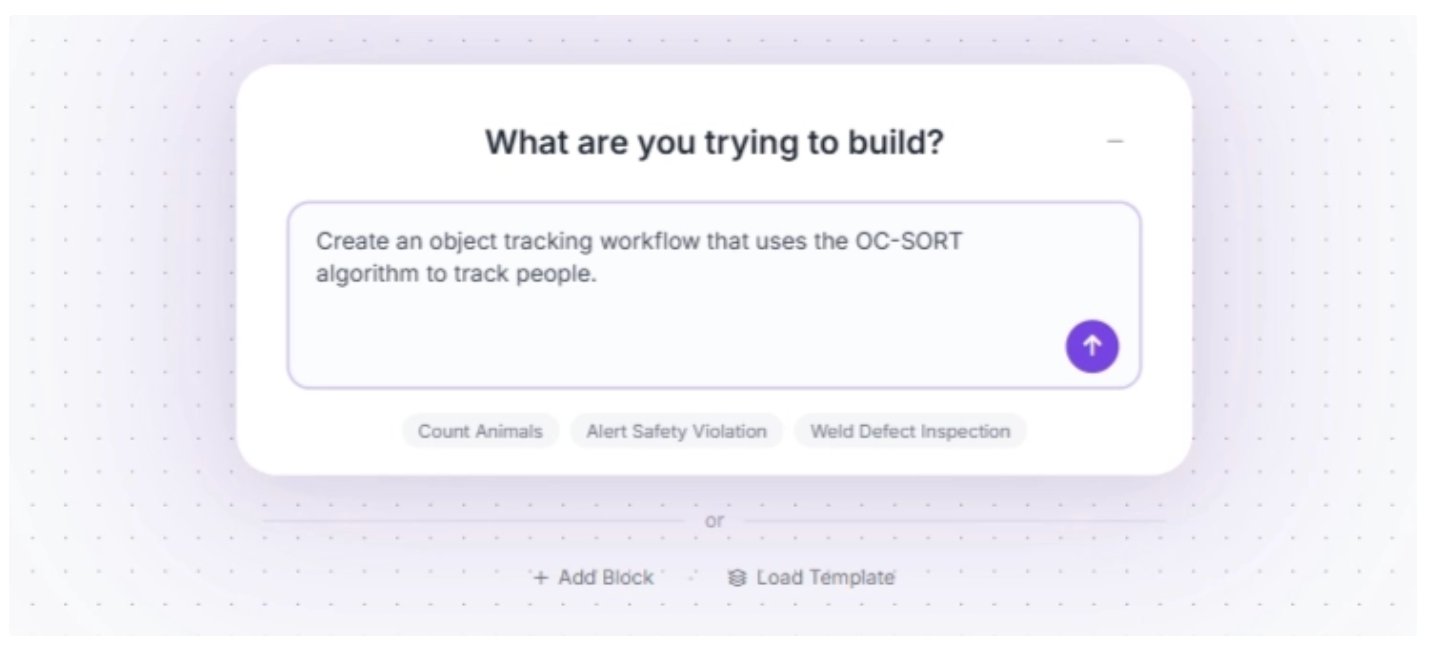
In this blog, however, we will build the workflow step by step using individual blocks so you can clearly understand how each component works and how they fit together. You can minimize the AI Assistant pop-up for now.
You can also rename your workflow by clicking the ⚙️ icon in the top-left corner. This opens the workflow configuration modal, as shown below:
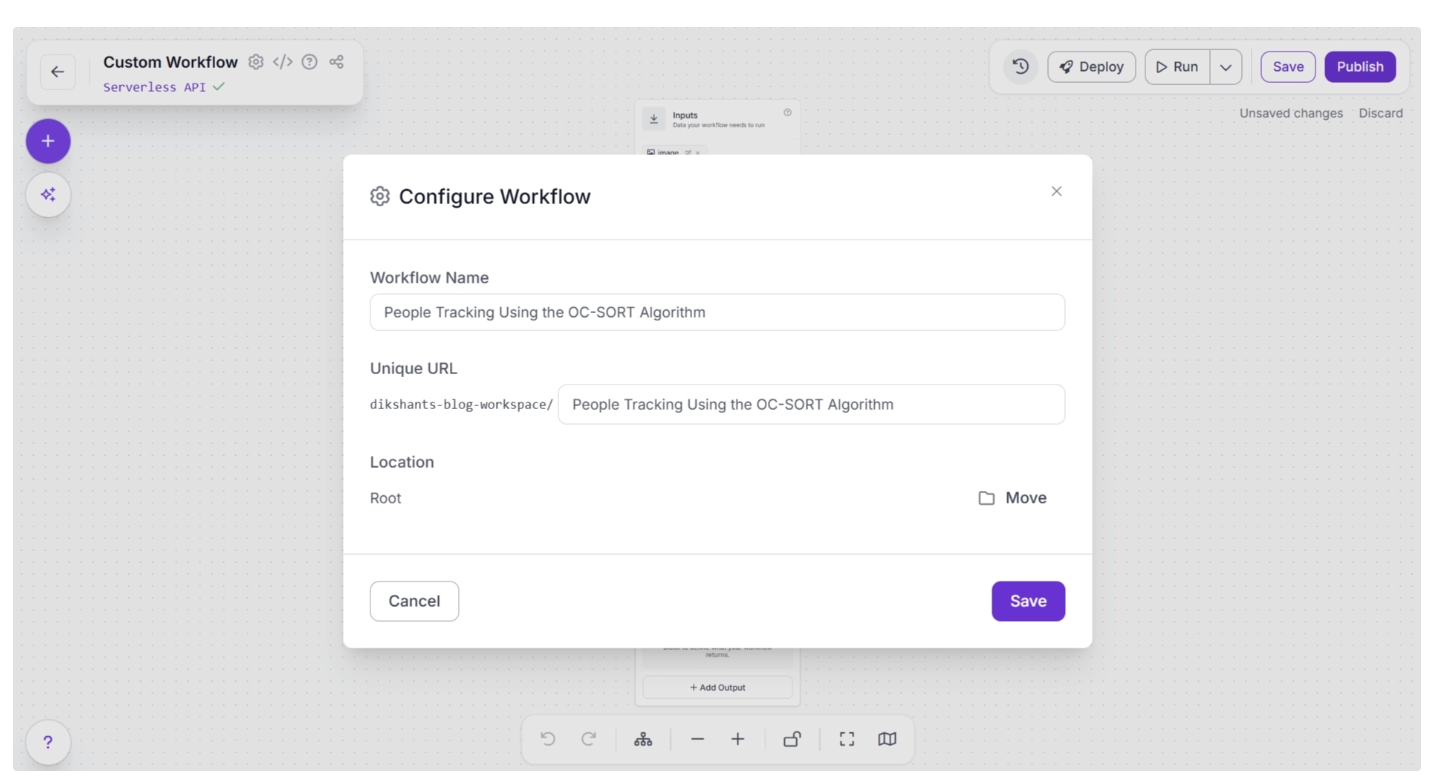
Once renamed, you can return to the home page and reopen the workflow from the Workflows section in the left sidebar to continue building.
Step 2: Add and Configure the Object Detection Model
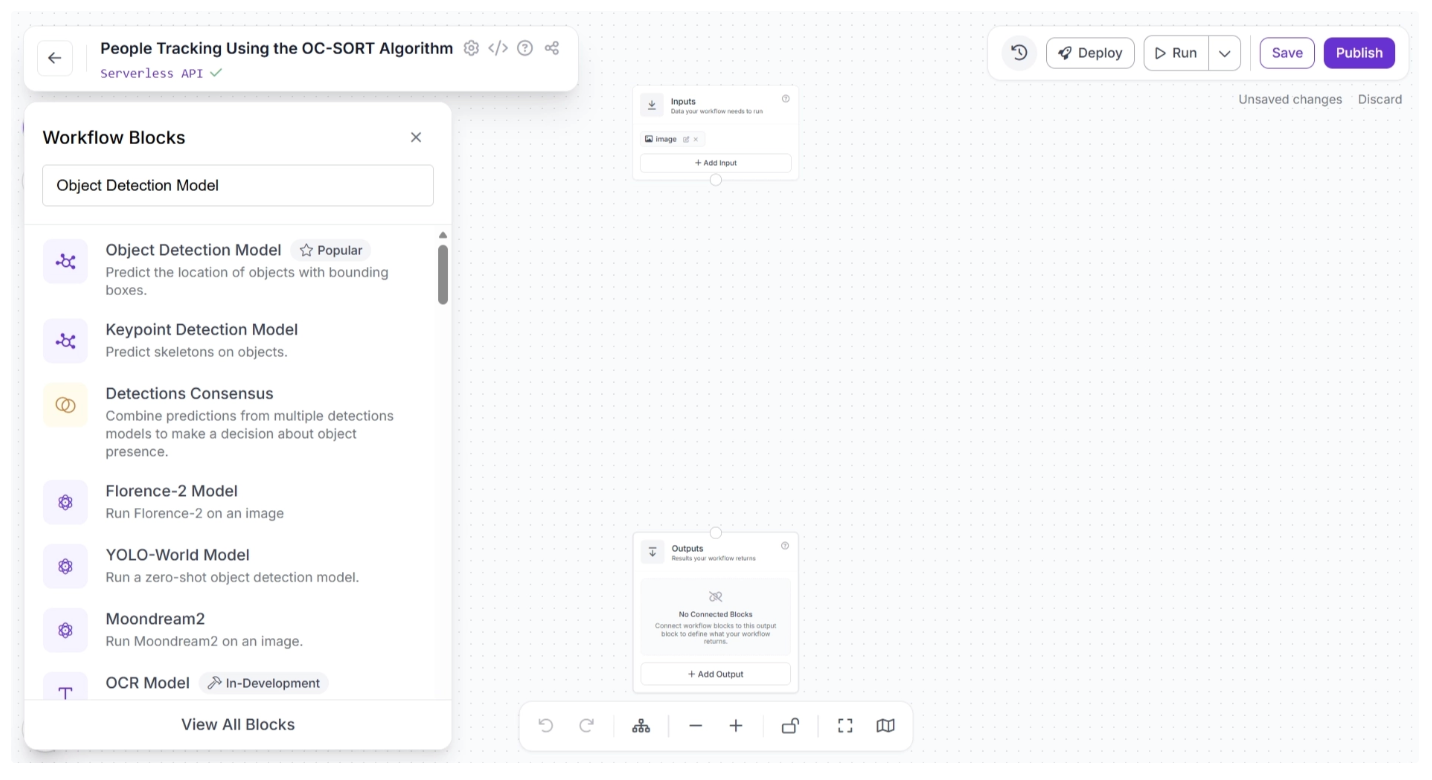
Next, we’ll add object detection to the workflow using the Object Detection Model block. This block allows you to run models such as RF-DETR to detect dancers in each frame.
To add it, click the + button in the top-left corner of the canvas. A menu of available blocks will appear, as shown below. Search for Object Detection Model and insert it into your workflow.
Once added, connect the Inputs block to the Object Detection Model block. This ensures that the input data flows into the model for inference.
When a connection is made between two blocks, the downstream block receives the output from the upstream block, which can then be used as input for its parameters.
After connecting the blocks, click Auto Layout (to the left of the zoom controls at the bottom) to neatly organize the canvas. Your workflow should now look like this:
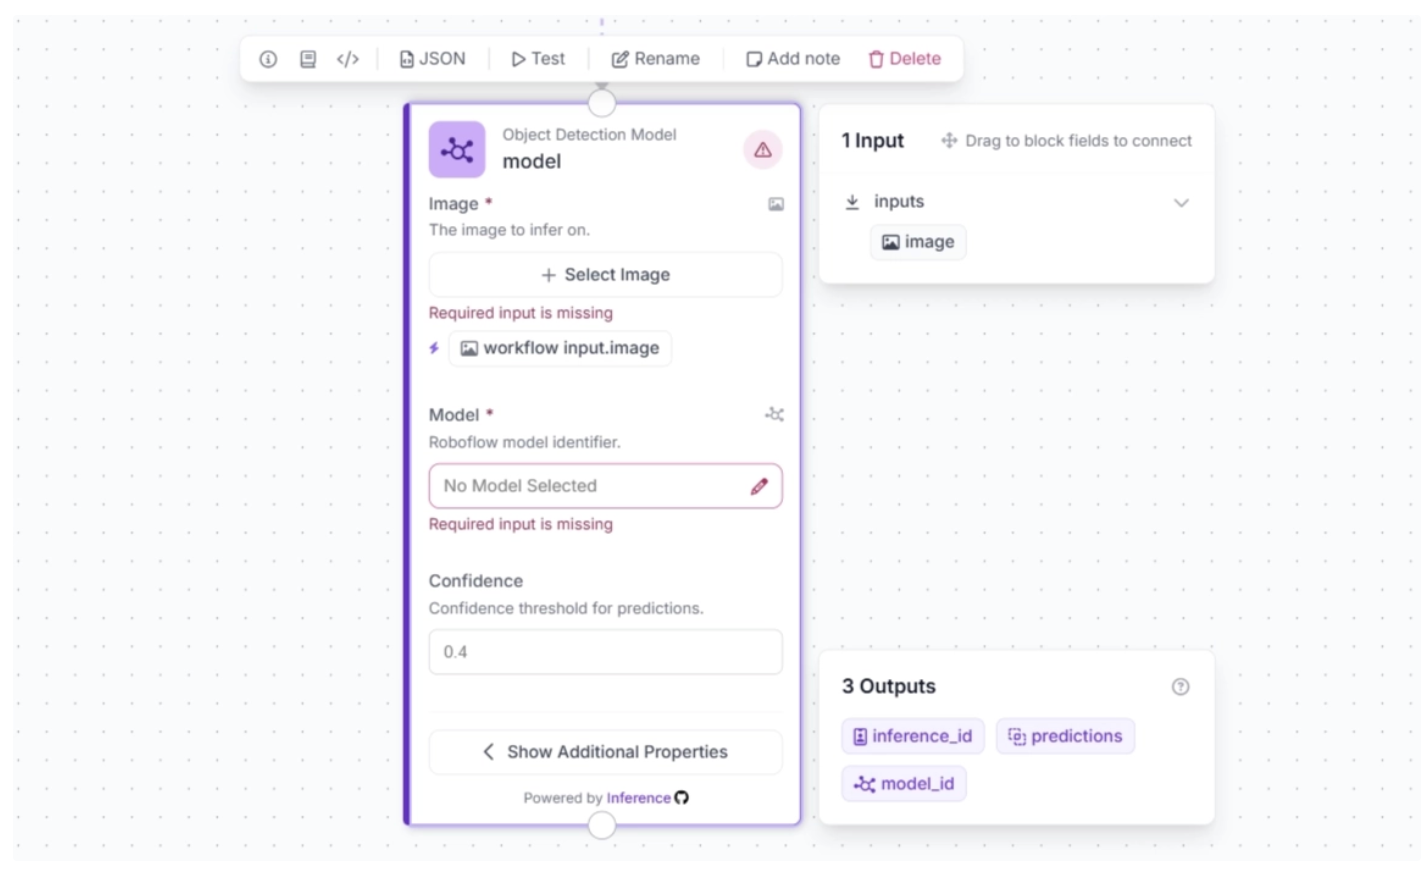
Now, configure the detection model to use. Select the Object Detection Model block to expand its parameters, then click the ✏️ icon under the Model parameter.
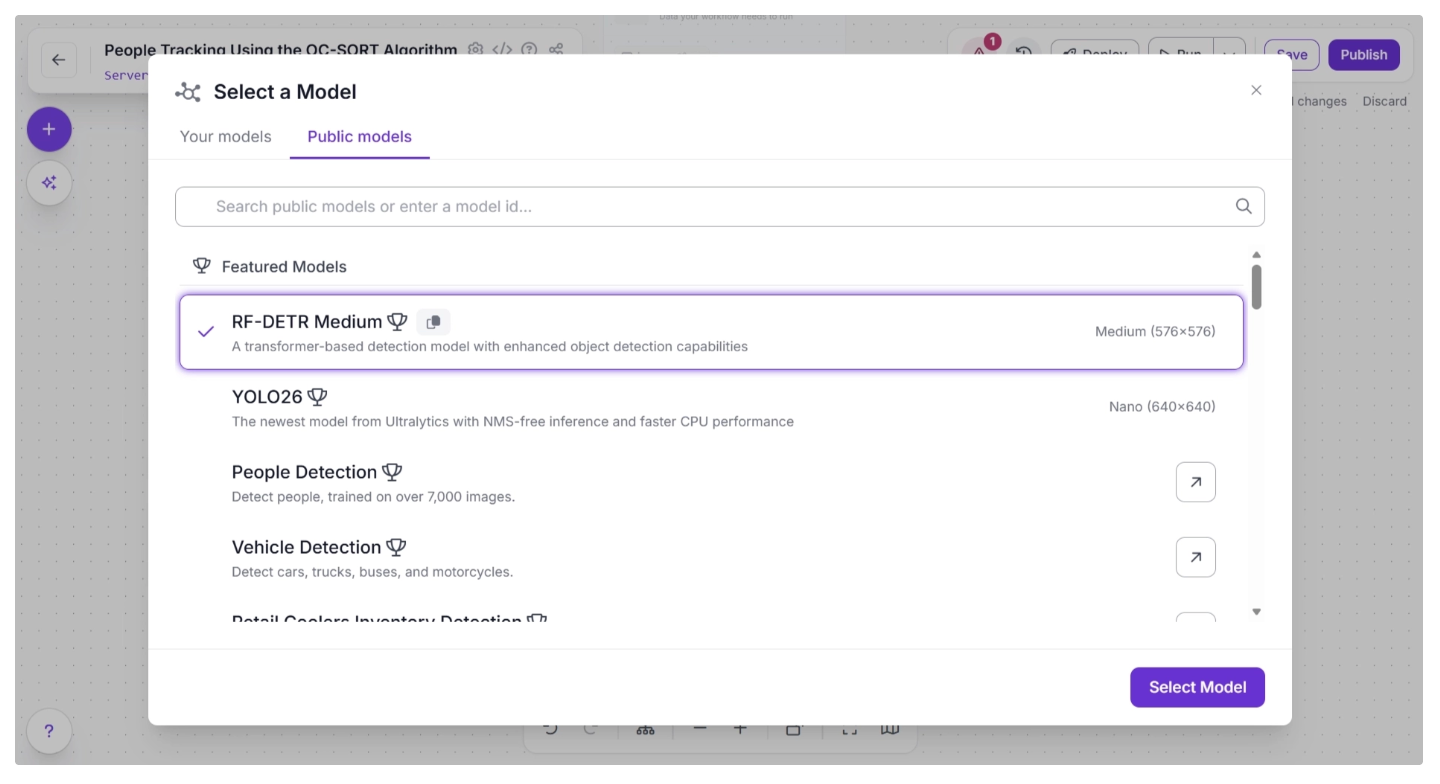
Once you click the pencil icon, a pop-up will appear. In the pop-up, select Public Models, then browse the available object detection models. Search for RF-DETR and choose the Medium variant.
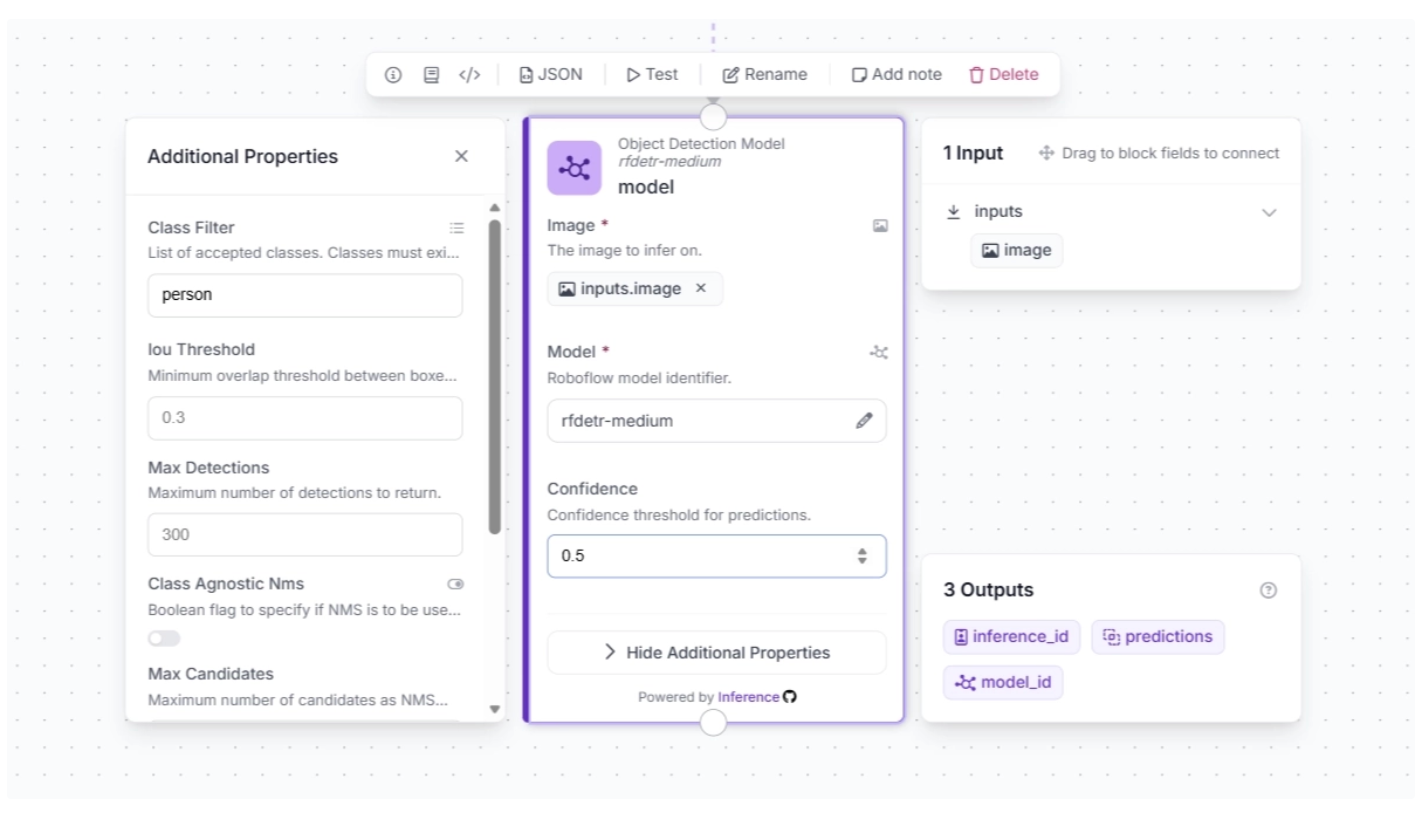
Once the model is selected, you can configure the confidence score. For this use case, set the confidence to 0.5. Then, click the ‘input.image’ button next to the lightning icon (⚡) under the Image parameter in the block. This links the input image from the upstream Inputs block to the Object Detection Model, allowing it to be used for inference.
The lightning icon (⚡) automatically assigns input values from the upstream block to the most relevant parameters of the selected block.
Next, click Show Additional Properties. This will reveal more parameters for the Object Detection Model block.
One such parameter is Class Filter, which filters out all detection classes except the one specified. We will use this to make the model detect only dancers. To do this, add “person" as the value for the Class Filter.
The block should then be configured as shown below.
Make sure you publish the workflow after adding a few blocks to save your changes.
Step 3: Integrate the OC-SORT Tracker for Multi-Frame Tracking
The object detection model operates on a frame-by-frame basis, detecting objects in each frame independently without any temporal context. To track objects across video frames, a tracker is required. You can integrate it into your workflow by adding a OC-SORT Tracker block.
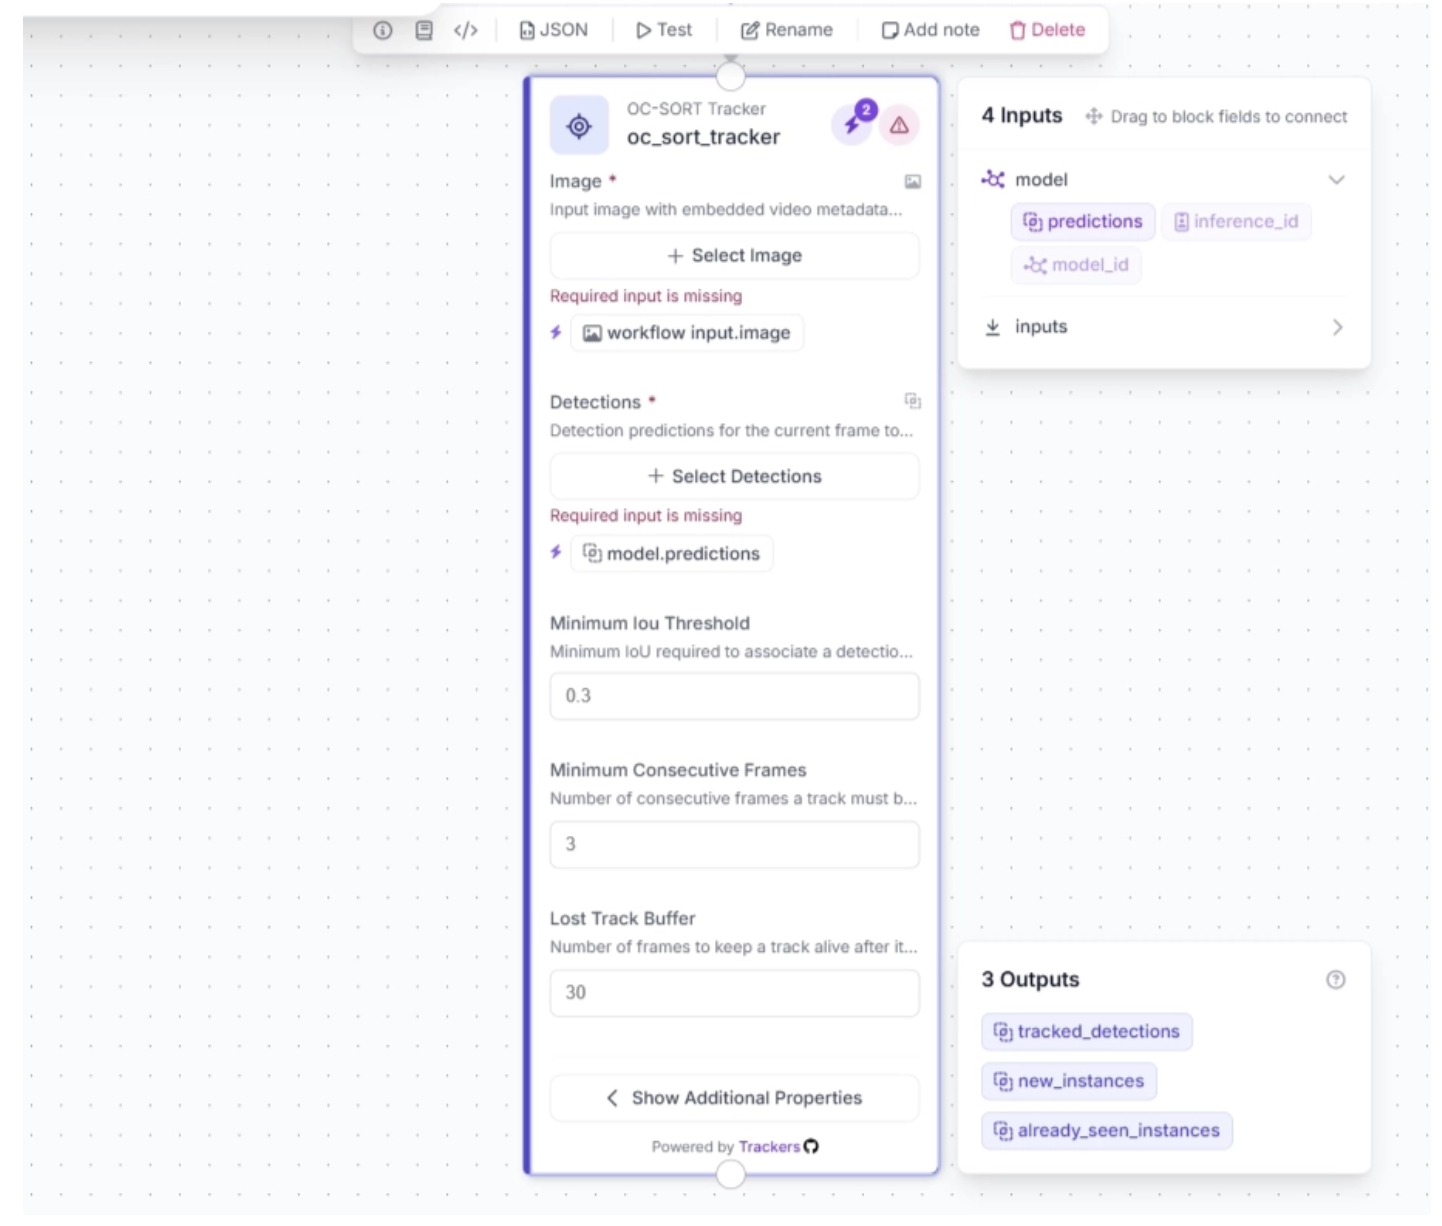
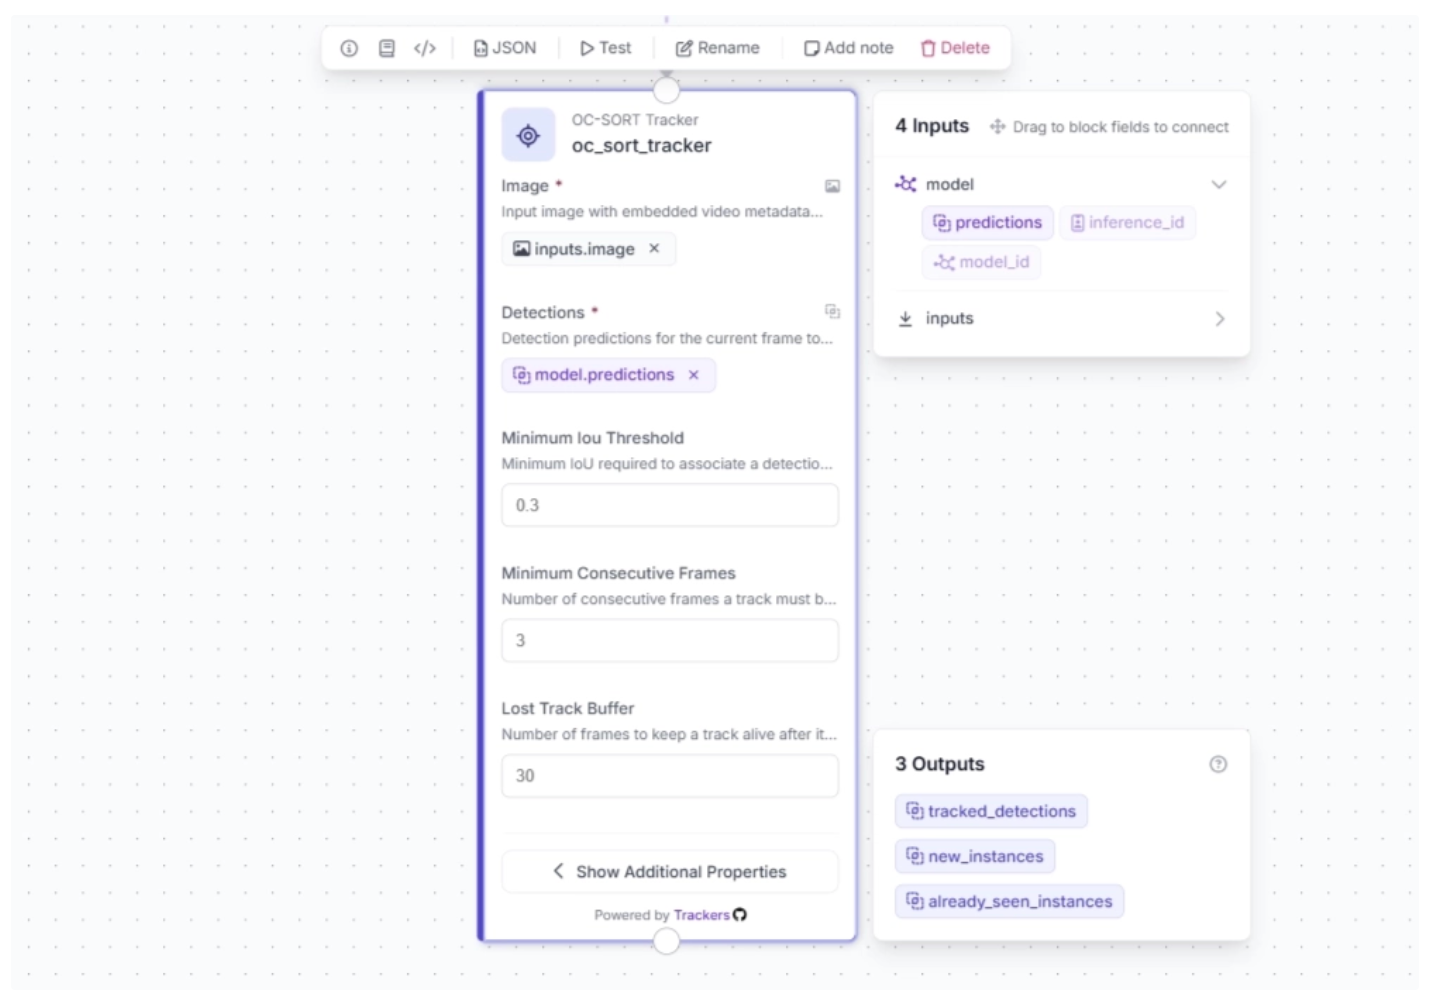
This block takes object detections and their corresponding video frames as input, initializing trackers for each detection based on configurable parameters such as:
- minimum_iou_threshold: The minimum Intersection-over-Union (IoU) required to match a detection to an existing track. Higher values make matching stricter.
- minimum_consecutive_frames: The number of consecutive frames a potential track must appear in before it is considered a confirmed track with a real track ID.
- lost_track_buffer: The number of frames the tracker will keep a track alive after it no longer matches a detection, helping maintain identity across brief occlusions.
- high_conf_det_threshold: Minimum confidence score required for a detection to be treated as high-confidence during matching. Increasing this value makes the tracker rely only on more reliable detections, reducing false associations but potentially missing faint or uncertain objects.
- direction_consistency_weight: Controls how strongly the tracker enforces motion direction alignment when matching tracks to detections. Higher values give more importance to whether a detection lies in the expected movement direction of a track, improving stability in motion-heavy scenes but reducing flexibility during abrupt direction changes.
- delta_t: Defines how many previous frames are used to estimate a track’s short-term motion trend. A larger value produces smoother and more stable velocity estimation, while a smaller value reacts faster to sudden motion changes but can be noisier.
- instances_cache_size: The size of the cache storing historical track IDs to determine whether a detection belongs to a new object or one seen before. Larger sizes let the tracker remember more past objects.
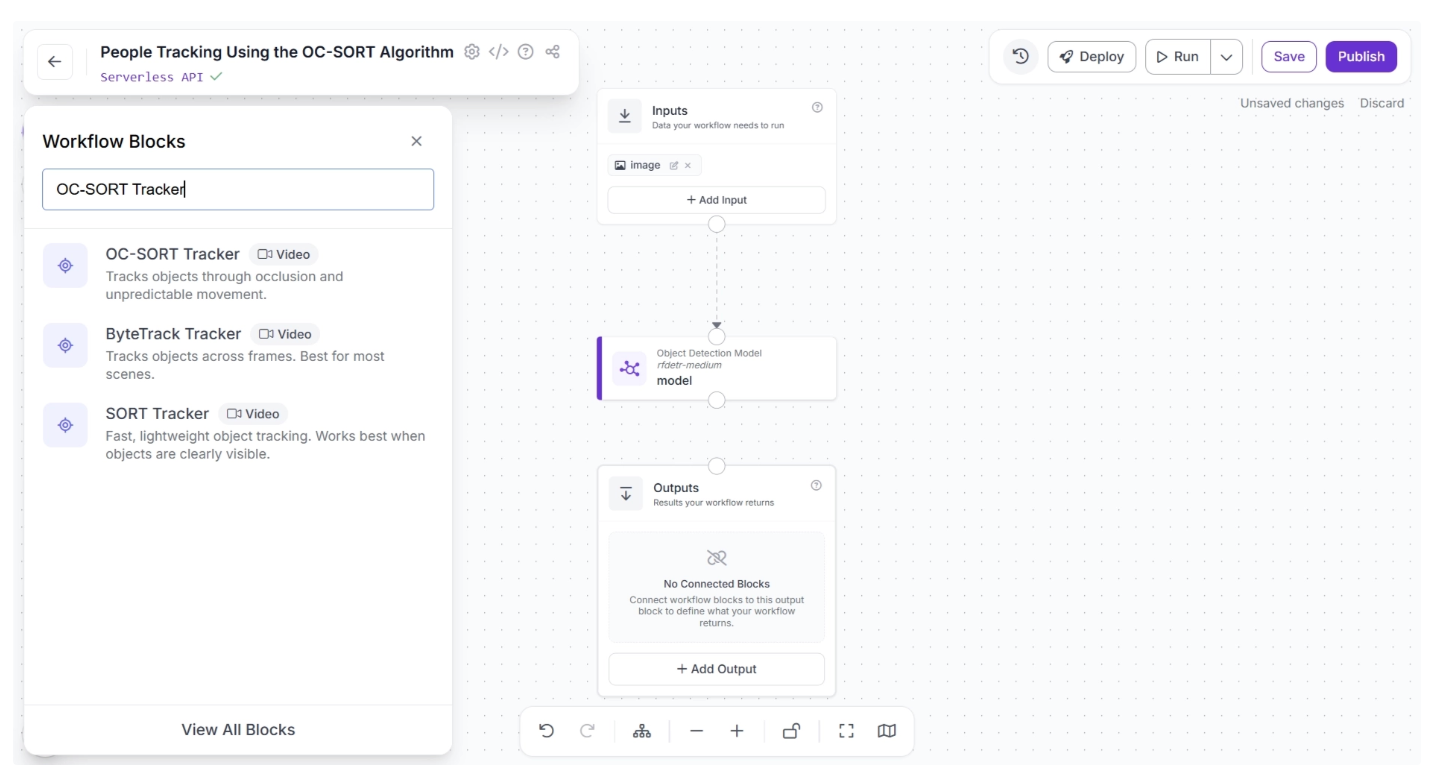
To add this block, click the + button in the top-left corner of the workflow canvas. A pop-up menu with workflow blocks will appear. From there, search for OC-Sort Tracker and select it to insert it into your workflow.
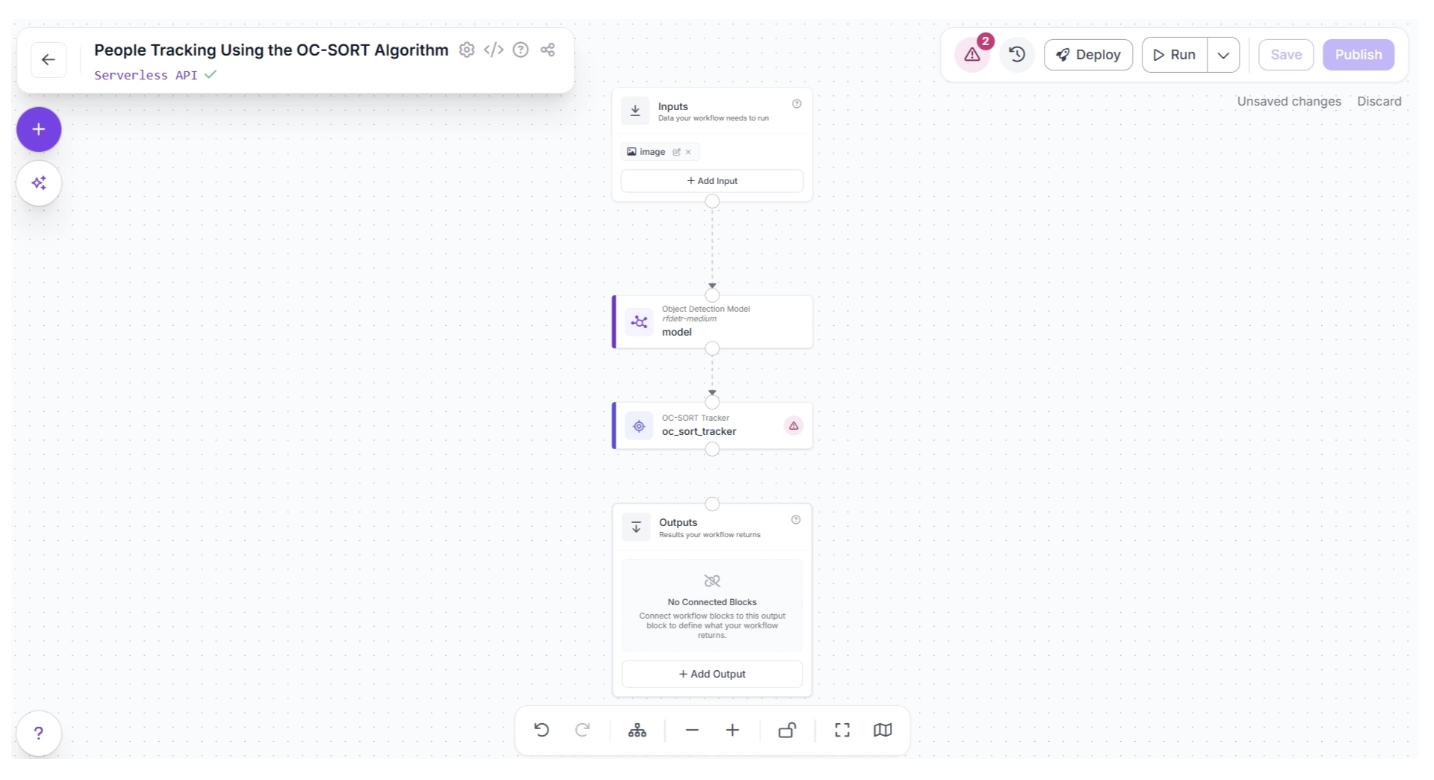
Once added, create a connection from the Object Detection Model block to the OC-SORT Tracker block. This ensures that the outputs of the Object Detection Model block are available to the OC-SORT Tracker block.
The canvas should then appear as shown below:
After making the connection, select the OC-SORT Tracker block. This will expand the block and display its configurable parameters.
Click the lightning icon (⚡) in the top-right corner of the OC-SORT Tracker block to accept input suggestions, as shown below.
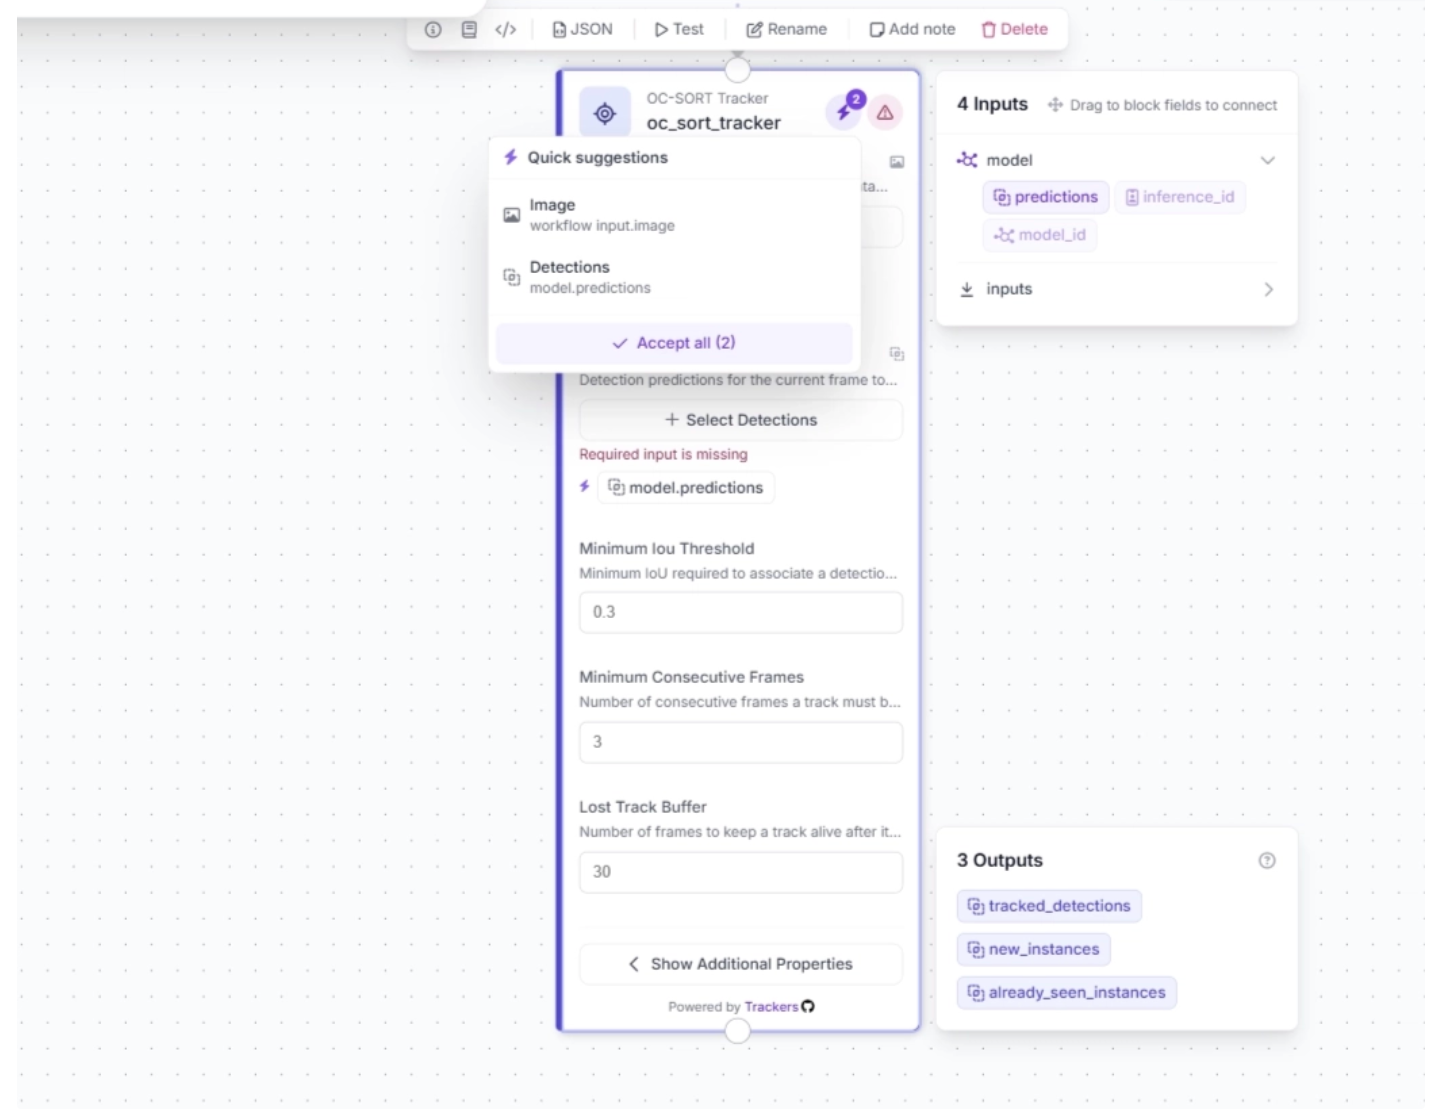
The OC-SORT Tracker block parameters should then be auto-configured as shown below:
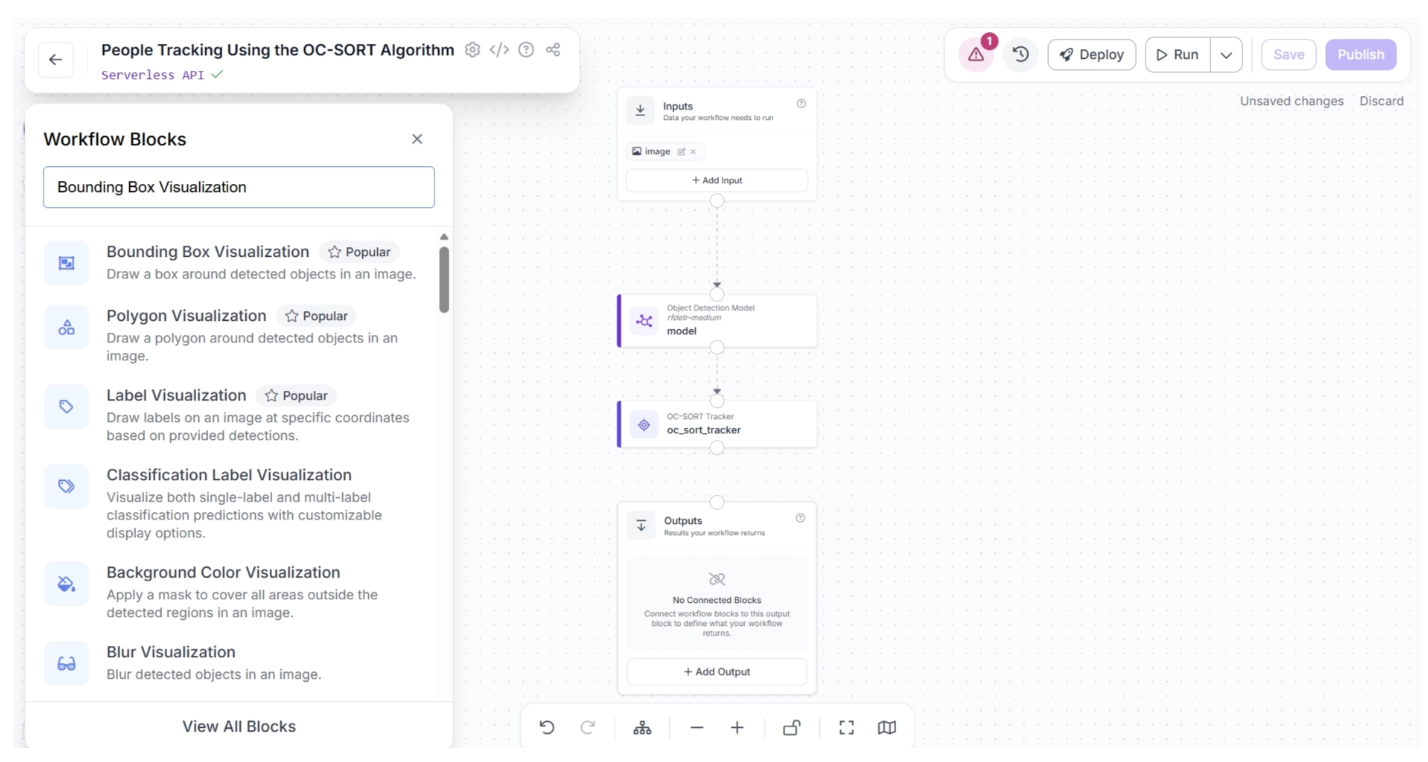
Step 4: Visualize Detections with Bounding Boxes
The OC-SORT Tracker block receives outputs from the Object Detection Model block and initializes trackers for each detected object. These detections can then be visualized as bounding boxes in the video frames using the Bounding Box Visualization block.
To add this block, click the + button in the top-left corner of the workflow canvas. A pop-up menu with workflow blocks will appear. From there, search for Bounding Box Visualization and select it to insert into your workflow.
Once added, create a connection from the OC-SORT Tracker block to the Bounding Box Visualization block. This ensures that the tracked detection outputs from the OC-SORT Tracker block are available to the Bounding Box Visualization block.
After making the connection, select the Bounding Box Visualization block. This will expand the block and display its configurable parameters.
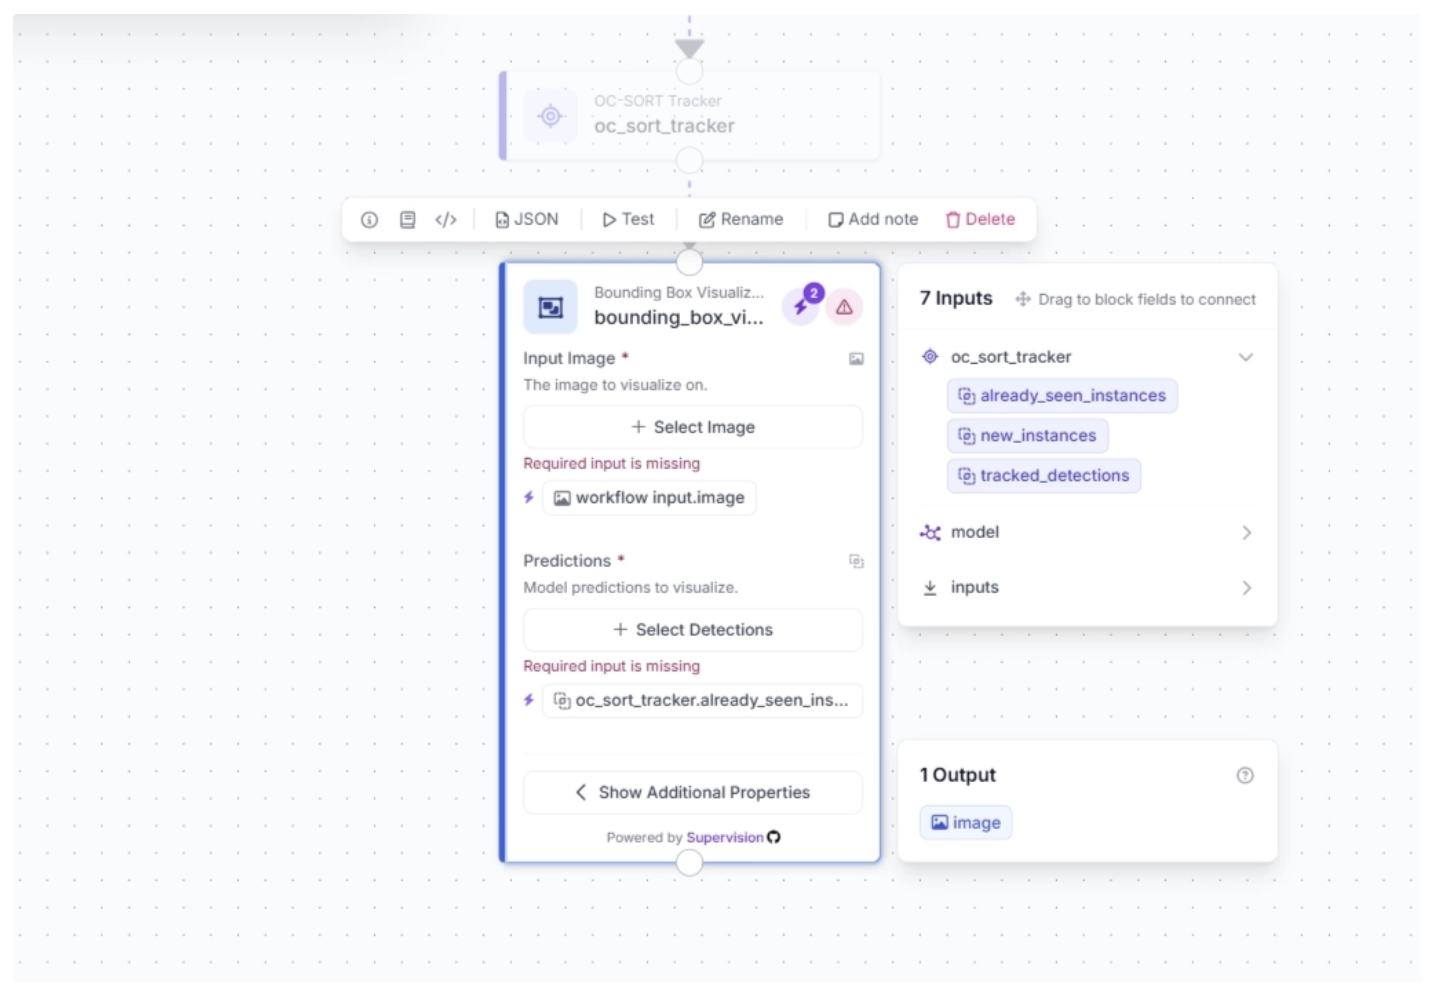
Click the lightning icon (⚡) in the top-right corner of the Bounding Box Visualization block to accept input suggestions, as shown below.
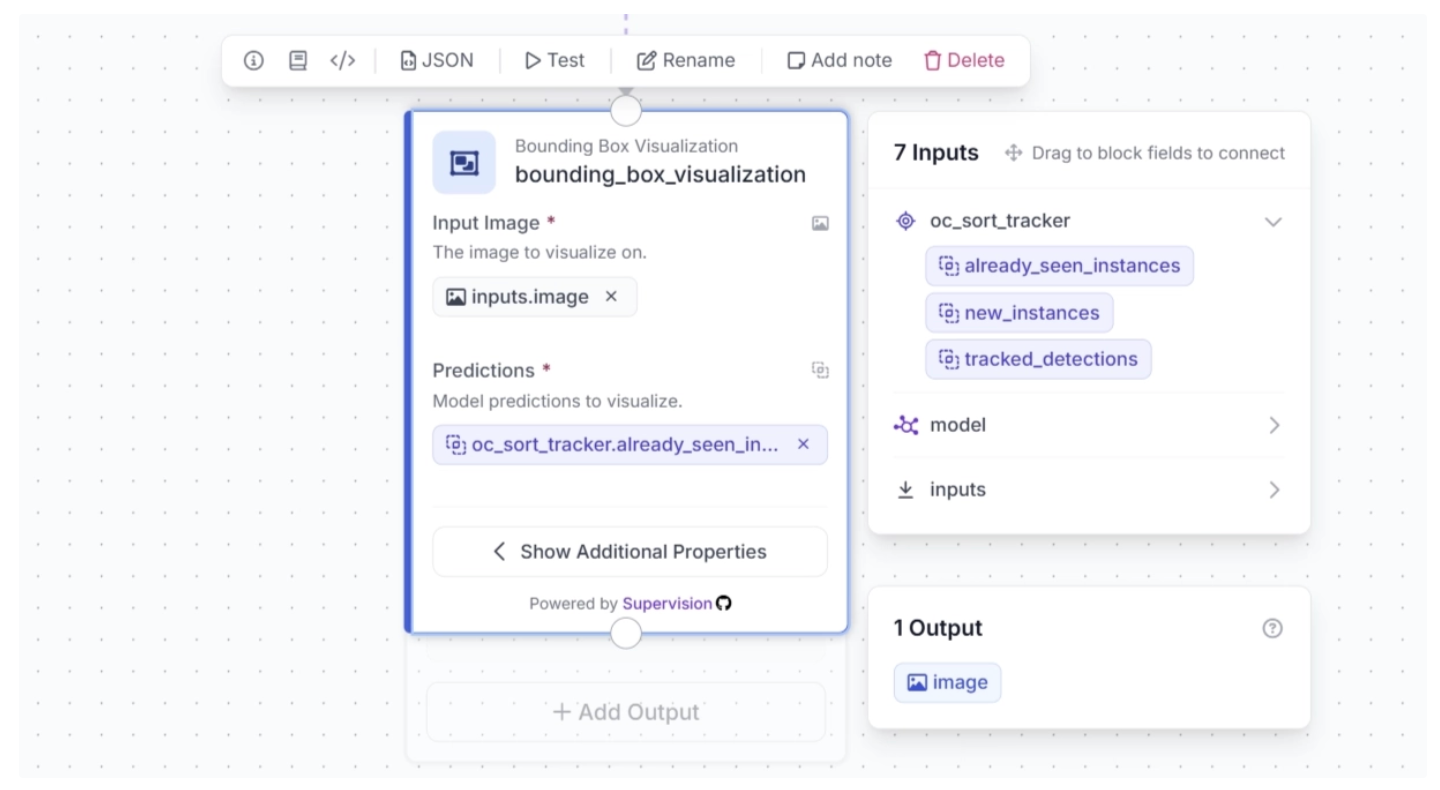
Under the Bounding Box Visualization block’s additional properties, you can configure the color palette for the bounding boxes overlaid on detected objects and specify custom colors.
For this example, set the color palette to Matplotlib Tab10 and the custom color to #00FF00, as shown below.
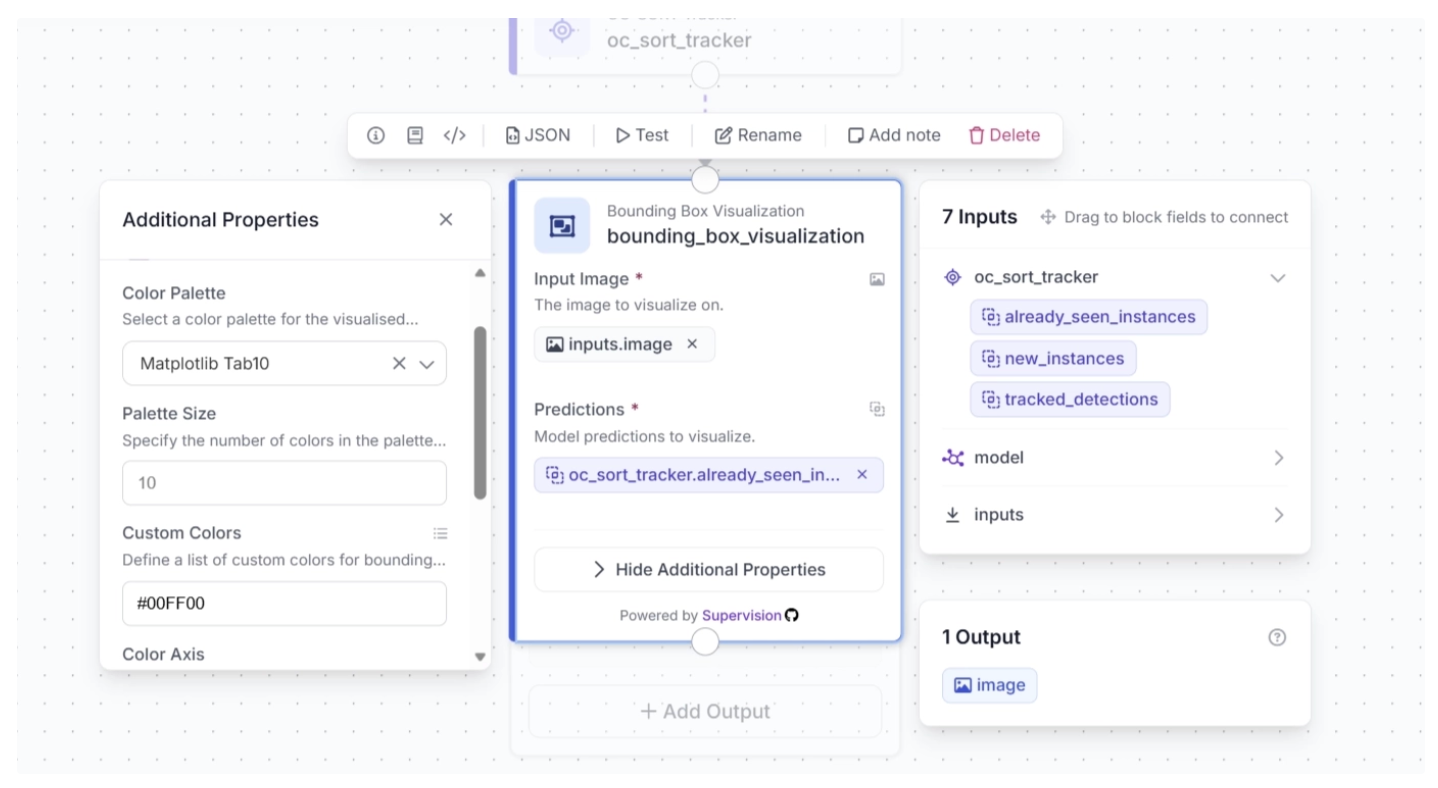
You can also configure the color axis and thickness of the bounding boxes. For this example, set the color axis to TRACK and the thickness to 4, as shown below.

Step 5: Display Tracker IDs as Labels
The OC-SORT Tracker block outputs tracker IDs along with the bounding box coordinates generated by the Object Detection Model block for each detected object in the video. These tracker IDs can then be visualized as labels on the video frames using the Label Visualization block.
To add this block, click the + button in the top-left corner of the workflow canvas. A pop-up menu with workflow blocks will appear. From there, search for Label Visualization and select it to insert into your workflow.
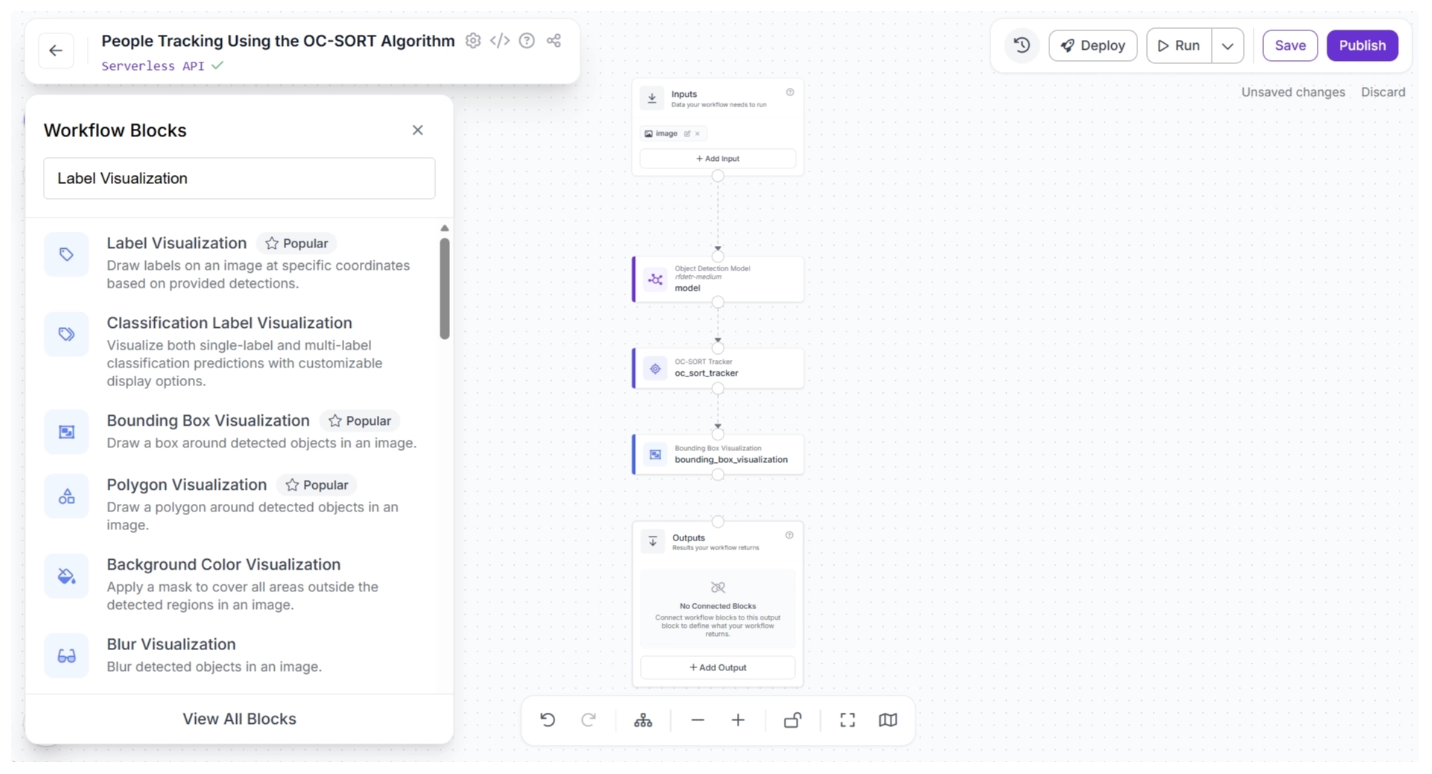
Once added, create a connection from the Bounding Box Visualization block to the Label Visualization block.
This ensures that the tracked detection outputs from the OC-SORT Tracker, along with the bounding box–visualized frames, are available to the Label Visualization block, as all upstream outputs from each block are accessible to downstream blocks.
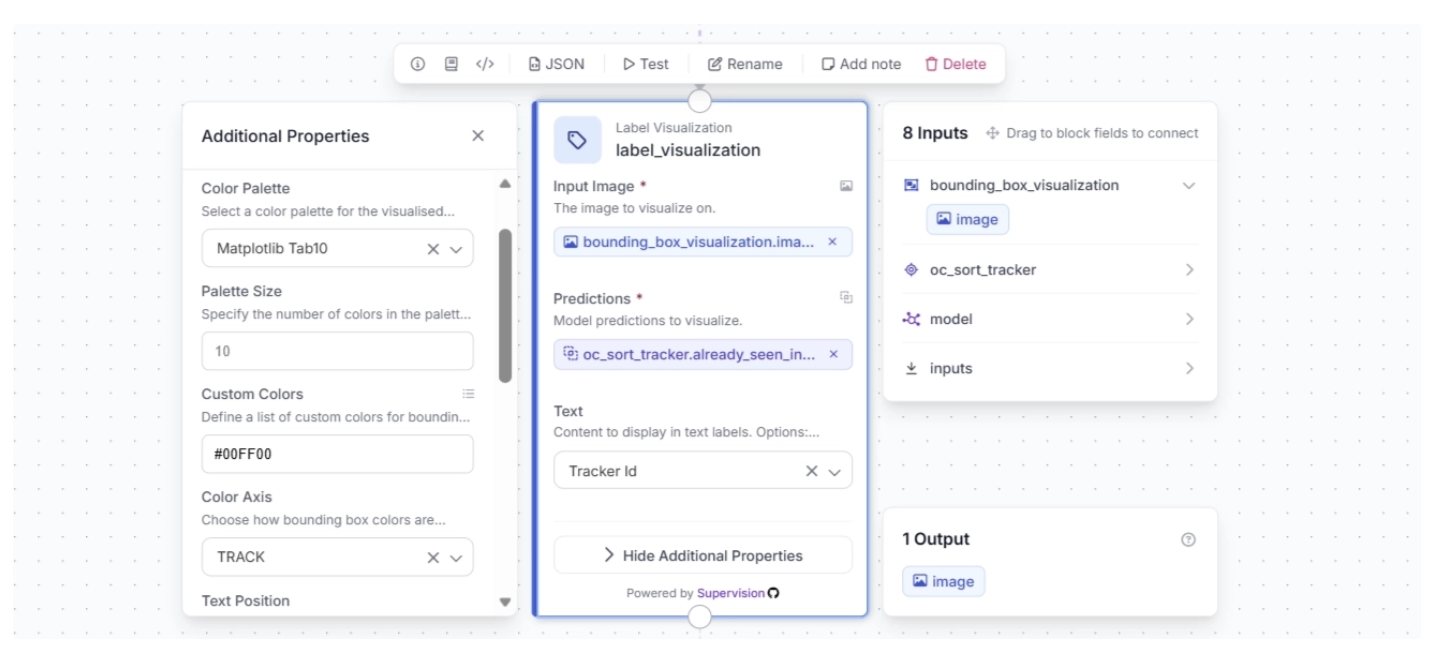
After making the connection, select the Label Visualization block. This will expand the block and display its configurable parameters.
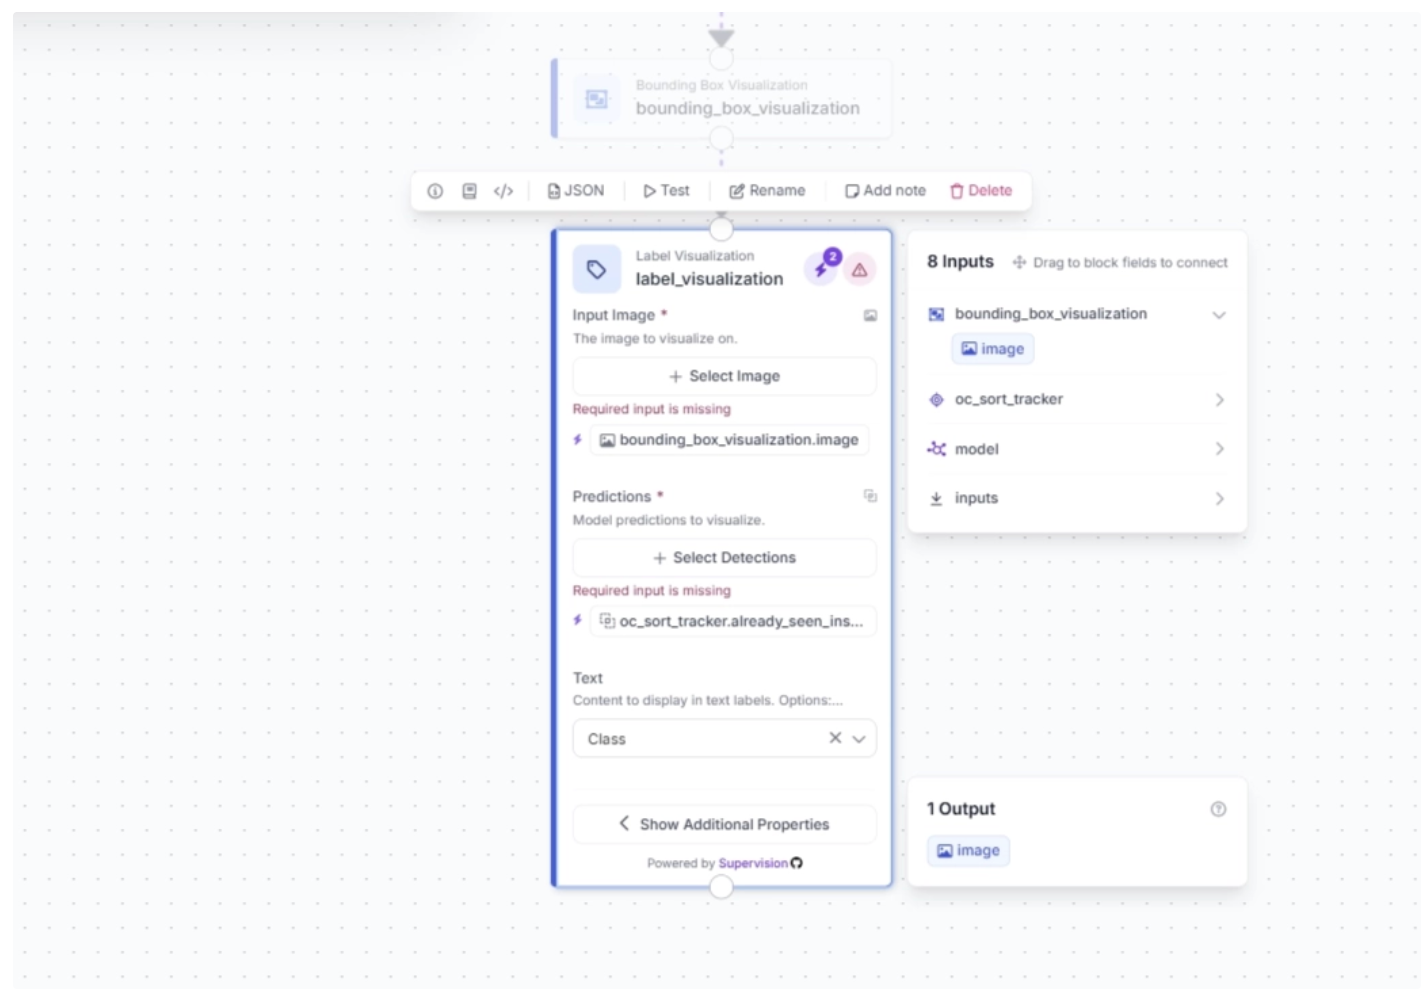
Click the lightning icon (⚡) in the top-right corner of the Label Visualization block to accept input suggestions. Make sure the Text parameter is set to Tracker Id.
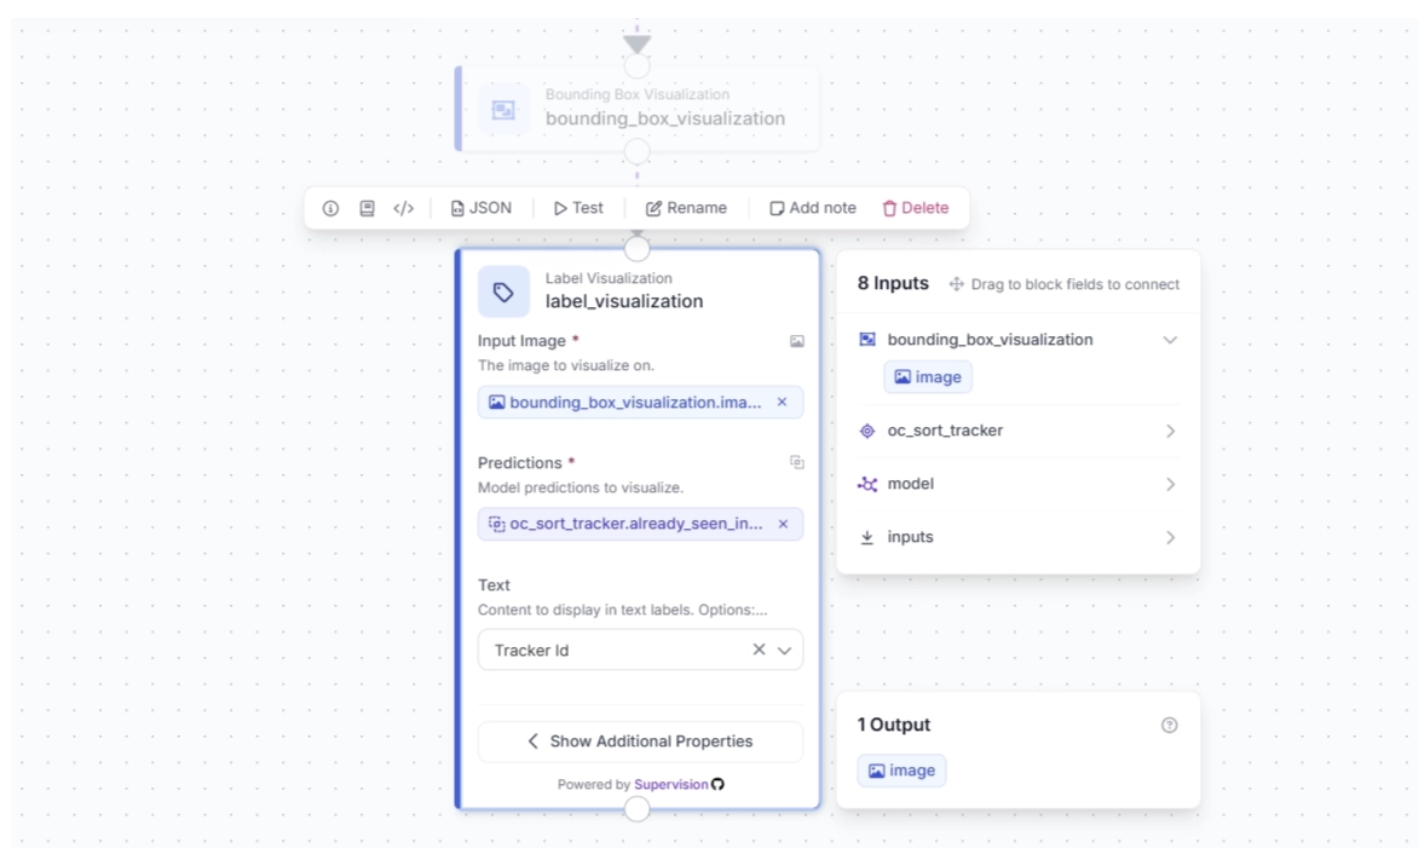
The input image for the Label Visualization block is connected to the bounding box–annotated output, ensuring that labels are rendered on frames where detections are already outlined. This allows both bounding boxes and labels to appear together in the final video.
In the Label Visualization block’s additional properties, you can define how labels are colored. This includes selecting a color palette and assigning custom colors if needed.
For this example, use the Matplotlib Tab10 palette, set the custom color to #00FF00, and choose TRACK as the color axis. This keeps the label colors aligned with the bounding box colors, maintaining visual consistency across tracked objects.
Step 6: Configure Workflow Outputs
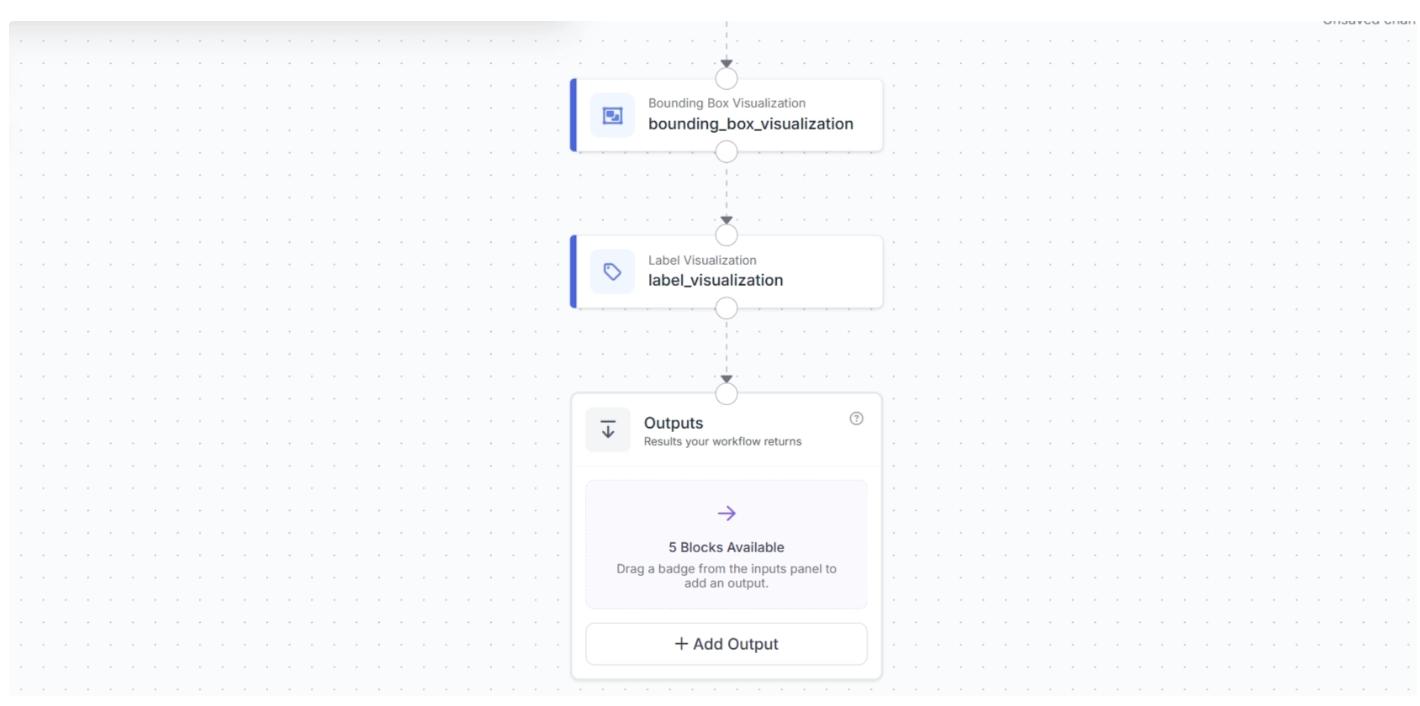
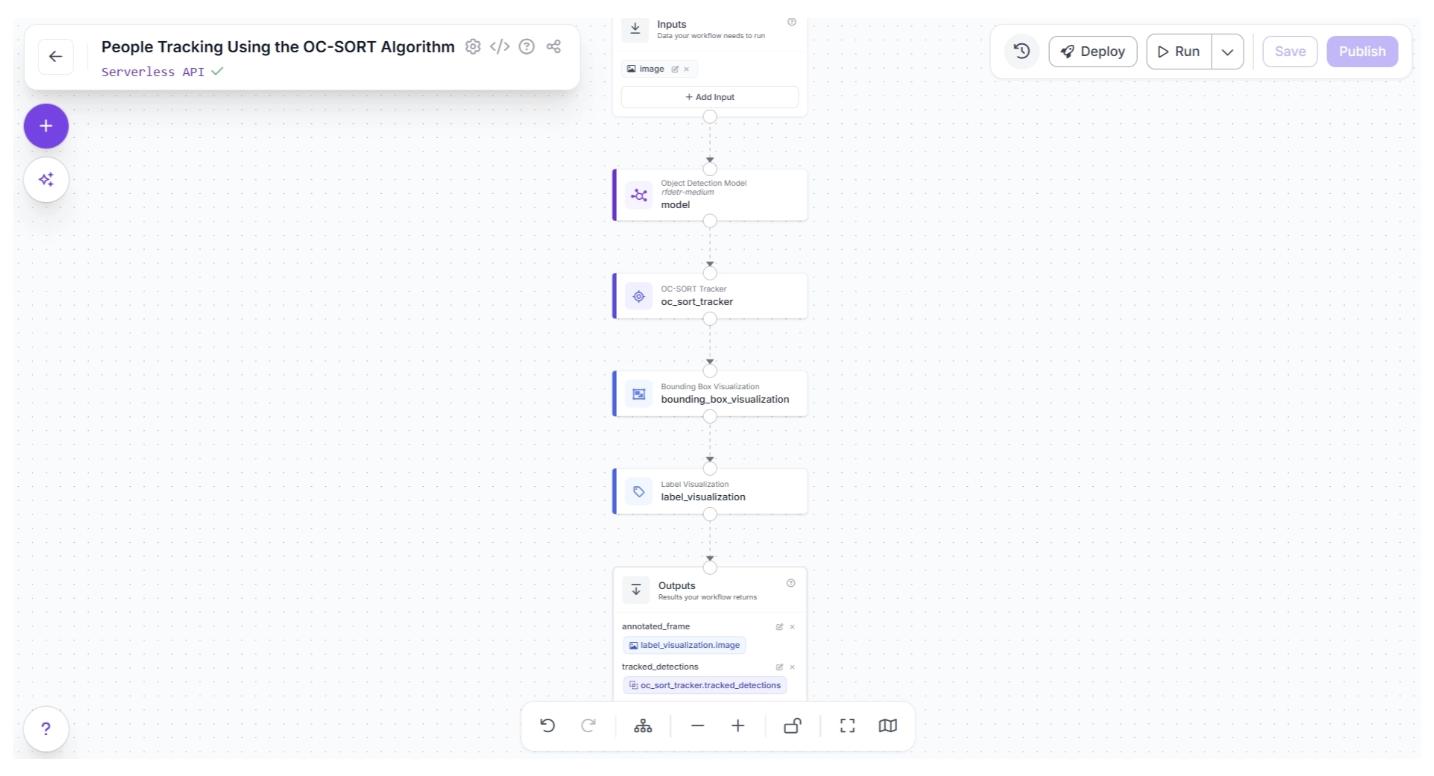
To output the label-visualized video, create a connection from the Label Visualization block to the Outputs block, as shown below. This ensures that the outputs from the Label Visualization block, along with upstream blocks, are available to the Outputs block.
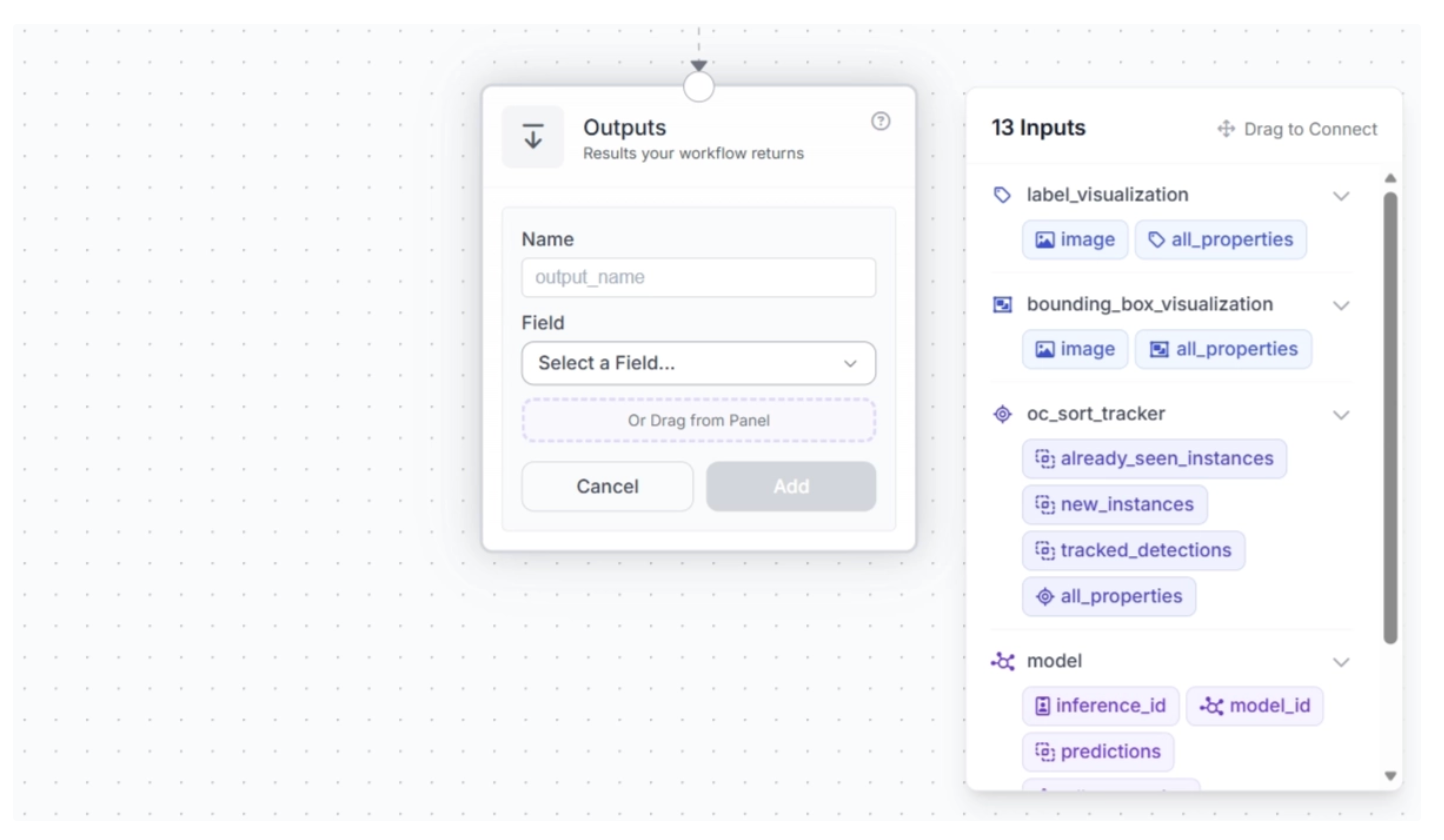
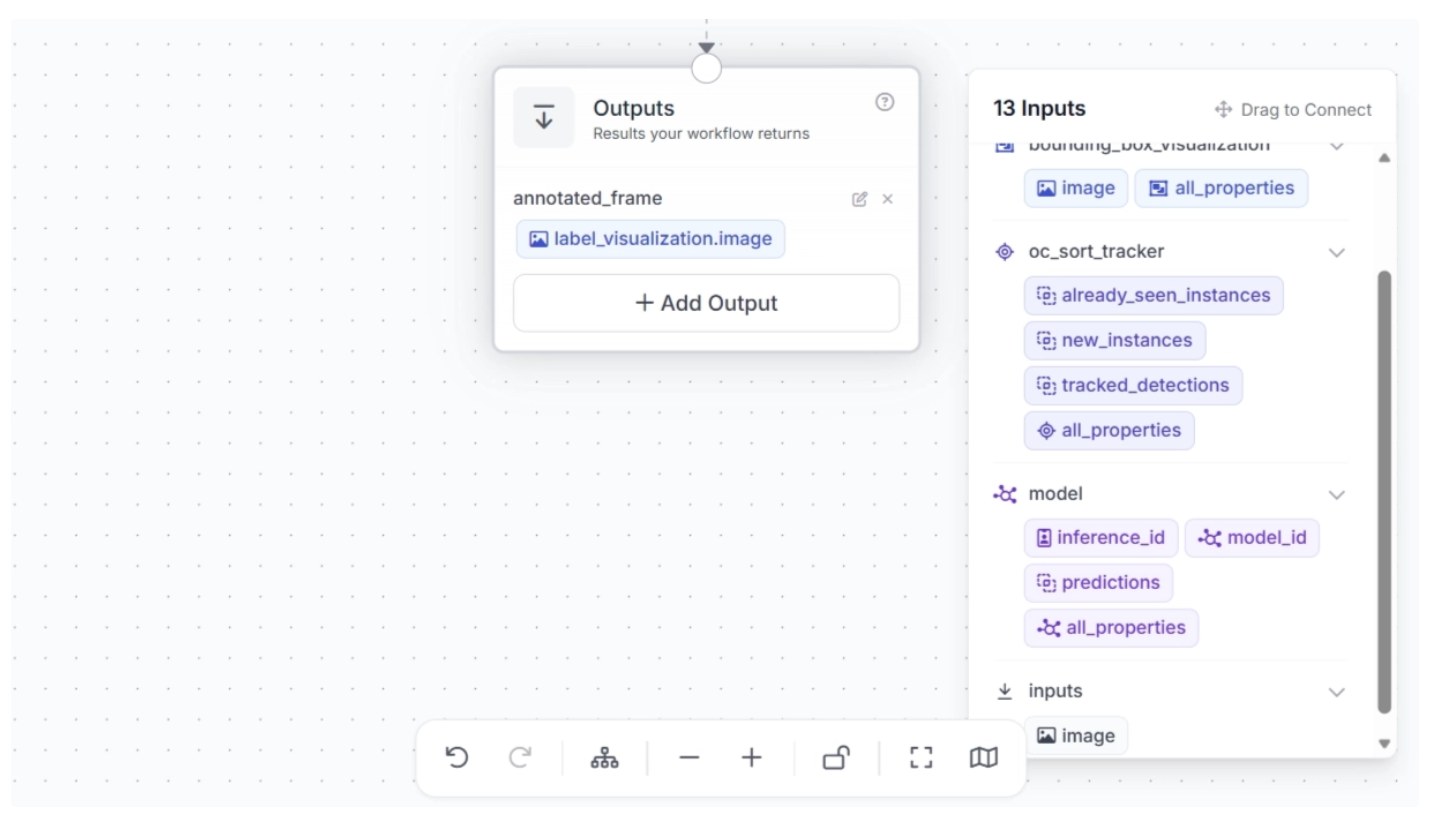
Click the + Add Output button to reveal all possible outputs from the workflow, as shown below:
Next, drag and drop the image under ‘label_visualization’ into the Outputs block and enter a parameter name for this output. In this example, we chose ‘annotated_frame’, as shown below:
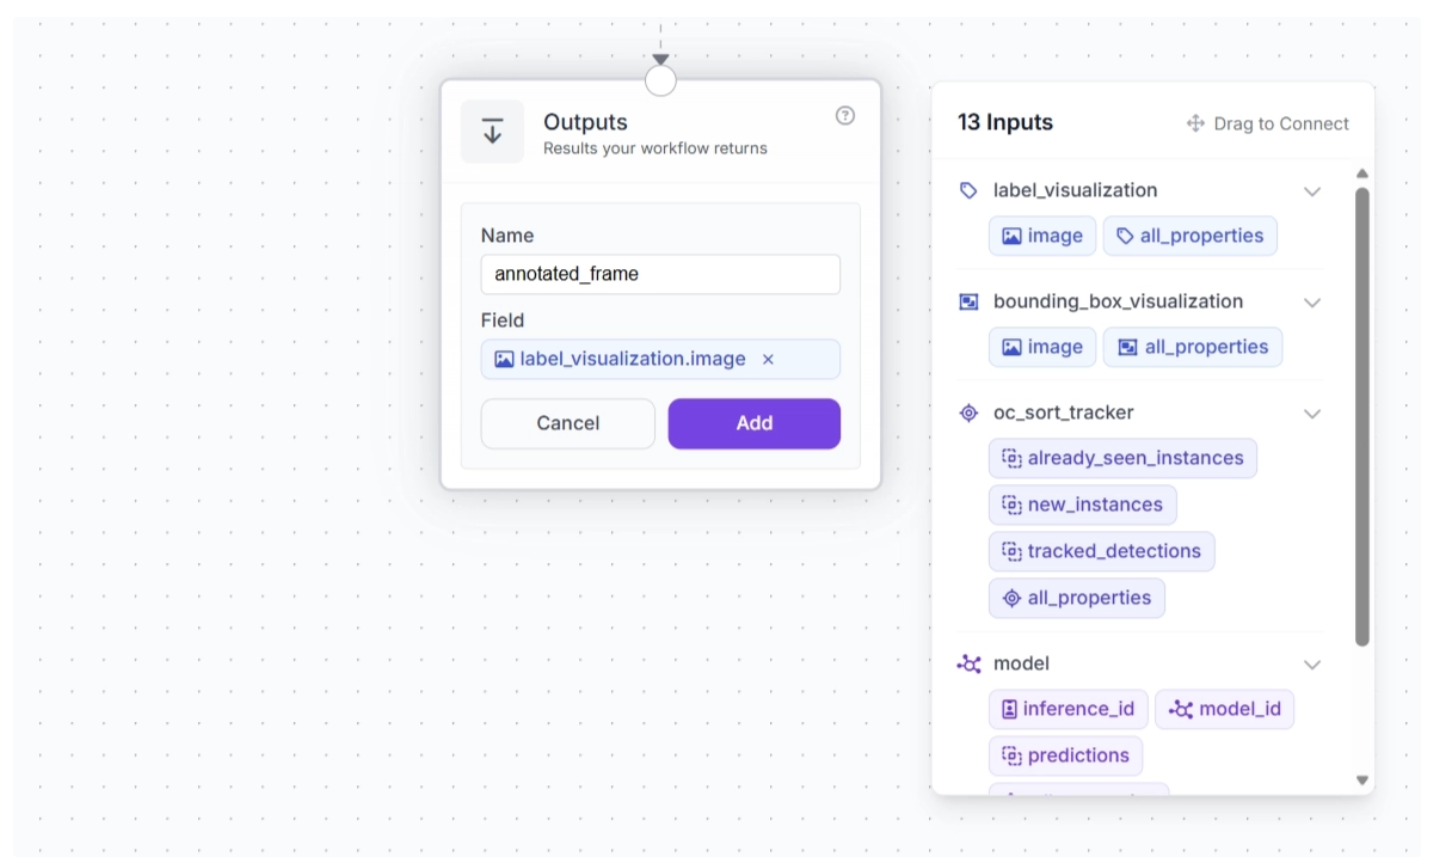
Once done, click Add. This ensures that your workflow takes in a video stream and outputs a video stream where dancers are detected, labeled with tracker IDs, and their labels are visualized across frames.
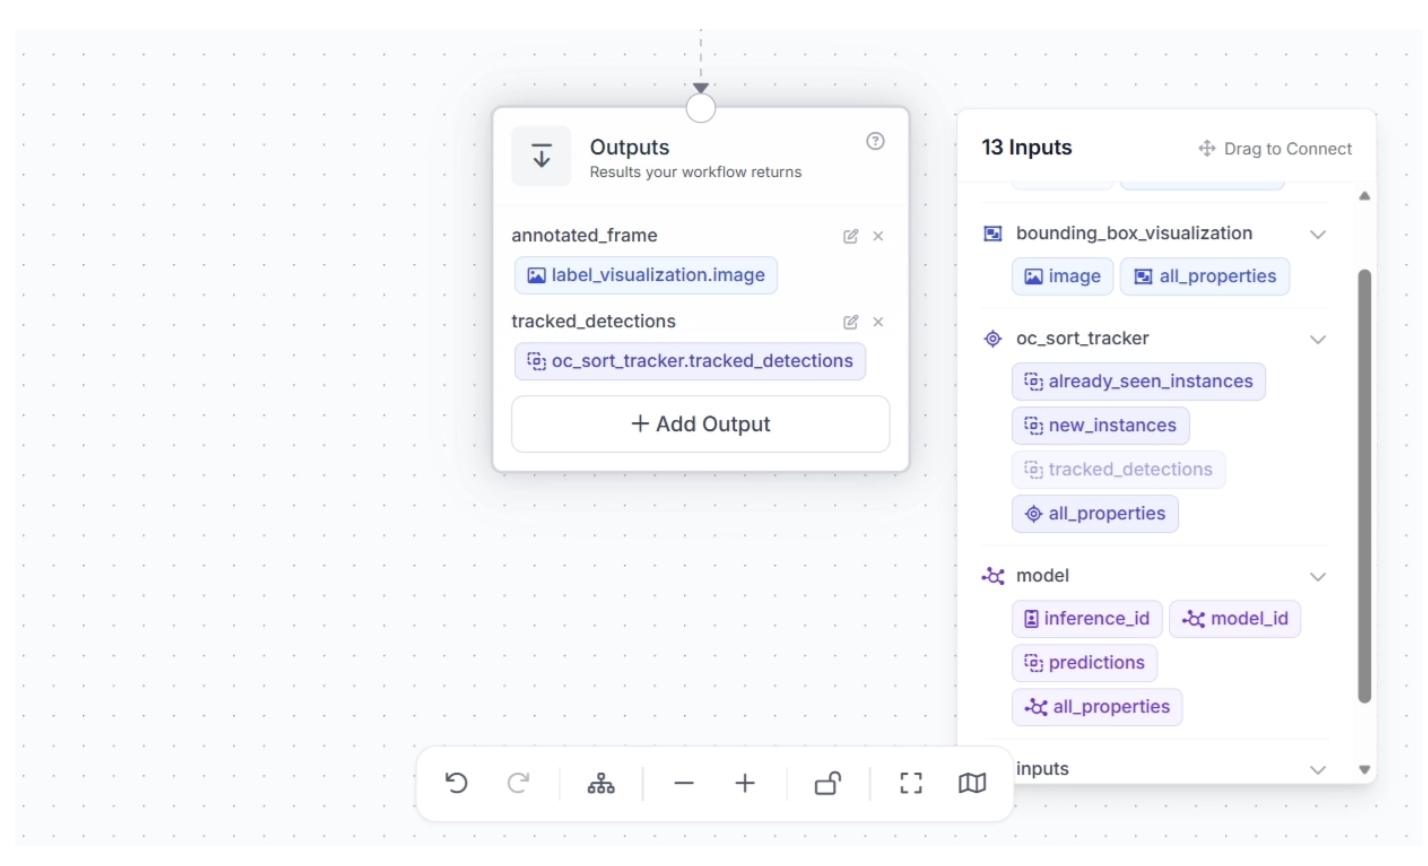
You can also output the OC-SORT tracked detections from the workflow. To do this, click + Add Output, drag and drop ‘tracked_detections’ under ‘oc_sort_tracker’ into the Outputs block, and enter a parameter name for this output. In this example, we chose ‘tracked_detections’, as shown below:
This completes our workflow: Dancer Tracking Workflow.
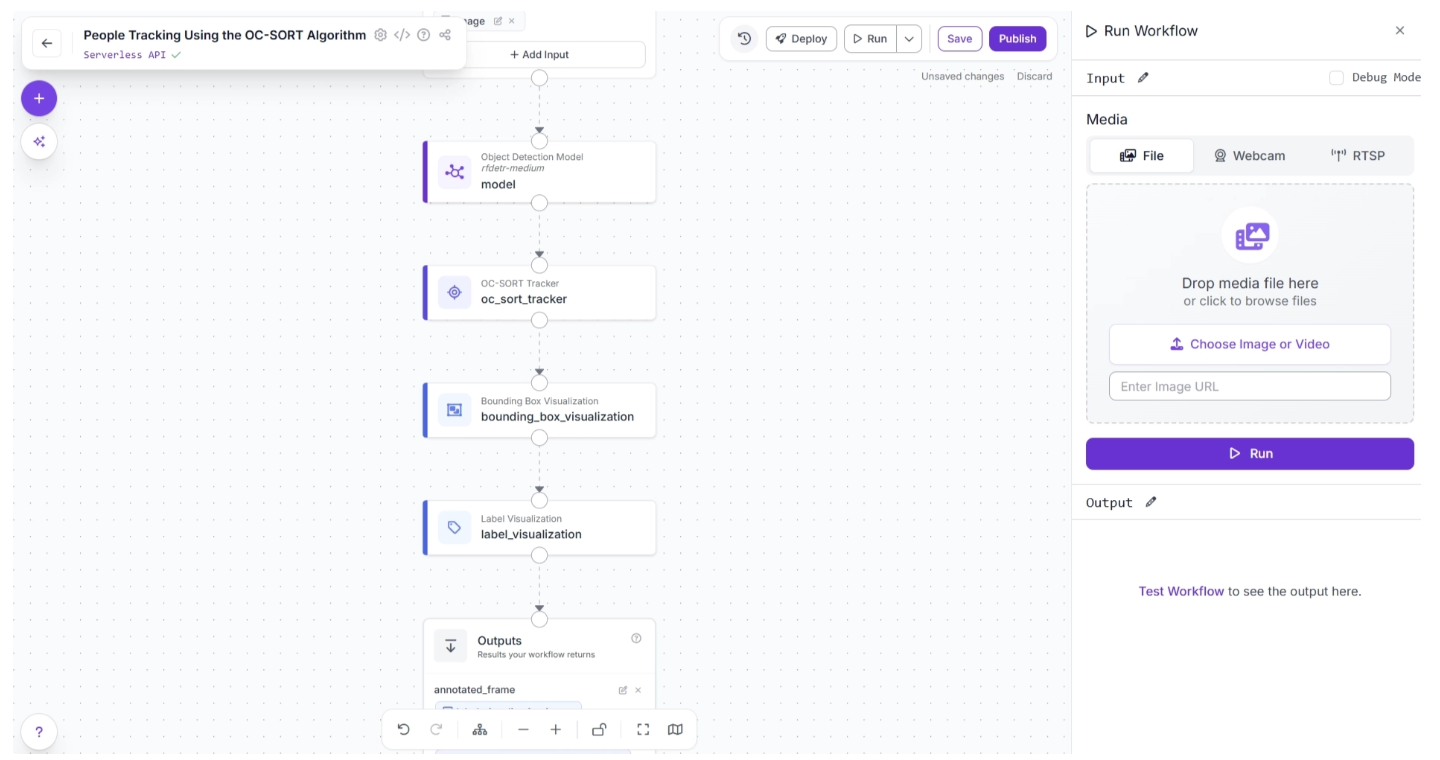
Step 7: Run the Workflow
With our workflow complete, you can now run it. Click the Run button in the top-right corner of the editor. This opens a sidebar where you can upload a video and execute the workflow:
The workflow may fail when run on high-resolution videos directly from the UI due to WebRTC connection issues. In such cases, use an inference server (Docker recommended) to run the workflow locally.
First, set up the inference server and ensure it is running at http://localhost:9001, then install the inference-sdk package:
pip install -U inference-sdk
And then execute the script below:
import cv2
import base64
import numpy as np
from inference_sdk import InferenceHTTPClient
from inference_sdk.webrtc import VideoFileSource, StreamConfig, VideoMetadata

# Initialize client
client = InferenceHTTPClient.init(
    api_url="http://localhost:9001",
    api_key="YOUR_ROBOFLOW_API_KEY"
)


source = VideoFileSource("dance.mp4", realtime_processing=False)  # Buffer and process all frames

VIDEO_OUTPUT = "annotated_frame"
DATA_OUTPUTS = ["tracked_detections"]

config = StreamConfig(
    stream_output=[], # We request all data via data_output for video files
    data_output=["annotated_frame","tracked_detections"]
)

session = client.webrtc.stream(
    source=source,
    workflow="people-tracking-using-the-oc-sort-algorithm",
    workspace="YOUR-WORKSPACE",
    image_input="image",
    config=config
)

frames = []

@session.on_data()
def on_data(data: dict, metadata: VideoMetadata):
    # print(f"Frame {metadata.frame_id} predictions: {data}")

    if VIDEO_OUTPUT and VIDEO_OUTPUT in data:
        timestamp_ms = metadata.pts * metadata.time_base * 1000
        img = cv2.imdecode(np.frombuffer(base64.b64decode(data[VIDEO_OUTPUT]["value"]), np.uint8), cv2.IMREAD_COLOR)
        frames.append((timestamp_ms, metadata.frame_id, img))
        print(f"Processed frame {metadata.frame_id}")
    else:
        print(f"Processed frame {metadata.frame_id} (data only)")

session.run()

if VIDEO_OUTPUT and len(frames) > 0:
    # Stitch frames into output video
    frames.sort(key=lambda x: x[1])
    fps = (len(frames) - 1) / ((frames[-1][0] - frames[0][0]) / 1000) if len(frames) > 1 else 30.0
    h, w = frames[0][2].shape[:2]
    out = cv2.VideoWriter("output.mp4", cv2.VideoWriter_fourcc(*"mp4v"), fps, (w, h))
    for _, _, frame in frames:
        out.write(frame)
    out.release()
    print(f"Done! {len(frames)} frames at {fps:.1f} FPS -> output.mp4")
elif VIDEO_OUTPUT:
    print("No video frames collected.")
The Python script above is taken from the “Deploy” menu, where you can also find your API key. When executed, it generates a video with objects detected, tracked, and their labels visualized.
Step 8: Deploy Your Workflow for Production Use
Roboflow offers several deployment options for workflows. You can access them by clicking the Deploy button, located to the left of the Run button in the top-right corner of the canvas. This opens a pop-up window, as shown below:
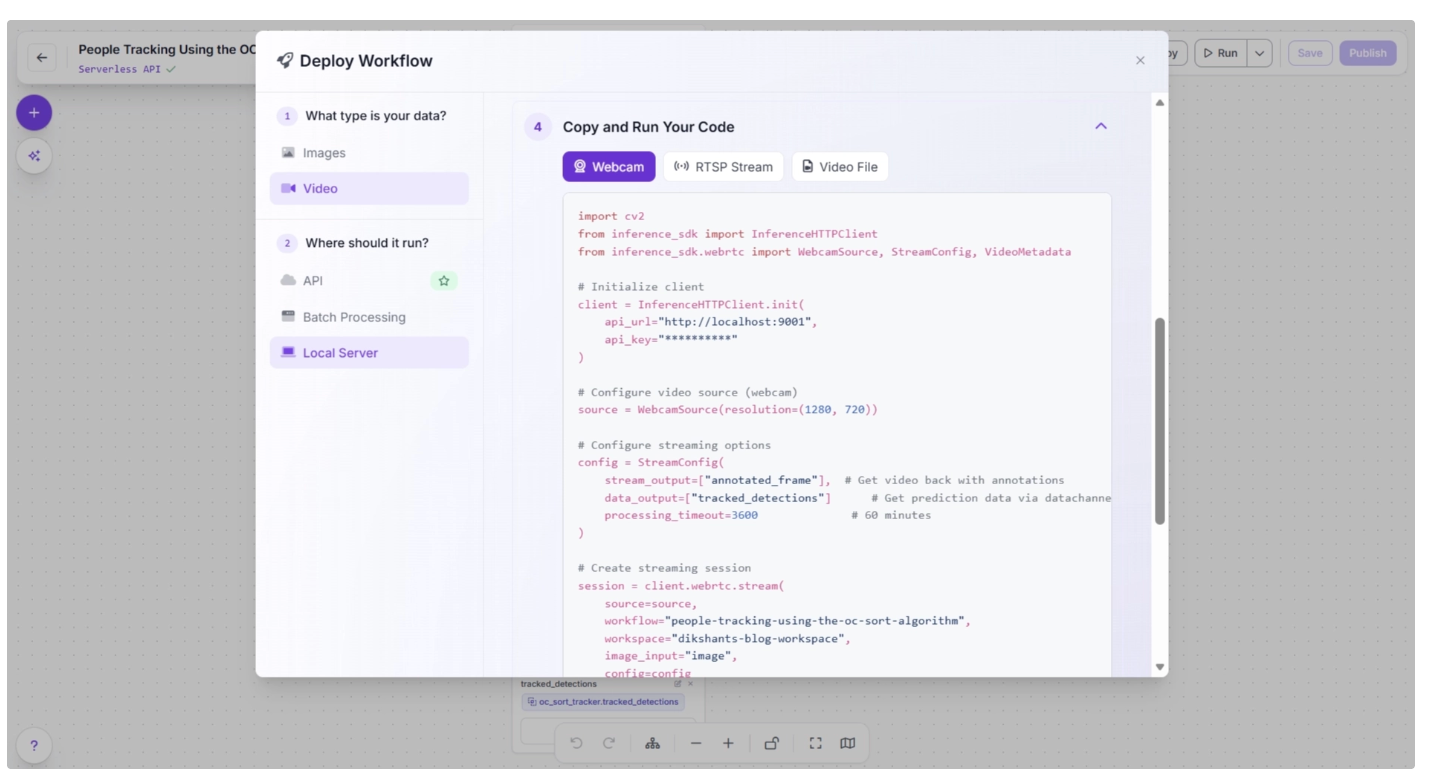
Various deployment options exist for running inference on the workflow. Cloud deployment options include API and Batch Processing, while Local Server is an edge deployment option.
When to Use Alternatives: SORT, ByteTrack, and OC-SORT
SORT: Best for simple, fast, real-time tracking in low-resource environments. Avoid using it in crowded scenes, during frequent occlusions, or when objects leave and re-enter the frame, as it can lose identities or confuse tracks.
ByteTrack: Improves SORT in crowded and occluded scenes by associating even low-confidence detections. Best when many objects overlap or disappear temporarily.
OC-SORT: Improves SORT in handling abrupt or non-linear motion, producing smoother and more stable trajectories. Best for objects with irregular motion patterns.
Conclusion: OC-SORT Tracker in Roboflow Workflows
OC-SORT provides a upgrade over traditional tracking approaches by addressing real-world challenges like occlusion, noisy detections, and irregular motion. By combining observation-centric updates with motion-aware association, it produces more stable and reliable object tracks across video frames.
With Roboflow Workflows, building and deploying OC-SORT Tracker–powered systems becomes far more accessible. Instead of managing complex logic, you can focus on designing, iterating, and scaling your computer vision pipelines, while leaving the underlying orchestration to Roboflow through its workflow blocks.
In this guide, you built a complete end-to-end pipeline that detects dancers, tracks them consistently, and visualizes their identities over time. This same structure can be adapted to many applications, including surveillance, sports analytics, retail monitoring, and human activity analysis.
If your use case involves dynamic scenes, frequent occlusions, or non-linear movement, OC-SORT is a reliable choice that balances performance and accuracy while remaining efficient enough for real-time workflows.
You can try it for free through Roboflow Workflows and learn more about trackers here.
Written by Dikshant Shah
Cite this Post
Use the following entry to cite this post in your research:
Contributing Writer. (Apr 14, 2026). Real-Time Object Tracking with OC-SORT & Roboflow Workflows. Roboflow Blog: https://blog.roboflow.com/how-to-use-the-oc-sort-tracker/