

Pose estimation is the computer vision task of locating keypoints on a body, like shoulders, hips, and wrists, and connecting them into a skeleton, so software can read not just where a person is but what their body is doing. This guide explains how it works, then trains an RF-DETR Keypoint model to tell swimming from drowning.
Pose estimation is the computer vision task that finds the position of a body's joints in an image and connects them into a skeleton. Where an object detection model draws a box around a person, a pose estimation model tells you their arms are raised, their torso is vertical, and their head is below the waterline.
That difference can save a life. Drowning claims more than 300,000 lives a year, predominantly among children and young people, with more than nine in ten deaths in low and middle-income countries, according to the WHO Global Status Report on Drowning Prevention. Most happen where no automated monitoring exists. A detector sees a person in the pool either way. A pose estimation model can distinguish a swimmer mid-stroke from someone whose posture has shifted into a drowning position, even when both are partially submerged.
This guide covers what pose estimation is and how it works, then puts it to work: we'll train a keypoint model on a public dataset of 621 underwater pool images and build a Workflow that returns each person's skeleton overlay and a swimming-or-drowning call.
What Is Pose Estimation?
Pose estimation is a computer vision task that predicts the location of specific points, called keypoints, on an object in an image or video. For a person, the keypoints are joints: shoulders, elbows, wrists, hips, knees, ankles. Connecting those keypoints produces a skeleton that describes the body's position, which a model or downstream logic can then classify into an action or state: swimming, falling, lifting, reaching.
People are the most common subject, but not the only one. Any object whose shape can be described through meaningful points works the same way: the joints of a robotic arm, the corners of a package, the wings of a bird, the posture of a dairy cow. The task is the same: find the points, connect the structure, read the state.
How Pose Estimation Works
A pose model returns three things per subject: the coordinates of each keypoint, a confidence score for each one (an occluded wrist scores lower than a visible shoulder), and, in classification-aware models, a class for the overall pose. A skeleton definition tells the system which keypoints connect to which, so a set of dots becomes a readable figure.
Two architectural families dominate. Top-down models detect each person first, then locate joints inside each detection, which is accurate but costs more as the number of people grows. Bottom-up models find every joint in the image first, then group them into people, which scales better in crowds. Modern transformer-based models like RF-DETR Keypoint collapse the distinction, predicting detections and their keypoints in a single pass at real-time speeds.
2D vs. 3D Pose Estimation
Most production pose estimation is 2D: every keypoint is an x, y position in the image plane. That's enough for the majority of applications, including the one in this tutorial, because the question is about configuration (what shape is this body making?) rather than exact geometry.
3D pose estimation adds depth, producing joint positions in space. It matters when the application needs real angles and distances: gait analysis, biomechanics, robotic manipulation. It also costs more, requiring multiple cameras, depth sensors, or a model that lifts 2D poses into 3D. Start with 2D unless the application demands measurements a flat skeleton can't give.
Pose Estimation vs. Keypoint Detection
The terms overlap almost completely, and you'll see them used interchangeably. Keypoint detection is the general task: locate defined points on any object. Pose estimation usually implies the next step: keypoints connected into a skeleton and interpreted as a posture or movement, most often for bodies. In practice, training a pose model in Roboflow means creating a keypoint detection project with a skeleton defined; the vocabulary difference doesn't change the work.
What Is Pose Estimation Used For?
Every application below depends on body position rather than body presence. Sports teams analyze stroke and swing mechanics frame by frame. Physical therapists check exercise form and count reps from a phone camera. Safety systems flag a worker bending under load or entering an unsafe posture before an injury, and ergonomics teams audit repetitive motion across a shift. And monitoring systems, like the one this tutorial builds, distinguish a swimmer from someone drowning when both occupy the same pixels of pool.
Pose Estimation Models in 2026
For custom pose estimation, RF-DETR Keypoint is the strong default: real-time inference, support for custom skeleton definitions (people, machinery, animals, tools), and training on your own images through Roboflow's hosted pipeline. For the wider landscape, our guide to the best pose estimation models compares current options, and the history of pose estimation algorithms traces how the field got from pictorial structures to transformers.
How to Do Pose Estimation with Roboflow
The rest of this guide is hands-on. We'll take a public dataset of underwater pool images labeled for swimming and drowning, train an RF-DETR Keypoint model on it, and build a Workflow that returns each person's skeleton overlay, pose class, and a structured alert. By the end you'll have a working pipeline you can point at your own use case by swapping the dataset and classes.
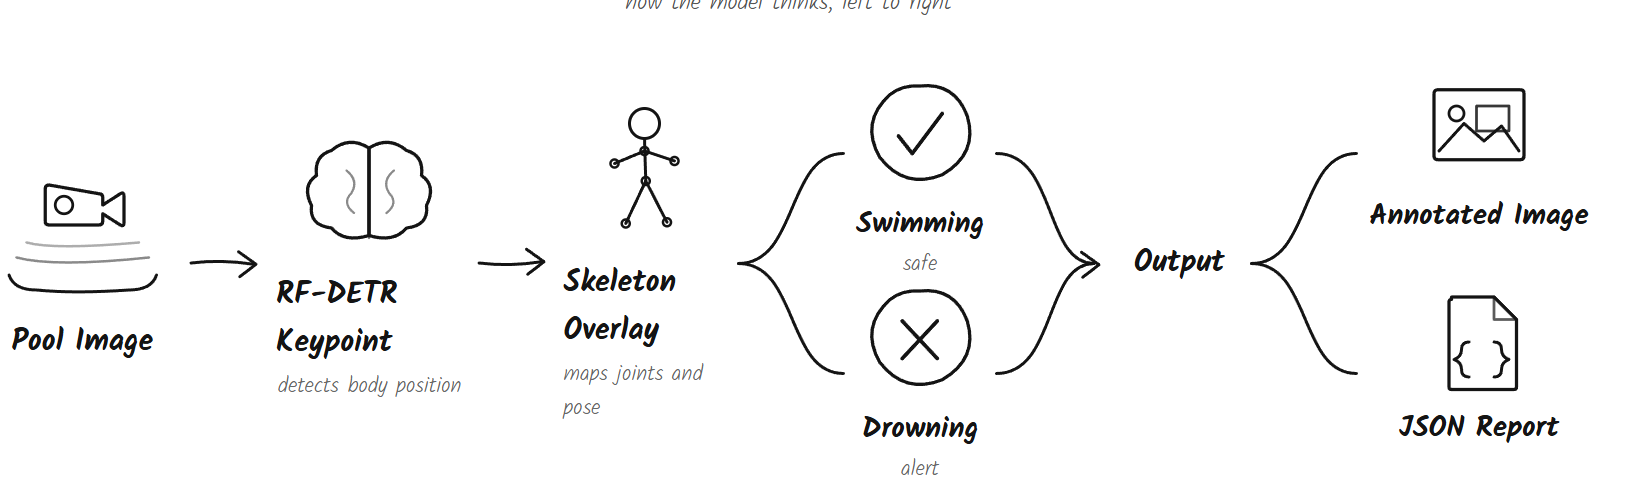
Here's the workflow we'll build.
Dataset
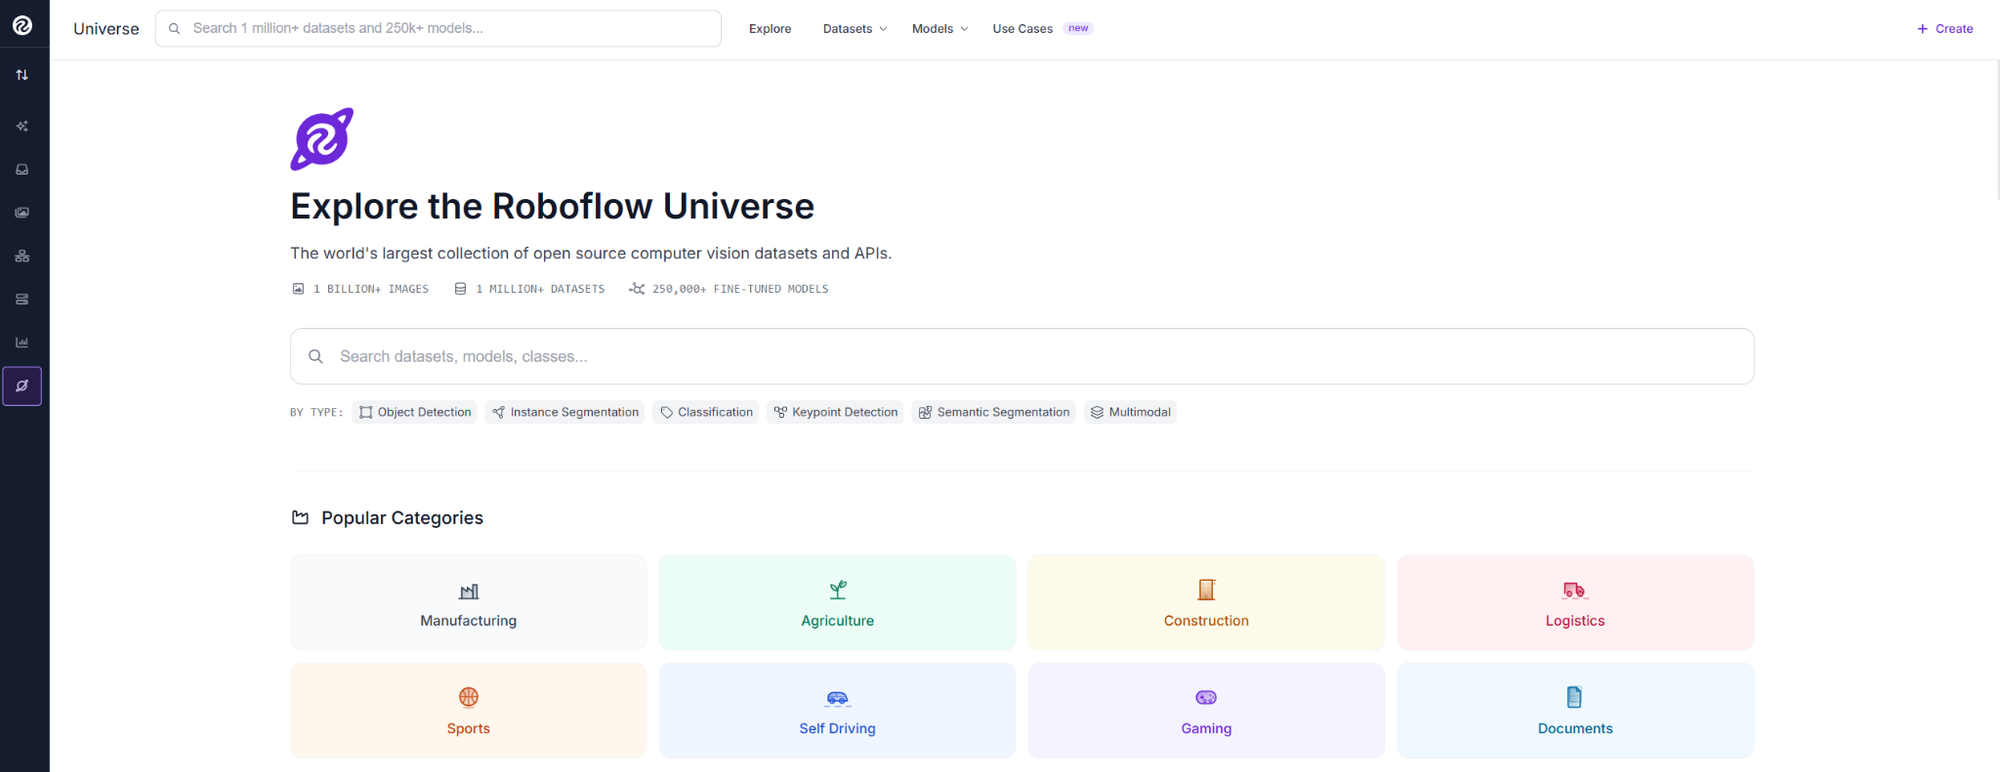
Go to Roboflow Universe and search for the pose estimation swimming and drowning dataset. Universe hosts over 1 million open source computer vision datasets.
The dataset includes 621 underwater pool images labeled as drowning and swimming. Captured from below the surface, it focuses on body pose and movement patterns as the main detection signals.
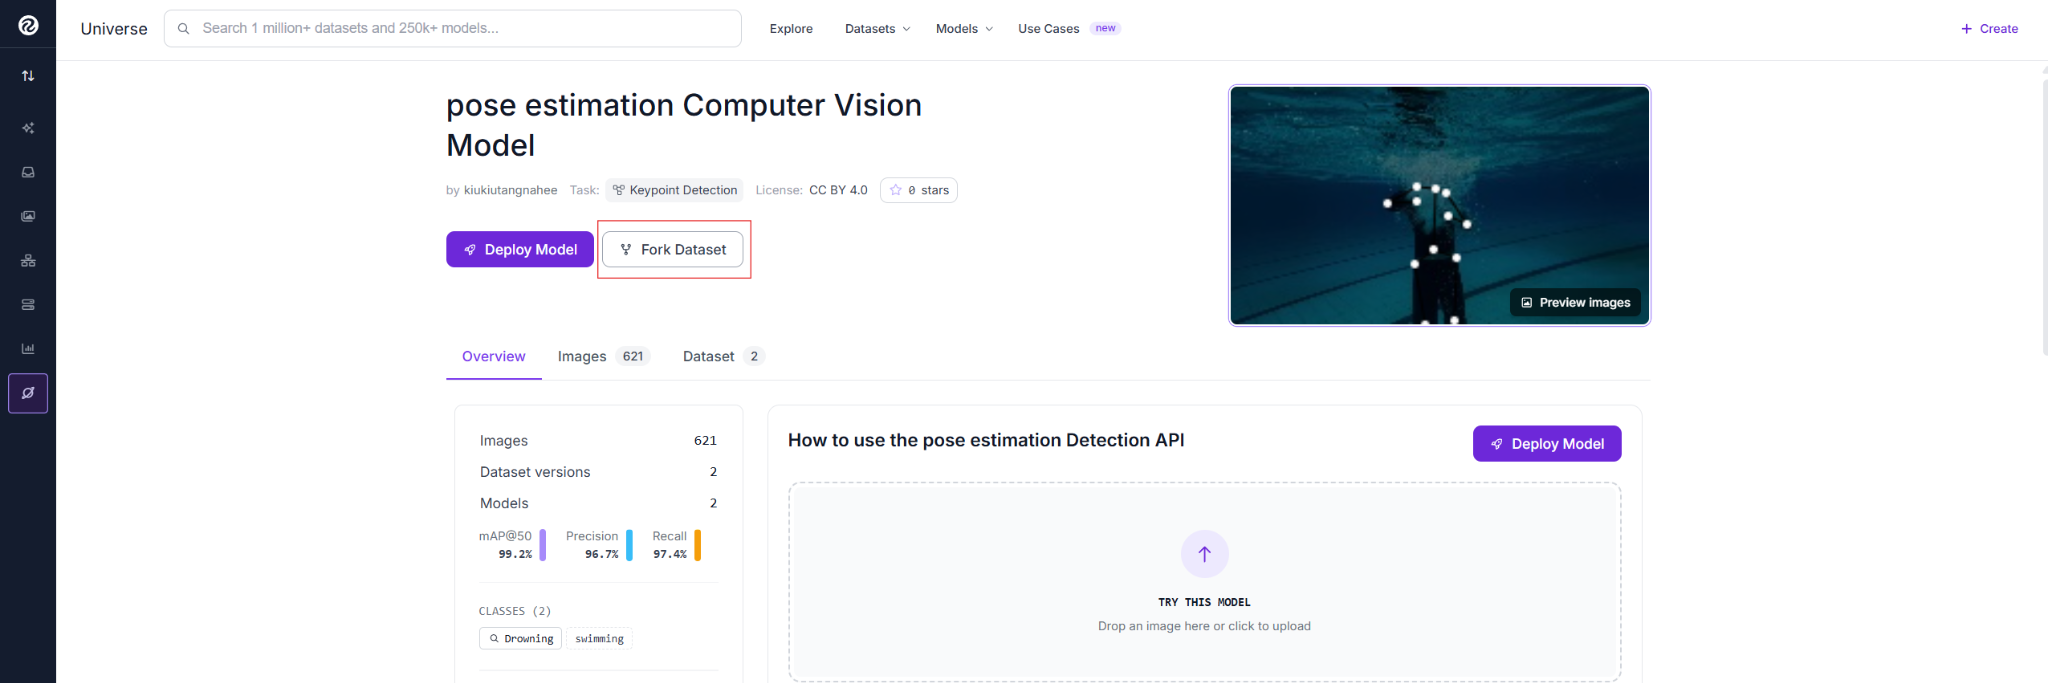
From here, fork the dataset into your own workspace, annotations included, so you have your own copy to build on.
Train RF-DETR Keypoint
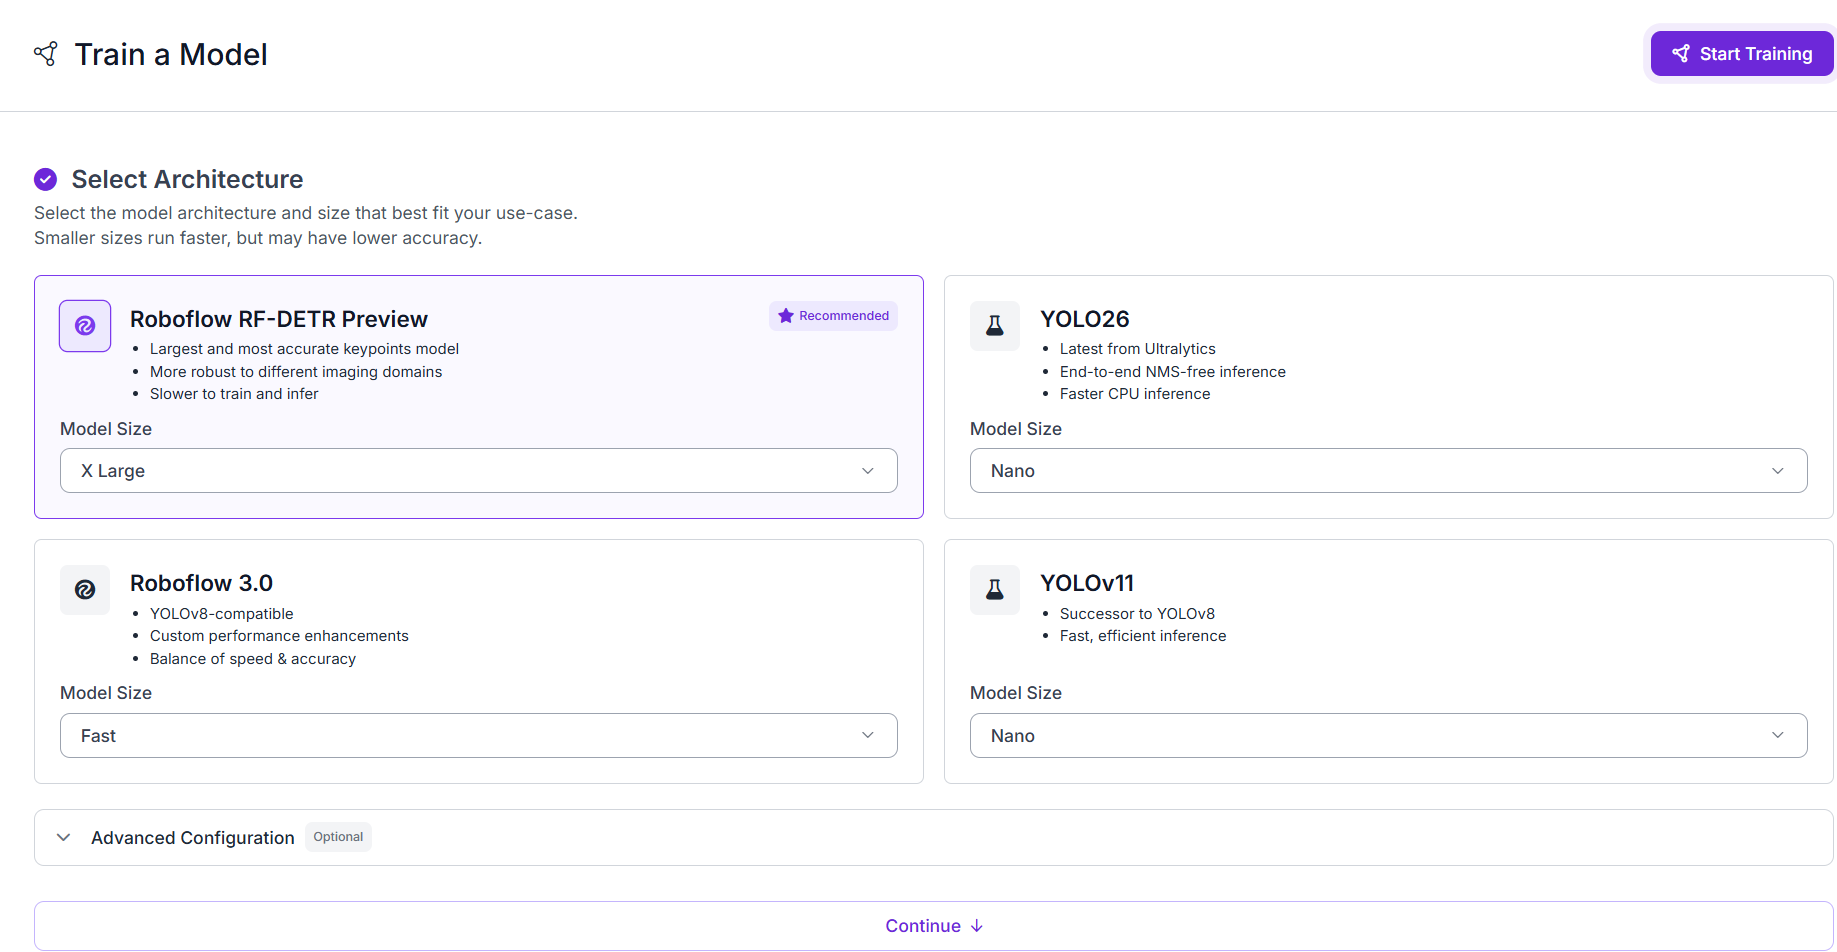
Select Roboflow RF-DETR Preview (X Large) for keypoint detection. It provides high accuracy for underwater conditions and trains on Roboflow’s hosted pipeline without a local GPU.
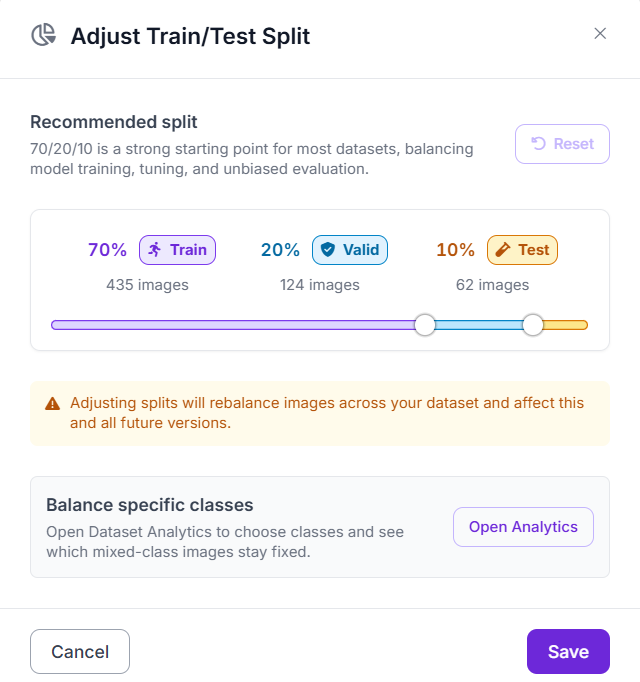
Apply Auto Orient, resize to 576×576, and split the dataset into training, validation, and test sets.
The training summary confirms the final configuration, including the dataset split, input resolution, training duration, and estimated runtime.

Roboflow tracks mAP and key loss curves during training, showing improved keypoint and classification performance with expected box loss variation on a small dataset.
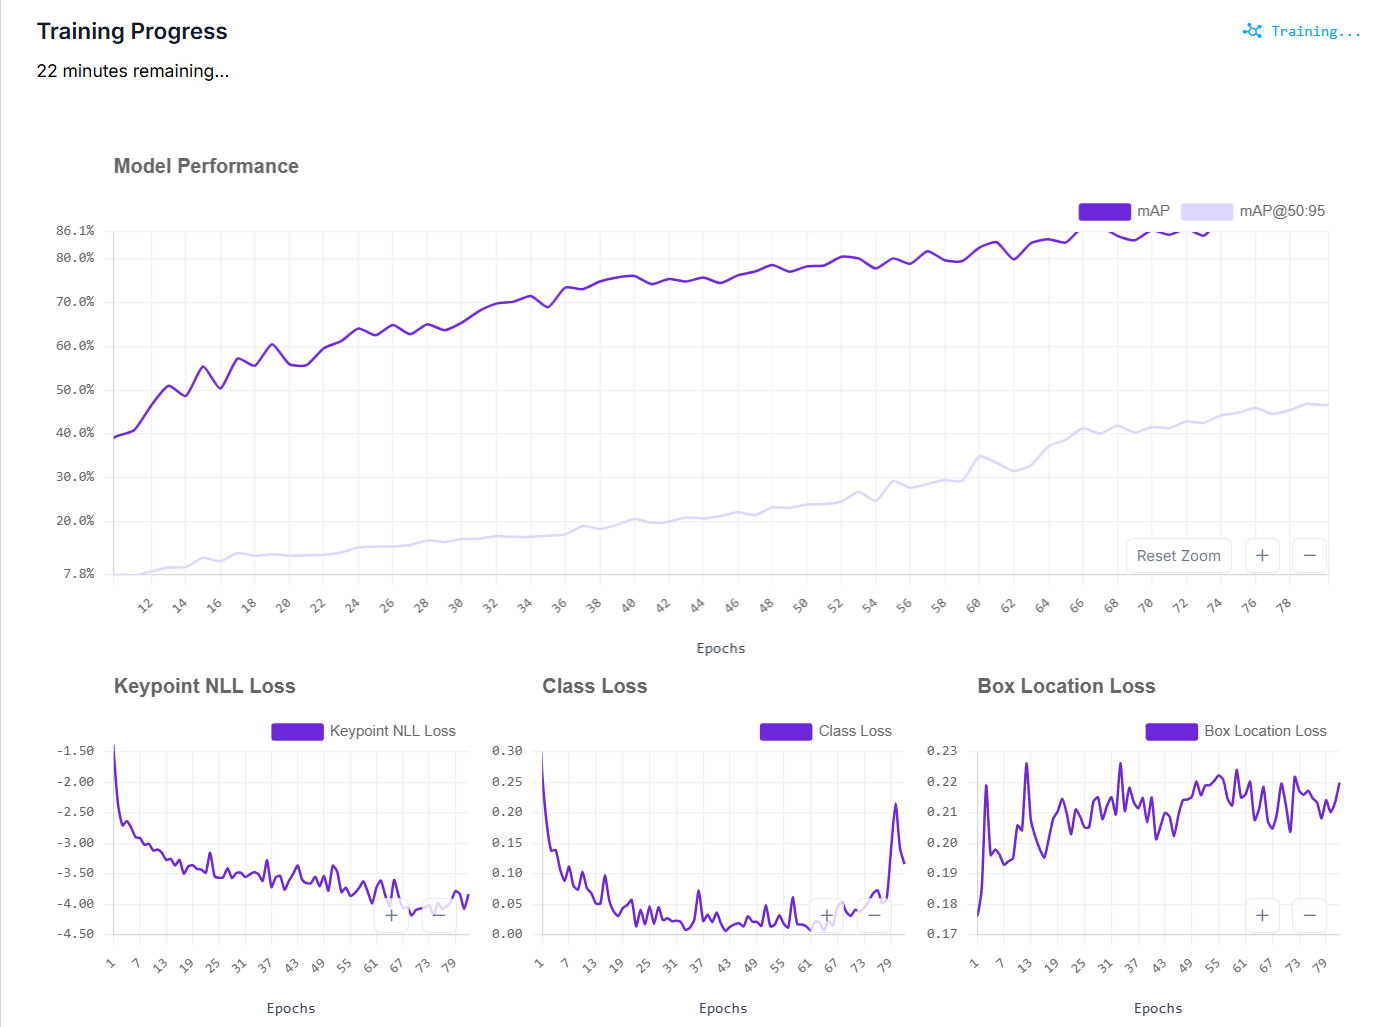
When training finishes, review the metrics on the test set: mAP, precision, and recall. These reflect how the model performs on images it never saw during training.
How to Build the Pose Estimation Workflow
Here's what each block does in this Workflow:
- Keypoint Detection Model: Runs RF-DETR Keypoint and returns keypoints and class labels.
- Keypoint Detection Report: Generates a JSON report with count, class, confidence, and alert status.
- Clean Keypoint Skeleton Visualization: Draws skeletons and labels on the image.
- Text Display: Adds count and alert status to the image.
- Roboflow Vision Events: Logs inferences, images, and predictions.
- Outputs: Returns the annotated image and JSON report.
Step 1: Create a new Workflow and add the Keypoint Detection Model block
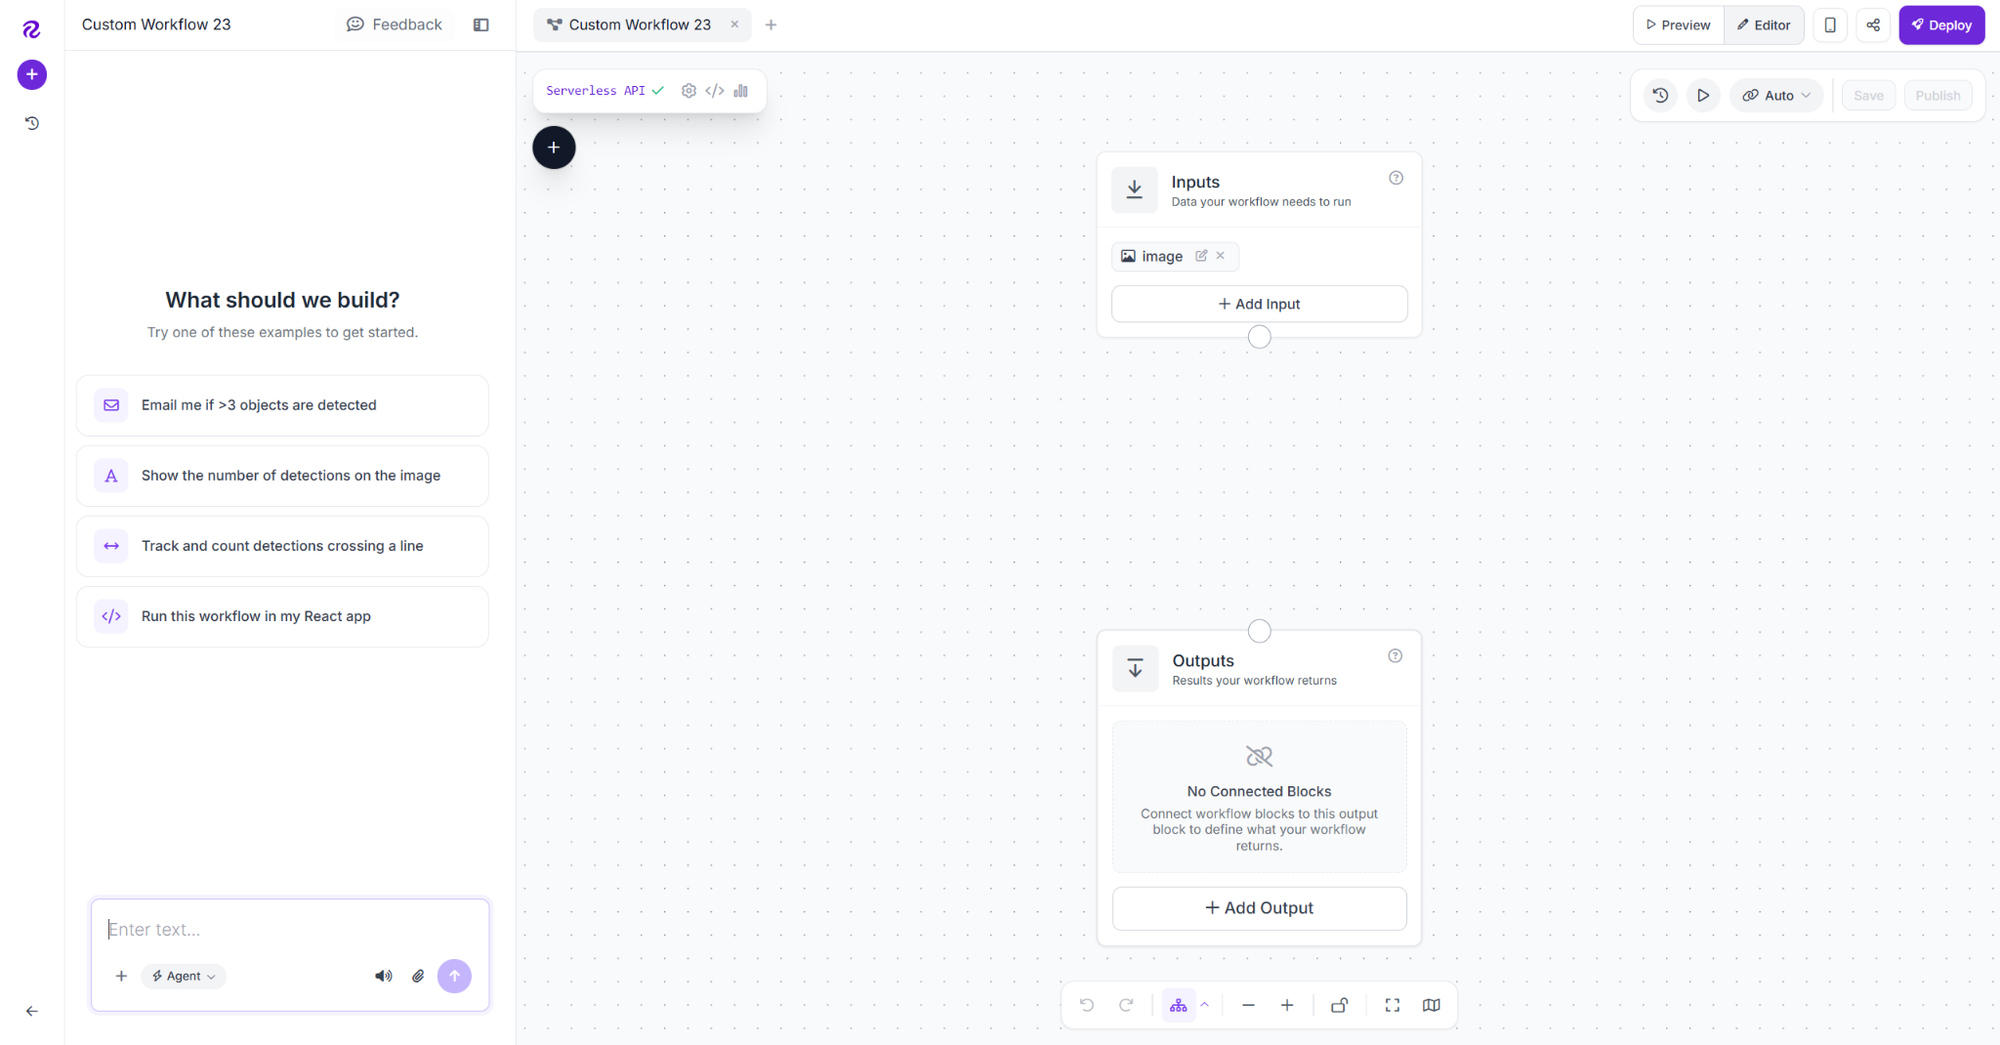
Open the Workflows tab and create a new Workflow. Roboflow adds an Image Input and Outputs block automatically.
Add a Keypoint Detection Model block, connect the image input, and set the model URL. Configure confidence: 0.5, keypoint confidence: 0.5, IoU: 0.3, and filter classes to Drowning, Swimming. It returns keypoints and class labels.
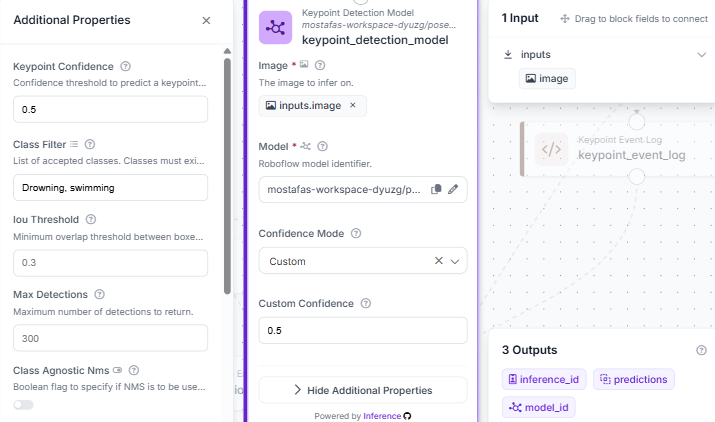
This block is the entry point for all detections; everything downstream reads from its predictions output.
Step 2: Add the Keypoint Detection Report block
Add a Custom Python Block named "Keypoint Detection Report" and connect it to the model predictions output. It takes predictions as input and returns report and display_text outputs.
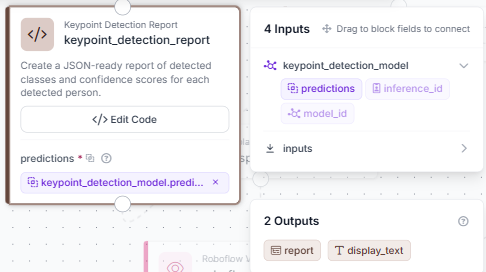
Open Edit Code to generate a JSON report with person count, class, confidence scores, alert status, and a display summary for the image overlay.
def run(self, predictions):
    n = len(predictions) if predictions is not None else 0
    data = getattr(predictions, "data", {}) or {}
    names = list(data.get("class_name", []))
    conf = getattr(predictions, "confidence", None)

    detections, drowning = [], False
    for i in range(n):
        cls = str(names[i]) if i < len(names) else "unknown"
        score = round(float(conf[i]) if conf is not None and i < len(conf) else 0.0, 3)
        drowning |= cls.lower() == "drowning"
        detections.append({"id": i+1, "class": cls, "confidence": score})

    count_text = f"{n} {'person' if n==1 else 'people'} detected"
    status = "ALERT: Drowning detected" if drowning else ("No person detected" if n==0 else "No drowning detected")

    return {
        "report": {"person_count": n, "person_count_text": count_text, "alert_status": status, "detections": detections},
        "display_text": f"{count_text}\n{status}"
    }
Open the full editor to set the block type, description, inputs, and outputs before saving.
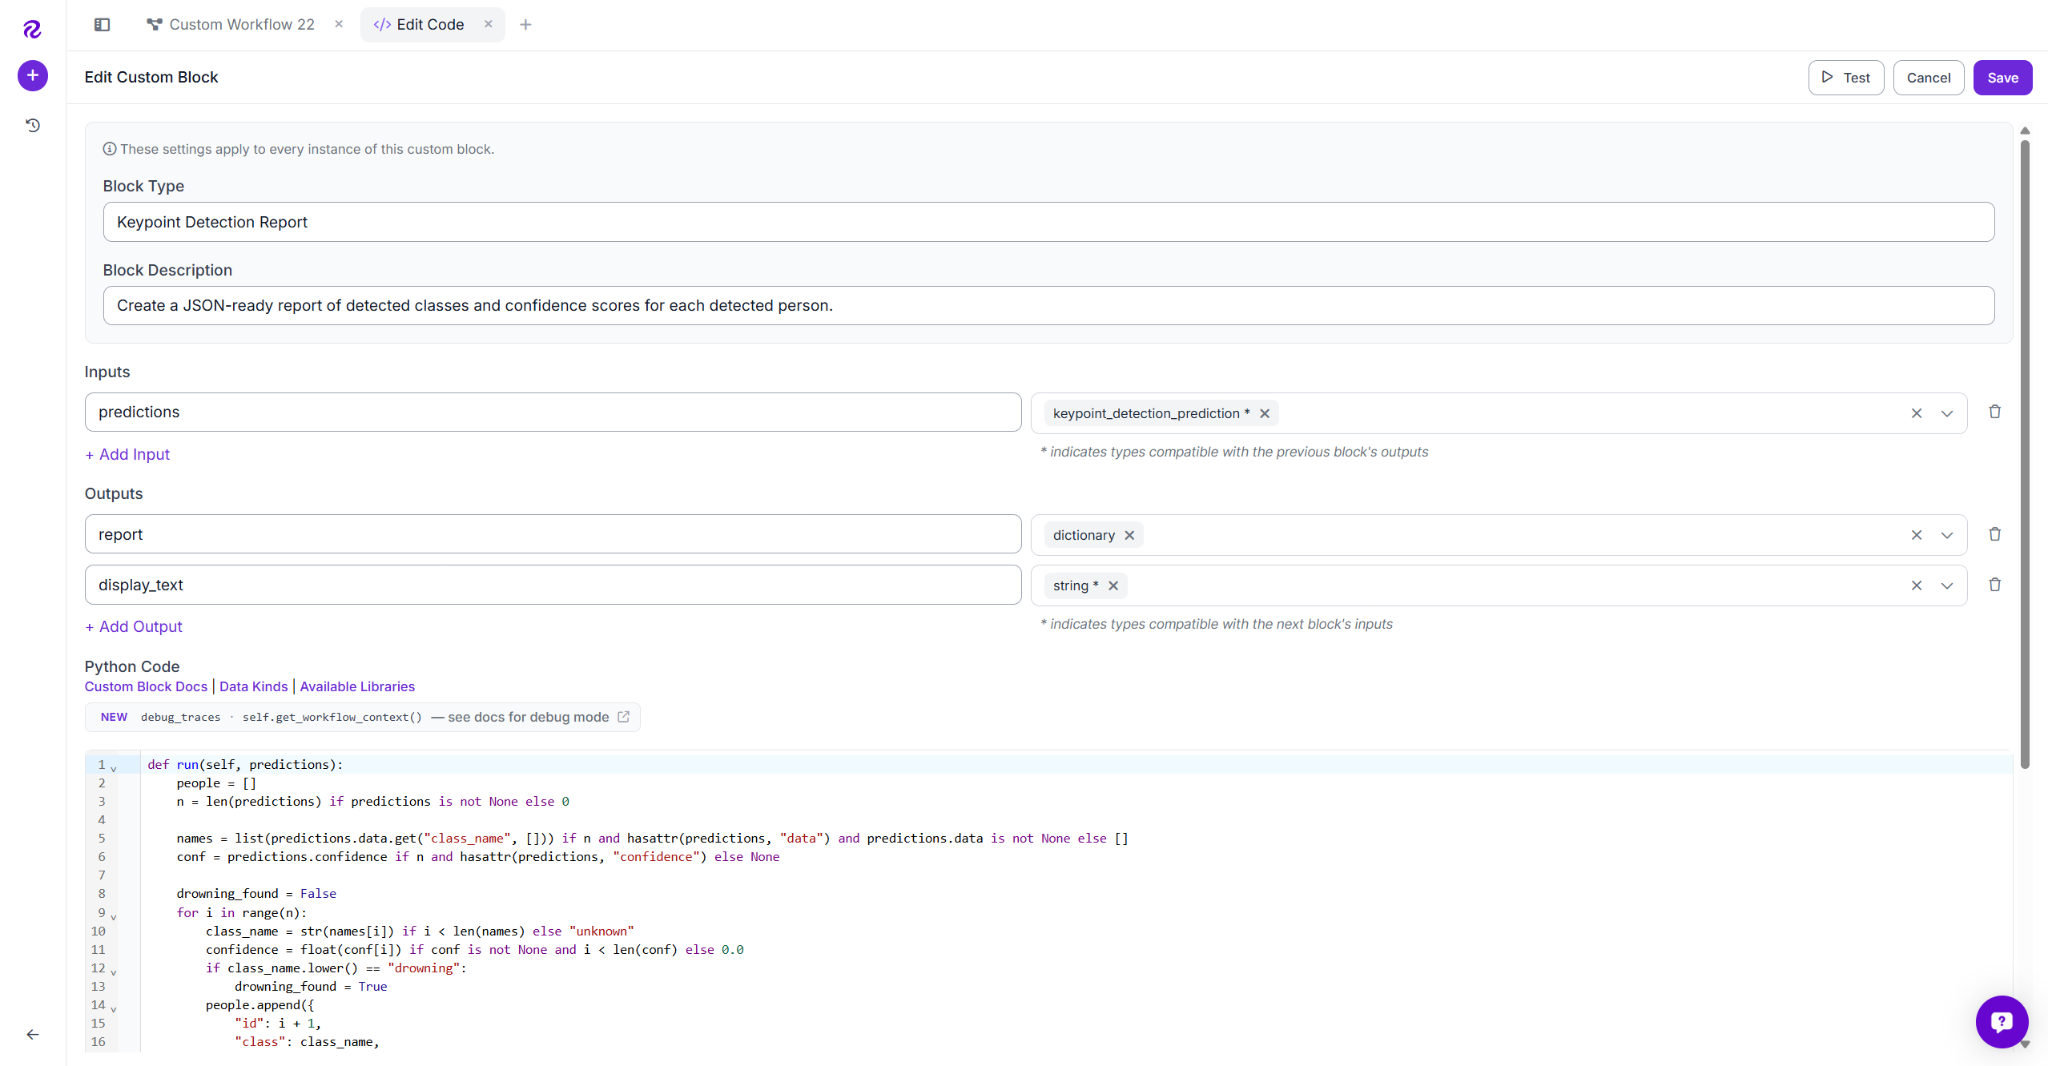
Both outputs feed into downstream blocks: report goes to the Outputs block, and display_text goes to the Text Display block.
Step 3: Add the Clean Keypoint Skeleton Visualization block
Add a Custom Python block named Clean Keypoint Skeleton Visualization. Connect the input image and model predictions, then configure the block to output the annotated image with the skeleton overlay.
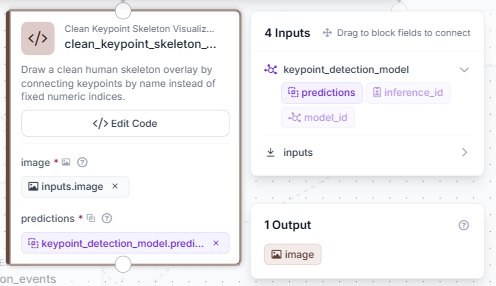
Open Edit Code to create a skeleton overlay.
def run(self, image, predictions):
    arr = image.numpy_image.copy()
    h, w = arr.shape[:2]
    RED, GREEN, BLACK, WHITE = (0,0,255), (0,255,80), (0,0,0), (255,255,255)
    THRESH = 0.5

    def output():
        return {"image": WorkflowImageData.copy_and_replace(origin_image_data=image, numpy_image=arr)}

    if predictions is None or len(predictions) == 0:
        return output()

    data = getattr(predictions, "data", {}) or {}
    xy = data.get("keypoints_xy")
    if xy is None:
        return output()

    xy = np.asarray(xy)
    if xy.ndim == 2: xy = xy[None]

    conf = data.get("keypoints_confidence")
    if conf is not None:
        conf = np.asarray(conf)
        if conf.ndim == 1: conf = conf[None]

    names = data.get("keypoints_class_name")
    if names is not None:
        names = np.asarray(names, dtype=object)
        if names.ndim == 1: names = np.tile(names, (xy.shape[0], 1))

    classes = list(data.get("class_name", []))
    boxes = getattr(predictions, "xyxy", None)

    alias_map = {a: k for k, v in {
        "nose": "nose head face",
        "neck": "neck upperneck shouldercenter",
        "left_shoulder": "leftshoulder lshoulder",
        "right_shoulder": "rightshoulder rshoulder",
        "left_elbow": "leftelbow lelbow",
        "right_elbow": "rightelbow relbow",
        "left_wrist": "leftwrist lwrist lefthand",
        "right_wrist": "rightwrist rwrist righthand",
        "left_hip": "lefthip lhip",
        "right_hip": "righthip rhip",
        "left_knee": "leftknee lknee",
        "right_knee": "rightknee rknee",
        "left_ankle": "leftankle lankle leftfoot",
        "right_ankle": "rightankle rankle rightfoot",
        "pelvis": "pelvis midhip hipcenter"
    }.items() for a in v.split()}

    edges = [
        ("nose","neck"), ("neck","left_shoulder"), ("neck","right_shoulder"),
        ("left_shoulder","left_elbow"), ("left_elbow","left_wrist"),
        ("right_shoulder","right_elbow"), ("right_elbow","right_wrist"),
        ("neck","pelvis"), ("pelvis","left_hip"), ("pelvis","right_hip"),
        ("left_hip","left_knee"), ("left_knee","left_ankle"),
        ("right_hip","right_knee"), ("right_knee","right_ankle")
    ]
    fallback_edges = [
        (0,1),(1,2),(2,3),(3,4),(1,5),(5,6),(6,7),
        (1,8),(8,9),(9,10),(8,11),(11,12),(12,13),(8,14),(5,8),(1,11)
    ]

    clean = lambda v: ''.join(c for c in str(v).lower() if c.isalnum())
    valid = lambda pt, c=None: 0<=pt[0]<w and 0<=pt[1]<h and not(pt[0]==0 and pt[1]==0) and (c is None or c>=THRESH)
    mid = lambda a,b: (int((a[0]+b[0])/2), int((a[1]+b[1])/2))

    for i, person in enumerate(xy):
        cls = classes[i] if i < len(classes) else ""
        color = RED if cls.lower() == "drowning" else GREEN

        if boxes is not None and i < len(boxes):
            x1,y1,x2,y2 = map(int, boxes[i])
            cv2.rectangle(arr, (x1,y1), (x2,y2), color, 3)
            label = cls or "person"
            (tw,th), base = cv2.getTextSize(label, cv2.FONT_HERSHEY_SIMPLEX, .7, 2)
            bx1,by1,bx2,by2 = max(0,x1), max(0,y1-th-base-12), min(w-1,x1+tw+12), min(h-1,y1)
            cv2.rectangle(arr, (bx1,by1), (bx2,by2), color, -1)
            cv2.putText(arr, label, (bx1+6, by2-6-base), cv2.FONT_HERSHEY_SIMPLEX, .7,
                       WHITE if cls.lower()=="drowning" else BLACK, 2)

        points, joints = {}, {}
        for k, pt in enumerate(person):
            c = conf[i][k] if conf is not None and i < len(conf) and k < len(conf[i]) else None
            if not valid(pt, c): continue
            p = (int(pt[0]), int(pt[1]))
            points[k] = p
            if names is not None:
                joint = alias_map.get(clean(names[i][k]))
                if joint: joints[joint] = p

        if "neck" not in joints and "left_shoulder" in joints and "right_shoulder" in joints:
            joints["neck"] = mid(joints["left_shoulder"], joints["right_shoulder"])
        if "pelvis" not in joints and "left_hip" in joints and "right_hip" in joints:
            joints["pelvis"] = mid(joints["left_hip"], joints["right_hip"])

        drawn = False
        for a, b in edges:
            if a in joints and b in joints:
                cv2.line(arr, joints[a], joints[b], BLACK, 3)
                drawn = True
        if not drawn and len(points) == 15:
            for a, b in fallback_edges:
                if a in points and b in points:
                    cv2.line(arr, points[a], points[b], BLACK, 3)

        for p in list(points.values()) + [joints[x] for x in ["neck","pelvis"] if x in joints]:
            cv2.circle(arr, p, 5, WHITE, -1)
            cv2.circle(arr, p, 1, BLACK, -1)

    return output()
Open the full editor to paste the complete code before saving.
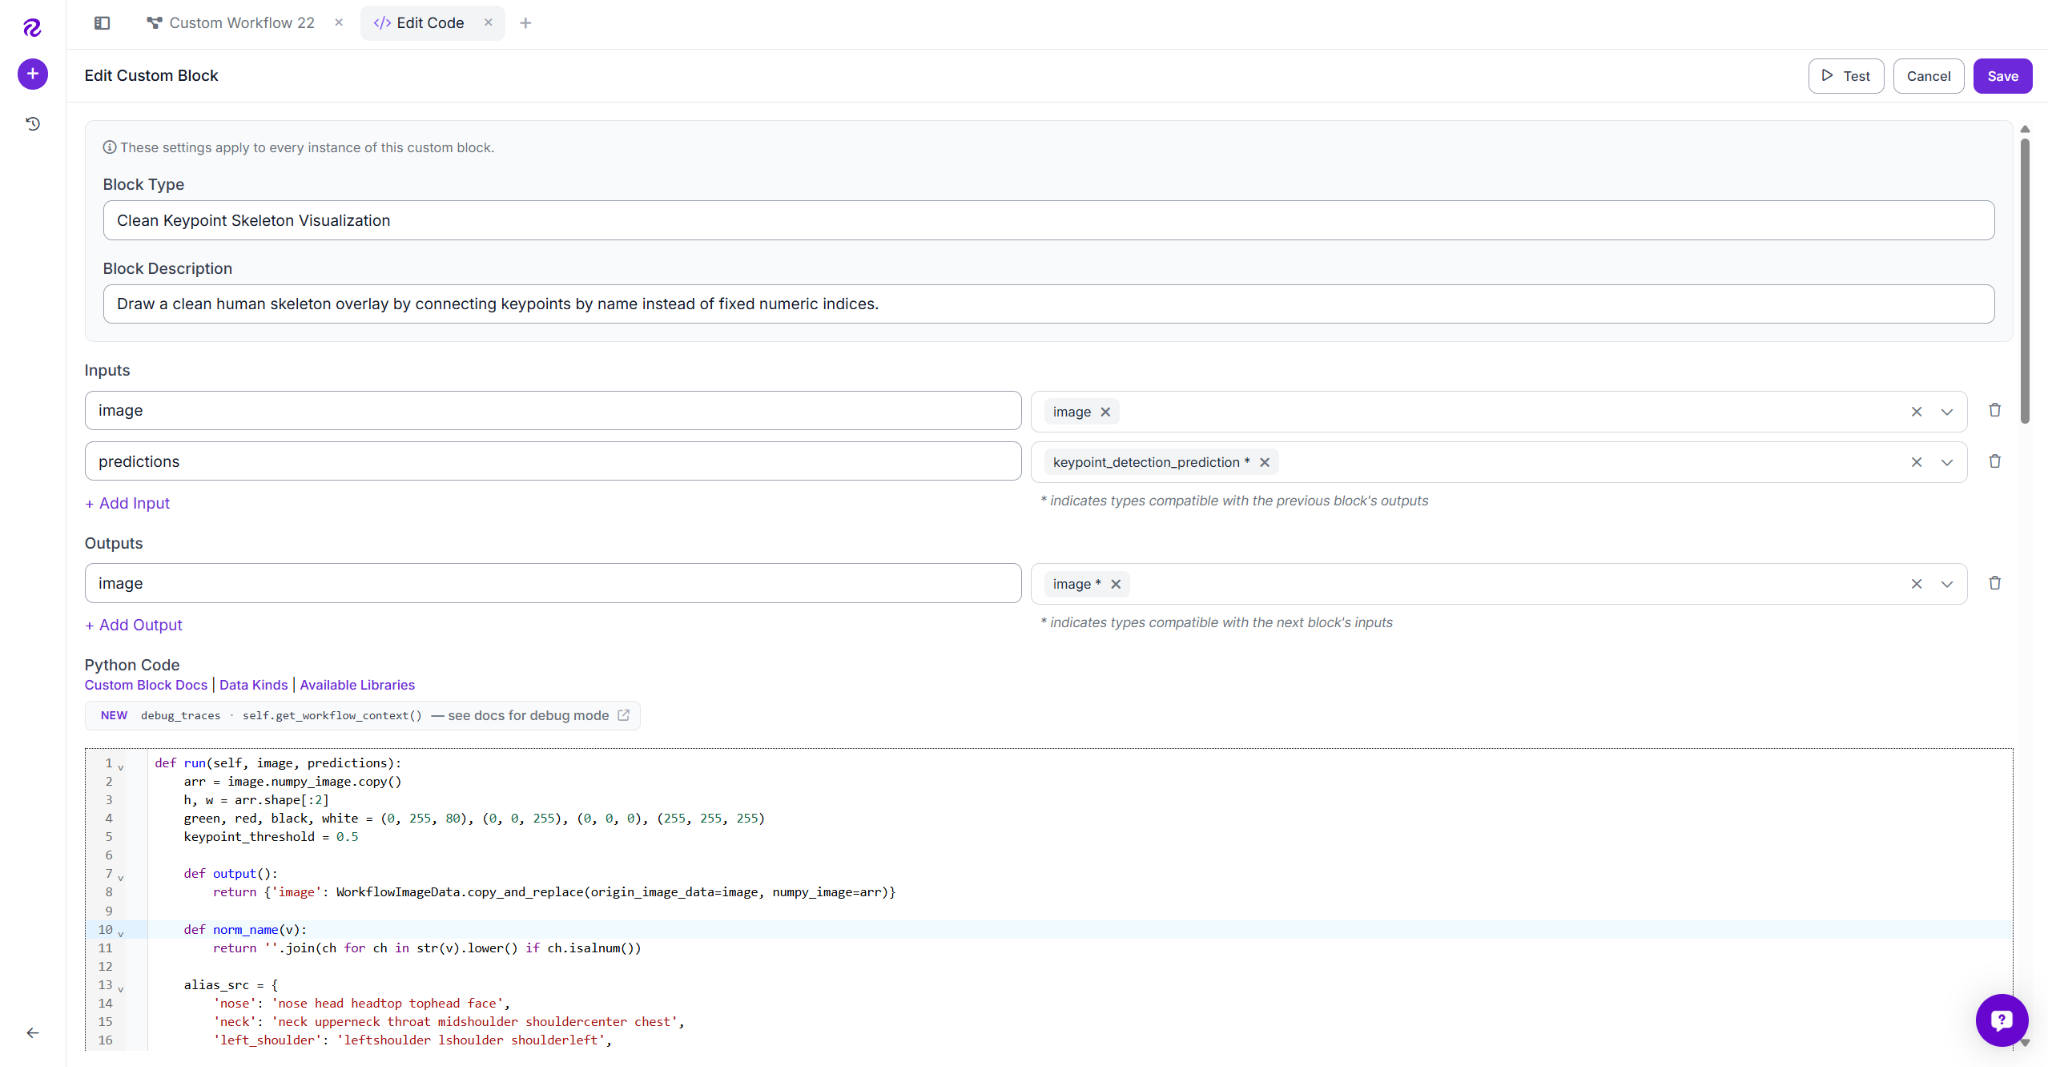
This block produces the annotated image that feeds into the Text Display block.
Step 4: Add the Text Display block
Add a Text Display block connected to the annotated image output, using the status summary from the Keypoint Detection Report with a bottom-left text overlay configuration.
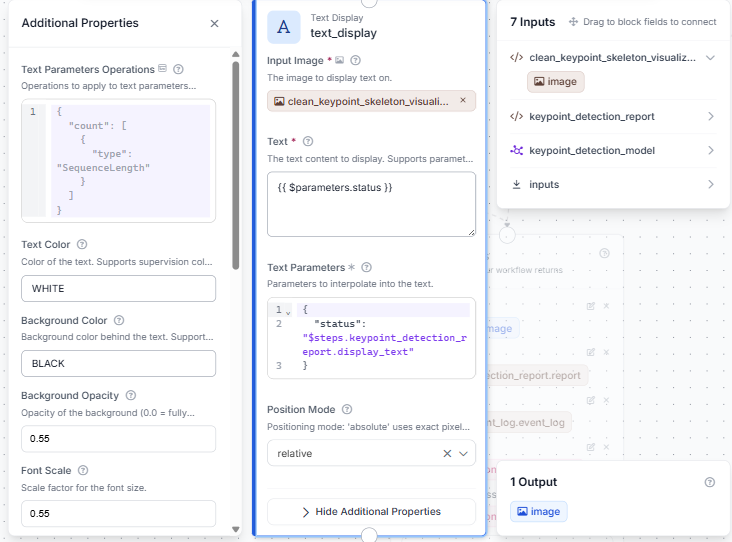
This block combines the annotated skeleton image from Step 3 with the alert status text from Step 2 into a single output image.
Step 5: Add the Roboflow Vision Events block
Add Roboflow Vision Events, connect inputs, and enable Safety Alert, Swim Safety Monitoring, metadata tracking, and Fire and Forget.
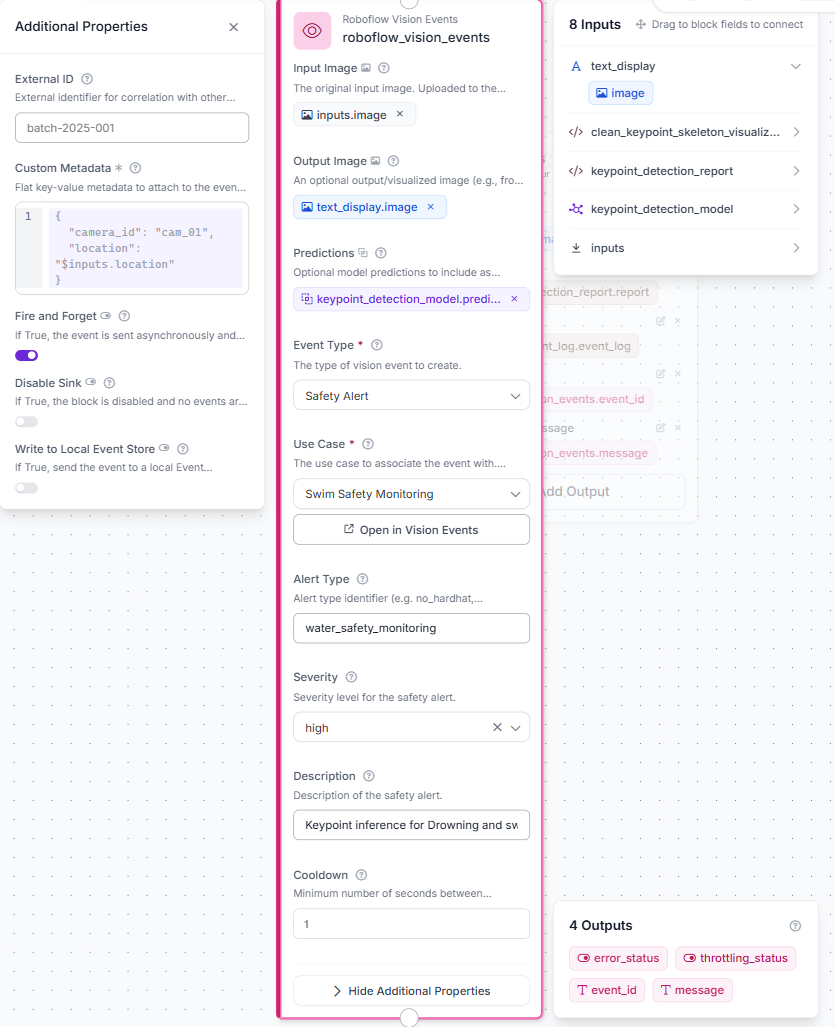
Logs each inference, including images and predictions, for monitoring without affecting Workflow outputs.
Step 6: Configure the Outputs block
Configure the Outputs block with output_image and json_report from their workflow outputs.
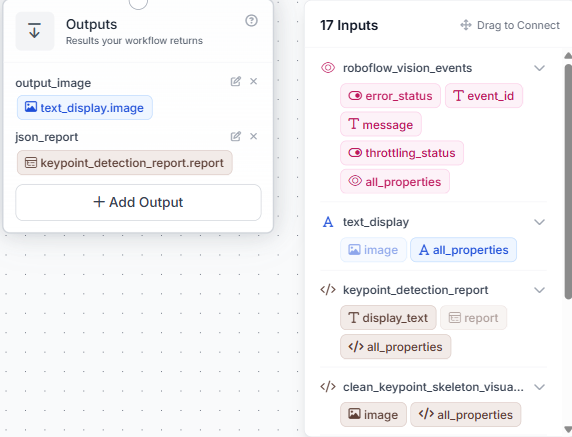
With everything connected, the full Workflow looks like this.
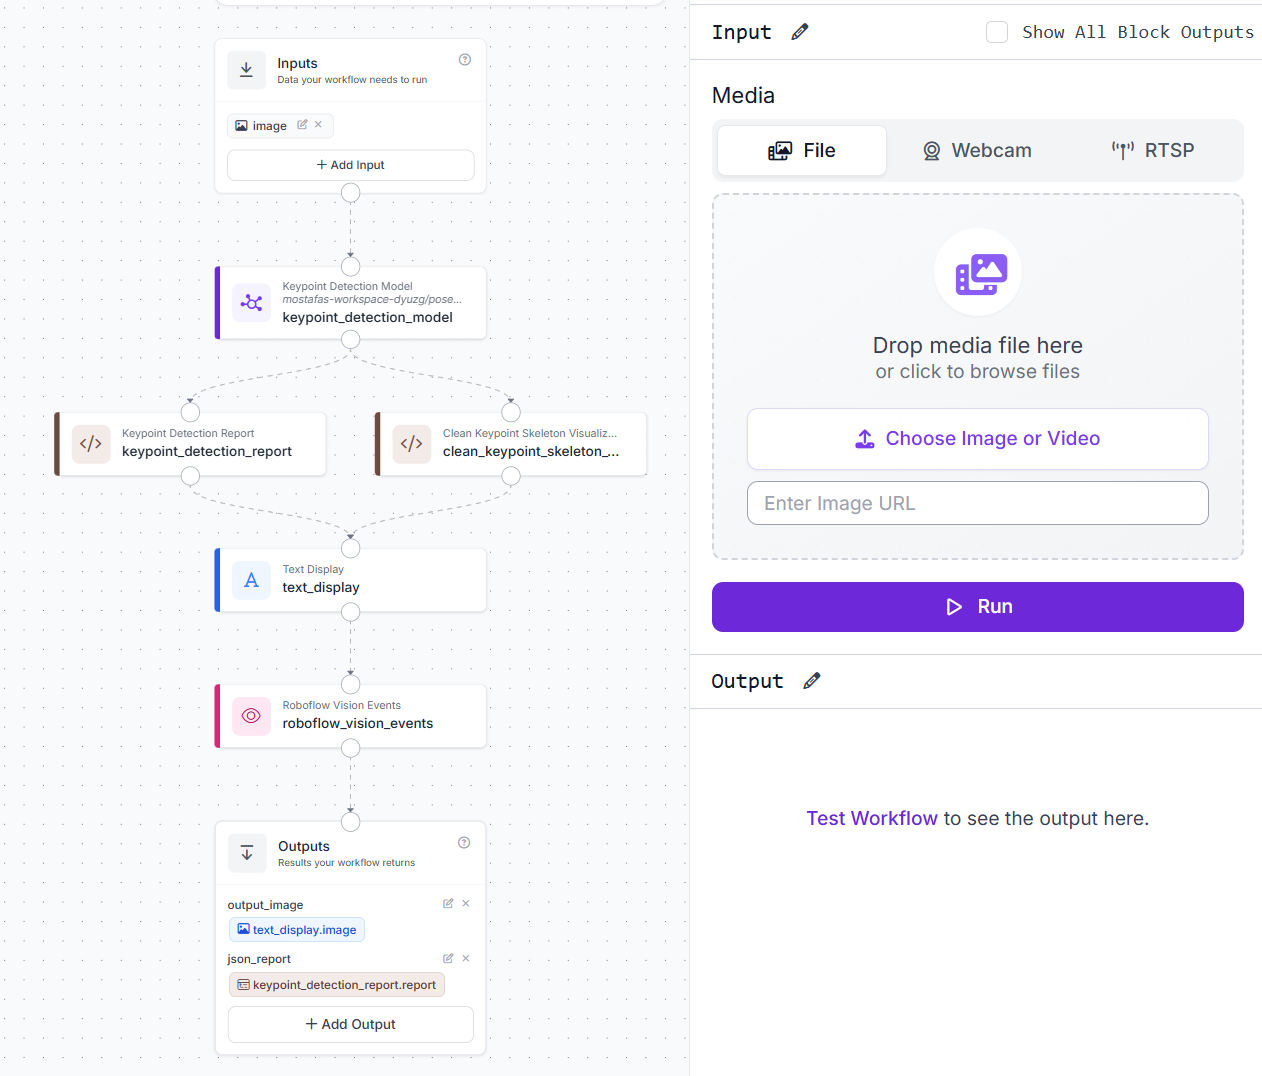
One image in, and an annotated image with skeleton overlay and a structured JSON report out.
Results
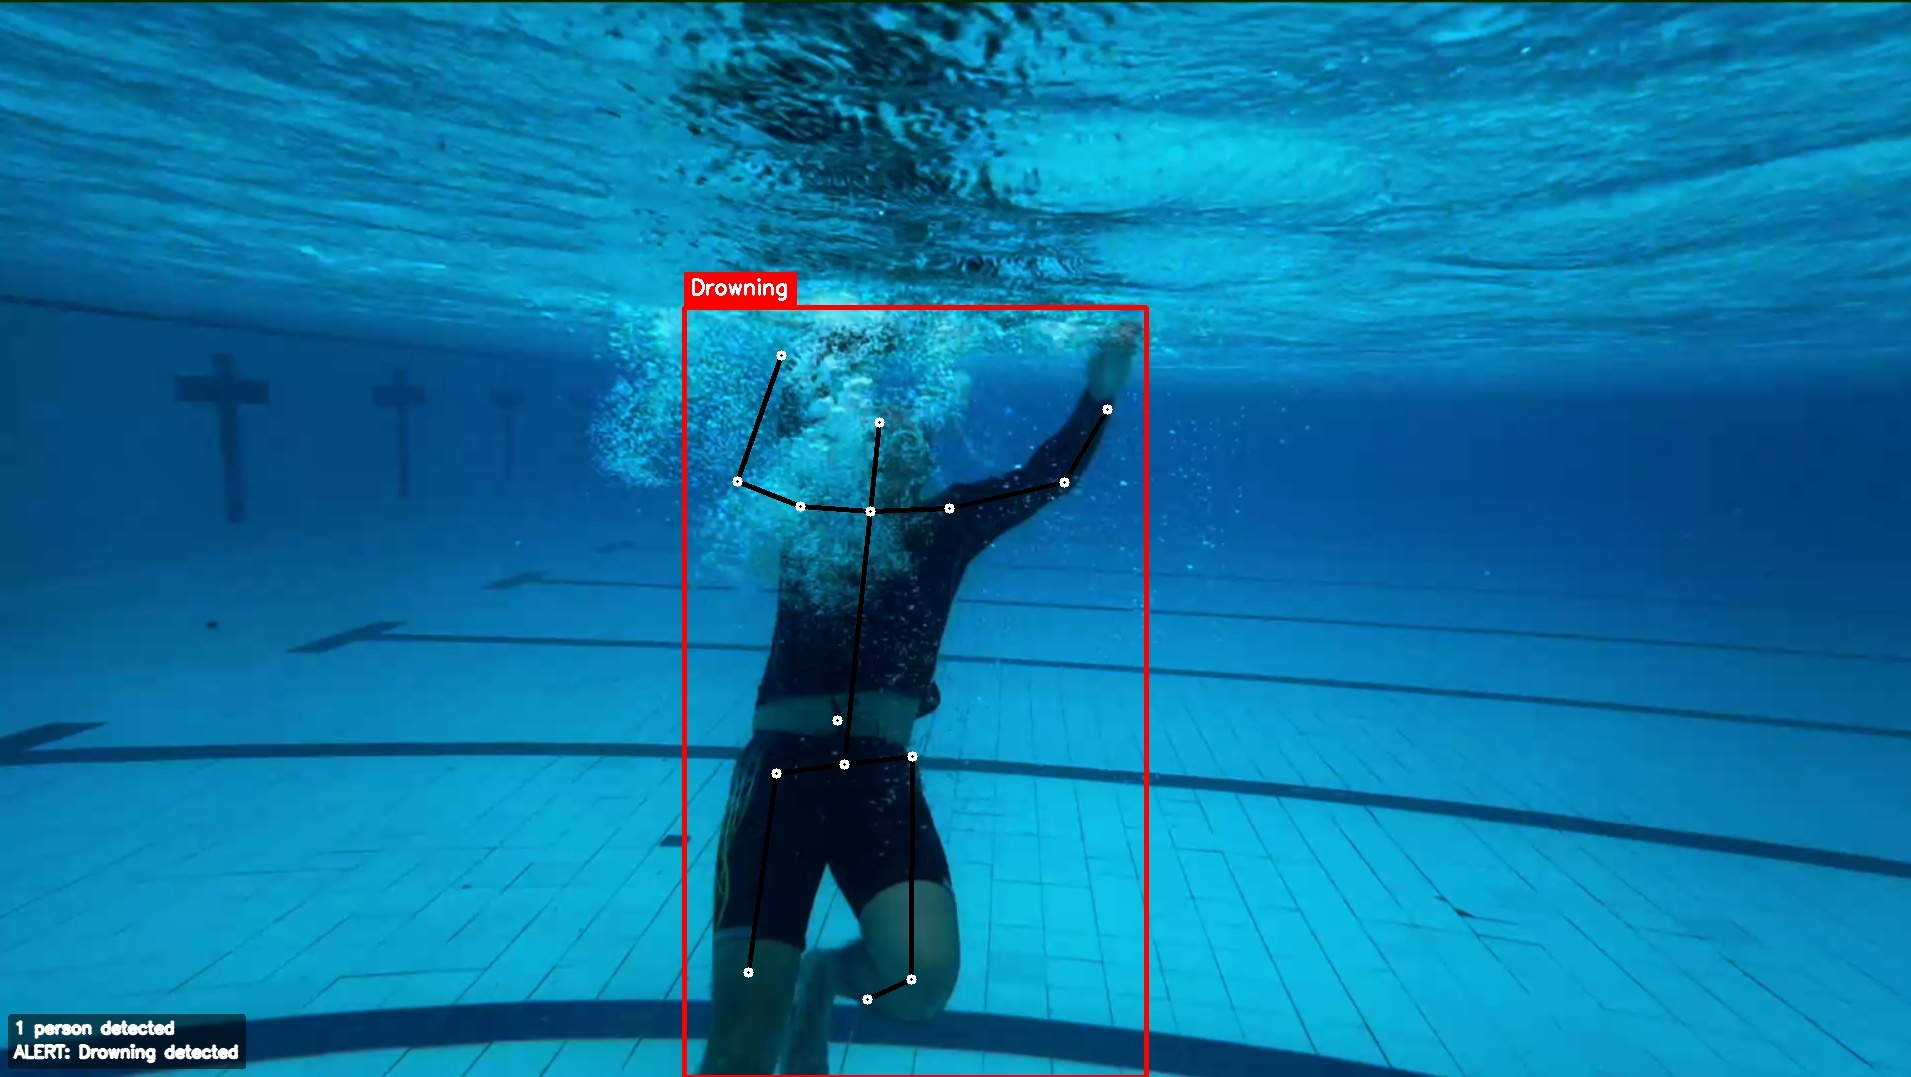
Test case 1: Drowning detected
A distressed body position returns a skeleton overlay, red bounding box, and a "Drowning" label, with the visual text reading: "1 person detected / ALERT: Drowning detected"
The output json_report confirms the "Drowning" class at 73.9% confidence and sets the alert_status to "ALERT: Drowning detected".
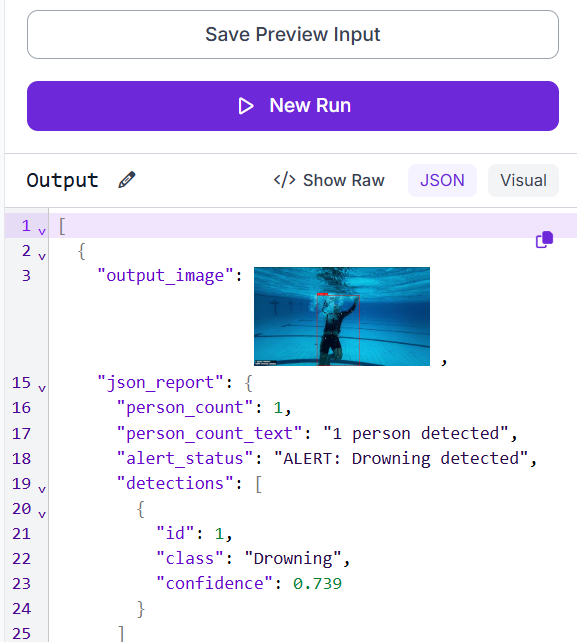
This provides a structured alert ready for downstream monitoring systems without the overhead of tracking separate event streams.
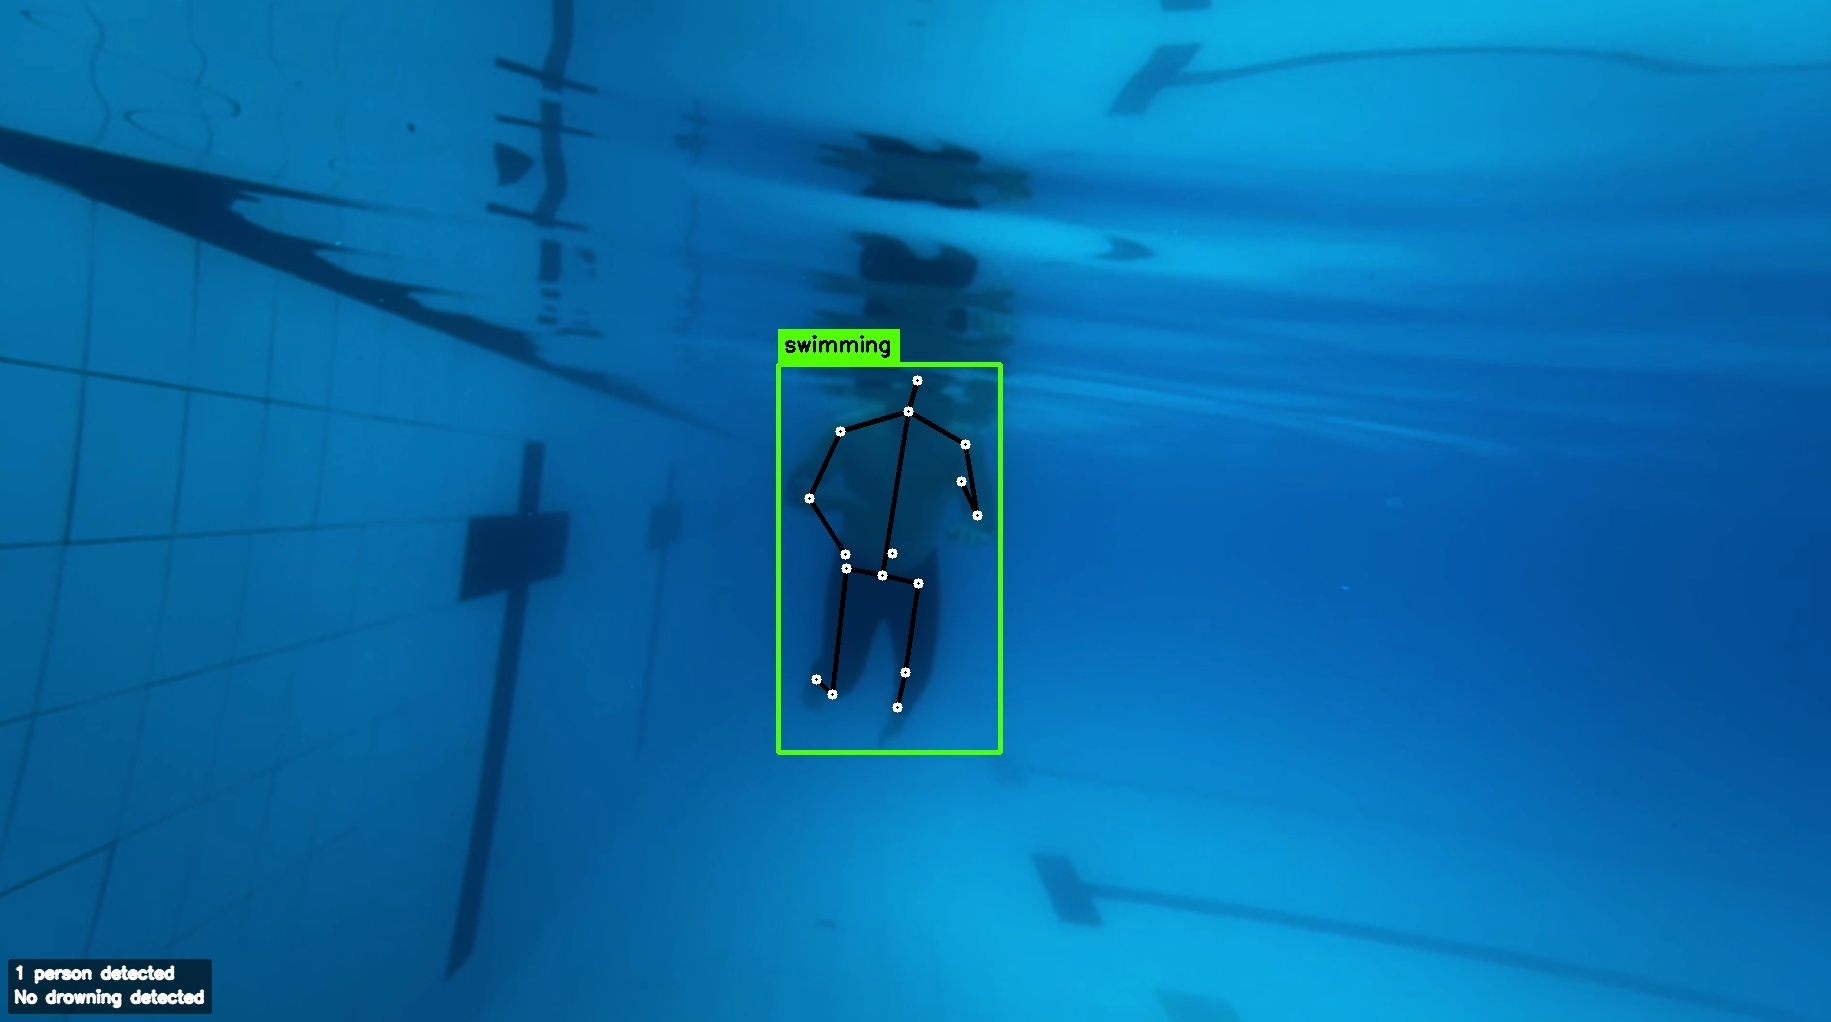
Test case 2: Swimming detected
A swimming pose returns a skeleton overlay, green bounding box, and a "swimming" label, with the visual text reading: "1 person detected / No drowning detected".
The output json_report confirms the "swimming" class at 70.5% confidence and sets the alert_status to "No drowning detected".
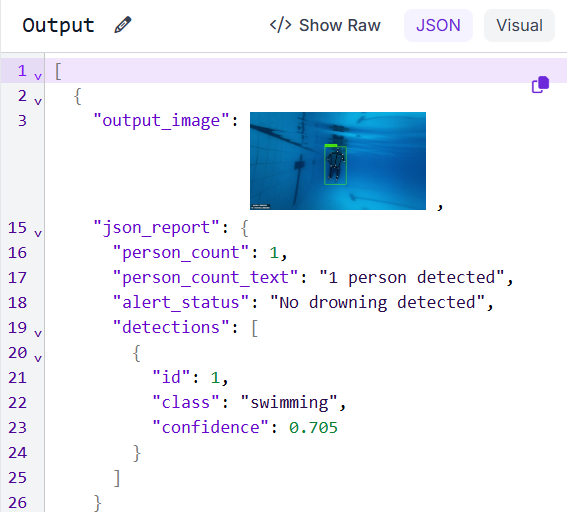
These two test cases show the workflow in action: the core skeleton pipeline and JSON structure stay exactly the same, but the alert path changes dynamically based on the detected body position.
Production Deployment
This Workflow starts with a single image, but it can be extended into a continuous pool monitoring system by connecting Roboflow Inference to an underwater camera stream. The same pipeline processes incoming frames without requiring structural changes.
Each inference is logged through Vision Events with metadata such as camera ID, location, and alert status, creating a searchable record of detections across a facility. This enables deeper analysis beyond individual alerts, such as identifying cameras, areas, or conditions that produce frequent uncertain detections.
The model can also improve over time. Low-confidence predictions can be reviewed, added to the dataset, and used for future retraining. As the model becomes more accurate, only the underlying model changes while the Workflow remains the same.
Use Roboflow Agent
Roboflow Agent can build this Workflow from a prompt instead of block-by-block assembly. Describe what you want in plain language ("run my keypoint model on the input image, draw skeleton overlays, and return a JSON report with an alert when the class is drowning") and Agent generates the connected blocks, which you can then review and adjust in the Workflow editor.
It's also useful mid-build: ask it to add a visualization block, change a confidence threshold, or swap the model when you retrain, and it edits the existing Workflow rather than starting over.
Pose Estimation Conclusion
This Workflow takes a pool image, runs it through a custom-trained RF-DETR Keypoint model, and returns a skeleton overlay, JSON report, and safety event log in one pass. By analyzing body position instead of just detecting people, it can distinguish between swimming and drowning from a single frame.
The Workflow is reusable because the dataset, classes, and confidence settings can be updated without changing the pipeline structure. The same approach extends to areas where pose analysis matters, such as physical therapy, sports biomechanics, and industrial safety.
Further Reading


Cite this Post
Use the following entry to cite this post in your research:
Mostafa Ibrahim. (Jul 8, 2026). What Is Pose Estimation?. Roboflow Blog: https://blog.roboflow.com/what-is-pose-estimation/