
This tutorial walks through training YOLOR (You Only Learn One Representation) on a custom object detection dataset using a public blood cells dataset as the example. The guide covers installing dependencies, downloading and preparing data via Roboflow, loading pre-trained weights, running the training loop, evaluating mAP, visualizing results, running inference on test images, and exporting trained weights for deployment elsewhere. YOLOR combines explicit and implicit knowledge representations and benchmarks around 88% faster than Scaled-YOLOv4 at similar accuracy on COCO.
The YOLO family recently got a new champion. YOLOR: You Only Learn One Representation. In this post, we will walk through how you can train YOLOR to recognize object detection data for your custom use case.
We use a public blood cells object detection dataset for the purpose of this tutorial. However, you can import your own data into Roboflow and export it to train this model to fit your own needs. The YOLOR notebook used for this tutorial can be downloaded here.
Thanks to Wong Kin-Yiu for publishing the underlying repository that formed the foundation of our notebook.
In this guide, we take the following steps:
- Install YOLOR dependencies
- Download custom YOLOR object detection data
- Prepare Pre-Trained Weights for YOLOR
- Run YOLOR training
- Evaluate YOLOR performance
- Visualize YOLOR training data
- Run YOLOR inference on test images
- Export saved YOLOR weights for future inference
What is YOLOR?
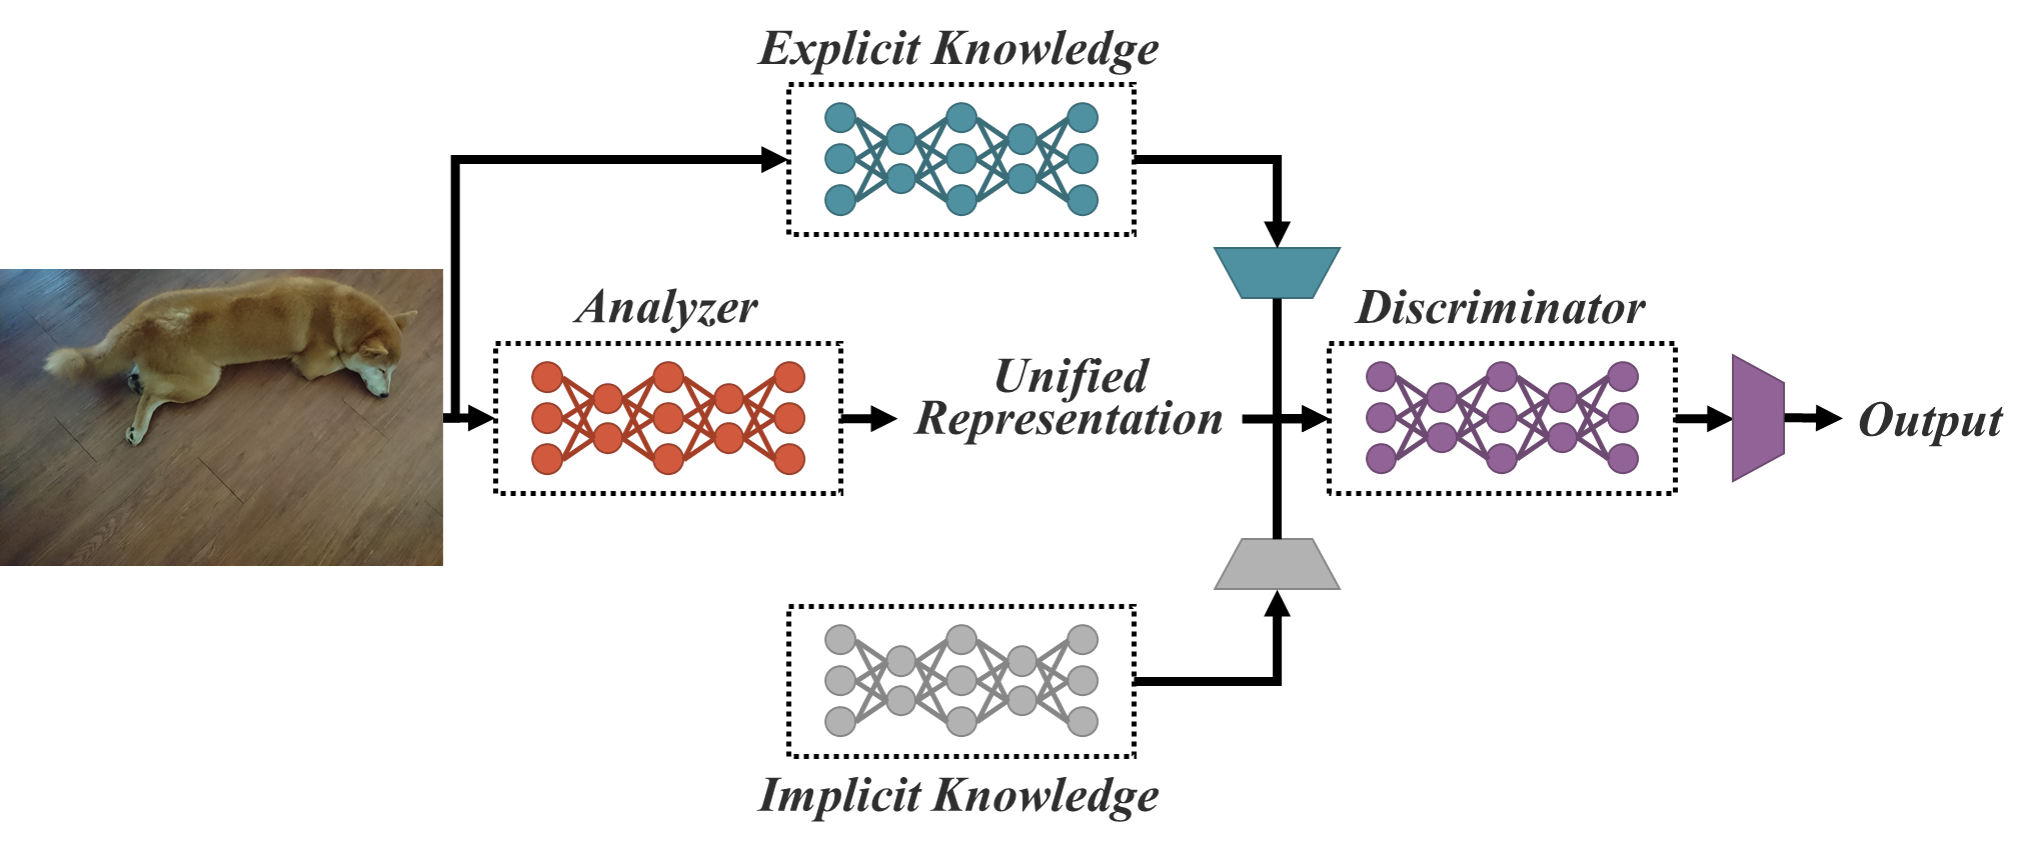
YOLOR (You Only Learn One Representation) is a model that uses the YOLO model architecture. YOLOR trains an implicit knowledge network using COCO data and combines this with explicit knowledge, both used during the inference stage to make a prediction about what is in an image.
What's New in YOLOR?
YOLOR is the latest evolution of YOLO models, and you've probably heard of YOLOv3, YOLOv4, and YOLOv5. Perhaps you've even also heard of Scaled-YOLOv4 and PP-YOLO and PP-YOLOv2. All of which are great content should you choose to dive into the YOLO-verse.
Wong Kin-Yiu has previously made impacts in computer vision research with his CSP-Net and Scaled-YOLOv4. CSP-Net implemented hyper-efficient convolutional layers to speed up YOLO detection speed with little impact on accuracy. Scaled-YOLOv4 took these concepts and applied them to a family of state of the art detectors.
The pattern in AI training today is to first pre-train your network on a generic task over a large dataset corpus, and then collect a domain-specific dataset to fine-tune your model to. During this pre-train/fine-tune process, the same set of model weights are edited. YOLOR pre-trains an implicit knowledge network with all of the tasks present in the COCO dataset, namely object detection, instance segmentation, panoptic segmentation, keypoint detection, stuff segmentation, image caption, multi-label image classification, and long tail object recognition.
When optimizing for the COCO dataset, YOLOR trains another set of parameters that represent explicit knowledge. For prediction, both implicit and explicit knowledge are used.
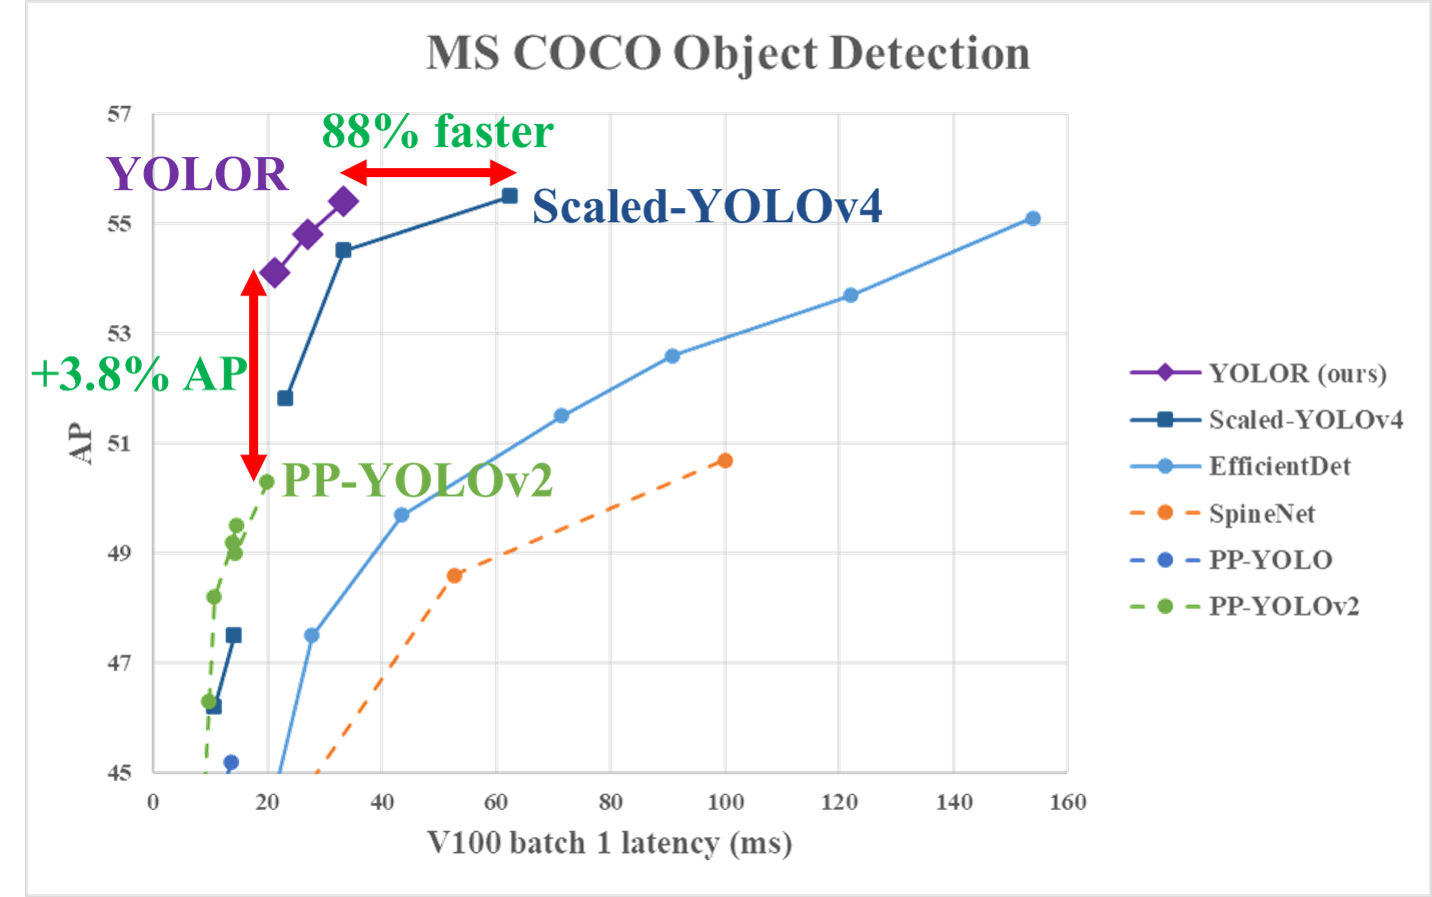
This novel approach propels YOLOR to the state-of-the-art for object detection in the speed/accuracy tradeoff landscape.
For more on these exciting new breakthroughs check out the YOLOR paper.
How to Train YOLOR
Alright let's dive in and apply YOLOR to our own dataset. To the notebook.
Install YOLOR Dependencies
To setup our development environment, we will first clone the base YOLOR repository and download the necessary requirements:
# clone YOLOR repository
!git clone https://github.com/roboflow-ai/yolor
%cd yolor
!git reset --hard eb3ef0b7472413d6740f5cde39beb1a2f5b8b5d1

# install dependencies as necessary
!pip install -qr requirements.txt
We will then install Mish CUDA to be able to use the Mish activation:
# Install Mish CUDA
!git clone https://github.com/JunnYu/mish-cuda
%cd mish-cuda
!git reset --hard 6f38976064cbcc4782f4212d7c0c5f6dd5e315a8
!python setup.py build install
%cd ..
We will also install PyTorch wavelelts to be able to use the DWT downsampling module:
# Install PyTorch Wavelets
!git clone https://github.com/fbcotter/pytorch_wavelets
%cd pytorch_wavelets
!pip install .
%cd ..
Download Custom YOLOR Object Detection Data
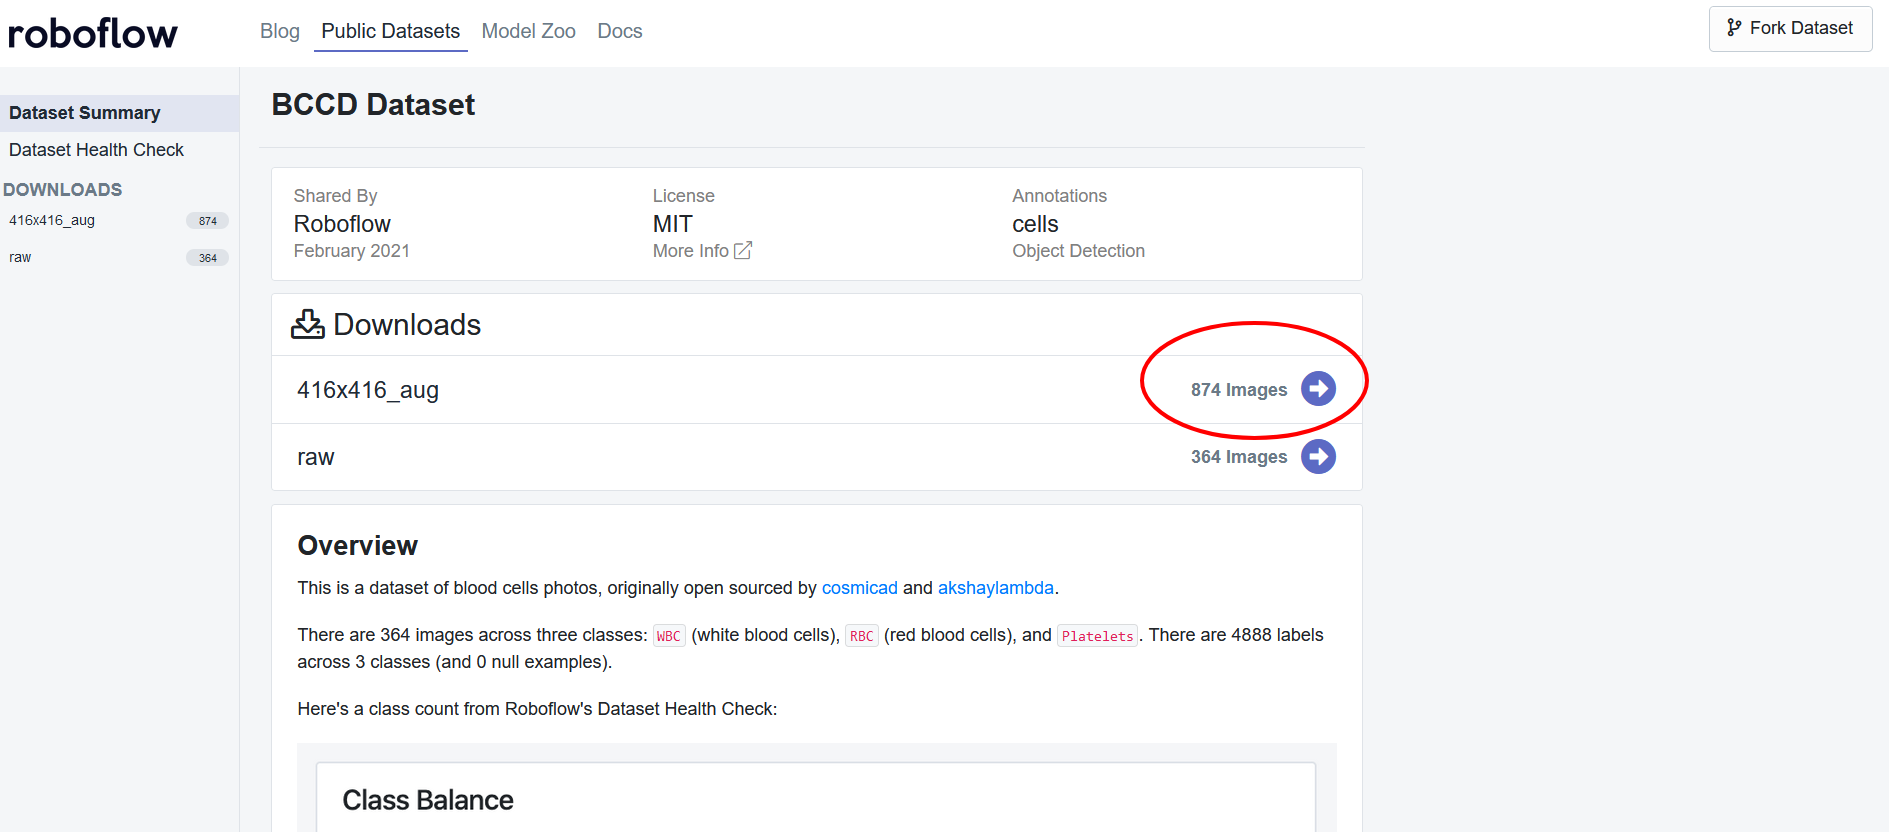
Before, we get started, you will want to create a Roboflow account. We will be using this blood cells dataset but you are welcome to use any dataset whether it be your own dataset loaded into Roboflow or another public dataset.
Using Your Own Data
To export your own data for this tutorial, sign up for Roboflow and make a public workspace, or make a new public workspace in your existing account. If your data is private, you can upgrade to a paid plan for export to use external training routines like this one or experiment with using Roboflow's internal training solution.
Label Images
Note: the public dataset has images that are already labeled. If you do not have labeled images you can easily label in Roboflow. This is a pre-requisite to training your custom object detector.
For this notebook, we will want to use the preprocessed version of these images with the size of 416 x 416. Click on that version of the dataset:
You will be led to a pop-up and will then want to download this as the YOLOv5 PyTorch dataset format. Select "show download code" and continue:
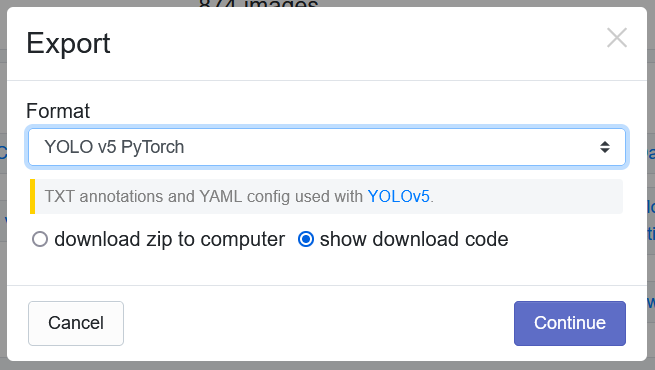
You will then want to get the Jupyter Notebook command generated and replace this line in the notebook with your new command:
!curl -L "https://public.roboflow.com/ds/[YOUR-KEY-HERE]" > roboflow.zip; unzip roboflow.zip; rm roboflow.zip
Prepare Pre-Trained Weights for YOLOR
YOLOR comes with some pre-trained weights that we can have our model train off of. We can download these weights using the shell script provided:
%cd /content/yolor
!bash scripts/get_pretrain.sh
Note that both implicit and explicit weights of the network are downloaded.
Run YOLOR Training
With everything prepared for the training process, we will then initiate the YOLOR training process. To kick off training we running the training command with the following options:
- img: define input image size
- batch: determine batch size
- epochs: define the number of training epochs. (Note: often, 3000+ are common here!)
- data: set the path to our yaml file (This is provided when we downloaded the dataset from Roboflow)
- cfg: specify our model configuration
- weights: specify a custom path to weights. (Note: We can specify the pretrained weights we downloaded up above with the shell script)
- name: result names
- hyp: Define the hyperparamters for training
And run the training command:
!python train.py --batch-size 8 --img 416 416 --data '../data.yaml' --cfg cfg/yolor_p6.cfg --weights '/content/yolor/yolor_p6.pt' --device 0 --name yolor_p6 --hyp '/content/yolor/data/hyp.scratch.1280.yaml' --epochs 50
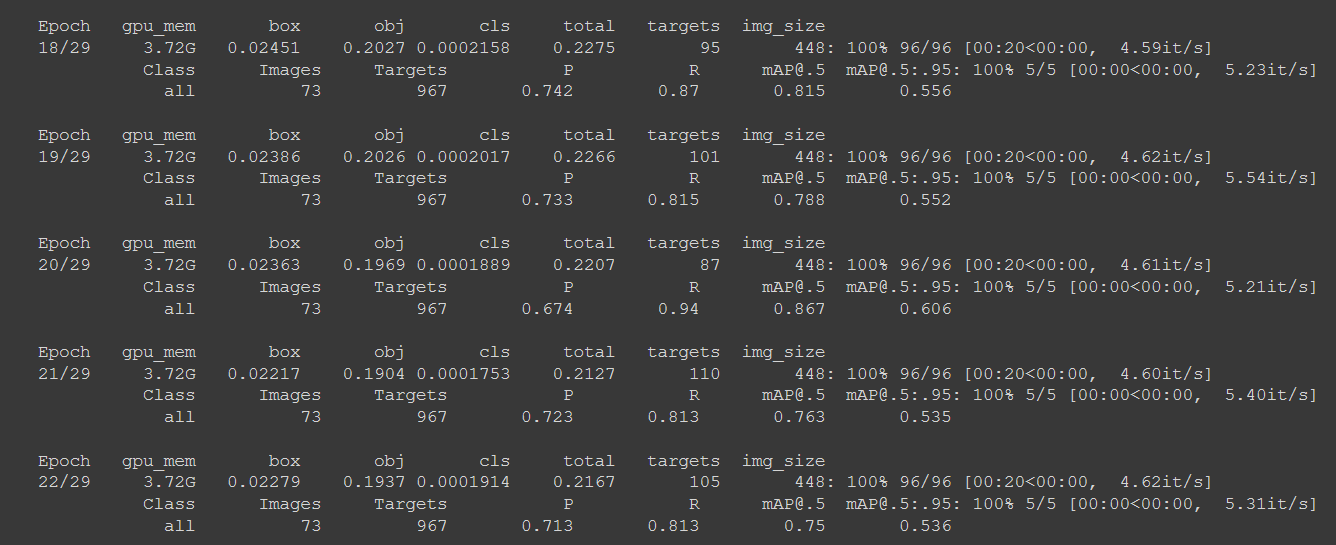
Evaluate Custom YOLOR Detector Performance
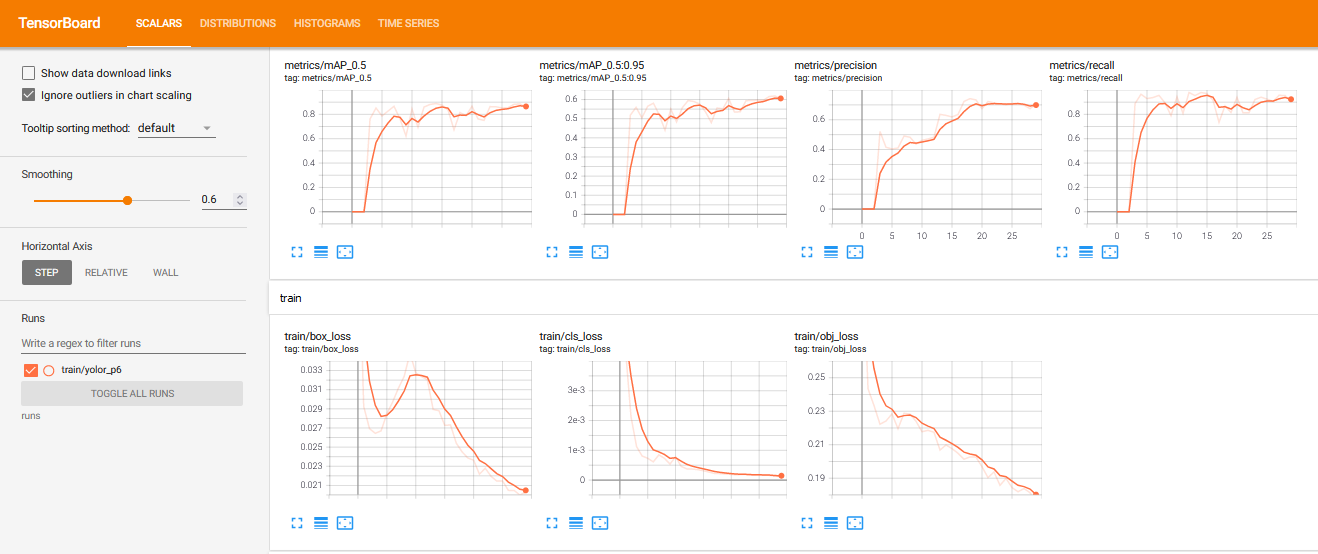
Now that we have completed training, we can evaluate how well the training procedure performed by visualizing the logs in runs folder via Tensorboard:
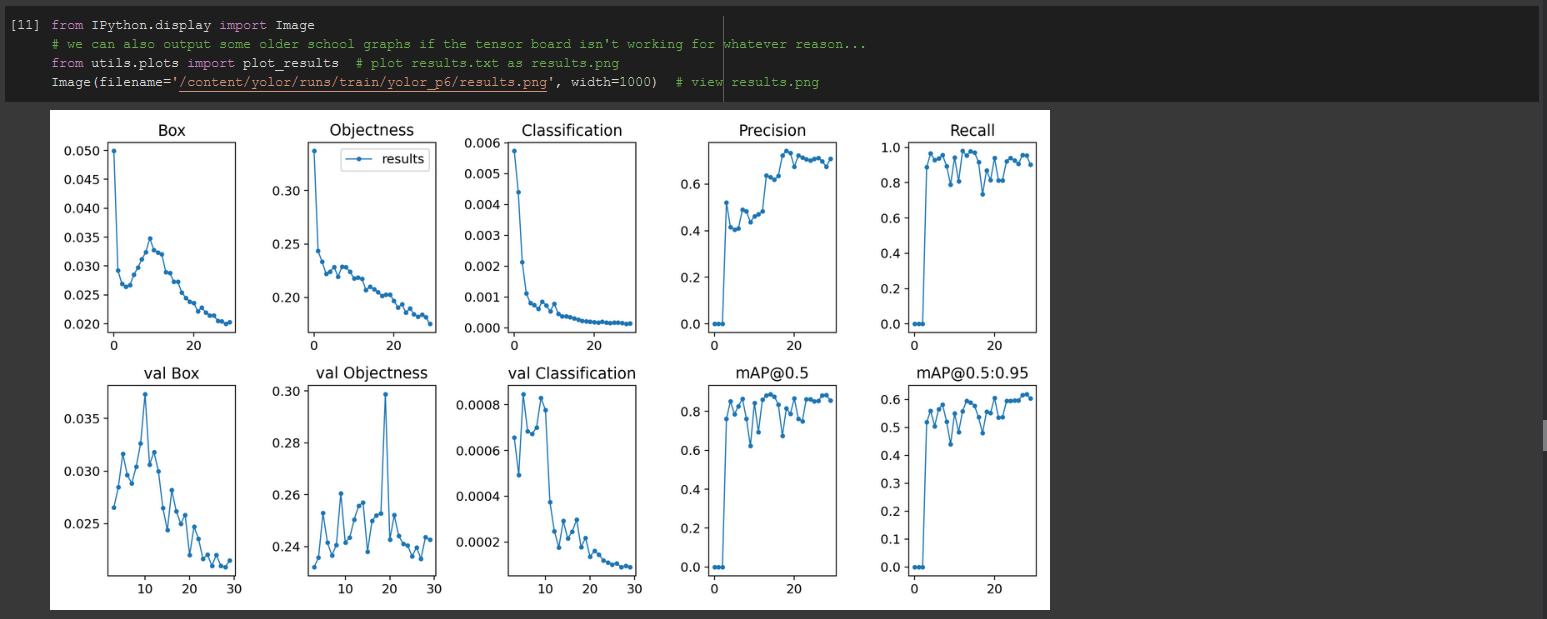
We can also simply plot the the results directly in Colab:
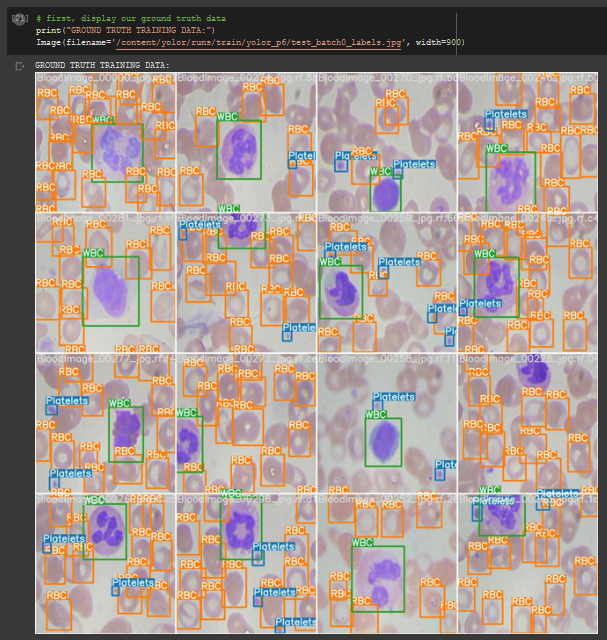
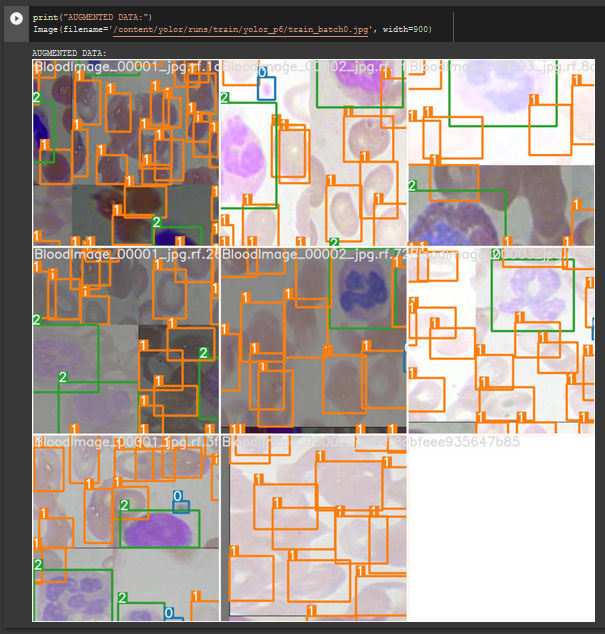
Visualize YOLOR Training Data
During the training process, YOLOR applies augmentations to the images. We can visualize original images as well as augmented images:
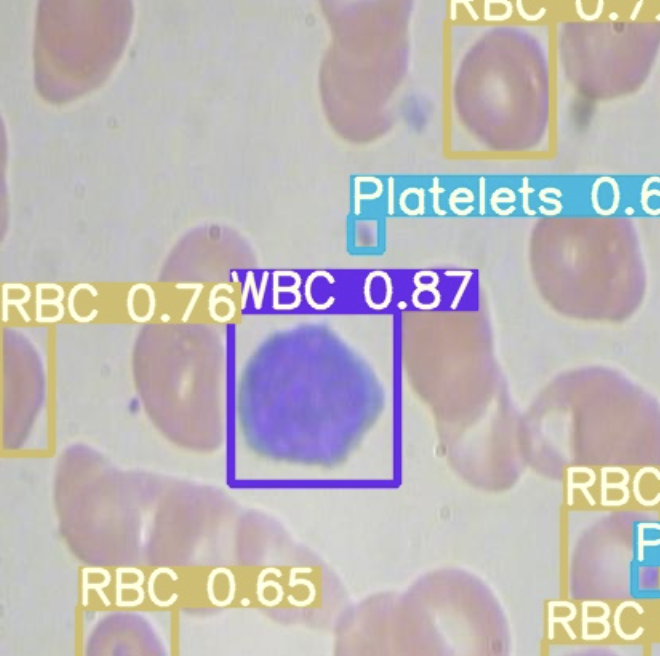
Run YOLOR Inference on Test Images
Now we take our trained model and conduct an inference on test images from when we downloaded our dataset from Roboflow. All weights from the training process can be found in the weights/.
To kick off inference, we run the command with the following parameters:
- conf: The model confidence to make a prediction (higher confidence required makes less predictions)
- source: Can accept a directory of images, individual images, video files, and also a device's webcam port.
- weights: Here you specify which model you want to use from the
weights/folder. - names: here you specify the names of the different classes of your model (we generate this earlier in the notebook based on the YAML file)
To run the inference:
!python detect.py --weights "runs/train/yolor_p6/weights/best.pt" --conf 0.4 --source ../test/images --names ../data.names
Export Saved YOLOR Weights for Future Inference
Now that we have created our YOLOR object detector, it might be a good idea to export the weights out of Colab for use on a different project. To do so we import a Google Drive module and send them out:
from google.colab import drive
drive.mount('/content/gdrive')

%cp /content/yolor/runs/train/yolor_p6/weights/best.pt /content/gdrive/My\ Drive
Your YOLOR model is now trained on a custom dataset, ready to be deployed to wherever your model is needed.
Conclusion
YOLOR is an incredibly powerful, state-of-the-art object detection model. In this tutorial we covered how to:
- Prepare a YOLOR environment
- Download custom object detection data using Roboflow
- Run the YOLOR training process
- Visualise data from YOLOR
- Use YOLOR for inference
Now you have the knowledge you need to use YOLOR in your computer vision tasks.
Frequently Asked Questions
Is YOLOR faster than YOLOv4?
YOLOR is around 88% faster than Scaled-YOLOv4 as measured by V100 batch 1 latency, while attaining a similar level of performance.
How does YOLOR compare to PP-YOLO2?
YOLOR achieves a 3.8% mAP increase over PP-YOLOv2 when benchmarked against the MS COCO dataset.
Cite this Post
Use the following entry to cite this post in your research:
Samrat Sahoo, Jacob Solawetz. (Jul 2, 2021). How to Train YOLOR on a Custom Dataset. Roboflow Blog: https://blog.roboflow.com/train-yolor-on-a-custom-dataset/