
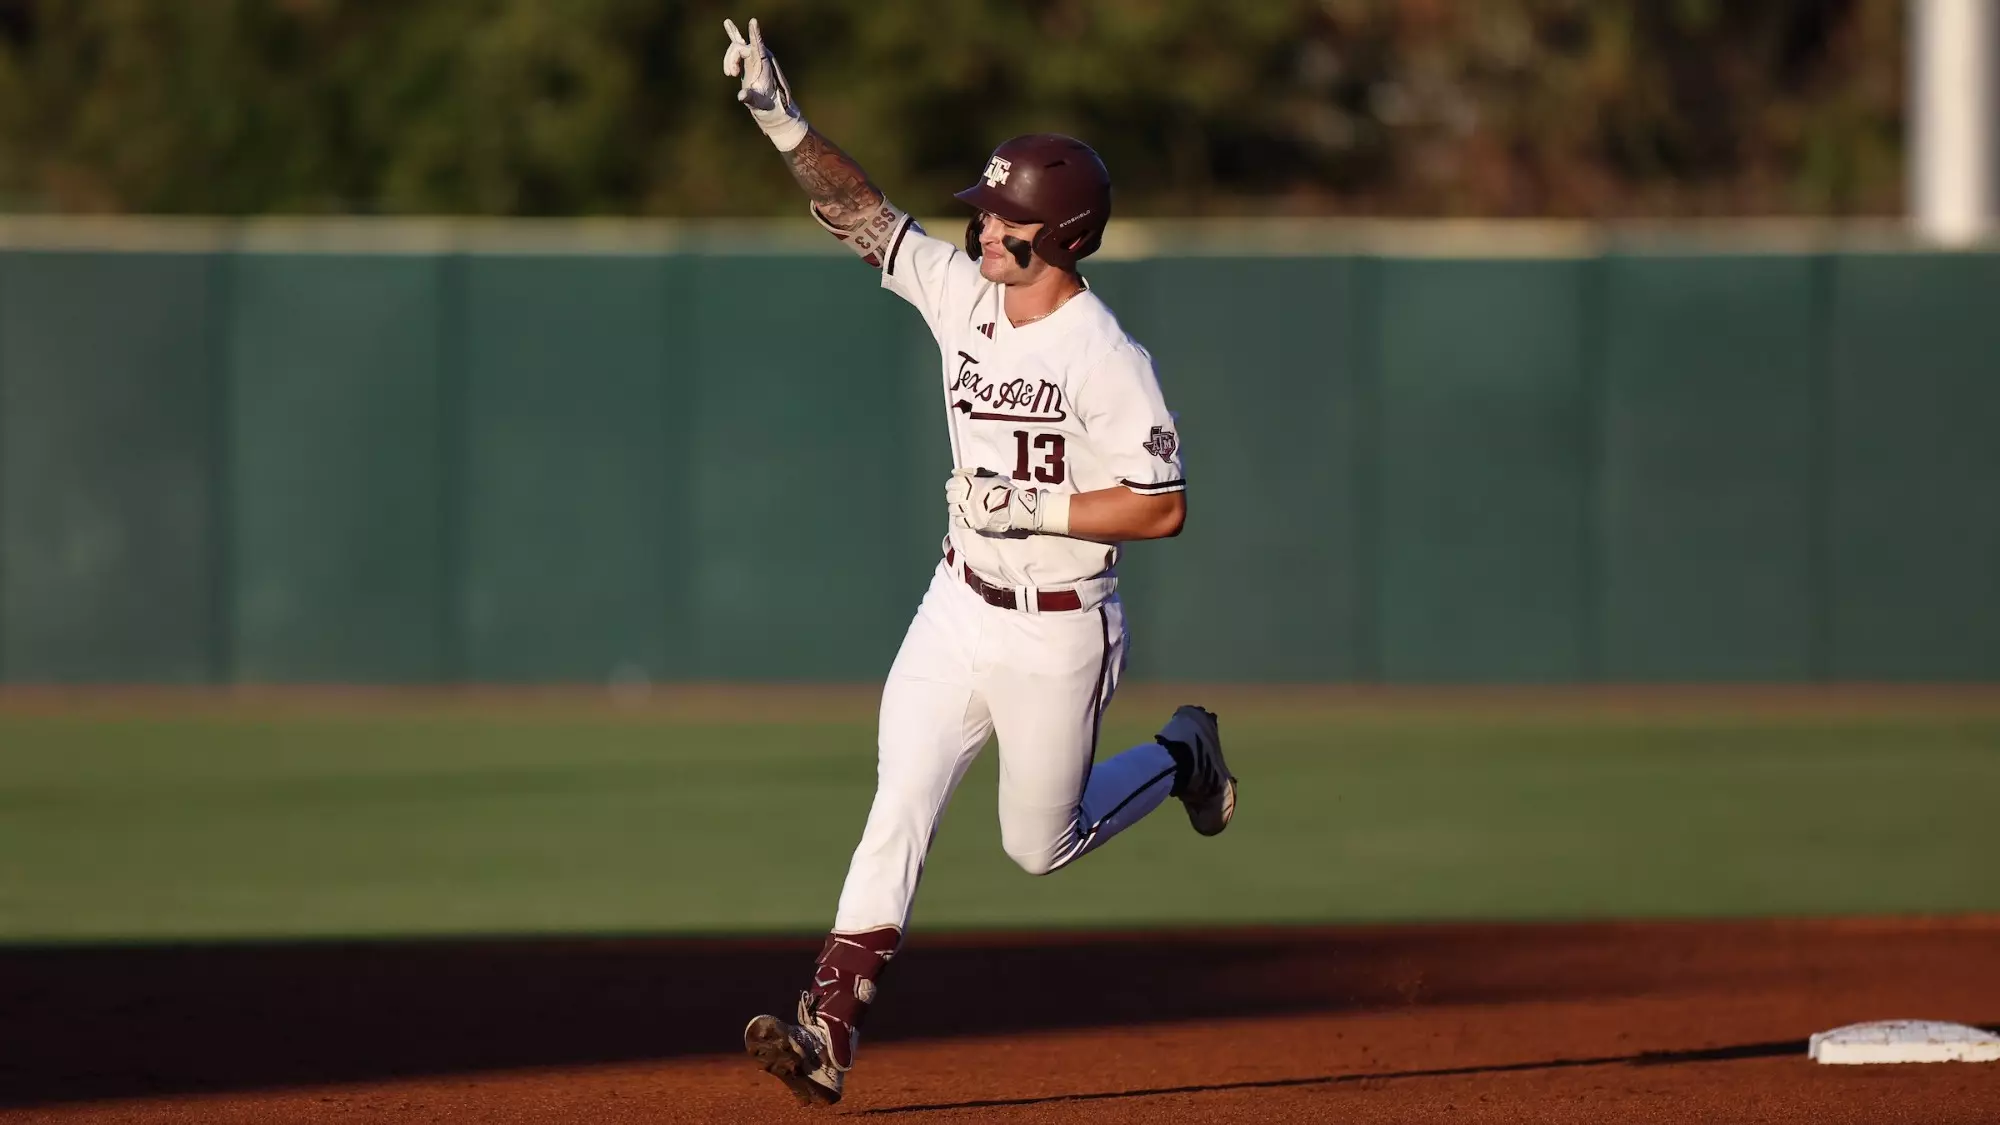
Object detection is one of the most popular tasks in computer vision. It's a computer vision solution that identifies what is in an image and where the detected objects are in the image. Instead of just saying “there is a cat,” object detection draws a box around the cat and labels it.
Object detection is used to transform raw visuals into structured information that other systems can use. For example, it helps detect and count items and sort them on conveyor belts; it helps scan pallets in warehousing, it is used for part inspection and defect detection in manufacturing; it's used to perform leaf disease detection in agriculture, and so much more.
Mobile object detection takes those same detection models, and optimizes them to run on devices that fit in your pocket, mount on drones, or sit on factory walls. Instead of relying on huge cloud servers, computation happens right on the device. This unlocks several important benefits such as:
- Speed: Results appear instantly, without waiting for cloud communication.
- Real-time performance: On-device inference happens in milliseconds, enabling continuous video analysis or frame-by-frame detection.
- Privacy: Images never leave the device, protecting sensitive environments.
- Offline capability: The model keeps working even without an internet connection which is great for remote forests, farms, or offshore platforms.
- Lower cost: No constant cloud compute bills or data transfer fees.
For example, mobile object detection excels on drones inspecting solar panels for their location. In these settings, shipping every frame to the cloud would create delays, cost bandwidth, and potentially expose sensitive information. With mobile object detection, the device becomes smart enough to make decisions on the spot.
Inspecting solar panel location
To run efficiently on small devices, mobile models are designed to be lightweight, smart, and extremely optimized. Tools like TensorFlow Lite (now LiteRT) help compress models, so they run smoothly on Android phones or microcontrollers. CoreML takes full advantage of Apple’s Neural Engine inside iPhones and iPads. And newer architectures such as RF-DETR bring transformer-based detection to the edge, offering strong accuracy without heavy compute.
When devices can detect and locate objects locally, our world becomes faster, safer, and more efficient. In this blog, we will explore some of the best object detection models that make these advances possible.
Best Mobile Object Detection Models
Mobile object detection models run directly on phones, edge devices, and embedded systems. Explore five of the most effective models that bring real-time detection to the edge.
1. RF-DETR
RF-DETR is Roboflow’s transformer-based object detection model designed for practical, real-world deployment. Unlike older detectors that rely on anchor boxes and complex post-processing, RF-DETR simplifies detection by predicting objects through transformer attention, which improves stability and reduces the need for tuning. You can train RF-DETR on your own dataset, and then export it for deployment, making it a powerful option for production-grade computer vision workflows.
Roboflow offers RF-DETR in different model sizes, each trading speed for accuracy depending on the hardware you plan to use. Models like RF-DETR Nano and RF-DETR Small are ideal for edge devices with limited compute, offering fast inference and low memory usage.
For deployment, Roboflow also supports exporting RF-DETR to the ONNX format. ONNX serves as a universal model representation, which means the exported file can run on a wide variety of runtimes and hardware accelerators. The export process is handled directly through Roboflow’s tooling, so you can convert your trained model with a few lines of Python without needing to rewrite architecture layers.
RF-DETR the Real-Time Object Detector
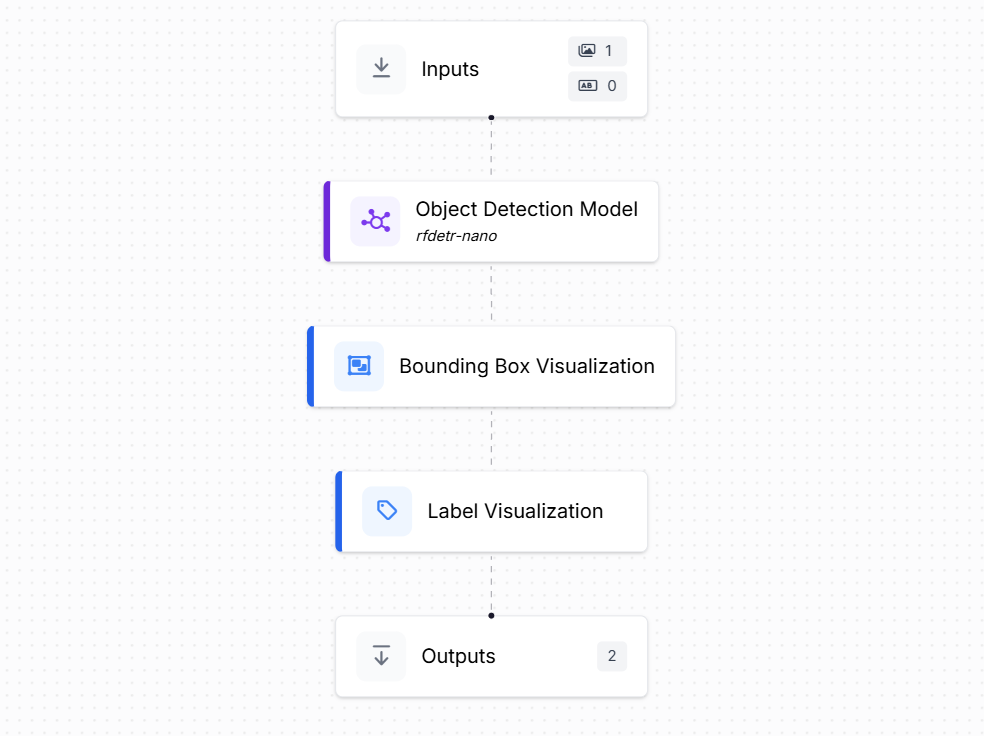
Here's how to get started with RF-DETR. In this example, we will build a workflow with an object detection block with the RF-DETR Nano model, as well as include visualization blocks such as the bounding box visualization and label visualization as shown below.
To deploy this Workflow on an Edge device like Raspberry Pi 5 (with 64-bit OS), you first need to install docker on your Raspberry Pi device. After installing docker, install Roboflow’s open source computer vision inference server with the following command which will automatically select and configure the inference docker container.
pip install inference-cliand then run the server which will start the inference server,
inference server startNow install the Roboflow SDK with following command,
pip install inference-sdkand then use the following code to deploy your workflow,
# 1. Import the library
from inference_sdk import InferenceHTTPClient
import base64, numpy as np, cv2

# 2. Connect to your workflow
client = InferenceHTTPClient(
    api_url="http://localhost:9001",
    api_key="API_KEY"
)

# 3. Run your workflow on an image
result = client.run_workflow(
    workspace_name="tim-4ijf0",
    workflow_id="demo-workflow-rfdetr",
    images={
        "image": "baseball.jpg" # Path to your image file
    },
    use_cache=True # Speeds up repeated requests
)

# 4. Get your results
viz_b64 = result[0]['label_visualization']
pad = (-len(viz_b64)) % 4
if pad: viz_b64 += "=" * pad

img = cv2.imdecode(np.frombuffer(base64.b64decode(viz_b64), np.uint8),
                   cv2.IMREAD_COLOR)
cv2.imwrite("workflow_viz.jpg", img)
print("Saved to workflow_viz.jpg")
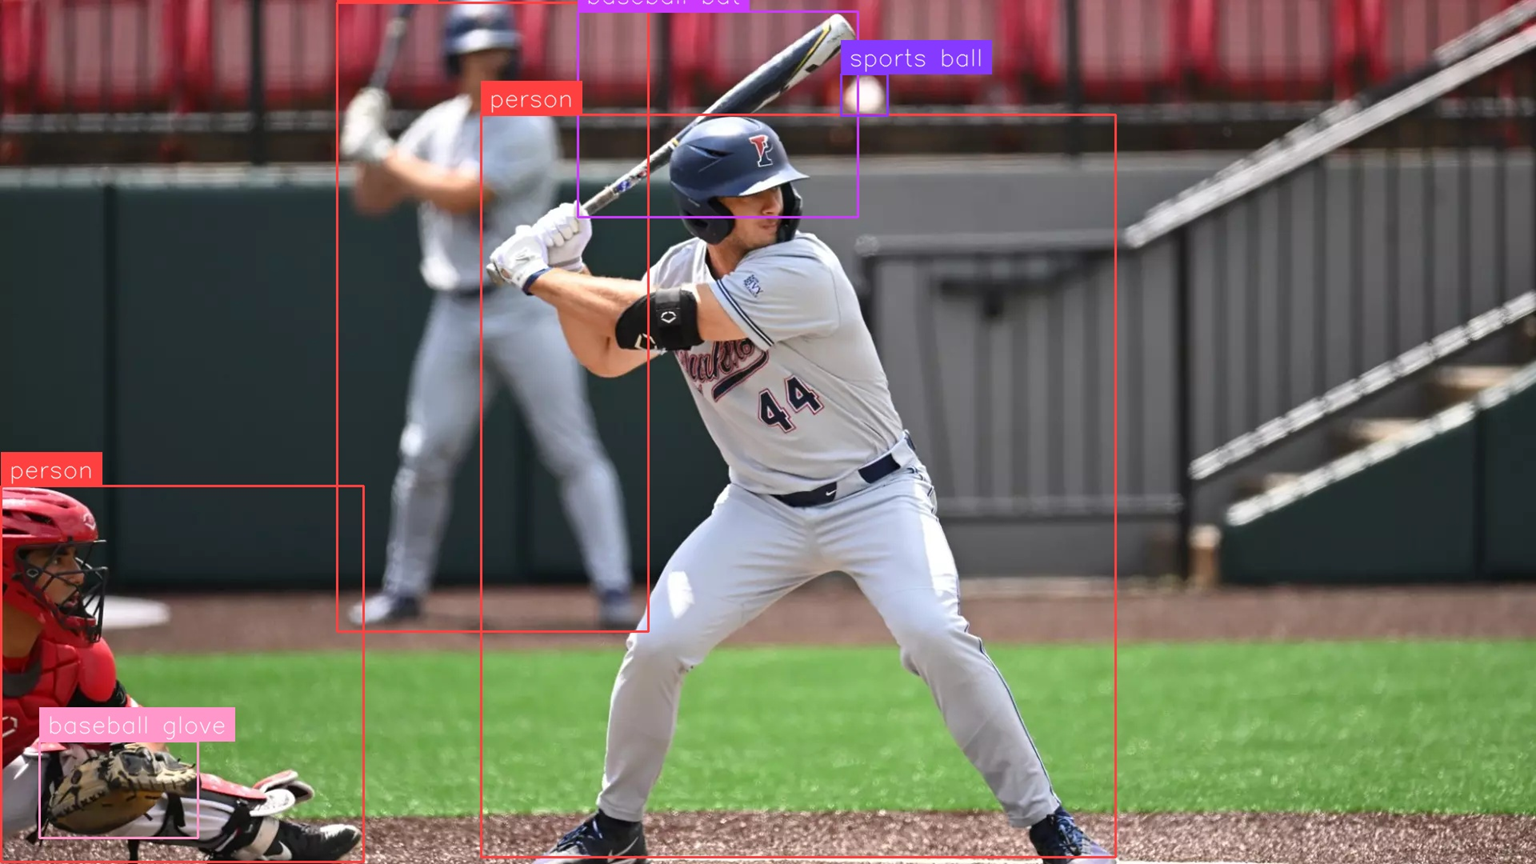
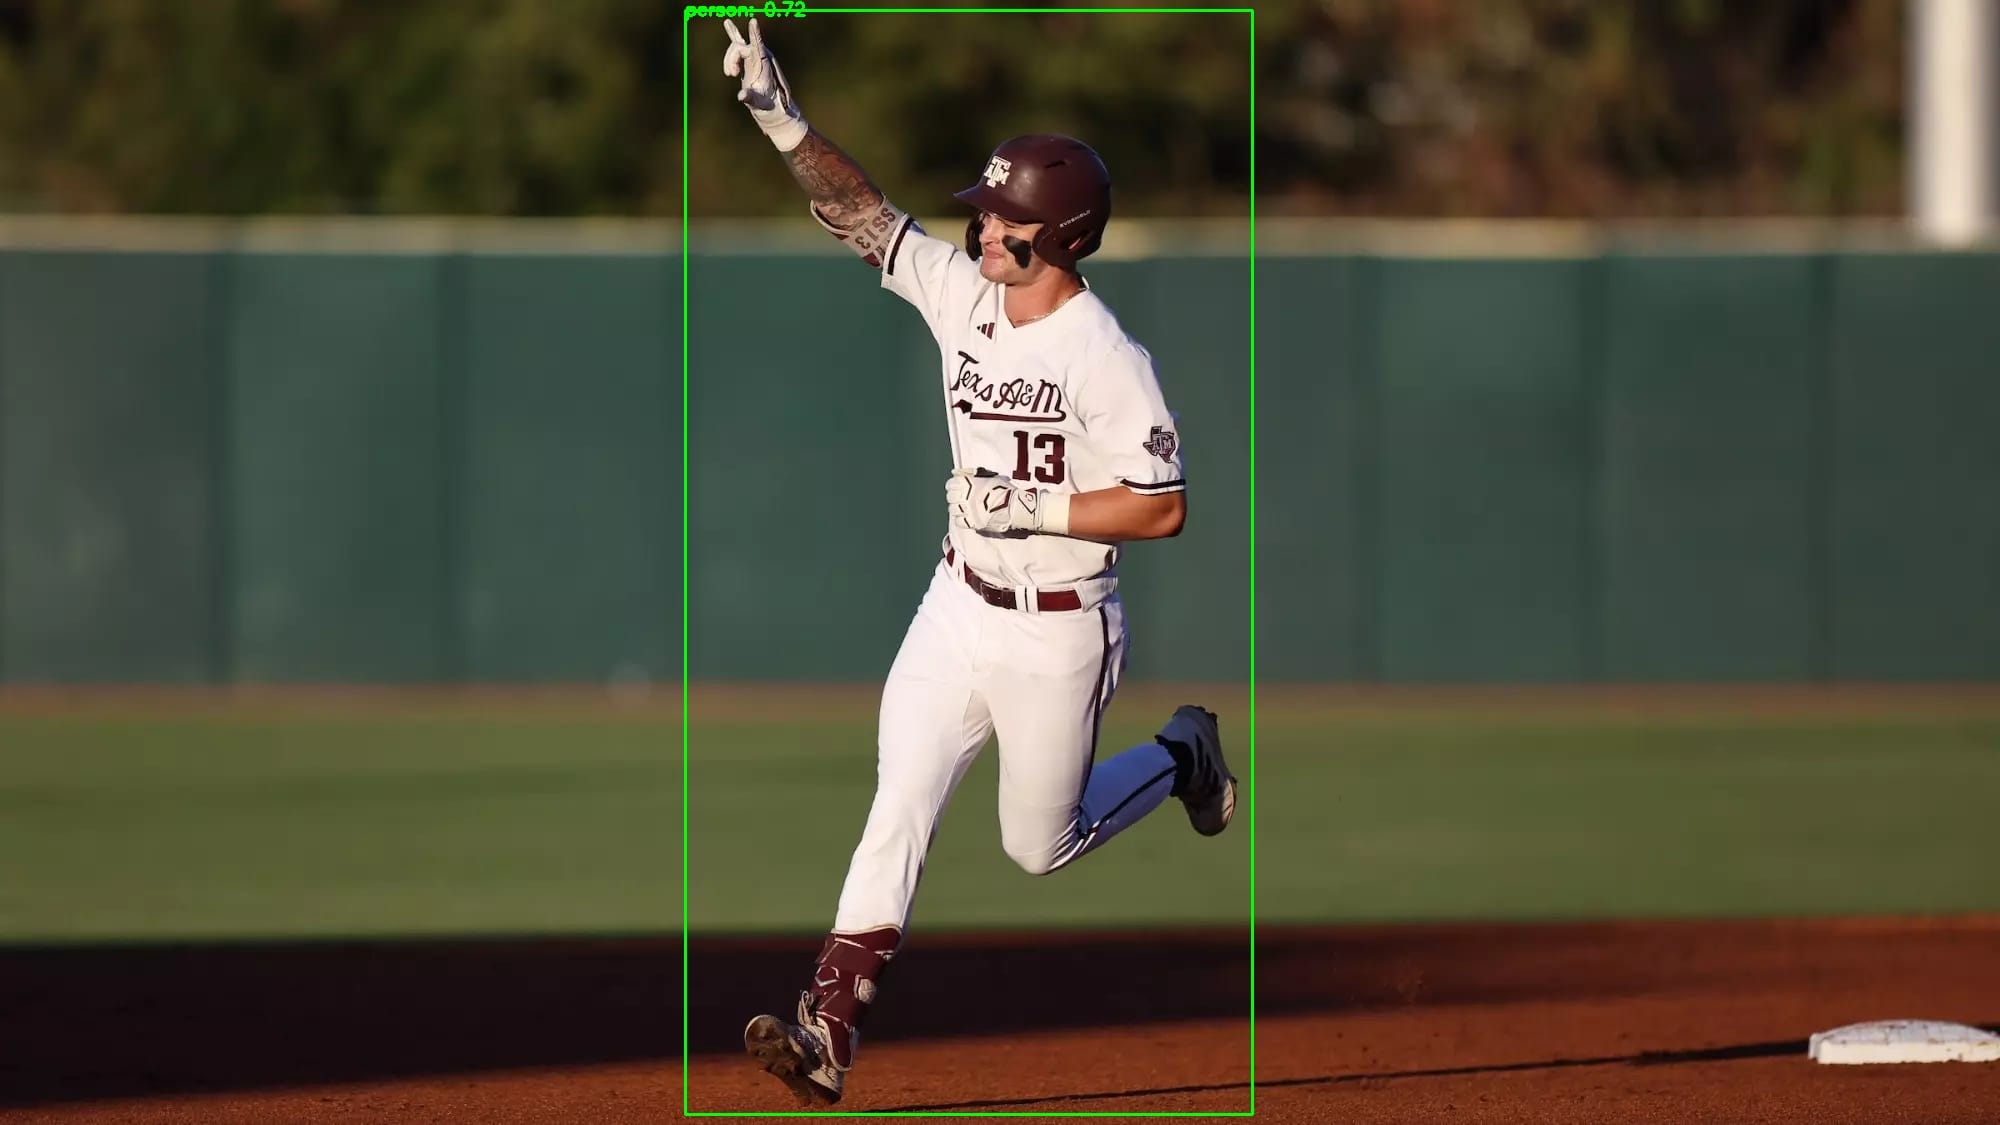
Running the code using following input image:

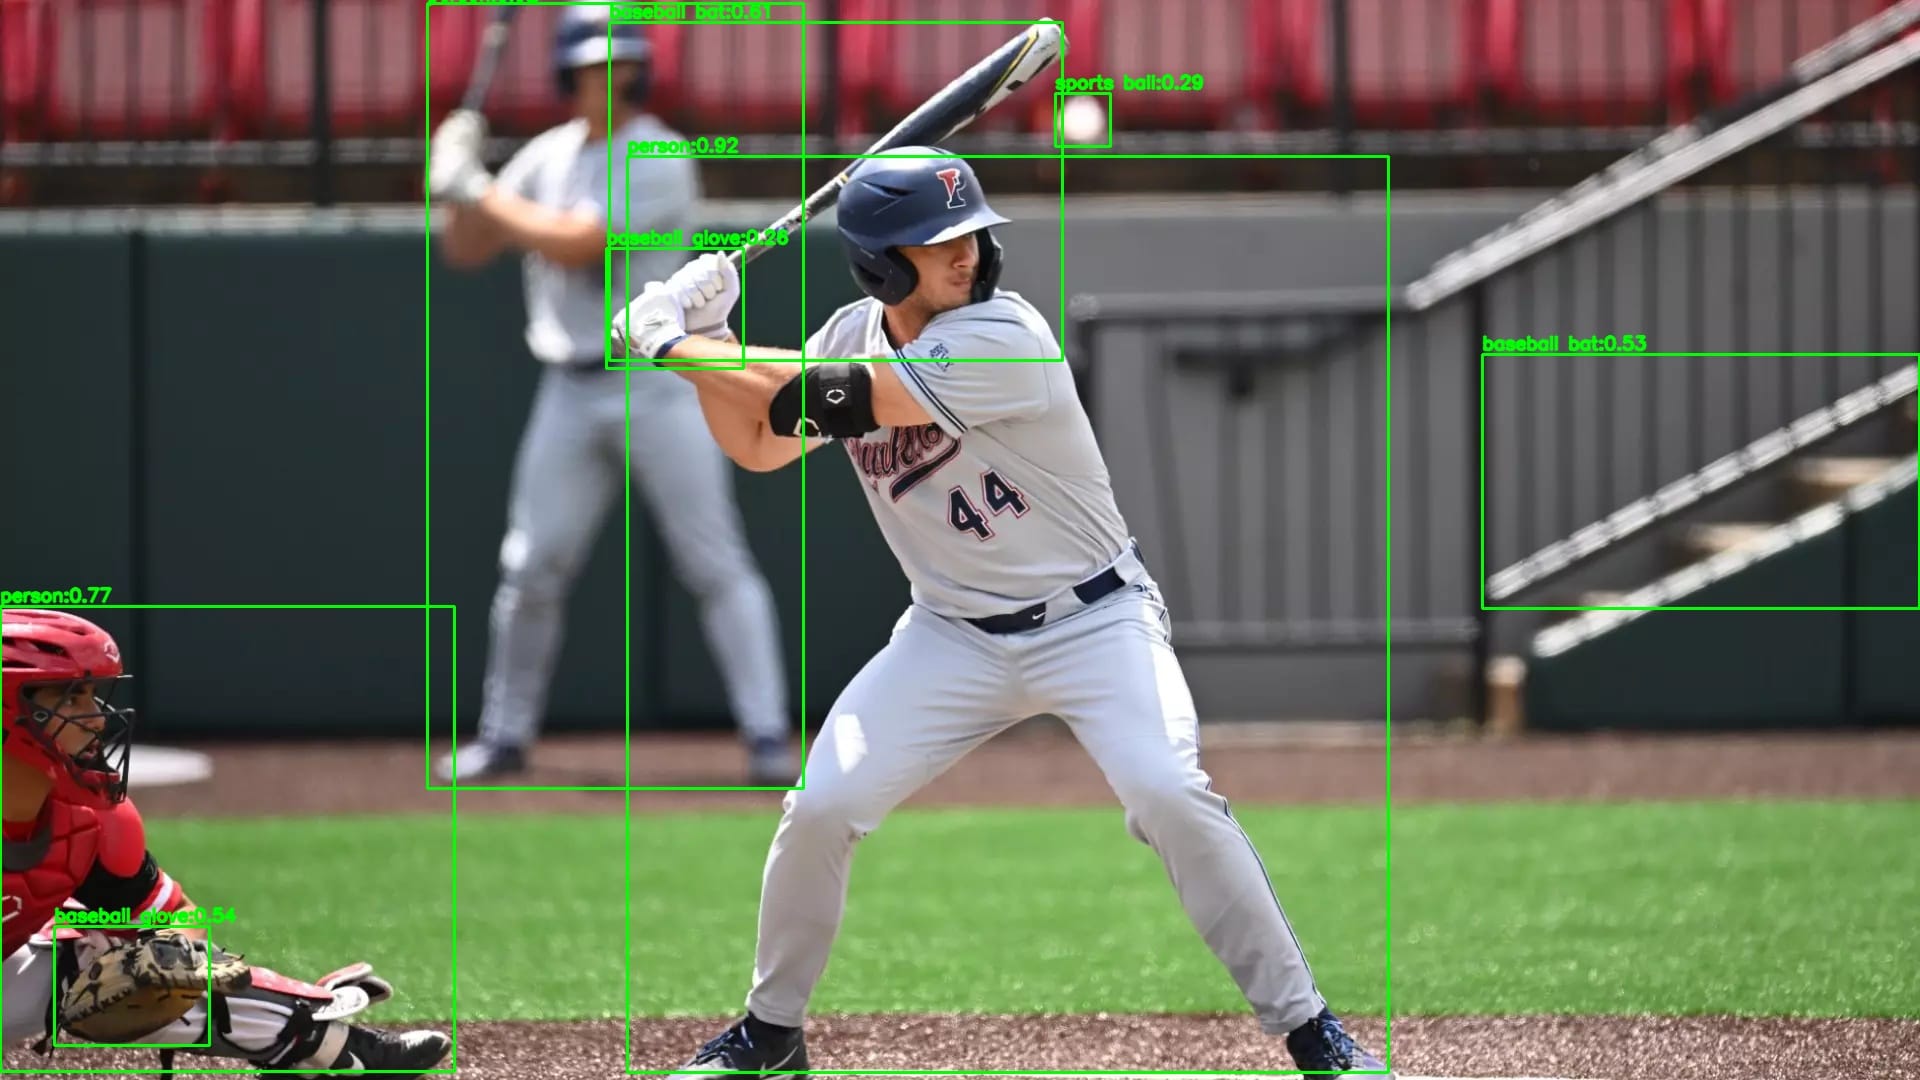
You will see an output similar to the following:
To learn more about model deployment and how to deploy models on edge devices check out our guides below:
2. TensorFlow Lite
TensorFlow Lite (TFLite), now LiteRT, is Google’s lightweight, production-ready framework designed to run machine learning models directly on mobile and edge devices such as smartphones, IoT boards, microcontrollers, and embedded systems. It takes models trained in standard TensorFlow, and optimizes them to be smaller, faster, and more efficient, enabling on-device predictions. This reduces latency, improves privacy by keeping data local, lowers network costs, and allows AI to function even without an Internet connection.
A TensorFlow Lite model (with a .tflite extension) is an optimized neural network designed for deployment on resource-constrained devices. These models can run on a wide range of hardware including Android and iOS smartphones, Linux-based systems, and microcontrollers.
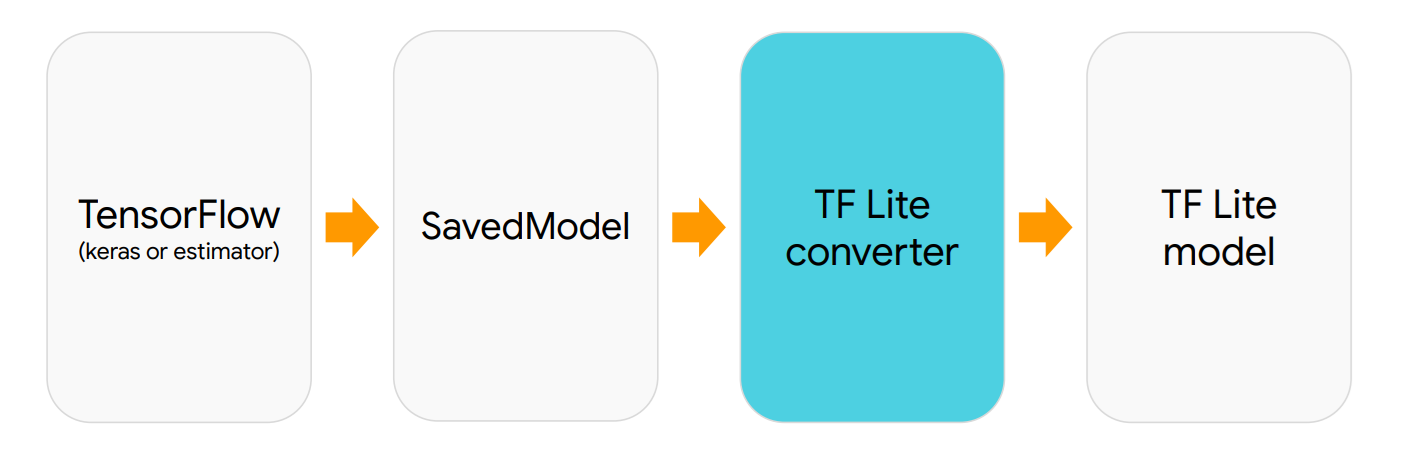
While TensorFlow Lite is part of the TensorFlow ecosystem, it's not exclusively tied to TensorFlow-trained models. Models from other frameworks such as PyTorch, Keras, and even traditional ML libraries like scikit-learn can be converted to TFLite format. The conversion process often involves exporting to an intermediate format (like ONNX or SavedModel) before converting to TFLite. Popular model architectures including YOLO, MobileNet, EfficientNet, and transformer-based models can all be converted to TFLite, provided their operations are compatible with TFLite's supported operation set.
The "Lite" in TensorFlow Lite signifies its lightweight nature. These models are specifically optimized for devices with limited memory, processing power, and battery life.
Now let's look at a practical example of getting started with TensorFlow Lite. The first step is obtaining a model. One of the simplest approaches is to download a pre-trained model like EfficientDet-Lite0 directly from TensorFlow Hub.
import urllib.request, os

MODEL_URL = "https://tfhub.dev/tensorflow/lite-model/efficientdet/lite0/detection/metadata/1?lite-format=tflite"
MODEL_PATH = "efficientdet_lite0.tflite"

if not os.path.exists(MODEL_PATH):
    urllib.request.urlretrieve(MODEL_URL, MODEL_PATH)
    print("Downloaded:", MODEL_PATH)
else:
    print("Model already present:", MODEL_PATH)

You can also train your own detector (e.g., YOLOv8) on a custom dataset with Roboflow notebooks and then export to TFLite:
from ultralytics import YOLO

# Use your own weights if you trained a model; or start from a pretrained one:
model = YOLO("best.pt")  # e.g., "runs/detect/train/weights/best.pt"

# Export to TFLite (float32). Set imgsz to your desired inference size.
path_tflite = model.export(format="tflite", imgsz=640, nms=True)  # returns path string
print("Exported:", path_tflite)
TFLite is lightweight and portable, designed for mobile and edge: Android (Java/Kotlin, C++), iOS (via Core ML delegate or plain TFLite), desktop/server (Python/C++), Raspberry Pi (Python/C++), and even microcontrollers via TensorFlow Lite for Microcontrollers (TFLM). You can accelerate it with delegates like XNNPACK (CPU), GPU (OpenGL/Metal/Vulkan), NNAPI (Android), Core ML (iOS/macOS), and Hexagon (Qualcomm DSP). Once you have a .tflite file, you can load it with the TFLite Interpreter and run inference with just a few lines of code.
import numpy as np
import cv2
import tensorflow as tf
from PIL import Image

# Load TFLite model
interpreter = tf.lite.Interpreter(model_path="efficientdet_lite0.tflite")
interpreter.allocate_tensors()

# Get input & output details
input_details = interpreter.get_input_details()
output_details = interpreter.get_output_details()

# Read image
img = Image.open("baseball.jpg").convert("RGB")

# Resize to model input shape
h, w = input_details[0]['shape'][1], input_details[0]['shape'][2]
img_resized = img.resize((w, h))

# Normalize & expand batch dim
input_data = np.expand_dims(img_resized, axis=0).astype(np.uint8)

# Run inference
interpreter.set_tensor(input_details[0]['index'], input_data)
interpreter.invoke()

# Extract outputs
boxes   = interpreter.get_tensor(output_details[0]['index'])[0]
classes = interpreter.get_tensor(output_details[1]['index'])[0]
scores  = interpreter.get_tensor(output_details[2]['index'])[0]
count   = int(interpreter.get_tensor(output_details[3]['index'])[0])

# COCO class names (91 classes, EfficientDet trained on COCO)
COCO_CLASSES = [
    'person','bicycle','car','motorcycle','airplane','bus','train','truck','boat','traffic light',
    'fire hydrant','stop sign','parking meter','bench','bird','cat','dog','horse','sheep','cow',
    'elephant','bear','zebra','giraffe','backpack','umbrella','handbag','tie','suitcase','frisbee',
    'skis','snowboard','sports ball','kite','baseball bat','baseball glove','skateboard','surfboard',
    'tennis racket','bottle','wine glass','cup','fork','knife','spoon','bowl','banana','apple',
    'sandwich','orange','broccoli','carrot','hot dog','pizza','donut','cake','chair','couch',
    'potted plant','bed','dining table','toilet','tv','laptop','mouse','remote','keyboard','cell phone',
    'microwave','oven','toaster','sink','refrigerator','book','clock','vase','scissors','teddy bear',
    'hair drier','toothbrush'
]

# Convert PIL image to OpenCV (BGR)
img_cv = cv2.cvtColor(np.array(img), cv2.COLOR_RGB2BGR)
h0, w0 = img_cv.shape[:2]

# Draw detections
for i in range(count):
    if scores[i] > 0.5:  # threshold
        ymin, xmin, ymax, xmax = boxes[i]
        x1, y1, x2, y2 = int(xmin * w0), int(ymin * h0), int(xmax * w0), int(ymax * h0)
        class_id = int(classes[i])
        label_name = COCO_CLASSES[class_id] if class_id < len(COCO_CLASSES) else f"Class {class_id}"
        label = f"{label_name}: {scores[i]:.2f}"
        cv2.rectangle(img_cv, (x1, y1), (x2, y2), (0, 255, 0), 2)
        cv2.putText(img_cv, label, (x1, max(15, y1 - 10)),
                    cv2.FONT_HERSHEY_SIMPLEX, 0.6, (0, 255, 0), 2)

# Save and display
cv2.imwrite("tflite_output.jpg", img_cv)
cv2.imshow("TFLite Detection", img_cv)
print("Saved to tflite_output.jpg")
In this code, you load the .tflite model into the Interpreter, allocate tensors, and query the input tensor shape so you can resize the image correctly. The image is converted to RGB, resized to the expected input resolution, and batched into shape (1, H, W, 3) as uint8 (this EfficientDet variant is quantized-style inputs; if you export a float model, you’d pass float32 normalized to [0,1]). After invoke(), you read four outputs: boxes (normalized ymin, xmin, ymax, xmax), classes (class IDs), scores (confidences), and count (number of detections). The boxes are scaled to the original image size, filtered by a confidence threshold, annotated with COCO class names, drawn with OpenCV, and saved/displayed.
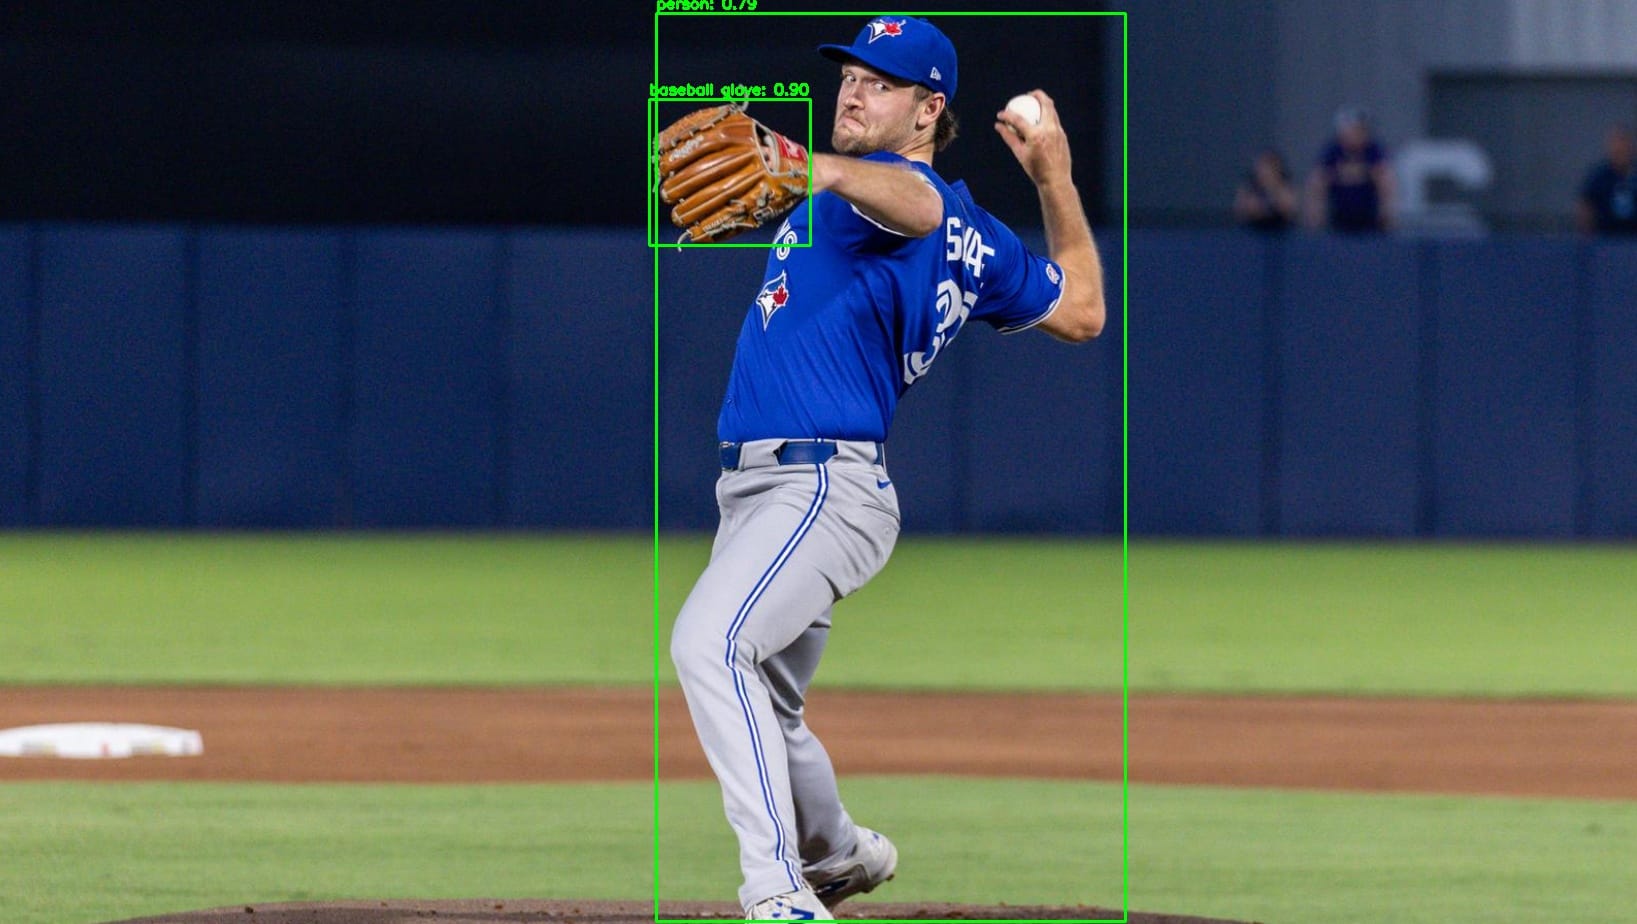
When you run the code on the following input image:
You will see an output similar to the following:
You can run the same TFLite file in multiple ways:
- Android: Java/Kotlin with the TFLite Task Library (fast and convenient) or raw Interpreter; accelerate with NNAPI or GPU.
- iOS/macOS: TFLite with Core ML delegate (or run Core ML export directly).
- Python/C++ on edge: Raspberry Pi or Jetson using CPU (XNNPACK) or GPU delegates.
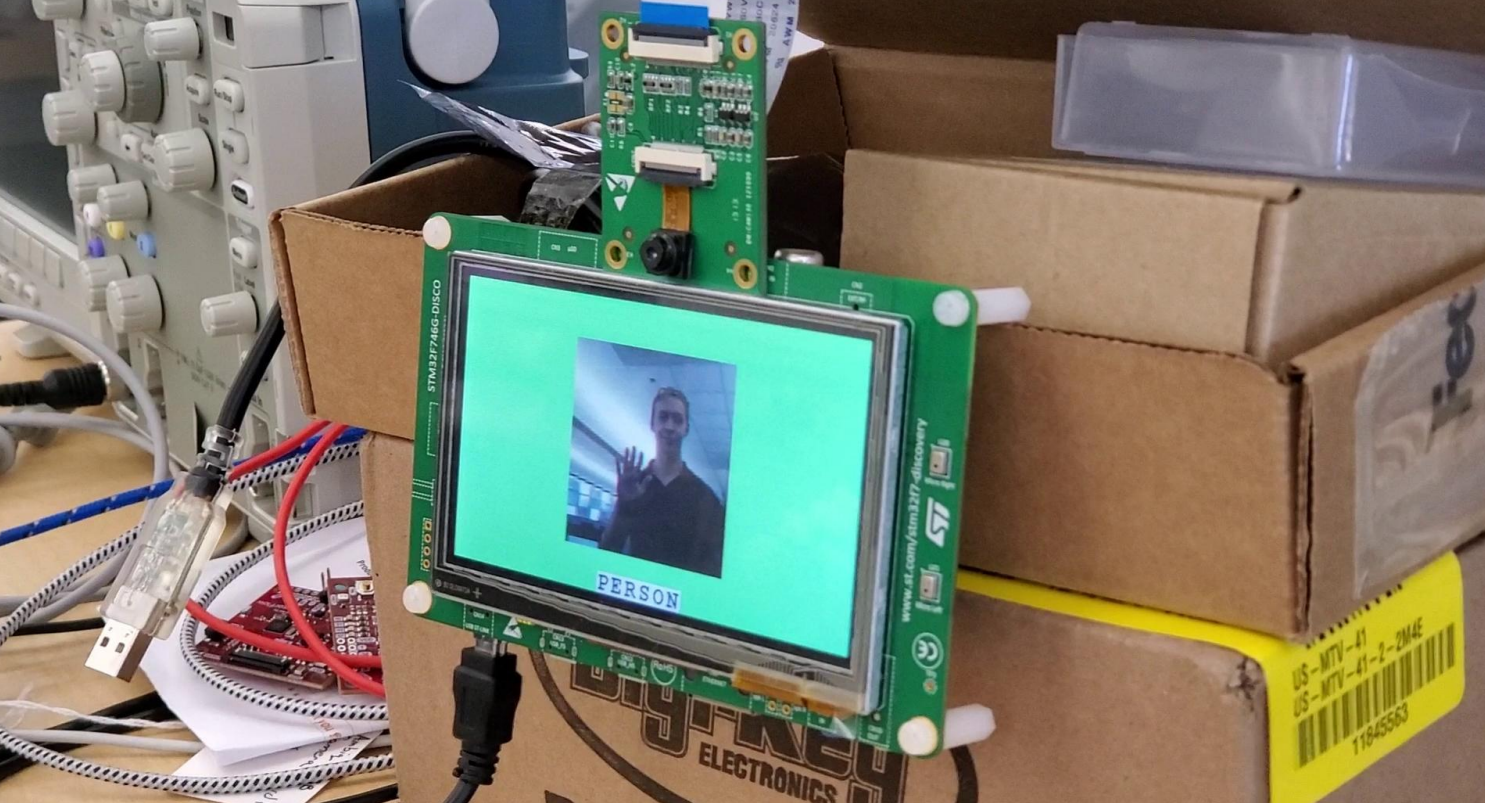
- Microcontrollers: Convert to TensorFlow Lite (now LiteRT) for Microcontrollers (TFLM) for MCUs like STM32/ESP32/Arduino (int8 weights/activations, tiny RAM/Flash).
That’s the whole TFLite flow: obtain a .tflite model (build, download or export), load it with the Interpreter, feed a properly shaped/typed tensor, read the detections, and visualize or use them in your app.
Read more about TensorFlow object detection model in our blogs and docs:
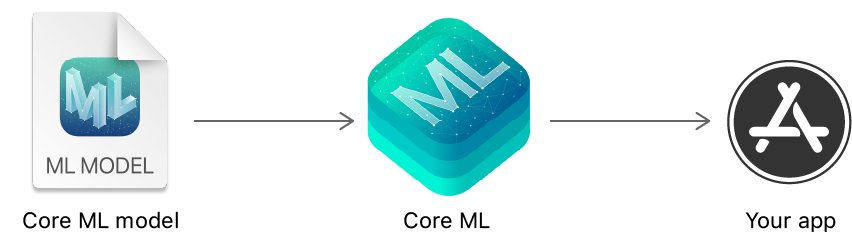
3. Core ML
Core ML is Apple’s machine learning framework for executing models directly on Apple devices. It supports a range of model types, including neural networks, decision trees, support vector machines, and natural language models.
Core ML is integrated into iOS, iPadOS, macOS, watchOS, and tvOS, which allows apps to perform inference locally without sending data to external servers. This improves user privacy, reduces network dependency, and lowers latency for tasks like image recognition, object detection, activity classification, and text analysis.
A model used by CoreML is stored in the .mlmodel format. This format is optimized for Apple hardware and can be accelerated by the CPU, GPU, and Apple’s dedicated Neural Engine (ANE). Apple provides tools, such as coremltools, to convert models from other machine learning frameworks into the CoreML format. Supported source formats include TensorFlow, PyTorch, Keras, XGBoost, scikit-learn, and ONNX, which acts as a common bridge for many external models. After conversion, models can also be quantized or compressed to reduce size and improve inference speed.
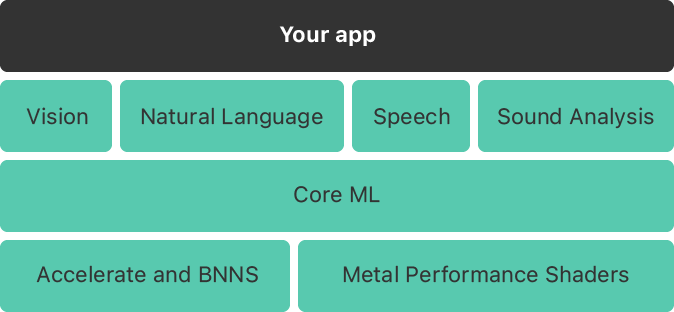
Core ML is not tied to a specific training environment. Training typically happens in Python libraries or deep learning frameworks, and the finished model is converted afterward. During runtime, Core ML loads the .mlmodel file and performs inference inside the app. Because the computation stays on the device, sensitive information, such as camera frames or user text, doesn’t need to leave the user’s hardware. CoreML also integrates with other Apple frameworks such as Vision (for image analysis), Natural Language (for text processing), Speech (for converting audio to text) and Create ML (for simplified model training on macOS).
Now let’s see an example of how to get started with a Core ML model. The first thing is to get the Core ML model. The simplest way to get a Core ML model is using the Ultralytics library and the YOLOv8n model weight.
from ultralytics import YOLO

# 1) Load a pretrained checkpoint (or your own .pt after training)
m = YOLO("yolov8n.pt")

# 2) Export to Core ML
mlpackage_path = m.export(
    format="coreml",  # target format
    imgsz=640,        # input image size
    nms=True          # include Non-Maximum Suppression in the model
)
print("Core ML saved at:", mlpackage_path)  # e.g., yolov8n.mlpackage
format="coreml" tells Ultralytics to convert the PyTorch model into an Apple Core ML .mlpackage. With nms=True, the model outputs already-filtered detections (coordinates + confidence), which simplifies inference code.
Core ML is designed for fast, on-device inference on iPhone, iPad, and macOS, and can use the Neural Engine/GPU where available. Once you’ve exported your model to Core ML format, you can load it on macOS with coremltools for quick tests, or integrate it directly into an Xcode app. The code below shows how to perform object detection inference using Core ML, PIL for image handling, and simple drawing.
import coremltools as ct
import numpy as np
from PIL import Image, ImageDraw, ImageFont

def _clip(x, lo, hi):
    return max(lo, min(x, hi))

class YOLOv8CoreMLTester:
    def _init_(self, model_path: str, conf_threshold: float = 0.25):
        self.model = ct.models.MLModel(model_path)
        self.conf_threshold = conf_threshold

        # Input description
        spec = self.model.get_spec()
        inp = spec.description.input[0]
        self.input_name = inp.name
        itype = inp.type.WhichOneof("Type")
        if itype != "imageType":
            raise ValueError("Model input must be an imageType for this script.")
        self.in_w = getattr(inp.type.imageType, "width", 0) or 0
        self.in_h = getattr(inp.type.imageType, "height", 0) or 0

        # COCO labels
        self.class_names = [
            'person','bicycle','car','motorcycle','airplane','bus','train','truck','boat',
            'traffic light','fire hydrant','stop sign','parking meter','bench','bird','cat','dog',
            'horse','sheep','cow','elephant','bear','zebra','giraffe','backpack','umbrella','handbag',
            'tie','suitcase','frisbee','skis','snowboard','sports ball','kite','baseball bat',
            'baseball glove','skateboard','surfboard','tennis racket','bottle','wine glass','cup',
            'fork','knife','spoon','bowl','banana','apple','sandwich','orange','broccoli','carrot',
            'hot dog','pizza','donut','cake','chair','couch','potted plant','bed','dining table',
            'toilet','tv','laptop','mouse','remote','keyboard','cell phone','microwave','oven',
            'toaster','sink','refrigerator','book','clock','vase','scissors','teddy bear','hair drier',
            'toothbrush'
        ]


    def _letterbox(self, img: Image.Image, new_w: int, new_h: int, pad_color=(114,114,114)):
        ow, oh = img.size
        r = min(new_w / ow, new_h / oh)
        sw, sh = int(round(ow * r)), int(round(oh * r))
        img_resized = img.resize((sw, sh), Image.BILINEAR)

        # centered padding (YOLO default)
        canvas_c = Image.new("RGB", (new_w, new_h), pad_color)
        pad_x_c = (new_w - sw) // 2
        pad_y_c = (new_h - sh) // 2
        canvas_c.paste(img_resized, (pad_x_c, pad_y_c))

        # top-left padding variant (some exports)
        canvas_tl = Image.new("RGB", (new_w, new_h), pad_color)
        pad_x_tl = 0
        pad_y_tl = 0
        canvas_tl.paste(img_resized, (pad_x_tl, pad_y_tl))

        meta = dict(
            r=r, sw=sw, sh=sh, ow=ow, oh=oh,
            centered=dict(pad_x=pad_x_c, pad_y=pad_y_c),
            topleft=dict(pad_x=pad_x_tl, pad_y=pad_y_tl),
        )
        return canvas_c, canvas_tl, meta


    def _extract_scores(self, conf_raw: np.ndarray):
        if conf_raw.ndim == 1:
            det_conf = conf_raw.astype(float)
            det_cls  = np.zeros_like(det_conf, dtype=int)
        elif conf_raw.ndim == 2:
            if conf_raw.shape[1] == 1:
                det_conf = conf_raw[:, 0].astype(float)
                det_cls  = np.zeros_like(det_conf, dtype=int)
            else:
                det_cls  = np.argmax(conf_raw, axis=1).astype(int)
                det_conf = conf_raw[np.arange(conf_raw.shape[0]), det_cls].astype(float)
        else:
            raise ValueError(f"Unexpected confidence shape: {conf_raw.shape}")
        return det_conf, det_cls

    # box converters
    def _xyxy_pixels(self, B, W, H):
        """Assume B already xyxy; if max<=1.5 treat as normalized."""
        b = B.astype(float).copy()
        if b.ndim == 2 and b.shape[0] == 4 and b.shape[1] != 4:
            b = b.T
        if b.ndim != 2 or b.shape[1] != 4:
            return None
        if b.size and b.max() <= 1.5:
            b[:, [0,2]] *= float(W)
            b[:, [1,3]] *= float(H)
        return b

    def _xywh_tl_pixels(self, B, W, H):
        """Assume top-left (x,y,w,h); if normalized -> scale, then convert to xyxy."""
        b = B.astype(float).copy()
        if b.ndim == 2 and b.shape[0] == 4 and b.shape[1] != 4:
            b = b.T
        if b.ndim != 2 or b.shape[1] != 4:
            return None
        if b.size and b.max() <= 1.5:
            b[:, [0,2]] *= float(W)
            b[:, [1,3]] *= float(H)
        b[:, 2] = b[:, 0] + b[:, 2]
        b[:, 3] = b[:, 1] + b[:, 3]
        return b

    def _xywh_center_pixels(self, B, W, H):
        """Assume center (cx,cy,w,h); if normalized -> scale, then convert to xyxy."""
        b = B.astype(float).copy()
        if b.ndim == 2 and b.shape[0] == 4 and b.shape[1] != 4:
            b = b.T
        if b.ndim != 2 or b.shape[1] != 4:
            return None
        if b.size and b.max() <= 1.5:
            b[:, [0,2]] *= float(W)
            b[:, [1,3]] *= float(H)
        cx, cy, w, h = b[:,0], b[:,1], b[:,2], b[:,3]
        x1 = cx - w/2.0
        y1 = cy - h/2.0
        x2 = cx + w/2.0
        y2 = cy + h/2.0
        return np.stack([x1,y1,x2,y2], axis=1)

    # unpad/unscale
    def _undo_letterbox(self, boxes_xyxy_input, pad_x, pad_y, r):
        b = boxes_xyxy_input.copy()
        b[:, [0,2]] -= pad_x
        b[:, [1,3]] -= pad_y
        b[:, [0,2]] /= r
        b[:, [1,3]] /= r
        return b

    # scoring to choose best interpretation
    def _score_boxes(self, b, ow, oh):
        """Return a score favoring valid boxes fully inside image with reasonable areas."""
        if b is None or b.size == 0:
            return -1e9
        b = b.copy()
        # order
        x1 = np.minimum(b[:,0], b[:,2])
        y1 = np.minimum(b[:,1], b[:,3])
        x2 = np.maximum(b[:,0], b[:,2])
        y2 = np.maximum(b[:,1], b[:,3])
        w  = np.maximum(0, x2 - x1)
        h  = np.maximum(0, y2 - y1)
        area = w*h
        inside_x = (x1 >= -2) & (x2 <= ow+2)
        inside_y = (y1 >= -2) & (y2 <= oh+2)
        pos = (w > 2) & (h > 2)
        not_huge = (area <= 0.95*ow*oh)
        valid = inside_x & inside_y & pos & not_huge
        score = valid.mean() + 0.001 * np.clip(area/(ow*oh+1e-6), 0, 1).mean()
        return float(score)

    # drawing
    def _draw(self, img, detections):
        draw = ImageDraw.Draw(img)
        try:
            font = ImageFont.truetype("Arial.ttf", 20)
        except Exception:
            font = ImageFont.load_default()
        W, H = img.size
        for det in detections:
            x1, y1, x2, y2 = det["box"]
            x1 = _clip(int(round(x1)), 0, W-1)
            y1 = _clip(int(round(y1)), 0, H-1)
            x2 = _clip(int(round(x2)), 0, W-1)
            y2 = _clip(int(round(y2)), 0, H-1)
            if x2 <= x1 or y2 <= y1:
                continue
            draw.rectangle([x1,y1,x2,y2], outline="red", width=3)
            name = self.class_names[det["class_id"]] if 0 <= det["class_id"] < len(self.class_names) else f"Class {det['class_id']}"
            draw.text((x1, max(0, y1-20)), f"{name}: {det['confidence']:.2f}", fill="red", font=font)
        return img

    # pipeline
    def predict(self, image_path: str, save_path: str = "output.jpg"):
        print(f"Processing: {image_path}")
        orig = Image.open(image_path).convert("RGB")
        ow, oh = orig.size

        # Build model input
        if self.in_w == 0 or self.in_h == 0:
            # flexible: feed original
            model_input = orig
            meta = dict(mode="flex", ow=ow, oh=oh, in_w=ow, in_h=oh)
        else:
            # fixed: try both centered and top-left letterbox
            canvas_c, canvas_tl, lmeta = self._letterbox(orig, self.in_w, self.in_h)
            model_input = canvas_c  # feed centered; we will try both mappings after
            meta = dict(mode="fixed", ow=ow, oh=oh, in_w=self.in_w, in_h=self.in_h, lmeta=lmeta)

        # Inference
        preds = self.model.predict({self.input_name: model_input})
        print("Model outputs:", list(preds.keys()))

        # Extract confidences/classes
        conf_raw = np.array(preds["confidence"])
        det_conf, det_cls = self._extract_scores(conf_raw)

        # Filter by threshold early to reduce noise
        keep = det_conf >= self.conf_threshold
        if not np.any(keep):
            print("Found: 0 detections (after threshold).")
            out = orig.copy()
            out.save(save_path)
            out.show()
            return []
        # boxes raw
        B = np.array(preds["coordinates"])[keep]
        C = det_conf[keep]
        K = det_cls[keep]

        # Candidate interpretations in INPUT space
        inW = meta["in_w"]; inH = meta["in_h"]
        cand_in = []
        cand_in.append(("xyxy", self._xyxy_pixels(B, inW, inH)))
        cand_in.append(("xywh_tl", self._xywh_tl_pixels(B, inW, inH)))
        cand_in.append(("xywh_center", self._xywh_center_pixels(B, inW, inH)))

        # Map candidates to ORIGINAL space
        mapped = []
        if meta["mode"] == "flex":
            # No letterbox to undo
            for name, bx in cand_in:
                mapped.append((f"{name}|flex", bx))
        else:
            # Try centered and top-left letterbox reversals
            r = meta["lmeta"]["r"]
            for pad_mode in ("centered", "topleft"):
                pad = meta["lmeta"][pad_mode]
                for name, bx in cand_in:
                    if bx is None:
                        mapped.append((f"{name}|{pad_mode}", None)); continue
                    m = self._undo_letterbox(bx, pad["pad_x"], pad["pad_y"], r)
                    mapped.append((f"{name}|{pad_mode}", m))

        # Score all candidates, choose best
        best_name, best_boxes, best_score = None, None, -1e9
        for name, bx in mapped:
            s = self._score_boxes(bx, ow, oh)
            if s > best_score:
                best_name, best_boxes, best_score = name, bx, s

        if best_boxes is None or best_boxes.size == 0:
            print("No valid boxes after format inference.")
            out = orig.copy()
            out.save(save_path)
            out.show()
            return []

        # Build detections with sanitized boxes in ORIGINAL pixels
        detections = []
        for (x1,y1,x2,y2), conf, cls in zip(best_boxes, C, K):
            # order & clip
            if x2 < x1: x1, x2 = x2, x1
            if y2 < y1: y1, y2 = y2, y1
            x1 = _clip(float(x1), 0.0, ow-1.0)
            y1 = _clip(float(y1), 0.0, oh-1.0)
            x2 = _clip(float(x2), 0.0, ow-1.0)
            y2 = _clip(float(y2), 0.0, oh-1.0)
            if (x2 - x1) < 1 or (y2 - y1) < 1:
                continue
            detections.append(dict(box=[x1,y1,x2,y2], confidence=float(conf), class_id=int(cls)))

        print(f"Chosen interpretation: {best_name} (score={best_score:.3f})")
        print(f"Found: {len(detections)} detections")

        out = orig.copy()
        out = self._draw(out, detections)
        out.save(save_path)
        out.show()

        # Print normalized boxes as well
        for i, d in enumerate(detections, 1):
            x1,y1,x2,y2 = d["box"]
            print(f"{i:02d}: cls={d['class_id']} conf={d['confidence']:.3f} "
                  f"box_norm={[round(x1/ow,4), round(y1/oh,4), round(x2/ow,4), round(y2/oh,4)]}")
        return detections

if _name_ == "_main_":
    tester = YOLOv8CoreMLTester("yolov8n.mlpackage", conf_threshold=0.25)
    tester.predict("baseball.jpg", "coreml_result.jpg")
In this code, the image is first opened with PIL and resized using a function that maintains the original aspect ratio by adding gray padding (letterboxing) so it fits the model’s required input size without distortion. The Core ML model is loaded from the .mlpackage, and we call predict with the prepared image. Since nms=True was used at export, the outputs already contain ready-to-use detections, typically exposed as coordinates (boxes) and confidence (scores/classes). The script converts any normalized box coordinates to pixels, removes the letterbox padding and scaling to map boxes back to the original image, and draws labeled rectangles. Finally, the result image with detections is saved as coreml_result.jpg.
Running the code with the following input image:

Will generate an output similar to the following:

This example demonstrates a complete Core ML inference workflow: export, lightweight preprocessing, a single Core ML prediction call, simple decoding of model outputs, and visualization, matching how you’d later integrate the same model into an iOS/macOS application.
To learn more about Core ML and how to build Core ML model, follow our guides given below:
4. ONNX
ONNX (Open Neural Network Exchange) is an open standard for representing machine learning models so they can move between different frameworks, platforms, and inference engines. It was originally created by Microsoft and Facebook to solve a common problem in AI development as models trained in one ecosystem (for example, PyTorch) were difficult to deploy in another (for example, TensorFlow, C++, or custom hardware). ONNX defines a neutral, framework-agnostic model format that multiple tools can understand, which makes the workflow of training, converting, and deploying far more flexible.
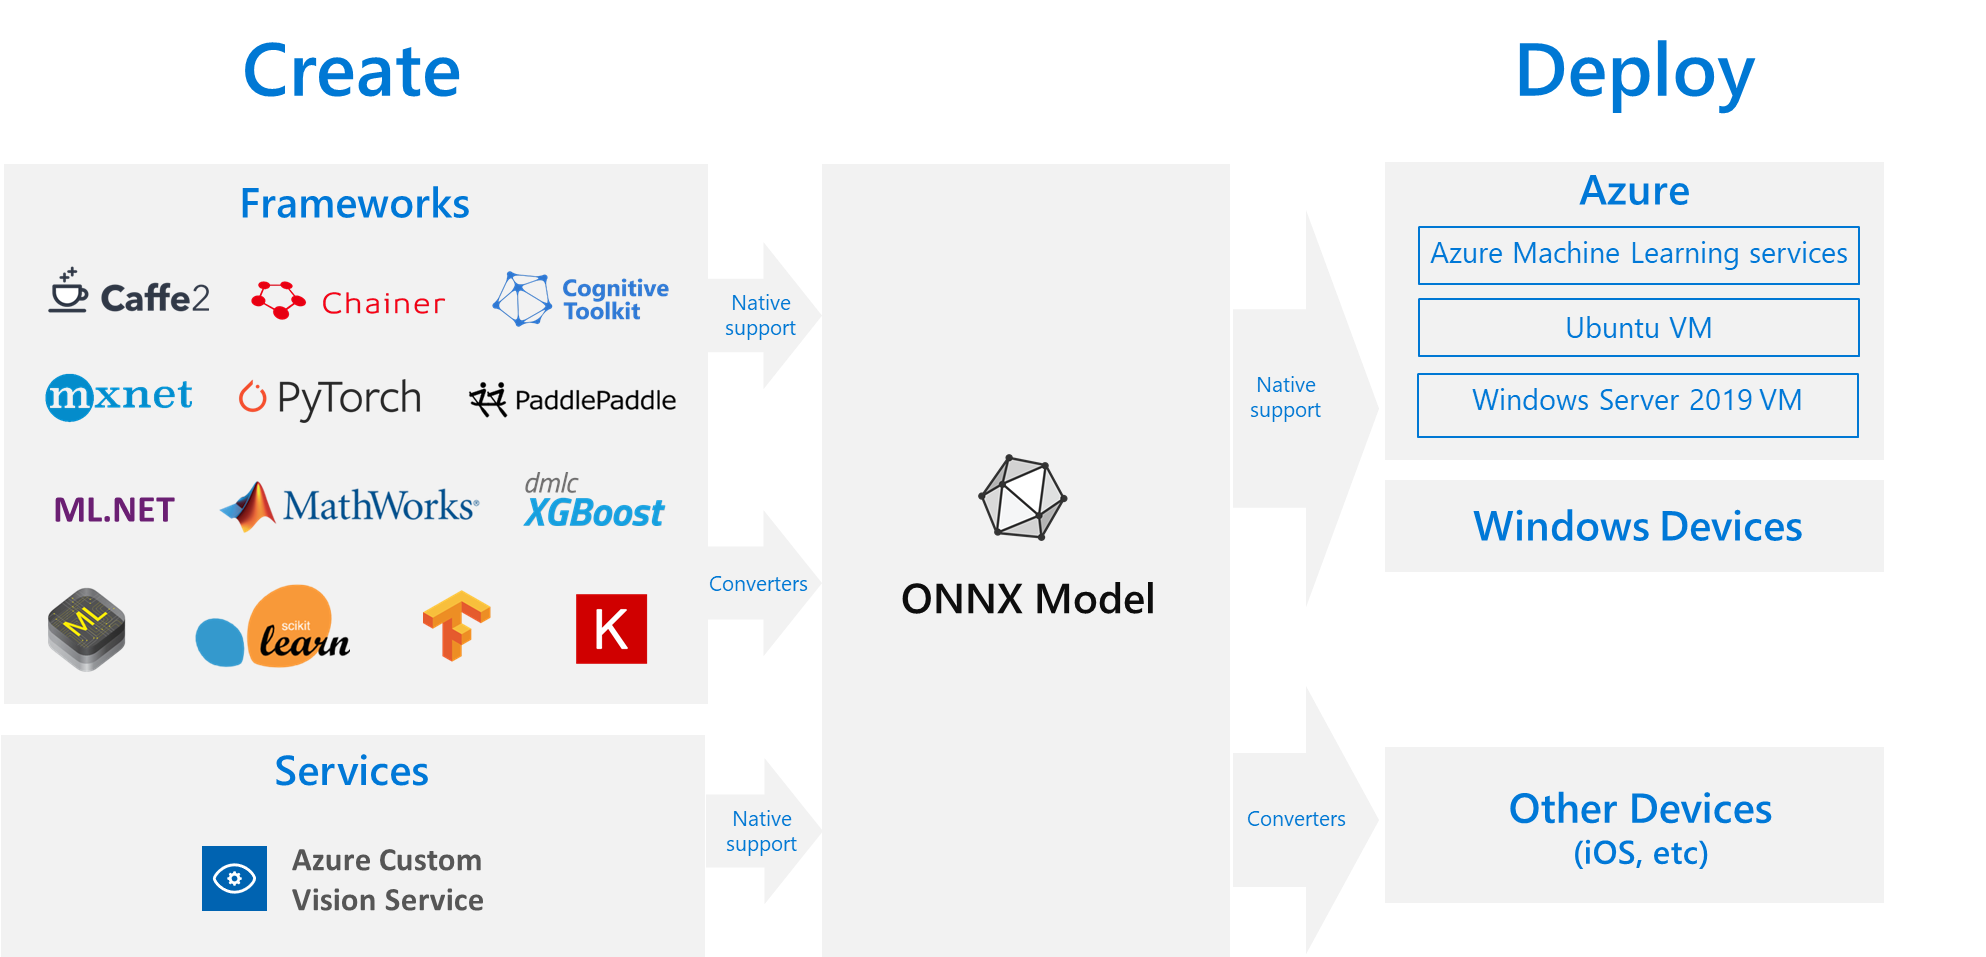
An ONNX model stores the network’s structure (its layers and operations) and the trained weights in a single .onnx file. One of ONNX’s biggest advantages is portability. Models can be trained in PyTorch, exported to ONNX, then deployed using ONNX Runtime on platforms like Windows, Linux, macOS, Android, iOS, web browsers (through WebAssembly), and many embedded IoT devices.
ONNX is also supported by hardware acceleration libraries on GPUs, NPUs, and specialized chips. Beyond neural networks, ONNX supports classical ML models, like decision trees and linear regressors, through ONNX-ML extensions. ONNX has become a widely adopted “exchange language” in the AI ecosystem. It enables cross-framework model sharing, simplifies edge deployment, and reduces vendor lock-in.
Now let’s see an example on how to get started with ONNX model. The first thing is to get the ONNX model using the Ultralytics library and yolov8n model weight.
from ultralytics import YOLO

# 1) Load a pretrained checkpoint (or your own .pt after training)
m = YOLO("yolov8n.pt")

# 2) Export to ONNX
onnx_path = m.export(
    format="onnx",   # target format
    opset=12,        # ONNX operator set; 12+ works well across runtimes
    dynamic=True,    # dynamic input shapes (e.g., 640x640, 1280x720, etc.)
    simplify=True,   # run onnx-simplifier to fold constants / clean graph
    imgsz=640        # default export resolution; keep consistent with training
)
print("ONNX saved at:", onnx_path)
In the above code, format="onnx" tells Ultralytics to convert the PyTorch model into an ONNX file.
YOLOv8 on it, and get a best.pt weight file. Once training is done, you can export your custom model to ONNX using the same export command shown above. If you’re working in TensorFlow or Keras, you can use tools like tf2onnx to convert your model. And for PyTorch models not built with Ultralytics, you can use the built-in torch.onnx.export() function.Now we see how to use the ONNX model to run inference. The advantage of using ONNX is that it’s lightweight and portable, making it suitable for running on mobile, desktop, and edge devices such as NVIDIA Jetson or Raspberry Pi. Once you’ve exported your model to ONNX format, you can load it anywhere without depending on the original training framework. The code below shows how to perform object detection inference using ONNX Runtime, OpenCV, and NumPy:
import cv2, numpy as np, onnxruntime as ort

def resize_with_padding(im, new_shape=(640, 640), color=(114, 114, 114)):
    h, w = im.shape[:2]
    if isinstance(new_shape, int):
        new_shape = (new_shape, new_shape)
    r = min(new_shape[0] / h, new_shape[1] / w)
    new_unpad = (int(round(w * r)), int(round(h * r)))
    dw, dh = new_shape[1] - new_unpad[0], new_shape[0] - new_unpad[1]
    dw //= 2; dh //= 2
    im_resized = cv2.resize(im, new_unpad, interpolation=cv2.INTER_LINEAR)
    im_padded = cv2.copyMakeBorder(im_resized, dh, dh, dw, dw, cv2.BORDER_CONSTANT, value=color)
    return im_padded, r, dw, dh

def nms(xyxy, scores, iou_thres=0.45, score_thres=0.25):
    idxs = np.where(scores >= score_thres)[0]
    if idxs.size == 0: return []
    boxes = xyxy[idxs]
    scores = scores[idxs]
    order = scores.argsort()[::-1]
    keep_local = []
    while order.size > 0:
        i = order[0]
        keep_local.append(idxs[i])
        if order.size == 1: break
        xx1 = np.maximum(boxes[i,0], boxes[order[1:],0])
        yy1 = np.maximum(boxes[i,1], boxes[order[1:],1])
        xx2 = np.minimum(boxes[i,2], boxes[order[1:],2])
        yy2 = np.minimum(boxes[i,3], boxes[order[1:],3])
        w = np.maximum(0.0, xx2-xx1); h = np.maximum(0.0, yy2-yy1)
        inter = w*h
        area_i = (boxes[i,2]-boxes[i,0])*(boxes[i,3]-boxes[i,1])
        area_j = (boxes[order[1:],2]-boxes[order[1:],0])*(boxes[order[1:],3]-boxes[order[1:],1])
        ovr = inter / (area_i + area_j - inter + 1e-9)
        order = order[1:][ovr <= iou_thres]
    return keep_local

# Inference
onnx_model = "yolov8n.onnx"  # or whatever you exported
sess = ort.InferenceSession(onnx_model, providers=['CPUExecutionProvider'])
inp_name = sess.get_inputs()[0].name
out_name = sess.get_outputs()[0].name

img_path = "baseball.jpg"
img0 = cv2.imread(img_path); assert img0 is not None
imgsz = 640
img_lb, r, dw, dh = resize_with_padding(img0, (imgsz, imgsz))
blob = (cv2.cvtColor(img_lb, cv2.COLOR_BGR2RGB)/255.0).transpose(2,0,1)[None].astype(np.float32)

out = sess.run([out_name], {inp_name: blob})[0]  # shape variants: (1,N,85) or (1,85,N) or (1,N,84) or (1,84,N)
pred = out[0]  # drop batch

#  Normalize output layout to (N, C)
if pred.shape[0] in (84, 85):      # (C, N) -> (N, C)
    pred = pred.T                   # now (N, C)

num_cols = pred.shape[1]

# Branch on presence of objectness column
if num_cols == 85:
    xywh   = pred[:, :4]
    obj    = pred[:, 4:5]          # (N,1)
    clsP   = pred[:, 5:]           # (N,80)
elif num_cols == 84:
    xywh   = pred[:, :4]
    obj    = np.ones((pred.shape[0], 1), dtype=pred.dtype)  # no obj column → treat as 1
    clsP   = pred[:, 4:]
else:
    # Generic fallback: last K columns are class scores, first 4 are boxes
    # Assume no explicit objectness
    xywh = pred[:, :4]
    clsP = pred[:, 4:]
    obj  = np.ones((pred.shape[0], 1), dtype=pred.dtype)

cls_id = np.argmax(clsP, axis=1)
cls_sc = clsP.max(axis=1, keepdims=True)
conf   = (obj * cls_sc).squeeze(1)

# xywh -> xyxy
xyxy = np.zeros_like(xywh)
xyxy[:,0] = xywh[:,0] - xywh[:,2]/2
xyxy[:,1] = xywh[:,1] - xywh[:,3]/2
xyxy[:,2] = xywh[:,0] + xywh[:,2]/2
xyxy[:,3] = xywh[:,1] + xywh[:,3]/2

# map back to original image
xyxy[:,[0,2]] -= dw
xyxy[:,[1,3]] -= dh
xyxy /= r

# clip
h0, w0 = img0.shape[:2]
xyxy[:,0::2] = np.clip(xyxy[:,0::2], 0, w0-1)
xyxy[:,1::2] = np.clip(xyxy[:,1::2], 0, h0-1)

# NMS and draw
keep = nms(xyxy.copy(), conf, iou_thres=0.45, score_thres=0.25)

# COCO labels (80)
COCO80 = [
    'person','bicycle','car','motorcycle','airplane','bus','train','truck','boat','traffic light',
    'fire hydrant','stop sign','parking meter','bench','bird','cat','dog','horse','sheep','cow',
    'elephant','bear','zebra','giraffe','backpack','umbrella','handbag','tie','suitcase','frisbee',
    'skis','snowboard','sports ball','kite','baseball bat','baseball glove','skateboard','surfboard',
    'tennis racket','bottle','wine glass','cup','fork','knife','spoon','bowl','banana','apple',
    'sandwich','orange','broccoli','carrot','hot dog','pizza','donut','cake','chair','couch',
    'potted plant','bed','dining table','toilet','tv','laptop','mouse','remote','keyboard','cell phone',
    'microwave','oven','toaster','sink','refrigerator','book','clock','vase','scissors','teddy bear',
    'hair drier','toothbrush'
]

if len(keep) == 0:
    # Loosen thresholds for debugging
    keep = nms(xyxy.copy(), conf, iou_thres=0.50, score_thres=0.10)

for i in keep:
    x1,y1,x2,y2 = xyxy[i].astype(int)
    cid = int(cls_id[i])
    score = float(conf[i])
    name = COCO80[cid] if cid < len(COCO80) else str(cid)
    cv2.rectangle(img0, (x1,y1), (x2,y2), (0,255,0), 2)
    cv2.putText(img0, f"{name}:{score:.2f}", (x1, max(0,y1-5)),
                cv2.FONT_HERSHEY_SIMPLEX, 0.6, (0,255,0), 2, cv2.LINE_AA)

cv2.imwrite("onnx_result.jpg", img0)
print("Saved: onnx_result.jpg; Detections:", len(keep), "Max conf:", conf.max() if conf.size else None)
In this code, the image is first read using OpenCV and resized using a function that maintains the original aspect ratio by adding gray padding (called letterboxing). This ensures that the image fits the model’s required input shape without distortion. The image is then normalized (pixel values divided by 255) and rearranged into the format (batch, channels, height, width) as expected by the ONNX model.
Next, the ONNX Runtime session is created to load the exported YOLOv8 model and run inference on the input tensor. The output predictions contain bounding boxes, confidence scores, and class probabilities for each detected object. The code checks whether the output has 84 or 85 columns to handle different export versions. After that, it extracts the coordinates and confidence values, converts the YOLO box format (center-based) into corner-based (x1, y1, x2, y2) boxes, and maps them back to the original image size.
The Non-Maximum Suppression (NMS) step removes overlapping boxes that refer to the same object, keeping only the one with the highest confidence. Finally, the detected objects are drawn on the image with their class labels and confidence scores, and the output image with bounding boxes is saved as onnx_result.jpg.
When you run the code on the following input image:
You should see an output similar to the following:
This example demonstrates a complete ONNX inference workflow, from preprocessing an image, running the model, decoding predictions, and visualizing the results, all using lightweight, portable tools that make deployment easy across any hardware platform.
Read following guide to learn more about ONNX:
5. ncnn
NCNN is a high-performance, lightweight neural network inference framework developed by Tencent, designed specifically for mobile and embedded devices. Its main goal is to run deep learning models efficiently on platforms like Android phones, ARM boards, real-time systems, and custom hardware without relying on heavy dependencies or external libraries. ncnn is written in C++ and focuses on CPU execution, which allows it to run in environments where GPUs or specialized accelerators are not available.
ncnn works closely with the model conversion tool ONNX2ncnn, which allows developers to convert ONNX models which is originally trained in frameworks like PyTorch or TensorFlow into ncnn’s internal .param (network structure) and .bin (weight data) files. These two files are all the runtime needs to execute the neural network. Through the ncnnoptimize tool, weights and network structures can be further compressed or quantized to reduce memory footprint and accelerate inference.
Now let’s see an example of how to get started with an ncnn model. The first thing is to get the ncnn files which you can export using the Ultralytics library and a YOLOv8n weight.
from ultralytics import YOLO
from pathlib import Path

# 1) Load a pretrained checkpoint (or your own .pt after training)
pt_model = YOLO("yolov8n.pt")  # replace with your custom .pt if you have one

# 2) Export to NCNN (creates a folder with .param/.bin)
# Tip: set half=True for FP16 to reduce size/latency on many devices
export_dir = pt_model.export(format="ncnn", half=False)

export_dir = Path(export_dir)
print("Exported NCNN folder:", export_dir)  # contains *.ncnn.param and *.ncnn.bin
format="ncnn" tells Ultralytics to produce ncnn artifacts (*.ncnn.param and *.ncnn.bin) that run on CPU/GPU/Vulkan via Tencent’s ultra-light runtime which is great for Android, Raspberry Pi, and other edge devices. Using half=True often shrinks model size and speeds things up on Vulkan-capable GPUs.
Now we see how to use the ncnn model to run inference. ncnn is a tiny, dependency-free inference engine that’s ideal for mobile and embedded targets. Once you have the .param and .bin, you can load them with the ncnn Python bindings (or native C++), feed an image, and decode detections. The code below shows how to run inference, parse boxes/scores/classes, apply NMS, and draw results with OpenCV.
import ncnn
import cv2
import numpy as np

MODEL_PARAM = "model.ncnn.param"
MODEL_BIN = "model.ncnn.bin"
IMAGE_PATH = "baseball.jpg"

# COCO 80 class names - ADD THIS SECTION
CLASS_NAMES = [
    'person', 'bicycle', 'car', 'motorcycle', 'airplane', 'bus', 'train', 'truck', 'boat',
    'traffic light', 'fire hydrant', 'stop sign', 'parking meter', 'bench', 'bird', 'cat',
    'dog', 'horse', 'sheep', 'cow', 'elephant', 'bear', 'zebra', 'giraffe', 'backpack',
    'umbrella', 'handbag', 'tie', 'suitcase', 'frisbee', 'skis', 'snowboard', 'sports ball',
    'kite', 'baseball bat', 'baseball glove', 'skateboard', 'surfboard', 'tennis racket',
    'bottle', 'wine glass', 'cup', 'fork', 'knife', 'spoon', 'bowl', 'banana', 'apple',
    'sandwich', 'orange', 'broccoli', 'carrot', 'hot dog', 'pizza', 'donut', 'cake', 'chair',
    'couch', 'potted plant', 'bed', 'dining table', 'toilet', 'tv', 'laptop', 'mouse', 'remote',
    'keyboard', 'cell phone', 'microwave', 'oven', 'toaster', 'sink', 'refrigerator', 'book',
    'clock', 'vase', 'scissors', 'teddy bear', 'hair drier', 'toothbrush'
]

# Load model
net = ncnn.Net()
net.load_param(MODEL_PARAM)
net.load_model(MODEL_BIN)

# Load image
img = cv2.imread(IMAGE_PATH)
h, w = img.shape[:2]
img_resized = cv2.resize(img, (640, 640))

# Prepare input
mat_in = ncnn.Mat.from_pixels(img_resized, ncnn.Mat.PixelType.PIXEL_BGR2RGB, 640, 640)
mat_in.substract_mean_normalize([0, 0, 0], [1/255.0, 1/255.0, 1/255.0])

# Run inference
ex = net.create_extractor()
ex.input("in0", mat_in)  # Changed from "images" to "in0"
ret, mat_out = ex.extract("out0")  # Changed from "output0" to "out0"

# Get output
output = np.array(mat_out).reshape(mat_out.c, mat_out.h, mat_out.w)
if output.shape[0] == 1:
    output = output[0]
if output.shape[0] < output.shape[1]:
    output = output.T

# Parse detections
boxes = output[:, :4]
scores = output[:, 4:].max(1)
classes = output[:, 4:].argmax(1)

# Filter confidence > 0.5 (increased from 0.25)
keep = scores > 0.5
boxes = boxes[keep]
scores = scores[keep]
classes = classes[keep]

print(f"Detections before NMS: {len(boxes)}")

# Convert boxes (cx,cy,w,h) -> (x1,y1,x2,y2)
cx, cy, bw, bh = boxes.T
x1 = (cx - bw/2) * (w/640)
y1 = (cy - bh/2) * (h/640)
x2 = (cx + bw/2) * (w/640)
y2 = (cy + bh/2) * (h/640)
boxes_xyxy = np.stack([x1, y1, x2, y2], axis=1)

# Apply NMS (Non-Maximum Suppression) to remove duplicate detections
def nms(boxes, scores, iou_thresh=0.45):
    if len(boxes) == 0:
        return []
    x1, y1, x2, y2 = boxes.T
    areas = (x2 - x1) * (y2 - y1)
    order = scores.argsort()[::-1]
    keep = []
    while order.size > 0:
        i = order[0]
        keep.append(i)
        if order.size == 1:
            break
        xx1 = np.maximum(x1[i], x1[order[1:]])
        yy1 = np.maximum(y1[i], y1[order[1:]])
        xx2 = np.minimum(x2[i], x2[order[1:]])
        yy2 = np.minimum(y2[i], y2[order[1:]])
        w_int = np.maximum(0.0, xx2 - xx1)
        h_int = np.maximum(0.0, yy2 - yy1)
        inter = w_int * h_int
        iou = inter / (areas[i] + areas[order[1:]] - inter + 1e-6)
        inds = np.where(iou <= iou_thresh)[0]
        order = order[inds + 1]
    return keep

# Apply NMS
keep_nms = nms(boxes_xyxy, scores, iou_thresh=0.45)
boxes_xyxy = boxes_xyxy[keep_nms]
scores = scores[keep_nms]
classes = classes[keep_nms]

print(f"Detections after NMS: {len(boxes_xyxy)}")

# Draw results
for i in range(len(boxes_xyxy)):
    x1i, y1i, x2i, y2i = boxes_xyxy[i].astype(int)
    cv2.rectangle(img, (x1i, y1i), (x2i, y2i), (0, 255, 0), 2)

    # Use actual class name instead of just number
    class_name = CLASS_NAMES[classes[i]] if classes[i] < len(CLASS_NAMES) else f"Class {classes[i]}"
    label = f"{class_name}: {scores[i]:.2f}"

    cv2.putText(img, label, (x1i, y1i-5), cv2.FONT_HERSHEY_SIMPLEX, 0.5, (0, 255, 0), 2)
    print(f"  - {label} at [{x1i}, {y1i}, {x2i}, {y2i}]")

cv2.imwrite("output.jpg", img)
print(f"Done! Found {len(boxes_xyxy)} objects. Saved to output.jpg")
In this code, the ncnn net loads your .param and .bin, an image is resized to 640×640 and normalized to match training, and an extractor runs a forward pass with input blob name "in0" and output "out0" . The raw output is a 2-D array where each row is a candidate detection: the first four numbers are box center-format (cx, cy, w, h) in the 640×640 space, followed by class scores. The script picks the best class per row, filters by confidence, converts boxes to corner format (x1, y1, x2, y2) and scales them back to your original image size, then applies Non-Maximum Suppression to remove overlaps. Finally, it draws labeled rectangles and saves output.jpg.
When you run the code on the following input image:
You will see an output similar to the following:
Mobile Object Detection with iOS: A Step‑by‑Step Guide
Roboflow provides an iOS sdk that allows you to run RF-DETR or other Roboflow models on iOS. In this guide we will show you how to do this.
We have prepared an iOS starter project that demonstrates how to build an iOS app using the Roboflow SDK for computer vision.
Prerequisites
- You need a Mac with Xcode installed.
- CocoaPods is used to install the Roboflow iOS SDK into the project. You can install it by running sudo gem install cocoapods (if you have Ruby) or brew install cocoapods.
- You’ll need an API key and model ID from Roboflow to run your own model. These values are set in the code.
- The sample app uses the camera, therefore you must have a physical iOS device. You must enable developer mode on your device, connect it to your Mac and trust the computer.
- In Xcode, you must sign the project with your Apple ID. Open the
.xcworkspace, go to Settings-> Accounts and add your Apple ID, then set your team in Signing & Capabilities. This is required to run on a real device.
Installation and Setup
Follow these steps to get the project running:
Clone the repository:
git clone https://github.com/roboflow/roboflow-ios-starter.git
cd roboflow-ios-starter
Install dependencies via CocoaPods: Change into the sample project directory and run pod install :
cd "Roboflow Starter Project"
pod install
This downloads the Roboflow SDK and creates a new Xcode workspace.
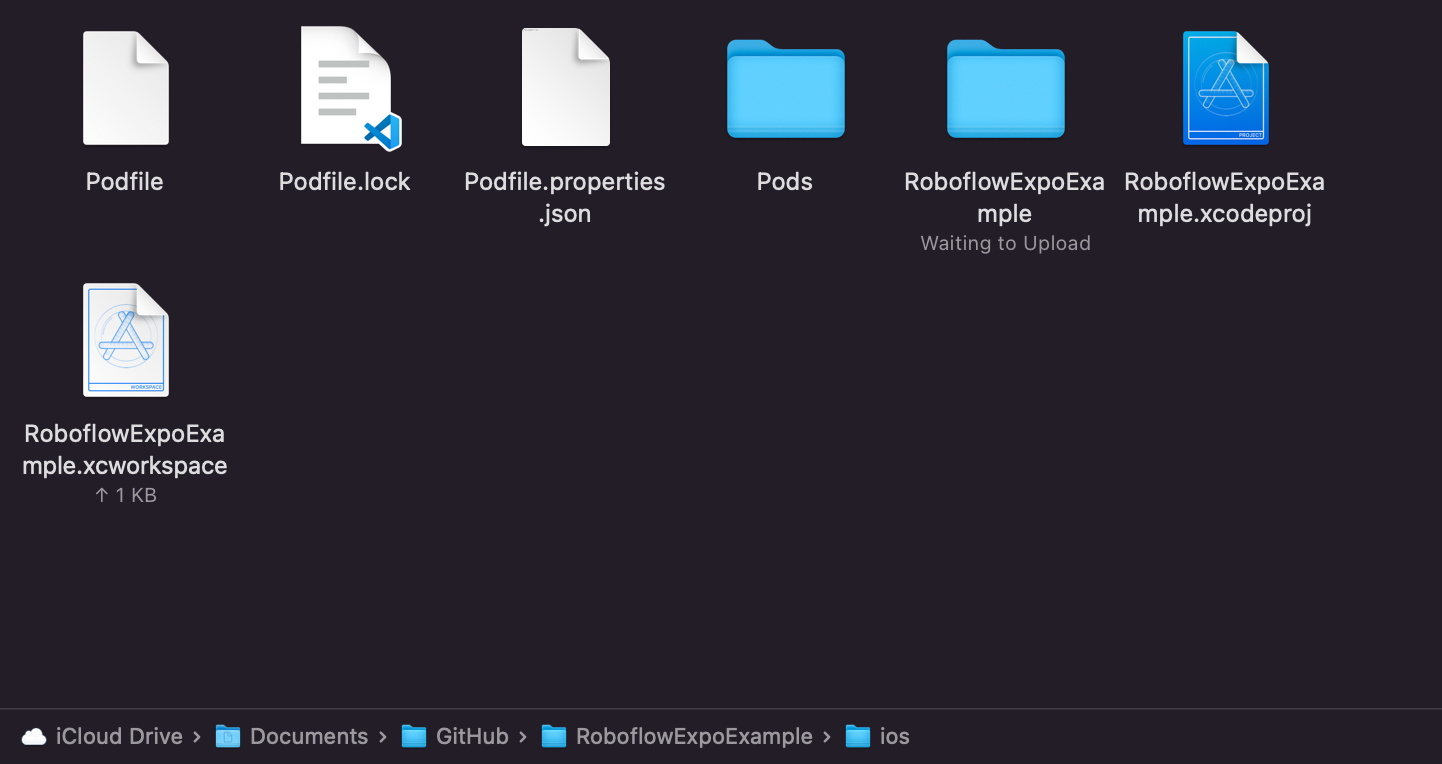
Open the workspace in Xcode: Open the Roboflow Starter Project.xcworkspace. This ensures that CocoaPods‑installed frameworks like Roboflow are linked properly.
Add your API key and model information: In the Xcode Project navigator, open ViewController.swift. At the top you’ll see three global variables: API_KEY, MODEL and VERSION.
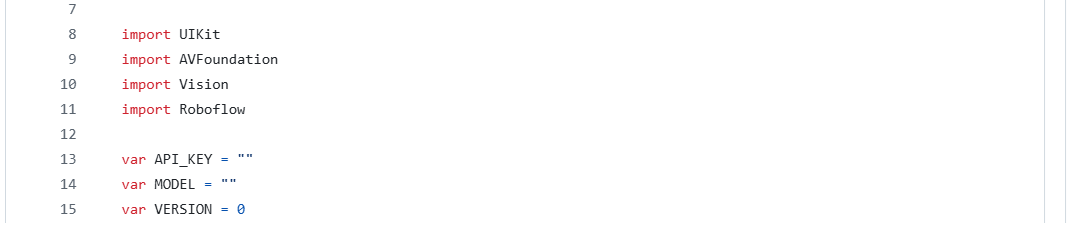
ViewController.swiftRunning the App
- Connect a physical iPhone/iPad and make sure it is in developer mode.
- Open Roboflow Starter
Project.xcworkspaceand select your device from the run target menu. - Set your Apple ID as the signing team in the project’s Signing & Capabilities tab.
- Tap the play button in Xcode to build and run the app on your device. Because the project has camera and machine‑learning code, it will ask for camera permissions on first launch.
How the Roboflow SDK is Used
The integration with the Roboflow SDK happens in the file ViewController.swift. Key parts include:
SDK import and initialization: At the top of the file, the Roboflow library is imported (import Roboflow), and an instance of RoboflowMobile is created with your API key. A variable roboflowModel of type RFModel! is also declared to hold the loaded model:
//Initialize the Roboflow SDK
let rf = RoboflowMobile(apiKey: API_KEY)
var roboflowModel: RFModel!
Model loading: In viewDidLoad(), the method loadRoboflowModelWith(model:version:threshold:overlap:maxObjects:) is called. This method invokes the SDK’s rf.load() to download the specified model and version, then configures detection parameters (confidence threshold, overlap and maximum objects):
rf.load(model: MODEL, modelVersion: VERSION) { model, error, modelName, modelType in
    if error != nil {
        print(error?.localizedDescription as Any)
    } else {
        roboflowModel = model
        roboflowModel?.configure(threshold: threshold, overlap: overlap, maxObjects: maxObjects,
                                 processingMode: .performance, maxNumberPoints: 20)
    }
}
Camera setup and frame capture: The controller implements AVCaptureVideoDataOutputSampleBufferDelegate. It sets up an AVCaptureSession using the front camera, requests permission from the user, and receives frames in captureOutput(_:didOutput:from:). When frames are dropped, captureOutput(_:didDrop:from:) logs the event.
Running inference: In the captureOutput(_:didOutput:from:) method, a pixel buffer from the camera is passed to roboflowModel?.detect(pixelBuffer:). The callback provides an array of RFObjectDetectionPrediction objects, which include class, confidence, coordinates and optional segmentation points. The sample then calls drawBoundingBoxesFrom(detections:) to overlay boxes and labels.
roboflowModel?.detect(pixelBuffer: pixelBuffer) { detections, error in
    if error != nil {
        print(error!)
    } else {
        let detectionResults: [RFObjectDetectionPrediction] = detections!
        self.drawBoundingBoxesFrom(detections: detectionResults)
        // update FPS label …
    }
}
Drawing results: The functions drawBoundingBoxesFrom(detections:), drawBoundingBox(boundingBox:color:detectedValue:confidence:) and related helpers translate the detection data into CALayer overlays for display. Bounding boxes and labels are drawn with configurable colors and sizes, and the layout is updated when the device orientation changes.
Uploading images to your dataset: The project includes a button that, when pressed, converts the current camera frame to a UIImage and calls rf.uploadImage(image:project:) to upload it to a Roboflow project dataset. This lets you crowdsource images of misclassifications for future training. The Roboflow SDK logic resides in this single view controller, making it easy for you to modify or reuse. You can also add your own user interface on top of the bounding boxes or adjust threshold values to tune performance.
The roboflow-ios-starter project lets your iPhone or iPad recognize and locate real-world objects directly through the camera using RF-DETR model trained in Roboflow. It runs efficiently on-device, enabling real-time detection. You can utilize this app any computer vision use cases like defect inspection, counting, or smart assistance without needing the cloud.
Conclusion: Mobile Object Detection Models
Mobile object detection is the practice of running object detection models directly on phones, edge boards, and embedded devices, close to where the data is captured. Doing it on-device eliminates latency, preserves privacy, works offline, and reduces cloud cost while enabling real-time decisions in the field.
How to Manage Hundreds of Edge Vision AI Devices in One Place
Cite this Post
Use the following entry to cite this post in your research:
Timothy M. (Nov 2, 2025). Best Mobile Object Detection Models. Roboflow Blog: https://blog.roboflow.com/mobile-object-detection-models/