
This tutorial walks through training a YOLOv4 Tiny model in the Darknet framework on a custom dataset, converting the resulting weights to a TensorFlow SavedModel, and then exporting to TensorFlow Lite for on-device inference. The post covers the data preparation steps, the Darknet training configuration for the Tiny variant, the multi-step conversion pipeline, and final deployment on an Android device using the TensorFlow Lite object detection demo app. Roboflow handles dataset formatting into the YOLOv4 Darknet format used during training.
In this post, we walk through how to train an end to end custom mobile object detection model. We will use the state of the art YOLOv4 tiny Darknet model and convert to TensorFlow Lite for on-device inference.
Roboflow supports deploying to iOS with a native SDK and provide an example of integrating this SDK into an Expo app with React Native here. You may find this useful when considering the construction of your own downstream application.
Short on time? Jump to the Mobile Object Detection Colab with YOLOv4-tiny Notebook.

We will take the following steps to go from data to deploy:
- Prepare YOLOv4 tiny Darknet Custom Data
- Train YOLOv4 tiny Darknet
- Convert Darknet Model to TensorFlow Lite
- Export Weights for Future Inference
- Deploy on Device
If you prefer this content in video format.
Background on YOLOv4 Darknet and TensorFlow Lite
YOLOv4 Darknet is currently the most accurate performant model available with extensive tooling for deployment. It builds on the YOLO family of realtime object detection models with a proven track record that includes the popular YOLOv3.
Because we are deploying on a lower-end device, we will trade some accuracy for higher frame rate by using the YOLOv4 variant YOLOv4 Tiny. For higher accuracy at lower frame rate, check out the larger model in How To Train YOLOv4.
We will train YOLOv4 in the Darknet framework because construction for a stable TensorFlow model is still underway. Though not especially easy to use, Darknet is a very powerful framework that is usually used to train YOLO models.
To deploy on-device, we will use TensorFlow Lite, Google's official framework for on-device inference. We will convert the weights from Darknet to a TensorFlow SavedModel, and from that to TensorFlow Lite weights. We will finally drop these weights into an app, ready to be configured, tested, and used in the real world.
With context covered, let's get started! We recommend reading this post side-by-side with the Mobile Object Detection Colab Notebook.
Prepare YOLOv4 Darknet Custom Data
First, we need data in the YOLOv4 Darknet format. Since this is cumbersome to acquire manually, we will use Roboflow to convert to the Darknet annotation format automatically.
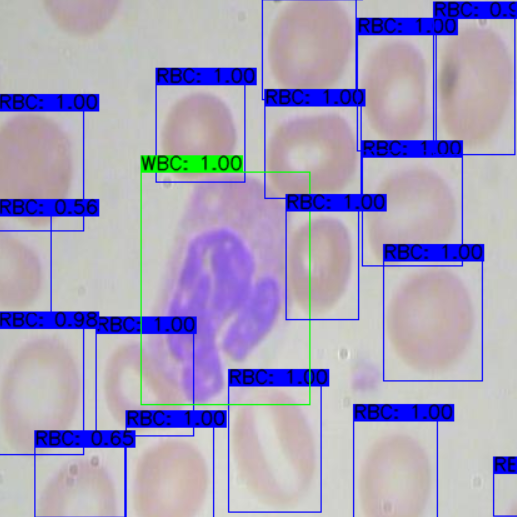
If you lack a dataset, you can still follow along. Roboflow offers over 90,000 public object detection datasets free to use anytime, anywhere. In this tutorial we will use the public Blood Cell Count and Detection (BCCD) dataset.
If you already have a labeled dataset, continue along. If your data is unlabeled, you will need to label it first. Otherwise, the computer will have no idea what's correct while learning.
Roboflow Annotate is free for up to 10,000 images so go ahead and create your free account.
Using Your Own Custom Data to Train YOLOv4 Darknet
To export your own data for this tutorial, sign up for Roboflow and make a public workspace, or make a new public workspace in your existing account.
If your data is private, you can upgrade to a paid plan for export to use external training routines like this one or experiment with using Roboflow's internal training solution.
If you haven’t yet, sign up for a free account with Roboflow. Then upload your dataset.
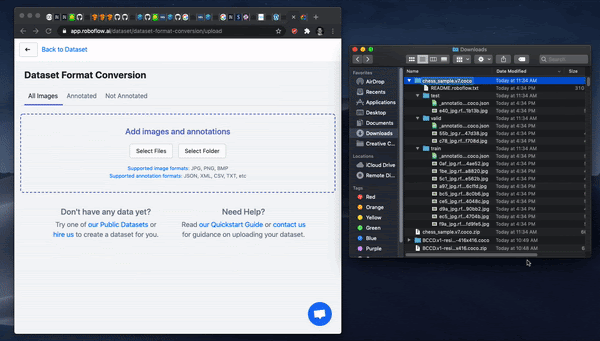
After upload you will be prompted to choose options including preprocessing and augmentations.
After selecting these options, click Generate and then Download. You will be prompted to choose a data format for your export. Choose YOLO Darknet format.
Note: in addition to converting data to YOLO Darknet in Roboflow, you can make sure your dataset is healthy with the Roboflow's dataset health check, preprocess your images, and generate a larger dataset via augmentations.
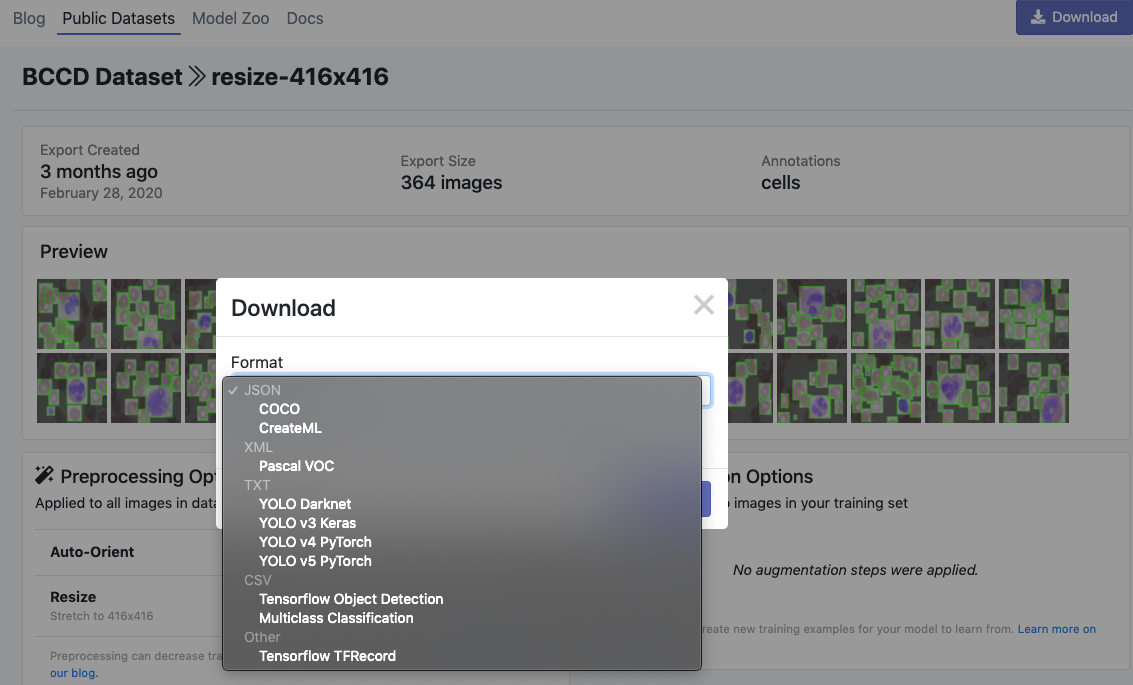
After export, you will receive a curl link to download your data into our training notebook.
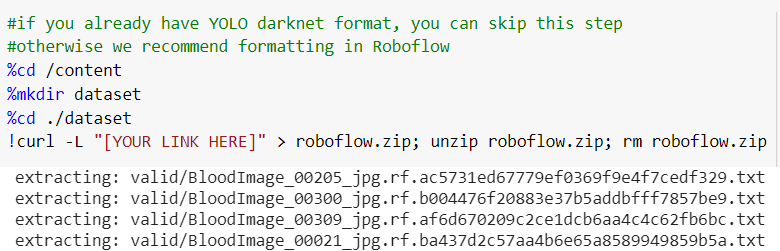
That's it to get your data into Colab, just several lines of code.
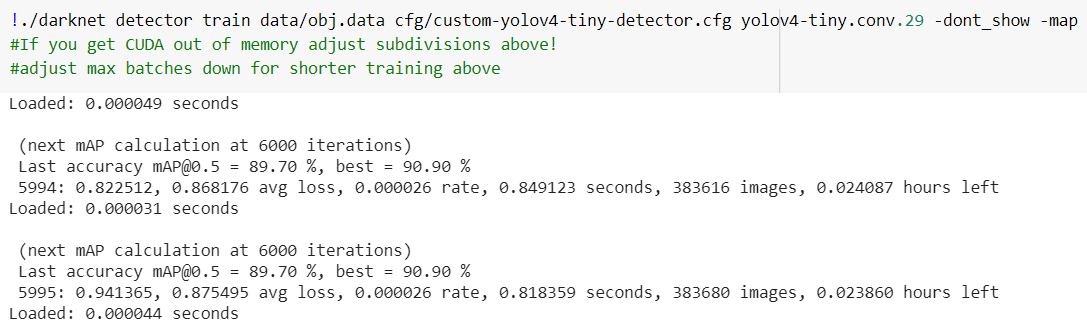
Train YOLOv4 tiny Darknet
Training YOLOv4 tiny (and the original model) is a task in itself. In fact, we have an entire blog post about How To Train YOLOv4 tiny*.
Thus, we will not describe training thoroughly here. Refer to the blog post instead. From a high level, the post takes the following steps to train in the YOLOv4-tiny Colab Notebook:
- Install Darknet YOLOv4, tailored for Colab
- Customize training configuration
- Train custom YOLOv4 detector
- Infer custom objects with saved YOLOv4 weights
Follow the steps to train the YOLOv4 model. Then move on to conversion.
Convert Darknet Model to TensorFlow Lite
Darknet produces a .weights file for internal use in the Darknet framework. To use it with TensorFlow Lite, we need to convert it. For this, we will use the tool TensorFlow-YOLOv4-TFLite.
This tool uses the COCO dataset as a base, so we will need to change the classes to our custom ones. But once that's done, the tool is straightforward. It lets us convert from Darknet to TensorFlow SavedModel, then from TensorFlow SavedModel to TensorFlow Lite, both with simple commands.
It even includes a script to test that our TensorFlow Lite infers correctly, which we will make use of. There's many possible failure points along the way, and if a process failed, we want to know right away rather than track down a silent error that occurred ten steps ago.
Once we've verified that our TensorFlow Lite representation infers correctly, it's time to save weights.
Save Weights for Future Inference
TensorFlow Lite produces a single .tflite file. This makes it easier to use on-device, since all you need to do is copy a single file that contains all your weights. In the provided Mobile Object Detection Colab Notebook, we will copy this generated file to Google Drive for future inference.
We also want to keep our Darknet weights in case we want to use them without TensorFlow Lite, whether for more testing or different deployment. That's in the simple .weights file that Darknet produced.
Finally, if we want a TensorFlow representation that not for TensorFlow Lite, we can use the SavedModel format. It's a directory containing both assets and variables subdirectories, and a .pb file. We can save this for using other TensorFlow deployment strategies as well.
Deploy Your Custom Object Detection Model on a Mobile Device
Let's use our model in the real world. So far, we've used one part of TensorFlow Lite: the converter. The other part is the interpreter. Depending on your needs, deployment can actually be much harder than conversion, as conversion is usually permissive but the interpreter needs details.
TensorFlow Lite focuses more on simplifying conversion than usage, which is especially frustrating if you have little experience in development of the platform you are deploying on.
Deployment for the purposes of this post will be on Android, though TensorFlow Lite does have an example repository for iOS, as well as a Python API for Raspberry Pi or other general devices.
TensorFlow Lite offers an Android official object detection demo, but it needs significant modification before it can work with our converted YOLOv4 model. The demo uses the output format of MobileNetSSDv2, which you can actually learn how to train in How to Train a TensorFlow Lite Object Detection Model.
But for this tutorial, we will be using the same tool we used to convert YOLOv4 Darknet to TensorFlow Lite: TensorFlow-YOLOv4-TFLite. It has an adapted Android demo, which makes it easy to test.
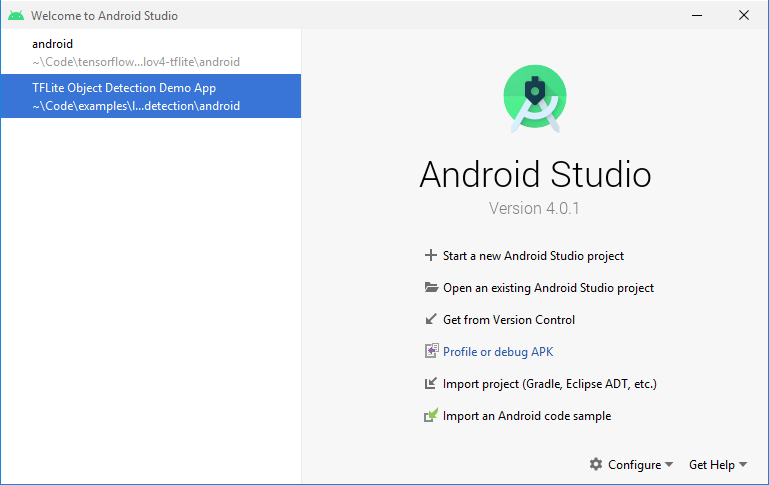
On the machine that you will be developing on, clone the TensorFlow-YOLOv4-TFLite repository. Next, install Android Studio, the official IDE for Android development.
Then, click "Open an existing Android Studio project" and open the android subdirectory within TensorFlow-YOLOv4-TFLite. Click "OK" for Gradle Sync and other build steps.
Download the TFLite model file from your Google Drive to the android/app/src/main/assets directory. You will also need to get your label names in the same directory. This will be in the _darknet.labels file that Roboflow generated; you can simply copy that file. Name it whatever you want. It simply maps the numerical values outputted by the model to human-readable class names.
Now, you need to change the constants for the model and label paths. Do a find and replace (Ctrl-R or Edit > Find > Replace...) for TF_OD_API_MODEL_FILE and TF_OD_API_LABELS_FILE, replacing all with the filenames of your model and labels files, respectively.
Finally, change the flag for isTiny in YoloV4Classifier.java to true. The software for your test app is now ready. Huge thanks to hunglc007 for making this simple.
You need to set up a hardware device to test. Basically, you need to enable USB Debugging under Developer Options on the Android device and possibly install some drivers on your development machine. For more information, refer to the documentation.
If prompted, do not use Instant Run. Once you connect your USB Device, you're ready to go.
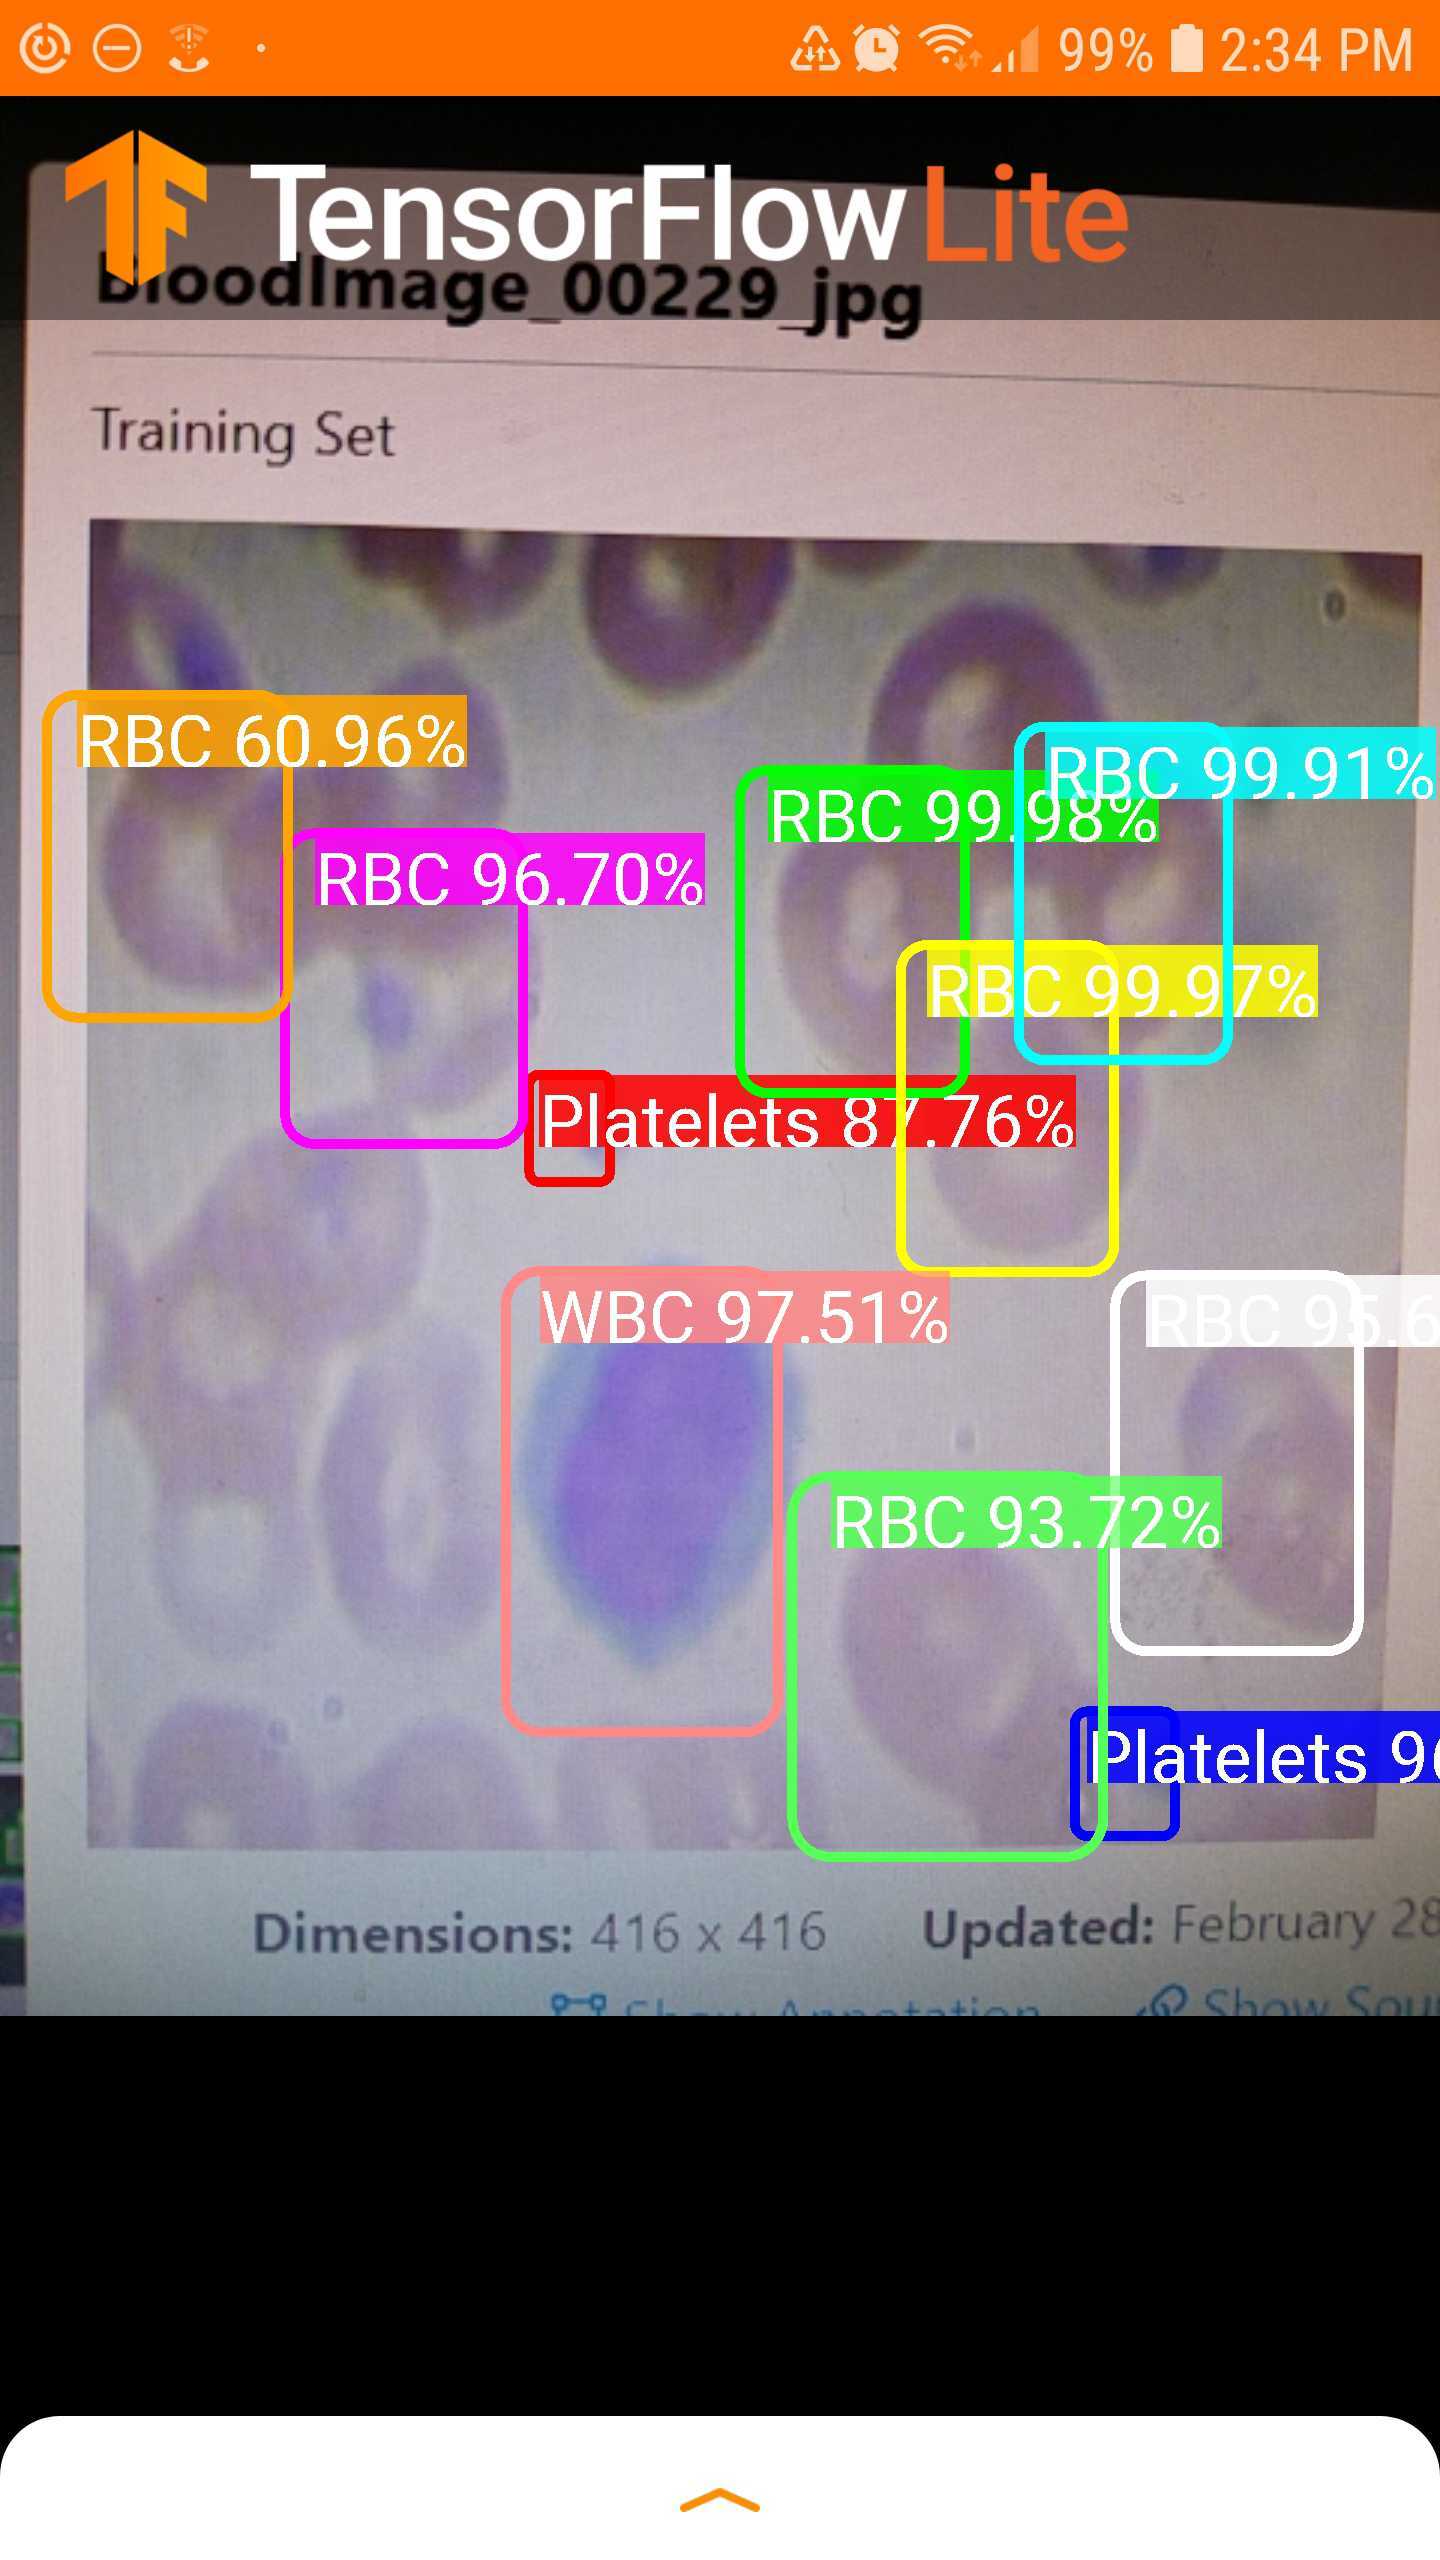
Happy detecting—this time in the real world!
*For the larger YOLOv4 model, check out Training YOLOv4 on a Custom Dataset
Next Steps
To get even more out of the YOLOv4 repository, we wrote a guide on advanced tactics in YOLOv4. We highly recommend checking that out after you've trained YOLOv4.
If you're interested in deploying models to iOS as well, follow this guide to see how you can do that as well.
Cite this Post
Use the following entry to cite this post in your research:
Jim Su, Samrat Sahoo. (Aug 22, 2020). How to Train a Custom Mobile Object Detection Model (with YOLOv4 Tiny and TensorFlow Lite). Roboflow Blog: https://blog.roboflow.com/how-to-train-a-custom-mobile-object-detection-model/