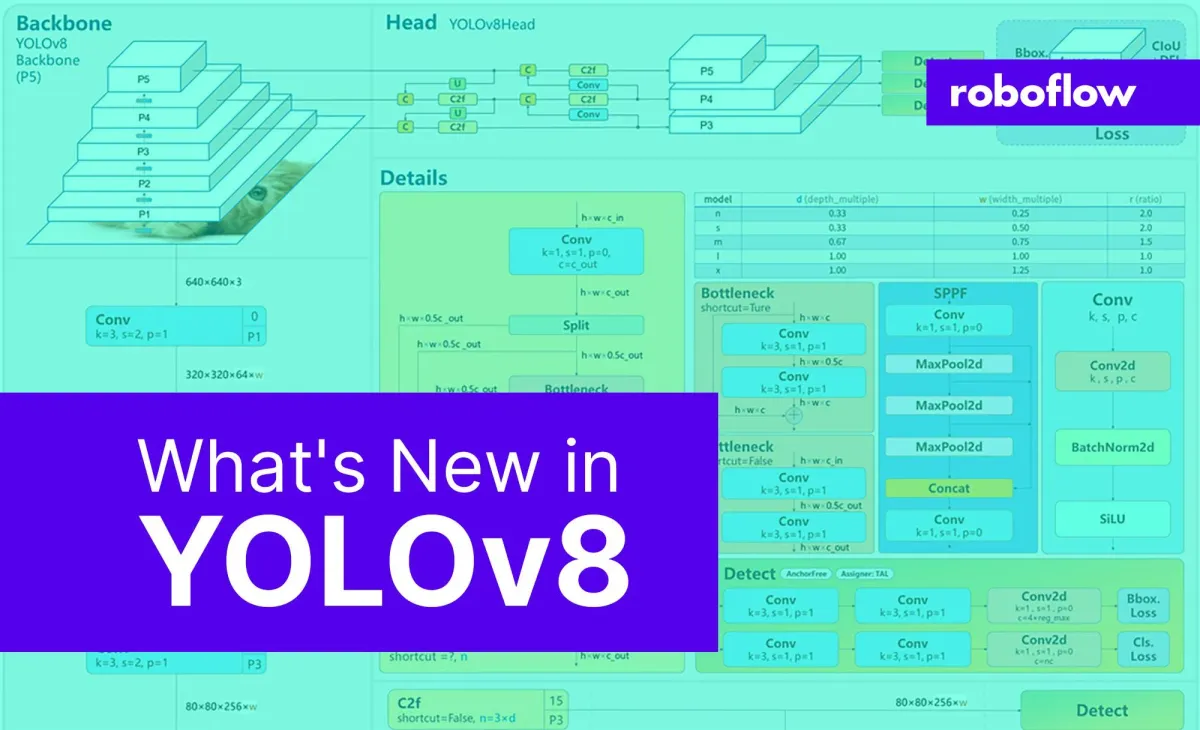
The field of computer vision advances with the release of YOLOv8, a model that defines a new state of the art for object detection, instance segmentation, and classification.
Along with improvements to the model architecture itself, YOLOv8 introduces developers to a new friendly interface via a PIP package for using the YOLO model.
In this blog post, we will dive into the significance of YOLOv8 in the computer vision world, compare it to similar models in terms of accuracy, and discuss the recent changes in the YOLOv8 GitHub repository.
If you are looking to learn how to train or work with a specific YOLOv8 model, we have dedicated posts to help:
- Train a YOLOv8 object detection model
- Train a YOLOv8 pose estimation (keypoint detection) model
- Train a YOLOv8 Oriented Bounding Box (OBB) model
- Train a YOLOv8 classification model
- Train a YOLOv8 segmentation model
You can try a YOLOv8 model with the following Workflow:
In the Workflow above, you can drag and drop an image of an animal and the system will detect the presence of animals using a YOLOv8 model. You can also see how the model compares to YOLO-World, a zero-shot model.
What is YOLOv8?
YOLOv8 is the newest state-of-the-art YOLO model that can be used for object detection, image classification, and instance segmentation tasks. YOLOv8 was developed by the same team who created the YOLOv5 model. YOLOv8 includes numerous architectural and developer experience changes and improvements over YOLOv5.
How YOLO Grew Into YOLOv8
The YOLO (You Only Look Once) series of models has become famous in the computer vision world. YOLO's fame is attributable to its considerable accuracy while maintaining a small model size. YOLO models can be trained on a single GPU, which makes it accessible to a wide range of developers. Machine learning practitioners can deploy it for low cost on edge hardware or in the cloud.
YOLO has been nurtured by the computer vision community since its first launch in 2015 by Joseph Redmond. In the early days (versions 1-4), YOLO was maintained in C code in a custom deep learning framework written by Redmond called Darknet.
YOLOv5 inferring on a bicycle
The YOLOv8 author shadowed the YOLOv3 repo in PyTorch (a deep learning framework from Facebook). As the training in the shadow repo got better, they eventually launched YOLOv5.
YOLOv5 quickly became the world's SOTA repo given its flexible Pythonic structure. This structure allowed the community to invent new modeling improvements and quickly share them across repository with similar PyTorch methods.
Along with strong model fundamentals, the YOLOv5 maintainers have been committed to supporting a healthy software ecosystem around the model. They actively fix issues and push the capabilities of the repository as the community demands.
In the last two years, various models branched off of the YOLOv5 PyTorch repository, including Scaled-YOLOv4, YOLOR, and YOLOv7. Other models emerged around the world out of their own PyTorch based implementations, such as YOLOX and YOLOv6. Along the way, each YOLO model has brought new SOTA techniques that continue to push the model's accuracy and efficiency.
Over the last six months, the newest SOTA version of YOLO, YOLOv8, was launched on January 10th, 2023.
Why Should I Use YOLOv8?
Here are a few main reasons why you should consider using YOLOv8 for your next computer vision project:
- YOLOv8 has a high rate of accuracy measured by Microsoft COCO and Roboflow 100.
- YOLOv8 comes with a lot of developer-convenience features, from an easy-to-use CLI to a well-structured Python package.
- There is a large community around YOLO and a growing community around the YOLOv8 model, meaning there are many people in computer vision circles who may be able to assist you when you need guidance.
YOLOv8 achieves strong accuracy on COCO. For example, the YOLOv8m model -- the medium model -- achieves a 50.2% mAP when measured on COCO. When evaluated against Roboflow 100, a dataset that specifically evaluates model performance on various task-specific domains, YOLOv8 scored substantially better than YOLOv5. More information on this is provided in our performance analysis later in the article.
Furthermore, the developer-convenience features in YOLOv8 are significant. As opposed to other models where tasks are split across many different Python files that you can execute, YOLOv8 comes with a CLI that makes training a model more intuitive. This is in addition to a Python package that provides a more seamless coding experience than prior models.
The community around YOLO is notable when you are considering a model to use. Many computer vision experts know about YOLO and how it works, and there is plenty of guidance online about using YOLO in practice. Although YOLOv8 is new as of writing this piece, there are many guides online that can help.
Let's do a deep dive into the architecture and what makes YOLOv8 different from prior YOLO models.
YOLOv8 Architecture: A Deep Dive
YOLOv8 does not yet have a published paper, so we lack direct insight into the direct research methodology and ablation studies done during its creation. With that said, we analyzed the repository and information available about the model to start documenting what's new in YOLOv8.
If you want to peer into the code yourself, check out the YOLOv8 repository and you view this code differential to see how some of the research was done.
Here we provide a quick summary of impactful modeling updates and then we will look at the model's evaluation, which speaks for itself.
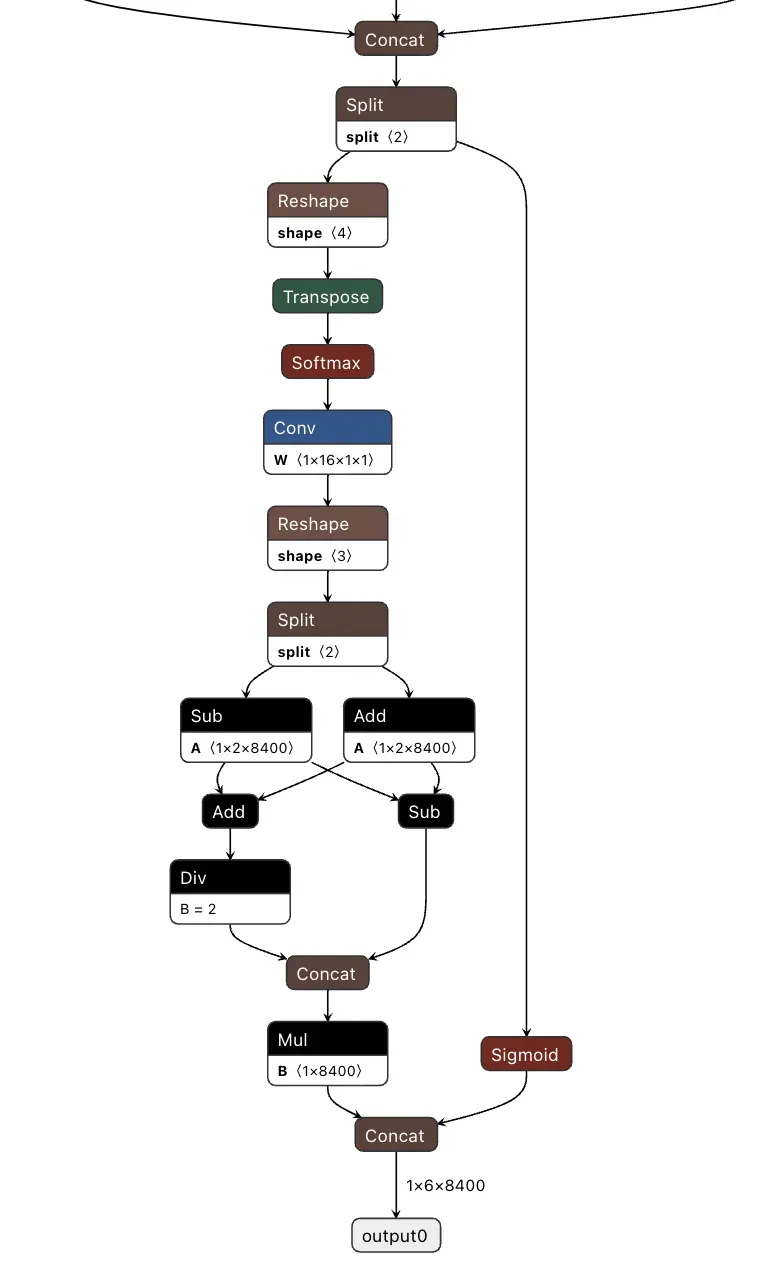
The following image made by GitHub user RangeKing shows a detailed vizualisation of the network's architecture.
Anchor Free Detection
YOLOv8 is an anchor-free model. This means it predicts directly the center of an object instead of the offset from a known anchor box.
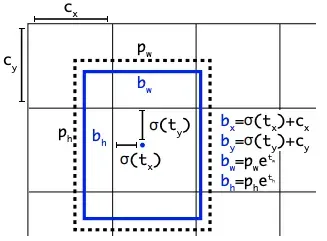
Anchor boxes were a notoriously tricky part of earlier YOLO models, since they may represent the distribution of the target benchmark's boxes but not the distribution of the custom dataset.
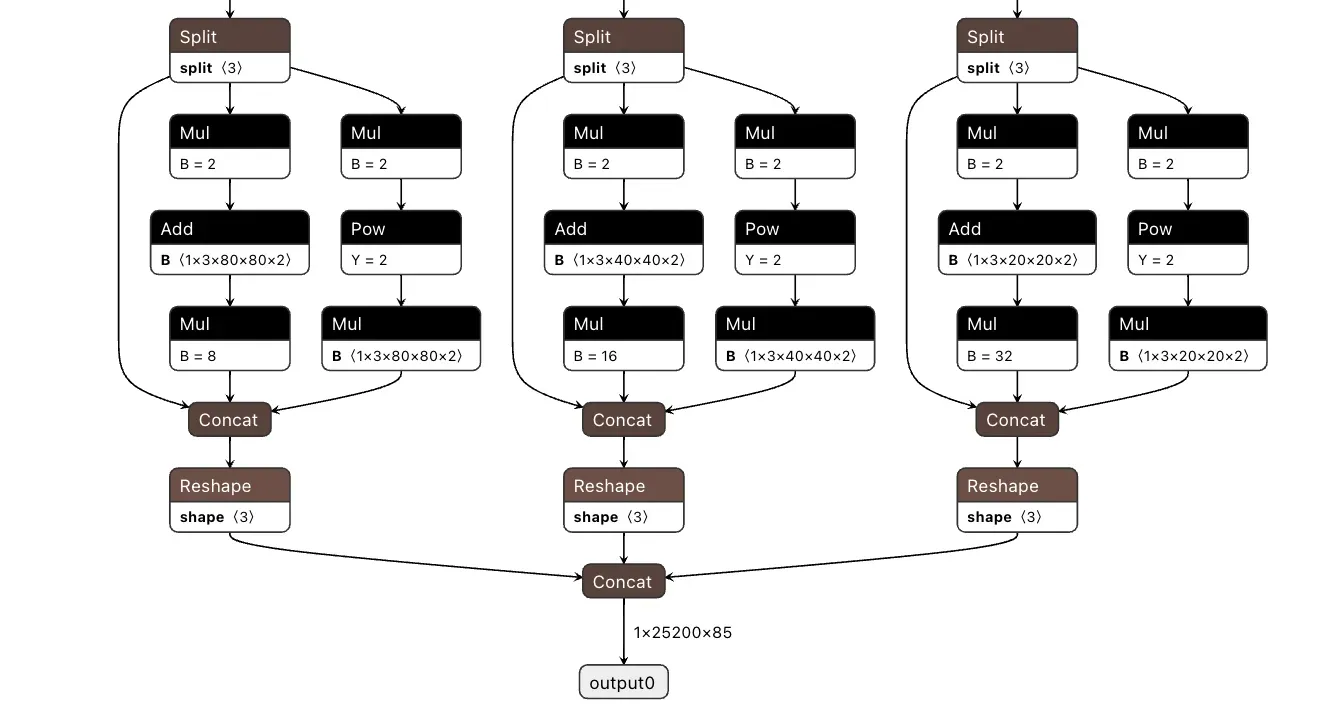
Anchor free detection reduces the number of box predictions, which speeds up Non-Maximum Suppression (NMS), a complicated post processing step that sifts through candidate detections after inference.
New Convolutions
The stem's first 6x6 conv is replaced by a 3x3, the main building block was changed, and C2f replaced C3 . The module is summarized in the picture below, where "f" is the number of features, "e" is the expansion rate and CBS is a block composed of a Conv, a BatchNorm and a SiLU later.
In C2f, all the outputs from the Bottleneck (fancy name for two 3x3 convs with residual connections) are concatenated. While in C3 only the output of the last Bottleneck was used.
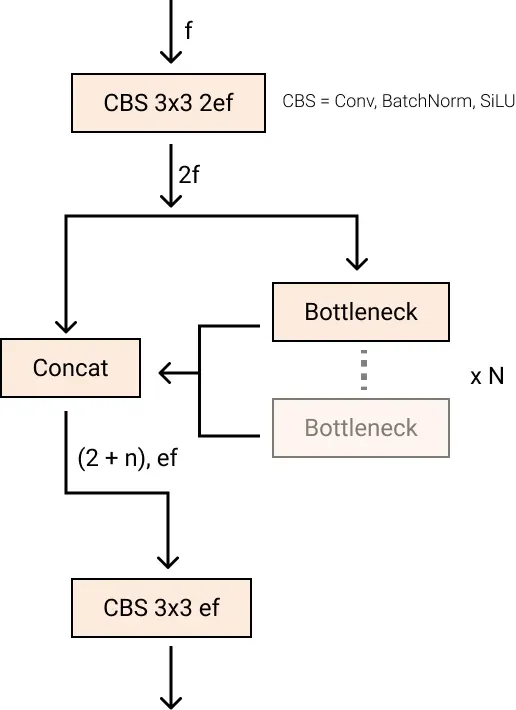
C2f moduleThe Bottleneck is the same as in YOLOv5 but the first conv's kernel size was changed from 1x1 to 3x3. From this information, we can see that YOLOv8 is starting to revert to the ResNet block defined in 2015.
In the neck, features are concatenated directly without forcing the same channel dimensions. This reduces the parameters count and the overall size of the tensors.
Closing the Mosaic Augmentation
Deep learning research tends to focus on model architecture, but the training routine in YOLOv5 and YOLOv8 is an essential part of their success.
YOLOv8 augments images during training online. At each epoch, the model sees a slightly different variation of the images it has been provided.
One of those augmentations is called mosaic augmentation. This involves stitching four images together, forcing the model to learn objects in new locations, in partial occlusion, and against different surrounding pixels.
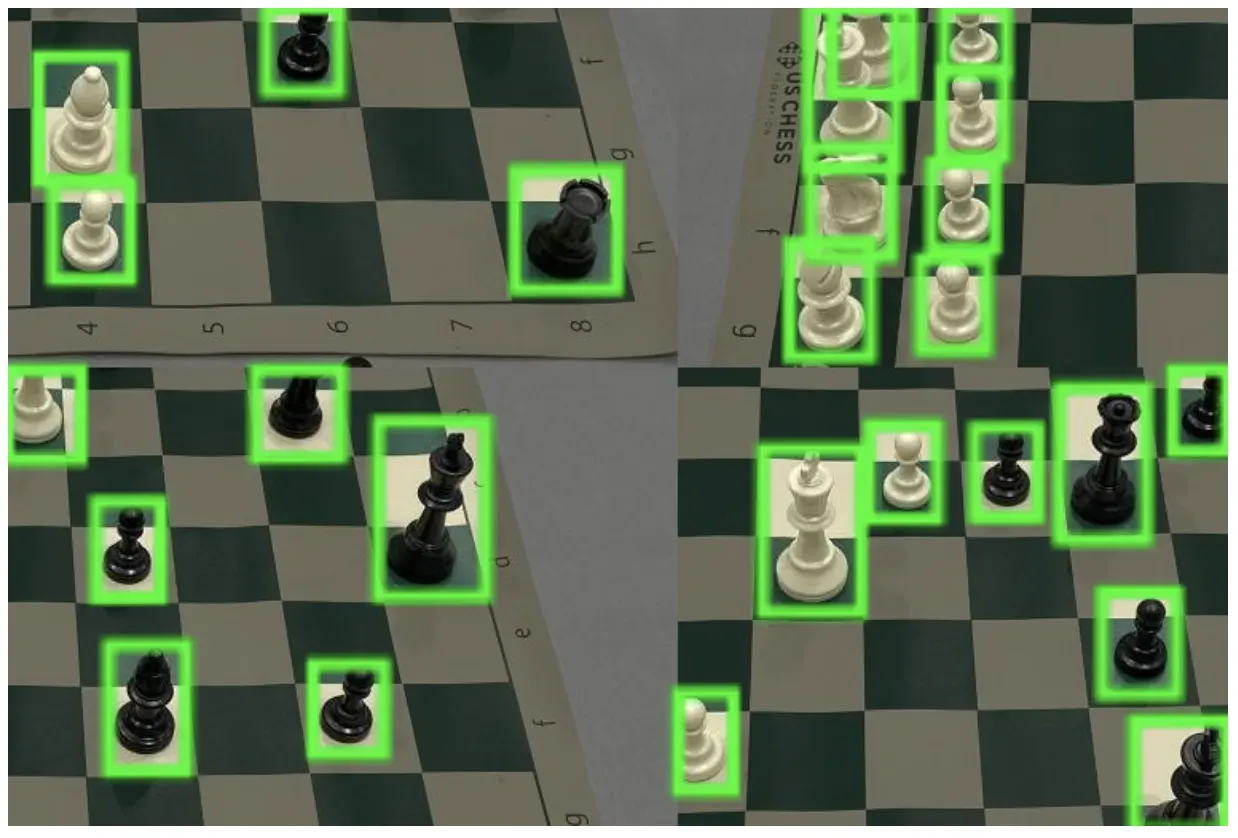
However, this augmentation is empirically shown to degrade performance if performed through the whole training routine. It is advantageous to turn it off for the last ten training epochs.
This sort of change is exemplary of the careful attention YOLO modeling has been given in overtime in the YOLOv5 repo and in the YOLOv8 research.
YOLOv8 Accuracy Improvements
YOLOv8 research was primarily motivated by empirical evaluation on the COCO benchmark. As each piece of the network and training routine are tweaked, new experiments are run to validate the changes effect on COCO modeling.
YOLOv8 COCO Accuracy
COCO (Common Objects in Context) is the industry standard benchmark for evaluating object detection models. When comparing models on COCO, we look at the mAP value and FPS measurement for inference speed. Models should be compared at similar inference speeds.
The image below shows the accuracy of YOLOv8 on COCO, using data collected by the team and published in their YOLOv8 README:
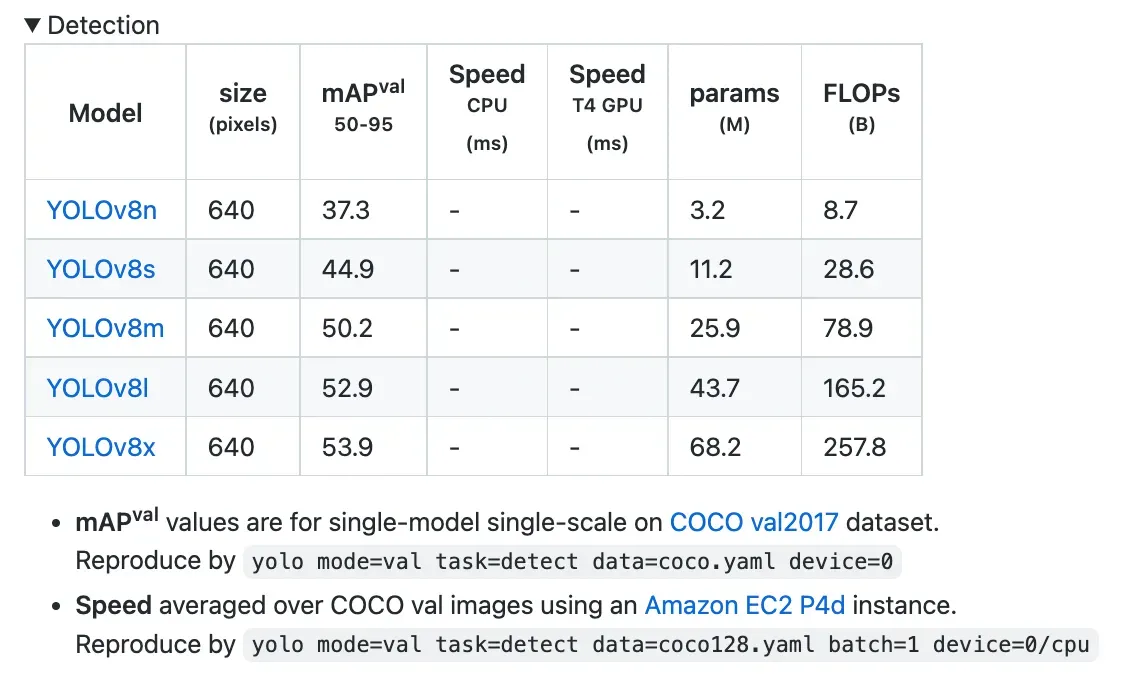
YOLOv8 COCO accuracy is state of the art for models at comparable inference latencies as of writing this post.
RF100 Accuracy
At Roboflow, we have drawn 100 sample datasets from Roboflow Universe, a repository of over 100,000 datasets, to evaluate how well models generalize to new domains. Our benchmark, developed with support from Intel, is a benchmark for computer vision practitioners designed to provide a better answer to the question: "how well will this model work on my custom dataset?"
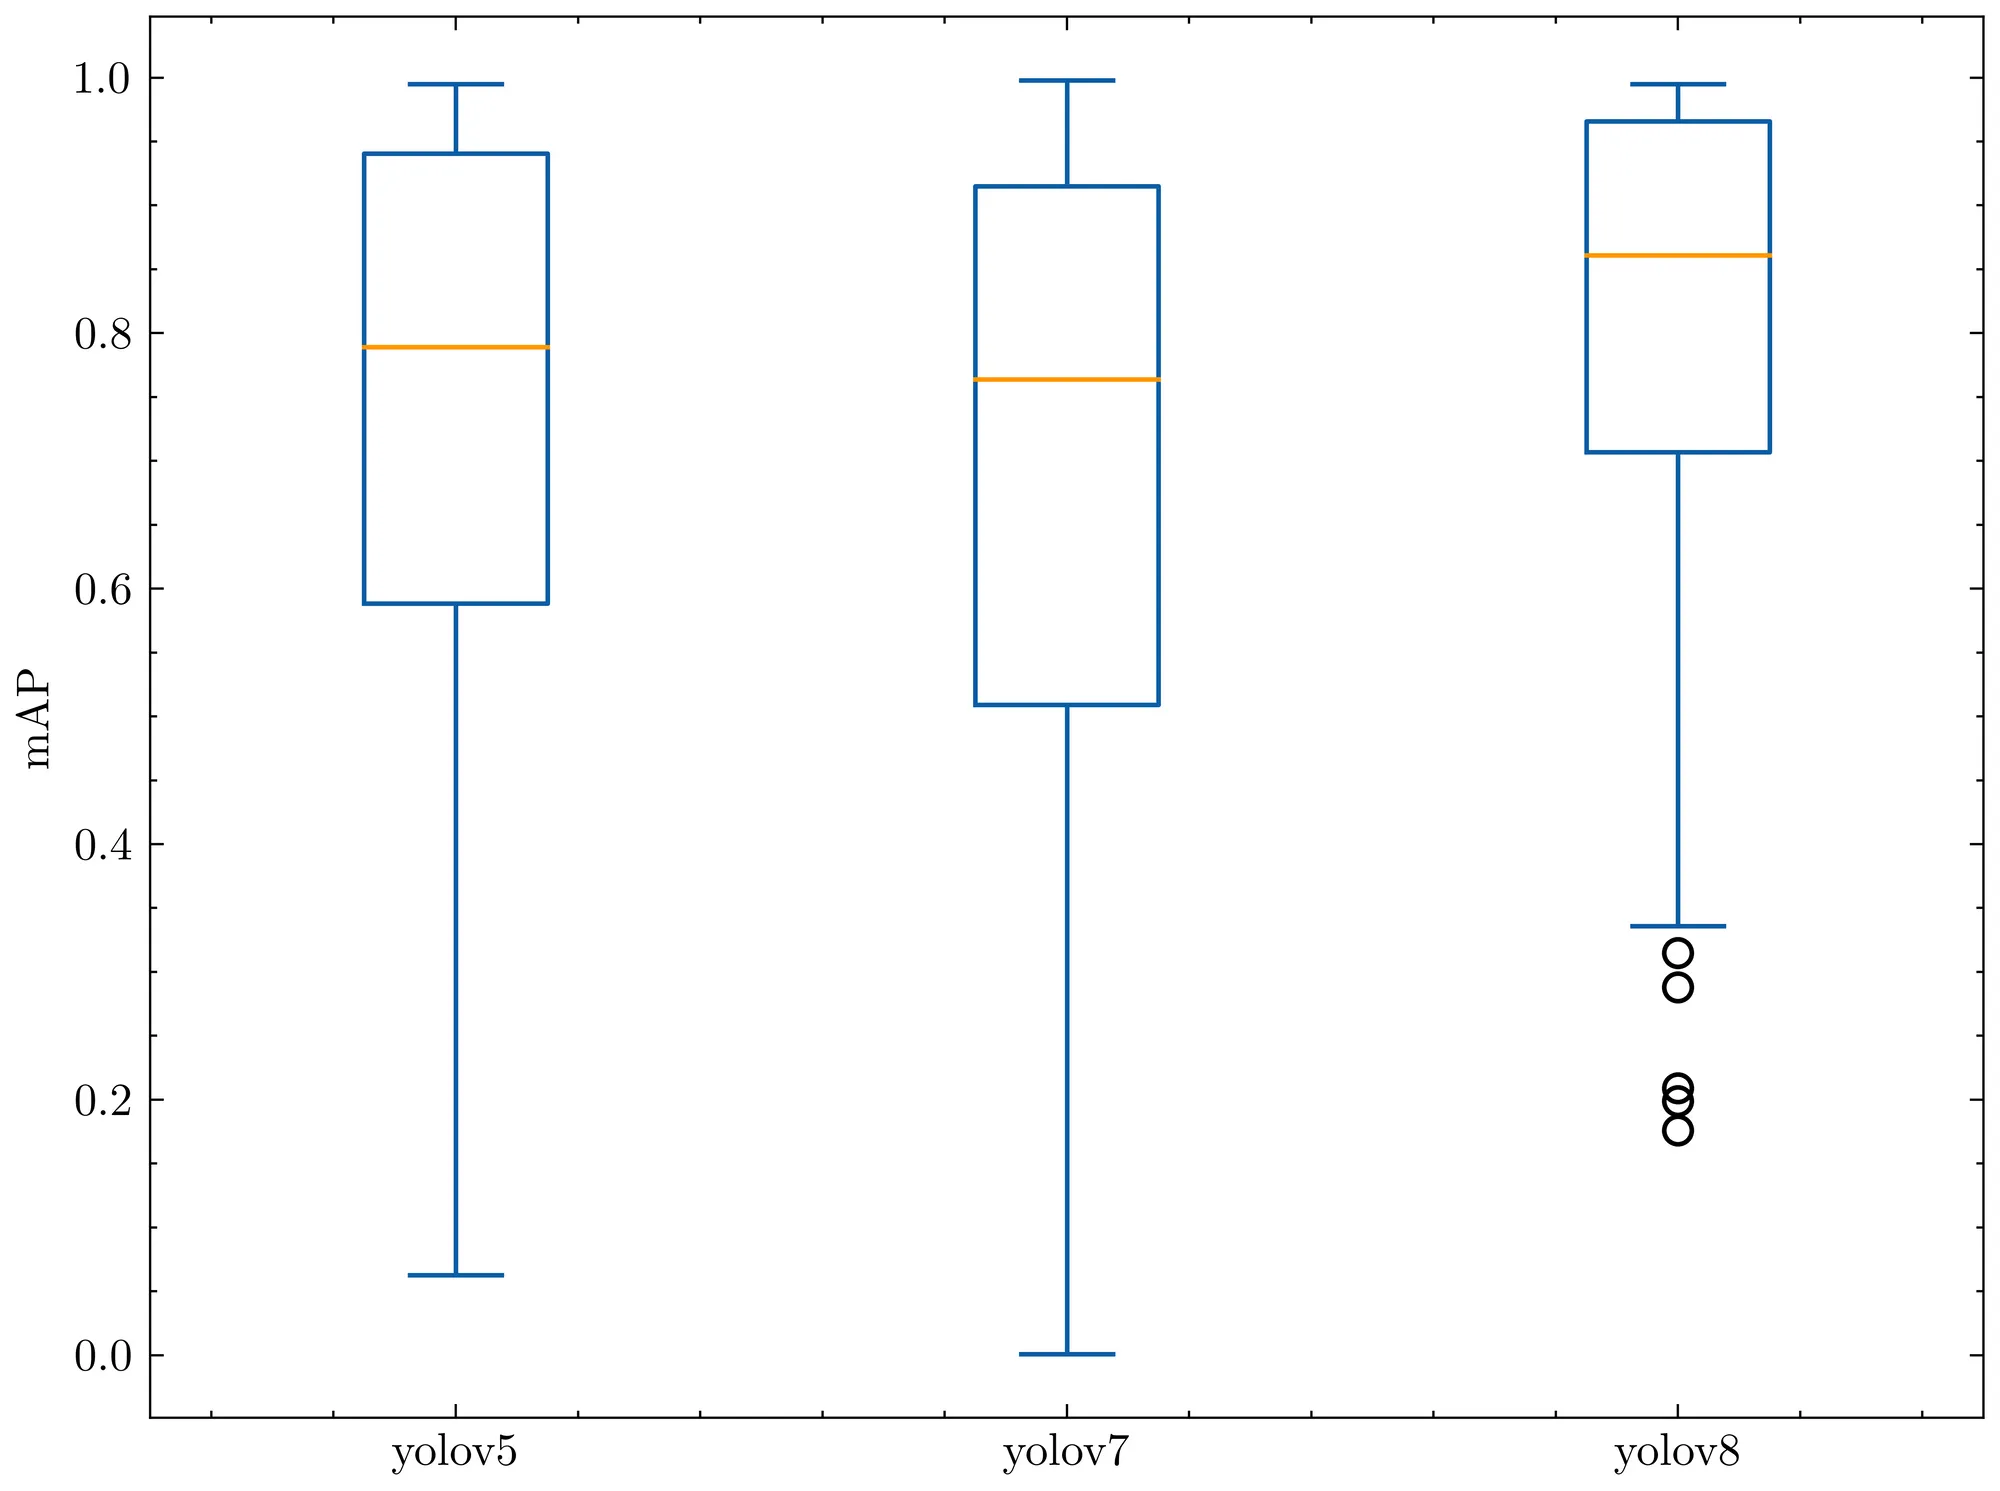
We evaluated YOLOv8 on our RF100 benchmark alongside YOLOv5 and YOLOv7, the following box plots show each model's mAP@.50.
We run the small version of each model for 100 epochs, we ran once with a single seed so due to gradient lottery take this result with a grain of salt.
The box plot below tells us YOLOv8 had fewer outliers and an overall better mAP when measured against the Roboflow 100 benchmark.
The following bar plot shows the average mAP@.50 for each RF100 category. Again, YOLOv8 outperforms all previous models.
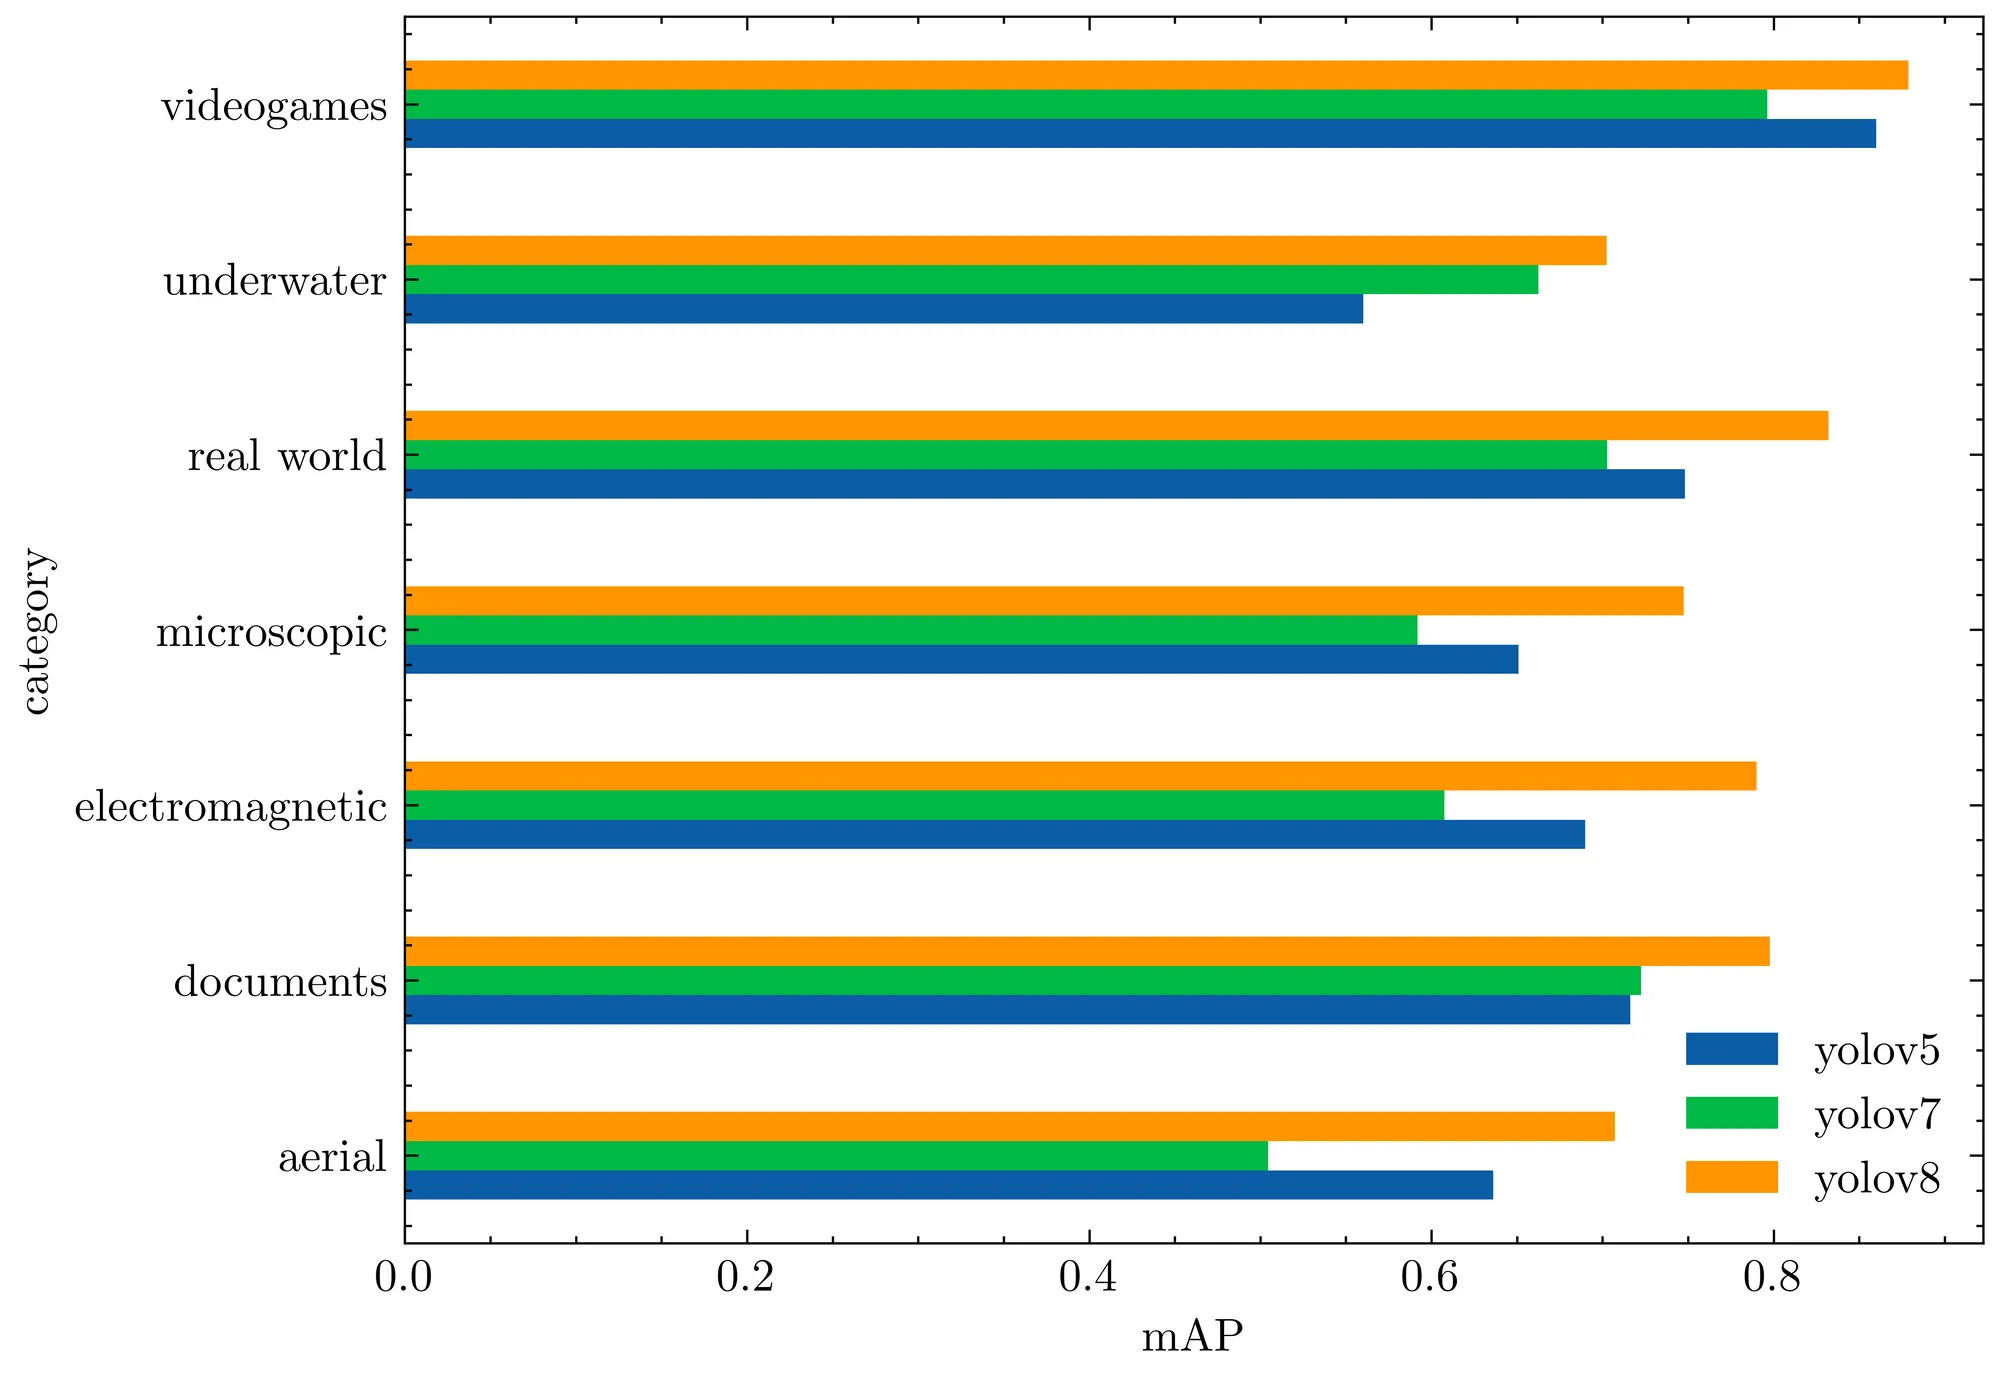
Relative to the YOLOv5 evaluation, the YOLOv8 model produces a similar result on each dataset, or improves the result significantly.
YOLOv8 Repository and PIP Package
The YOLOv8 code repository is designed to be a place for the community to use and iterate on the model. Since we know this model will be continually improved, we can take the initial YOLOv8 model results as a baseline, and expect future improvements as new mini versions are released.
The best outcome that we can hope for is that researchers begin to develop their networks on top of the repository. Research has been happening in forks of YOLOv5, but it would be better if models were made in one location and eventually merged into the main line.
YOLOv8 Repository Layout
The YOLOv8 models utilize similar code to YOLOv5 with new structure where classification, instance segmentation, and object detection task types are supported with the same code routines.
Models are still initialized with the same YOLOv5 YAML format and the dataset format remains the same as well.
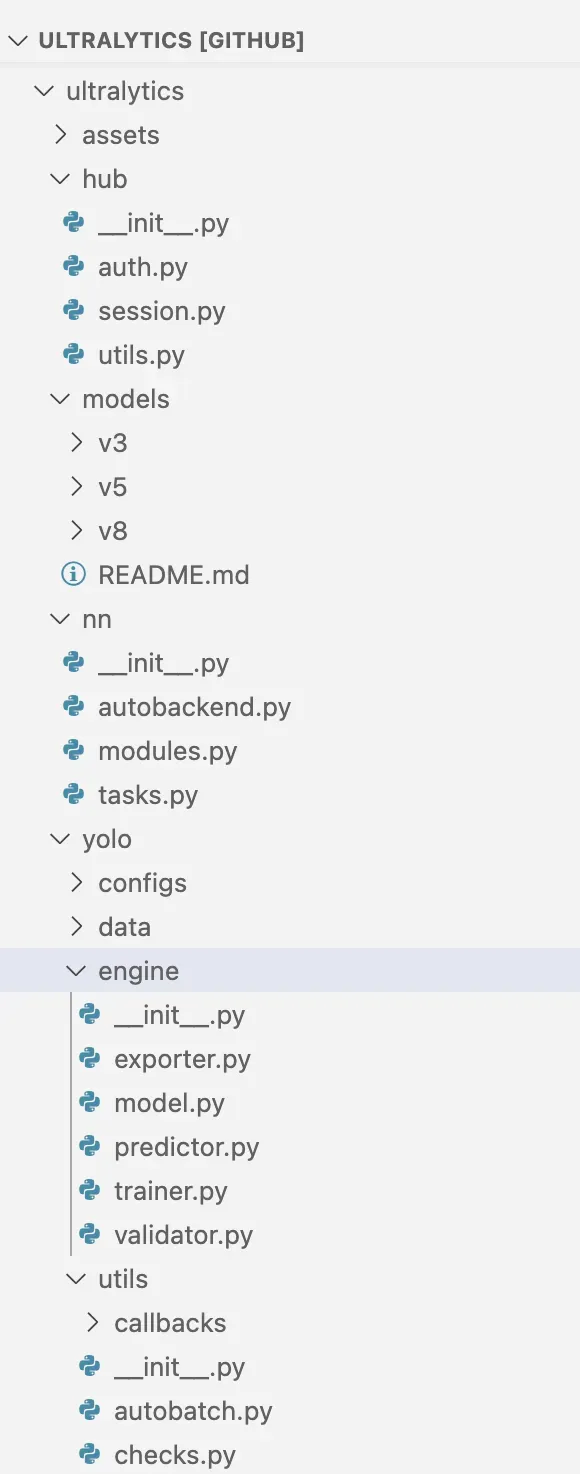
YOLOv8 CLI
The ultralytics package is distributed with a CLI. This will be familiar to many YOLOv5 users where the core training, detection, and export interactions were also accomplished via CLI.
yolo task=detect mode=val model={HOME}/runs/detect/train/weights/best.pt data={dataset.location}/data.yamlYou can pass a task in [detect, classify, segment] , a mode in [train, predict, val, export], a model as a uninitialized .yaml or as a previously trained .pt file.
YOLOv8 Python Package
In addition to the CLI tool available, YOLOv8 is now distributed as a PIP package. This makes local development a little harder, but unlocks all of the possibilities of weaving YOLOv8 into your Python code.
from ultralytics import YOLO

# Load a model
model = YOLO("yolov8n.yaml")  # build a new model from scratch
model = YOLO("yolov8n.pt")  # load a pretrained model (recommended for training)

# Use the model
results = model.train(data="coco128.yaml", epochs=3)  # train the model
results = model.val()  # evaluate model performance on the validation set
results = model("https://ultralytics.com/images/bus.jpg")  # predict on an image
success = YOLO("yolov8n.pt").export(format="onnx")  # export a model to ONNX format
The YOLOv8 Annotation Format
YOLOv8 uses the YOLOv5 PyTorch TXT annotation format, a modified version of the Darknet annotation format. If you need to convert data to YOLOv5 PyTorch TXT for use in your YOLOv8 model, we have you covered. Check out our Roboflow Convert tool to learn how to convert data for use in your new YOLOv8 model.
YOLOv8 Labeling Tool
The creator and maintainer of YOLOv8 has partnered with Roboflow to be a recommended annotation and export tool for use in your YOLOv8 projects. Using Roboflow, you can annotate data for all the tasks YOLOv8 supports – object detection, classification, and segmentation – and export data so that you can use it with the YOLOv8 CLI or Python package.
Getting Started with YOLOv8
To get started applying YOLOv8 to your own use case, check out our guide on how to train YOLOv8 on custom dataset.
To see what others are doing with YOLOv8, browse Roboflow Universe for other YOLOv8 models, datasets, and inspiration.
For practitioners who are putting their model into production and are using active learning strategies to continually update their model - we have added a pathway where you can deploy your YOLOv8 model, using it in our inference engines and for label assist on your dataset. Alternatively, you can deploy YOLOv8 on device using Roboflow Inference, an open source inference server.
Deploy YOLOv8 Models to Roboflow
Once you have finished training a YOLOv8 model, you will have a set of trained weights ready for use with a hosted API endpoint. You can upload your model weights to Roboflow Deploy with the deploy() function in the Roboflow pip package to use your trained weights in the cloud.
To upload model weights, first create a new project on Roboflow, upload your dataset, and create a project version. Check out our complete guide on how to create and set up a project in Roboflow. Then, write a Python script with the following code:
import roboflow

roboflow.login()

rf = roboflow.Roboflow()

project = rf.workspace().project(PROJECT_ID)

project.version(DATASET_VERSION).deploy(model_type="yolov8", model_path=f"{HOME}/runs/detect/train/")
Replace PROJECT_ID with the ID of your project and DATASET_VERSION with the version number associated with your project. Learn how to find your project ID and dataset version number.
Shortly after running the above code, your model will be available for use in the Deploy page on your Roboflow project dashboard.
Deploy YOLOv8 Models to the Edge
In addition to using the Roboflow hosted API for deployment, you can use Roboflow Inference, an open source inference solution that has powered millions of API calls in production environments. Inference works with CPU and GPU, giving you immediate access to a range of devices, from the NVIDIA Jetson to TRT-compatible devices to ARM CPU devices.

With Roboflow Inference, you can self-host and deploy your model on-device.
You can deploy applications using the Inference Docker containers or the pip package. Let's use the pip package. First run:
pip install inferenceThen, create a new Python file and add the following code:
from inference import get_model
import supervision as sv
import cv2

# define the image url to use for inference
image_file = "image.jpeg"
image = cv2.imread(image_file)

# load a pre-trained yolov8n model
model = get_model(model_id="yolov8n-640")

# run inference on our chosen image, image can be a url, a numpy array, a PIL image, etc.
results = model.infer(image)[0]

# load the results into the supervision Detections api
detections = sv.Detections.from_inference(results)

# create supervision annotators
bounding_box_annotator = sv.BoundingBoxAnnotator()
label_annotator = sv.LabelAnnotator()

# annotate the image with our inference results
annotated_image = bounding_box_annotator.annotate(
    scene=image, detections=detections)
annotated_image = label_annotator.annotate(
    scene=annotated_image, detections=detections)

# display the image
sv.plot_image(annotated_image)
Above, set your Roboflow workspace ID, model ID, and API key, if you want to use a custom model you have trained in your workspace.
Also, set the URL of an image on which you want to run inference. This can be a local file.
Here is an example of an image running through the model:
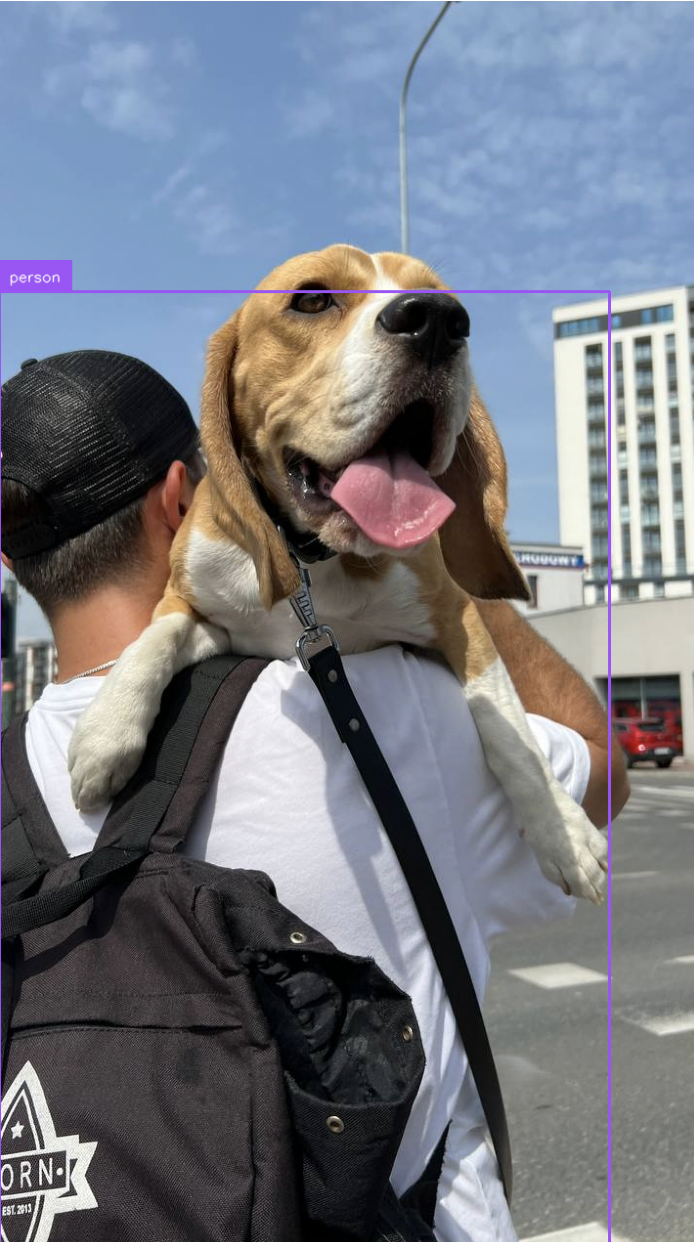
The model successfully detected a person in the image, indicated by the purple bounding box on the image.
To use your YOLOv8 model commercially with Inference, you will need a Roboflow Enterprise license, through which you gain a pass-through license for using YOLOv8. An enterprise license also grants you access to features like advanced device management, multi-model containers, auto-batch inference, and more.
To learn more about deploying commercial applications with Roboflow Inference, contact the Roboflow sales team.
YOLOv8 FAQs
What are the versions of YOLOv8?
YOLOv8 has five versions as of its release on January 10th, 2023, ranging from YOLOv8n (the smallest model, with a 37.3 mAP score on COCO) to YOLOv8x (the largest model, scoring a 53.9 mAP score on COCO).
What tasks can YOLOv8 be used for?
YOLOv8 has support for object detection, instance segmentation, and image classification out of the box.
Cite this Post
Use the following entry to cite this post in your research:
Jacob Solawetz, Francesco. (Oct 23, 2024). What is YOLOv8? A Complete Guide. Roboflow Blog: https://blog.roboflow.com/what-is-yolov8/
